


 Loading...
HP Deskjet 460
Mobile Printer
User’s Guide

HP Deskjet 460 Mobile Printer
User’s Guide
First edition: 06/2005

Copyright Information
© 2005 Copyright Hewlett-Packard Development Company, L.P.
Reproduction, adaptation or translation without prior written permission is prohibited, except as allowed under the copyright laws.
The information contained herein is subject to change without notice.
The only warranties for HP products and services are set forth in the express warranty statements accompanying such products and services. Nothing herein should be construed as constituting an additional warranty. HP shall not be liable for technical or editorial errors or omissions contained herein.
1, 6/2005
Trademark Credits
Adobe® and Acrobat® are trademarks of Adobe Systems Incorporated.
Bluetooth is a trademark owned by its proprietor and used by Hewlett-Packard Company under license.
Microsoft®, Windows®, and Windows® XP are U.S.-registered trademarks of Microsoft Corporation.
Pentium® is a registered trademark of Intel Corporation or its subsidiaries in the United States and other countries.
SD Logo is a trademark of its proprietor.

Contents
1 Getting started
Finding other resources for the product. . . . . . . . . . . . . . . . . . . . . . . . . . . . . . . . . . . . . . . . . 10 Understanding the printer parts . . . . . . . . . . . . . . . . . . . . . . . . . . . . . . . . . . . . . . . . . . . . . . 11 Front view . . . . . . . . . . . . . . . . . . . . . . . . . . . . . . . . . . . . . . . . . . . . . . . . . . . . . . . . . . 11 Back and side view. . . . . . . . . . . . . . . . . . . . . . . . . . . . . . . . . . . . . . . . . . . . . . . . . . . . 12 Bottom view . . . . . . . . . . . . . . . . . . . . . . . . . . . . . . . . . . . . . . . . . . . . . . . . . . . . . . . . . 13 Travel tips . . . . . . . . . . . . . . . . . . . . . . . . . . . . . . . . . . . . . . . . . . . . . . . . . . . . . . . . . . . . . 14
2 Installing and using accessories
Installing and using the battery . . . . . . . . . . . . . . . . . . . . . . . . . . . . . . . . . . . . . . . . . . . . . . 15 Battery safety . . . . . . . . . . . . . . . . . . . . . . . . . . . . . . . . . . . . . . . . . . . . . . . . . . . . . . . . 15 Understanding the battery . . . . . . . . . . . . . . . . . . . . . . . . . . . . . . . . . . . . . . . . . . . . . . . 16 Charging and using the battery . . . . . . . . . . . . . . . . . . . . . . . . . . . . . . . . . . . . . . . . . . . 16 Installing and using 802.11 and Bluetooth accessories. . . . . . . . . . . . . . . . . . . . . . . . . . . . . . 18 Installing the 802.11 or Bluetooth wireless printer card . . . . . . . . . . . . . . . . . . . . . . . . . . . 18 Installing a Bluetooth USB adapter . . . . . . . . . . . . . . . . . . . . . . . . . . . . . . . . . . . . . . . . . 18 802.11 and Bluetooth wireless printing . . . . . . . . . . . . . . . . . . . . . . . . . . . . . . . . . . . . . . 19
3 Using the printer
Selecting print media . . . . . . . . . . . . . . . . . . . . . . . . . . . . . . . . . . . . . . . . . . . . . . . . . . . . . 21 Tips for selecting and using print media. . . . . . . . . . . . . . . . . . . . . . . . . . . . . . . . . . . . . . 21 Understanding specifications for supported print media . . . . . . . . . . . . . . . . . . . . . . . . . . . 23 Loading media . . . . . . . . . . . . . . . . . . . . . . . . . . . . . . . . . . . . . . . . . . . . . . . . . . . . . . . . . 26 Changing print settings. . . . . . . . . . . . . . . . . . . . . . . . . . . . . . . . . . . . . . . . . . . . . . . . . . . . 27 Canceling a print job . . . . . . . . . . . . . . . . . . . . . . . . . . . . . . . . . . . . . . . . . . . . . . . . . . . . . 27 Printing on both sides (duplexing, Windows). . . . . . . . . . . . . . . . . . . . . . . . . . . . . . . . . . . . . 28 Printing on special and custom-sized media . . . . . . . . . . . . . . . . . . . . . . . . . . . . . . . . . . . . . 29 Printing from mobile devices . . . . . . . . . . . . . . . . . . . . . . . . . . . . . . . . . . . . . . . . . . . . . . . . 30 Printing digital photographs . . . . . . . . . . . . . . . . . . . . . . . . . . . . . . . . . . . . . . . . . . . . . . 30 Printing from mobile phones . . . . . . . . . . . . . . . . . . . . . . . . . . . . . . . . . . . . . . . . . . . . . . 32 Printing from Pocket PC devices . . . . . . . . . . . . . . . . . . . . . . . . . . . . . . . . . . . . . . . . . . . 33 Printing from Palm OS devices . . . . . . . . . . . . . . . . . . . . . . . . . . . . . . . . . . . . . . . . . . . . 35 Using memory devices . . . . . . . . . . . . . . . . . . . . . . . . . . . . . . . . . . . . . . . . . . . . . . . . . . . . 37 Printing from memory cards and USB Flash drives. . . . . . . . . . . . . . . . . . . . . . . . . . . . . . . 37
4 Managing and configuring the printer
Managing the printer . . . . . . . . . . . . . . . . . . . . . . . . . . . . . . . . . . . . . . . . . . . . . . . . . . . . . 39 Understanding device information pages . . . . . . . . . . . . . . . . . . . . . . . . . . . . . . . . . . . . . . . 47 Printing device information pages from the control panel . . . . . . . . . . . . . . . . . . . . . . . . . . 47 Printing device information pages from the software . . . . . . . . . . . . . . . . . . . . . . . . . . . . . 48 Configuring the printer . . . . . . . . . . . . . . . . . . . . . . . . . . . . . . . . . . . . . . . . . . . . . . . . . . . . 49 Direct connection . . . . . . . . . . . . . . . . . . . . . . . . . . . . . . . . . . . . . . . . . . . . . . . . . . . . . 49 802.11 wireless connection . . . . . . . . . . . . . . . . . . . . . . . . . . . . . . . . . . . . . . . . . . . . . . 53 Bluetooth wireless connection . . . . . . . . . . . . . . . . . . . . . . . . . . . . . . . . . . . . . . . . . . . . . 61
5
5 Maintaining and troubleshooting
Maintaining the printer. . . . . . . . . . . . . . . . . . . . . . . . . . . . . . . . . . . . . . . . . . . . . . . . . . . . 69 Cleaning the printer . . . . . . . . . . . . . . . . . . . . . . . . . . . . . . . . . . . . . . . . . . . . . . . . . . . 69 Cleaning the print cartridges . . . . . . . . . . . . . . . . . . . . . . . . . . . . . . . . . . . . . . . . . . . . . 70 Replacing the print cartridges. . . . . . . . . . . . . . . . . . . . . . . . . . . . . . . . . . . . . . . . . . . . . 72 Aligning the print cartridges. . . . . . . . . . . . . . . . . . . . . . . . . . . . . . . . . . . . . . . . . . . . . . 74 Printing with a single print cartridge . . . . . . . . . . . . . . . . . . . . . . . . . . . . . . . . . . . . . . . . 75 Calibrating color . . . . . . . . . . . . . . . . . . . . . . . . . . . . . . . . . . . . . . . . . . . . . . . . . . . . . 75 Replacing the ink service module . . . . . . . . . . . . . . . . . . . . . . . . . . . . . . . . . . . . . . . . . . 76
Troubleshooting tips and resources . . . . . . . . . . . . . . . . . . . . . . . . . . . . . . . . . . . . . . . . . . . 77 General troubleshooting tips . . . . . . . . . . . . . . . . . . . . . . . . . . . . . . . . . . . . . . . . . . . . . 77 Resolving printing problems . . . . . . . . . . . . . . . . . . . . . . . . . . . . . . . . . . . . . . . . . . . . . . . . 79 Printer shuts down unexpectedly . . . . . . . . . . . . . . . . . . . . . . . . . . . . . . . . . . . . . . . . . . . 79 All printer lights are blinking . . . . . . . . . . . . . . . . . . . . . . . . . . . . . . . . . . . . . . . . . . . . . 79 Printer is not responding (nothing prints) . . . . . . . . . . . . . . . . . . . . . . . . . . . . . . . . . . . . . 79 Printer does not accept print cartridge . . . . . . . . . . . . . . . . . . . . . . . . . . . . . . . . . . . . . . . 80 Printer takes a long time to print . . . . . . . . . . . . . . . . . . . . . . . . . . . . . . . . . . . . . . . . . . . 80 Blank page is printed . . . . . . . . . . . . . . . . . . . . . . . . . . . . . . . . . . . . . . . . . . . . . . . . . . 81 Something on the page is missing or incorrect . . . . . . . . . . . . . . . . . . . . . . . . . . . . . . . . . 81 Placement of the text or graphics is wrong . . . . . . . . . . . . . . . . . . . . . . . . . . . . . . . . . . . . 82 Poor print quality and unexpected printouts . . . . . . . . . . . . . . . . . . . . . . . . . . . . . . . . . . . 83 Meaningless characters print . . . . . . . . . . . . . . . . . . . . . . . . . . . . . . . . . . . . . . . . . . . . . 84 Ink is smearing . . . . . . . . . . . . . . . . . . . . . . . . . . . . . . . . . . . . . . . . . . . . . . . . . . . . . . . 85 Ink is not filling the text or graphics completely . . . . . . . . . . . . . . . . . . . . . . . . . . . . . . . . . 85 Output is faded or dull colored. . . . . . . . . . . . . . . . . . . . . . . . . . . . . . . . . . . . . . . . . . . . 86 Colors are printing as black and white . . . . . . . . . . . . . . . . . . . . . . . . . . . . . . . . . . . . . . 86 Wrong colors are printing . . . . . . . . . . . . . . . . . . . . . . . . . . . . . . . . . . . . . . . . . . . . . . . 87 Printout shows bleeding colors . . . . . . . . . . . . . . . . . . . . . . . . . . . . . . . . . . . . . . . . . . . . 87 Colors do not line up properly . . . . . . . . . . . . . . . . . . . . . . . . . . . . . . . . . . . . . . . . . . . . 88 Lines or dots are missing from text or graphics . . . . . . . . . . . . . . . . . . . . . . . . . . . . . . . . . 88 Resolving paper-feed problems . . . . . . . . . . . . . . . . . . . . . . . . . . . . . . . . . . . . . . . . . . . . . . 89 Media is not picked up from the input tray. . . . . . . . . . . . . . . . . . . . . . . . . . . . . . . . . . . . 89 Paper skew . . . . . . . . . . . . . . . . . . . . . . . . . . . . . . . . . . . . . . . . . . . . . . . . . . . . . . . . . 89 Paper output problem . . . . . . . . . . . . . . . . . . . . . . . . . . . . . . . . . . . . . . . . . . . . . . . . . . 89 Clearing jams . . . . . . . . . . . . . . . . . . . . . . . . . . . . . . . . . . . . . . . . . . . . . . . . . . . . . . . 89 Troubleshooting installation issues . . . . . . . . . . . . . . . . . . . . . . . . . . . . . . . . . . . . . . . . . . . . 91 Problems printing an alignment page . . . . . . . . . . . . . . . . . . . . . . . . . . . . . . . . . . . . . . . 91 Problems installing software . . . . . . . . . . . . . . . . . . . . . . . . . . . . . . . . . . . . . . . . . . . . . . 91 Problems setting up 802.11 or Bluetooth wireless communication . . . . . . . . . . . . . . . . . . . . 92
A Printer lights reference
Printer buttons and lights. . . . . . . . . . . . . . . . . . . . . . . . . . . . . . . . . . . . . . . . . . . . . . . . . . . 95 Printer light patterns . . . . . . . . . . . . . . . . . . . . . . . . . . . . . . . . . . . . . . . . . . . . . . . . . . . . . . 96
B HP supplies and accessories
Ordering printing supplies online . . . . . . . . . . . . . . . . . . . . . . . . . . . . . . . . . . . . . . . . . . . . 99 Accessories. . . . . . . . . . . . . . . . . . . . . . . . . . . . . . . . . . . . . . . . . . . . . . . . . . . . . . . . . . . . 99 Supplies . . . . . . . . . . . . . . . . . . . . . . . . . . . . . . . . . . . . . . . . . . . . . . . . . . . . . . . . . . . . . 100 Print cartridges . . . . . . . . . . . . . . . . . . . . . . . . . . . . . . . . . . . . . . . . . . . . . . . . . . . . . . 100 HP media . . . . . . . . . . . . . . . . . . . . . . . . . . . . . . . . . . . . . . . . . . . . . . . . . . . . . . . . . 100
C Support and warranty
Obtaining electronic support. . . . . . . . . . . . . . . . . . . . . . . . . . . . . . . . . . . . . . . . . . . . . . . 111 Obtaining HP telephone support . . . . . . . . . . . . . . . . . . . . . . . . . . . . . . . . . . . . . . . . . . . . 111 Before you call . . . . . . . . . . . . . . . . . . . . . . . . . . . . . . . . . . . . . . . . . . . . . . . . . . . . . . 111 Telephone support numbers . . . . . . . . . . . . . . . . . . . . . . . . . . . . . . . . . . . . . . . . . . . . . 112 Hewlett-Packard limited warranty statement. . . . . . . . . . . . . . . . . . . . . . . . . . . . . . . . . . . . . 116
6
D Regulatory information
FCC statement. . . . . . . . . . . . . . . . . . . . . . . . . . . . . . . . . . . . . . . . . . . . . . . . . . . . . . . . . 119 EMI statement (Korea) . . . . . . . . . . . . . . . . . . . . . . . . . . . . . . . . . . . . . . . . . . . . . . . . . . . 119 VCCI statement (Japan) . . . . . . . . . . . . . . . . . . . . . . . . . . . . . . . . . . . . . . . . . . . . . . . . . . 120 Regulatory model number . . . . . . . . . . . . . . . . . . . . . . . . . . . . . . . . . . . . . . . . . . . . . . . . . 120 Power cord statement . . . . . . . . . . . . . . . . . . . . . . . . . . . . . . . . . . . . . . . . . . . . . . . . . . . . 120 LED classification . . . . . . . . . . . . . . . . . . . . . . . . . . . . . . . . . . . . . . . . . . . . . . . . . . . . . . . 120 Environmental sustainability program . . . . . . . . . . . . . . . . . . . . . . . . . . . . . . . . . . . . . . . . . 121
Reduction and elimination . . . . . . . . . . . . . . . . . . . . . . . . . . . . . . . . . . . . . . . . . . . . . . 121 Power consumption . . . . . . . . . . . . . . . . . . . . . . . . . . . . . . . . . . . . . . . . . . . . . . . . . . . 121 Hazardous materials . . . . . . . . . . . . . . . . . . . . . . . . . . . . . . . . . . . . . . . . . . . . . . . . . . 122 Material safety data sheets . . . . . . . . . . . . . . . . . . . . . . . . . . . . . . . . . . . . . . . . . . . . . 122 Recycling . . . . . . . . . . . . . . . . . . . . . . . . . . . . . . . . . . . . . . . . . . . . . . . . . . . . . . . . . . 123
Declaration of Conformity. . . . . . . . . . . . . . . . . . . . . . . . . . . . . . . . . . . . . . . . . . . . . . . . . 124
E Printer specifications
Index
7
8

1 Getting started
This printer provides quick, professional mobile printing. You can print from notebooks and desktop computers through a cable or wireless connection. The printer also works with other wireless devices such as:
•Personal digital assistants (PDAs) running Microsoft® Pocket PC, Windows® CE, or Palm OS
•Digital cameras using a USB cable or a supported memory card
•Mobile phones with Bluetooth or 802.11 connectivity
From any of these devices, the printer provides high-quality output with vibrant colors on media up to 216 mm by 356 mm (8.5 in by 14 in).
9

Finding other resources for the product
You can obtain product information and further troubleshooting resources that are not included in this guide from the following resources:
Setup Poster |
Provides illustrated setup information. |
A printed version of this document comes with |
|
|
the printer. An electronic version is available |
|
|
as an Adobe® Acrobat® Portable Document |
|
|
Format (PDF) file on the Starter CD. |
|
|
|
Getting Started |
Includes information about setting up the printer |
A printed version of this document comes with |
Guide |
and installing the software. |
the printer. |
|
|
|
Onscreen User’s |
Provides information about setting up and |
This guide is available as a PDF file and a |
Guide |
completing basic tasks with the printer and |
Microsoft HTML Help (CHM) file on the |
|
solving printer problems. |
Starter CD and as a CHM file and an Apple |
|
|
Help file on the computer after software |
|
|
installation. To view the CHM file, your |
|
|
computer must be running Microsoft |
|
|
Windows and Internet Explorer version 4.01 |
|
|
or later. To view the Apple Help file in the |
|
|
Mac OS, use the Mac Help viewer. If your |
|
|
computer does not meet these requirements, |
|
|
use the PDF version. |
Toolbox |
Provides status and maintenance information |
(Windows) |
about the printer, such as ink levels and battery |
|
charge level, and provides links to this onscreen |
|
User’s Guide for help in performing basic printing |
|
tasks and solving problems. It also provides links |
|
to HP Instant Support and the myPrintMileage |
|
website, which keeps track of printer usage |
|
information. You can also configure 802.11 and |
|
Bluetooth wireless settings for wireless printing. |
|
See Toolbox (Windows) for more information. |
The Toolbox is normally installed with the printer software.
Toolbox software |
Provides status and maintenance information |
for PDAs |
about the printer. You can view ink levels and |
(Pocket PC and |
battery charge level, understand printer lights, |
Palm OS) |
align print cartridges, and also configure 802.11 |
|
and Bluetooth wireless settings for wireless |
|
printing. |
See Toolbox software for PDAs (Pocket PC and Palm OS) for more information.
HP Printer Utility The HP Printer Utility contains tools to configure (Mac OS) print settings, calibrate the printer, clean the print
cartridges, print configuration and test pages, order supplies online, and find website support information. You can also configure 802.11 and Bluetooth wireless settings for wireless printing. See HP Printer Utility (Mac OS) for more information.
The HP Printer Utility is normally installed with the printer software.
Online Help |
Provides information about using the printer driver |
The online help is installed with the printer |
(Windows) |
and the Toolbox. |
driver and the Toolbox. |
|
|
|
HP Instant Support |
A web-based tool that provides self-help and |
This e-service can be accessed through the |
(Windows) |
troubleshooting tips to diagnose and solve your |
Toolbox. See HP Instant Support (Windows) |
|
printer problems. It also includes printer usage |
for more information. |
|
information, which helps you understand your |
|
|
printing patterns. |
|
|
|
|
World Wide Web |
Provides the latest printer information. |
Visit |
|
|
http://www.hp.com/support/dj460. |
|
|
|
10 Chapter 1 - Getting started
Understanding the printer parts
Front view
1.Input tray extension (not included in models for some countries/regions) – Slides up to support legalsize print media. This prevents possible media feed problems.
2.Input tray – Holds the media. Remove media and close this tray when the printer is not in use.
3.Wide media paper guide – Letter, legal, and A4 are loaded flush against this guide.
4.Media width guide – Adjusts to accommodate different media sizes. Slide to the right to accommodate narrow media. This automatically slides the narrow media guide to the left to ensure that media is aligned for correct print margins.
5.Narrow media guide – When you move the media width guide to the right, this guide automatically slides to the left to accommodate narrower media.
6.Print cartridge latches – Lift these latches for easy removal and insertion of print cartridges.
7.Print cartridge cradle compartments – Holds the print cartridges.
8.Front access cover – Provides access to the print cartridges and for clearing paper jams. This cover must be closed before printing can begin.
9.Output slot – Media exits the printer from here.
10.Output door – Drops open automatically when the printer is turned on. Allows media to exit the printer.
Understanding the printer parts 11

Back and side view
1.Battery contacts – Provides contact for power from the optional battery. (See HP supplies and accessories.)
2.Battery contact cover – Covers the battery contacts when the optional battery is not installed.
3.Battery slot – Battery installs here.
4.PictBridge/USB Host Port – Connects a PictBridge device, such as a digital camera, a USB Flash drive, or a Bluetooth USB device.
5.USB port – Connect a USB cable here.
6.Wireless profile switch – Store settings for up to three 802.11 computers or networks. This allows you to easily move the printer from home to the office or between any three wireless network environments.
7.Power connector – Connect the power cord here.
8.Security lock slot – Connect a security lock here.
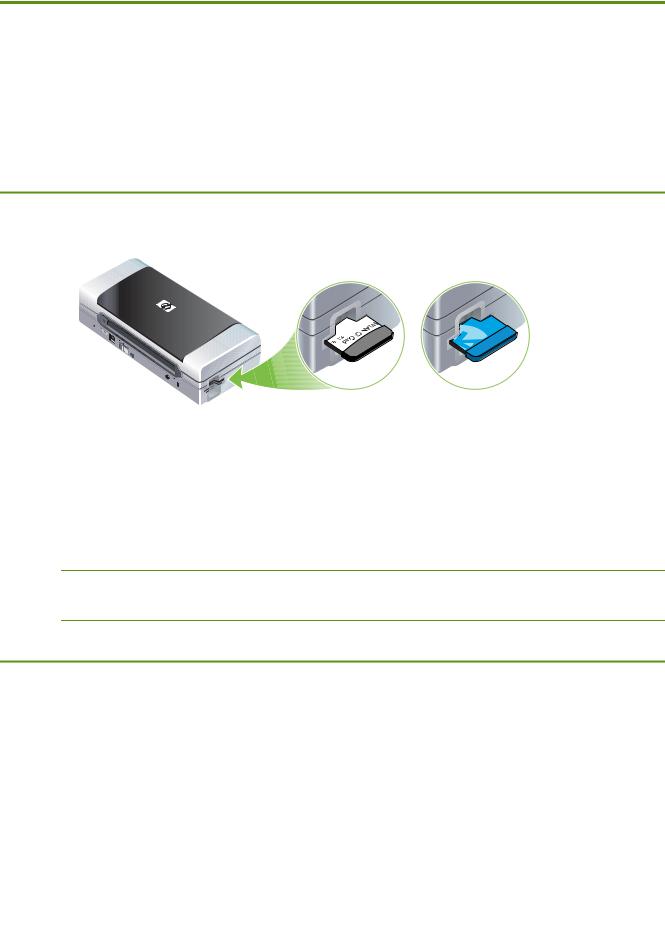
9.CF, SD, MMC slots – Top slot accepts a Type I CompactFlash (CF) card for printing digital images or an 802.11 or Bluetooth wireless printing accessory. Bottom slot accepts a Secure Digital (SD) card or Multimedia Card (MMC) for printing digital images.
12 Chapter 1 - Getting started

Bottom view
1.Card holder – Holds a name card or business card.
2.Cover of replaceable ink service module – Provides access to the ink service module. (See Replacing the ink service module.)
Understanding the printer parts 13

Travel tips
The following tips will help you prepare for traveling with your printer:
•If you are bringing an extra black or photo print cartridge, follow these guidelines: For a partially used black print cartridge or a partially used or full photo print cartridge, store it in the travel holder to prevent ink leakage (see HP supplies and accessories). A newly opened black print cartridge will leak slightly at high altitudes (such as in airplanes). To avoid this, wait to install new black cartridges until you reach your destination. Until then, keep them in their original, taped packaging.
•You can bring the printer in a carrying case. (See HP supplies and accessories.) The carrying case has compartments for both your notebook and the printer. The compartments also detach if you want to carry the notebook and printer separately.
•Turn off the printer using  (Power button). This ensures that the print cartridges return to the home position at the left side of the printer and lock in place.
•Disconnect the printer cable and power adapter from the printer. Slide down the input tray extension and close the input tray.
•If you are traveling to another country/region, bring the necessary plug adapter with you.
•If you need to buy print cartridges while traveling to another country/region, see the online help called “Traveling with your HP Mobile Printer” for regional cartridge compatibility information. This help is available through the Toolbox (Windows), HP Printer Utility (Mac OS), or Toolbox software for PDAs (Pocket PC and Palm OS).
•Use only the power adapter that is supplied with the printer. Do not use any other voltage transformer or converter. The power adapter can be used with AC power sources of 100 to 240 volts, 50 or
60 Hz.
•Remove the battery if you will not be using the printer for more than a month.
•When traveling with photo paper, pack it flat so it doesn't warp or curl. Photo paper should be flat before printing. If the corners of the photo paper curl more than 10 mm (3/8 inch), flatten the paper by putting it in the resealable storage bag, then rolling the bag on a table edge until the paper is flat.
14 Chapter 1 - Getting started

2 Installing and using accessories
This chapter provides information on optional accessories such as the battery and wireless printer cards that are included with certain printer models. To order accessories, see Accessories.
Installing and using the battery
The lithium-ion rechargeable battery comes with the HP Deskjet 460cb, 460wf, and 460wbt printers. It is also available for purchase as an optional accessory. See HP supplies and accessories.
Battery safety
•Use only the battery designed specifically for the printer. See HP supplies and accessories and Printer specifications.
•When discarding a battery, contact your local waste disposal provider regarding local restrictions on the disposal or recycling of batteries. Though the lithium-ion rechargeable battery is mercury-free, it might require recycling or proper disposal at end-of-life. See Recycling for more information.
•Battery might explode if incorrectly replaced or disposed of in fire. Do not short-circuit.
•To purchase a replacement battery, contact your local dealer or HP sales office. See HP supplies and accessories.
•To avoid risk of fire, burns, or damage to your battery, do not allow a metal object to touch the battery contacts.
•Do not disassemble the battery. There are no serviceable parts inside.
•Handle a damaged or leaking battery with extreme care. If you come in contact with the electrolyte, wash the exposed area with soap and water. If it contacts the eye, flush the eye with water for
15 minutes and seek medical attention.
•Do not expose the battery to storage temperatures above 50°C (122°F) or below -20°C (4°F).
Important notes
Take note of the following when charging or using the battery:
•Charge the battery for 4 hours before using the battery for the first time. For subsequent charges, it takes approximately 2 hours to fully charge the battery.
•The battery charge light is green when the battery is charging. If it is red, the battery might be faulty and need to be replaced.
•The Power light is green when the battery is 41-100% charged, amber when 10-40% charged, and red when less than 10% charged. Charge the battery when the Power light turns amber. If it turns red, charge the battery as soon as possible. The battery status is also displayed on the Printer Status tab in the Toolbox (Windows) and the Power Management panel in the HP Printer Utility (Mac OS). If you are using a Pocket PC or Palm OS device, you can use the Toolbox software for PDAs. See Toolbox software for PDAs (Pocket PC and Palm OS).
Installing and using the battery 15

•If your battery is running low, either plug in the AC adapter to charge it or replace the battery with one that is charged.
•A fully charged battery can print up to approximately 450 pages, depending on the complexity of print jobs.
•By default, if the printer is using battery power and left idle for 15 minutes, it will turn off to conserve the battery power. You can configure this feature in the Toolbox (Windows), the HP Printer Utility (Mac OS), or the Toolbox software for PDAs (Pocket PC and Palm OS). See Toolbox software for PDAs (Pocket PC and Palm OS).
•Prior to long-term storage, fully charge the battery. Do not leave the battery in a discharged (empty) state for more than 6 months.
•To maximize battery life and capacity, observe the following temperature guidelines:
•Charging: 0° to 40°C (32° to 104°F)
•Using and storing: -20° to 50°C (-4° to 122°F)
Understanding the battery
1Battery – Supplies power to the printer.
2Battery release slider – Slides to release the battery.
Charging and using the battery
WARNING! Charge the battery for 4 hours before using the battery for the first time. Because the battery is normally warm while it is charging, do not charge it in a briefcase or other confined space as this might cause the battery to overheat.
 NOTE: The AC adapter is normally warm to the touch when plugged into an AC outlet.
 NOTE: Wireless printing uses more battery power than wired printing. See Installing and using the battery for information on checking the battery charge level.
16 Chapter 2 - Installing and using accessories
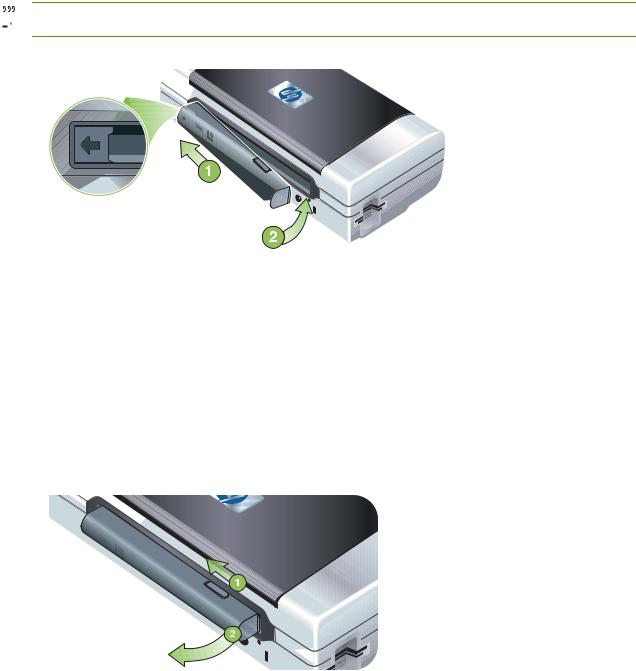
To install the battery
 NOTE: You can install the battery with the printer turned on or off.
1.Slide the battery into the battery slot at an angle, until the contacts on the battery are flush with the contacts in the battery slot. The battery contact cover slides open.
2.Push the battery into the battery slot until the battery clicks into place.
3.Plug in the AC adapter and turn on the printer. Allow the battery to charge for four hours before using the battery for the first time. Subsequently, the battery charge light is green when the battery is charging, and turns off when the battery is fully charged.
4.After the battery is fully charged, you can use the printer without connecting to the AC power supply.
To remove the battery
1.Slide the battery release slider in the direction of the arrow.
2.Remove the battery.
Installing and using the battery 17
Installing and using 802.11 and Bluetooth accessories
The HP Deskjet 460wf includes an HP 802.11 wireless printer card and the HP Deskjet 460wbt includes a Bluetooth wireless printer card. The printer also supports Bluetooth USB accessories.
See http://www.hp.com/support/dj460 to learn more about supported wireless accessories.
Installing the 802.11 or Bluetooth wireless printer card
• Insert the HP 802.11 or Bluetooth wireless printer card, with the lights facing up, into the CF card slot.
The 802.11 card has two lights: left is blue, right is orange. When the card is plugged in, the left blue light will be on; when there is 802.11 data communication, the right orange light will be blinking.
The Bluetooth card has one light with two colors: when the card is plugged in, the green light will be on; when there is Bluetooth data communication, the orange light will be blinking.
 NOTE: Make sure that your Bluetooth host device and operating system are supported by the printer. For more information, visit http://www.hp.com/support/dj460.
Installing a Bluetooth USB adapter
The printer supports Bluetooth accessories that connect to the USB/Pictbridge port. To install a USB Bluetooth adapter, connect it to the USB/Pictbridge port on the back of the printer.
18 Chapter 2 - Installing and using accessories

802.11 and Bluetooth wireless printing
The 802.11 and Bluetooth features in this printer allow you to print wirelessly. 802.11 printing allows wireless printing up to 100 meters (300 feet). Bluetooth printing allows wireless printing up to 10 meters (30 feet).
For instructions on wireless printing from mobile devices, see Printing from mobile devices.
 NOTE: Wireless communication is available through wireless printer cards that are included with certain printer models. Also, the sending device must have built-in wireless capability or a wireless card installed.
 NOTE: Wireless printing uses more battery power than wired printing. See Installing and using the battery for information on checking the battery charge level.
About 802.11
802.11 wireless technology allows you to wirelessly connect to your printer by setting up “ad hoc” communication between your computer and the printer. 802.11 does not require a direct line of sight between the sending device and the receiving device.
When you set up ad hoc communication between your computer and the printer, you are creating a network of two devices. This is the recommended setup for 802.11 printing to this mobile printer.
802.11 also lets you set up the printer on an existing “infrastructure” network. Setting it up on an infrastructure network puts the printer directly onto a local area network (LAN) using a wireless connection to an 802.11 wireless access point (WAP). Once the printer is successfully connected to the network wirelessly, then all the computers on the same subnet can use the printer.
Before setting up the printer, it is recommended that you temporarily connect the printer to the computer with a USB cable to set up the wireless connection. Once the wireless connection is established, you will remove the cable and print wirelessly. You can also set up the printer without using a USB cable.
To set up and configure the printer for 802.11 wireless printing, see 802.11 wireless connection.
About Bluetooth
Bluetooth wireless technology allows you to wirelessly connect to your printer using radio waves in the 2.4 GHz spectrum. Bluetooth is typically used for short distances (up to 10 meters or 30 feet) and does not require a direct line of sight between the sending device and the receiving device.
Different Bluetooth profiles emulate different types of standard cable connections and have different capabilities. See Bluetooth wireless profiles for more information about Bluetooth profiles.
When your printer is directly connected to your computer (either by cable or Bluetooth), it is possible to share it on a network using “printer sharing”. However, your computer has to be connected to the network for others to use the printer.
To set up and configure the printer for Bluetooth wireless printing, see Bluetooth wireless connection.
 NOTE: To configure Bluetooth settings or monitor printer status (such as ink levels) using the Toolbox, you must connect the printer to your computer with a USB cable.
Installing and using 802.11 and Bluetooth accessories 19
20 Chapter 2 - Installing and using accessories
3 Using the printer
This chapter provides information on media usage for the printer, changing print settings, and performing basic printing tasks.
Selecting print media
The printer is designed to work well with most types of office paper. It is best to test a variety of print media types before buying large quantities. Use HP media for optimum print quality. See HP supplies and accessories.
Tips for selecting and using print media
For the best results, observe the following guidelines.
•Always use media that conforms to the printer specifications. See Understanding specifications for supported print media.
•Load only one type of media at a time. On models that have an input tray extension, make sure the input tray extension is fully extended.
•Load media print-side up and aligned squarely against the alignment guides. See Loading media.
•Do not overload the input tray. See Understanding specifications for supported print media.
•To prevent jams, poor print quality and other printer problems, avoid the following media:
•Multipart forms
•Media that is damaged, curled, or wrinkled
•Media with cutouts or perforations
•Media that is heavily textured, embossed, or does not accept ink well
•Media that is too lightweight or stretches easily
•For quick access to the printer settings, use the Printing Shortcuts tab (Windows only). (Open the printer driver, select the Printing Shortcuts tab, and select the feature from the What do you want to do? drop-down list.)
•Do not leave media in the input tray overnight. This might cause it to bend.
•Remove each sheet of media as it prints and set aside to dry. Allowing wet media to stack up might cause smearing.
•For instructions on calibrating color, see Calibrating color.
Selecting print media 21

Cards and envelopes
•Always load envelopes into the printer with the flap facing the back of the printer and the stamp position oriented according to the envelope icon.
•Avoid envelopes that have a very slick finish, self-stick adhesives, clasps, or windows. Also avoid cards and envelopes with thick, irregular, or curled edges, or areas that are wrinkled, torn, or otherwise damaged.
•Use tightly constructed envelopes, and make sure the folds are sharply creased.
Photo paper
•Use Best mode to print photographs. This mode provides longer drying time and ensures that the ink dries completely before the next page is printed. In this mode, printing takes longer and more memory is required from your computer.
You can also select Maximum dpi for optimum print quality for photographs. See Printing digital photographs.
•Remove each sheet as it prints and set it aside to dry. Allowing wet media to stack up might cause smearing.
•Photo paper should be flat before printing. If the corners of the photo paper curl more than
10 mm (3/8 inch), flatten the paper by putting it in the resealable storage bag, then rolling the bag on a table edge until the paper is flat.
Transparencies
•Use Best mode to print transparencies. This mode provides longer drying time and ensures that the ink dries completely before the next page is printed. In this mode, printing takes longer and more memory is required from your computer.
•Load transparencies print-side up and the adhesive strip pointing towards the front of the printer. The print side of the transparencies is the rougher side.
•Remove each sheet as it prints and set it aside to dry. Allowing wet media to stack up might cause smearing.
Custom-sized media
•Use only custom-sized media supported by the printer.
•If your application supports custom-sized media, set the media size in the application before printing the document. If not, set the size in the printer driver. You might need to reformat existing documents to print them correctly on custom-sized media.
22 Chapter 3 - Using the printer

Understanding specifications for supported print media
This section provides information regarding the sizes, types, and weights of media that the printer supports. It also provides information on the tray capacity. Use HP media for optimum print quality. See HP supplies and accessories.
NOTE: Borderless printing is available only with photo media that is L-size (89 by 127 mm; 3.5 by 5 inches); 102 by 152 mm; and 4 by 6 inches.
Understanding supported media sizes
Media size
Standard paper sizes
U.S. Letter (216 by 279 mm; 8.5 by 11 inches)*
U.S. Legal (216 by 356 mm; 8.5 by 14 inches)*
A4 (210 by 297 mm; 8.3 by 11.7 inches)*
U.S. Executive (184 by 267 mm; 7.25 by 10.5 inches)*
U.S. Statement (140 by 216 mm; 5.5 by 8.5 inches)*
JIS B5 (182 by 257 mm; 7.2 by 10.1 inches)*
A5 (148 by 210 mm; 5.8 by 8.3 inches)*
Envelopes
U.S. #10 Envelope (105 by 241 mm; 4.12 by 9.5 inches)
Monarch Envelope (98 by 191 mm; 3.88 by 7.5 inches)
HP Greeting Card Envelope (111 by 152 mm; 4.38 by 6 inches)
A2 Envelope (111 by 146 mm; 4.37 by 5.75 inches)
DL Envelope (110 by 220 mm; 4.3 by 8.7 inches)
C5 Envelope (162 by 229 mm; 6.4 by 9 inches)
C6 Envelope (114 by 162 mm; 4.5 by 6.4 inches)
Cards
Index card (76.2 by 127 mm; 3 by 5 inches)*
Index card (102 by 152 mm; 4 by 6 inches)*
Index card (127 by 203 mm; 5 by 8 inches)*
A6 card (105 by 149 mm; 4.13 by 5.83 inches)*
Selecting print media 23

Media size
Photo media
Photo (101.6 by 152.4 mm; 4 by 6 inches)
Photo with tab (101.6 by 152.4 mm; 4 by 6 inches)
Photo (127 by 177.8 mm; 5 by 7 inches)
Photo (203.2 by 254 mm; 8 by 10 inches)
Photo 10 by 15 cm (100 by 150 mm; 4 by 6 inches)
Photo 10 by 15 cm with tab (100 by 150 mm; 4 by 6 inches)
Borderless Photo (101.6 by 152.4 mm; 4 by 6 inches)
Borderless Photo with tab (101.6 by 152.4 mm; 4 by 6 inches)
Borderless Photo 10 by 15 cm (100 by 150 mm; 3.93 x 5.9 inches)
Borderless Photo 10 by 15 cm with tab (100 by 150 mm; 3.93 x 5.9 inches)
Photo L (89 by 127 mm; 3.5 by 5 inches)
Photo L with tear-off tab (89 by 127 mm; 3.5 by 5 inches)
Photo 2L (178 by 127 mm; 7 by 5 inches)
Photo 2L with tear-off tab (178 by 127 mm; 7 by 5 inches)
Borderless Photo L (89 by 127 mm; 3.5 by 5 inches)
Borderless Photo L with tear-off tab (89 by 127 mm; 3.5 by 5 inches)
Photo media sizes between 89 by 127 mm (3.5 by 5 inches) and 216 by 279 mm (8.5 by 11 inches)
Other media
L (89 by 127 mm; 3.5 by 5 inches)
L with tab (89 by 127 mm; 3.5 by 5 inches)
2L (178 by 127 mm; 5 by 7 inches)
2L with tab (178 by 127 mm; 5 by 7 inches)
Custom-sized media between 76.2 to 216 mm wide and 102 to 356 mm long (3 to 8.5 inches wide and 4 to 14 inches long)*
* These media sizes support manual duplex printing. See Printing on both sides (duplexing, Windows).
24 Chapter 3 - Using the printer

Understanding supported media types and weights
Type |
Weight |
Capacity |
|
|
|
Paper |
64 to 90 g/m2 |
Up to 50 sheets of plain paper |
|
(16 to 24 lb bond) |
(5 mm or 0.2 inch stacked) |
|
|
|
Photo paper |
5 to 12 mils |
Up to 10 sheets |
|
|
|
Transparencies |
|
Up to 20 sheets |
|
|
|
Labels |
|
Up to 20 sheets |
|
|
|
Cards |
Up to 162 g/m2 |
Up to 5 sheets |
|
(90 lb index) |
|
|
|
|
Envelopes |
75 to 200 g/m2 |
Up to 5 envelopes |
|
(20 to 53 lb bond) |
|
|
|
|
Selecting print media 25

Loading media
 NOTE: To print on special and custom-sized media you can use the Printing Shortcuts tab (Windows only). (Open the printer driver, select the Printing Shortcuts tab, and select the feature from the What do you want to do? drop-down list.)
To load media
1.Remove all media from the input tray.
2.Insert the media print-side up and align it squarely against the media paper guide. Adjust the media width guide so it fits snugly against the sides of the media.
3.If printing on legal media, extend the input tray extension, if available on your model.
4.Set desired software options:
Windows:
a.Open the printer driver (typically on the File menu, click Print, and then click Properties).
b.Select the media size from the Paper Size menu.
c.Under Paper/Quality, select the paper type you are using from the Paper Type menu.
Mac OS:
a.On the File menu, click Page Setup, and then select the media size from the Paper Size menu.
b.Open the printer driver (on the File menu, click Print).
c.Under Paper Type/Quality, select the paper type you are using from the Paper Type menu.
5.Change any other print settings if necessary, then click OK to print.
26 Chapter 3 - Using the printer

Changing print settings
You can change print settings (such as media size or type) from an application or the printer driver. Changes made from an application take precedence over changes made from the printer driver. However, after the application is closed, the settings return to the defaults configured in the printer driver.
 NOTE: To set print settings for all print jobs, change the print settings in the printer driver.
For more information about printer driver features in Windows, see the printer driver online help. For more information about printing from a specific application, see the documentation for that application.
To change settings from an application for current print jobs (Windows)
1.Open the document you want to print.
2.On the File menu, click Print, and then click Setup or Properties. (Specific options might vary depending on the application you are using.)
3.Change any desired settings and click OK, Print, or a similar command.
To change default settings for all future print jobs (Windows)
1.Click the Start button, point to Settings, and then click Printers or Printers and Faxes.
2.Right-click the printer icon, and then choose Properties, Document Defaults, or Printing Preferences.
3.Change any desired settings and click OK.
To change settings (Mac OS)
1.On the File menu, click Page Setup.
2.Change any desired settings and click OK.
3.On the File menu, click Print.
4.Change any desired settings and click Print.
Canceling a print job
You can cancel a print job using one of the following methods:
•Control panel
Press  (Cancel button). This will clear the current print job. It does not affect print jobs waiting to be processed.
•Windows
Double-click the printer icon that appears in the task bar. Select the print job, and then press the Delete key on the keyboard.
•Mac OS
Double-click the printer in the Printer Setup Utility or Print Center. Select the print job you want to cancel and click Delete.
Changing print settings 27

Printing on both sides (duplexing, Windows)
You can print on both sides manually using the Windows printer software.
Guidelines for printing on both sides of a page
To print on both sides of a page, you must specify duplex options in your software application or in the printer driver.
•Always use media that conforms to the printer specifications. See Understanding specifications for supported print media.
•Specify duplex options in your application or in the printer driver.
•Do not print on both sides of transparencies.
•Do not print on both sides of envelopes or on media lighter than 75 g/m2 (18 lb). Jams might occur with these media types.
•Do not print on both sides of photo paper or glossy media unless specifically designed for two-sided printing.
•Several kinds of media require a specific orientation when you print on both sides of a page, such as letterhead, preprinted paper, and paper with watermarks and prepunched holes. When you print from a computer running Windows, the printer prints the odd pages of the print job first. Load the media with the print side facing the front of the printer.
To perform duplexing (Windows)
1.Load the appropriate media. See Guidelines for printing on both sides of a page and Loading media.
2.With a document open, on the File menu, click Print, and then click Properties.
3.Click the Finishing tab.
4.Select the Print on Both Sides check box.
5.To automatically resize each page to match the document's onscreen layout, ensure Preserve Layout is selected. Clearing this option might result in unwanted page breaks.
6.Select or clear the Flip Pages Up check box to match the way you want the binding. See the graphics in the printer driver for examples.
7.Change any other desired settings and click OK.
8.Print your document.
9.After the first side of the document is printed, follow the onscreen instructions and reload the paper into the tray to complete printing.
10.After reloading the paper, click Continue in the onscreen instructions to continue the print job.
28 Chapter 3 - Using the printer

Printing on special and custom-sized media
This section provides information on how to print on media such as envelopes, photo paper, postcards, transparencies, and custom-sized media.
To print on special and custom-sized media (Windows)
1.Load the appropriate media. See Loading media.
2.With a document open, on the File menu, click Print, and then click Setup or Properties.
3.Click the Paper/Quality tab.
4.Select the media type from the Type is drop-down list.
5.Select the media size from the Size is drop-down list. -Or-
Click Custom, enter the dimensions of the media, and then click OK.
6.Change any other desired settings and click OK.
7.Print your document.
To print on special and custom-sized media (Mac OS)
1.Load the appropriate media. See Loading media.
2.On the File menu, click Page Setup.
3.Select the media size.
4.To set a custom media size, complete the following steps:
a.Click Custom Paper Size in the Settings drop-down menu.
b.Click New, and then type a name for the size in the Paper Size Name box.
c.In the Width and Height boxes, type the dimensions, and set the margins.
d.Click OK.
e.Click Save.
5.On the File menu, click Page Setup and select the new custom size.
6.Click OK.
7.On the File menu, click Print.
8.Open the Paper Type/Quality panel.
9.Click the Paper tab and select the media type.
10.Change any other desired settings and click Print.
Printing on special and custom-sized media 29

Printing from mobile devices
The printer supports printing from a variety of mobile devices and memory cards, such as:
•Cameras
•Mobile phones
•PDAs
Printing digital photographs
You can print photographs directly from a digital camera or directly from a memory card, or you can transfer the photos from the card or camera to your computer and print them from a software application, such as HP Photo Printing Software. Also, you can print photos directly from a PictBridge-compatible camera.
If your digital camera uses a Type I CompactFlash™ (CF) card, SD card, or MMC, you can insert the card into the printer to print your photos. Your camera must support Digital Print Order Format (DPOF) version 1 or 1.1 in order to print directly from the card to the printer. DPOF files also automatically print directly from a USB Flash drive that is connected to the USB port of the printer.
See Printing from memory cards and USB Flash drives for more information.
To print with six-ink color
Your printer can print with six-ink color to enhance the quality of printed photographs. Print high-quality grayscale photographs by using a black print cartridge and a tri-color print cartridge, or by using a gray photo print cartridge and a tri-color print cartridge. To perform six-ink color printing, a photo and a tricolor print cartridge must be installed together.
 NOTE: You can print high-quality black-and-white photographs using a gray photo print cartridge, combined with the tri-color print cartridge.
Guidelines for printing photographs
•For the best results when printing photographs and images, choose Best mode and select an HP photo paper in the printer driver. Best mode uses HP's unique PhotoREt IV color-layering technology and ColorSmart III color optimization technology to create realistic photo images, vivid color output, and extremely sharp text. With PhotoREt IV, a greater range of colors, lighter tones, and smoother gradations between tones can be achieved, ensuring the best photo and image print quality.
Alternatively, select Maximum dpi, which provides up to 4800 x 1200 optimized dpi* for optimum print quality.
*Up to 4800 x 1200 optimized dpi for color printing and 1200 input dpi. This setting might temporarily use a large amount of hard disk space (400 MB or more) and will print more slowly. Photo cartridge, if present, further enhances the print quality.
•It is recommended to remove each sheet of paper as it prints and set it aside to dry.
•If the printed colors visibly shift towards yellow, cyan or magenta, or there is a tinge of color in the gray shades, you need to calibrate the color. See Calibrating color.
30 Chapter 3 - Using the printer
Loading...