


 Loading...
HP Customer Care
Thank you for buying an HP DeskJet printer. Because HP wants owning your printer to be a trouble-free experience, we back your purchase with HP Customer Care—award-winning service and support that includes:
HP Customer Care Online
Click your way to a quick solution! http://www.hp.com/support/home_products is a great place to start for answers to questions about your HP DeskJet printer—24 hours a day, seven days a week.
HP Customer Care User Forums
Go online, anytime, and you will also find helpful user forums—a great source of ideas and suggestions for using your HP DeskJet printer. You can access the user forums directly from http://www.hp.com/support/home_products.
HP Customer Care by Phone
Call us direct and connect with a service technician who specializes in your product and who can typically answer your questions in one phone call. See page 46 in this User’s Guide for phone numbers.

HP DeskJet Printer
User’s Guide for Macintosh
970C Series
English
Acknowledgments
Apple, the Apple logo, AppleTalk, ColorSync, the ColorSync logo, EtherTalk, Finder, LocalTalk, Mac, Macintosh, MacOS, PowerBook, Power Macintosh, and QuickDraw are trademarks of Apple Computer, Inc., registered in the U.S. and other countries.
Notice
The information contained in this document is subject to change without notice.
Hewlett-Packard Company makes no warranty of any kind with regard to this material, including, but not limited to, the implied warranties of merchantability and fitness for a particular purpose.
Hewlett-Packard shall not be liable for any errors or for incidental or consequential damages in connection with the furnishing, performance, or use of this material.
All rights reserved. Reproduction, adaptation, or translation of this manual is prohibited without prior written permission of Hewlett-Packard Company, except as allowed under the copyright laws.
No part of this document may be photocopied, reproduced, or translated to another language without the prior written consent of Hewlett-Packard Company.
Edition 1, July 1999
© Copyright Hewlett-Packard Company and Apple Computer, Inc. 1999
Portions © Copyright 1989-1999 Palomar Software, Inc. HP DeskJet 970C includes printer driver technology licensed from Palomar Software, Inc., www.palomar.com.

 Table of Contents
Chapter 1 Using Your Printer
Buttons and Lights . . . . . . . . . . . . . . . . . . . . . . . . . . . . . . . . . . . . . . . . . . . . . . . . . . . 1
Paper Trays . . . . . . . . . . . . . . . . . . . . . . . . . . . . . . . . . . . . . . . . . . . . . . . . . . . . . . . . 2
Automatic Two-Sided Printing . . . . . . . . . . . . . . . . . . . . . . . . . . . . . . . . . . . . . . . .3
Basic Printer Maintenance . . . . . . . . . . . . . . . . . . . . . . . . . . . . . . . . . . . . . . . . . . . 5
Chapter 2 Using Your Printer Software
Choosing Your Printer . . . . . . . . . . . . . . . . . . . . . . . . . . . . . . . . . . . . . . . . . . . . . . .7 Other Ways to Select a Default Printer . . . . . . . . . . . . . . . . . . . . . . . . . . . . . . . 8 Desktop Printing. . . . . . . . . . . . . . . . . . . . . . . . . . . . . . . . . . . . . . . . . . . . . . . . . . . . 8 Checking Printer Status . . . . . . . . . . . . . . . . . . . . . . . . . . . . . . . . . . . . . . . . . . . . . 9 Page Setup - Controlling Page Layout . . . . . . . . . . . . . . . . . . . . . . . . . . . . . . 10 Print Dialog Box . . . . . . . . . . . . . . . . . . . . . . . . . . . . . . . . . . . . . . . . . . . . . . . . . . . . 12 Printing on Different Types of Paper and Media . . . . . . . . . . . . . . . . . . . . . .18 HP DeskJet 900 Series Utility Window . . . . . . . . . . . . . . . . . . . . . . . . . . . . . . 26
Chapter 3 Using and Caring for Your Print Cartridges
Print Cartridge Status . . . . . . . . . . . . . . . . . . . . . . . . . . . . . . . . . . . . . . . . . . . . . . 29 Replacing Print Cartridges . . . . . . . . . . . . . . . . . . . . . . . . . . . . . . . . . . . . . . . . . . 31 Storing Print Cartridges . . . . . . . . . . . . . . . . . . . . . . . . . . . . . . . . . . . . . . . . . . . . 33 Cleaning Print Cartridges . . . . . . . . . . . . . . . . . . . . . . . . . . . . . . . . . . . . . . . . . . 34 Damage Resulting from Refilling the Print Cartridges. . . . . . . . . . . . . . . . .37
Chapter 4 Getting Help When Things Go Wrong
Basic Troubleshooting . . . . . . . . . . . . . . . . . . . . . . . . . . . . . . . . . . . . . . . . . . . . . 39
Clearing a Paper Jam . . . . . . . . . . . . . . . . . . . . . . . . . . . . . . . . . . . . . . . . . . . . . . 43
HP Customer Care . . . . . . . . . . . . . . . . . . . . . . . . . . . . . . . . . . . . . . . . . . . . . . . . . 45
Chapter 5 Supplies and Accessories
Part Names and Numbers . . . . . . . . . . . . . . . . . . . . . . . . . . . . . . . . . . . . . . . . . . 47 Printer Quick Start Posters and User’s Guides for Macintosh . . . . . . . . . . 48 Paper and Other Media . . . . . . . . . . . . . . . . . . . . . . . . . . . . . . . . . . . . . . . . . . . . 49 Ordering Information . . . . . . . . . . . . . . . . . . . . . . . . . . . . . . . . . . . . . . . . . . . . . . 50
i

 Table of Contents
Appendix A |
Setup Instructions |
|
|
Using a USB Connection . . . . . . . . . . . . . . . . . . . . . . . . . . . . . . . . . . . . . . . . . . . |
53 |
|
Using an AppleTalk Connection . . . . . . . . . . . . . . . . . . . . . . . . . . . . . . . . . . . . |
56 |
Appendix B |
Specifications . . . . . . . . . . . . . . . . . . . . . . . . . . . . . . . . . . . . . . . . . . . . . . . . . . . . |
57 |
Appendix C |
Legal Information |
|
|
Regulatory Notices . . . . . . . . . . . . . . . . . . . . . . . . . . . . . . . . . . . . . . . . . . . . . . . . |
61 |
|
Limited Warranty Statement . . . . . . . . . . . . . . . . . . . . . . . . . . . . . . . . . . . . . . . . |
62 |
|
HP Year 2000 Warranty . . . . . . . . . . . . . . . . . . . . . . . . . . . . . . . . . . . . . . . . . . . . |
62 |
Index |
. . . . . . . . . . . . . . . . . . . . . . . . . . . . . . . . . . . . . . . . . . . . . . . . . . . . . . . . . . . . . . . . . . . |
63 |
ii

 Introduction
Thank You For Buying an HP DeskJet Printer!
Here’s what comes in the box. If something is missing, talk to your HP dealer or call HP Customer Care. (See “HP Customer Care by Phone” on page 46 for the
appropriate telephone number.)
Printer
Automatic
Two-Sided
Printing
Module
MacOS |
Quick |
|
|
Start |
|
|
|
Power cord |
Quick Start |
|
poster |
||
|
Documents about your printer
Printer software
Black print cartridge
Color print cartridge
Note:You will need to buy a USB-to-USB printer cable, or an HP JetDirect 300X External Print Server, to connect your HP DeskJet printer to your computer. See page 47 for ordering information.
iii

Special Features of Your HP DeskJet Printer
Your new HP DeskJet printer is equipped with special features that improve print quality, giving you a competitive edge:
Exceptional print quality
•Stunning photo quality through HP’s Color Layering Technology
•Laser-quality black text
•Excellent print quality on plain paper
Uncompromising performance
•Print speeds of up to 12 pages per minute for black text and 10 pages per minute for text with color graphics
•Efficient, fast photo image printing
Features that expand your printing possibilities
•Innovative, easy-to-use Automatic Two-Sided Printing
•Large capacity paper tray that holds up to 150 sheets
•Network-capable (supports HP JetDirect 300X External Print Server)
Finding More Information
This User’s Guide shows you how to operate your printer. For more information:
•Use the Quick Start Poster for installation.
•Turn on balloon help in the Help menu. Move your cursor over any print setting to view an explanation.
•Visit the HP web site on the Internet at http://www.hp.com/support/home_products or http://www.hp.com for the latest product information, troubleshooting, and printer software updates.
iv

1 Using Your Printer
Buttons and Lights
The buttons on the front of your HP DeskJet printer enable you to turn the printer on and off, cancel a print job, or resume printing. The lights provide you with visual cues about the state of your printer. The buttons and lights from left to right are:
 Cancel Button – Press this button to cancel the current print job in the printer.
 Print Cartridge Status Light – When lit, the light above this symbol indicates that you need to check the status of your print cartridges. See “Print Cartridge Status” on page 29.
 Resume Button and Light – Whenever
the light above the Resume Button flashes, press the Resume Button to continue printing.
 Power Button and Light – Use the Power Button to turn the printer on and off. The green light above the Power Button flashes when the printer is processing information.
Warning Use only the Power Button on the front of the printer to turn the printer on and off. Using a power strip, surge protector, or a wall-mounted switch to turn the printer on and off may cause premature printer failure.
1

1Using Your Printer
Paper Trays
IN Tray
You place paper and other media types for printing in the IN tray. Pull out this tray for easy loading. Once you insert the media you want to use, slide the paper guides so they rest snugly against the media. Be sure to slide all media as far as it will go into the IN tray.
OUT Tray
The printer sends its completed pages to the OUT tray. The OUT tray has two different positions.
Down – For most types of printing (except banners). The down position also allows single envelope printing.
Up – For ease of loading media in the IN tray and for banner printing.
IN tray pushed in
Width paper guide
Length paper guides
IN tray pulled out
Width paper guide
|
Length paper guides |
Printer Basics |
|
Out Tray Up |
Single |
ch1/out_tray_up.eps |
|
Master B |
envelope |
|
slot |
OUT tray down
OUT tray up
2

1Using Your Printer
Automatic Two-Sided Printing
The Automatic Two-Sided Printing Module is a special hardware and software feature that enables your printer to automatically print on both sides of the page.
Installing the Automatic Two-Sided Printing Module
1Turn the knob on the printer’s Rear Access Door counter-clockwise, and remove the door.
3
1Using Your Printer
2Press the button on each side of the Automatic Two-Sided Printing Module, and insert the module into the back of the printer.
3 Release the buttons.
Printing with the Automatic Two-Sided Printing Module
1 Load appropriate paper.
Note:Not all paper types or sizes work with the Automatic Two-Sided Printing Module. You can print on plain paper, HP Bright White Inkjet Paper, and HP Premium Inkjet Heavyweight Paper.
2 From the File menu, select Page Setup.
3 Check the Two Sided Safe Margins box, then click OK.
4 From the File menu, select Print.
5Choose Layout from the General pop-up menu. See “Print Dialog Box” on page 12 for instructions.
6In the Layout dialog box, check the Print Both Sides box, and select
Automatic.
7 Click on either the Book or Tablet icon to choose the correct page orientation.
8Make any other formatting selections from other Print dialog boxes, then click
Print.
4

1Using Your Printer
Note:After one side of the page is printed on, the paper is held while the ink dries. Once the ink is dry, the paper is pulled back in, and the reverse side is printed. As each page is finished, the page will drop into the OUT tray.
Note:If you have problems with Two-Sided Printing, see “Basic
Troubleshooting” beginning on page 39.
Basic Printer Maintenance
Because the printer ejects ink onto the paper in a fine mist, ink smudges will eventually appear on the printer case. Follow the cleaning instructions provided below.
•Do not clean the interior of the printer. Keep all fluids away from the interior.
•To remove stains, smudges and/or dried ink from the exterior of the printer, use a soft cloth moistened with water. Do not use household cleaners or detergent. In the event that a household cleaner or detergent is used on the printer, wipe the printer’s exterior surfaces with a soft cloth moistened with water.
•Do not lubricate the rod on which the print cartridge cradle moves. Noise is normal when the cradles move back and forth.
For information on cleaning print cartridges and the print cartridge cradle, see “Cleaning Print Cartridges” on page 34.
5

1Using Your Printer
NOTES:
6

2 Using Your Printer Software
Choosing Your Printer
If you haven’t already selected your HP DeskJet as the default printer in the Chooser, you should do so now. How you select the HP DeskJet in the Chooser depends on whether your computer is connected to the printer via USB or AppleTalk.
USB Connection
1Make sure the computer and printer are turned on, and your printer is connected to your computer with a USB cable.
2 From the Apple menu, select Chooser.
3 In the left side of the Chooser window, click the DeskJet 900 Series icon.
4 In the right side of the Chooser window, click DeskJet 970C.
5 Close the Chooser.
AppleTalk Network Connection
1Make sure the computer and printer are both turned on and connected to your AppleTalk network. You will need an HP JetDirect 300X External Print Server to connect the printer to your AppleTalk network.
2 From the Apple menu, select Chooser.
3 Click the Active button next to AppleTalk.
4 In the left side of the Chooser window, click the DeskJet 900 Series icon.
5 Select the printer zone, if necessary.
6 In the right side of the Chooser, click DeskJet 970C.
7 Close the Chooser.
7

2Using Your Printer Software
Other Ways to Select a Default Printer
Besides using the Chooser, you can also select a default printer in the following ways:
•Select the desired printer by clicking on the menu bar printer icon at the top of the screen, and choosing the DeskJet 970C.
•If your control strip is on, then select the desired printer by clicking the printer icon at the bottom of the screen, and choosing the DeskJet 970C.
•Drag the document you want to print to the desktop icon of the printer you want to use.
•Double-click the icon of the HP DeskJet printer you want to use, and choose
Set Default Printer from the Print menu.
The Print command will send your documents to this printer until you select a new default printer. If you switch printers, check your document before you print it to see whether the formatting or pagination changed.
Desktop Printing
Desktop printing is useful when you have a number of documents to print at once, or when you have a document that is already formatted for printing on a particular printer. There are two methods to print documents from the desktop. To perform desktop printing, either:
•Drag the icons of the documents you want to print to the desktop icon of the printer you want to use.
or
•Select the icons of the documents you want to print, then choose Print from the File menu. When the Print dialog box appears, select your print options, then click the Print button.
8
2Using Your Printer Software
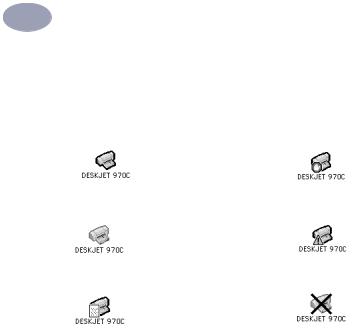
Checking Printer Status
You can tell the status of a printer by looking at its desktop icon:
|
|
Icon |
Description |
Icon |
Description |
||||||
|
|
|
|
|
|
|
|
|
|
|
|
|
|
|
|
|
|
|
|
|
|
|
|
|
|
|
|
|
|
Idle printer (default) |
|
|
|
|
Printing stopped on |
|
|
|
|
|
|
|
|
|
|
||
|
|
|
|
|
|
|
|
|
|
||
|
|
|
|
|
|
|
|
|
|
|
default printer |
|
|
|
|
|
|
|
|
|
|
|
|
|
|
|
|
|
|
|
|
|
|
|
|
|
|
|
|
|
|
Idle printer (not |
|
|
|
|
Error on default printer |
|
|
|
|
|
|
|
|
|
|
||
|
|
|
|
|
|
default) |
|
|
|
|
|
|
|
|
|
|
|
|
|
|
|
|
|
|
|
|
|
|
|
|
|
|
|
|
|
|
|
|
|
|
|
Printing on default |
|
|
|
|
Printer not available or |
|
|
|
|
|
|
|
|
|
|
||
|
|
|
|
|
|
|
|
|
|
||
|
|
|
|
|
|
printer |
|
|
|
|
connected |
|
|
|
|
|
|
|
|
|
|
|
|
|
|
|
|
|
|
|
|
|
|
|
|
|
|
|
|
|
|
|
|
|
|
|
|
9

2Using Your Printer Software
Page Setup - Controlling Page Layout
You control settings such as paper size, scaling, page orientation, and watermarks from the HP DeskJet 900 Series Page Setup dialog box. To get to this dialog box:
1 Open the software program used to create your document.
2 From the File menu, select Page Setup.
Paper Size, Scaling, and Page Orientation
Check to automatically adjust margins for Two-Sided Printing.
Make sure you correctly choose the size of paper, envelopes, or other media you have in the IN tray.
Enter a number from 5 to 999. Numbers smaller than 100 reduce the image size, and numbers greater than 100 enlarge it. Changing size may change pagination.
Click the appropriate icon to choose page orientation.
10
2Using Your Printer Software
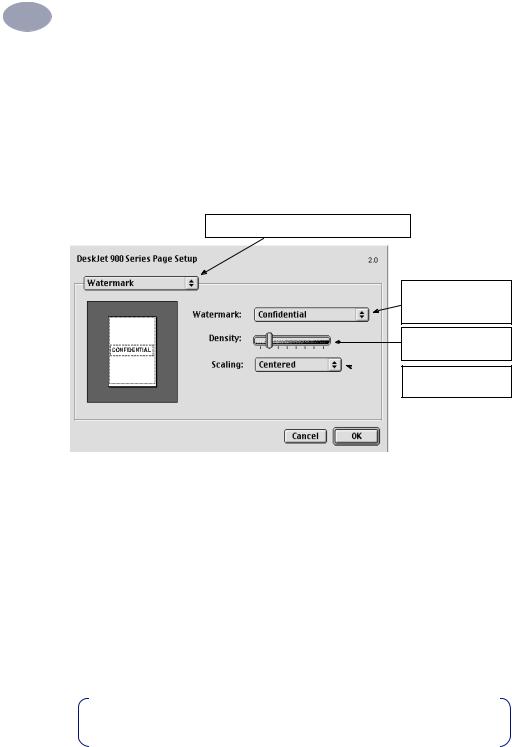
Watermarks
Traditionally, a watermark is an indelible image impressed on a piece of paper that is visible by holding the paper up to the light. Your HP DeskJet printer can’t do that, but can create the illusion of a watermark by putting an image on each page of your document. Your HP DeskJet 970C comes with a number of watermarks, and you can create more.
Choose Watermark to display this window.
Choose the name of the watermark file you want to print.
Slide to adjust darkness of the watermark.
 Choose watermark position on the page.
Creating Your Own Watermark File
Use any drawing or other program that can save PICT files to create your own custom watermarks, such as your company logo.
1 Create the image and save it as a PICT file.
2Save the PICT file inside the Printing Prefs folder.
To find the Printing Prefs folder, open the System Folder, then open the Preferences folder. The name you use when saving the file is the name that will appear in the Watermark dialog box.
Note:Make the watermark with solid colors. When you print the document, you can use the Density control to make the watermark lighter.
11

2Using Your Printer Software
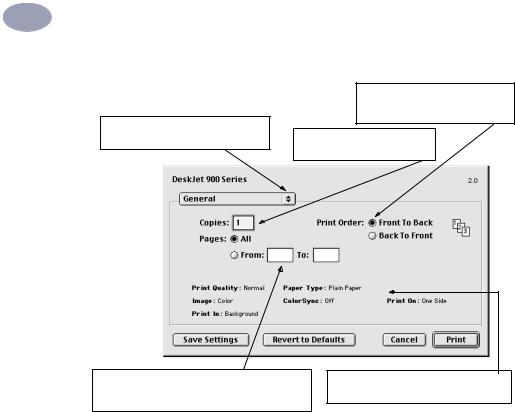
Print Dialog Box
You control settings such as number of copies, all or specific pages to print, paper type, print quality, page layout, color, and background printing from the HP DeskJet 900 Series Print dialog box. To get to this dialog box, select Print from your software program’s File menu.
Buttons
There are four buttons at the bottom of every Print dialog box:
•Save Settings, which saves any print settings you select
•Revert to Defaults, which returns your print settings to the original HP-defined settings
•Cancel, which cancels settings you have entered and closes the Print dialog box
•Print, which starts printing
General
General is the default panel selected in the Print dialog box menu. This panel lets you select the number of copies you want to print, whether you want to print the entire document or select pages, and whether you want to print from the front of your document or begin printing from the end forward.
12
2Using Your Printer Software
Click to display a list of other printcontrol panels.
Indicate whether you want to start printing from the first page or from the last page.
Enter the number of copies you want to print.
If you don’t want to print the entire document, enter the beginning and ending page numbers you want to print.
This area displays options set in other Print panels.
You may also choose the following options from the General menu:
•Paper Type/Quality (see “Paper Type/Quality” on page 14)
•Layout (see “Layout” on page 14)
•Color (see “Color” on page 15)
•Background Printing (see “Background Printing” on page 16)
•Ink Controls (see “Basic Troubleshooting” beginning on page 39)
13

2Using Your Printer Software
Paper Type/Quality
Choose from a wide
 range of paper types.
Print Quality
Draft: Quick printing
Normal: Every day
printing
Best: Highest quality
High Res Photo: Only for photo media
Prints a mirrored image of your document.
Layout
This dialog box allows you to specify the number of pages printed on each sheet of paper, or to print a poster by specifying the number of pages printed across and down. You also set Two-Sided Printing options from this dialog box.
Check here to print on both sides of the paper.
Choose the number of pages (1, 2, or 4) to print on each sheet.
or
Print a poster:
Choose the size of your poster by choosing the number of pages across and down (2x2, 3x3, or
4x4).
Check to print a border around each page.
If you check Print Both Sides, choose the appropriate method:
Manualor Automatic
(if using the Automatic Two-Sided Printing Module).
If you check Print Both Sides,
choose appropriate Binding (side or top).
14

2Using Your Printer Software
Color
Your HP DeskJet 970C uses HP’s Color Matching technology to intelligently analyze each element on a page—text, graphics, and photographs—and provide the best color output.
Choose:
•HP Color Matching (default)
•ColorSync
•Grayscale (print in shades of gray)
•Black & White (no color)
Slide to adjust:
•Saturation
•Brightness
 •Color Tone
HP Color Matching is the default Image setting on the Color panel. While you can adjust saturation, brightness, and color tone with the sliders that appear when you choose this option, the center position of the sliders is optimized for most printing uses and types of media.
The ColorSync setting can be used for color matching with other computers using the ColorSync matching system.
Grayscale prints in shades of gray. With this setting, you also have the option to optimize printing for fax and photocopy.
Black & White prints only in black and white (no color, no gray).
15
2Using Your Printer Software
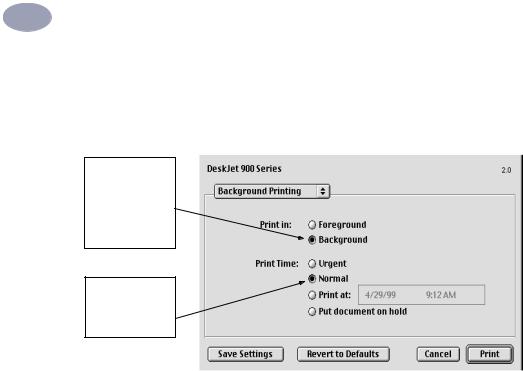
Background Printing
Choose Background if you want to continue working while printing takes place. If you choose Foreground printing, you won’t be able to work on other tasks until the printing is complete, but printing will be faster.
Choose:
•Background to continue working while printing
•Foreground for faster printing
Click the button that matches the desired timing for your print job
The following table describes additional features available when using background printing. To access these features from the desktop, double-click the HP DeskJet 970C printer icon.
16
Loading...