


 Loading...
HP Deskjet F4200 All-in-One series
Basics Guide
Guide d’utilisation
Guia de conceitos básicos

Hewlett-Packard Company notices
The information contained in this document is subject to change without notice.
All rights reserved. Reproduction, adaptation, or translation of this material is prohibited without prior written permission of Hewlett-Packard, except as allowed under copyright laws. The only warranties for HP products and services are set forth in the express warranty statements accompanying such products and services. Nothing herein should be construed as constituting an additional warranty. HP shall not be liable for technical or editorial errors or omissions contained herein.
© 2007 Hewlett-Packard Development Company, L.P.
Windows, Windows 2000, and Windows XP are U.S. registered trademarks of Microsoft Corporation.
Windows Vista is either a registered trademark or trademark of Microsoft Corporation in the United States and/or other countries.
Intel and Pentium are trademarks or registered trademarks of Intel Corporation or its subsidiaries in the United States and other countries.
Avis publiés par la société Hewlett-Packard
Les informations contenues dans ce document peuvent faire l'objet de modifications sans préavis.
Tous droits réservés. La reproduction, l'adaptation ou la traduction de ce matériel est interdite sans l'accord écrit préalable de Hewlett-Packard, sauf dans les cas permis par la législation relative aux droits d'auteur. Les seules garanties relatives aux produits et services HP sont décrites dans les déclarations de garantie expresse accompagnant lesdits produits et services. Aucun élément de ce document ne constitue une garantie supplémentaire. Hewlett-Packard ne saurait être tenu pour responsable des erreurs ou omissions techniques ou rédactionnelles de ce document.
© 2007 Hewlett-Packard Development Company, L.P.
Windows, Windows 2000 et Windows XP sont des marques déposées de Microsoft Corporation aux Etats-Unis.
Windows Vista est une marque déposée ou une marque de Microsoft Corporation aux Etats-Unis et/ou dans d'autres pays.
Intel et Pentium sont des marques ou des marques déposées d'Intel Corporation ou de ses filiales aux Etats-Unis et dans d'autres pays.
Avisos da Hewlett-Packard Company
As informações contidas neste documento estão sujeitas a alterações sem aviso prévio.
Todos os direitos reservados. É proibida a reprodução, adaptação ou tradução deste material sem a permissão prévia por escrito da Hewlett-Packard, exceto quando permitido pelas leis de direitos autorais. As únicas garantias aos produtos e serviços da HP são aquelas descritas nas declarações de garantia expressa que acompanham os respectivos produtos e serviços. Nada aqui contido deve ser interpretado como garantia adicional. A HP não se responsabiliza por erros técnicos ou editoriais nem por omissões aqui contidos.
© 2007 Hewlett-Packard Development Company, L.P.
Windows, Windows 2000 e Windows XP são marcas registradas da Microsoft Corporation nos Estados Unidos e/ou em outros países. Windows Vista é uma marca comercial ou marca registrada da Microsoft Corporation nos Estados Unidos e/ou em outros países.
Intel e Pentium são marcas comerciais ou marcas registradas da Intel Corporation ou suas subsidiárias nos Estados Unidos e/ou em outros países.
2007

HP Deskjet F4200 All-in-One series
Basics Guide
English

Contents
1 HP All-in-One overview |
|
The HP All-in-One at a glance.................................................................................................... |
2 |
Control panel buttons................................................................................................................. |
3 |
Status light overview................................................................................................................... |
4 |
Load originals for scanning and copying.................................................................................... |
5 |
Make a copy............................................................................................................................... |
6 |
Scan an original.......................................................................................................................... |
6 |
2 Troubleshooting and support |
|
Uninstall and reinstall the software............................................................................................. |
7 |
Hardware setup troubleshooting................................................................................................. |
7 |
Clear paper jams...................................................................................................................... |
10 |
Print cartridge troubleshooting.................................................................................................. |
10 |
Find more information............................................................................................................... |
10 |
Setup Guide........................................................................................................................ |
10 |
Onscreen Help.................................................................................................................... |
10 |
HP Web site........................................................................................................................ |
11 |
HP support................................................................................................................................ |
11 |
HP support by phone.......................................................................................................... |
11 |
Phone support period................................................................................................... |
11 |
After the phone support period..................................................................................... |
11 |
Before calling HP Support.................................................................................................. |
11 |
Technical information............................................................................................................... |
11 |
System requirements.......................................................................................................... |
12 |
Paper specifications........................................................................................................... |
12 |
Physical specifications........................................................................................................ |
12 |
Power specifications........................................................................................................... |
12 |
Environmental specifications.............................................................................................. |
12 |
Regulatory notices.............................................................................................................. |
12 |
Regulatory model identification number....................................................................... |
12 |
Warranty............................................................................................................................. |
13 |
English
1

1 HP All-in-One overview
The HP Deskjet F4200 All-in-One series is a versatile device that gives you easy-to-use copying, scanning, and printing. For information about the full range of features and functions, see the onscreen Help.
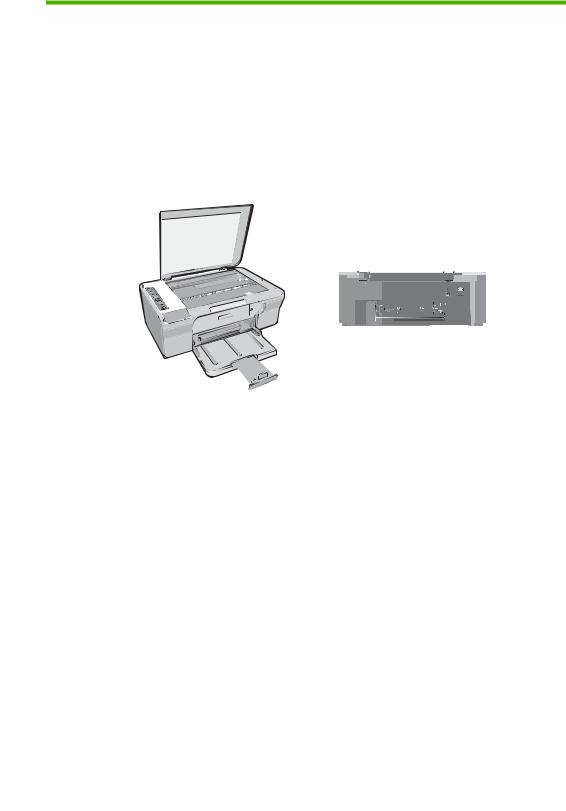
The HP All-in-One at a glance
English
Label Description
1Control panel
2Front access door
3Paper-width guide
4Input tray
5Tray extender
6Print cartridge door
7Glass
8Lid backing
9Rear access door
10Rear USB port
11Power connection*
*Use only with the power adapter supplied by HP.
2 HP Deskjet F4200 All-in-One series

Control panel buttons
English
|
|
|
|
|
|
|
|
|
|
|
|
|
|
|
|
|
|
|
|
|
|
|
|
|
|
|
|
|
|
|
|
|
|
|
|
|
|
|
|
|
|
|
|
|
|
|
|
|
|
|
|
|
|
|
|
|
|
|
|
|
|
|
|
|
|
|
|
|
|
|
|
|
|
|
|
|
|
|
|
|
|
|
|
|
|
|
|
|
|
|
|
|
|
|
|
|
|
|
|
|
|
|
|
|
|
|
|
|
|
|
|
|
|
|
|
|
|
|
|
|
|
|
|
|
|
|
|
Label |
|
Icon |
|
|
|
|
|
|
Name and Description |
||||||
|
|
|
|
|
|
|
|
|
|
|
|
|
|
||
1 |
|
|
|
|
|
|
|
|
|
|
|
|
Ink Level lights: Show ink level information for each print cartridge, four for |
||
|
|
|
|
|
|
|
|
|
|
|
|
|
the tri-color cartridge and four for the black cartridge. |
||
|
|
|
|
|
|
|
|
|
|
|
|
|
Check Print Cartridge lights: Indicates the need to reinsert the specified print |
||
|
|
|
|
|
|
|
|
|
|
|
|
|
cartridge, replace the print cartridge, or close the print cartridge door. The |
||
|
|
|
|
|
|
|
|
|
|
|
|
|
Black ink icon light indicates that the problem is with the black print cartridge, |
||
|
|
|
|
|
|
|
|
|
|
|
|
|
and the Color ink icon light indicates that the problem is with the tri-color print |
||
|
|
|
|
|
|
|
|
|
|
|
|
|
cartridge. |
||
2 |
|
|
|
|
|
|
|
|
|
|
|
|
Scan: Starts scanning the original currently on the glass. A Scan button |
||
|
|
|
|
|
|
|
|
|
|
|
|
|
press is ignored if the HP All-in-One is busy with any other job. The Scan |
||
|
|
|
|
|
|
|
|
|
|
|
|
|
button functions only when the computer is on. |
||
3 |
|
|
|
|
|
|
|
|
|
|
|
|
Paper Selection: Changes the paper type setting to either plain, large photo, |
||
|
|
|
|
|
|
|
|
|
|
|
|
|
or small photo paper. Make sure the appropriate paper type is loaded in the |
||
|
|
|
|
|
|
|
|
|
|
|
|
|
input tray. The default paper type setting is Plain. |
||
|
|
|
|
|
|
|
|
|
|
|
|
|
The Paper Selection lights indicate the currently selected paper size and |
||
|
|
|
|
|
|
|
|
|
|
|
|
|
type. |
||
|
|
|
|
|
|
|
|
|
|
|
|
|
|
||
4 |
|
|
|
|
|
|
|
|
|
|
|
|
Resize to Fit / Fit to Page: Scales the original to the maximum size to fit |
||
|
|
|
|
|
|
|
|
|
|
|
|
|
within the margins of the selected paper size for copying. |
||
|
|
|
|
|
|
|
|
|
|
|
|
|
|
||
5 |
|
|
|
|
|
|
|
|
|
|
|
|
Start Copy Black: Starts a black-and-white copy job. |
||
|
|
|
|
|
|
|
|
|
|
|
|
|
Press this button multiple times to specify multiple black copies. The printer |
||
|
|
|
|
|
|
|
|
|
|
|
|
|
will start printing shortly after the number of copies have been selected. The |
||
|
|
|
|
|
|
|
|
|
|
|
|
|
number of copies to be printed is shown to the right of this button. |
||
|
|
|
|
|
|
|
|
|
|
|
|
|
|
||
6 |
|
|
|
|
|
|
|
|
|
|
|
|
Start Copy Color: Starts a color copy job. |
||
|
|
|
|
|
|
|
|
|
|
|
|
|
Press this button multiple times to specify multiple color copies. The printer |
||
|
|
|
|
|
|
|
|
|
|
|
|
|
will start printing shortly after the number of copies have been selected. The |
||
|
|
|
|
|
|
|
|
|
|
|
|
|
number of copies to be printed is shown to the right of this button. |
||
Control panel buttons |
3 |

English
Chapter 1 (continued)
Label |
Icon |
Name and Description |
|
|
|
7 |
|
Resume: Instructs the HP All-in-One to continue after a problem is solved. |
|
|
A blinking Resume light next to the Resume button indicates the need to |
|
|
load paper or clear a paper jam. |
|
|
|
8 |
|
Cancel: Stops a print, copy, or scan job. |
|
|
|
9 |
|
On: Turns the HP All-in-One on or off. The On button is lit when the |
|
|
HP All-in-One is powered on. |
|
|
|
Status light overview
Several indicator lights inform you of the status of the HP All-in-One.
Label |
Description |
1 |
Ink Level lights |
|
|
2 |
Check Print Cartridge lights |
3Paper Selection lights (for the Paper Selection button)
4 |
Resize to Fit / Fit to Page light |
5 |
Resume light |
|
|
6 |
On light |
The following table describes common situations and explains what the lights mean.
4 HP Deskjet F4200 All-in-One series

Light status |
What it means |
|
|
|
|
All lights are off. |
The HP All-in-One is turned off. Press the On button to turn on the |
|
|
product. |
|
|
|
|
The On light is blinking. |
The HP All-in-One is busy printing, scanning, copying, or aligning the |
|
|
print cartridges. |
|
|
|
|
The On light blinks quickly for 3 |
You pressed a button while the HP All-in-One is already busy printing, |
|
seconds and then is on steady. |
scanning, copying, or aligning the print cartridges. |
|
|
|
|
The On light blinks for 20 seconds |
You pressed the Scan button and there was no response from the |
|
and then is steady. |
computer. |
|
|
|
|
The Resume light is blinking. |
• |
The HP All-in-One is out of paper. |
|
• |
The HP All-in-One has a paper jam. |
|
|
|
The Check Print Cartridge light is |
• |
The print cartridge door is open. |
blinking. |
• |
The print cartridges are missing or not seated correctly. |
|
• |
The tape was not removed from the print cartridge. |
|
• |
The print cartridge is not intended for use in this HP All-in-One. |
|
• |
The print cartridge might be defective. |
|
|
|
The On, Resume, and Check Print |
Scanner failure. |
|
Cartridge lights are blinking. |
Turn off the HP All-in-One, then turn it on again. If the problem persists, |
|
|
contact HP Support. |
|
|
|
|
The Resume and Check Print |
The print cartridge carriage is stalled. |
|
Cartridge lights are blinking. |
|
|
|
|
|
All lights are blinking. |
The HP All-in-One has a fatal error. |
|
|
1. |
Turn off the product. |
|
2. |
Unplug the power cord. |
|
3. |
Wait a minute, then plug the power cord back in. |
|
4. |
Turn on the product. |
|
If the problem persists, contact HP Support. |
|
|
|
|
English
Load originals for scanning and copying
You can load many different types and sizes of paper in the HP All-in-One, including letter or A4 paper, photo paper, transparencies, and envelopes. For more information, see the onscreen Help.
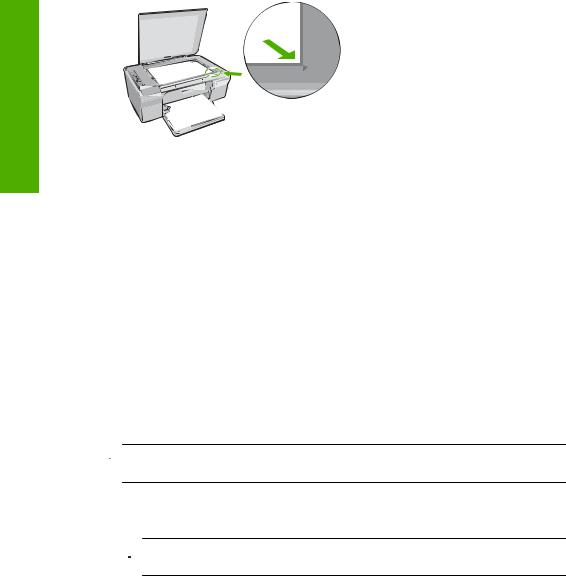
To load an original on the glass
1.Lift the lid to the open position.
2.Load your original print side down on the right front corner of the glass.
 TIP: To get the correct copy size, make sure that there is no tape or other foreign object on the glass.
Load originals for scanning and copying |
5 |
English
Chapter 1
3. Close the lid.
Make a copy
You can make quality copies from the control panel.
To make a copy from the control panel
1.Make sure you have paper loaded in the input tray.
2.Load your original print side down on the right front corner of the glass.
3.Press the Paper Selection button to set the paper type.
4.Press Start Copy Black or Start Copy Color.
Scan an original
For original documents or images placed on the glass, you can start a scan from your computer or from the HP All-in-One. To use the scan features, the HP All-in-One and computer must be connected and turned on. The HP Photosmart Software must also be installed and running on your computer prior to scanning.
 NOTE: If you are using Windows 2000, use the Windows Scanner wizard instead of pressing the Scan button.
To scan to a computer
1.Load your original print side down on the right front corner of the glass.
 TIP: For quality copies, ensure that the scanner glass is clean and that there are no foreign materials adhering to it.
2.Press Scan.
3.Make any edits to the preview image, and then click Accept when you are finished.
6 HP Deskjet F4200 All-in-One series

2 |
Troubleshooting and support |
|
|
|
This chapter contains troubleshooting information for installation and configuration issues and some |
|
|
|
operational topics. For more troubleshooting information, see the onscreen Help. |
|
|
|
Many issues are caused when the product is connected to the computer using a USB cable before |
|
|
|
the HP Photosmart software is installed on the computer. If you connected the product to your |
|
|
|
computer before the software installation screen prompts you to do so, you must follow these steps: |
|
|
|
To troubleshoot software installation |
English |
|
|
1. |
Disconnect the USB cable from the computer. |
|
|
2. |
reinstall the software” on page 7. |
|
|
Uninstall the software (if you have already installed it). For more information, see “Uninstall and |
|
|
|
3. |
Restart your computer. |
|
|
4. |
Turn off the product, wait one minute, then restart it. |
|
|
5. |
Reinstall the HP Photosmart software. |
|
CAUTION: Do not connect the USB cable to the computer until prompted by the software installation screen.
For support contact information, see the inside back cover of this guide.
Uninstall and reinstall the software
If your installation is incomplete, or if you connected the USB cable to the computer before prompted by the software installation screen, you might need to uninstall and then reinstall the software. Do not simply delete the HP All-in-One application files from your computer. Make sure to remove them properly using the uninstall utility provided when you installed the software that came with the
HP All-in-One.
To uninstall from a Windows computer and then reinstall
1.Open the Windows control panel and double-click Add or Remove Programs.
2.Select HP Deskjet All-in-One Driver Software, and then click Change/Remove. Follow the onscreen instructions.
3.Disconnect the product from your computer.
4.Restart your computer.
 NOTE: It is important that you disconnect the product before restarting your computer. Do not connect the product to your computer until after you have reinstalled the software.
5.To reinstall the software, insert the product CD-ROM into your computer’s CD-ROM drive and follow the instructions on the startup screen to install the software.
If the startup screen does not appear, double-click My Computer, double-click the CD-ROM icon with the HP logo, and then double-click setup.exe
6.Follow the onscreen instructions and the instructions provided in the Setup Guide that came with the product.
When the software installation is complete, the HP Digital Imaging Monitor icon appears in the Windows system tray.
To verify that the software is properly installed, print a test page. For printing a test page, see the onscreen Help.
For Macintosh users: Uninstall and reinstall directions are in the Readme file and in the Help files for the software.
Hardware setup troubleshooting
This section contains hardware troubleshooting information for the HP All-in-One.
Hardware setup troubleshooting |
7 |
Chapter 2
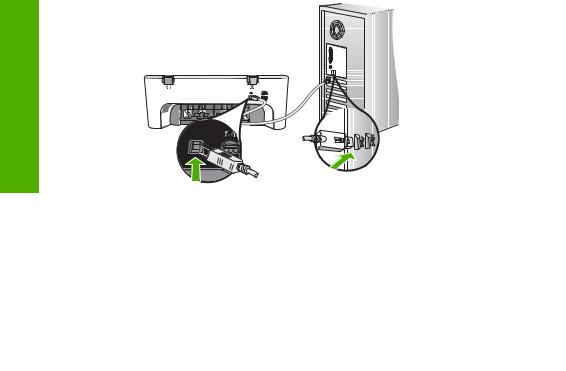
The product will not turn on
Solution
•Make sure the power cord is firmly connected to both the product and the power adapter. Plug the power cord into a power outlet, surge protector, or power strip.
English
1 |
Power connection |
|
|
2 |
Power cord and adapter |
|
|
3 |
Power outlet |
|
|
•If you are using a power strip, make sure the power strip is on. Or, try plugging the product directly into a power outlet.
•Test the power outlet to make sure it is working. Plug in an appliance that you know works, and see if the appliance has power. If not, then there might be a problem with the power outlet.
•If you plugged the product into a switched outlet, make sure the outlet is switched on. If it is switched to on but still does not work, then there might be a problem with the power outlet.
Cause: The product was not being used with the power cord it was shipped with.
Solution: The product might not respond if you press the On button too quickly. Press the On button once. It might take a few minutes for the product to turn on. If you press the On button again during this time, you might turn the product off.
CAUTION: If the product still does not turn on, it might have a mechanical failure. Unplug the product from the power outlet.
Contact HP support for service.
Go to: www.hp.com/support. If prompted, choose your country/region, and then click Contact HP for information on calling for technical support.
Cause: You pressed the On button too quickly.
I connected the USB cable, but I am having problems using the HP All-in-One with my computer
Solution: You must first install the software that came with the product before connecting the USB cable. During installation, do not plug in the USB cable until prompted by the onscreen instructions. Connecting the USB cable before prompted can cause errors.
Once you have installed the software, connecting your computer to the product with a USB cable is straightforward. Simply plug one end of the USB cable into the back of your computer and the other into the back of the product. You can connect to any USB port on the back of your computer.
8 HP Deskjet F4200 All-in-One series

For more information on installing the software and connecting the USB cable, see the Setup Guide that came with the HP All-in-One.
The HP All-in-One does not print
Solution: If the product and computer are not communicating with each other, try the following:
•Look at the On button located on the product. If it is not lit, the product is turned off. Make sure the power cord is firmly connected to both the product and the power adapter and plugged into a power outlet. Press the On button to turn on the product.
•Make sure the print cartridges are installed.
•Make sure you have paper loaded in the input tray.
•Make sure that the product does not have a paper jam.
•Check that the print carriage is not jammed.
Open the front access door to access the print carriage area. Remove any objects that are blocking the print carriage, including any packing materials. Turn the product off and then turn it on again.
•Print a test page to see if the product can print and is communicating with the computer. For more information, see the onscreen Help.
•Make sure that the print queue is not paused. If it is, choose the appropriate setting to resume printing. For more information about accessing the print queue, see the documentation that came with the operating system installed on your computer.
•Check the USB cable. If you are using an older cable, it might not be working properly. Try connecting it to another product to see if the USB cable works. If you experience problems, the USB cable might need to be replaced. Also verify that the cable does not exceed 3 meters (9.8 feet) in length.
•Make sure your computer is USB ready and that you are using a supported operating system. For more information, see the Readme file.
•Check the connection from the product to your computer. Verify that the USB cable is securely plugged into the USB port on the back of the product. Make sure the other end of the USB cable is plugged into a USB port on your computer. After the cable is connected properly, turn the product off and then on again.
English
Hardware setup troubleshooting |
9 |
Chapter 2
English
•If you are connecting the product through a USB hub, make sure the hub is turned on. If the hub is on, try connecting directly to your computer.
•Check other printers or scanners. You might need to disconnect older products from your computer.
•Try connecting the USB cable to another USB port on your computer. After you check the connections, try restarting your computer. Turn the product off and then on again.
•After you check the connections, try restarting your computer. Turn the product off and then on again.
•If necessary, remove and then install the software you installed with the product again. For more information on setting up the HP All-in-One and connecting it to your computer, see the Setup Guide that came with the HP All-in-One.
Clear paper jams
For information about clearing a paper jam, see the onscreen Help. For instructions on accessing the onscreen Help, see “Onscreen Help” on page 10.
Print cartridge troubleshooting
For information about troubleshooting print cartridges, see the onscreen Help. For instructions on accessing the onscreen Help, see “Onscreen Help” on page 10.
Find more information
A variety of resources, both printed and onscreen, provide information about setting up and using the HP All-in-One.
Setup Guide
The Setup Guide provides instructions for setting up your HP All-in-One and installing software. Make sure you follow the steps in the Setup Guide in order.
If you have problems during setup, see Troubleshooting in the last section of the Setup Guide, or see “Troubleshooting and support” on page 7 in this guide.
Onscreen Help
The onscreen Help provides detailed instructions on features of your HP All-in-One that are not described in this guide, including features that are only available using the software you installed with your HP All-in-One. The onscreen help also provides regulatory and enviornmental information.
10 HP Deskjet F4200 All-in-One series

To access the onscreen Help
•Windows: Click Start > All Programs > HP > Deskjet F4200 All-in-One series > Help.
To install the onscreen Help, insert the software CD in your computer and follow the onscreen instructions.
•Macintosh: Click Help > Mac Help > Library > HP Product Help.
HP Web site
If you have Internet access, you can get help and support from the HP Web site at www.hp.com/ support. This Web site offers technical support, drivers, supplies, and ordering information.
HP support
You can contact HP Support by phone and online. Support options and availability vary by product, country/region, and language.
HP support by phone
For a list of support phone numbers, see the inside back cover of this guide. Support options and availability vary by product, country/region, and language.
Phone support period
One year of phone support is available in Latin America (including Mexico). To determine the duration of phone support in North America, Eastern Europe, the Middle East, Asia Pacific, and Africa, go to www.hp.com/support.
Standard phone company charges apply.
After the phone support period
After the phone support period, help is available from HP at an additional cost.
Contact your HP dealer or call the support phone number for your country/region to learn more about support options.
Before calling HP Support
1.Make sure that:
a. The HP All-in-One is plugged in and turned on.
b. The specified print cartridges are installed correctly.
c. The recommended paper is properly loaded in the input tray.
2.Reset the HP All-in-One:
a. Turn off the HP All-in-One by pressing the On button.
b. Unplug the power cord from the back of the HP All-in-One. c. Plug the power cord back into the HP All-in-One.
d. Turn on the HP All-in-One by pressing the On button.
3.Have the following information available:
a. Specific name of the HP All-in-One, as it appears on the control panel. b. Print a self-test report. For more information, see the onscreen Help. c. Be prepared to describe your problem in detail.
d. Have your serial number and service ID ready, found on the self-test report. e. Be near the HP All-in-One printer when you call HP Support.
Technical information
The technical specifications and international regulatory information for the HP All-in-One are provided in this section. For additional regulatory and environmental specifications, see the onscreen help.
For additional regulatory and environmental information, including the Declaration of Conformity statement, see the onscreen Help.
English
Technical information |
11 |

English
Chapter 2
System requirements
Software system requirements are located in the Readme file.
Paper specifications
•Input tray capacity: Plain paper sheets: Up to 80 (65-90 gsm (16-24 lb.) paper)
•Output tray capacity: Plain paper sheets: Up to 50 (65-90 gsm (16-24 lb.) paper)
 NOTE: For a complete list of supported media sizes, see the printer software.
Physical specifications
•Height: 161.5 mm (6.36 inches)
•Width: 437.5 mm (17.22 inches)
•Depth (Input tray up): 290.4 mm (11.43 inches)
•Weight: 4.9 kg (10.8 pounds)
Power specifications
•Power consumption: 20 watts (average printing)
•Input voltage: AC 100 to 240 V ~ 1 A 50–60 Hz
•Output voltage: DC 32 V===375 mA, 16 V===500mA
•Power supply: 0957-2242, AC 100-240 V (±10%), 50-60 Hz (±3 Hz)
•Power supply: 0957-2250, AC 100-240 V (±10%), 50-60 Hz (±3 Hz)
 NOTE: Use only with the power adapter supplied by HP.
Environmental specifications
•Maximum operating conditions
◦Temperature: 5° to 40°C (41° to 104°F)
◦Humidity: 15% to 80% RH non-condensing
•Recommended operating conditions
◦Temperature: 15° to 30°C (59° to 86°F)
◦Humidity: 20% to 80% RH non-condensing
•Maximum shipping (storage) conditions
◦Temperature: -40° to 60°C (-40° to 140°F)
◦Humidity: 5% to 90% RH non-condensing
•In the presence of high electromagnetic fields, it is possible the output from the HP All-in-One may be slightly distorted
•HP recommends using a USB cable less than or equal to 3 m (10 feet) in length to minimize injected noise due to potential high electromagnetic fields
Regulatory notices
The HP All-in-One meets product requirements from regulatory agencies in your country/region. For a complete listing of regulatory notices, see the onscreen Help.
Regulatory model identification number
For regulatory identification purposes, your product is assigned a Regulatory Model Number. The Regulatory Model Number for your product is VCVRA-0811. This regulatory number should not be confused with the marketing name (HP Deskjet F4200 All-in-One series, etc.) or product numbers (CB656A, etc.).
12 HP Deskjet F4200 All-in-One series

Warranty
HP product |
Duration of limited warranty |
|
|
|
Software Media |
90 days |
|
||
|
|
|
|
|
Printer |
1 year |
|
||
|
|
|
|
|
Print or Ink cartridges |
Until the HP ink is depleted or the “end of warranty” date printed |
|
||
|
|
on the cartridge has been reached, whichever occurs first. This |
|
|
|
|
warranty does not cover HP ink products that have been refilled, |
|
|
|
|
remanufactured, refurbished, misused, or tampered with. |
|
|
|
|
|
|
|
Accessories |
1 year unless otherwise stated |
|
||
A. Extent of limited warranty |
|
|
English |
|
1. |
Hewlett-Packard (HP) warrants to the end-user customer that the HP products specified above will be free from defects |
|||
|
in materials and workmanship for the duration specified above, which duration begins on the date of purchase by the |
|||
|
customer. |
|
|
|
2. |
For software products, HP’s limited warranty applies only to a failure to execute programming instructions. HP does not |
|||
|
warrant that the operation of any product will be interrupted or error free. |
|||
|
|
|||
3. |
HP's limited warranty covers only those defects that arise as a result of normal use of the product, and does not cover |
|
||
|
any other problems, including those that arise as a result of: |
|
||
|
a. Improper maintenance or modification; |
|
|
|
|
b. Software, media, parts, or supplies not provided or supported by HP; |
|
||
|
c. Operation outside the product's specifications; |
|
|
|
|
d. Unauthorized modification or misuse. |
|
|
|
4. |
For HP printer products, the use of a non-HP cartridge or a refilled cartridge does not affect either the warranty to the |
|
||
|
customer or any HP support contract with the customer. However, if printer failure or damage is attributable to the use of |
|
||
|
a non-HP or refilled cartridge or an expired ink cartridge, HP will charge its standard time and materials charges to |
|
||
|
service the printer for the particular failure or damage. |
|
|
|
5. |
If HP receives, during the applicable warranty period, notice of a defect in any product which is covered by HP's |
|
||
|
warranty, HP shall either repair or replace the product, at HP's option. |
|
||
6. |
If HP is unable to repair or replace, as applicable, a defective product which is covered by HP's warranty, HP shall, |
|
||
|
within a reasonable time after being notified of the defect, refund the purchase price for the product. |
|
||
7. |
HP shall have no obligation to repair, replace, or refund until the customer returns the defective product to HP. |
|
||
8. |
Any replacement product may be either new or like-new, provided that it has functionality at least equal to that of the |
|
||
|
product being replaced. |
|
|
|
9. |
HP products may contain remanufactured parts, components, or materials equivalent to new in performance. |
|
||
10. HP's Limited Warranty Statement is valid in any country where the covered HP product is distributed by HP. Contracts for additional warranty services, such as on-site service, may be available from any authorized HP service facility in countries where the product is distributed by HP or by an authorized importer.
B. Limitations of warranty
TO THE EXTENT ALLOWED BY LOCAL LAW, NEITHER HP NOR ITS THIRD PARTY SUPPLIERS MAKES ANY OTHER WARRANTY OR CONDITION OF ANY KIND, WHETHER EXPRESS OR IMPLIED WARRANTIES OR CONDITIONS OF MERCHANTABILITY, SATISFACTORY QUALITY, AND FITNESS FOR A PARTICULAR PURPOSE.
C.Limitations of liability
1.To the extent allowed by local law, the remedies provided in this Warranty Statement are the customer's sole and exclusive remedies.
2.TO THE EXTENT ALLOWED BY LOCAL LAW, EXCEPT FOR THE OBLIGATIONS SPECIFICALLY SET FORTH IN THIS WARRANTY STATEMENT, IN NO EVENT SHALL HP OR ITS THIRD PARTY SUPPLIERS BE LIABLE FOR DIRECT, INDIRECT, SPECIAL, INCIDENTAL, OR CONSEQUENTIAL DAMAGES, WHETHER BASED ON CONTRACT, TORT, OR ANY OTHER LEGAL THEORY AND WHETHER ADVISED OF THE POSSIBILITY OF SUCH DAMAGES.
D.Local law
1.This Warranty Statement gives the customer specific legal rights. The customer may also have other rights which vary from state to state in the United States, from province to province in Canada, and from country to country elsewhere in the world.
2.To the extent that this Warranty Statement is inconsistent with local law, this Warranty Statement shall be deemed modified to be consistent with such local law. Under such local law, certain disclaimers and limitations of this Warranty Statement may not apply to the customer. For example, some states in the United States, as well as some governments outside the United States (including provinces in Canada), may:
a.Preclude the disclaimers and limitations in this Warranty Statement from limiting the statutory rights of a consumer (e.g., the United Kingdom);
b.Otherwise restrict the ability of a manufacturer to enforce such disclaimers or limitations; or
c.Grant the customer additional warranty rights, specify the duration of implied warranties which the manufacturer cannot disclaim, or allow limitations on the duration of implied warranties.
3.THE TERMS IN THIS WARRANTY STATEMENT, EXCEPT TO THE EXTENT LAWFULLY PERMITTED, DO NOT EXCLUDE, RESTRICT, OR MODIFY, AND ARE IN ADDITION TO, THE MANDATORY STATUTORY RIGHTS APPLICABLE TO THE SALE OF THE HP PRODUCTS TO SUCH CUSTOMERS.
HP Limited Warranty
Dear Customer,
You will find below the name and address of the HP entity responsible for the performance of the HP Limited Warranty in your country.
You may have additional statutory rights against the seller based on your purchase agreement. Those rights are not in any way affected by this HP Limited Warranty.
Ireland: Hewlett-Packard Ireland Ltd. 30 Herbert Street IRL-Dublin 2
United Kingdom: Hewlett-Packard Ltd, Cain Road, Bracknell, GB-Berks RG12 1HN
Technical information |
13 |

Tout-en-un HP Deskjet série F4200
Guide d'utilisation
Français

Français

Sommaire
1 Présentation de l'appareil HP Tout-en-un |
|
L'appareil HP Tout-en-un en un coup d'œil................................................................................ |
2 |
Boutons du panneau de commande........................................................................................... |
3 |
Présentation des voyants d'état.................................................................................................. |
4 |
Chargement d'originaux pour la numérisation et la copie........................................................... |
5 |
Création d'une copie................................................................................................................... |
6 |
Numérisation d'un original.......................................................................................................... |
6 |
2 Dépannage et assistance |
|
Désinstallation et réinstallation du logiciel.................................................................................. |
7 |
Dépannage de la configuration du matériel................................................................................ |
8 |
Elimination de bourrages papier............................................................................................... |
10 |
Résolution des problèmes concernant les cartouches d'impression........................................ |
10 |
Recherche d'informations supplémentaires.............................................................................. |
10 |
Guide de configuration....................................................................................................... |
10 |
Aide en ligne....................................................................................................................... |
11 |
Site Web HP....................................................................................................................... |
11 |
Assistance HP.......................................................................................................................... |
11 |
Assistance téléphonique HP............................................................................................... |
11 |
Période d'assistance téléphonique............................................................................... |
11 |
Après la période d'assistance téléphonique................................................................. |
11 |
Avant de contacter le service d'assistance HP................................................................... |
11 |
Renseignements techniques.................................................................................................... |
12 |
Configurations système minimales..................................................................................... |
12 |
Spécifications relatives au papier....................................................................................... |
12 |
Spécifications physiques.................................................................................................... |
12 |
Spécifications électriques................................................................................................... |
12 |
Conditions d'exploitation..................................................................................................... |
12 |
Déclarations de conformité................................................................................................. |
13 |
Numéro d'identification réglementaire de modèle........................................................ |
13 |
Garantie.............................................................................................................................. |
14 |
Français
1
1Présentation de l'appareil HP Tout-en-un
L'appareil Tout-en-un HP Deskjet série F4200 est un périphérique polyvalent qui vous offre des fonctions de copie, de numérisation et d'impression faciles à utiliser. Pour plus d'informations sur l'ensemble des fonctionnalités disponibles, reportez-vous à l'aide en ligne.
L'appareil HP Tout-en-un en un coup d'œil
Français
Numéro |
Description |
1 |
Panneau de commande |
|
|
2 |
Trappe d'accès avant |
|
|
3 |
Guide de largeur |
|
|
4 |
Bac d'alimentation |
|
|
5 |
Rallonge du bac |
|
|
6 |
Trappe d'accès aux cartouches d'impression |
|
|
7 |
Vitre |
|
|
8 |
Intérieur du capot |
|
|
9 |
Trappe d'accès arrière |
|
|
10 |
Port USB arrière |
11Connexion de l'alimentation*
*Utilisez exclusivement l'adaptateur secteur fourni par HP.
2 Tout-en-un HP Deskjet série F4200
Loading...