


DeskJet 5150
Table of contents
 Loading...
user's guide
To find an answer to a question, select a topic beneath the picture of your printer
model:
● notices
● special features
● getting started
● connectivity
● printing
● maintenance
● troubleshooting
● specifications
● notices
● special features
● getting started
● connectivity
● printing
● maintenance
● troubleshooting
● specifications

notices
● notices and acknowledgements
● terms and conventions
● accessibility

notices and acknowledgements
hewlett-packard company notices
The information contained in this document is subject to change without notice.
Hewlett-Packard (HP) makes no warranty of any kind with regard to this material
including, but not limited to, the implied warranties of merchantability and fitness for
a particular purpose.
Hewlett-Packard shall not be liable for any errors or for incidental or consequential
damages in connection with the furnishing, performance, or use of this material.
All rights reserved. Reproduction, adaptation, or translation of this material is
prohibited without prior written permission of Hewlett-Packard, except as allowed
under copyright laws.
acknowledgements
Microsoft, MS, MS-DOS, Windows, and XP are registered trademarks of Microsoft
Corporation.
TrueType is a U.S. trademark of Apple Computer, Inc.
Adobe and Acrobat are trademarks of Adobe Systems Incorporated.
Copyright 2003 Hewlett-Packard Company
terms and conventions
The following terms and conventions are used in the user's guide.
terms
The HP Deskjet printer may be referred to as the HP printer or printer.
symbols
The > symbol guides you through a series of software steps. For example:
Click File > Print.
cautions and warnings
A Caution indicates possible damage to the HP Deskjet printer or to other
equipment. For example:
Caution! Do not touch the print cartridge ink nozzles or copper
contacts. Touching these parts will result in clogs, ink failure, and bad
electrical connections.
A Warning indicates possible harm to you or to others. For example:
Warning! Keep both new and used print cartridges out of the reach
of children.
icons
A Note icon indicates that additional information is provided. For example:
For great results use HP products.
A Mouse icon indicates that additional information is available through the What's
This? help feature. For example:
To find more information about options on each tab screen, point to
an option and click the right mouse button to display the What's
This? dialog box. Click What's This? to view information about the
selected option.
A Do Not icon indicates that an action is not recommended.

Do not clean the interior of the printer.

accessibility
Your HP printer provides a number of features that make it accessible for people with
disabilities.
visual
The printer software is accessible for users with visual impairments or low vision
through the use of Windows accessibility options and features. It also supports most
assistive technology such as screen readers, Braille readers, and voice-to-text
applications. For users who are color blind, colored buttons and tabs used in the
software and on the HP printer have simple text or icon labels that convey the
appropriate action.
mobility
For users with mobility impairments, the printer software functions can be executed
through keyboard commands. The software also supports Windows accessibility
options such as StickyKeys, ToggleKeys, FilterKeys, and MouseKeys. The printer
doors, buttons, paper trays, and paper guides can be operated by users with limited
strength and reach.
support
For more details about the accessibility of this product and HP's committment to
product accessibility:
● Visit HP's Web site at: www.hp.com/accessibility
● Email HP at: accessibility@hp.com
special features
Congratulations! You have purchased an HP Deskjet printer that is equipped with
several exciting features:
● Borderless printing: Use the entire page surface when printing photos and
cards using the borderless printing feature.
● Print screen: Prints the image displayed on your computer's monitor at the
touch of a button.
● Six-ink upgradeable printing: Enhance photo printing with a photo print
cartridge.
● Digital photo printing: Enhanced digital photo printing capabilities.
● Ink-backup mode: Ink-backup mode lets you continue printing with one print
cartridge when the other print cartridge has run out of ink.
● Auto-on and Auto-off: Enable the auto-off feature to place the printer into a
low-power, energy-efficient mode after it has been idle for 30 minutes. The
printer turns on automatically when you print a file.
● Print multiple pages on a single sheet of paper: Use the printer software
to print up to 16 pages on a single sheet of paper.
● Print Cancel Button: Cancel print jobs at the touch of a button.
● Optional Two-Sided Printing Accessory: Purchase a Two-Sided Printing
Accessory to print two-sided documents automatically.
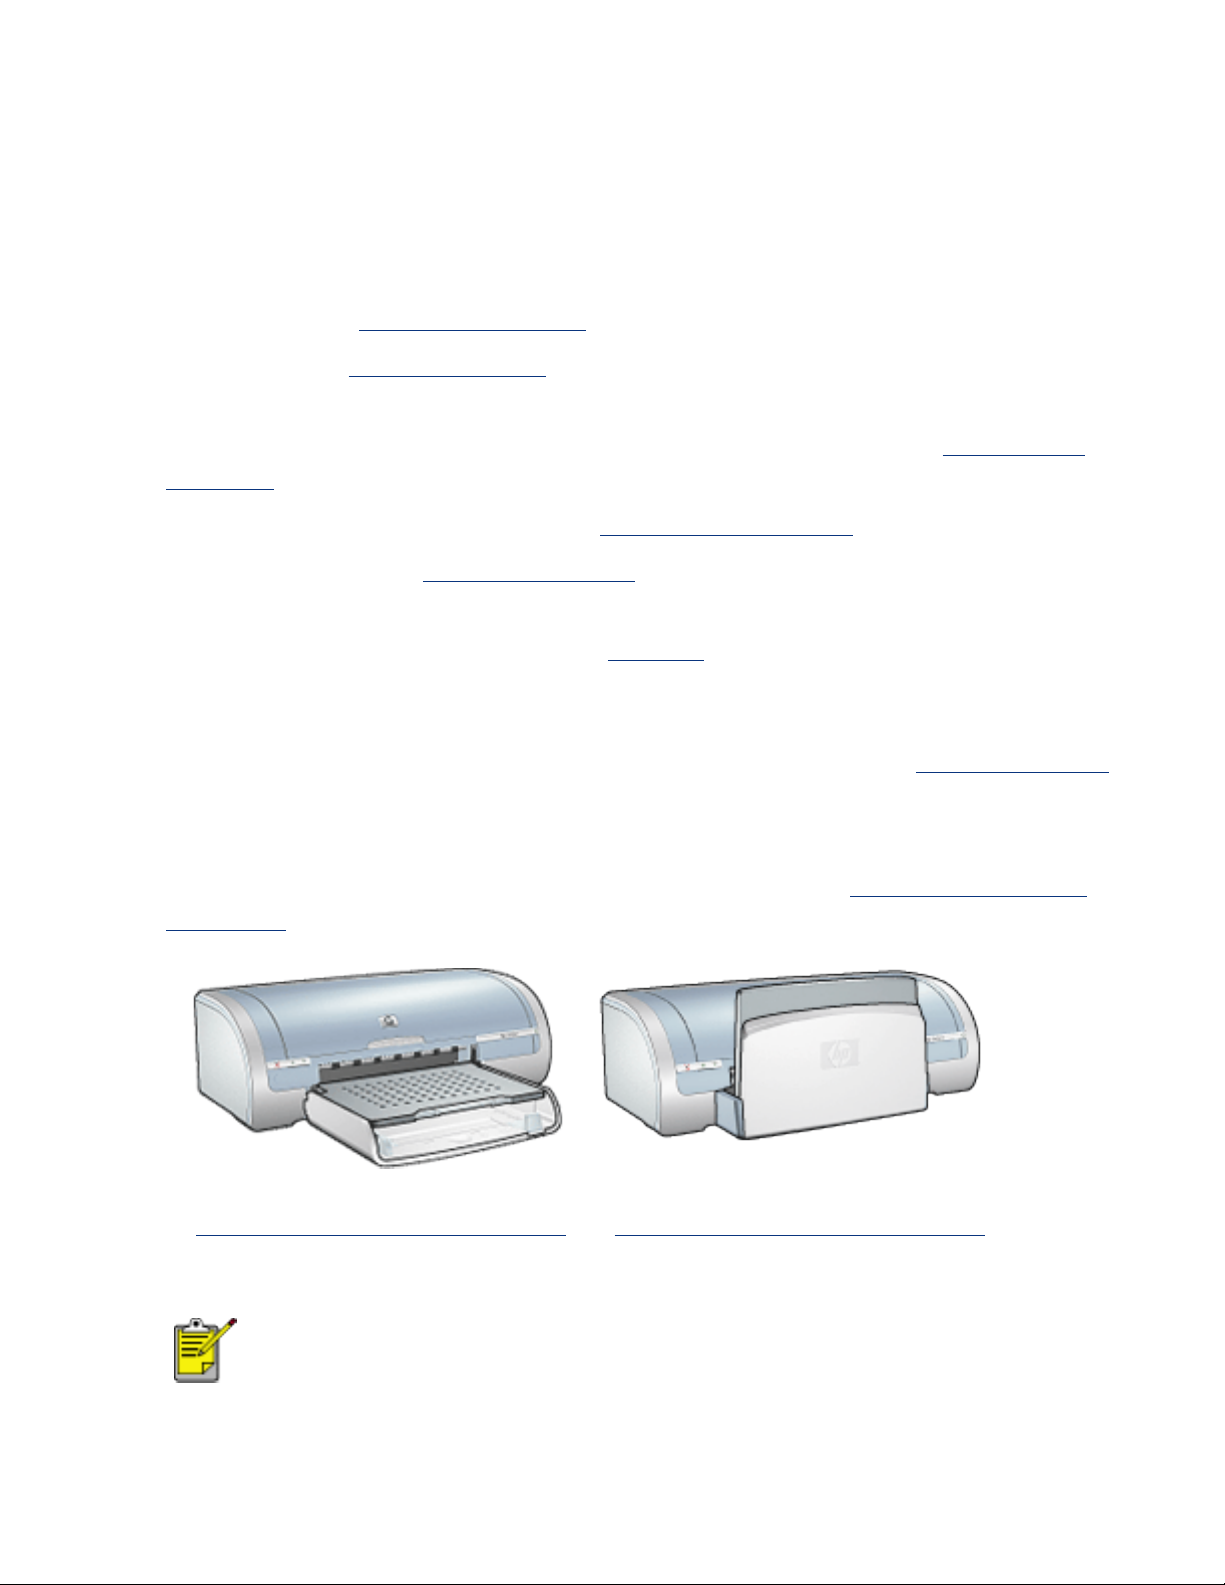
HP Deskjet 5150 series printer
HP Deskjet 5160 series printer
All printer models are not available in all countries/regions.

borderless printing
Borderless printing lets you print to edges of certain paper types and a range of
standard paper sizes from L size (89 x 127 mm) to Letter (8.5 x 11 in) and A4 (210 x
297 mm). The printer can also print on 4 x 6 inch photo paper with a tear-off tab.
guidelines
● Do not print borderless documents in ink-backup mode. Always have two print
cartridges installed in the printer.
● Open the file in a software application and assign the image size. Ensure that
the size corresponds to the paper size on which you want to print the image.
printing
Follow these steps to print a borderless document:
1. Open the file you want to print.
2. Open the
Printer Properties dialog box.
3. Select one of the borderless paper sizes from the Size is drop-down list. Verify
that the paper size you select matches the size of the paper loaded in the In
tray.
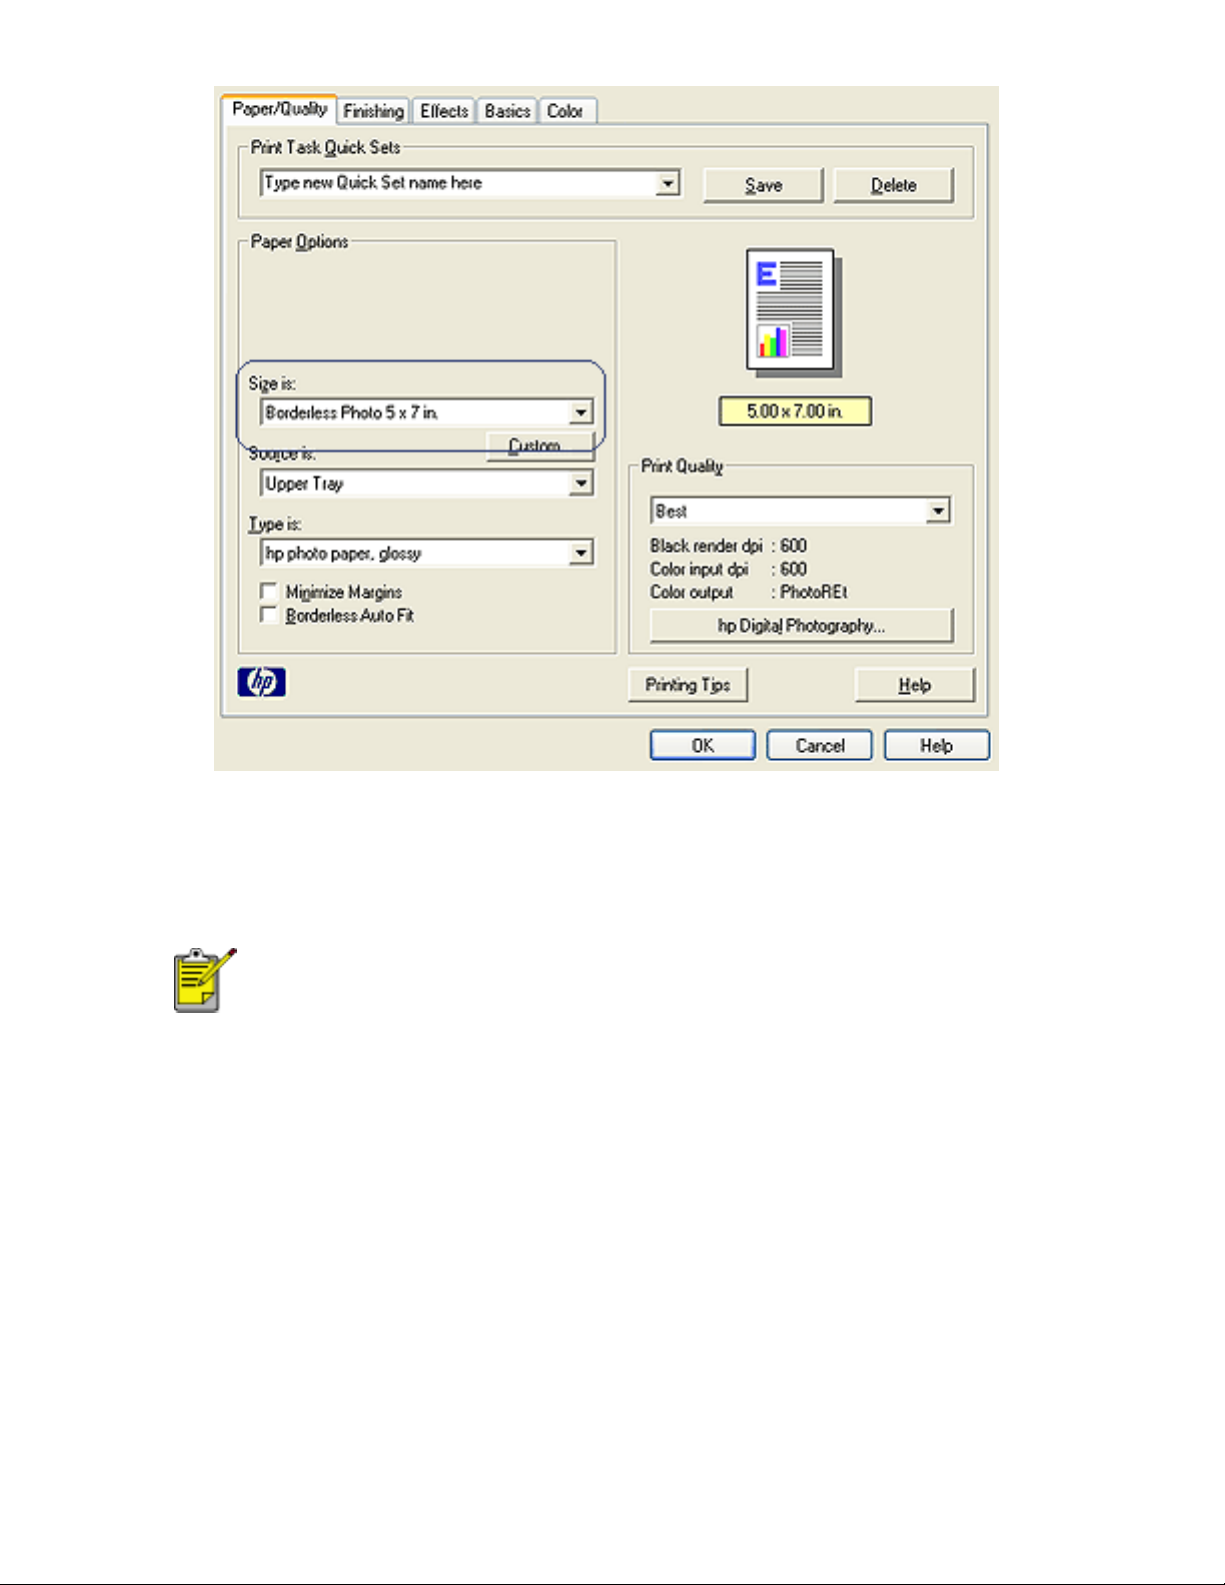
4. Select the appropriate paper type in the Type is drop-down list.
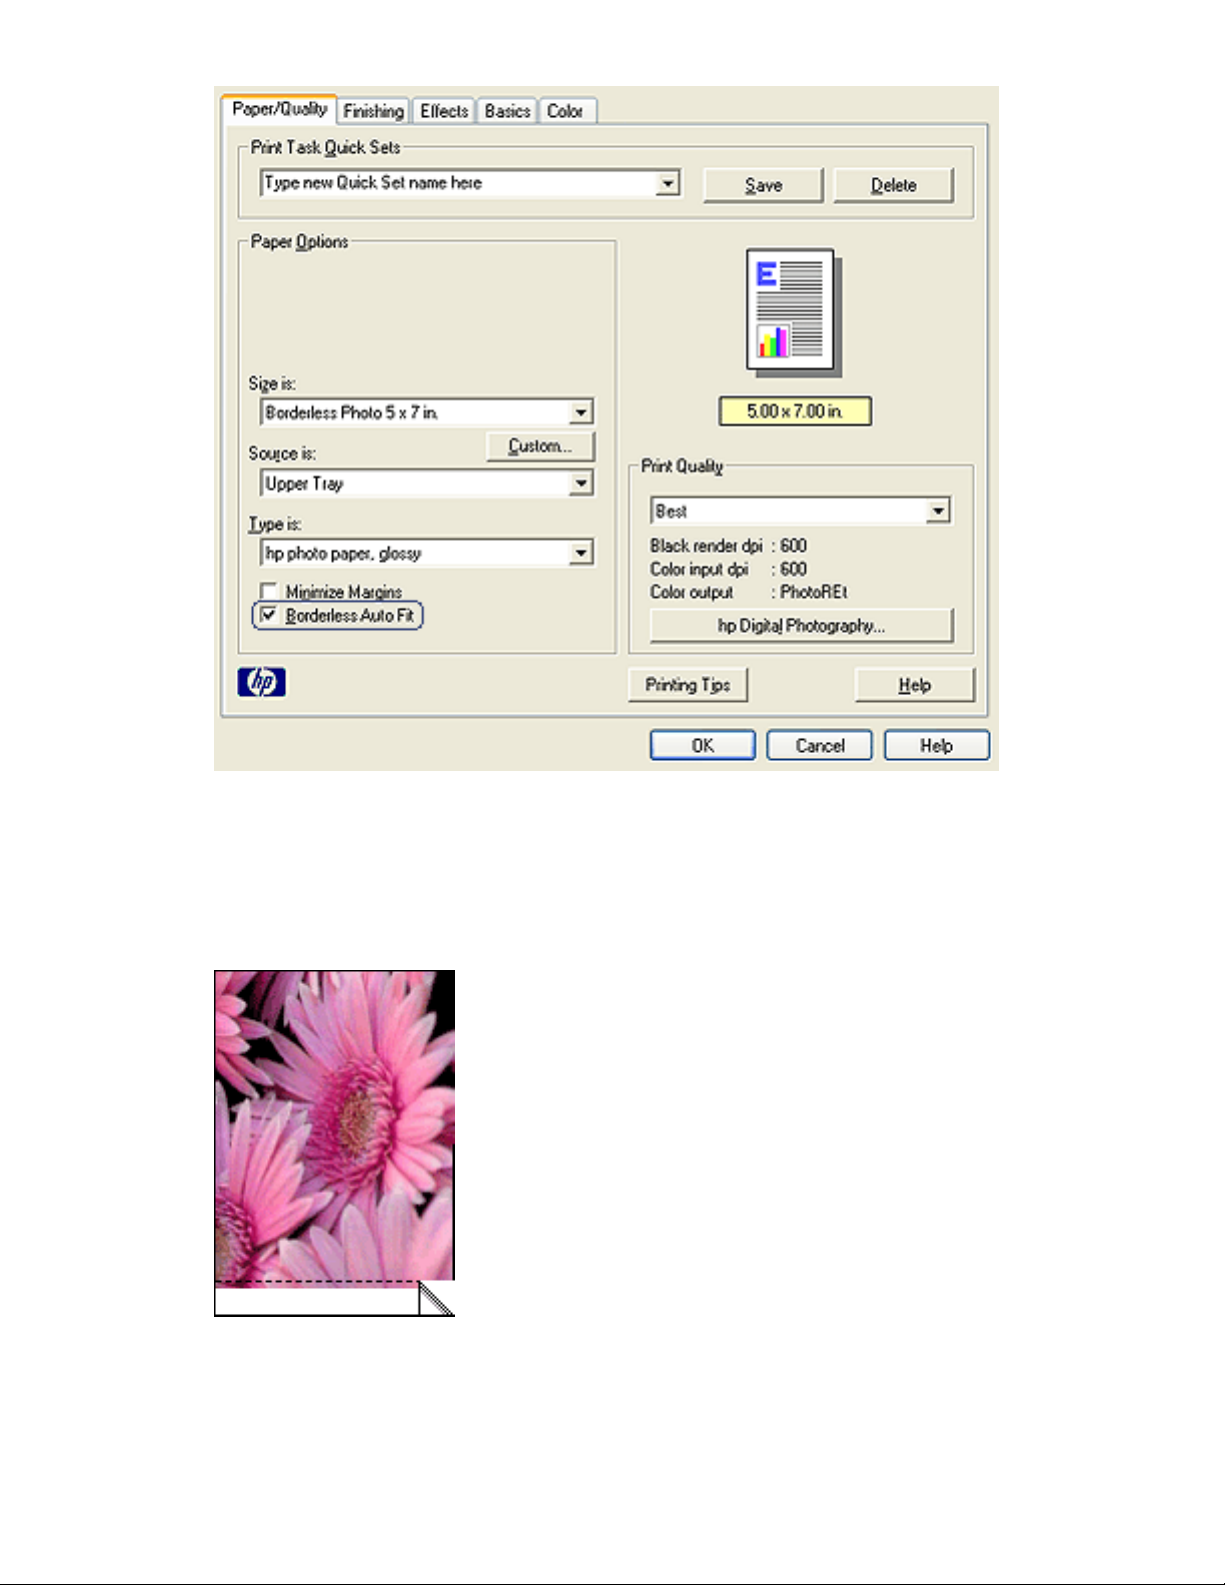
5. Click the Borderless Auto Fit checkbox to automatically resize the image to
print without a border.
The Borderless Auto Fit option is only available for photo
paper types.
6. Select any other desired print settings, then click OK.
If you printed on photo paper with a tear-off tab, remove the tab to make the
document completely borderless.
ink-backup mode
Ink-backup mode allows the printer to operate using only one print cartridge. It is
initiated when a print cartridge is removed from the cradle.
For instructions on removing a print cartridge, click here.
ink-backup mode output
Printing in ink-backup mode slows the printer and affects the quality of printouts.
when only this print cartridge is
installed...
the result is...
black print cartridge
Colors are printed as grayscale.
tri-color print cartridge
Colors print but black is grayed and
is not a true black.
photo print cartridge
Colors are printed as grayscale,
black is grayed and is not a true
black.
It is recommended that you do not use the photo print cartridge for
ink-backup mode.
exiting ink-backup mode
Install two print cartridges in the printer to exit ink-backup mode.
For instructions on installing a print cartridge, click here.
replacing print cartridges
Before buying replacement print cartridges, verify the correct part numbers.
The printer can operate with only one print cartridge installed. For more information
click
here.
To replace a print cartridge:
1. Load a stack of plain white paper in the In tray.
2. Press the Power button to turn on the printer.
3. Open the printer cover.
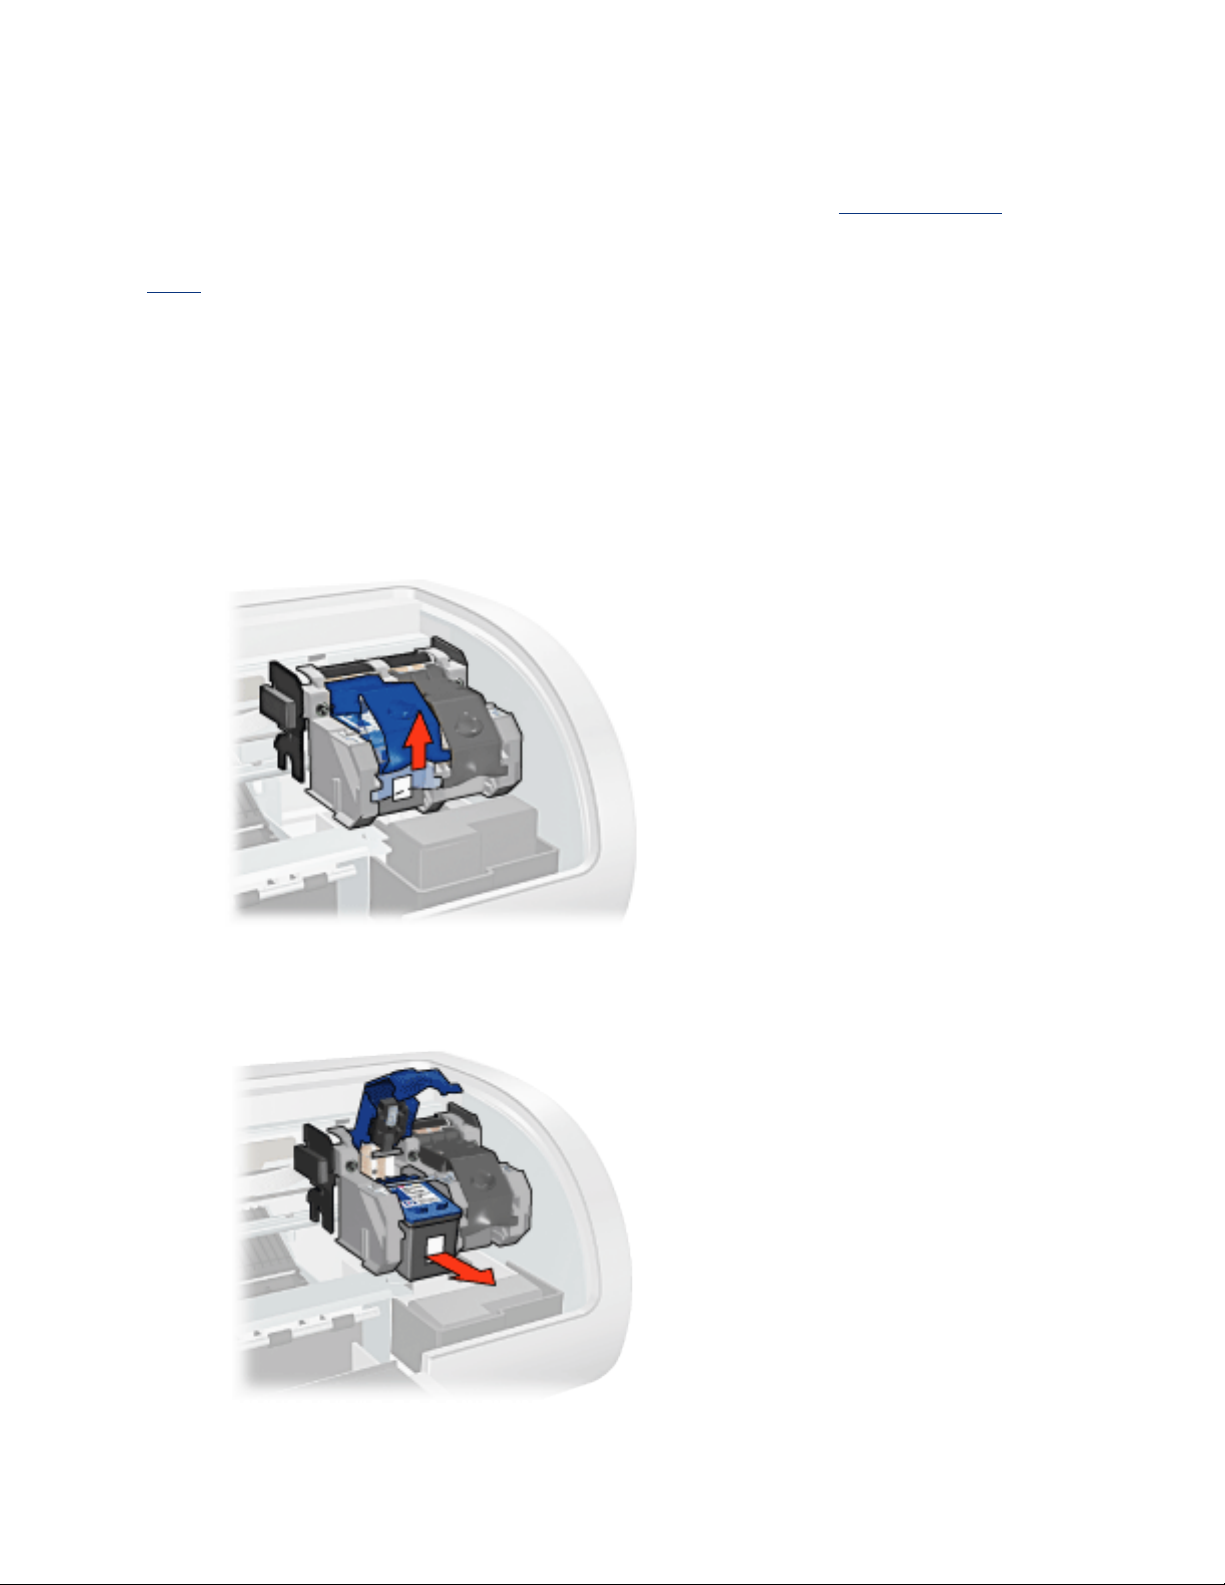
4. Lift the print cartridge latch to the open position.
5. Slide the print cartridge out of the print cartridge cradle.
6. Remove the replacement print cartridge from its packaging and carefully
remove the plastic tape.
Caution! Do not touch the print cartridge ink nozzles or copper
contacts. Touching these parts will result in clogs, ink failure, and
bad electrical connections. Do not remove the copper strips. They
are required electrical contacts.
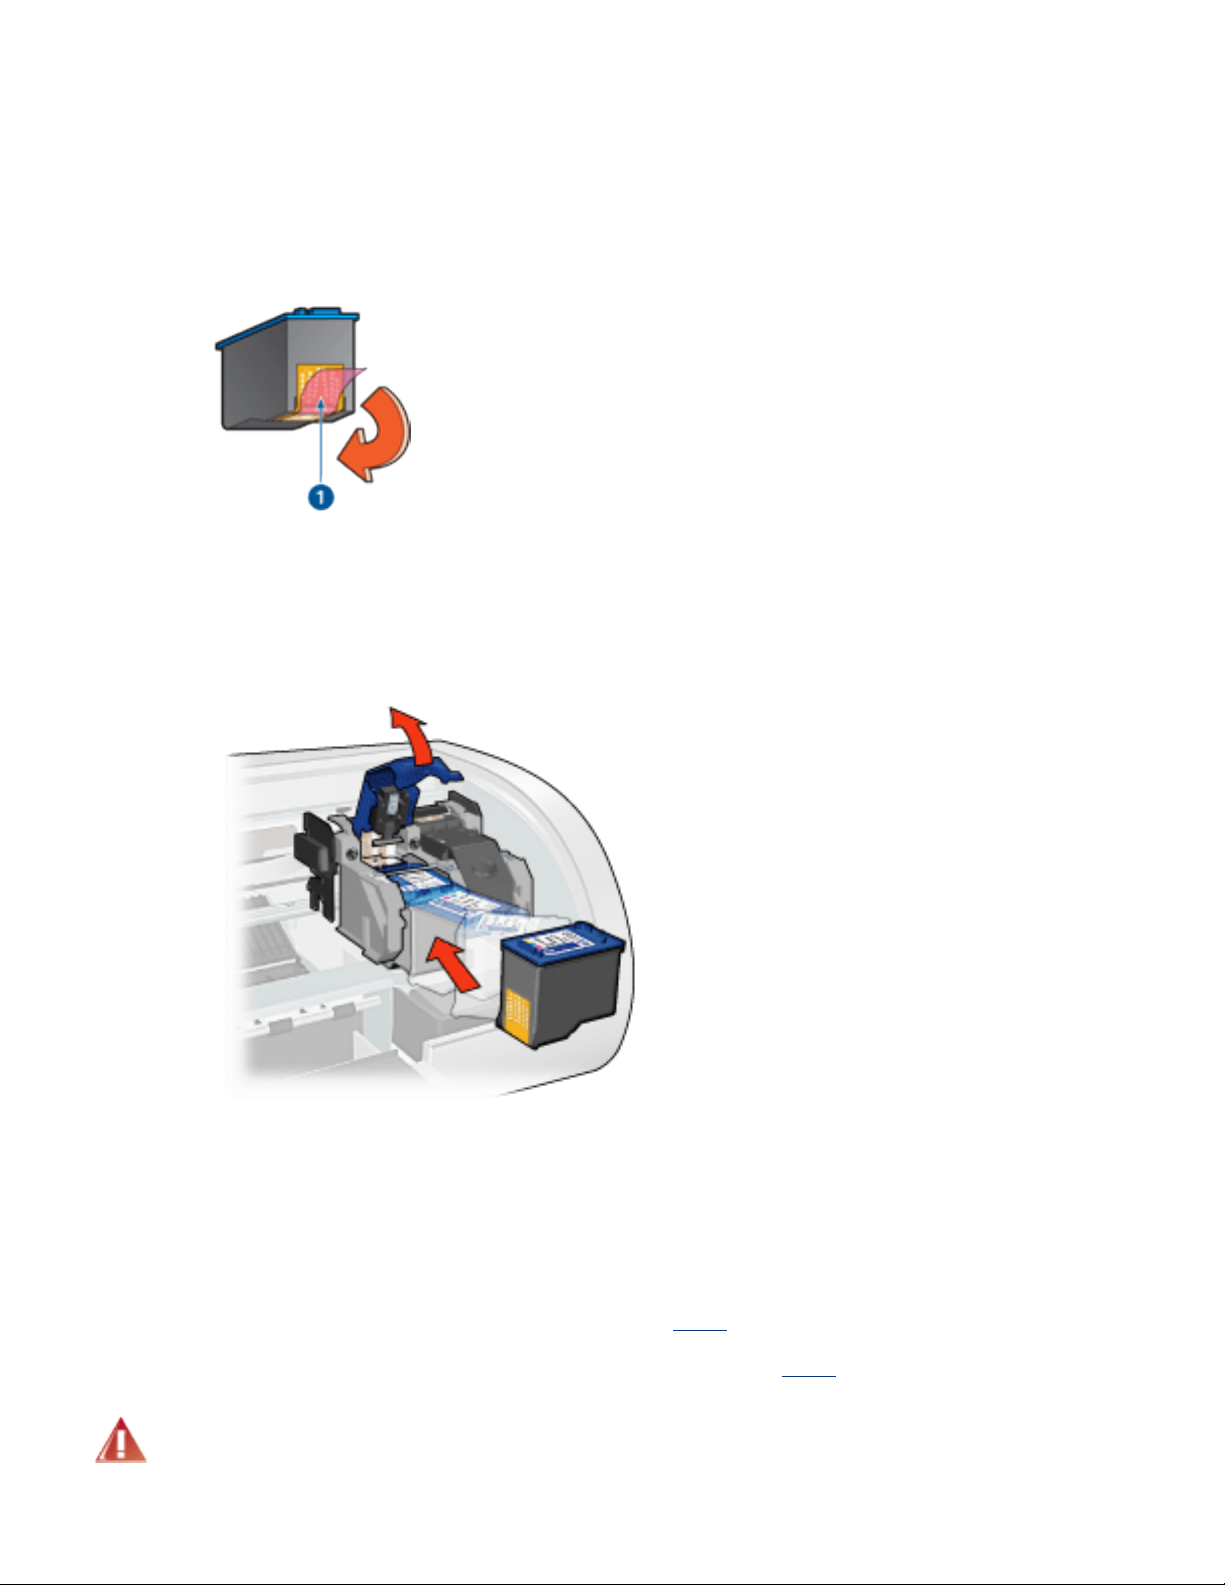
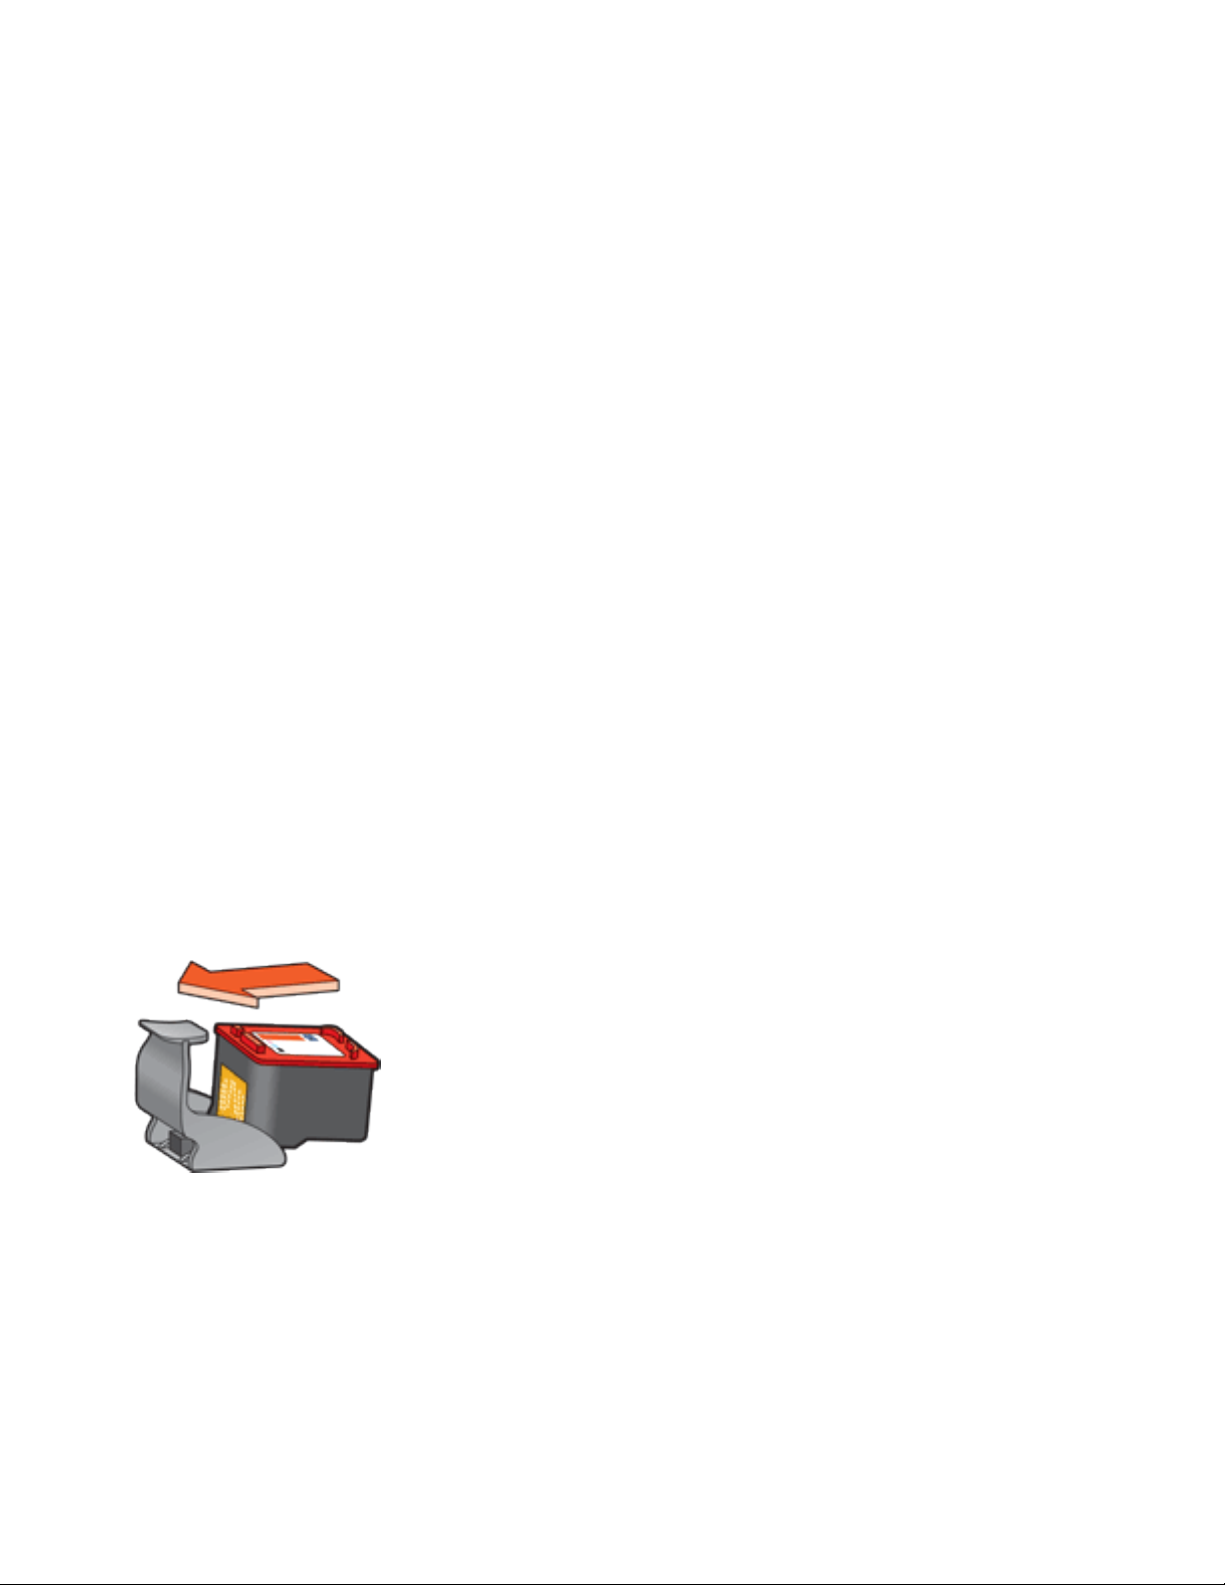
1. remove plastic tape
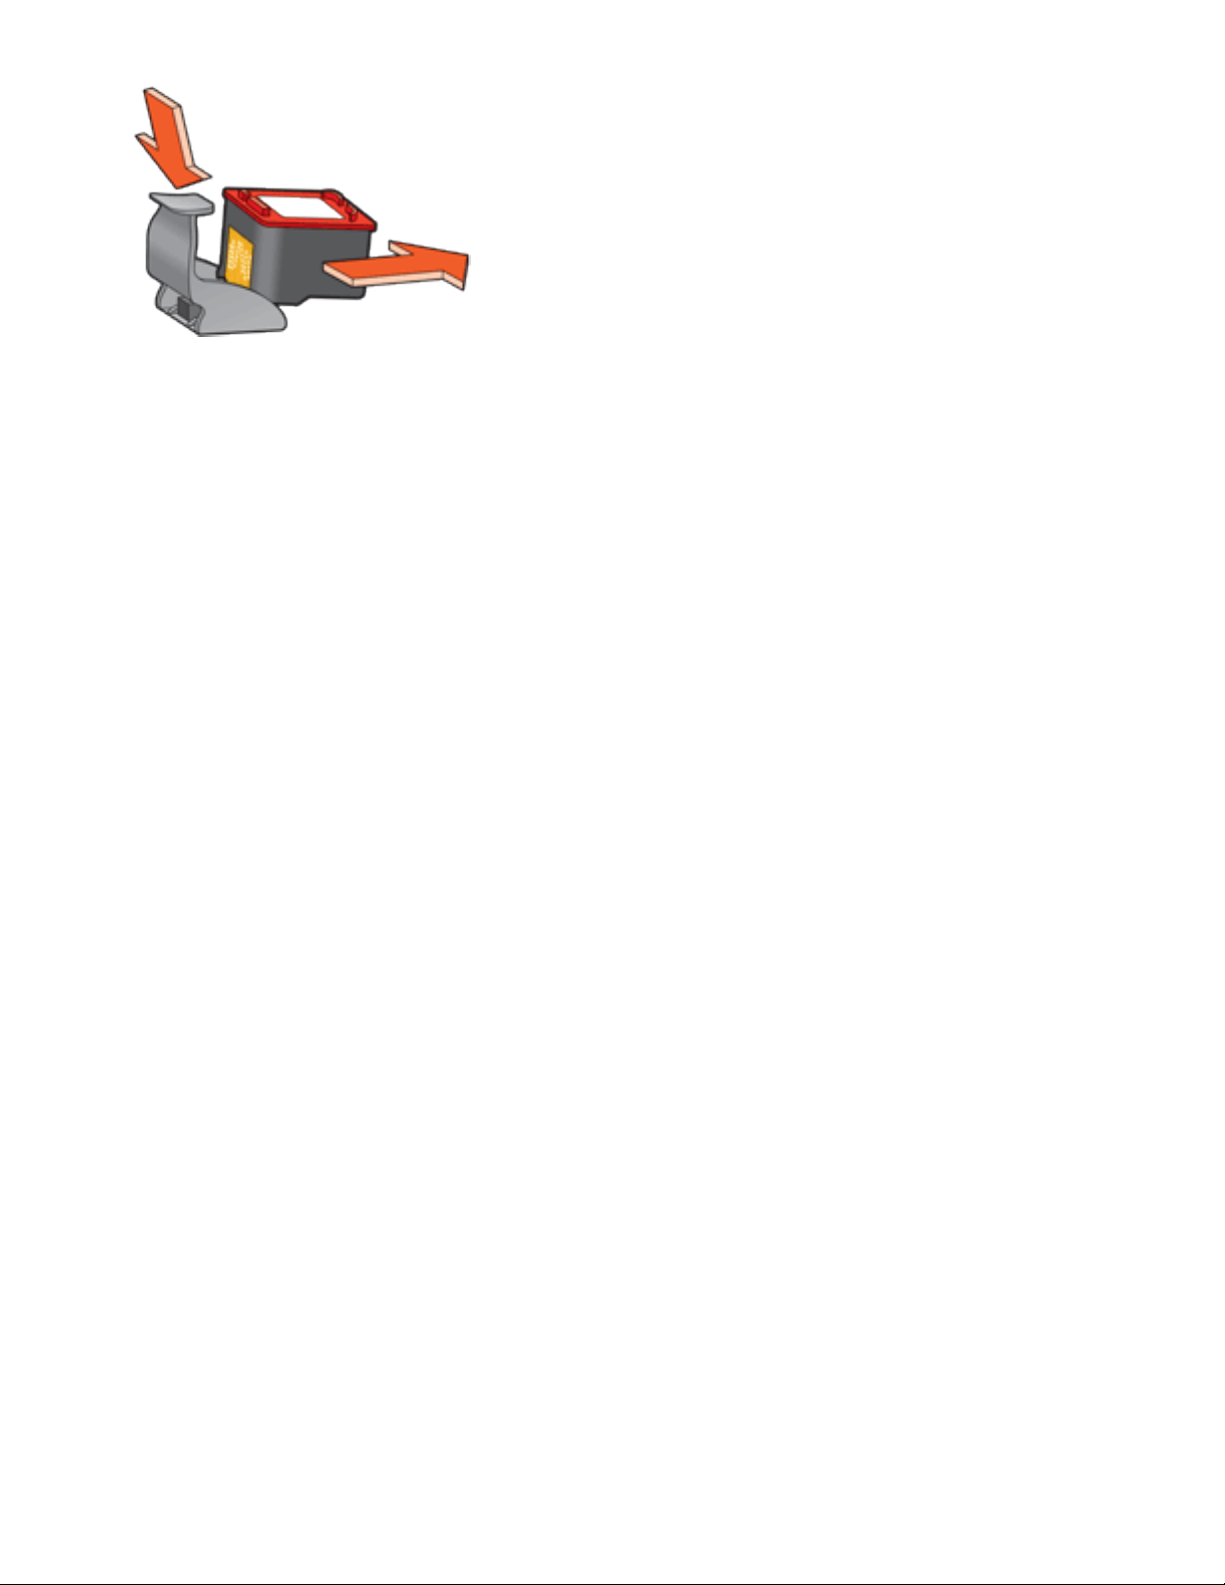
7. Hold the print cartridge so that the copper strip is on the bottom and facing
toward the printer, then slide the print cartridge into the cradle as shown.
8. Push down on the print cartridge latch until it snaps closed.
9. Close the top cover.
The printer automatically prints a calibration page.
For information on storing print cartridges, click here.
For information on recycling empty print cartridges, click
here.
Warning! Keep both new and used print cartridges out of the reach
of children.
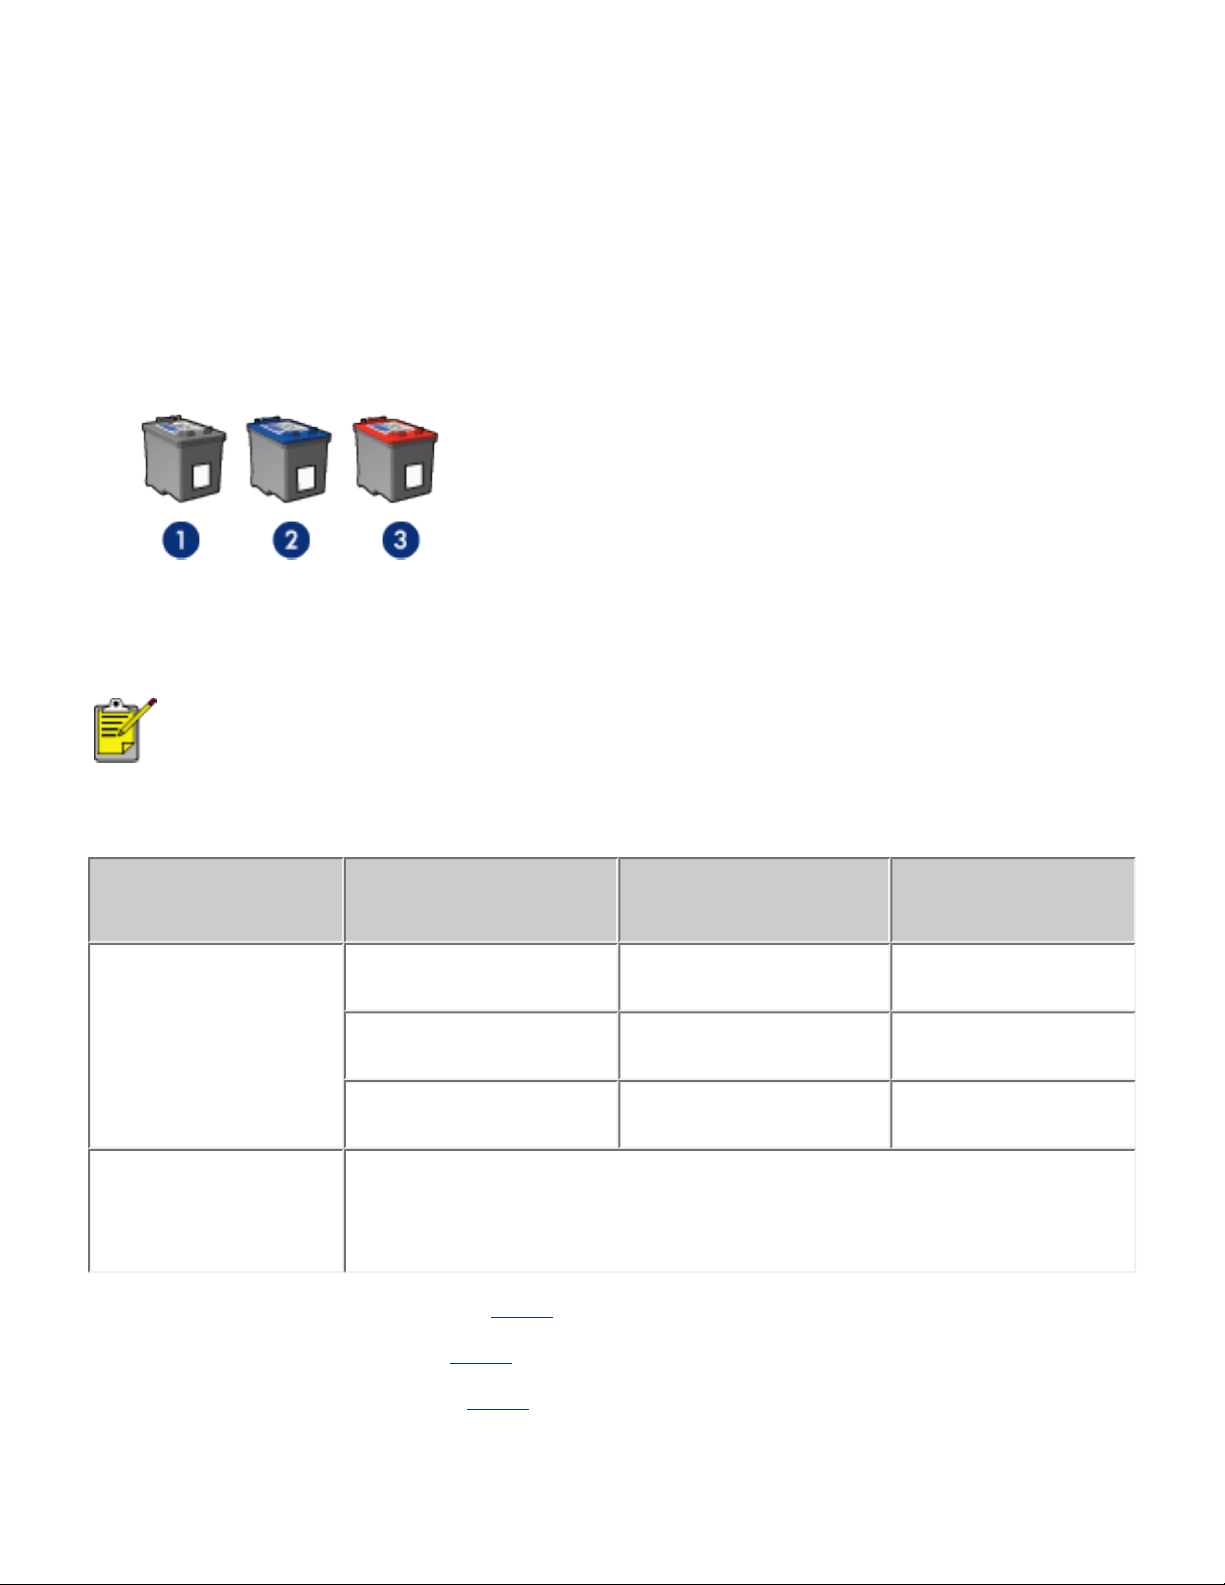
print cartridges
These print cartridges can be used with the printer.
● black print cartridge
● tri-color print cartridge
● photo print cartridge
1. black print cartridge 2. tri-color print cartridge 3. photo print cartridge
Not all print cartridges may be packaged with your printer.
All print cartridges are not available in all countries/
regions.
print cartridge selection
printer model print cartridge
selection
number
product
number
HP Deskjet
5100 Series
(except HP
Deskjet 5168)
black
56
c6656
tri-color
57
c6657
photo
58
c6658
HP Deskjet
5168
Please refer to the graphic instructions located under the
printer cover, or the hardcopy reference guide that was
included with your printer.
For installation instructions, click
here .
For storage instructions, click
here .
For recycling instructions, click
here .

For print cartridge ink capacity, see the information included in the
print cartridge packaging.
For great performance from your HP printer, use only genuine, factory-filled HP print
cartridges.
Caution! Damage that is directly attributable to modified or refilled
HP print cartridges is specifically excluded from the HP printer's
warranty coverage.
maintaining print cartridges
The following tips will help maintain HP print cartridges and ensure consistent print
quality:
● Keep all print cartridges in their sealed packages until they are needed. Print
cartridges should be stored at room temperatures (15-35 degrees C or 59-95
degrees F).
● Do not remove the plastic tape covering the ink nozzles until you are ready to
install the print cartridge in the printer. If the plastic tape has been removed
from the print cartridge, do not attempt to reattach it. Reattaching the tape
damages the print cartridge.
storing print cartridges
When print cartridges are removed from the printer, store them in a print cartridge
protector or an airtight plastic container.
A print cartridge protector comes with the photo print cartridge. If you store the print
cartridge in an airtight plastic container, make sure that the ink nozzles face down
but are not in contact with the container.
inserting the print cartridge into the print cartridge protector
Slide the print cartridge at a slight angle into the protector, and snap it securely in
place.
removing the print cartridge from the print cartridge protector
Press down and back on the top of the protector to release the cartridge. Slide the
cartridge out of the protector.
Caution! Do not drop the print cartridge. Dropping the print cartridge
may damage it.

print cartridge recovery
Customers interested in recycling their genuine HP print cartridges can participate in
HP's empty print cartridge return and recycle program. HP offers this program in
more countries/regions than any other print cartridge manufacturer in the world. This
program is provided as a free service to HP customers as an environmentally sound
solution for these products at end-of-life. It is not available in all countries/regions.
To participate, simply request postage-paid return envelopes or bulk boxes via the
Web at www.hp.com/recycle.
Because HP's unique recycling processes are very sensitive to material
contamination, we cannot take back and recycle cartridges from other manufacturers.
The end products of the recycling process are used in the manufacture of new
products, and HP must ensure the composition of the material is consistent. To do
that, we recycle only HP original cartridges. This program does not extend to refilled
cartridges.
Returned cartridges are separated for purification into raw materials for use in other
industries to manufacture new products. Examples of products made from recycled
HP print cartridge materials include automobile parts, trays used in microchip
fabrication processes, copper wire, steel plates, and the precious materials used in
electronics. Depending on the model, HP is able to recycle up to 65% of the print
cartridge by weight. The remaining parts that cannot be recycled (ink, foam, and
composite parts) are disposed of in an environmentally responsible manner.
print settings
The printer is controlled by software installed on your computer. Use the printer
software, known as the printer driver, to change the print settings for a document.
To change the print settings, open the Printer Properties dialog box.
displaying the printer properties dialog box
Follow these steps to display the Printer Properties dialog box:
1. Open the file you want to print.
2. Click File > Print, then select Properties. The Printer Properties dialog box
appears.
The path to the Printer Properties dialog box may vary depending
on the software program.
using the printer properties dialog box
The Printer Properties dialog box has several tools that make it easy to use.
buttons and menus
The Printer Properties dialog box has the following features:
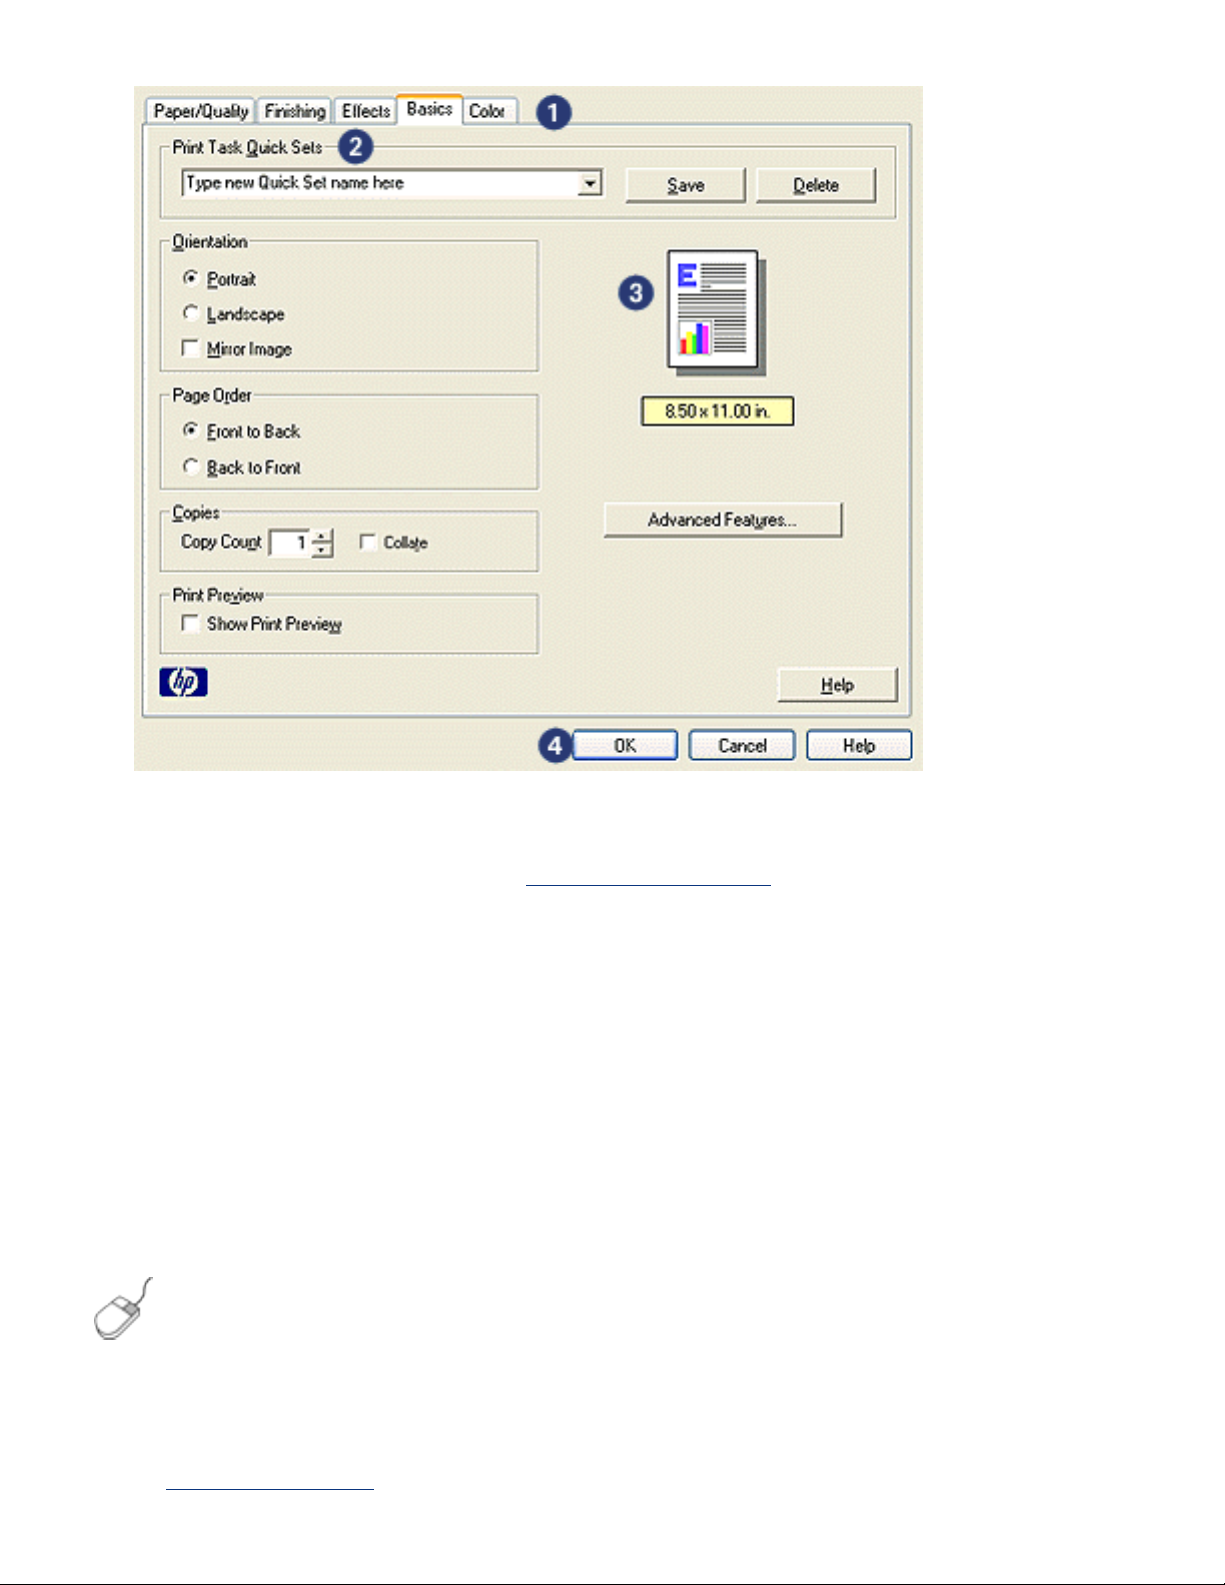
1. Tabs: Click a tab to see its contents.
2. Print Task Quick Sets: See
print task quick sets.
3. Preview: Shows how changes to the print settings affect the printout.
4. Buttons:
❍ OK: Saves and applies changes.
❍ Cancel: Closes the dialog box without saving the new settings.
❍ Help: Offers instructions for using the What's This? help feature.
An Apply button may also appear. The Apply button saves changes to the
settings without closing the dialog box.
To find more information about options on each tab screen, point to
an option and click the right mouse button to display the What's
This? dialog box. Click What's This? to view more information about
the selected item.
tabs
● paper/quality tab

● finishing tab
● effects tab
● basics tab
● color tab
Printer features, and instructions on how to use them, are subject
to change. This document was released for publishing before all of
the printer features were determined.
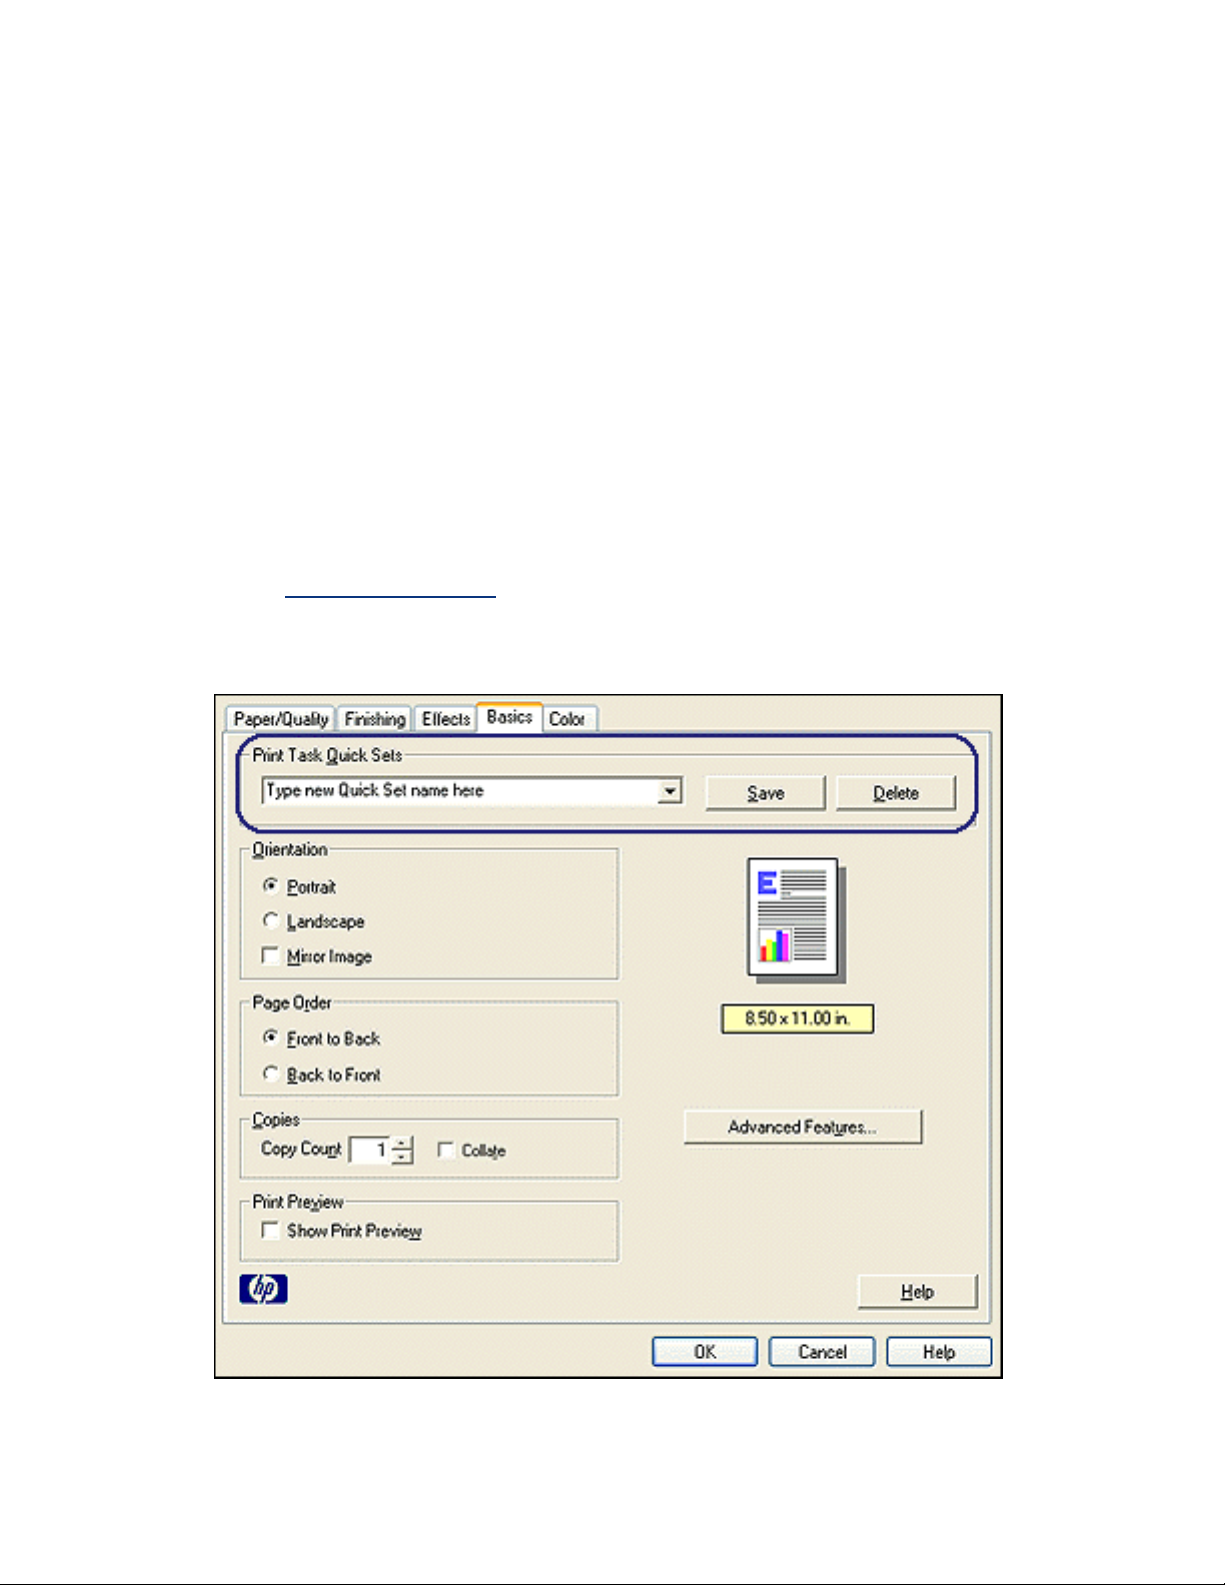
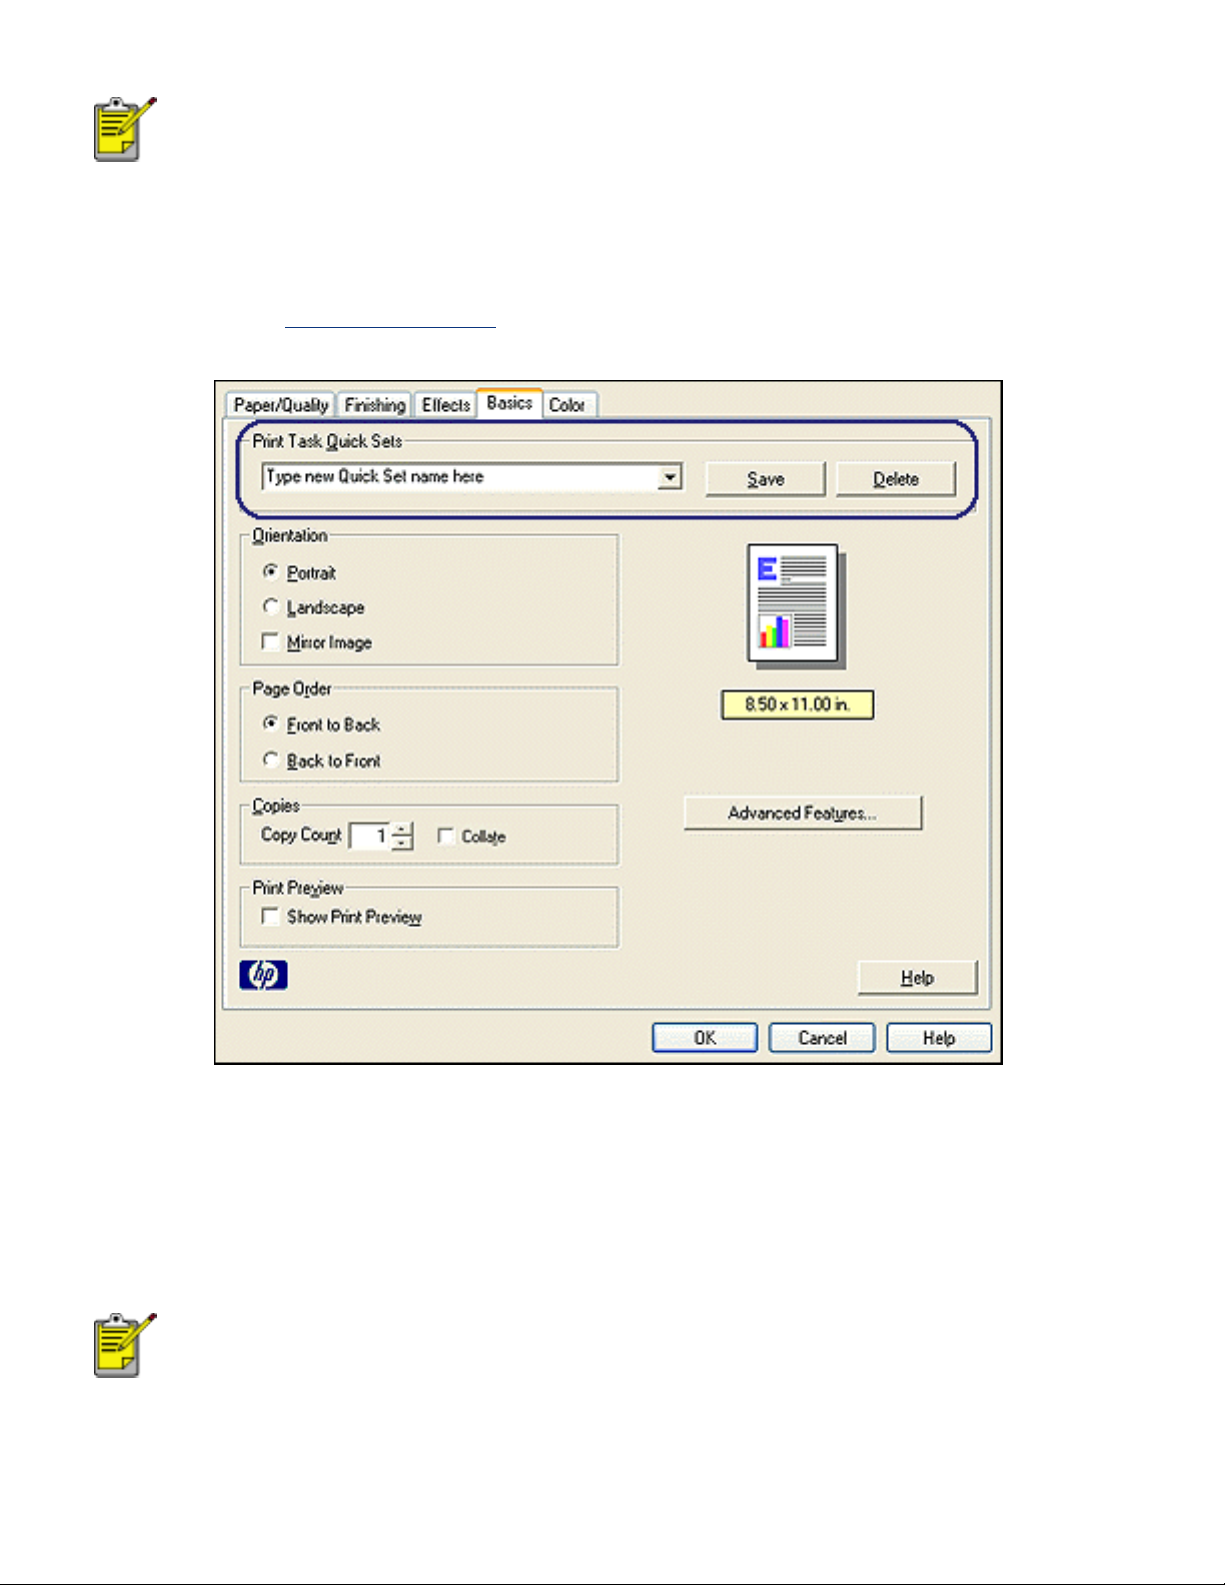
print task quick sets
Use print task quick sets to print with or save print settings you use often.
For example, if you frequently print envelopes, you can create a print task that
contains the paper size, print quality, and orientation setting you normally use for
envelopes. After creating the print task, simply select it when printing envelopes
rather that setting each of the print settings separately.
Create your own print task or use the specially designed print tasks available in the
Print Task Quick Sets drop-down list.
using a print task quick set
Follow these steps to use a print task quick set:
1. Open the
Printer Properties dialog box.
2. Select the print task you want to use from the drop-down list.
3. Click OK.
To restore default print settings, select Default Print Settings from
the Print Task Quick Sets drop-down list, and click OK.
creating a print task quick set
Follow these steps to create a print task quick set:
1. Open the
Printer Properties dialog box.
2. Select the options you want to include in the new print task.
3. Enter a name for the new print task in the Print Task Quick Sets drop-down
list, then click Save.
The print task quick set is added to the drop-down list.
If you add more options to the print task, you must rename the
print task, then click OK.
deleting a print task quick set
Follow these steps to delete a print task quick set:

1. Open the Printer Properties dialog box.
2. Select the print task you want to delete from the drop-down list, then click
Delete.
Some print task quick sets cannot be deleted.
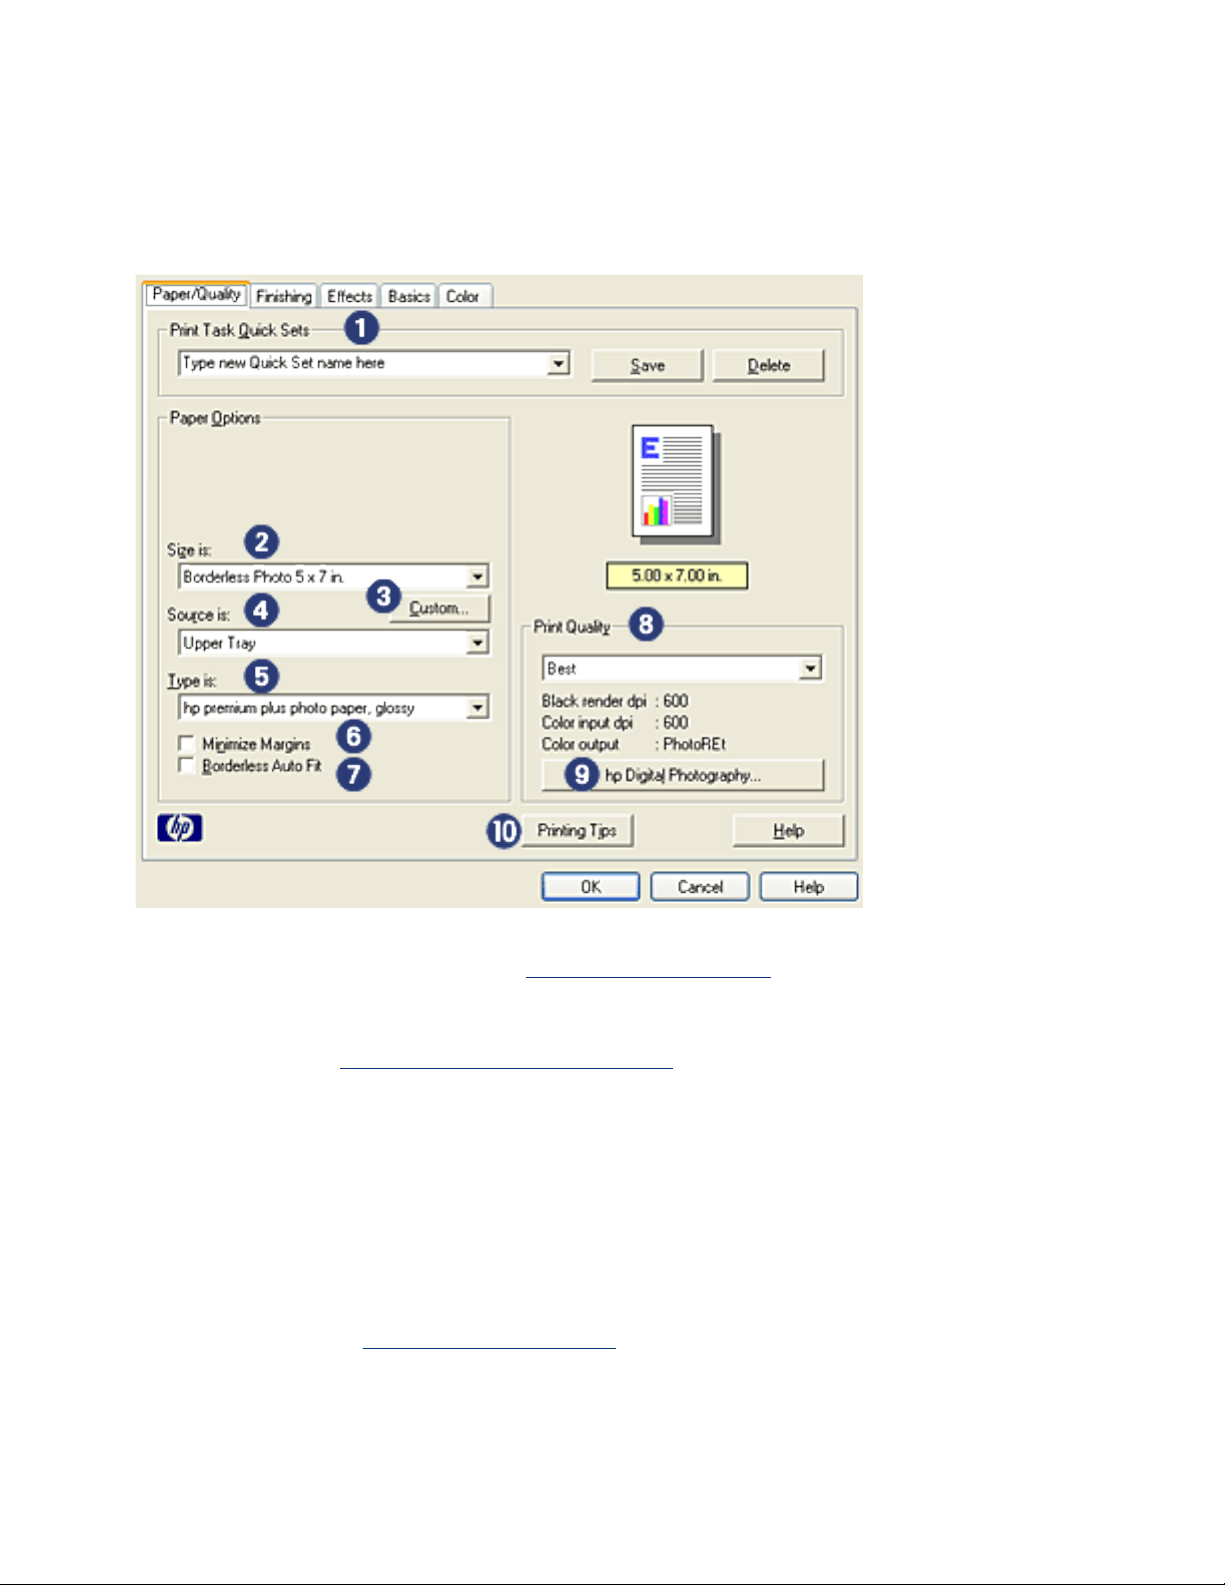
paper/quality tab
The Paper/Quality tab allows you to set these options:
1. Print Task Quick Sets: See
print task quick sets.
2. Size is: Size of paper used.
3. Custom: See
setting a custom paper size.
4. Source is: Select the tray from which you want to print. Select Upper Tray to
print from the printer's In tray.
5. Type is: Type of paper used.
6. Minimize Margins: Select to print closer to the bottom edge of the page. This
feature may cause ink to smear on certain paper types.
7. Borderless Auto Fit: Select to fit the printed image across the entire page
when printing a
borderless document on certain paper types.
8. Print Quality: There are five print quality options: FastDraft, Fast Normal,
Normal, Best, and Maximum dpi. As print quality increases from FastDraft to
Maximum dpi, the quality of the printed image improves and the print speed
decreases. FastDraft uses the least amount of ink. Maximum dpi mode uses

the most amount of ink and requires a large amount of disk space.
9. hp Digital Photography: See printing digital photographs.
10. Printing Tips: Printing ideas.

setting a custom paper size
Use the Custom Paper Size dialog box to print on a special paper size.
defining a custom paper size
Follow these steps to define a custom paper size:
1. Open the
Printer Properties dialog box.
2. Click the Paper/Quality tab.
3. Click the Custom button.
The Custom Paper Size dialog box is displayed.
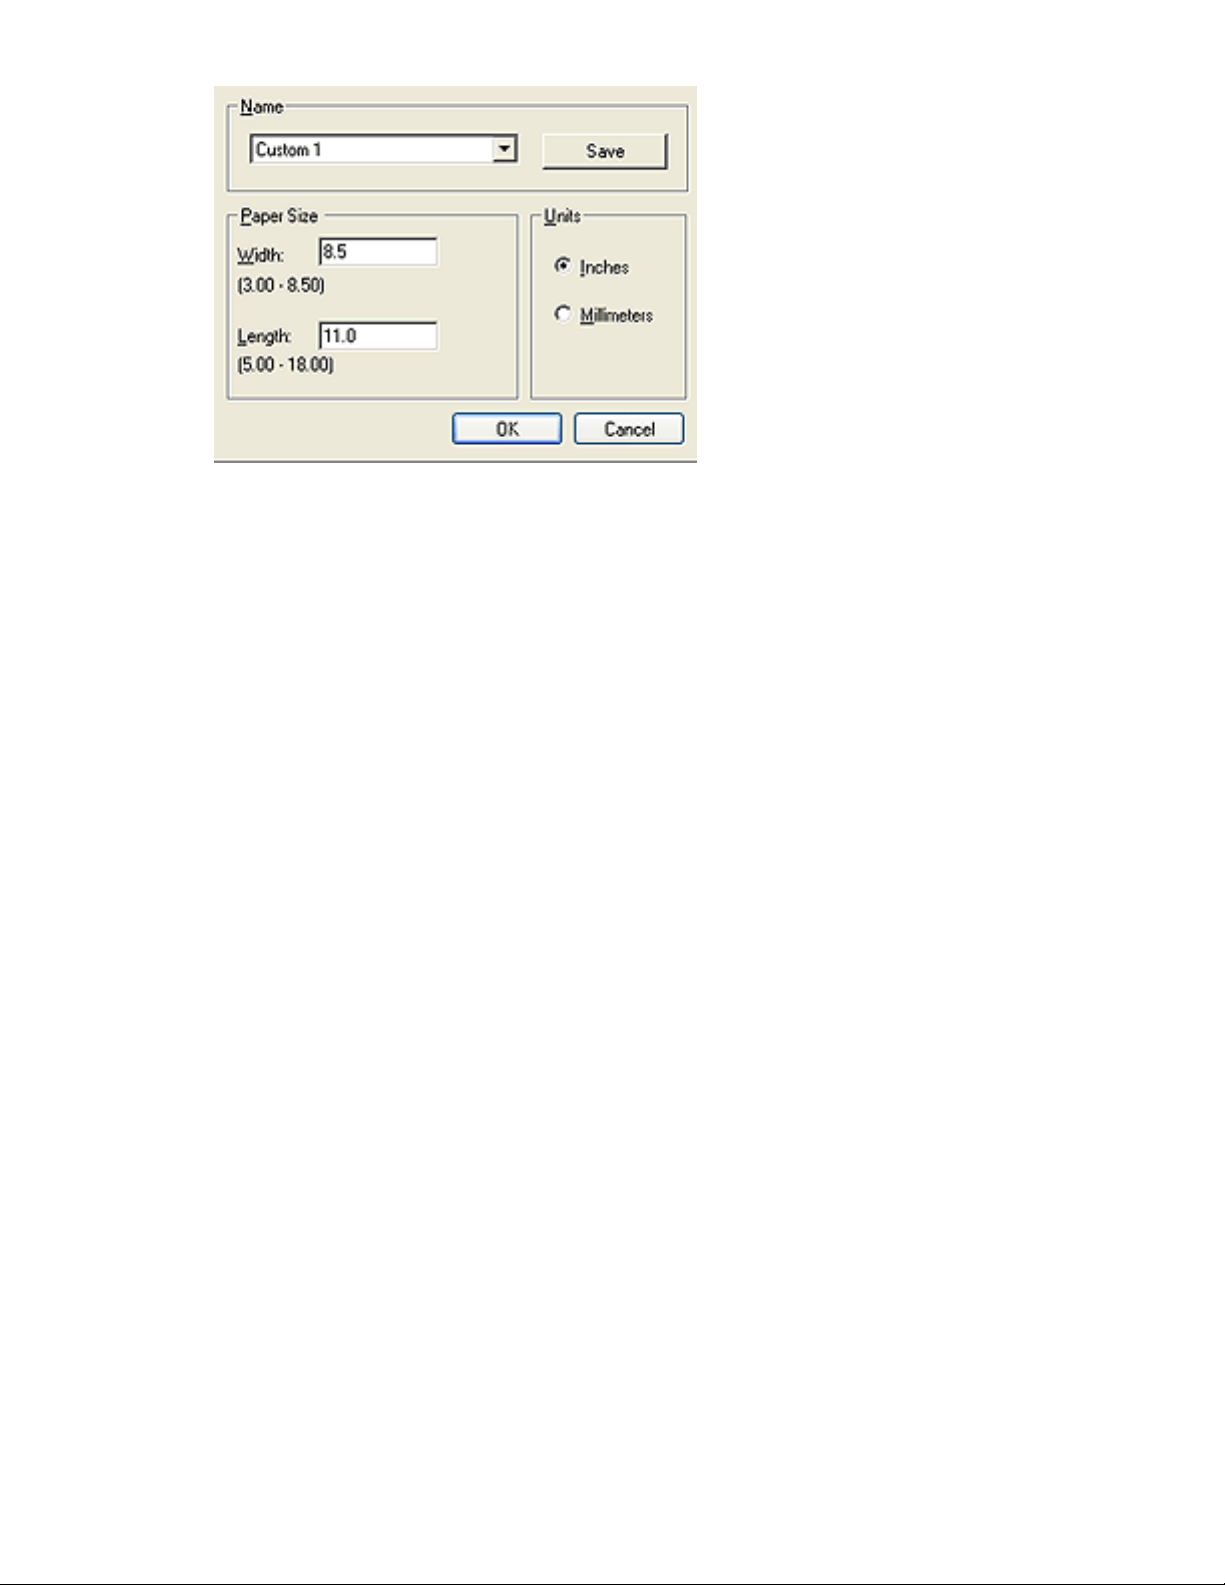
4. Select a custom paper size name from the Name drop-down list.
5. Enter the paper dimensions in the Width and Length boxes.
The minimum and maximum paper dimensions appear beneath each of the
boxes.
6. Select the unit of measurement: Inches or Millimeters.
7. Click Save to save the custom paper size.
You can save up to five custom paper sizes.
8. Click OK to exit the Custom Paper Size dialog box.

printing digital photographs
The printer has several features to enhance the quality of digital photographs.
opening the hp digital photography options dialog box
Follow these steps to open the hp Digital Photography Options dialog box:
1. Open the
Printer Properties dialog box.
2. Click the Paper/Quality tab, then click the hp Digital Photography button.
using the hp digital photography options dialog box
Use the hp Digital Photography Options dialog box to set these options:
1. Red Eye Removal: Click On to remove or reduce red-eye from the
photograph.
2. Contrast Enhancement: Adjust contrast to preference. Click Automatic to
allow the printer driver to automatically balance the contrast.
3. Digital Flash: Lighten dark images. Click Automatic to allow the printer driver
to automatically balance lightness and darkness.
4. SmartFocus: Click On to allow the printer driver to automatically focus

images.
5. Sharpness: Adjust image sharpness to preference. Click Automatic to allow
the printer driver to automatically sharpen the image.
6. Smoothing: Adjust distortion to preference. Click Automatic to allow the
printer driver to automatically smooth the image.
Loading...