


HP Deskjet 6980 series
Setup Guide Guide d'installation
Guía de configuración

Start here
Follow these steps to set up the hardware and connect the HP Deskjet printer to the network or directly to your computer. If you have connection problems during setup, see the “Troubleshooting a wireless connection” or “Troubleshooting an Ethernet connection” section of the network guide.
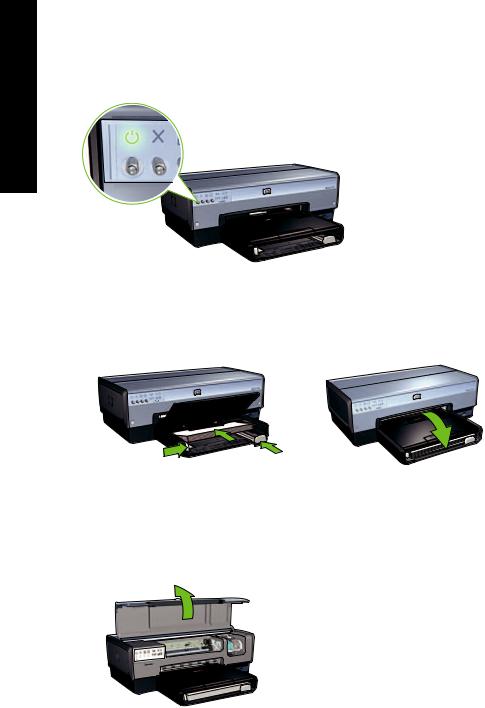
Locate components |
Remove tape and packing material |
from inside and around the printer. |
|
|
Tri-color print cartridge |
|
Black print cartridge |
Power supply |
Ethernet cable |
Power cord
USB cable*
Reference guide
Network guide
Printer software CD (Win/Mac) (Includes the onscreen user guide)
*Purchased separately, if needed
The contents of your box may differ. Additional equipment needed for network setup is specified later in this guide.
Plug in the power supply
English
HP Deskjet 6980 Series Setup Guide |
1 |
|
|
English
Turn on the printer
Load the paper
1 |
2 |
Load white paper. |
Lower the tray. |
Open the cover
2 |
HP Deskjet 6980 Series Setup Guide |
|
|

Remove the pink tape
English
Do not touch or remove the copper
strip.
Insert the print cartridges
For each cartridge, raise cradle latch, insert print cartridge, then close cradle latch.
Close the cover
After installing both print cartridges, close top cover.
The printer will automatically align the new print cartridges.
HP Deskjet 6980 Series Setup Guide |
3 |
|
|
English
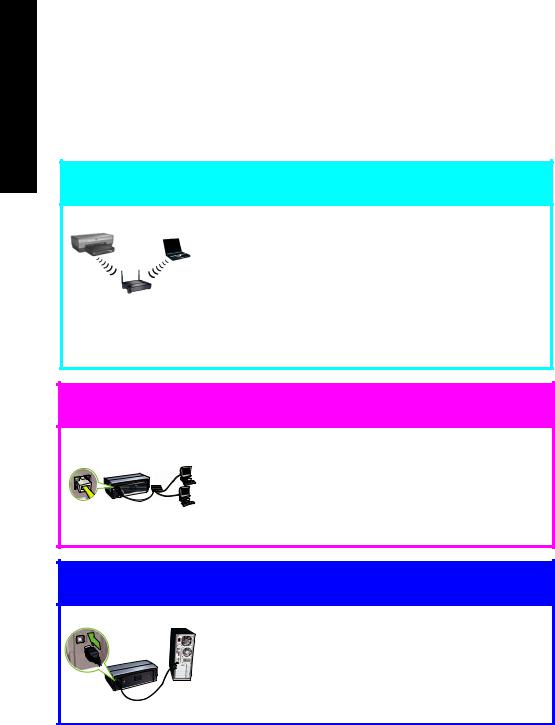
Choose ONE connection type (A, B, or C)
Note: If you have a personal firewall other than Windows XP, follow the “Configuring the printer for a software firewall” instructions in the network guide before connecting the printer to the network.
A: Wireless (access point) connection
Use this connection type if you want a wireless (802.11b or g) connection between the printer and your network.
Requires a wireless hub or access point.*
For a wireless access point connection, go to Section A on page 5 for instructions.
*If you do not have an access point, but you want to connect your computer to the printer, see “Wireless ad hoc network setup” on page 12.
B: Ethernet (wired) network
Use this connection type if you want an Ethernet cable connection between the printer and your network.
Equipment needed: hub/router/switch and Ethernet cable.
For an Ethernet connection, go to Section B on page 11 for instructions.
C: USB connection
Use this connection type if you want to connect the printer directly to one computer.
Equipment needed: USB cable.
For a USB connection, go to Section C on page 11 for instructions.
4 |
HP Deskjet 6980 Series Setup Guide |
|
|

Section A. Wireless (access point) network
Choose ONE method for entering wireless settings
A1 SecureEasySetup
Requires: Access point with SecureEasySetup and a network currently set up with WPA security
For SecureEasySetup instructions, go to Section A1.
OR
 A2 Connect Now
Requires: Windows XP Service Pack 2 and a USB flash drive to use the Windows Connect Now feature
For Connect Now instructions, go to Section A2.
OR
 A3
A3 Using an Ethernet cable
If your access point does not support either SecureEasySetup or the Connect Now features, you can set up the wireless connection manually.
Requires: Ethernet cable (used temporarily when installing the printer software and configuring its wireless settings during the first installation on the network)
For reference during setup, write down the following wireless settings:
•Network name (also called SSID)
•WEP/WPA passphrase or passkey (if needed)
If you do not have this information, see the onscreen user guide or the documentation that came with your wireless access point.
For manual connection instructions, go to Section A3.
English
HP Deskjet 6980 Series Setup Guide |
5 |
|
|
English
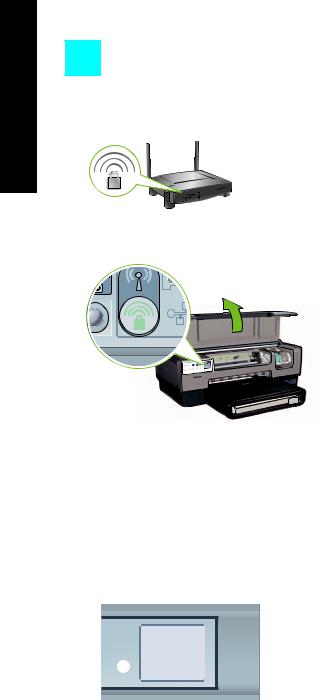
A1 Wireless: SecureEasySetup
Follow these steps to set up a wireless network connection using SecureEasySetup:
1.Push the SecureEasySetup button on the router/access point.
2.Lift the cover of the printer, and then push the SecureEasySetup button on the printer.
The network name, or “Service Set Identifier (SSID)” is now set and Wi-Fi Protected Access (WPA) security is activated.
3.Close the printer cover.
4.Insert the printer software CD in the computer CD-ROM, and then follow the onscreen instructions.
5.On the Connection Type screen, select Wireless, and then click Next.
6.Follow the onscreen instructions to complete the software installation.
The SecureEasySetup connection is successful when both the Wireless Status light and the Network light on the printer front panel transition from blinking to ON.
If you have additional computers on your network that will use the printer, follow the instructions on page 12 to install the printer software on each computer.
6 |
HP Deskjet 6980 Series Setup Guide |
|
|

A2 Wireless: Connect Now
Follow these steps to use the Windows Connect Now feature and a USB drive to configure the printer for your wireless network:
1.From Windows Control Panel, click Wireless Network Setup Wizard. Follow the onscreen instructions.
2.When prompted, enter the network name of the wireless network, then do one of the following tasks:
•To let Windows create the settings, select the automatic option.
•To create the settings yourself, select the manual option.
Note: If the router on your network does not support the use of the Windows Connect Now feature, you must select the manual option. If you select the manual option, you must know the wireless network security settings. Consult the configuration utility for the computer wireless network card or the network Wireless Access Point (WAP) for the security settings.
3.Follow the onscreen instructions until you are prompted to remove the USB drive from the computer.
4.With the printer powered on, plug the USB drive into the front USB port of the printer.
5.Wait for the printer lights to flash simultaneously three times.
6.Plug the USB drive into the computer, and then follow the onscreen instructions to complete the Wireless Network Setup Wizard.
7.Insert the printer software CD in the computer CD-ROM drive, and then follow the onscreen instructions.
8.On the Connection Type screen, select Wireless, and then click Next.
9.Follow the onscreen instructions to complete the software installation.
If you have additional computers on your network that will use the printer, follow the instructions on page 12 to install the printer software on each computer.
English
HP Deskjet 6980 Series Setup Guide |
7 |
|
|
English
A3 Wireless: Using an Ethernet cable
Follow these steps to temporarily connect an Ethernet cable to configure the printer for your wireless network:
Note: Once the printer is configured for wireless communication, the setup wizard prompts you to remove the cable.
1.Use an Ethernet cable to connect the printer to an Ethernet port on the network, such as an available Ethernet port on a Wireless Access Point (WAP), router, hub, or wall socket.
2. Verify that the Network icon is on. If not, check the cable connections.
3. Install the printer software.
Windows users
a.Insert the printer software CD in the computer CD-ROM, and then follow the onscreen instructions.
b.On the Connection Type screen, select Wireless, and then click Next.
c.Follow the onscreen instructions to complete the software installation.
8 |
HP Deskjet 6980 Series Setup Guide |
|
|
Macintosh users |
|
|
a. |
Insert the printer software CD in the computer CD-ROM drive, and then |
|
|
double-click the CD desktop icon. |
English |
b. |
instructions. |
|
Double-click the HP Deskjet 6980 installer icon, and then follow the onscreen |
|
|
c. |
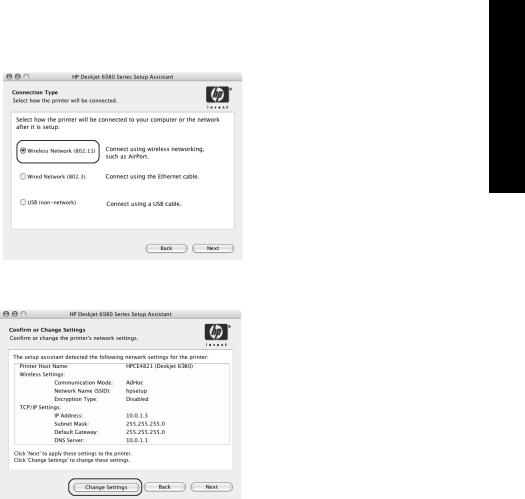
On the Connection Type screen, select Wireless Network (802.11), and then |
|
|
click Next. |
|
d. |
Proceed through the next several screens to find the printer on the network. |
|
e. |
On the Confirm or Change Settings screen, click the Change Settings button. |
|
f.On the Change Settings screen, click the Change Settings button. The printer’s embedded Web server (EWS) opens.
g.On the EWS, click the Networking tab.
h.Under the Connections heading, click Wireless (802.11).
i.On the Wireless (802.11) Interface screen, click the Start Wizard button to start the Wireless Configuration Wizard.
HP Deskjet 6980 Series Setup Guide |
9 |
|
|
|
j. |
Follow the onscreen instructions to configure the printer settings. |
||
|
k. |
After the Wireless Configuration Wizard is finished, close the EWS. |
||
English |
l. |
On the Confirm or Change Settings screen, click Next. |
||
m. |
Follow the onscreen instructions to complete the printer software installation. |
|||
|
||||
|
n. |
On the Add Printer screen, click Open Print Center (Mac OS X 10.2) or Open |
||
|
|
Printer Setup Utility (Mac OS X 10.3 or later). |
||
|
o. |
Click Add Printer. |
|
|
|
p. |
Do one of the following depending on the version of Mac OS X you are |
||
|
|
using: |
Mac OS X 10.2.2 and earlier |
|
|
|
|||
|
|
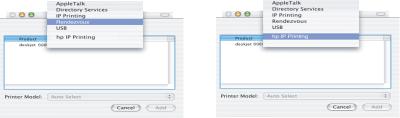
Mac OS X 10.2.3 and later |
||
Select Rendezvous (renamed |
Select HP IP Printing, and then click |
Bonjour in Mac OS X 10.4). |
the Discover button. |
q.Select the printer, and then click the Add button.
r.Close Print Center (Mac OS X 10.2) or Printer Setup Utility (Mac OS X 10.3 or later).
If you have additional computers on your network that will use the printer, follow the instructions on page 12 to install the printer software on each computer.
10 |
HP Deskjet 6980 Series Setup Guide |
|
|
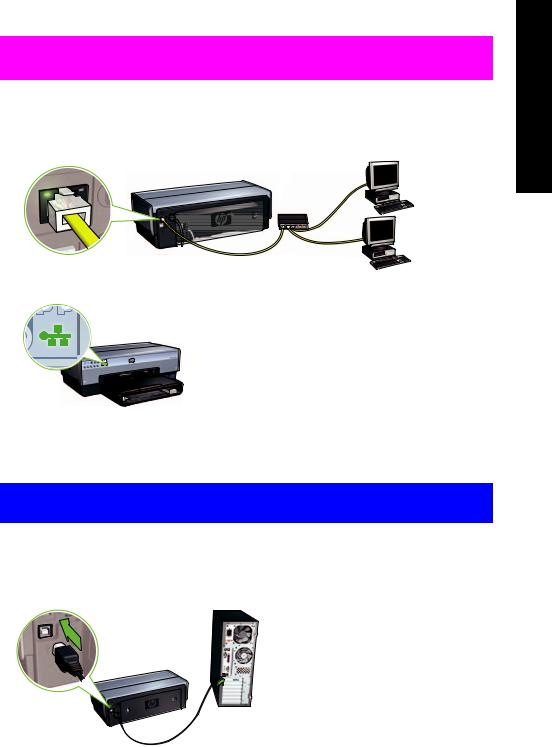
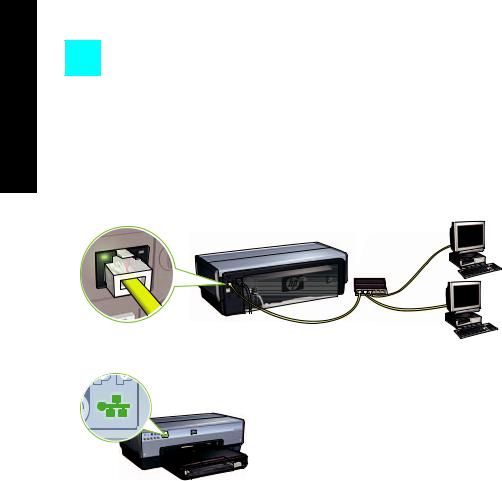
Section B. Ethernet (wired) network
1. Use an Ethernet cable to connect the printer to the network hub, switch, or router. |
English |
|
|
Note: A network cable and a USB cable cannot be used at the same time. |
|
2. Verify that the Network icon is on. If not, check the cable connections.
3.Insert the printer software CD in the computer CD-ROM drive, and then follow the onscreen instructions.
Go to page 12 to set up additional computers.
Section C. USB connection
1.Connect the printer to the computer with the USB cable. Wait for a wizard screen.
2.Insert the printer software CD in the computer CD-ROM drive, and then follow the onscreen instructions.
Windows XP: During installation, when prompted, select hpfipna.inf.
HP Deskjet 6980 Series Setup Guide |
11 |
|
|
English
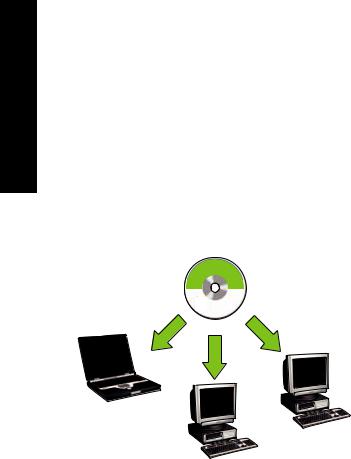
Install software on additional computers
If you have additional computers on your network, install the printer software on each computer that will use the printer. Follow the onscreen instructions. Make sure that you choose the connection type between the network and your printer (not between your computer and the network). Select Wired if the printer is connected to the network with a wired connection or select Wireless if the printer is connected to the network with a wireless connection.
Once you have set up your printer on the network, you will not need to configure it again when you add additional computers. During the installation of a wireless connection, the software will discover the SSID (network name) of the existing network.
Wireless ad hoc network setup
An ad hoc wireless network is a direct wireless connection between a computer and the printer without a wireless hub or router. It is not secure and is separate from any existing networks. Ad hoc connections are sometimes used to configure the printer for a wireless network or can be used when no wireless network exists.
Devices on the ad hoc network must:
•Be 802.11b compatible (includes 802.11g devices)
•Have ad hoc as the communication mode
•Have the same network name (SSID)
•Be on the same subnet
•Be on the same channel
•Have the same wireless security settings
12 |
HP Deskjet 6980 Series Setup Guide |
|
|
Follow these steps to connect to the printer using the factory default ad hoc network settings:
Windows users
1.Verify the printer is powered on and idle, and that the blue Wireless Status light is illuminated. If the Wireless Status light is not illuminated:
a.Open the top cover of the printer.
b.Press the SES button twice (two presses within 3 seconds). The wireless radio (and the Wireless Status light) will turn on and stay on.
c.Close the top cover.
2.Search for and join the ad hoc wireless network named hpsetup. For information on searching for and joining a wireless network, see the documentation that came with your computer or wireless card.
3.Wait two minutes for the printer to obtain an IP address, and then press the HP Report button to print an HP Report page.
Note: The Network light will turn on and stay on when the printer has obtained an IP address.
4.On the HP Report page, verify the following settings:
• The network name (SSID) is hpsetup
• The communication mode is ad hoc
• The subnet mask and channel match those of your wireless network
• The IP address is something other than 0.0.0.0
If one of the above is not true, repeat steps 1 through 3.
5.Insert the printer software CD in the computer CD-ROM drive, and then follow the onscreen instructions.
6.On the Connection Type screen, select Wireless, and then click Next.
7.Follow the onscreen instructions to complete the software installation.
English
HP Deskjet 6980 Series Setup Guide |
13 |
|
|

English
Additional computers
You must install the printer software on each computer that will use the printer. Follow steps 5 through 7 above to install the printer software on other network computers.
Advanced setup
For instructions on configuring the printer to operate on ad hoc networks other than the hpsetup factory default, visit the HP Web site at www.hp.com/support.
802.11g
The printer defaults to 802.11b in ad hoc mode in order to be compatible with the widest assortment of 802.11 devices. If your network is made up of only 802.11g devices, then you might want to configure the printer to operate in 802.11g mode in order to optimize network performance.
Follow these steps to configure the printer to operate in 802.11g mode while connected to an ad hoc network:
1.Open the printer embedded Web server (EWS). For help opening the EWS, see the network guide.
2.Click the Networking tab.
3.Under the Connections heading, click Wireless (802.11).
4.Click the Advanced tab.
5.Scroll to the bottom of the Web page, and clear the In an ad hoc network use 802.11b behavior check box.
6.Click the Apply button, and then close the EWS.
Macintosh users
Ad hoc or computer-to-computer
1.Verify the printer is powered on and idle, and that the blue Wireless Status light is illuminated. If the Wireless Status light is not illuminated:
a.Open the top cover of the printer.
b.Press the SES button twice (two presses within 3 seconds). The wireless radio (and the Wireless Status light) will turn on and stay on.
c.Close the top cover.
2.Make sure the Airport protocol is turned on. To configure the Airport protocol, open System Preferences, double-click Network, and then choose Airport from the Show pop-up menu.
3.Insert the printer software CD in the computer CD-ROM drive, and then doubleclick the CD desktop icon.
4.Double-click the HP Deskjet 6980 installer icon, and then follow the onscreen instructions.
14 |
HP Deskjet 6980 Series Setup Guide |
|
|
5.On the Connection Type screen, select Wireless Network (802.11), and then click Next.
English
6.Proceed through the next several screens to find the printer on the network.
7.On the Confirm or Change Settings screen, click the Change Settings button.
8.On the Change Settings screen, click the Change Settings button. The printer’s embedded Web server (EWS) opens.
9.On the EWS, click the Networking tab.
10.Under the Connections heading, click Wireless (802.11).
11.On the Wireless (802.11) Interface screen, click the Advanced tab.
HP Deskjet 6980 Series Setup Guide |
15 |
|
|

|
12. |
Enter the wireless network settings for the wireless network to which you want to |
|
|
|
connect the printer: |
|
English |
|
• Under the Network Name heading, enter the network name (such as |
|
|
“MyNetwork”) in the SSID box. |
|
|
|
|
|
|
|
|
• Under the Network Settings heading: |
|
|
|
• Select Ad Hoc. |
|
|
|
• Select the channel from the Channel pop-up list. |
|
|
|
• Enter the network wireless security settings. |
|
|
13. |
After entering the wireless network settings, click the Apply button, and then close |
|
|
|||
|
|
the EWS. |
|
14. |
On the Add Printer screen, click Open Print Center. |
||
15. |
Click Add Printer. |
|
|
16. |
Do one of the following depending on the version of Mac OS X you are using: |
||
|
|
Mac OS X 10.2.3 and later |
Mac OS X 10.2.2 and earlier |
Select Rendezvous (renamed |
Select HP IP Printing, and then click |
Bonjour in Mac OS X 10.4). |
the Discover button. |
17.Select the printer, and then click the Add button.
18.Close Print Center.
16 |
HP Deskjet 6980 Series Setup Guide |
|
|
 Loading...