


DeskJet F380
Table of contents
 Loading...
HP Deskjet F300 All-in-One series
User Guide

HP Deskjet F300 All-in-One series
User Guide

© Copyright 2006 Hewlett-Packard
Development Company, L.P.
The information contained herein is
subject to change without notice.
Reproduction, adaptation or
translation without prior written
permission is prohibited, except as
allowed under copyright laws.
Adobe and the Acrobat logo are either
registered trademarks or trademarks
of Adobe Systems Incorporated in the
United States and/or other countries.
Windows®, Windows NT®, Windows
ME®, Windows XP®, and Windows
2000® are U.S. registered
trademarks of Microsoft Corporation.
Intel® and Pentium® are registered
trademarks of Intel Corporation.
Energy Star® and Energy Star logo®
are US registered marks of the United
States Environmental Protection
Agency.
Publication number: Q8130-90157
February 2006
Notice
The only warranties for HP products
and services are set forth in the
express warranty statements
accompanying such products and
services. Nothing herein should be
construed as constituting an
additional warranty. HP shall not be
liable for technical or editorial errors
or omissions contained herein.
The Hewlett-Packard Company shall
not be liable for incidental or
consequential damages in connection
with, or arising out of the furnishing,
performance, or use of this document
and the program material which it
describes.
Note: Regulatory information can be
found in Technical information.
It is not lawful in many places to make
copies of the following items. When in
doubt, check with a legal
representative first.
● Governmental paper or
documents:
– Passports
– Immigration papers
– Selective service papers
– Identification badges,
cards, or insignias
● Governmental stamps:
– Postage stamps
– Food stamps
● Checks or drafts drawn on
Governmental agencies
● Paper currency, traveler’s
checks, or money orders
● Certificates of deposit
● Copyrighted works
Safety information
Warning To prevent fire or
shock hazard, do not expose
this product to rain or any
type of moisture.
Always follow basic safety
precautions when using this product
to reduce risk of injury from fire or
electric shock.
Warning Potential shock
hazard
1. Read and understand all
instructions in the Setup Guide.
2. Use only a grounded electrical
outlet when connecting the
device to a power source. If you
do not know whether the outlet
is grounded, check with a
qualified electrician.
3. Observe all warnings and
instructions marked on the
product.
4. Unplug this product from wall
outlets before cleaning.
5. Do not install or use this product
near water or when you are wet.
6. Install the product securely on a
stable surface.
7. Install the product in a protected
location where no one can step
on or trip over the power cord,
and where the power cord will
not be damaged.
8. If the product does not operate
normally, see the onscreen
Troubleshooting help.
9. No operator-serviceable parts
inside. Refer servicing to
qualified service personnel.
10. Use in a well-ventilated area.
11. Use only with the power adapter
supplied by HP.
Warning This equipment
will be inoperable when
main power fails.

Contents
1 HP All-in-One overview........................................................................................3
The HP All-in-One at a glance................................................................................3
Control panel buttons.............................................................................................4
Status light overview...............................................................................................5
2 Find more information.......................................................................................... 7
Sources of information............................................................................................7
3 Connection information.......................................................................................9
Supported connection types...................................................................................9
Connect using a USB cable....................................................................................9
Use printer sharing.................................................................................................9
4 Load originals and load paper...........................................................................11
Load originals.......................................................................................................11
Choose papers for printing and copying...............................................................11
Load paper...........................................................................................................13
Avoid paper jams..................................................................................................17
5 Print from your computer..................................................................................19
Print from a software application..........................................................................19
Stop a print job.....................................................................................................20
6 Use the copy features........................................................................................21
Make a copy.........................................................................................................21
Set the copy paper type........................................................................................21
Make multiple copies of the same original............................................................21
Stop copying.........................................................................................................22
7 Use the scan features......................................................................................... 23
Scan an image......................................................................................................23
Stop scanning.......................................................................................................24
8 Maintain the HP All-in-One.................................................................................25
Clean the HP All-in-One.......................................................................................25
Print a self-test report...........................................................................................26
Work with print cartridges.....................................................................................27
9 Order supplies....................................................................................................35
Order paper, or other media.................................................................................35
Order print cartridges............................................................................................35
Order other supplies.............................................................................................36
10 Troubleshooting information.............................................................................37
View the Readme file............................................................................................37
Setup troubleshooting...........................................................................................38
Operational troubleshooting..................................................................................45
11 HP warranty and support...................................................................................49
Warranty...............................................................................................................49
Get support and other information from the Internet.............................................51
Before you call HP customer support...................................................................51
Access your serial number and service ID............................................................ 51
Call in North America during warranty..................................................................52
Call elsewhere in the world...................................................................................52
User Guide
1

Prepare the HP All-in-One for shipment...............................................................54
Pack the HP All-in-One.........................................................................................54
12 Technical information........................................................................................57
System requirements............................................................................................57
Paper specifications.............................................................................................57
Print specifications................................................................................................59
Copy specifications...............................................................................................60
Scan specifications...............................................................................................60
Physical specifications..........................................................................................60
Power specifications.............................................................................................60
Environmental specifications................................................................................60
Acoustic information.............................................................................................60
Environmental product stewardship program.......................................................61
Regulatory notices................................................................................................62
Index...........................................................................................................................65
2
HP Deskjet F300 All-in-One series
1
HP All-in-One overview
You can make copies quickly and easily from the HP All-in-One without turning on
your computer. You can also use the HP All-in-One to print and scan photos and text
documents by using the software installed on your computer during the initial setup.
● The HP All-in-One at a glance
● Control panel buttons
● Status light overview
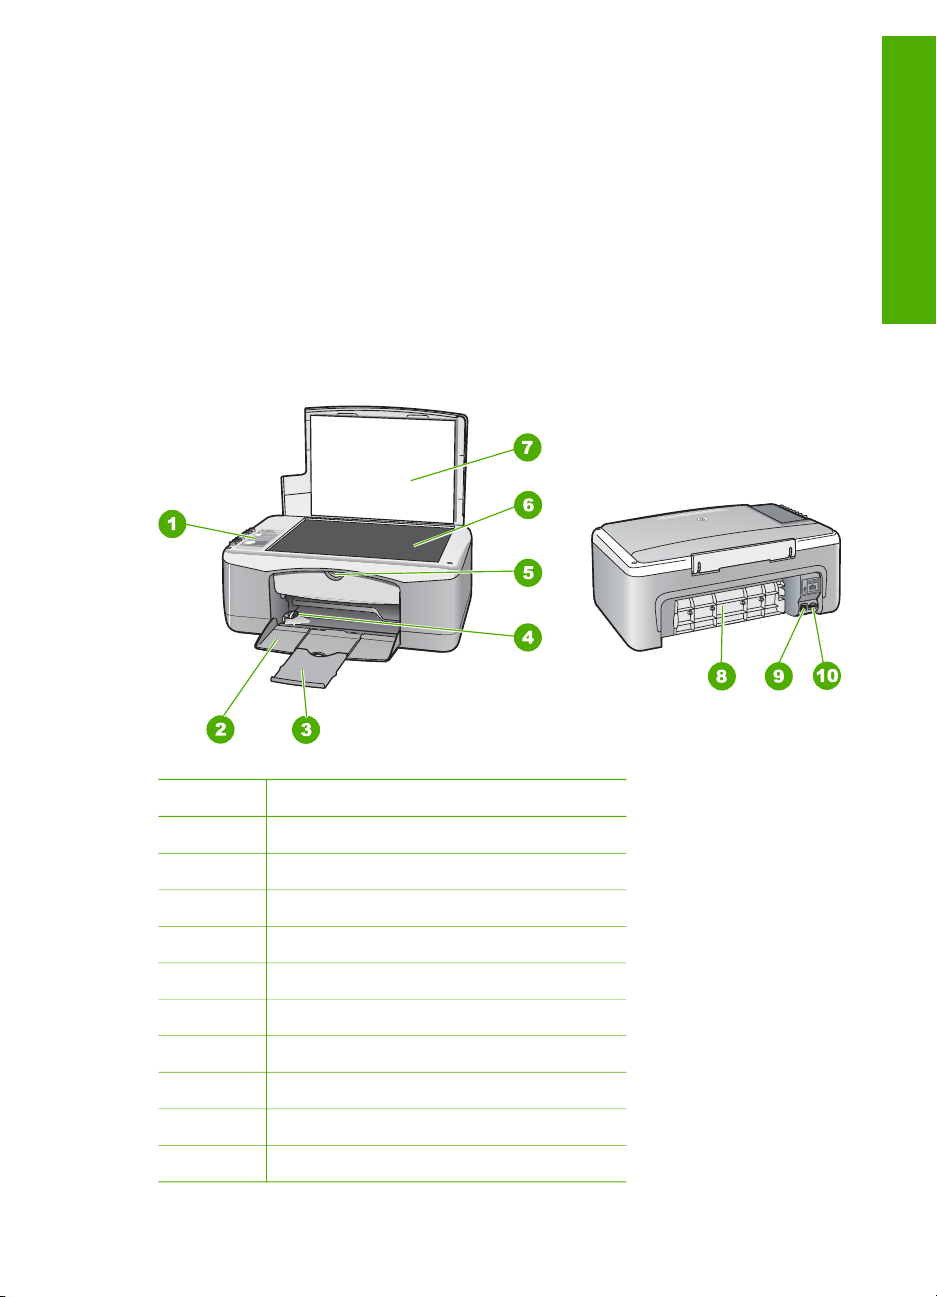
The HP All-in-One at a glance
HP All-in-One overview
User Guide
Label Description
1 Control panel
2 Input tray
3 Tray extender
4 Paper-width guide
5 Print cartridge door
6 Glass
7 Lid backing
8 Rear door
9 Rear USB port
10 Power connection
3

Chapter 1
Control panel buttons
HP All-in-One overview
Label Icon Name and Description
1 On: Turns the HP All-in-One on or off. The On button is lit when
the HP All-in-One is powered on. The light blinks while performing
a job.
When the HP All-in-One is off, a minimal amount of power is still
supplied to the device. To completely disconnect the power
supply to the HP All-in-One, turn the device off, and then unplug
the power cord.
2 Check Paper light: Indicates the need to load paper or remove a
paper jam.
3 Check Print Cartridge light: Indicates the need to reinsert the print
cartridge, replace the print cartridge, or close the print cartridge
door.
4
5 Copies: Specifies the number of copies to be printed.
Cancel: Stops a print, copy, or scan job.
4
HP Deskjet F300 All-in-One series
(continued)
Label Icon Name and Description
Tip From the control panel, you can specify up to nine copies
of an original. However, if you connect the HP All-in-One to a
computer, you can use the HP Photosmart Software to specify
more. When initiating more than nine copies of an original from
the HP Photosmart Software, only the last digit of the number of
copies is represented on the control panel. For example, if you
are making 25 copies, the number 5 appears on the display.
6 Plain Paper Type: Changes the paper type setting to plain paper.
This is the default setting for the HP All-in-One.
7 Photo Paper Type: Changes the paper type setting to photo
paper. Make sure photo paper is loaded in the input tray.
8 Start Copy Black: Starts a black-and-white copy job. In certain
situations (for example, after clearing a paper jam), this button
resumes printing.
9 Start Copy Color: Starts a color copy job. In certain situations
(for example, after clearing a paper jam), this button resumes
printing.
HP All-in-One overview
10
Scan: Starts scanning the original currently on the glass.
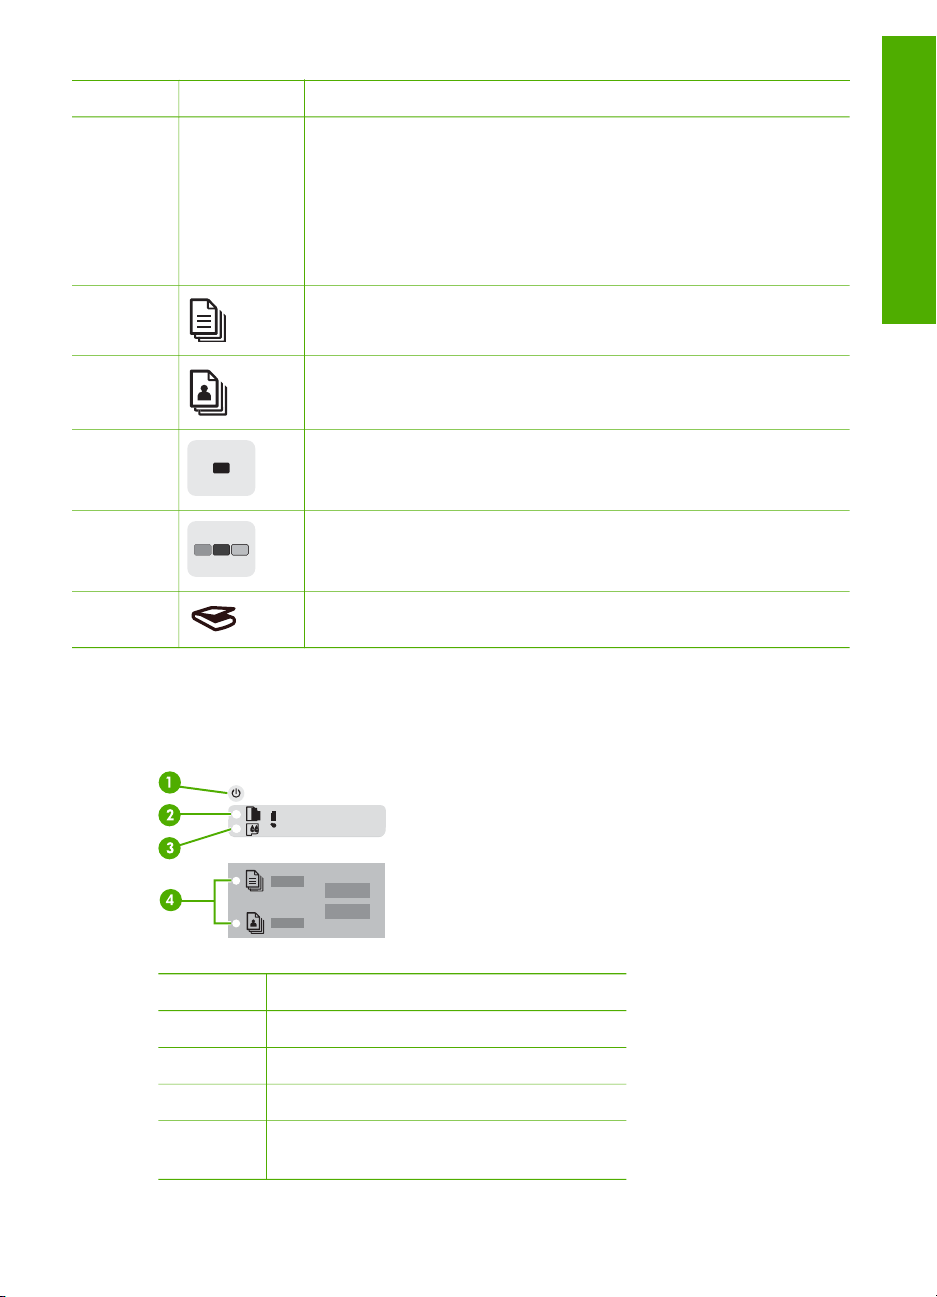
Status light overview
Several indicator lights inform you of the status of the HP All-in-One.
Label Description
1 On button
2 Check Paper light
3 Check Print Cartridge light
4 Paper Type lights (for the Plain Paper
Type and Photo Paper Type buttons)
User Guide
5

Chapter 1
The following table describes common situations and explains what the lights mean.
HP All-in-One overview
Light status
What it means
All lights are off. The HP All-in-One is turned off. Press the On
button to turn on the device.
The On light and one of the Paper Type lights
are on.
The HP All-in-One is ready for printing,
scanning, or copying.
The On light is blinking. The HP All-in-One is busy printing, scanning,
copying, or aligning the print cartridges.
The On light blinks quickly for 3 seconds and
then is on steady.
You pressed a button while the HP All-in-One
is already busy printing, scanning, copying, or
aligning the print cartridges.
The On light blinks for 20 seconds and then is
on steady.
You pressed the Scan button and there was
no response from the computer.
The Check Paper light is blinking. ● The HP All-in-One is out of paper.
● The HP All-in-One has a paper jam.
● The paper size setting does not match
the paper size detected in the input tray.
The Check Print Cartridge light is blinking. ● The print cartridge door is open.
● The print cartridges are missing or not
seated correctly.
● The tape was not removed from the print
cartridge.
● The print cartridge is not intended for use
in this HP All-in-One.
● The print cartridge might be defective.
The On, Check Paper, and Check Print
Cartridge lights are blinking.
Scanner failure.
Turn off the HP All-in-One, then on again. If
the problem persists, contact HP Support.
All lights are blinking. The HP All-in-One has a fatal error.
1. Turn the HP All-in-One off.
2. Unplug the power cord.
3. Wait a minute, then plug the power cord
back in.
4. Turn the HP All-in-One back on.
If the problem persists, contact HP Support.
6
HP Deskjet F300 All-in-One series

2
Find more information
You can access a variety of resources, both printed and onscreen, that provide
information about setting up and using the HP All-in-One.
Sources of information
Setup Guide
The Setup Guide provides instructions for setting up the HP All-inOne and installing software. Make sure you follow the steps in the
Setup Guide in order.
If you have problems during setup, see Troubleshooting in the last
section of the Setup Guide, or see Troubleshooting information in
this guide.
User Guide
HP Photosmart
2600 series printer
User Guide
This guide contains information on how to use the HP All-in-One,
including troubleshooting tips and step-by-step instructions. It also
provides additional setup instructions to supplement those in the
Setup Guide.
HP Photosmart Software Tour (Windows)
The HP Photosmart Software Tour is a fun, interactive way to get a
brief overview of the software included with the HP All-in-One. You
will learn how the software you installed with the HP All-in-One can
help you edit, organize, and print your photos.
Find more information
User Guide
Onscreen Help
The onscreen Help provides detailed instructions on features of the
HP All-in-One that are not described in this guide, including features
that are only available using the software you installed with the
HP All-in-One.
HP Photosmart Software Help (Windows)
● The Get the most out of your help topic provides information
about using the onscreen Help to find instructions for using the
HP Photosmart Software or the HP All-in-One. The topic also
provides information on how to view animated videos of
common tasks you can perform with your software and device.
● The Get step-by-step instructions topic provides information
on using the HP Photosmart Software with the HP All-in-One.
7

Chapter 2
(continued)
● The Explore what you can do topic provides more information
about the practical and creative things you can do with the
HP Photosmart Software and the HP All-in-One.
● If you need further assistance or want to check for HP software
updates, see the Troubleshooting and support topic.
HP Photosmart Mac Help (Mac)
● The How Do I? topic provides access to animated videos that
show you how to perform common tasks.
● The Get Started topic provides information about importing,
modifying, and sharing your images.
● The Use Help topic provides information about finding
information in the onscreen Help.
Readme
The Readme file contains the most recent information which might
not be found in other publications.
Install the software to access the Readme file.
Find more information
www.hp.com/support If you have Internet access, you can get help and support from the
HP website. This website offers technical support, drivers, supplies,
and ordering information.
8
HP Deskjet F300 All-in-One series

3
Connection information
The HP All-in-One comes equipped with a USB port so you can connect directly to a
computer using a USB cable. You can also share your printer over an existing
Ethernet network using a computer as a print server.
● Supported connection types
● Connect using a USB cable
● Use printer sharing
Supported connection types
Description Recommended
number of
connected
computers for best
performance
USB connection One computer
connected with a
USB cable to the rear
USB 1.1 full speed
peripheral connection
port on the HP All-inOne. The port is
compatible with 2.0
high speed hardware.
Printer sharing Five.
The host computer
must be on at all
times in order to print
from the other
computers.
Connect using a USB cable
Refer to the Setup Guide that came with the HP All-in-One for detailed instructions on
using a USB cable to connect a computer to the rear USB port.
Supported software
features
All features are
supported.
All features resident
on the host computer
are supported. Only
printing is supported
from the other
computers.
Setup instructions
Follow the Setup
Guide for detailed
instructions.
Connection information
Follow the
instructions in Use
printer sharing.
Use printer sharing
If your computer is on a network, and another computer on the network has an HP Allin-One connected to it by a USB cable, you can print to that printer using printer
sharing.
The computer directly connected to the HP All-in-One acts as the host for the printer
and has full software functionality. The other computer, which is referred to as a
User Guide
9

Chapter 3
client, has access only to the print features. You must perform other functions from
the host computer or from the control panel on the HP All-in-One.
To enable printer sharing on a Windows computer
➔
Refer to the user guide that came with your computer or see the Windows
onscreen Help.
To enable printer sharing on a Mac
1. On both the client and host computers, do the following:
a. Click System Preferences in the Dock, or, from the Apple menu, choose
System Preferences.
The System Preferences dialog appears.
b. In the Internet & Network area, click Sharing.
c. From the Services tab, click Printer Sharing.
2. On the host computer, do the following:
a. Click System Preferences in the Dock, or, from the Apple menu, choose
System Preferences.
The System Preferences dialog appears.
b. In the Hardware area, click Print & Fax.
c. Do one of the following, depending on your OS:
• (OS 10.2.8 or 10.3.x) From the Printing tab, click the check box to
Share my printers with other computers.
• (OS 10.4.x) Click Sharing, click the check box to Share this printer
with other computers, and then select the printer to share.
Connection information
10
HP Deskjet F300 All-in-One series
4
Load originals and load paper
You can load many different types and sizes of paper in the HP All-in-One, including
letter or A4 paper, photo paper, transparencies, and envelopes.
● Load originals
● Choose papers for printing and copying
● Load paper
● Avoid paper jams
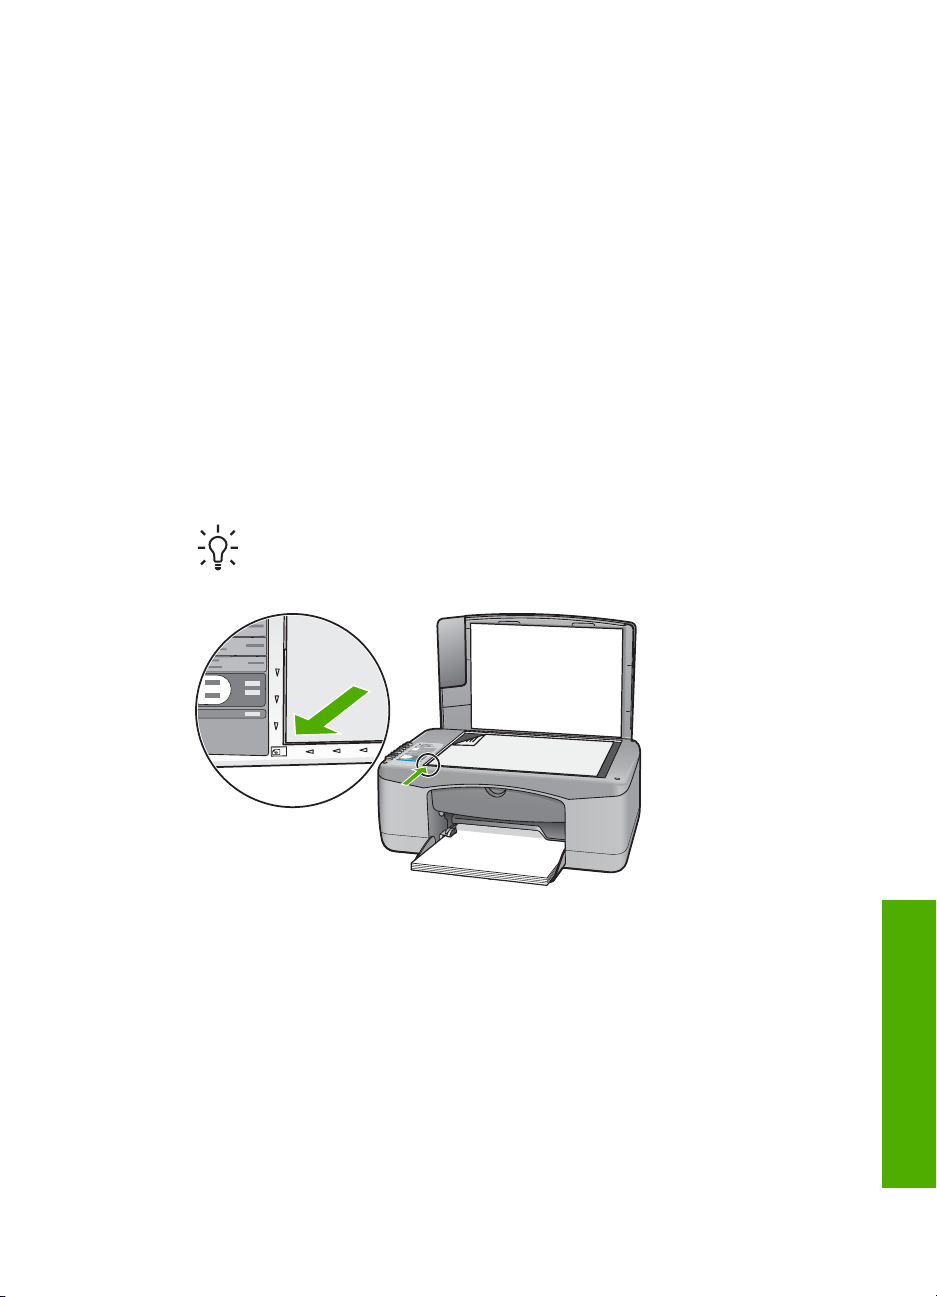
Load originals
You can copy or scan up to letter- or A4-size originals by loading them on the glass.
To load an original on the glass
1. Lift the lid on the HP All-in-One.
2. Place your original print side down on the left front corner of the glass.
Tip For more help on loading an original, refer to the engraved guides
along the edge of the glass.
3. Close the lid.
Choose papers for printing and copying
You can use different types and sizes of paper in the HP All-in-One. Review the
following recommendations to get the best printing and copying quality. Whenever you
change paper types or sizes, remember to change those settings.
● Recommended papers for printing and copying
● Papers to avoid
User Guide
Load originals and load paper
11

Chapter 4
Recommended papers for printing and copying
If you want the best print quality, HP recommends using HP papers that are
specifically designed for the type of project you are printing. If you are printing photos,
for example, load HP Premium or HP Premium Plus photo paper in the input tray.
Note 1 This device supports 10 x 15 cm (4 x 6 inch) with tab, A4-, letter-, and
legal- (US only) size paper only.
Note 2 To achieve a borderless print, you must use 10 x 15 cm (4 x 6 inch)
paper with tab. The HP All-in-One prints to the edge of three sides of the
paper. When you remove the tab from the fourth side, you have a borderless
print.
To order HP papers and other supplies, go to www.hp.com/learn/suresupply. If
prompted, choose your country/region, follow the prompts to select your product, and
then click one of the shopping links on the page.
Note At this time, this portion of the HP website is available in English only.
Papers to avoid
Using paper that is too thin or too thick, paper that has a slick texture, or paper that
stretches easily can cause paper jams. Using paper that has a heavy texture or does
not accept ink can cause printed images to smear, bleed, or not fill in completely.
Load originals and load paper
Papers to avoid for all print and copy jobs
● Any size paper other than those listed in the Technical specifications chapter. For
more information, see Technical information.
● Paper with cutouts or perforations (unless specifically designed for use with HP
inkjet devices).
● Highly textured stock, such as linen. It might not print evenly, and the ink can
bleed into these papers.
● Extremely smooth, shiny, or coated papers not specifically designed for the
HP All-in-One. They can jam the HP All-in-One or repel the ink.
● Multi-part forms, such as duplicate and triplicate forms. They can wrinkle or get
stuck, and the ink is more likely to smear.
● Envelopes with clasps or windows. They can get stuck in the rollers and cause
paper jams.
● Banner paper.
● 10 x 15 cm (4 x 6 inch) photo paper without tabs.
Additional papers to avoid when copying
● Envelopes.
● Transparency film other than HP Premium Inkjet Transparency Film or
HP Premium Plus Inkjet Transparency Film.
● Iron-On Transfers.
● Greeting card paper.
12
HP Deskjet F300 All-in-One series
Load paper
This section describes the procedure for loading different types and sizes of paper
into the HP All-in-One for your copies or printouts.
Tip To help prevent rips, wrinkles, and curled or bent edges, store all paper
flat in a resealable bag. If the paper is not stored properly, extreme changes in
temperature and humidity might result in curled paper that does not work well
in the HP All-in-One.
● Load full-size paper
● Load 10 x 15 cm (4 x 6 inch) photo paper
● Load envelopes
● Load other types of paper
Load full-size paper
You can load many types of letter or A4 paper into the input tray of the HP All-in-One.
To load full-size paper
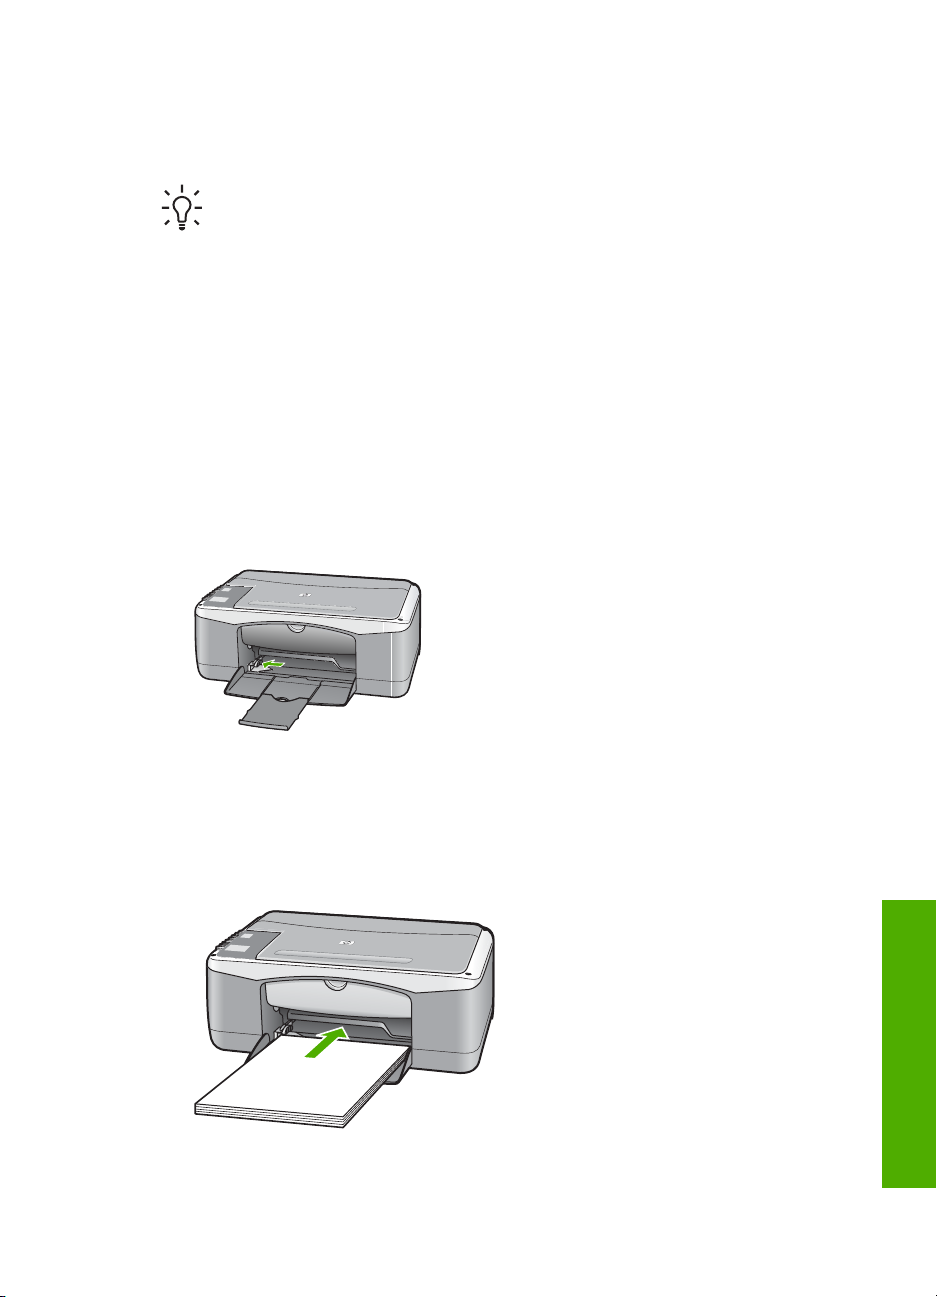
1. Slide the paper-width guide to its outermost position.
User Guide
2. Tap a stack of paper on a flat surface to align the edges, and then check the
paper for the following:
– Make sure it is free of rips, dust, wrinkles, and curled or bent edges.
– Make sure all the paper in the stack is the same size and type.
3. Insert the stack of paper into the input tray with the short edge forward and the
print side down. Slide the stack of paper forward until it stops.
Load originals and load paper
13
Chapter 4
Caution Make sure that the HP All-in-One is idle and silent when you
load paper into the input tray. If the HP All-in-One is servicing the print
cartridges or otherwise engaged in a task, the paper stop inside the
device might not be in place. You could push the paper too far forward,
causing the HP All-in-One to eject blank pages.
Tip If you are using letterhead, insert the top of the page first with the
print side down. For more help on loading full-size paper and letterhead,
refer to the diagram engraved in the base of the input tray.
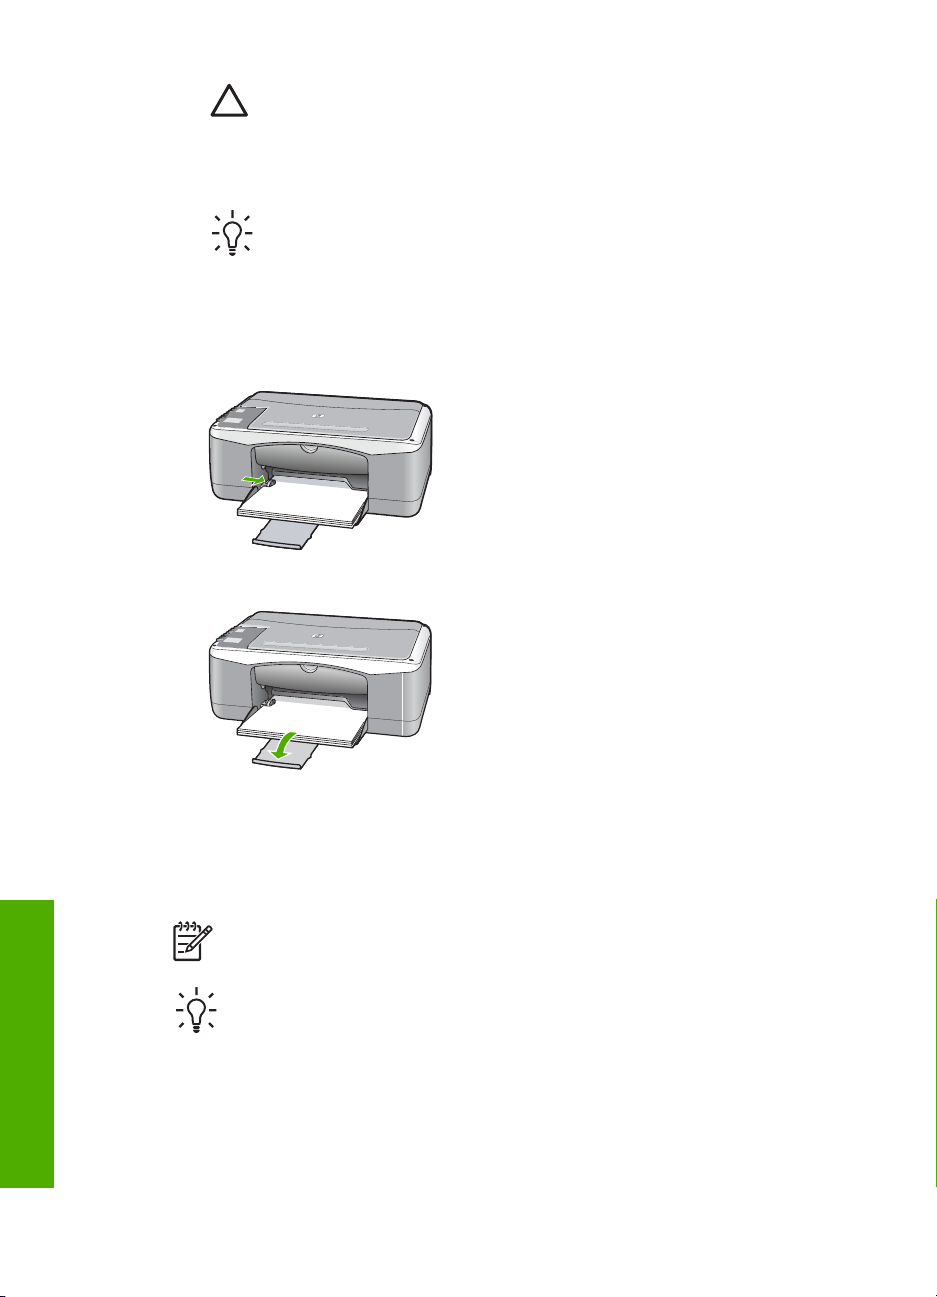
4. Slide the paper-width guide inward until it stops at the edge of the paper.
Do not overload the input tray; make sure the stack of paper fits within the input
tray and is no higher than the top of the paper-width guide.
5. Flip the tray extender up toward you.
Load 10 x 15 cm (4 x 6 inch) photo paper
You can load 10 x 15 cm (4 x 6 inch) photo paper into the input tray of the HP All-inOne. For the best results, use 10 x 15 cm (4 x 6 inch) HP Premium Plus Photo Paper
or HP Premium Photo Paper with tab.
Note For borderless printing, the HP All-in-One only supports printing 10 x 15
cm (4 x 6 inch) paper with tab.
Tip To help prevent rips, wrinkles, and curled or bent edges, store all paper
flat in a resealable bag. If the paper is not stored properly, extreme changes in
temperature and humidity might result in curled paper that does not work well
in the HP All-in-One.
Load originals and load paper
14
HP Deskjet F300 All-in-One series
To load 10 x 15 cm ( 4 x 6 inch) photo paper with tab in the input tray
1. Remove all paper from the input tray.
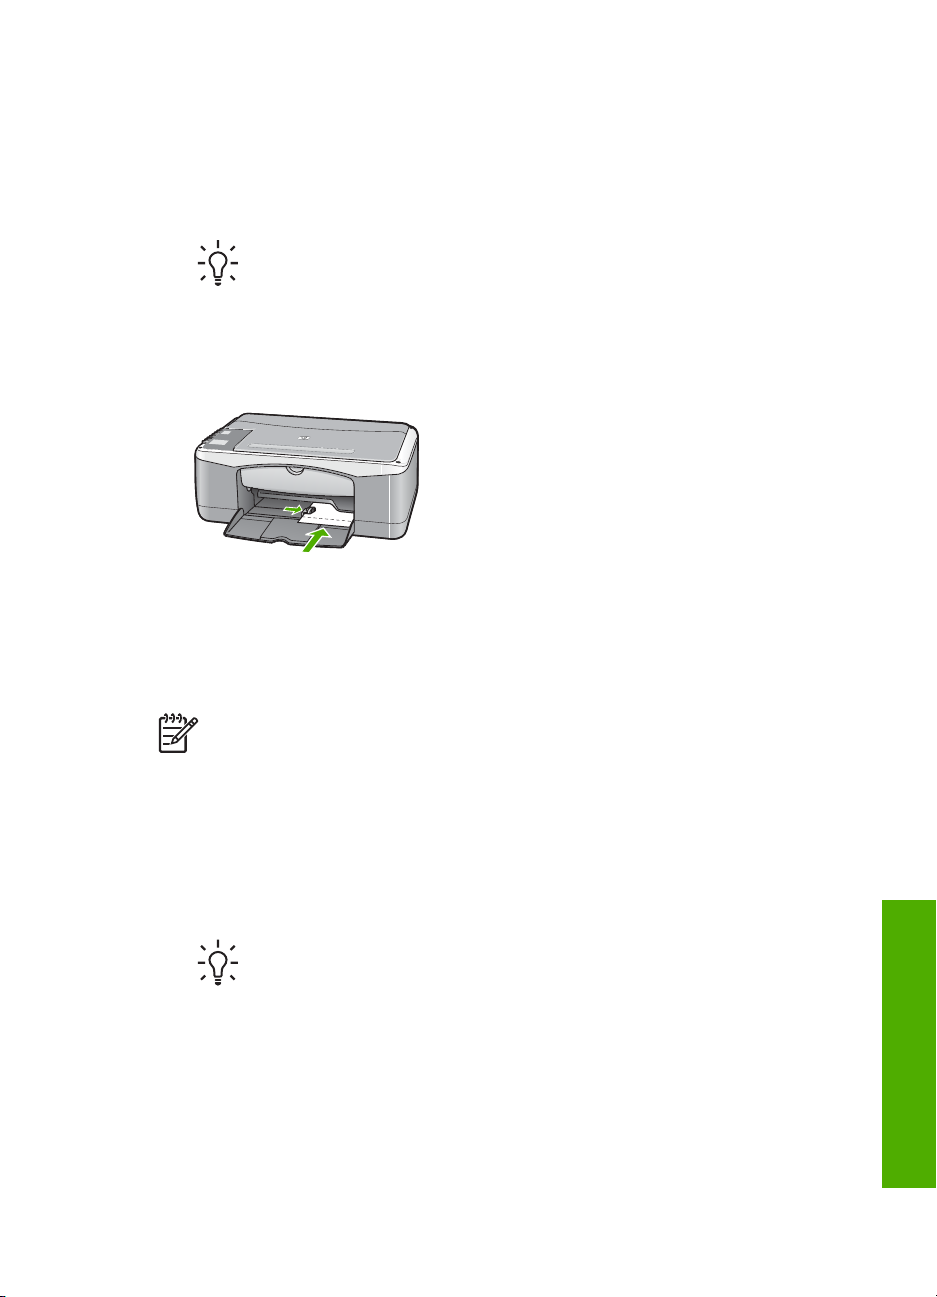
2. Insert the stack of photo paper into the far-right side of the input tray with the
short edge forward and the print side down. Slide the stack of photo paper
forward until it stops.
Load the photo paper so that the tabs are closest to you.
3. Slide the paper-width guide inward until it stops at the edge of the paper.
Do not overload the input tray; make sure the stack of paper fits within the input
tray and is no higher than the top of the paper-width guide.
For best results, set the paper type and paper size before copying or printing.
Load envelopes
You can load one or more envelopes into the input tray of the HP All-in-One. Do not
use shiny or embossed envelopes or envelopes that have clasps or windows.
Tip For more help on loading small-size photo paper, refer to the guides
engraved in the base of the input tray for loading photo paper.
User Guide
Note For specific details on how to format text for printing on envelopes,
consult the help files in your word processing software. For best results,
consider using a label for the return address on envelopes.
To load envelopes
1. Remove all paper from the input tray.
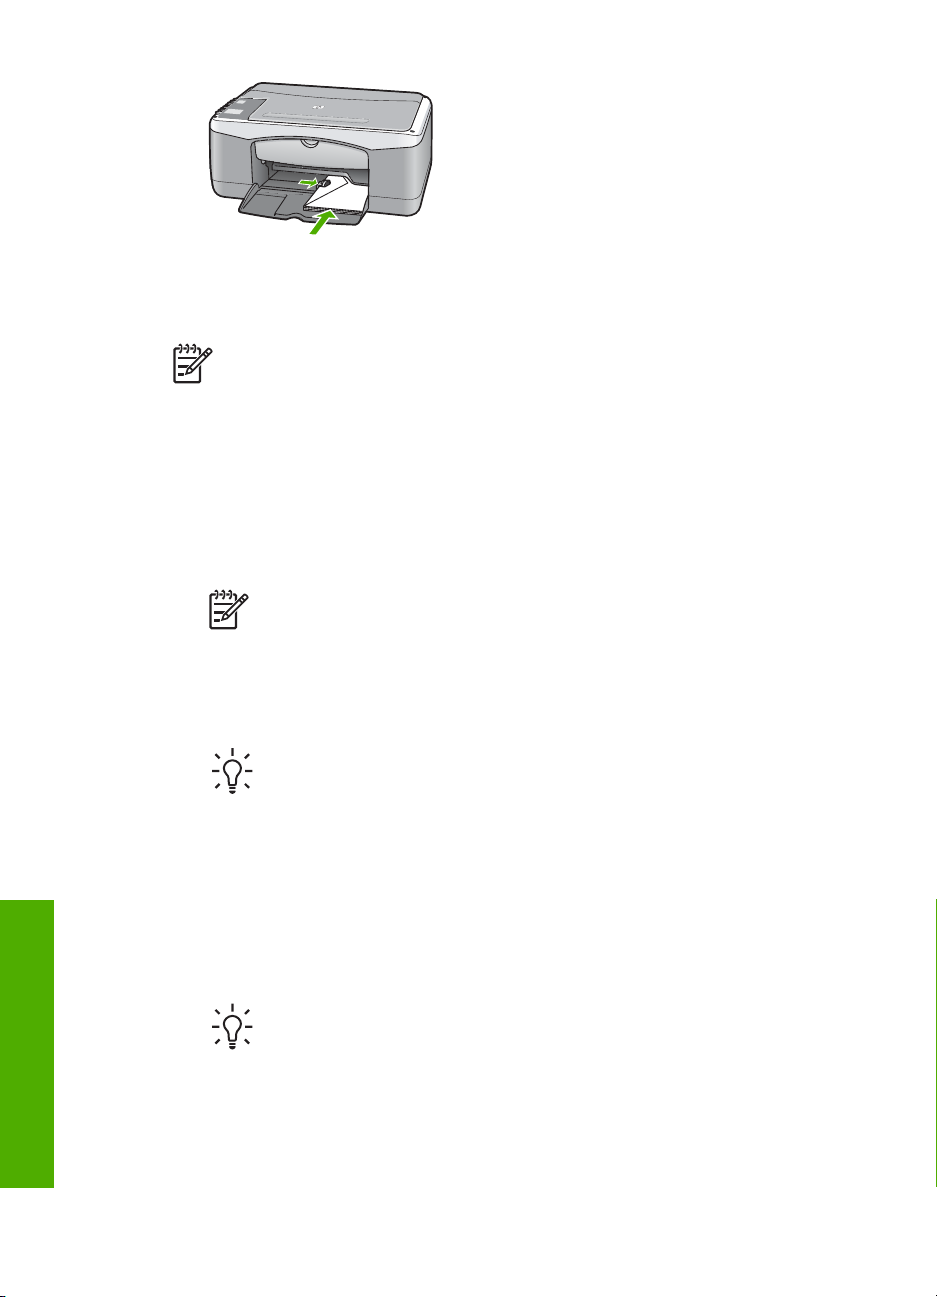
2. Insert one or more envelopes into the far-right side of the input tray with the
envelope flaps up and on the left. Slide the stack of envelopes forward until it
stops.
Load originals and load paper
Tip For more help on loading envelopes, refer to the diagram engraved
in the base of the input tray.
3. Slide the paper-width guide inward against the stack of envelopes until it stops.
Do not overload the input tray; make sure the stack of envelopes fits within the
input tray and is not higher than the top of the paper-width guide.
15
Chapter 4
Load other types of paper
The following papers require extra attention to load them properly.
Note Not all paper sizes and paper types are available with all the functions
on the HP All-in-One. Some paper sizes and paper types can only be used if
you are starting a print job from the Print dialog box in a software application.
They are not available for copying. Papers that are only available for printing
from a software application are indicated as such.
HP Premium Inkjet Transparency Film and HP Premium Plus Inkjet
Transparency Film
➔
Insert the film so that the white transparency strip (with arrows and the HP logo)
is on top and is going into the input tray first.
Note The HP All-in-One cannot automatically detect the paper size or
paper type. For best results, set the paper type to transparency film before
printing or copying onto transparency film.
Load originals and load paper
16
HP Iron-On Transfers (for printing only)
1. Flatten the transfer sheet completely before using it; do not load curled sheets.
Tip To prevent curling, keep transfer sheets sealed in the original
package until you are ready to use them.
2. Locate the blue stripe on the nonprinting side of the transfer paper and then
manually feed one sheet at a time into the input tray with the blue stripe facing up.
HP Greeting Cards, HP Photo Greeting Cards, or HP Textured Greeting Cards
(for printing only)
➔
Insert a small stack of HP greeting card paper into the input tray with the print
side down; slide the stack of cards forward until it stops.
Tip Make sure the area on which you want to print is inserted first, facing
down in the input tray.
HP Inkjet labels (for printing only)
1. Always use letter or A4 label sheets designed for use with HP inkjet devices
(such as HP inkjet labels), and make sure that the labels are no more than two
HP Deskjet F300 All-in-One series

years old. Labels on older sheets might peel off when the paper is pulled through
the HP All-in-One, causing subsequent paper jams.
2. Fan the stack of labels to make sure none of the pages are sticking together.
3. Place a stack of label sheets on top of full-size plain paper in the input tray, label
side down. Do not insert labels one sheet at a time.
For best results, set the paper type and paper size before copying or printing.
Avoid paper jams
To help avoid paper jams, follow these guidelines.
● Remove printed papers from the output tray frequently.
● Prevent curled or wrinkled paper by storing all unused paper flat in a resealable
bag.
● Ensure that paper loaded in the input tray lays flat and the edges are not bent or
torn.
● Do not combine different paper types and paper sizes in the input tray; the entire
stack of paper in the input tray must be the same size and type.
● Adjust the paper-width guide in the input tray to fit snugly against all paper. Make
sure the paper-width guide does not bend the paper in the input tray.
● Do not force paper too far forward in the input tray.
● Use paper types that are recommended for the HP All-in-One.
User Guide
Load originals and load paper
17

Chapter 4
Load originals and load paper
18
HP Deskjet F300 All-in-One series
Loading...