


Dear valued customer,
To discover a De Dietrich product is to experience the range of unique emotions which only high-value items can produce.
The attraction is immediate, from the moment you set eyes on the product. The sheer quality of the design shines through thanks to the timeless style and outstanding finishes which make each appliance an elegant and refined little masterpiece in its own right, each in perfect harmony with the others.
Next, comes the irresistible urge to touch it. De Dietrich's design makes extensive use of robust and prestigious materials. The accent is placed firmly upon authenticity.
By combining state-of-the-art technology with top quality materials, De Dietrich produces beautifully crafted products to help you get the most from the culinary arts, a passion shared by all lovers of cooking and fine food.
We hope that you enjoy using this new appliance and we would love to receive your suggestions and to answer any questions you may have. Please feel free to contact our customer service department via our website.
To benefit from the many advantages offered by the brand, we recommend that you register your product at: www.de-dietrich.com.
Thank you for choosing a De Dietrich product.
De Dietrich
You can find a full range of information about the brand at www.de-dietrich.com Visit the De Dietrich Gallery, 6 rue de la Pépinière (Paris eighth district)
Open from Tuesday to Saturday from 10 am to 7 pm Customer service department: 0892 02 88 04
We are constantly improving our products; for this reason we reserve the right to make all modifications to their technical, functional or aesthetic characteristics, originating from technical developments.
Warning
This product is not foreseen for sale in the USA
Before installing and using your appliance please read this installation and use the guide carefully - it will help you familiarise yourself very rapidly with its operation.
1
Downloaded from www.Manualslib.com manuals search engine

EN CONTENTS
1 |
/ INSTALLING YOUR APPLIANCE |
|
|
• Installation _________________________________________________________ |
3 |
|
• Connection _________________________________________________________ |
4 |
2 |
/ USING YOUR APPLIANCE |
|
|
• The induction principle _______________________________________________ |
5 |
|
• Description of your top _______________________________________________ |
6 |
|
• Using a cooking zone ________________________________________________ |
8 |
|
• Additional functions _________________________________________________ |
8 |
|
Preheating |
|
|
Boil |
|
|
Independent timer |
|
|
Elapsed time |
|
|
Delayed cooking |
|
|
Switch |
|
|
Preselected power settings |
|
|
Child safety |
|
|
Clean lock |
|
|
• Safety features when operating ________________________________________ |
11 |
3 |
/ MAINTAINING YOUR APPLIANCE ______________________________________ |
12 |
4 |
/ SPECIAL MESSAGES, DIFFICULTIES __________________________________ |
13 |
5 |
/ AFTERSALES SERVICE __________________________________________ |
14 |
We are constantly improving our products; for this reason we reserve the right to make all modifications to their technical, functional or aesthetic characteristics, originating from technical developments.
Warning
This product is not foreseen for sale in the USA
Before installing and using your appliance please read this installation and use the guide carefully - it will help you familiarise yourself very rapidly with its operation.
2
Downloaded from www.Manualslib.com manuals search engine

1 / INSTALLING YOUR APPLIANCE |
|
EN |
|
|
|
|
|
|
L |
|
l |
|
|
6,4 |
|
|
Air outlet |
|
|
|
|
|
|
|
|
|
|
|
Sortie d'air |
|
|
|
Air intake |
|
|
|
|
|
Entrée d'air |
|
|
|
|
|
l’ |
L’ |
m |
|
|
|
|
|
|
|
|
|
|
|
c |
ve |
|
4 |
|
|
4 |
|
c |
|
|
||
n |
|
|
|||
4 ti |
|
|
|
||
|
m |
|
|
||
l |
|
|
|
||
a |
|
|
|
||
c |
|
|
|
|
|
m |
|
|
|
|
|
|
tion |
|
|
|
m |
|
s |
|
|
|
|
|
p |
|
|
|
c |
|
|
A |
|
4 |
|
|
ace |
|
|
||
|
|
|
Above a cabinet |
||
|
|
|
|
|
with a door or drawer |
• CHOOSING THE POSITION |
|
||
The distance between the edge of your appliance |
MIN 4 mm |
||
and the side and rear walls (or partitions) must be at |
|||
|
|||
least four centimetres (zone A). |
|
|
|
Your appliance may be built in without any restric- |
|
||
tion. Check, however, that the air intake and outlet |
|
||
are free of obstruction. |
|
|
|
The building-in method opposite is recommended |
|
||
for use above an oven or a built-in appliance. |
|
||
• BUILDING-IN |
|
Above an oven |
|
Follow the diagram above. |
|
|
|
Glue the foam seal underneath your appliance, follo- |
|
||
wing the perimeter of the hole in the worktop, upon |
|
||
which your appliance will rest. This will ensure a |
|
||
good seal against the worktop. |
|
|
|
Attach the clips to the hob |
(depending on the |
|
|
model). |
|
|
|
Tip
If your hob is located above your oven, the hob’s thermal safety devices can impede the simultaneous use of the hob and the oven’s pyrolysis program.
Your hob is equipped with an anti-overheating safety system.
This safety device can trigger, for example, when the hob is installed over an oven that is not sufficiently insulated. If this occurs, a series of small lines appears on the control panel. In such circumstances we recommend that you increase the hob’s ventilation by creating an opening in the side of the cabinet, (8 x 5 cm), and/or installing an oven insulation kit available from the after-sales (Ref . 75X1652)
You can also install your hob above a dishwasher.
In this case, your worktop must be at least 900mm high in order to ensure proper ventilation to your hob and you could also fit the dishwasher insulation kit that is available from the After-Sales Service (Ref. 77X7781).
3
Downloaded from www.Manualslib.com manuals search engine
EN 1 / INSTALLING YOUR APPLIANCE
Connection
Your appliance should be positioned so that the mains switch is accessible.
These hobs must be connected to the mains using a socket in compliance with publication CEI 60083 or an all-pole circuit-breaker device in compliance with the installation rules in force.
When power is first supplied to your hob, or after an extended power cut, an indicator light will appear on the control panel. This information will disappear after 30 seconds.
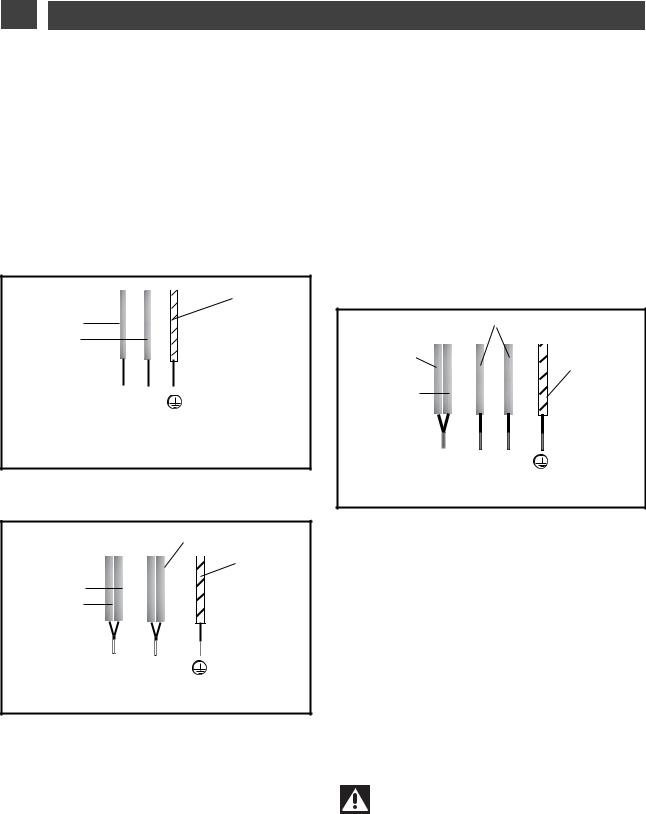
•Hook-up of 220-240V ~
Green/yellow
Blue
Brown
N L
Neutral Phase Earth
32A
•Hook-up of 220-240V
Black or grey
Green/yellow
Blue
Brown
N L
32A Neutral Phase Earth
•Hook-up of 400V 2N ~ - 16A
Separate the 2 phase wires (L1 and L2) before connection.
Black-grey
Brown
Green/yellow
Blue
NL1 L2
Neutral Phase Earth
With hook-up of 400 V 2N three phase, verify that the neutral wire is properly connected.
Warning
If the cable is damaged it must be replaced by the manufacturer, its aftersales service or a person with a similar qualification to prevent danger.
4
Downloaded from www.Manualslib.com manuals search engine

2 / USING YOUR APPLIANCE |
|
EN |
|
|
|
We have designed this cooking hob for use by private individuals in their homes.
These cooking hobs are intended exclusively for cooking beverages and foodstuffs and do not contain any asbestos-based materials.
This appliance is not intended to be used by persons (including children) with reduced physical, sensory or mental abilities, or persons lacking experience or awareness, unless using it with the help of a person reponsible for their safety, or under supervision and with prior instruction in its use. Children should be supervised to ensure that they do not play with the appliance.
• The induction principle
The principle of induction is based on a magnetic effect.
When you place your cookware on a cooking zone and you turn it on, the electronic circuits in your cooking hob produce “induced” currents in the bottom of the cookware which instantly raise its temperature. This heat is then transmitted to the food
To help you choose, a list of cookware is provided with this guide.
• Cookware
Most cookware is compatible with induction. To verify that your cookware is suitable, place it on a heating area on power 4.
-If the display remains on, your cookware is compatible.
-If the display flashes, your cookware cannot be used with induction cooking.
You can also use a magnet to test the cookware.
If a magnet “sticks” to the bottom of the cookware, it is compatible with induction.
Only glass, terra cotta, aluminium without a special finish on the bottom, copper and some non-magnetic stainless steels do not work with induction cooking. We recommend that you select cookware with a thick, flat bottom. When you buy your cookware, make sure that this logo is on the package; it assures you that it is compatible with induction cooking.
|
C |
A |
B |
|
|
|
+ |
|
- |
A - Induction plate
B - Electronic circuit
C - Induced currents
•Choosing a cooking area
Cooking |
|
Diameter of base |
|
area |
|
of cookware |
|
|
|
|
|
16 cm |
10 |
..... 18 cm |
|
|
|
|
|
18 cm |
12 ..... |
22 cm |
|
|
|
|
|
21 cm |
18 ..... |
24 cm |
|
|
|
|
|
23 cm |
12 ..... |
26 cm |
|
|
|
|
|
28 cm |
12 ..... |
32 cm |
|
15 |
32 cm for DTI1113X |
||
|
|||
|
|
|
5
Downloaded from www.Manualslib.com manuals search engine
 Loading...