


99642284_A_ML.qxp 27/09/2007 11:42 Page 1
FR |
GUIDE D’INSTALLATION ET D’UTILISATION |
EN |
GUIDE TO INSTALLATION AND USE |
PT |
MANUAL DE INSTALAÇÃO E UTILIZAÇÃO |
ES |
MANUAL DE INSTALACIÓ Y UTILIZACIÓN |
Table de cuisson
Cooking Hob
Placa de cozinha
Placa de cocción
99642284_A_ML.qxp 27/09/2007 11:43 Page 16
FR 02
EN 16
PT 32
ES 46
Dear Customer,
You have just acquired a DE DIETRICH hob and we would like to thank you.
In order to offer you an excellent product, our research teams have created this new generation of appliances for you. Their quality, appearance, functions and technological advances make them exceptional products, showcases of our unique know-how.
In the line of DE DIETRICH products, you will also find a wide range of ovens, microwaves, ventilation hoods, hoods, dishwashers, and refrigerators, all of which can be integrated and all of which can be coordinated with your new DE DIETRICH hob.
Of course, in our ongoing desire to ensure our products satisfy your needs in the best possible way, our customer service department is always at your disposal at our site.
DE DIETRICH
Setting New Values
We are constantly improving our products; for this reason we reserve the right to make all modifications to their technical, functional or aesthetic characteristics, originating from technical developments.
Warning
This product is not foreseen for sale in the USA
Before installing and using your appliance please read this installation and use the guide carefully - it will help you familiarise yourself very rapidly with its operation.
16

99642284_A_ML.qxp 27/09/2007 11:43 Page 18
EN 1 / INSTALLING YOUR APPLIANCE
As shown in this logo, the materials used to package this appliance are not recyclable. Recycle them and play a role in protecting the environment by depositing them in municipal containers provided for this purpose.
Recycling of the appliances organised by your manufacturer will thus be undertaken in optimum conditions, in accordance with European directive 2002/96/CE relating to electrical and electronic equipment waste. Contact your local authority or retailer for how to have used appliances collected or collection points.
L
6,4
4cm
4 c m
l
l’
L’


 m c 4
m c 4
|
m |
c |
|
4 |
|
Installation
Your appliance should be positioned so that the mains switch is accessible.
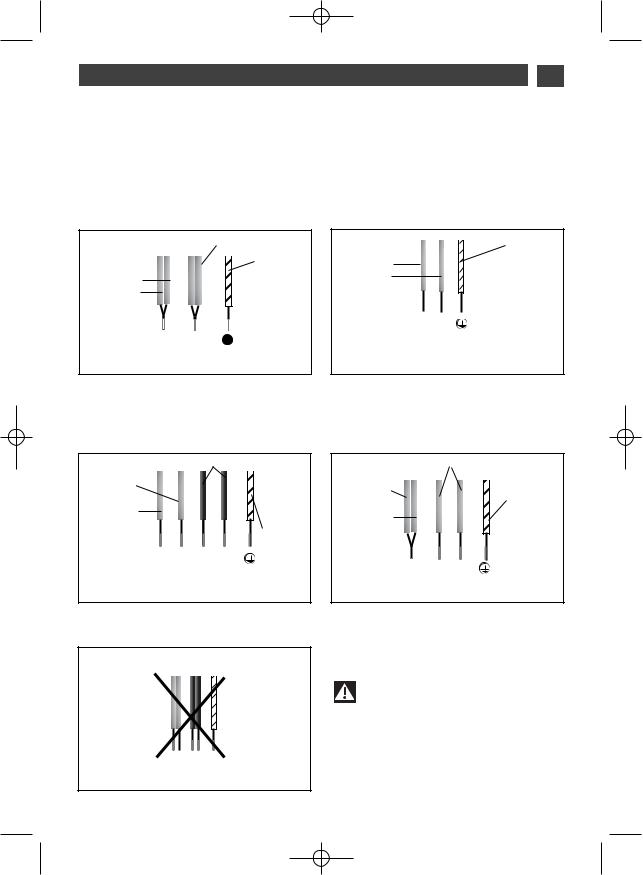
The distance between the edge of your appliance and the side and rear walls (or partitions) must be at least four centimetres (area A).
Your appliance can be easily integrated above a cabinet, an oven or a build-in household appliance. Simply verify that the air intakes and outlets are well clear.
Stick the foam gasket to the bottom of your appliance. This will allow you to achieve an airtight seal with the worktop.
Attach the clips to the hob. (See drawing)
Tip
If your hob is located above your oven, the hob’s thermal safety measures forbid the simultaneous use of the hob and your oven’s pyrolysis program (self-clean- ing by extreme heat).
This safety feature can be activated, for example, when the hob is installed over an oven that is not sufficiently insulated. If this occurs, a series of small lines appear in the control panel. In this case, we recommend that you increase the ventilation of your hob by creating an opening in the side of your cabinet (8 cm x 5 cm) and/or that you install the oven insulation kit (reference 75X1652) that is available from the After-Sales Service Department.
18
99642284_A_ML.qxp 27/09/2007 11:43 Page 19
1 / INSTALLING YOUR APPLIANCE EN
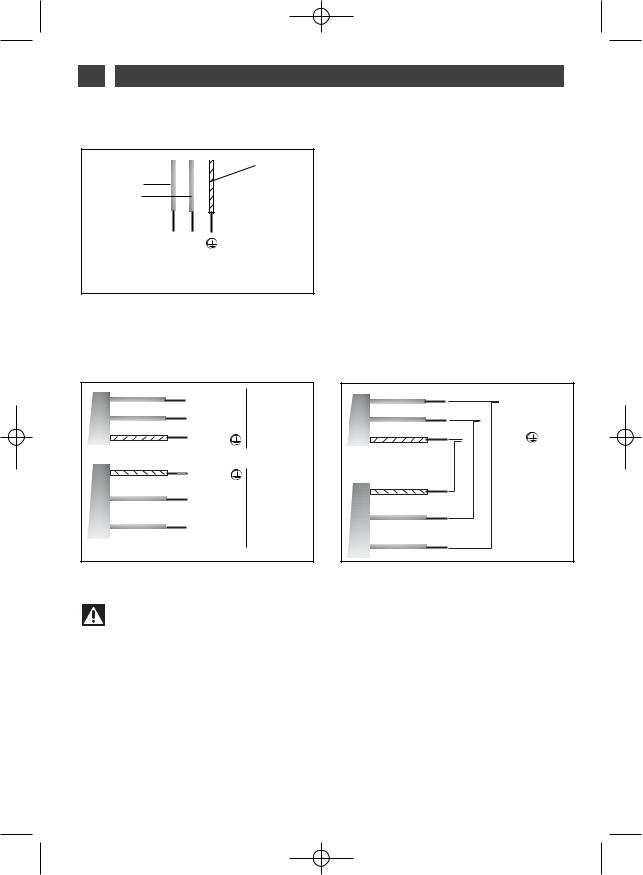
Connection
These hobs must be connected to the mains using a socket in with publication CEI 60083 or an all-pole circuit-breaker device in compliance with the installation rules in force.
When power is first supplied to your hob, or after an extended power cut, indicator light will appear on the control panel. This information will disappear after 30 seconds.
•Hook-up of 220-240V ~
Black or grey
Green/yellow
Blue
Brown
N L
32A Neutral Phase Earth
•Hook-up of 2x230V 2L+2N ~ - 16A
Separate the wires before connection.
Black-grey
Brown
Blue
Green/yellow
N1 N2 L1 L2
Neutral Phase Earth
•Hook-up of 400V 3~ - 16A
Green/yellow
Blue
Brown
N L
Neutral Phase Earth
16A
•Hook-up of 400V 2N ~ - 16A
Separate the 2 phase wires (L1 and L2) before connection.
Black-grey
Brown
Green/yellow
Blue
NL1 L2
Neutral Phase Earth
With hook-up of 400 V 2N three phase, verify that the neutral wire is properly connected.
Warning
If the cable is damaged it must be replaced by the manufacturer, its aftersales service or a person with a similar qualification to prevent danger.
19
99642284_A_ML.qxp 27/09/2007 11:43 Page 20
EN 1 / INSTALLING YOUR APPLIANCE
Connection DTI706X
•Hook-up of 220-240V ~
Green/yellow
Blue
Brown
N L
Neutral Phase Earth
32A
Connection DTI709X
• 220-240 V monophase hook-up
32 amp fuses. |
63 amp fuse. |
|
Brown |
Phase |
L |
|
Brown |
L |
16 A |
Phase |
||||
Blue |
Neutral N |
Blue |
N |
||
Neutre |
|||||
Green/yellow |
|
|
|
Green/yellow |
|
Green/yellow |
Ground |
|
|
|
|
|
|
|
Green/yellow |
|
|
|
|
|
|
|
|
Blue |
|
|
Neutral N |
32 A |
|
Brown |
Blue |
|
|
|
|
Phase L |
|
Brown |
|
|
Warning
If the cable is damaged it must be replaced by the manufacturer, its aftersales service or a person with a similar qualification to prevent danger.
20
 Loading...