


pNotice d’utilisation et d’installation
Micro-ondes
tOperating and installing instructions
Microwave Oven
kGebrauchs-und Installationsanweisungen
Mikrowellenherde
OManual de Instruções e de Instalação do Microondas
m Instrucciones de uso e instalación
Microondas
N Gebruiksen installatiehandleiding
Magnetronoven
l Betjeningsog installationsvejledning for
Mikrobølgeovn
p SOMMAIRE
Instruction de sécurité importantes. Lire avec attention et garder pour les futures utilisations.
Installation . . . . . . . . . . . . . . . . |
. . . . . . . . . . . . . . . . 3 |
Conseils . . . . . . . . . . . . . . . . . |
. . . . . . . . . . . . . . . . 4 |
Présentation . . . . . . . . . . . . . . . |
. . . . . . . . . . . . . . . . 5 |
Bandeau de commande . . . . . . . . |
. . . . . . . . . . . . . . . . 6 |
L'afficheur et le sélecteur . . . . . . . |
. . . . . . . . . . . . . . . . 7 |
Mise à l’heure / Equivalence des puissances |
. . . . . . . . . . . . . . . . . . . . .8 |
La programmation micro-ondes / Programmation express |
. . . . . . . . 9 |
Touches mémoires . . . . . . . . . . . . . . . . . . |
. . . . . . . . 10 |
Programmation enchaînée . . . . . . . . . . . . . . |
. . . . . . . . 11 |
Départ différé . . . . . . . . . . . . . . . . . . . . . |
. . . . . . . . 12 |
Un petit problème ! Que faire ? . . . . . . . . . . . |
. . . . . . . . 13 |
Entretien & nettoyage . . . . . . . . . . . . . . . |
. . . . . . . . 14 |
Recommandations / Service après-vente . . . . . . |
. . . . . . . . 15 |
2

I N S T A L L A T I O N
Avant branchement
• Vérifiez que votre appareil n’a subi aucune avarie lors du transport (porte ou joint
déformé, etc...). Si vous constatez un dommage quelconque, avant toute utilisation, |
|
F |
|
contactez votre revendeur. |
|
•Vérifiez la tension du secteur. Dans le cas d’une sous-tension PERMANENTE (200-210 volts), consultez votre installateur électricien.
Emplacement
•Cet appareil est destiné à être posé (ou encastré selon les cas) à une distance d’au moins 85 cm du sol.
•Posez l’appareil sur une surface plane et horizontale, éloigné de toute source
de chaleur ou de vapeur. Pour assurer la bonne stabilité de l’appareil, le pied avant gauche est réglable (5 positions). Tournez-le pour rehausser ou descendre le four.
• Assurez-vous de la libre circulation de l’air en dessous et autour du four.
Pour les appareils posés sur un plan travail, choisissez un emplacement laisse un espace libre minimum de :
-5 cm entre les faces latérales de l’appareil et les murs
-14 cm au-dessus de votre appareil
-10 cm pour la face arrière.
de |
|
|
qui |
14 cm |
|
|
|
|
|
10 |
cm |
|
|
|
|
5 cm |
|
|
5 cm |
|
•Veillez à ne pas obstruer les orifices de ventilation situés en dessous et à l’arrière du four.
•Certains appareils sont encastrables. Pour obtenir le kit d’encastrement correspondant, veuillez consulter votre revendeur.
•Veillez à ce que la fiche de prise de courant soit accessible après installation.
•N’utilisez pas immédiatement votre appareil (attendez environ 1-2 heures) aprés l’avoir transféré d’un endroit chaud, car la condensation peut provoquer un dysfonctionnement
Raccordement électrique
•Votre installation doit être équipée d’une protection thermique de 16 Ampères.
•Utilisez impérativement une prise de courant comportant une borne de mise à la terre et raccordée conformément aux normes de sécurité en vigueur.
•Prévoyez dans votre installation électrique un dispositif accessible par l’utilisateur qui doit être en mesure de séparer l’appareil du secteur et dont l’ouverture de contact est d’au moins 3 mm au niveau de tous les pôles.
•Si le câble d’alimentation est endommagé, il doit être remplacé par le fabricant, son service après vente, ou une personne de qualification similaire afin d’éviter un danger.
3

CONSEILS
•Votre appareil est exclusivement destiné à un usage domestique pour la cuisson, le réchauffage ou la décongélation des aliments. Le fabricant se dégage de toute responsabilité en cas d’utilisations non conformes.
•Vérifier que les ustensiles sont appropriés à l’usage dans un four à micro-ondes.
•Pour ne pas détériorer votre appareil, ne jamais le faire fonctionner à vide ou sans plateau.
•N’intervenez pas dans les orifices de la serrure en face avant; vous pourriez créer des dommages sur votre appareil qui nécessiteraient une intervention.
•Pendant le chauffage de denrées alimentaires dans des contenants en plastiques ou en papier, garder un oeil sur le four en raison de la possibilité d’inflammation.
•Il est déconseillé d’utiliser des récipients métalliques, des fourchettes, des cuillères, de couteaux ainsi que des liens et agrafes en métal pour sachets de congélation.
•L e contenu des biberons et des pots d’aliments pour bébés doit être remué ou agité et la température doit être vérifiée avant consommation, afin d’éviter les brûlures.
•MISE EN GARDE : Ne laissez les enfants utiliser le four sans surveillance que si des instructions appropriées ont été données afin que l’enfant puisse utiliser le four de façon sure et comprenne les dangers d’un usage incorrect.
•MISE EN GARDE : Les liquides ou autres aliments ne doivent pas être chauffés dans des récipients hermétiques car ils risquent d’exploser.
•Il est recommandé de ne pas chauffer les oeufs dans leur coquille et les oeufs durs entiers dans un four micro-ondes car ils risquent d’exploser, même après la fin de la cuisson
•Le chauffage de boissons par micro-ondes peut provoquer un jaillissement brusque et différé de liquide en ébullition, aussi des précautions doivent être prises lorsqu’on manipule le récipient.
•Dans le cas de petites quantités (une saucisse, un croissant, etc...) posez un verre d’eau à côté de l’aliment.
•Des temps trop longs peuvent dessécher l’aliment et le carboniser. Pour éviter de tels incidents, n’utilisez jamais les mêmes temps préconisés pour une cuisson au four traditionnel.
•Si de la fumée apparaît, arrêter ou débrancher le four et garder la porte fermée pour étouffer les flammes éventuelles.
4

P R É S E N T A T I O N |
|
|
|
|
|
|
F |
Etiquette |
Entraîneur |
Support à |
Plateau |
d’identification |
|
roulettes |
tournant |
•Le PLATEAU TOURNANT permet une cuisson
-Il peut être utilisé
-Il est guidé dans sa
-Il tourne indifféremment
-S’il ne tourne pas, vérifiez
•Le plateau en position permet l’utilisation de grands saire de tourner le récipient
•Le SUPPORT A
-Ne cherchez pas à faire de détériorer le système de l’absence de corps
l’aliment sans manipulation.
de cuisson.
et le support à roulettes.
les 2 sens.
les éléments soient bien positionnés.
toute la surface du four. Dans ce cas, il est nécesson contenu à mi-programme.
le support à roulettes, vous risqueriez
. En cas de mauvaise rotation, assurez-vous le plateau.
5

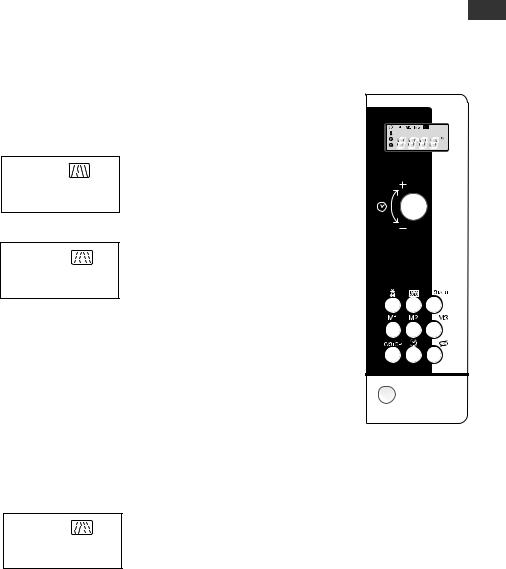
BANDEAU DE COMMANDE |
|
|
|||
A L'afficheur : |
|
|
|
|
|
|
vous facilite la programmation en affichant : |
|
|
||
|
la fonction, le temps, la température de cuisson |
|
|
||
|
ou l’heure. |
|
|
|
|
B Le sélecteur : |
|
|
|
A |
|
|
|
|
|
||
|
permet de programmer la durée, l’heure de la fin |
|
|
||
|
d’un programme ou l'horloge. |
|
|
|
|
C |
La touche décongélation |
: |
|
|
|
|
permet de décongeler tout produit surgelé. |
|
|
||
D La touche micro-ondes |
|
: |
|
|
|
|
permet de choisir la puissance micro-ondes désirée. |
|
|
||
E |
La touche START : |
|
|
|
|
|
permet de débuter tout programme. |
|
|
||
F |
Les touches Mémoire M1/M2/M3 : |
|
|
||
|
permet d'accéder rapidement à 3 opérations pré- |
|
|
||
|
programmées. |
|
|
|
|
G La touche Annulation C/STOP : |
|
|
|||
|
permet d’interrompre (Stop) ou d’effacer (Annulation) |
C |
E |
||
|
un programme en cours. Un appui pour Stop, |
||||
|
|
|
|||
|
deux appuis pour Annulation. |
|
|
|
|
H La touche horloge |
: |
|
|
|
|
|
permet de mettre l’horloge à l’heure ou pro- |
G |
I |
||
|
grammer un départ différé. |
|
|||
|
|
|
|
||
I |
La touche Arrêt plateau |
: |
|
|
|
|
permet l’arrêt du plateau tournant. |
|
|
||
J |
La touche ouverture de porte : |
|
J |
||
|
|
||||
|
permet d'ouvrir l'appareil ou arrêter un pro- |
|
|
||
|
gramme en cours. |
|
|
|
|
6

AFFICHEUR & SELECTEUR
F
W
L’afficheur et le sélecteur vous guident pour sélectionner :
plateau tournant : programmations mémorisées :
ARRET PLATEAU
fonctions :
Puissances micro-ondes
DECONGÉLATION |
CUISSON TRÈS DOUCE / CUISSON DOUCE / MIJOTAGE / |
|
RÉCHAUFFAGE / CUISSON FORTE |
le temps de programmation, l’horloge ou départ différé |
1 2 : 0 0 |
|
7
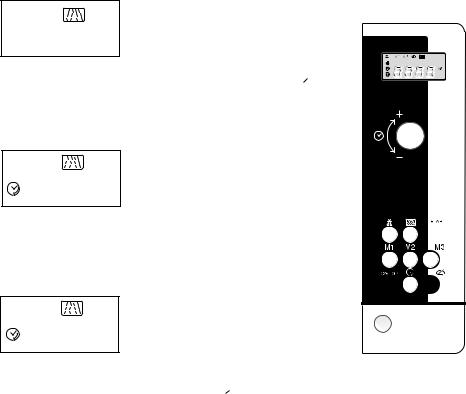
MISE A L'HEURE
Après le branchement de votre appareil ou une coupure de courant, l’horloge  apparaît dans l'afficheur et 0 0 : 0 0 clignote, vous invitant à régler l'heure.
Pour mettre l’horloge à l’heure :
-Appuyez pendant 5 secondes sur la touche horloge  .
.
-Programmez l’horloge en tournant le sélecteur  (ex. 12:00).
-Validez d’une simple pression sur la touche horloge  .
.
Votre horloge est à l’heure.
0 0 : 0 0
1 2 : 0 0
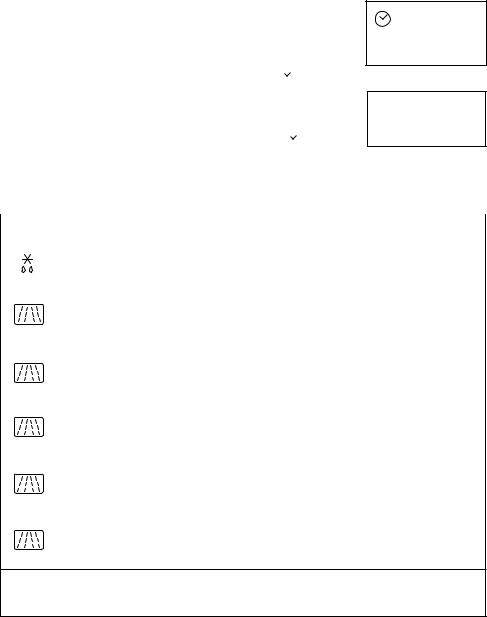
EQUIVALENCE DES PUISSANCES
|
PUISSANCE - WATT |
|
UTILISATION |
|
|
|
|
|
|
|
DECONGEL. |
1 5 0 |
Pour décongeler de la viande, du poisson, |
|
|
des fruits, du pain ou les aliments délicats. |
|||
|
|
|
||
|
|
|
|
|
|
CUISSON TRÈS |
|
Pour terminer des cuissons délicates ou pour |
|
|
|
|
||
|
DOUCE |
2 5 0 |
cuire très lentement. |
|
|
|
|
|
|
|
CUISSON |
|
Pour terminer la cuisson de |
plats commencée |
|
en “CUISSON FORTE” qui risquent de trop cuire |
|||
|
DOUCE |
3 5 0 |
||
|
en surface, tels que rôti de veau, de porc... |
|||
|
|
|
|
|
|
MIJOTAGE |
5 0 0 |
Pour tous les poissons et volailles. Pour terminer |
|
|
les préparations commencées en “CUISSON |
|||
|
|
|
FORTE”, telles que haricots, lentilles, laitages. |
|
|
|
|
|
|
|
RECHAUFFAGE |
7 0 0 |
Pour réchauffer tous vos plats cuisinés frais ou |
|
|
congelés. Pour mettre à température les plats |
|||
|
|
|
préparés et les légumes surgelés. |
|
|
|
|
|
|
|
CUISSON |
|
Pour cuire tous les légumes et potages. |
|
|
F O R T E |
1 0 0 0 |
Pour chauffer tous les liquides. |
|
|
|
|
|
|
PUISSANCE MICRO-ONDES RESTITUEE : 1000 W
8
LA PROGRAMMATION MICRO-ONDES
Votre appareil est maintenant branché et à l’heure.
Ouvrez la porte. Placez l’aliment dans l’appareil, fermez la porte. Si la porte n’est pas bien fermée, l’appareil ne fonctionnera pas. F
Si vous estimez que le plat ne peut pas tourner, utilisez la touche ARRÊT PLATEAU  avant ou en cours de programme.
Vous avez à votre disposition 6 puissances micro-ondes : (150 [décongélation] - 250 - 350 - 500 - 700 - 1000 W).
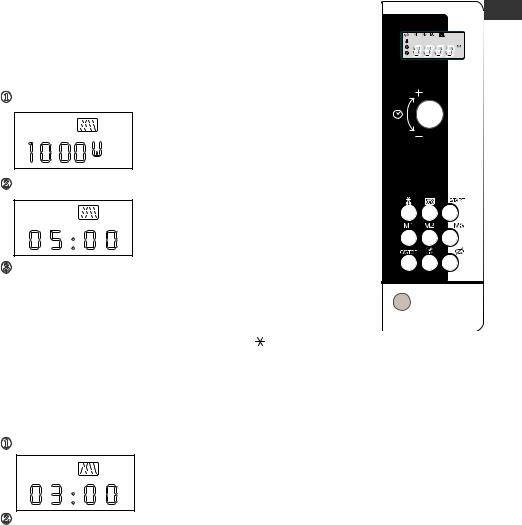
Exemple : Pour programmer une CUISSON FORTE (1000 W).
Sélectionnez 1000W avec le sélecteur micro-ondes
1 0 00 W |
s'affiche. |
2 |
Programmez le temps, ex. 5 minutes avec le sélecteur :
s'affiche.
0 5 : 0 0
1 3
Appuyez sur START.
Le programme démarre, le plateau tourne,l’éclairage intérieur s’allume. Un triple signal sonore indique la fin du programme. Ce signal est répété
toutes les minutes pendant dix minutes jusqu’à ouverture de la porte.
Pour décongeler : procéder de la même manière, en appuyant sur la touche décongélation afin de sélectionner la puissance micro-ondes 150W.
En cas d’erreur de programmation, appuyez deux fois sur la touche C/STOP.
PROGRAMMATION EXPRESS
Programmez le temps, ex. 3 minutes avec le sélecteur :
s'affiche.
0 3 : 0 0
Appuyez sur START.
Une programmation CUISSON FORTE démarre automatiquement : le plateau tourne, l’éclairage intérieur s’allume.
9

TOUCHES MEMOIRES M1 - M2 - M3
Les fonctions Mémoires vous permet d'enregistrer 3 programmes courants, que vous pouvez accéder ensuite en appuyant M1 / M2 / M3. Tous les programmes peuvent être mis en mémoire.
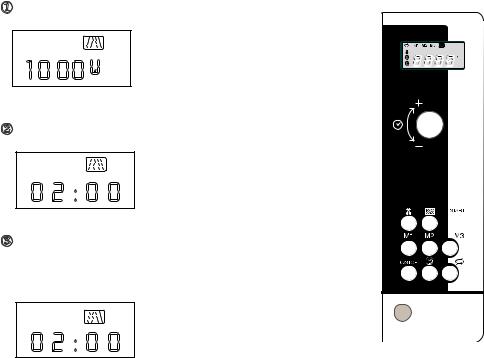
Exemple : Utilisez la touche Mémoire pour préprogrammer le réchauffage d'une assiette.
Programmez comme pour un démarrage immédiat :
Appuyez sur la touche micro-ondes afin de choisir CUISSON FORTE (100W):
|
s'affiche. |
1 0 00 W |
2 |
Programmez le temps, ex. 2 minutes avec le sélecteur :
0 2 : 0 0 |
s'affiche. |
|
1 |
||
3 |
||
|
Au lieu d'appuyez sur START, appuyez sur la touche MEMOIRE M1; un bip sonore confirme l'enregistrement de votre programme personnalisé.
s'affiche.
0 2 : 0 0
Procédez de la même façon en appuyant sur les touches Mémoires M2 & M3 afin d'enregistrer 2 programmes supplémentaires.
Pour lancer un programme mémorisé : appuyez sur la touche mémoire associée M1, M2 ou M3; les informations préprogrammées s'affichent.
Appuyez sur START, le programme démarre.
10
PROGRAMMATION ENCHAÎNEE
Vous pouvez enchaîner 2 programmes, combinant la fonction |
|
décongélation et micro-ondes. |
F |
Exemple : Utilisation de la programmation enchaînée pour lancer une décongélation de 10 minutes suivie d'une programmation micro-ondes (mijotage)
Procéder comme pour programmer une décongélation simple : - appuyez sur la touche décongélation 
- programmez le temps (ex. 10 min).
1 0 : 0 0 |
s'affiche. |
|
|
|
3 |
Au lieu d'appuyer sur START, programmez la fonction suivante :
- appuyez sur la touche  pour programmer micro-ondes, ex. MIJOTAGE
5 00 W |
s'affiche. |
1 2 4 |
|
Programmez en rajoutant le temps (ex. 20 min) au temps de décongélation.
s'affiche.
3 0 : 0 0
Appuyez sur START.
3 0 : 0 0 |
s'affiche. |
|
La programmation micro-ondes débutera automatiquement à la fin de la décongélation.
11
D E P A R T D I F F E R E
Vérifier que l'heure de l'horloge est exacte avant de commencer la programmation.
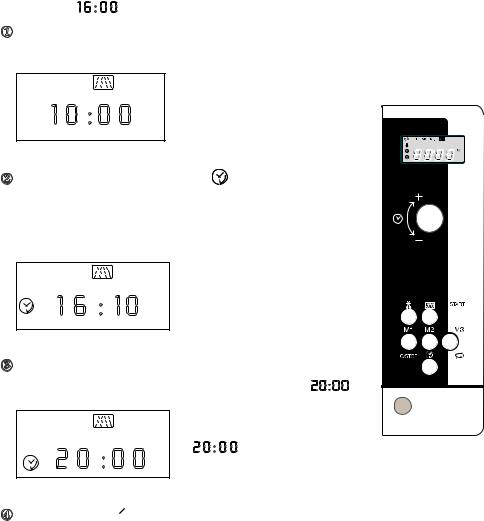
Exemple : 1 6 : 0 0
Programmez comme pour un départ immédiat :
sélectionnez la fonction et le temps (ex. micro-ondes CUISSON FORTE, 10 minutes).
s'affiche.
1 0 : 0 0
Au lieu d'appuyer sur START, appuyez sur la touche horloge  . Le temps de programmation (10 min) est rajouté automatiquement à l'heure
(16:00) et clignote dans l'afficheur, ainsi que l'horloge et la fonction sélectionnée.
3
1 6 : 1 0 |
s'affiche. |
|
1 
Programmez LA FIN de la cuisson, ex. vous voulez que le plat soit prêt à 20:00.
 2/4
2/4 
2 0 : 0 0 |
s'affiche. |
2 0 : 0 0 clignote |
Appuyez de nouveau sur la touche horloge  . L'horloge ainsi que l'heure de fin de cuisson préprogrammée s'affichent.
Vous pouvez programmer un départ différé avec toutes les fonctions à votre disposition sauf la décongélation.Vous pouvez également programmer le départ différé d’une programmation enchaînée.
Le temps de programmation minimum pour un départ différé est d'une minute.
12

UN PETIT PROBLÈME ! QUE FAIRE?
Problèmes
▼Le temps se décompte mais l’appareil ne fonctionne pas (le plateau ne tourne pas, l’éclairage ne s’allume pas et l’aliment n’est pas chauffé)
▼Le four est bruyant
▼Vous constatez de la buée sur la vitre
▼Le plateau ne tourne pas correctement
▼L’appareil produit des étincelles
Conseils
▲ Appuyer sur les touches ARRÊT PLATEAU |
F |
et DÉCONGÉLATION pendant 5 |
|
secondes. |
|
▲Ajuster le pied réglable.
Nettoyer les roulettes et la zone de roulement sous le plateau tournant.
▲Essuyer l’eau de condensation à l’aide d’un chiffon, afin d’éviter toute corrosion.
▲Nettoyer les roulettes et la zone de roulement sous le plateau tournant.
▲Vérifier que l'entraîneur et le support à roulettes soient bien positionnés. Bien nettoyer l‘appareil : retirer graisses, particules de cuisson ...
Eloigner tout élément métallique des parois du four.
Ne jamais utiliser d’éléments métalliques avec la clayette.
13

ENTRETIEN & NETTOYAGE
•MISE EN GARDE : Il est recommandé de nettoyer le four régulièrement et d’enlever tout dépot alimentaire à l’intérieur et à l’extérieur de l’appareil. Utiliser une éponge humide et savonneuse. Si l’appareil n’est pas maintenu
dans un état de propreté, sa surface pourrait se dégrader et affecter de façon inexorable sa durée de vie et conduire à une situation dangereuse. Si la porte ou le joint de porte est endommagé, le four ne doit pas être utilisé avant d’avoir été remis en état par une personne compétente.
• Ne pas nettoyer l’appareil avec un nettoyeur vapeur.
EAU
+
SAVON
•L'emploi de produits abrasifs, d'alcool ou de diluant est déconseillé; ils sont susceptibles de détériorer l'appareil.
•En cas d'odeur ou de four encrassé, faites bouillir de l'eau additionnée de jus de citron ou de vinaigre dans une tasse pendant 2 min et nettoyez les parois avec un peu de liquide vaisselle.
•Le plateau peut être retiré pour faciliter le nettoyage. Pour ce faire, prenez-le par les zones d’accès prévues
à cet effet. Si vous enlevez l'entraîneur, évitez de faire pénétrer de l'eau dans le trou de l'axe moteur.
N'oubliez pas de remettre l’entraîneur, le support à roulettes et le plateau tournant.
14

RECOMMANDATIONS
EN COURS DE PROGRAMME :
•Vous pouvez arrêter ou démarrer le plateau tournant en cours de programme en F appuyant sur la touche ARRÊT PLATEAU 
•Pour modifier un programme, appuyer deux fois sur la touche C/STOP et recommencer la programmation.
•Si vous ouvrez la porte avant la fin du programme, refermez la porte et appuyez sur la touche START pour remettre votre appareil en fonctionnement.
•En fonction Décongélation (150W), retournez l’aliment à mi-programme pour un meilleur résultat. Refermez la porte et appuyez sur la touche START pour redémarrer la décongélation.
•Si vous retirez l’aliment avant la fin de la programmation, annulez les données qui restent affichées en appuyant deux fois sur la touche C/STOP.
SERVICE APRES - VENTE
•Si l’appareil a subi une avarie quelconque :
-Vérifiez que la porte n’est pas déformée.
•Si l’appareil ne fonctionne pas, avant d’appeler le réparateur :
-Vérifiez l’alimentation électrique.
-Vérifiez la bonne fermeture de la porte.
-Vérifiez votre programmation.
ATTENTION : ne cherchez jamais à intervenir vous-même.
MISE EN GARDE : Il est dangereux pour quiconque autre qu’une personne compétente, d’effectuer une opération de maintenance ou une réparation qui nécessite le retrait d’un couvercle protégeant contre l’exposition à l’énergie des micro-ondes.
Les éventuelles interventions sur votre appareil doivent être
effectuées par un professionnel qualifié dépositaire de la marque.
Vous pouvez nous téléphoner au :
15
CONTENTS
Please read this user manual carefully. It contains important instructions concerning installation, use and security measures.
I n s t a l l a t i o n . . . . . . . . . . . . . . . . . . . . . . . . . . . . . . 17
Recommendations . . . . . . . . . . . . . . . . . . . . . . . . . . 18 General description . . . . . . . . . . . . . . . . . . . . . . . . . 19
Control panel . . . . . . . . . |
. |
. |
. |
. |
. |
. |
. |
. |
. |
. |
. |
. |
. |
. |
. |
. |
. |
. |
. 20 |
The display & the selector knob |
. |
. |
. |
. |
. |
. |
. |
. |
. |
. |
. |
. |
. |
. |
. |
. |
. |
. |
. 21 |
Setting the clock / Microwave power settings . . . . . . . . . . . 22
Setting a microwave programme/ Express programme . 23
Memory keys . . |
. . . . . . |
. |
. |
. |
. |
. |
. |
. |
. |
. |
. |
. |
. |
. |
. |
. |
. |
. |
. |
. |
. |
. 24 |
Linked programs |
. . . . . . |
. |
. |
. |
. |
. |
. |
. |
. |
. |
. |
. |
. |
. |
. |
. |
. |
. |
. |
. |
. |
. 25 |
Preprogramming |
START . . . |
. . . . . . . . . . . . . . . . . . . 26 |
Troubleshooting |
guide . . . |
. . . . . . . . . . . . . . . . . . . 27 |
Care & cleaning . . . . . . . . |
. . . . . . . . . . . . . . . . . . . 28 |
|
Pointers / After - sales service |
. . . . . . . . . . . . . . . . . . . 29 |
|
16

INSTALLATION
BEFORE CONNECTION
•Check whether your oven has suffered any damage during transport (deformed door or door seal, etc.). If you see any signs of damage, contact your dealer before use.
•Verify the power voltage. If there is a PERMANENT undervoltage (200-210 volts), consult your electrical installer.
LOCATION |
GB |
• The appliance should be installed at a distance of 85 cm above floor.
•Place the oven on a flat and horizontal surface, away from any source of heat or steam. To ensure the stability of the microwave oven, the front left foot is adjustable (5 positions). Turn it to raise or lower the appliance.
•Make sure that air may circulate freely around the oven.
Leave sufficient space around the oven :
-5 cm between the sides of the oven and any walls or objects
-14 cm above the oven
-10 cm behind the oven.
14 cm |
|
|
0 |
c |
m |
|
||
|
|
|
1 |
|
|
5 cm |
|
|
5 cm |
|
|
•Make sure that nothing obstructs the ventilation louvers at the back of the appliance.
•Some ovens are designed for flush-fitting. To obtain the corresponding kit, consult your dealer
•Make sure the electrical plug will be accessible after installation.
•Do not use your appliance immediatly (wait approx. 1-2 hours) after transfer from a cold place to a warm place as condensation may cause a malfunction.
ELECTRICAL CONNECTION
•Your installation must be protected by a 16 Amp thermal fuse.
•It is mandatory to use a power point with a ground terminal, connected in accordance with current safety regulations.
•In your electrical installation, provide a device that is accessible to the installer, capable of separating the appliance from the mains power and whose contact opening is at least 3 mm at all of the poles.
•If the supply cord is damaged, it must be replaced by the manufacturer, its service agent or similarly qualified persons in order to avoid a hazard.
17
RECOMMENDATIONS
•Your appliance is designed exclusively for the domestic purposes of defrosting, heating or cooking foods. The manufacturer bears no responsibility in the case of improper usage.
•Only use ustensils that are suitable for use in microwave ovens.
•To avoid deterioration of your microwave oven, never operate it empty or without the turntable.
•Never tamper with the lock mechanism of your microwave oven; you could cause damage requiring repair by an authorised technician.
•When heating food in plastic or paper containers, keep an eye on the oven due to the possibility of ignition.
•It is not advisable to use metal recipients, forks, spoons, knives, metal ties or staples for deep-freeze bags.
•The contents of feeding bottles are baby food jars shall be stirred or shaken and the temperature checked before consumption in order to avoid burns.
•WARNING : Only allow children to use the oven without supervision when adequate instructions have been given so that the child is able to use the oven in a safe way and understands the hazards of improper use.
•WARNING : Liquids and other foods must not be heated in sealed containers they are liable to explode.
•Eggs in their shell and whole hard-boiled eggs should not be heated in microwave ovens since they may explode, even after microwave heating has ended.
•Microwave heating of beverages can result in delayed eruptive boiling, therefore care must be taken when handling the container.
•For small amounts (one sausage, a single croissant, etc.), place a glass of water alongside the food item.
•Time settings that are too long may dry out and burn the food. To avoid such incidents, never use the same cooking times as those recommended for traditional ovens.
•If smoke is observed, switch off or unplug the appliance and keep the door closed in order to stifle any flames.
18

GENERAL DESCRIPTION
|
|
|
GB |
Identification |
Drive shaft |
Wheel |
Turntable |
label |
|
support |
|
• THE TURNTABLE :
ensures equal cooking of food throughout with no need to intervene.
-It may be used as a cooking dish.
-Rotation is controlled by the drive shaft and the wheel support.
-The turntable rotates in both directions.
-If it does not turn, verify that all components are properly positioned.
•TURNTABLE OFF  :
:
stops the turntable from revolving in order to use platters which require the entire oven space. When stopped, remember to stir the contents or turn the dish midway through the programme.
• THE WHEEL SUPPORT :
Do not try to rotate the roller ring manually, as you could damage the drive system. If it does not turn smoothly, make sure that there is nothing in the well beneath the turntable.
19
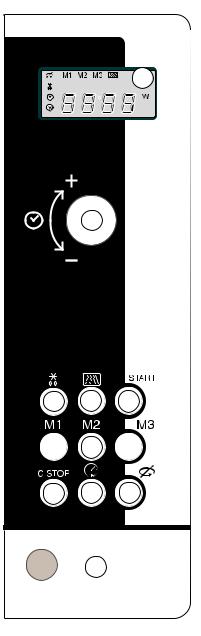
CONTROL PANEL
ADisplay window :
to simplify programming, the display indicates : the time of day, the programme length, the functions or cooking temperature programmed.
B Selector knob :
to set the clock, the programme length or the end-time of a programme.
CDefrost key  :
:
to defrost all frozen food.
DMicrowave key  :
:
to set the microwave power level.
ESTART key :
to start all programmes.
FMemory keys M1/M2/M3 :
for rapid access to 3 preprogrammed operations.
GCLEAR/STOP key C/STOP:
to interrupt (press once) or cancel a programme (press twice).
H Clock key  :
:
to set the clock or preprogramme START.
IStop-Turntable key  :
:
to stop the turntable from revolving.
JDoor open button :
to open the door or stop the oven.
|
|
A |
|
B |
|
C |
D |
E |
|
F |
|
G |
H |
I |
|
J |
|
20
T H E D I S P L A Y & T H E S E L E C T O R K N O B
W
GB
The display and the selector knobs guide you in your choice of :
turntable option :
STOP TURNTABLE
functions :
Microwave power levels
DEFROST
memorized programme settings :
M1 M2M2M3M3M3


W
|
W |
VERY LOW COOK |
/ LOW COOK / SIMMER / |
REHEAT / HIGH COOK |
|
the programme length, clock or preprogrammed start time  1 2 : 0 0
21

SETTING THE CLOCK
After first plugging in your microwave oven or after a power outage, the clock  appears in the display and 0 0 : 0 0 flashes, inviting you to set the time.
To set the clock :
-Press the CLOCK key  for 5 seconds.
-Turn the time selector knob  to the correct time (ex.12 o'clock).
-Validate by pressing the CLOCK key  .
.
Your clock is set.
0 0 : 0 0
: 0 0
1 2 : 0 0
MICROWAVE POWER SETTINGS
P O W E R S E T T I N G |
|
A P P L I C A T I O N |
|
D E F R O S T 1 5 0 W |
To defrost meat, fish, fruit, bread or delicate |
||
dishes. |
|||
|
|
||
VERY LOW |
|
To top off cooking of delicate dishes or to |
|
COOK |
2 5 0 W |
cook very slowly. |
|
|
|
To finish programmes begun with the HIGH |
|
LOW COOK 3 5 0 W |
COOK power setting which might otherwise over |
||
cook on the outside, for instance veal or pork roast. |
|||
|
|
||
|
|
To cook fish and poultry. To finish programmes |
|
|
5 0 0 W |
begun with the HIGH COOK power setting such |
|
|
as beans, lentils or milk-based dishes. |
||
|
|
||
REHEAT |
7 0 0 W |
To reheat all fresh or frozen pre-cooked dishes |
|
and frozen vegetables. |
|||
|
|
||
HIGH COOK 1000W |
To cook fresh vegetables and soup. To heat |
||
up all liquids. |
|||
|
|
||
MICROWAVE OUTPUT POWER : 1000W |
|
||
22
SETTING A MICROWAVE PROGRAMME
Your microwave oven is now plugged in and the clock is set.
Open the door, set the dish inside, close the door. If the door is nor properly shut, the appliance will not operate.
If the dish is too large to turn freely inside the oven, press the STOP TURNTABLE key  before or during the programme.
6 microwave power levels are available : |
GB |
|
(150 [defrost] - 250 - 350 - 500 - 700 - 1000 W). |
|
|
Example : Set a microwave programme at the HIGH COOK |
|
|
power level (1000 W). |
|
|
Press the MICROWAVE POWER KEY to select 1000W : |
|
|
|
|
2 |
1 0 00 W |
is displayed. |
|
|
|
|
Set the programme
 time with the selector knob, ex.5 minutes :
|
is displayed. |
1 |
3 |
0 5 : 0 0 |
|
|
|
|
|
|
|
Press START. |
|
|
|
The programme begins : the turntable revolves, the oven light comes on. 3 beeps announce the end of a programme. The beeps are repeated every minute for 10 minutes until you open the door.
To defrost, proceed similarly, using the defrost key  to select the 150W power level.
If there is an error in the programming, press the CLEAR/STOP key twice.
EXPRESS PROGRAMME
Set the programme time with the selector knob, ex. three minutes :
is displayed.
0 3 : 0 0
Press START.
The HIGH COOK programme begins automatically : the turntable revolves, the oven light comes on.
23
MEMORY KEYS M1 - M2 - M3
The Memory function allows you to store 3 frequently used programmes which you can then access simply by pressing M1 / M2 / M3. You may memorize any programme you wish.
Example : Use the Memory key to preprogramme heating up a plate of food.
Proceed as if setting the programme for immediate use :
Press the microwave power key to select HIGH COOK (1000W)
is displayed.
1 0 00 W
Set the programme time with the selector knob, ex. 2 minutes :
is displayed.
0 2 : 0 0
Instead of START, press the MEMORY key M1; after several seconds you will hear a tone confirming that the personalized programme has been memorized.
2
1 
3
M1 M2 |
M3 |
is displayed. |
|
0 2 : 0 0 |
|||
|
|||
You may memorize two more programmes by pressing the Memory key two or three times or by pressing the M2 / M3 keys.
To call up a programme, press the corresponding Memory key M1/M2/M3; the preprogrammed information is displayed.
Press START, the memorized programme begins.
24

L I N K E D P R O G R A M M E S
You may link 2 different programmes, combining defrost and microwave .
Example : Using linked programming to defrost ten minutes followed by simmer level microwave.
Proceed as if setting only a defrost programme : |
GB |
|
|
- press the defrost key |
|
- set the programme time (ex. 10 min). |
|
1 0 : 0 |
0 |
is displayed. |
|
|
|
|
|
|
|
|
|
|
3 |
|
Set the microwave level, ex. SIMMER |
|
|
|
|
5 00 |
|
|
|
|
W |
is displayed. |
|
|
|
|
W |
2 |
|
|
|
|
1 |
4 |
|
- set the programme length (ex. 20 min), adding it to the defrost time.
3 0 : 0 0 |
is displayed. |
W |
|
Press START. |
|
3 0 : 0 0 |
is displayed. |
|
The microwave programme will automatically begin at the end of the defrost programme.
25
P R E P R O G R A M M I N G S T A R T
Before programming, check that the clock is set to the correct time. Example : 1 6 : 0 0
Proceed as if setting the desired programme for immediate use :
select your function and programme length (ex. microwave HIGH COOK, 10 minutes).
is displayed.
1 0 : 0 0
Instead of START, press the CLOCK key |
. |
The programme length (10 min)is automatically added to the clocktime (16:00) and this hour flashes in the display, together with the clock symbol and the selected function.
is displayed.
1 6 : 1 0
1 0
Set the hour at which you wish the programme to finish with the time selector knob, ex. you would like the dish to be ready at 20:00 .
|
is displayed, |
|
2 0 : 0 0 |
2 0 : 0 0 |
flashes |
|
|
|
3
1 
 2/4
2/4
Press the clock key  again. The clock symbol and the preprogrammed end of the cooking time are displayed.
You may preprogramme START with whichever functions you like except for defrosting; you may even preprogramme the start of 2 linked programmes.
A minimum programme length of 1 minute is required to preprogramme START.
26

TROUBLESHOOTING GUIDE
Problem |
Suggestion |
▼The time counts down, but the appliance does not function (the turntable does not rotate, the light does not come on and the food is not heated).
▼The microwave oven is noisy when operating.
▼Condensation forms on the door glass.
▼The turntable does not revolve correctly.
▼The microwave programmes do not produce the desired results.
▼The appliance produces sparks.
▲Press the TURNTABLE OFF key  and the DEFROST key
  for 5 seconds.
GB
▲ Adjust the front left foot.
Clean the wheels and the well area beneath the turntable.
▲ Wipe the water off with the help of a cloth in order to
to avoid.
▲ Clean the wheels and the well beneath the turntable.
▲ Clean the vents under the appliance.
Make sure that you use only containers which are suitable for microwave cooking.
▲ Check whether the wheel support is correctly positioned.
Thoroughly clean the appliance : remove any greasy deposits, cooking residue, etc...
Move any metal objects away from the oven walls.
Never use metallic containers with a rack.
27

CARE & CLEANING
•WARNING : It is recomended to clear the oven regularly and to take any food deposit inside and outside the appliance.Use a soapy and wet cloth. If the appliance is not kept clean, its surface could deteriorat
and adversely affect its life and possibly result in a hazardous situation. If the door or door seals are damaged, the oven must not be operated until it has been repaired by a competent person.
• A steam cleaner is not to be used.
SOAP
+
WATER
•Do not use abrasives, alcohol or solvents as they are liable to damage the oven.
•In the event of unsavory odors or caked-on dirt, boil water containing lemon juice or vinegar in a cup for 2 minutes and clean the walls with a little dishwashing liquid.
• The turntable can be removed for cleaning. Wells are provided on both sides for easy access.
If you remove the drive shaft, do not allow water to enter the motor shaft hole.
Be sure to put the turntable, the drive shaft and the wheel support back in their proper place.
28

P O I N T E R S
WHILE THE OVEN IS OPERATING :
• You may stop or start the turntable revolving during a programme by pressing the
TURNTABLE STOP key  .
.
•To change a programme, press the C/STOP key twice and programme again.
•If you open the door before the end of the programme, shut the door and press the GB
START key to continue the programme.
•When using the defrost function (150W) turn the food midway through the programme to obtain the best results. Close the door and press the START key to continue the second half of the programme.
•If you remove a dish before the end of the programme, press the C/STOP key twice to erase the programme.
A F T E R S A L E S S E R V I C E
•If the equipment has sustained any damage :
-Check that the door is not deformed.
•If the oven does not operate, before calling the repairman :
-Check the electrical supply.
-Check that the door is properly closed.
-Check your programming.
CAUTION : never attempt to repair your oven yourself.
WARNING : it is dangerous for anyone other than qualified personnel to make any repairs requiring removal of the cover providing protection from exposure to microwave energy.
Only a specially trained technician is qualified
to repair your microwave oven.
You can ring us at the following number :
29
k INHALT
Wichtige Sicherheitshinweise. Bitte aufmerksam lesen und für zukünftige Benutzungen aufbewahren.
Installation . . . . . . . . . . . . . . . . . . . . . . . . |
. . . . . . . 31 |
Empfehlungen . . . . . . . . . . . . . . . . . . . . . . |
. . . . . . . 32 |
Präsentierung . . . . . . . . . . . . . . . . . . . . . . |
. . . . . . . 33 |
Schalterblende . . . . . . . . . . . . . . . . . . . . . . |
. . . . . . . 34 |
Display und Wählschalter . . . . . . . . . . . . . . . |
. . . . . . . 35 |
Einstellen der uhrzeit/leistungsangaben . . . . . . . . . |
. . . . . . . 36 |
Die mikrowellen-programmierung/express-programmierung |
. . . . . . 37 |
Die speichertasten . . . . . . . . . . . . . . . . . . . . . . . . . . . 38 Verknüpfte Programmierung . . . . . . . . . . . . . . . . . . . . . 39 Aufgeschobener Start . . . . . . . . . . . . . . . . . . . . . . . . . 40 Ein kleines Problem! Was können Sie tun? . . . . . . . . . . . . . 41 Pflege & Reinigung . . . . . . . . . . . . . . . . . . . . . . . . . 42 Hinweise / Kundendienst . . . . . . . . . . . . . . . . . . . . . . . 43
30
 Loading...