


FR |
GUIDE D’UTILISATION |
EN |
USER GUIDE |
ES |
MANUAL DE UTILIZACIÓN |
PT |
MANUAL DE UTILIZAÇÃO |
DE |
BETRIEBSANLEITUNG |
Four
Oven
Horno
Forno
Backofen

Dear customer,
When you discover De Dietrich products you experience the same feelings that only objects of value can arouse.
You are immediately attracted as soon as you see them. The quality of the design is illustrated by its timelessness, degree of refinement and elegance, and high standard of finish, resulting in perfect harmony between different appliances.
Then comes the irresistible urge to touch. De Dietrich design makes the most of sturdy and noble materials; priority is given to authenticity.
By combining the most advanced technologies with the best materials, De Dietrich makes products of the highest quality for the benefit of all those who love cooking.
We hope you are extremely satisfied with this new appliance and will be happy to receive your suggestions and to answer your questions. Please send them to our customer service department or use our Internet site.
We invite you to register your product on www.de-dietrich.com to take advantage of all the benefits the brand has to offer.
Thank you for your confidence.
De Dietrich
Find further details on the brand at www.de-dietrich.com
Visit La Galerie De Dietrich, 6 rue de la Pépinière in Paris
Open Tuesday to Saturday 10 a.m. to 7 p.m.
Customer Service: 0892 02 88 04
As part of our commitment to constantly improving our products, we reserve the right to make changes to them based on advances in their technical and functional features and appearance.
Attention:
Before installing and using your appliance, please read this Guide to Installation and Use carefully, as this will allow you to quickly familiarise yourself with its operation.
2
CONTENTS |
|
EN |
|
|
|
1/ DESCRIPTION OF YOUR APPLIANCE |
|
• Introduction to your oven __________________________________________ |
4 |
• Description of controls ____________________________________________ |
5 |
2 / USING YOUR APPLIANCE |
|
• Cooking or defrosting _____________________________________________ |
6 |
• Standby mode ___________________________________________________ |
6 |
• Settings when switching on for the first time __________________________ |
7 |
º Resetting the time ____________________________________________ |
7 |
• Controlling the turntable ___________________________________________ |
8 |
• “EXPERT” function (+ cooking guides) _______________________________ |
8 |
º Microwave __________________________________________________ |
14 |
º Defrost _____________________________________________________ |
15 |
º Microwave + Fan _____________________________________________ |
17 |
º Microwave + Grill _____________________________________________ |
18 |
º Turbo grill ___________________________________________________ |
19 |
º Fan cooking ________________________________________________ |
20 |
• “RECIPES” function (+ cooking guides)_______________________________ |
22 |
• “AUTO DEFROST” function ________________________________________ |
27 |
• “SETTINGS” function |
|
º Time ______________________________________________________ |
28 |
º Sound ______________________________________________________ |
28 |
º Display _____________________________________________________ |
28 |
º Consumption ________________________________________________ |
29 |
º Language ___________________________________________________ |
29 |
º Services ____________________________________________________ |
30 |
• TIMER function __________________________________________________ |
30 |
• Control panel locking (child safety device) ____________________________ |
31 |
• “DEMO” mode ___________________________________________________ |
31 |
3/ CARING FOR AND CLEANING YOUR APPLIANCE |
|
• Cleaning the outer surfaces ________________________________________ |
32 |
4/ FUNCTION SUITABILITY TESTS ________________________________________ |
33 |
5 / AFTER-SALES SERVICE |
|
• Service calls _____________________________________________________ |
34 |
3

EN 1/ DESCRIPTION OF YOUR APPLIANCE
• INTRODUCTION TO YOUR OVEN
|
|
3 |
B |
|
|
|
|
|
|
2 |
|
|
|
1 |
|
|
|
0 |
|
|
C |
|
D |
A |
|
|
|
B |
Cavity |
|
|
C |
Turntable |
|
|
D |
Door handle |
|
|
|
|
4 |
|
1/ DESCRIPTION OF YOUR APPLIANCE
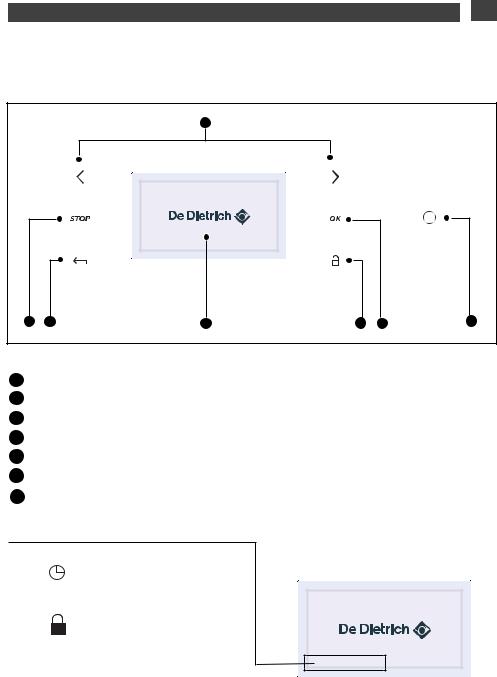
• DESCRIPTION OF CONTROLS
A
Switch off the oven or cooking programme Back to the previous level
Keypad locking
F
G “Wake up” button (emerge from standby)
List of symbols:
Programming in progress
Keypad locked
EN
G
5

EN 2 / USING YOUR APPLIANCE
• COOKING OR DEFROSTING
This oven provides three different types of programming depending on the amount of knowledge
you have about preparing the recipe in question:
-For recipes where you know all the settings (you will choose the type of cooking, temperature and cooking time yourself): select the “EXPERT” function.
-For recipes where you need the oven to help you (simply choose the type of food from a list and the weight; the oven will select the most suitable settings: temperature, cooking time, cooking type): select the “RECIPE” function.
-Automatic defrost You simply choose the type of food, enter the weight or a time for vegetables: select the “AUTO DEFROST” function
•STANDBY MODE
After 4 minutes with no action by the user, the display switches off to save energy (except for a delayed start) and the  button starts flashing. The screen is then
in standby mode.
To activate the oven and restore the display to full brightness, press the  “wake up” button.
The screen shows the time again.
6
2 / USING YOUR APPLIANCE |
|
EN |
• SETTINGS WHEN SWITCHING ON FOR THE FIRST TIME
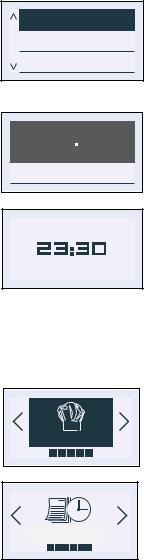
• Language
The oven automatically displays the following screen.
It allows you to select your language by pressing the < and > buttons.
Confirm by pressing OK.
English |
Francais |
Deutsch |
• Time
A second screen then appears, to allow you to set the time.
Select the time using the < and > buttons then press OK.
The hour display flashes, you can adjust it using the < and > buttons and confirm by pressing OK.
Do the same for the minutes (1).
You can choose a 12-hour (am/pm) or 24hour display (2).
Select using the < and > buttons and then confirm by pressing OK.
• Resetting the time
- Press the OK button.
The oven displays the following screen by default (“Expert”) function.
- Press the < and > buttons until the “Settings” screen appears, confirm with OK. The “Clock” screen is displayed; press OK again to access the time data screen and then proceed as for switching on for the first time.
(1)


(2)

 O K
O K
Digital display
EXPERT
21
ClockHeure
7
EN 2 / USING YOUR APPLIANCE
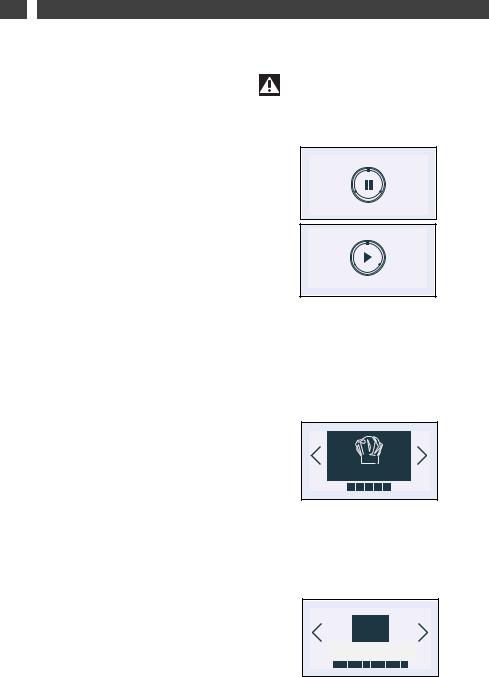
• CONTROLLING THE TURNTABLE
If you think that there is not enough space for it to rotate freely in the oven, you can stop the turntable before or during the programme.
• Stopping the turntable
- To stop the turntable, press and hold the OK button. A stop symbol is shown on the display for 3 seconds.
• Restarting the turntable
- Press OK again until an operating symbol is shown on the display.
• “EXPERT” FUNCTION
• The “Expert” function
The Expert function lets you set the cooking parameters (temperature, microwave power, cooking type, cooking time) yourself.
-Press the OK button. The “Expert” screen is displayed.
-Press OK again to choose the type of cooking from the following list by pressing the < and > buttons (to make a selection, refer to the cooking guide on the next page):
·Microwave
·Defrost
·Microwave & Fan
·Medium grill + Microwave
·High grill + Microwave
·Keep warm
·Turbo grill
·High grill
·Medium grill
·Fan cooking
Confirm your selection by pressing OK.
Warning
The turntable cannot be stopped during an auto DEFROST programme.
EXPERT
Example
Chal.tourn.+M-O
Microwave & Fan
8

2 / USING YOUR APPLIANCE |
|
EN |
“EXPERT” COOKING GUIDE
MICROWAVE
(recommended power setting 1000W min 100W max 1000W)
DEFROST
(fixed power setting 200W)
MICROWAVE & FAN
(recommended temperature 200°C min 50°C max 250°C and recommended power setting 500W min 100W max 500W)
MEDIUM GRILL + MICROWAVE
(recommended position 2 - min 1 - max 3 and recommended power setting 500W min 100W max 700W)
FULL GRILL + MICROWAVE
(recommended position 3 - min 1 - max 3 and recommended power setting 500W min 100W max 700W)
KEEP WARM
(fixed power setting 100W)
FULL GRILL
(recommended position 3 - min 1 - max 3)
•Cooking heat is provided by the upper element but without air circulation. •Preheat the oven for five minutes.
•Recommended for browning vegetable dishes, pasta, fruit, etc., placed under the grill.
9

EN 2 / USING YOUR APPLIANCE
“EXPERT” COOKING GUIDE
TURBO GRILL
(recommended temperature 200°C min 50°C max 200°C) •Cooking is done by the upper element and the fan.
•Preheating is unnecessary. Succulent roasts and poultry that are crisp all over. •Slide the drip tray on to the bottom shelf support.
•Recommended for searing and fully cooking legs of lamb, beef roasts. To retain the moist texture of fish steaks.
MEDIUM GRILL
(recommended position 2 - min 1 - max 3)
•Cooking heat is provided by the upper element but without air circulation. •Preheat the oven for five minutes.
•Recommended for browning vegetable dishes, pasta, fruit, etc., placed under the grill.
FAN COOKING
(recommended temperature 200°C min 50°C max 250°C)
•Cooking is controlled by the heating element located at the back of the oven and by the fan.
•Rapid temperature increase: Some dishes can be placed in the oven while it is still cold. •This is recommended to retain moisture in white meat, fish and vegetables.
For cooking multiple items on up to 2 levels.
10
2 / USING YOUR APPLIANCE |
|
EN |
• “EXPERT” FUNCTION
The oven asks you to enter the following cooking parameters:
Non-microwave cooking:
Temperature
Optional cooking time
Micro-wave cooking
Power
Cooking time.
Combined cooking + microwave:
Temperature
Power
Cooking time.
• Temperature
Based on the type of cooking you have already selected, the oven will recommend the ideal cooking temperature. This can be adjusted as follows:
Select the “Temperature” symbol by pressing < or >. Confirm by pressing OK, the “Temperature” field flashes: select the desired temperature by pressing < or > and confirming.
In the grill position (medium or high), select the “grill power” symbol and use the < and > buttons to set the power to the desired level (between 1 and 3) and then confirm.
Standard
OK
• Power
Based on the type of cooking you have already selected, the oven will recommend the ideal power. This can be adjusted as follows:
Select the “Power” symbol by pressing < or >. Confirm by pressing OK, the “Power” symbol flashes: select the desired power by pressing < or > and confirming.
OK |
11
 Loading...