


UK
installing instructions
Microwave Oven
CONTENTS
Important safety instructions. Read careffully and keep for future reference.
Installation . . . . . . . . . . . . |
. . . . . . . . . . . . . . . . . . . .4 |
|
Warning . . . . . . . . . . . . . . |
. . . . . . . . . . . . . . . . . . . 10 |
|
General |
description . . . . . . |
. . . . . . . . . . . . . . . . . . .11 |
Control |
panel . . . . . . . . . . |
. . . . . . . . . . . . . . . . . . .12 |
The display & the selector knob |
. . . . . . . . . . . . . . . . . . .13 |
|
Setting the clock / Microwave power settings . . . . . . . . . . .14
Setting a microwave programme/ Express programme |
. 15 |
The grilling rack . . . . . . . . . . . . . . . . . . . . . . . . |
. . .16 |
The grill function / Programming the grill function . . . .17 The microwave + grill function / Programming
the microwave + grill function |
. . . . . . . . . . . . . . . . . . 18 |
|||
The |
Pizza |
function . . . . . . . |
. . . . . . . . . . . . . . . . . . .19 |
|
The |
Pizza |
dish . . . . . . . . . . |
. . . . . . . . . . . . . . . . . . .21 |
|
Memory keys . . . . . . . . . . . |
. . . . . . . . . . . . . . . . . . .22 |
|||
Linked programs . . . . . . . . |
. . . . . . . . . . . . . . . . . . .23 |
|||
Preprogramming |
START . . . . |
. . . . . . . . . . . . . . . . . . .24 |
||
Troubleshooting |
guide . . . . |
. . . . . . . . . . . . . . . . . . . 25 |
||
Care |
& cleaning . . . . . . . . . |
. . . . . . . . . . . . . . . . . . .26 |
||
Pointers / After-sales service |
. . . . . . . . . . . . . . . . . . .27 |
|||
Aftersales |
service . . . . . . . . |
. . . . . . . . . . . . . . . . . . .27 |
||
In the unlikely event of there being a problem please call the number below quoting the model number of your appliance - this can be found on your appliance or on the front of this instruction manual. Our trained staff are available to advise or book you a servie call to one of our authorised service agents.
SERVICE LINE: O115 9766937
MON -SAT 9am -6pm
SUN 10am - 4pm
For any other information on our products please contact us at:
Brandt UK Ltd.
Intec 4
Wade Rd
Basingstoke
RG24 8NE
Tel: 01256 308000
3

INSTALLATION
BEFORE CONNECTION
•Check whether your oven has suffered any damage during transport (deformed door or door seal, etc.). If you see any signs of damage, contact your dealer before use.
•Verify the power voltage. If there is a PERMANENT undervoltage (200-210 volts), consult your electrical installer.
LOCATION
• The appliance should be installed at a distance of 85 cm above floor.
•Place the oven on a flat and horizontal surface, away from any source of heat or steam. To ensure the stability of the microwave oven, the front left foot is adjustable (5 positions). Turn it to raise or lower the appliance.
•Make sure that air may circulate freely around the oven.
Leave sufficient space around the oven :
-5 cm between the sides of the oven and any walls or objects
-14 cm above the oven
-10 cm behind the oven.
14 cm |
|
10 |
cm |
|
|
5 cm |
|
5 cm |
|
•Make sure that nothing obstructs the ventilation louvers at the back of the appliance.
•Make sure the electrical plug will be accessible after installation.
•Do not use your appliance immediatly (wait approx. 1-2 hours) after transfer from a cold place to a warm place as condensation may cause a malfunction.
ELECTRICAL CONNECTION
•Your installation must be protected by a 13 Amp thermal fuse.
•It is mandatory to use a power point with a ground terminal, connected in accordance with current safety regulations.
•In your electrical installation, provide a device that is accessible to the installer, capable of separating the appliance from the mains power and whose contact opening is at least 3 mm at all of the poles.
•If the supply cord is damaged, it must be replaced by the manufacturer, its service agent or similarly qualified persons in order to avoid a hazard.
4

INSTALLATION
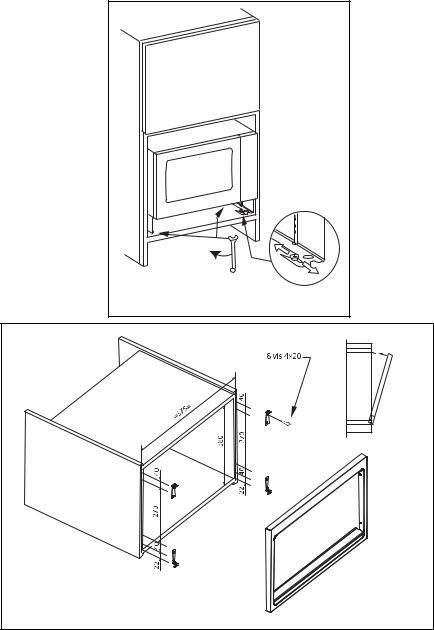
BUILT IN KIT
5

INSTALLATION
BUILT IN KIT
6 |

INSTALLATION
BUILT IN KIT
1 |
2 |
3 |
4 |
5 |
6 |
7 |
7
INSTALLATION
BUILT IN KIT
8 |
9 |
8 |

INSTALLATION
BUILT IN KIT
9
 Loading...