


Tutorial
There are six commands on the reference card indented one level under NEW: UP, DOWN, LEFT, RIGHT, PARAGRAPH, and MODE. They correspond to six of the options on ThinkTank’s NEW Com— mand menu and they allow you to specify what kind of new material to add and where. Press N (the command key for NEW)
to display this menu, which is shown in Figure 3—5.
There is a seventh option on the NEW Command Menu ——
ESCAPE —— that’s not listed under NEW on your reference card. That’s because ThinkTank’s escape valve, which stops whatever you’re doing, is always an option. It’s listed separately on the reference card under “Notes.”
You can reach these NEW options only by selecting the NEW command first. In ThinkTank terminology, these options are beneath or under NEW; they are one level deeper or subordinate to NEW in ThinkTank’s command structure. On the reference
card, and in ThinkTank in general, this relationship is expressed by levels of indentation from left to right.
The reference card is a map of ThinkTank in which one level of indentation corresponds to one level deeper in the command structure.
Now press N to select the NODE option from the NEW Command Menu. MODE disappears from the menu but a new option, EDIT, replaces it as shown in Figure 4—1. The explanation line reads TEXT EDITOR FOR HEADLINES. On the reference card, EDIT is indented one level under NODE (which is indented one level under NEW). In other words, to reach the “headline editor” from the NEW Command Menu, you must go through NODE first.
Notice that EDIT appears twice under “Adding Information” on the reference card, once under MODE and once under PARAGRAPH. As you can see from the two entries, each EDIT has a different meaning; EDIT under PARAGRAPH gets you to the TEXT EDITOR FOR PARAGRAPHS. Some other commands (such as DELETE
and COPY) also have more than one meaning in ThinkTank, depending on the context in which they appear. In all cases, the appropriate meaning will be clear from the screen, the reference card, and the reference guide.
—45—
Living Videotext, Inc.
ThinkTank Manual
Program by: David Winer
with assistance from: Jonathan Liewellyn
Manual by: John Unger Zussman with assistance from: David Greene
Software:
Copyright Cc) 1983
Living Videotext. Inc.
All rights reserved
Copyright (c) 1981
Apple Computer, Inc.
Parts of this software are copyrighted by The Regents of the University of California, 1979
Manual:
Copyright (c) 1983
Living Videotext, Inc.
All rights reserved
Living Videotext, Inc.; Apple Computer, Inc.; and the Regents of the University of California make no warranties, either express or implied, regarding the enclosed computer software package, its merchantability or its fitness for any particular purpose. The exclusion or implied warranties is not permitted by some states. The above exclusion may not apply to you. This warranty provides you with specific legal rights. There may be other rights that you have which vary from state to state.
|
Table of Contents |
|
TABLE OF |
CONTENTS |
|
PART I: LEARNING ABOUT THINKTANK |
1 |
|
Chapter 1: |
INTRODUCTION TO THINKTANK |
1 |
Box 1—1: |
Sample Uses of ThinkTank |
2 |
The Outline Approach |
3 |
|
Overview of the ThinkTank Manual |
5 |
|
Support |
|
6 |
Copy Protection and Software Piracy |
7 |
|
Chapter 2: THINKTANK ON APPLE PERSONAL COMPUTERS |
9 |
|
System Requirements |
9 |
|
Tour of the Apple Keyboards |
11 |
|
Starting Up ThinkTank |
14 |
|
Don’t Write—Protect Your Working Disks |
25 |
|
Exiting From ThinkTank |
25 |
|
Special Considerations |
26 |
|
Summary |
|
28 |
Chapter 3: A BRIEF TOUR OF THINKTANK |
29 |
|
Getting Synchronized |
29 |
|
The ThinkTank Screen |
30 |
|
The Text Area |
31 |
|
Expanding a Headline |
31 |
|
The Command Area |
33 |
|
Command Menus |
33 |
|
Adding a New Headline |
36 |
|
Deleting a Headline |
38 |
|
Correcting Mistakes |
38 |
|
Leave Disks in Place |
39 |
|
Backing Up |
40 |
|
Summary |
|
41 |
Chapter 4: USING THINKTANK: A TUTORIAL |
43 |
|
Learning More About ThinkTank |
43 |
|
The ThinkTank Reference Guide |
44 |
|
The ThinkTank Reference Card |
44 |
|
ThinkTank’ s Command System |
47 |
|
Putting It All Together |
51 |
|
A Comprehensive Example |
53 |
|
Getting Around |
54 |
|
Adding and Editing |
57 |
|
-i-
ThinkTank Manual |
|
Reorganizing an Outline |
63 |
Printing an Outline |
66 |
Creating a New Outline |
66 |
Concluding Note |
68 |
Box 4-1: Printing with 'Uppercase Computers |
69 |
Chapter 5: USING THINKTANK: NOTES AND SUGGESTIONS |
71 |
General Advice |
71 |
Getting Started |
72 |
Getting Around |
73 |
Adding Information |
74 |
Reorganizing |
76 |
Printing and Porting |
77 |
Editing Text |
80 |
Special Features |
82 |
Summary |
86 |
Appendix A: GLOSSARY |
87 |
Appendix B: INTRODUCTION TO THE PASCAL OPERATING SYSTEM |
93 |
What is an Operating System? |
93 |
Files |
93 |
Disks and Devices |
94 |
PASCAL Commands and Programs |
95 |
Appendix C: DISK MANAGEMENT |
97 |
Disk Management Tasks |
97 |
Apple II Series: Floppy Disk Systems |
98 |
Apple II Series: Hard Disk Systems |
104 |
Apple III Systems |
104 |
Appendix D: TECHNICAL INFORMATION |
107 |
Installing ThinkTank on a Hard Disk |
107 |
ASCII Conversion Table |
109 |
ThinkTank Technical Notes |
110 |
PART II: REFERENCE GUIDE |
113 |
THINKTANK COMMANDS |
113 |
ERROR MESSAGES |
197 |
INDEX |
217 |
-ii-
|
Table of Contents |
|
LIST OF FIGUKES AND TABLES |
|
|
Figure 1—1: |
Product Plan Outline |
4 |
Figure 1—2: |
ThinkTank Product Plan Outline |
6 |
Figure 2—1: |
Apple II Keyboard Figure 2—2: |
11 |
Figure 2—2: |
Apple IIe Keyboard |
12 |
Figure 2—3: |
Apple III Keyboard |
13 |
Figure 2—4: |
ThinkTank Date Display |
16 |
Figure 2—5: |
Setting the Date |
17 |
Figure 2—6: |
ThinkTank Sample Outline |
19 |
Figure 2—7: |
FILES Command Menu |
20 |
Figure 2—8: |
EXISTING FILE Menu |
21 |
Figure 2—9: |
Exit Screen |
26 |
Figure 3—1: |
ThinkTank Screen |
30 |
Figure 3—2: |
Expanding a Headline |
32 |
Figure 3—3: |
Main Command Menu |
34 |
Figure 3—4: |
Secondary Command Menu |
35 |
Figure 3—5: |
NEW Command Menu |
36 |
Figure 3—6: |
Mding a New Headline |
37 |
Figure 4—1: |
NEW Command Menu Mter Selecting MODE |
46 |
Figure 4—2: |
Reviewing the Port Format Settings |
52 |
Figure 4-3: |
Expanding and Collapsing |
55 |
Figure 4—4: |
Searching for a Keyword |
56 |
Figure 4—5: |
Entering a New Paragraph |
57 |
Figure 4—6: |
Top Level of the Paragraph Editor |
58 |
Figure 4—7: |
EDIT Command Menu |
59 |
Figure 4—8: |
Editing a Paragraph |
61 |
Figure 4—9: |
Defining a Selection |
61 |
Figure 4—10: |
Moving a Selection |
62 |
Figure 4—11: |
New Headlines |
63 |
Figure 4—12: |
Reorganizing an Outline |
64 |
Figure 4—13: |
Merged Paragraphs |
65 |
Figure 4—14: |
Creating a New Outline |
67 |
Figure 5—1: |
Translating Your Commands |
84 |
Figure C—i: |
SPECIAlIST Command Menu |
99 |
Figure 0—2: |
DISK MANAGER Command Menu |
100 |
Figure 0—3: |
Listing a Disk Directory |
103 |
Figure R—1: |
ThinkTank Screen |
113 |
Table R—1: |
Minimal Port Format Settings |
169 |
—iii—
PART I
LEARNING ABOUT THINKTANK
Chapter 1
INTRODUCTION TO THINKTANK
ThinkTank (tm) is a visual tool for working with ideas and information on your personal computer. The ThinkTank program uses the familiar format of an outline to help you generate, organize, store, and retrieve ideas with remarkable ease and efficiency. It is the first idea processor.
ThinkTank is flexible; you can apply it in many ways. It can serve as your:
*notebook
*address book
*appointment calendar
*card file
*file folder
*file cabinet
*secretary
*administrative assistant
*bulletin board
Because ThinkTank is electronic, you can examine, add, alter, reorganize, print, or delete your information in seconds.
ThinkTank’s flexibility means that you can adapt it to your needs and applications. You can choose what kind of in— formation to store in ThinkTank and how to organize it. You can use it to write a memo, store a customer list, look up a telephone number, organize a report, record a family tree, or catalogue a stamp-collection. Box 1—1, which lists representative uses of ThinkTank, contains just a fraction of its many applications. ThinkTank is like having an administrative genie at your beck and call.
—1—
ThinkTank Manual
------------------------------------------------------------------
Box 1—1
Sample Uses of ThinkTank
The applications of ThinkTank are as unlimited as your imagination. Here are a few of its many uses:
Business and Professional |
Scientific and Technical |
||
* |
Action lists |
* |
Bibliographies |
* |
Appointment calendars |
* |
Computer programs |
* |
Business plans |
* |
Curriculum vitae |
* |
Catalogues |
* |
Grant proposals |
* |
Checklists |
* |
Journal articles |
* |
Client records |
* |
Monographs |
* |
Corporate reports |
* |
Research notes |
* |
Correspondence |
* |
Research presentations |
* |
Customer lists |
* |
Research reports |
* |
Instruction manuals |
* |
Specifications |
* |
Inventory lists |
|
|
* |
Legal briefs |
Educational |
|
* |
Marketing plans |
* |
Bulletins |
* |
Medical records |
* |
Class notes |
* |
Memos |
* |
Course catalogues |
* |
Minutes |
* |
Course outlines |
* |
Notices |
* |
Courseware |
* |
Product analyses |
* |
Lesson plans |
* |
Product plans |
* |
Heading lists |
* |
Project plans |
* |
Student records |
* |
Proposals |
* |
Test item files |
*Personnel records
* |
Presentations |
Home |
|
* |
Reports |
* |
Address books |
* |
Resumes |
* |
Catalogues of collections |
* |
Schedules |
* |
Appointment calendars |
* |
Telephone directories |
* |
Correspondence |
* |
To do lists |
* |
Genealogies |
* |
Training manuals |
* |
Household records |
* |
Word processing |
* |
Shopping lists |
------------------------------------------------------------------
—2—
Introduction
THE OUTLINE APPROACH
The key to the power and flexibility of ThinkTank is its outline approach to organizing information. The outline approach mirrors our natural way of processing information. Suppose this morning when you came to work you learned that:
There is snow on the ground
Your car needs gas
The price of gas is up again
The stack market is down
It is cold
The consumer price index is up
Your boss is absent
When you think about this information, you don’t think of it as seven separate, independent items. Instead, you group
related items together in organized categories:
Weather
Snow
Cold
Economy
Stock market down
Inflation
Consumer price index up
Price of gas up
Work
Boss absent
In other words, you organize the items very much like an
outline.
Let’s take a more practical example. Suppose you are a corporate product manager developing a proposal for a new product line. You might start by writing down your thoughts as they occur to you, in random fashion:
—3—
ThinkTank Manual
Product type: alcoholic beverage
Primary market: young adults
Taste: sweet and fruity
Position: high Status and sophisticated
But random thoughts do not make a product plan; they must be arranged into a coherent, persuasive document. So you
might organize your thoughts into an outline as shown in Figure 1—1. With an outline it is easy to find information. For example, if you want to examine your ideas on product positioning, you can go straight to the section on marketing instead of searching through an unorganized list. You can see at a glance how your ideas fit together, which sections are solid and which need further thought. In addition, since the outline is organized just like the product plan will be, it makes the document much easier to write.
But it is difficult to work with an outline on paper. Some sections always seem to end up cluttered and hard to read, others sparse and empty. If you want to move an idea from one section of the outline to another, or eliminate it altogether. you have to do a lot of erasing, crossing out, or cutting and pasting. If you want to share the outline with a
Figure 1—1: Product Plan Outline
—4—
Introduction
colleague, you may have to decipher your handwriting or (worse) have it typed. Outlines on paper can be major hassles.
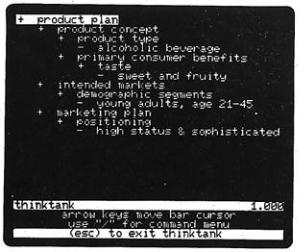
Figure 1—2 shows the same outline as ThinkTank might display it on your computer screen. (This is actually an excerpt from a larger outline included with the ThinkTank program and used as an example in this manual.) Unlike a paper outline, a ThinkTank outline is easy to work with because it is freeform, flexible, and controllable. You can readily:
*examine any part of it
*change any part of it
*add as many headings as you wish
*add as many levels of subheadings as you wish
*add paragraphs as well as headings
*copy any part of it
*delete any part of it
*move part of it from one section to another
*reorganize it
*search for specific information
*replace specific information
*print any part of the outline
*edit it with a word processor
*send it to other ThinkTank users
In other words, you have complete control over your outline. You can personalize it to your own needs. And you can perform all of these.operations with commands that are easy to learn and easy to use.
As you can see, ThinkTank is an organizing tool that can help you be more productive and efficient. There seems to be no limit to its usefulness; the more you use it, the more uses you’ll find.
OVERVIEW OF THE TRINKTANK MANUAL
The ThinkTank manual is divided into two parts, the first devoted to helping you learn ThinkTank, the second to helping you use it.
—5—
ThinkTank Manual
Figure 1—2: ThinkTank Product Plan Outline
The first part is called Learning About ThinkTank. Following this introduction, Chapter 2 describes how to start up and begin to operate ThinkTank on your computer. Chapter 3
gives you a brief tour of ThinkTank and contains essential information about using it. Chapter 4 is a tutorial which shows you how to learn about ThinkTank and introduces you to its most important commands. Once you have learned the basics, Chapter 5 contains notes and suggestions to help you get the most out of ThinkTank. At the end of Part I is a set of appendices including a glossary, an introduction to the PASCAL operating system, instructions for disk management, and technical information.
The second part of the manual is the Reference Guide, which contains a comprehensive alphabetical summary of all ThinkTank commands. The manual concludes with an index.
SUPPORT
The ThinkTank program and manual have been extensively tested and refined to minimize problems. If a problem occurs, ThinkTank generally displays an error message to help you diagnose it. There is a list of error messages and suggested solutions in the reference guide.
—6—
Introduction
If you have questions or problems that the manual does not resolve, check with your dealer. ThinkTank dealers are trained to configure the program to your computer system, provide guidance and information, solve problems, and help you get the most out of ThinkTank.
Living Videotext, Inc., is committed to supporting Think— Tank. If you have a question that your dealer can’t resolve, or if you purchased your copy of ThinkTank directly from Living Videotext, please feel free to call us for help. We also welcome your comments and suggestions for improving subsequent versions of ThinkTank.
In this package you will find the ThinkTank license agreement. Read it carefully, sign the attached card, and fill in all requested information including your ThinkTank serial number, which is displayed on your screen when you start up the program or change outlines. Mail the card back to Living Videotext (it is postage—free within the United States). It registers you as a ThinkTank user and entitles you to receive support and information about ThinkTank updates, applications, and new products.
Living Videotext maintains a library of ThinkTank technical notes which contain technical information not ordinarily required to operate the program. They are meant for specialized uses and include such topics as custom instal-
lation on a hard disk system and how to use ThinkTank with compatible word processing programs. You can order these notes from Living Videotext for a nominal cost of $5.00. Appendix D of this manual contains a list of technical notes currently available; others may be offered periodically.
COPY PROTECTION AND SOFTWARE PIRACY
The ThinkTank license agreement entitles you to use the program personally or in your business. You may not give or sell this program, or copies of it, to anyone else. Violation of this agreement is sometimes called software piracy and it is illegal.
—7—
ThinkTank Manual
Some software companies have chosen to combat piracy by making their programs impossible to copy. We decided against such copy protection because it could prevent you from getting the full benefit of ThinkTank. There are legitimate reasons for you to make copies.of ThinkTank —— to back up your program disk in case it becomes damaged, for example. Copy protection also increases the cost of a program.
We believe strongly in this open policy, but it’s risky. We will reevaluate it when we release future versions of Think— tank and other products. If experience shows that our trust was unwarranted, we will have to implement copy protection and other defensive measures to protect our software.
We ask that you help us keep ThinkTank flexible, open, and easy to use. Don't pirate our software!
-8—
Apple Versions
Chapter 2
THINKTANK ON APPLE PERSONAL COMPUTERS
ThinkTank comes in three different versions for Apple computers: one for the Apple II and II Plus; one for the Apple IIe; and one for the Apple III. This chapter contains information and instructions for each version. It covers:
*system requirements
*the Apple keyboards
*starting up ThinkTank
*exiting from ThinkTank
*special considerations for Apple computers
Make sure you have the right version of ThinkTank for your computer, and read the instructions below that apply to it.
SYSTEM REQUIREMENTS
Your equipment should be set up according to the manufacturer’s instructions. Your dealer can provide any assistance you need.
App1e II and App1e II Plus
To use the Apple II version of ThinkTank, you will need:
*an Apple II or Apple II Plus computer
*48K bytes or more of internal (random access) memory (RAM)
*a 16K Apple language or memory card
*two or more floppy disk drives; or one hard disk drive with the PASCAL operating system
—9—
ThinkTank Manual
*a video monitor (preferable) or television set (and adapter)
*a printer (recommended but not required)
On the Apple II, ThinkTank uses the simple 40—column, uppercase—only display. If you have an 80—column card, Think— Tank will automatically switch it off or ask you to do so.
The Apple II version of ThinkTank will also run on an Apple IIe computer -in 40—column, uppercase mode. However, if you have an Apple 80—Column Text Card in your Apple IIe, you should obtain the version of ThinkTank specifically designed for the Apple IIe.
Apple IIe
To use the Apple IIe version of ThinkTank, you will need:
*an Apple IIe computer
*an Apple 80—Column Text Card or Extended 80—Column Text Card
*two or more floppy disk drives; or one hard disk drive with the PASCAL operating system
*a video monitor (preferable) or television set (and adapter)
*a printer (recommended but not required)
Apple III
To use the Apple III version of ThinkTank, you will need:
*an Apple III computer, which includes one floppy disk drive
*one additional floppy disk drive, or a hard disk drive
— 10—
Apple Versions
*the video monitor supplied with the Apple III
*the System Utilities Disk supplied with the Apple III
*a printer (recommended but not required)
TOUR OF THE APPLE KEYBOARDS
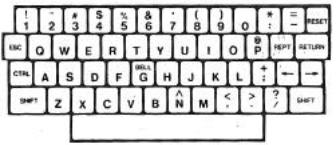
The keyboards of the Apple II, Apple IIe, and Apple III computers are illustrated in Figures 2—1, 2—2, and 2—3. They are very much like a typewriter —— with some important exceptions. Apple computers have several keys. that are not found on a standard typewriter, and ThinkTank uses some standard keys in nonstandard ways. These special keys are highlighted in the figures. Moving roughly counter—clockwise from the upper left, they include:
*ESCAPE OR ESC: The ESCAPE key, as its name implies,
is an all—purpose escape valve which is used to cancel, terminate, or conclude a ThinkTank command or operation.
*CONTROL or CTRL: The CONTROL key has no effect by
“Reproduced by permission of Apple Computer, Inc. 1983”
Figure 2—1: Apple II Keyboard
—11—

ThinkTank Manual
“Reproduced by permission of Apple Computer, Inc. 1983”
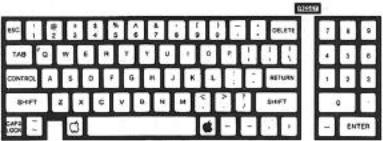
Figure 2—2: Apple IIe keyboard
itself, but it is often used with other keys to give ThinkTank commands. For example, you give the command CTRL—D, which is used to delete text in Think— Tank’s text editor, by holding down the CTRL key and pressing D. You must press the CTRL key first and must not release it before pressing D. The CTRL key is sometimes abbreviated by the caret ("^“) symbol, as in ^D.
*SHIFT: As on a typewriter, some Apple keys have two characters printed on them, like “," (comma) and "<" (less than) at the bottom right. You can enter the lower character (",”) simply by pressing the key, or the upper character (‘<“) by pressing it while holding down either SHIFT key.
On the Apple IIe and Apple III, you can hold down
the SHIFT key to capitalize letters that would otherwise be entered in lowercase. The Apple II SHIFT
key has no effect on letters. All letters are entered and displayed in uppercase regardless of whether you press SHIFT.
—12—
Apple Versions
“Reproduced by permission of Apple Computer, Inc. 1983”
|
Figure 2—3: Apple III Keyboard |
|
* |
CAPS LOCK or |
ALPHA LOCK: [Apple IIe and III only] |
|
A shift lock |
key. Once you press it, all letters |
are capitalized until you press it again.
*OPEN—APPLE: [Apple IIe and III only] Not used in ThinkTank.
*SOLID—APPLE: [Apple IIe and III only] On the Apple III, accelerates the repeating effect of holding down a key. Not used in ThinkTank on the Apple IIe.
*SPACE BAR: The space bar is used to enter spaces into your outline, to change lines in ThinkTank menus, and to enter the SPACE conmmand.
*ARROW KEYS: The left, right, up, and down arrow keys are used to move a pointer, or cursor, to dif— ferent headlines, characters, or commands. The left arrow key is also used as a backspace. Since the Apple II has no up and down arrow keys, we have configured CTRL—O and CTRL—K to substitute for them.
—13—
ThinkTank Manual
*REPT: [Apple II only] The REPEAT key, when held down simultaneously with another key, causes the other key to repeat. On the Apple IIe and III, you can repeat a key by simply holding it down.
*RETURN: The RETURN key enters a headline into Think— Tank or selects a command. You use it to indicate
that you are satisfied with your current entry or command and want the computer to accept it. Al-
though it is sometimes called a carriage return, you will generally not use it to move from the end of
one line to the beginning of the next, since Think— Tank does this automatically.
*DELETE: [Apple IIe only] In ThinkTank’s text editor, the DELETE key is used to erase characters or selected blocks of text.
*RESET: The RESET key terminates whatever program is running and causes your computer to act like it had just been turned on. (Since this can be a rather drastic measure, some computers require you to press CTRL—RESET to minimize the chance of accidentally resetting your computer.) You may use RESET to start up ThinkTank (see below). However, DO NOT
PRESS THE RESET KEY while running ThinkTank except in the rare case that your computer “hangs” and will not respond to your commands. Pressing RESET causes a premature exit from the program and you will lose any information that hasn’t yet been recorded on
your data disk.
In addition to these special keys, the Apple III has a numeric keypad on the right side of the keyboard. You can use all of its keys in ThinkTank. The ENTER key is equivalent to the RETURN key described above.
STARTING UP THINKTANK
This section is divided into two parts. If you have a hard disk drive on your computer system, skip to the section on “Hard Disk Systems” later in this chapter.
—14—
Apple Versions
Floppy Disk Systems
If you are operating ThinkTank on a floppy disk system, you will need at least two disk drives. Drive 1 is considered your main disk drive and is used to load and hold the THINK— TANK PROGRAM DISK. Drive 2 and other drives contain ThinkTank data disks. Your drives and their controller should be installed in standard fashion (Slot 6, Drives 1 and 2 on the Apple II and IIe). Your dealer will normally take care of this for you.
Step 1: INSERT PROGRAM AND DATA DISKS
Depending on your computer, the ThinkTank package may contain two or three disks. One is labelled THINKTANK PROGRAM DISK and it contains the instructions your computer uses to
run ThinkTank. The second is labelled THINKTANK DATA DISK and it contains the sample outlines discussed in this manual.
Once you learn how to use ThinkTank, you will create your own data disks to store your own outlines. If you have an Apple
III, you have a third disk called the THINKTANK BOOT DISK; it contains the instructions your computer uses to start up Think— Tank.
(a)Apple II and IIe. Place the THINKTANK PROGRAM DISK in Drive 1 of your machine and your ThinkTank data disk in another drive. If this is your first time using ThinkTank, use the THINKTANK( DATA DISK supplied with the program and insert it in Drive 2.
(b)Apple III. Place the THINKTANK BOOT DISK in the Apple III’s. built—in drive (Drive 1) and your ThinkTank data disk in another drive. If this is your first time ~using Think— Tank, use the THINKTANK DATA DISK supplied with ‘the program and insert it in Drive 2.
Step 2: POWER UP OR RESET
(a)If power is off, turn it on. ThinkTank is designed to start up automatically when you turn on your computer.
First turn on your monitor or television set if it has a separate switch. Now simply turn on the power switch, which is located on the back of your computer near the left—hand corner.
—15—
ThinkTank Manual
Your disk drives will whir and their lights will turn on as your computer reads information from the disks. On the Apple II or IIe, you will soon see the ThinkTank date display shown in Figure 2—4, which means that the program has loaded successfully. Skip to Step 3.
Apple III. Before it loads the program, your computer will display the message:
PUT PASCAL SYSTEM DISK IN BUILT—IN DRIVE. PRESS RETURN.
Remove the THINKTANK BOOT DISK from your built—in disk drive (Drive 1) and replace it with the THINK— TANK PROGRAM DISK. Then press RETURN. In a few seconds you will see the date display; skip to Step 3.
(b)If power is on, reset your computer. Make sure you have completed whatever program you were previously using.
Now simply press the BESET key (on some computers you may have to press CTRL-~RESET). The program will start as described in Step 2(a) above.
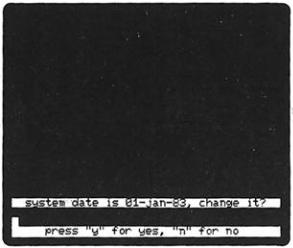
Figure 2—4: ThinkTank Date Display
— 16—

Apple Versions
Step 3: SET THE DATE
ThinkTank keeps a record of the current date, which it “stamps" on the outlines you create and print. Each time you start up the program, ThinkTank displays the last date entered and asks you if you want to change it, as shown in Figure 2—4.
Suppose the date shown is incorrect-. Press Y (for YES) to tell ThinkTank that you want to change it. The program now displays the current date and your options as shown in Figure 2—5.
Look~at the message:
<— MOVES BACK IN TIME, —> FORWARD
<— and —> represent the left and right arrow keys respectively. Press these keys and watch what happens to the date. The right arrow key advances it, while the left arrow key sets it back. Use the arrow keys to set the correct date.
Now look at the message:
PRESS "/” TO CHANGE MONTH
Figure 2—5: Setting the Date
— 17—
ThinkTank Manual
Press the slash ("/“) key and notice that the month begins to flash. You can now use the arrow keys to set the correct month. When you’re finished, press the slash key again and set the year. If you make a mistake, press the slash key several times to cycle back to the incorrect component.
The message:
PRESS (RETURN) TO EXIT
tells you what to do when the date is correct: press the
RETURN key. The program registers the new date and displays the ThinkTank title screen as it prepares to load in an outline.
The process of setting the date is representative of ThinkTank in general. The program always guides you through the steps and lets you know what your major options are.
If the date shown in Figure 2—4 is correct, or if you’d like to skip the date and go right into ThinkTank, just press N (for NO) or the ESC key —— ThinkTank’s all—purpose escape valve. ThinkTank will assume that the original date was correct and go directly to the title screen. No damage will be done if the date is incorrect.
Step 4: LOAD YOUR THINKTANK OUTLINE
(a) Automatic Loading. If you are using ThinkTank for the first time, it is set to load the sample outline from the THINKTANK DATA DISK. As you continue to use ThinkTank, it keeps a record of the last outline you worked on. If you insert the same disk in the same drive next time, ThinkTank will automatically load it along with the program.
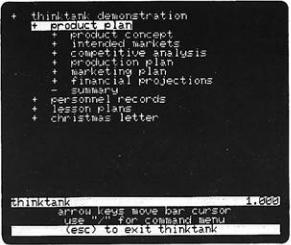
Thus, if you see the title of your outline at the top of your screen, you have successfully started up ThinkTank. (The title of the sample outline is THINKTANK( DEMONSTRATION, as shown in Figure 2—6.) Skip the next section on “Operator Loading” (as well as the following one on “Hard Disk Systems”) and continue with “Don’t Write—Protect Your Working Disks.”
— 18—
Apple Versions
Figure 2—6: ThinkTank Sample Outline
(b)Operator Loading. If you are not loading the sample outline or the same one you used last time, you will see the
FILES Command Menu at the bottom of your screen as shown in Figure 2—7. Press E to tell ThinkTank that you want to open
an existing outline, as indicated at the bottom of the screen.
ThinkTank’s response depends on how it has been configured to your disk drives. (For more information on configuring ThinkTank, see the DISK command in the reference guide.)
1.If ThinkTank displays the message:
PRESS (SPACEBAR)
AFTER INSERTING DISKETTE IN DRIVE 2
then it is configured for two floppy disk drives. Simply place your data disk in Drive 2 and press the space bar. You will see the title of the outline appear at the top of your screen.
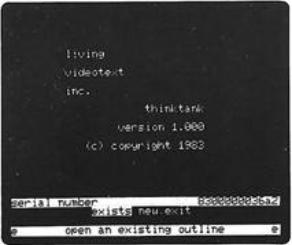
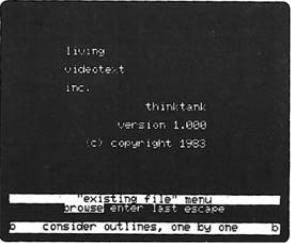
2. If ThinkTank displays an EXISTING FILE Menu like the one shown in Figure 2—8, it is configured for more than two floppy
—19—
ThinkTank Manual
Figure 2—7: FILES Command Menu
drives or a hard disk drive. Press ~ and ThinkTank will give you a chance to browse through your outlines. It begins to display the names or titles of the outlines it finds on your disks. You can press RETURN to select an outline or the right arrow key to display the next name. If you want to load the sample outline, its title is THINKTANK DEMONSTRATION and the file is called THINKTANK.DB.
When you press RETURN to select the outline you want, ThinkTank will read it from your data disk and display its title at the top of your screen. Skip the following section on “Hard Disk Systems” and continue with "Don’t Write—Protect Your Working Disks."
If your computer is set up correctly and you follow these steps, you should have no trouble starting up ThinkTank. In the rare case that a problem arises, ThinkTank will help to
diagnose it by displaying an error message at the bottom of the screen. These messages are listed in the reference guide
along with their most likely causes and recommended courses of action. If problems persist, consult your dealer or Living Videotext.
—20—
Apple Versions
Figure 2—8: EXISTING FILE Menu
Hard Disk Systems
If you have a hard disk drive, its increased capacity and rapid access will make ThinkTank especially powerful and convenient. To use a hard disk with an Apple II or IIe, you will need access to the PASCAL operating system (p—System) under which ThinkTank runs, and you must format at least part of your hard disk for this system. (For an introduction to the PASCAL operating system, see Appendix B).
You will also need to install ThinkTank on your hard disk. Your dealer can take care of this, or y~u can follow the instructions in Appendix D. The instructions in this section assume that you have already installed ThinkTank on your hard disk.
If you have floppy disk drives as well as a hard disk, you may load the ThinkTank program and outlines from either type of disk.
—21-
ThinkTank Manual
Step 1: ENTER THE PASCAL OPERATING SYSTEM
There are several ways to do this, depending on your system. You may simply have to turn on your computer or press the RESET key (CTRL—RESET on some machines). If you are running a PASCAL program, simply exit from it. If you are using another operating system, you may have to execute a program which loads PASCAL. Your dealer can help you determine which method to use.
When you enter the PASCAL system you will see the system command prompt~
Command: E(dit, R(un, F(ile, C(omp,
L(ink, X(ecute, A(ssem, D(ebug, ?
(If you see only half of this prompt line, press CTRL—A to switch from one half to the other.)
Step 2: SET SWAPPING’ OPTION (APPLE II and IIe ONLY)
Once the command prompt is displayed, turn on PASCAL’s
"swapping” option if you have an Apple II or IIe. Type S and PASCAL will tell you whether swapping is on or off and ask you whether you want to “toggle” (change) it. Assuming it’s cur-
rently off, type Y (for YES) PASCAL will activate swapping mode and display the command prompt again. (If swapping is currently on —— as it would be if you had already run Think— Tank in the current PASCAL session —— type N for NO instead of
Y.)
Step 3: EXECUTE THINKTANK
When PASCAL displays the command prompt again, press X
(for execute). The computer will respond:
EXECUTE WHAT FILE?
Enter the program name TANK, preceded by its volume or device number. Suppose you have installed the program on Drive I (PASCAL device #4) in a volume called TANK:. Then you could enter either of the following:
—22—
Apple Versions
#4: TANK TANK: TANK
and press RETURN. In a moment you will see the ThinkTank date display (Figure 2—4 above), which indicates that you have successfully loaded ThinkTank. If you have any trouble, check
the installation information in Appendix D.
Step 4: SET THE DATE
Setting the date on a hard disk system is identical to doing ‘so on a floppy disk system. Follow the instructions for Step 3 under “Floppy Disk Systems” above. Then return here for Step 5.
Step 5: LOAD YOUR THINKTANK OUTLINE
(a) Automatic Loading. If you are using ThinkTank for the first time, it is set to load the sample outline from Drive 2 (PASCAL device #5). As you continue to use ThinkTank, it keeps a record of the last outline you worked on. If it’s available in the same drive next time, ThinkTank will automatically load it along with the program.
Thus, if you see the title of your outline at the top of your screen, you have successfully started up ThinkTank. (The title of the sample outline is THINKTANK DEMONSTRATION, as shown in Figure 2—6 above.) Skip the next section on “Operator Loading.”
(b) Operator Loading. If you are not loading the sample outline or the same one you used last time, you will see the
PILES Command Menu at the bottom of your screen as shown in Figure 2—7 above. Press E to tell ThinkTank that you want to open an existing outline, as indicated at the bottom of the screen.
ThinkTank’s response depends on how it has been configured to your disk drives. (For more information on configuring ThinkTank, see the DISK command in the reference guide.)
1. If ThinkTank displays an EXISTING FILE Menu like the one
—23—
 Loading...