


 Loading...
Soundtrack Pro 3
User Manual
Copyright © 2009 Apple Inc. All rights reserved.
Your rights to the software are governed by the accompanying software license agreement. The owner or authorized user of a valid copy of Final Cut Studio or Logic Studio software may reproduce this publication for the purpose of learning to use such software. No part of this publication may be reproduced or transmitted for commercial purposes, such as selling copies of this publication or for providing paid for support services.
The Apple logo is a trademark of Apple Inc., registered in the U.S. and other countries. Use of the “keyboard” Apple logo (Shift-Option-K) for commercial purposes without the prior written consent of Apple may constitute trademark infringement and unfair competition in violation of federal and state laws.
Every effort has been made to ensure that the information in this manual is accurate. Apple is not responsible for printing or clerical errors.
Note: Because Apple frequently releases new versions and updates to its system software, applications, and Internet sites,images shown in this manual may be slightly different from what you see on your screen.
Apple
1 Infinite Loop Cupertino, CA 95014 408-996-1010 www.apple.com
Apple, the Apple logo, Apple Cinema Display, AppleScript, Apple TV, DVD Studio Pro, Final Cut, Final Cut Pro,
Final Cut Studio, FireWire, iPhoto, iPod, iTunes, Logic, Logic Studio, Mac, Macintosh, Mac OS, QuickTime, and Soundtrack are trademarks of Apple Inc., registered in the U.S. and other countries.
Finder and Multi-Touch are trademarks of Apple Inc.
AppleCare and iTunes Store are service marks of AppleInc., registered in the U.S. and other countries.
“Dolby,” “Pro Logic,” and the double-D symbol are trademarks of Dolby Laboratories. Confidential Unpublished Works, © 1992–1997 Dolby Laboratories, Inc. All rights reserved.
NeXT is a trademark of NeXT Software, Inc., registered in the U.S. and other countries.
Other company and product names mentioned herein are trademarks of their respective companies. Mention of third-party products is for informational purposes only and constitutes neither an endorsement nor a recommendation. Apple assumes no responsibility with regard to the performance or use of these products.
Production stills from the film “Koffee House Mayhem” provided courtesy of Jean-Paul Bonjour. “Koffee House Mayhem” © 2004 Jean-Paul Bonjour. All rights reserved. http://www.jeanpaulbonjour.com

Contents
Preface |
11 |
Welcome to Soundtrack Pro |
|
11 |
About Soundtrack Pro |
|
12 |
About the Soundtrack Pro Documentation |
|
12 |
Additional Resources |
Chapter 1 |
15 |
Setting Up Your System |
|
15 |
System Considerations |
|
17 |
Connecting Equipment |
|
21 |
Example Hardware Setups |
Chapter 2 |
27 |
The Soundtrack Pro Interface |
|
28 |
Soundtrack Pro Window Organization |
|
35 |
Project Pane |
|
36 |
Toolbar |
|
36 |
Transport Controls |
|
37 |
Timeline |
|
41 |
File Editor |
|
43 |
Mixer |
|
45 |
Multitake Editor |
|
46 |
Conform |
|
46 |
Bin |
|
48 |
Meters Tab |
|
49 |
Recording Tab |
|
50 |
Browser |
|
51 |
Search Tab |
|
53 |
Favorites Tab |
|
54 |
Video Tab |
|
54 |
Project Tab |
|
58 |
Details Tab |
|
62 |
Effects Tab |
|
63 |
Tracks Tab |
|
64 |
Actions Tab |
|
65 |
Analysis Tab |
3

|
66 |
HUDs |
Chapter 3 |
69 |
Basics of Working in Soundtrack Pro |
|
69 |
About Multitrack and Audio File Projects |
|
72 |
Setting Up Your Workspace |
|
76 |
Using Keyboard Shortcuts and Shortcut Menus |
|
77 |
Undoing and Redoing Changes |
|
78 |
About Changing Values and Timecode Entries |
|
81 |
Locating and Adding Audio Files |
|
89 |
About the Bin |
|
93 |
Previewing Audio Files |
|
95 |
Playing Projects |
|
99 |
Using Snapping |
|
101 |
Reconnecting Media Files |
Chapter 4 |
103 |
Soundtrack Pro Preferences |
|
103 |
Setting Soundtrack Pro Preferences |
|
105 |
General Preferences |
|
107 |
Project Preferences |
|
108 |
Recording Preferences |
|
109 |
Synchronization Preferences |
|
110 |
Control Surfaces Preferences |
|
111 |
Video Out Preferences |
Chapter 5 |
113 |
Working with Multitrack Projects |
|
113 |
Creating, Opening, and Closing Multitrack Projects |
|
114 |
Creating a Multitrack Project from Final Cut Pro Clips or Sequences |
|
114 |
Setting Project Properties |
|
118 |
Setting the Project Length |
|
119 |
Setting Default Locations for Saving Media Files |
|
120 |
Saving Multitrack Projects |
|
121 |
Adding Files to a Multitrack Project |
|
123 |
Clip Properties |
|
124 |
Tracks, Busses, Submixes, and the Master Bus |
Chapter 6 |
129 |
Working in the Timeline |
|
130 |
About the Timeline |
|
130 |
Using the Timeline Editing Tools |
|
132 |
Timeline Editing Tools HUD |
|
133 |
Moving Around in the Timeline |
|
140 |
Working with Tracks, Busses, and Submixes in the Timeline |
|
152 |
Selecting Audio Clips in the Timeline |
|
153 |
Selecting the Entire Contents of a Track |
4 |
Contents |

|
154 |
Selecting Partial Contents of One or More Tracks |
|
155 |
Cutting, Copying, Pasting, and Removing Audio Clips |
|
157 |
Splitting and Joining Audio Clips |
|
160 |
Spotting Clips to the Timeline |
|
161 |
Moving Clips |
|
163 |
Snapping Clips to Clips on Other Tracks |
|
163 |
Resizing Audio Clips |
|
166 |
Changing the Offset of an Audio Clip |
|
167 |
Creating Fades and Crossfades in the Timeline |
|
173 |
Truncating Overlapping Audio Clips |
|
174 |
Working with Markers |
|
179 |
Transposing Tagged Audio Clips |
|
179 |
Replacing the Source Audio in a Clip |
|
181 |
Replacing Audio with Related Files |
|
181 |
Making Clip Channel Selections |
|
184 |
Combining Separate Clips to Create Multichannel Clips |
|
184 |
Editing Clip and Track Properties |
Chapter 7 |
189 |
Editing Audio in the Multitrack Timeline |
|
189 |
How Selection Type Affects Actions |
|
191 |
Editing in Place |
|
192 |
How Clips Are Affected by Media File Editing |
|
192 |
How Source Audio File Editing Works in a Multitrack Project |
|
193 |
Making an Independent Copy of a Clip |
|
193 |
Using the Multitrack Timeline and the File Editor Together |
|
196 |
Editing with the Timeslice Tool |
|
201 |
Processing Audio Clips |
|
201 |
The Lift and Stamp Tools and the Sound Palette |
Chapter 8 |
207 |
Working in the File Editor |
|
207 |
About the File Editor |
|
209 |
Opening Audio Files in the File Editor Tab |
|
210 |
Playing Audio Files in the File Editor |
|
210 |
Soloing an Audio File in the File Editor |
|
211 |
Linking the File Editor Selection and the Cycle Region |
|
211 |
Scrubbing Audio Files |
|
212 |
Selecting All or Parts of an Audio File |
|
216 |
Cutting, Copying, and Pasting in the File Editor |
|
218 |
Zooming In and Out in the File Editor |
|
219 |
Editing Audio Files Graphically with Waveform Editing Tools |
|
223 |
Choosing the Sample Units in the File Editor |
|
224 |
Editing Multichannel Files |
|
226 |
Using Frequency Spectrum View |
Contents |
5 |

231 Working with Actions
237Overview of Analyzing and Fixing Problems in an Audio File
238Analyzing and Fixing Problems in an Audio File
242 Using the File Editor Project View
Chapter 9 |
251 |
Processing Audio Files |
|
252 |
Choosing Processing Effects |
|
253 |
Fade In |
|
253 |
Fade Out |
|
253 |
Normalize |
|
254 |
Adjust Amplitude |
|
254 |
Silence |
|
254 |
Invert |
|
255 |
Reverse |
|
255 |
Insert |
|
257 |
Time Stretch |
|
258 |
Noise Reduction |
|
262 |
Adding Ambient Noise |
|
263 |
Equalization Matching |
|
263 |
Convert to Mono |
|
264 |
Resample |
|
264 |
Swap Channels |
|
264 |
Edit Channels |
|
266 |
Render to Action |
Chapter 10 |
267 |
Working with Audio Effects |
|
267 |
Processing Effects and Realtime Effects |
|
269 |
Working with Effect Presets |
|
270 |
Audio Effects Included with Soundtrack Pro |
|
283 |
Working with Realtime Effects |
|
293 |
Working with Processing Effects |
Chapter 11 |
295 |
Using the Multitake Editor |
|
296 |
What Is Automatic Dialogue Replacement? |
|
296 |
Multitake Clips |
|
296 |
Creating Multitake Clips |
|
297 |
Overview of the Multitake Editor |
|
298 |
Editing in the Multitake Editor |
|
300 |
Slipping Take Regions |
|
300 |
Adding and Deleting Takes |
|
301 |
Renaming Takes |
|
301 |
Reordering Takes |
|
302 |
Example: A Multitake Editing Workflow |
6 |
Contents |

Chapter 12 |
305 |
Basic Mixing in Soundtrack Pro |
|
306 |
Steps in Mixing |
|
306 |
Structuring an Audio Post-Production Project |
|
316 |
Using the Mixer |
Chapter 13 |
335 |
Mixing Surround Sound |
|
335 |
What Is 5.1 Surround? |
|
336 |
Creating a Surround Project |
|
336 |
Setting Up Soundtrack Pro for Surround |
|
341 |
Using Surround Panners to Create a Surround Mix |
|
347 |
Surround Mixing Strategies |
|
353 |
Exporting and Delivering 5.1 Surround Projects |
Chapter 14 |
355 |
Working with Video in Soundtrack Pro |
|
356 |
Supported Video File Formats |
|
356 |
Adding a Video to a Project |
|
357 |
Playing the Video |
|
360 |
Viewing Video Details |
|
361 |
Working with a Video’s Audio |
|
361 |
Using the Time Display and Time Ruler with Video |
|
362 |
Scrubbing and Spotting with the Multipoint Video HUD |
|
365 |
Removing a Video from a Project |
Chapter 15 |
367 |
Working with Automation |
|
367 |
Working with Envelopes |
|
376 |
Recording Automation Data |
Chapter 16 |
379 |
Recording Audio in Soundtrack Pro |
|
379 |
Getting Ready to Record |
|
380 |
Recording Audio in the Timeline |
|
387 |
Recording Audio in the Mixer |
|
387 |
Recording Audio in the File Editor Project View |
Chapter 17 |
389 |
Creating Podcasts in Soundtrack Pro |
|
389 |
About Podcasts |
|
390 |
Podcasting Media Production |
|
391 |
Displaying the Podcast Track and the Details Tab |
|
392 |
Podcast Marker Information in the Details Tab |
|
393 |
Adding Markers to a Podcast |
|
396 |
Adding Images to a Podcast |
|
399 |
Exporting Podcasts |
Contents |
7 |

Chapter 18 |
403 |
Using Control Surfaces with Soundtrack Pro |
|
403 |
Connecting Control Surfaces |
|
404 |
Adding and Deleting Control Surfaces |
|
406 |
Premapped Controls |
|
407 |
Mapping Commands to Control Surface Buttons |
|
408 |
Recording Control Surface Automation |
Chapter 19 |
409 |
Using Soundtrack Pro with Other Applications |
|
409 |
Using Soundtrack Pro with Final Cut Pro |
|
421 |
Using Soundtrack Pro with DVD Studio Pro |
|
423 |
Using Soundtrack Pro with Motion |
|
424 |
Using Soundtrack Pro with Logic Pro |
|
425 |
Using Soundtrack Pro with Third-Party Applications |
Chapter 20 |
429 |
Exporting Multitrack Projects |
|
430 |
About Exporting |
|
430 |
Export File Formats Available in Soundtrack Pro |
|
430 |
About Export Options |
|
432 |
General Export Options |
|
434 |
About Export Options for AIFF, WAVE, and Other Formats |
|
435 |
About MP3 Export Options |
|
436 |
About AAC/Podcast Export Options |
|
439 |
About Dolby Digital Professional (AC-3) Export Options |
|
444 |
About Export Options Using Compressor |
|
445 |
Exporting Part of a Multitrack Project |
|
446 |
Exporting a Master Mix |
|
454 |
Exporting Tracks, Busses, and Submixes Separately |
|
455 |
About Exporting Multiple Mono Files |
|
456 |
Exporting to AAF |
|
457 |
Using Post-Export Actions |
|
458 |
Using Export Presets |
|
460 |
Distributing a Multitrack Project and Its Media Files Together |
Chapter 21 |
463 |
Using Conform with Final Cut Pro |
|
463 |
About Conforming Manually |
|
463 |
About Soundtrack Pro Conform |
|
464 |
Conforming a Soundtrack Pro Multitrack Project |
|
468 |
Reviewing and Approving Changes in a Conform Result Project |
Appendix A |
473 |
Soundtrack Pro Keyboard Shortcuts |
|
474 |
General and File |
|
474 |
Layouts, Tabs, and HUDs |
|
475 |
Navigating the Timeline |
8 |
Contents |

|
476 |
Project Playback |
|
476 |
Cycle Region |
|
477 |
General Editing |
|
477 |
Editing Audio Clips in the Timeline |
|
478 |
Moving Audio Clips and Envelope Points |
|
479 |
Viewing the Timeline |
|
480 |
Timeline Tools |
|
480 |
File Editor Project View Tools and Commands |
|
481 |
Processing and Editing Audio Files |
|
482 |
Tracks, Busses, and Submixes |
|
482 |
Markers |
|
483 |
Selecting Audio Clips in the Timeline |
|
484 |
Video Out |
|
484 |
Recording |
|
484 |
Using Arrow Keys to Move the Playhead |
|
485 |
Working with Timeslices |
Appendix B |
487 |
Audio Fundamentals |
|
487 |
What Is Sound? |
|
497 |
Digital Audio |
Appendix C |
501 |
Working with Professional Video and Audio Equipment |
|
501 |
Video Interfaces |
|
504 |
Video Signals and Connectors |
|
508 |
Setting Up an Audio Interface |
|
514 |
Audio Connectors, Cables, and Signal Formats |
|
518 |
About Balanced Audio Signals |
|
519 |
Tips for Choosing Speakers and an Amplifier |
|
521 |
Connecting Professional Video Devices |
|
525 |
Connecting Professional Audio Devices |
Appendix D 531 Working with Apogee Hardware in Soundtrack Pro
531Using Apogee Hardware with Soundtrack Pro
531Creating and Saving a New Apogee Configuration
532Specifying Global Parameters in the Apogee Setup Dialog
533Specifying Units Parameters in the Apogee Setup Dialog
537Using a Previously Saved Configuration
538Choosing a Configuration Saved with a Project
Appendix E |
539 |
Solving Problems |
|
539 |
Resources for Solving Problems |
|
539 |
Solutions to Common Problems |
|
541 |
Contacting AppleCare Support |
Contents |
9 |
Welcome to Soundtrack Pro
 Preface
Most experienced film and television producers know that “audio is more than half the picture.” The art and techniques of sound recording, dialogue editing, sound effect recording and placement, mixing, and sound design play a substantial role in how audiences perceive the (visual) quality of a film or video. Soundtrack Pro is designed to serve the art of motion picture sound post-production. Like the other applications in FinalCutStudio, SoundtrackPro was created for the film and video industry. SoundtrackPro gives you many specialized tools and powerful features that you can use to create high-quality audio.
Most audio applications focus on multitrack editing or waveform editing, but not both. Furthermore, most waveform editing applications handle media destructively—making permanent changes to your media files. Soundtrack Pro provides the best of both worlds: nondestructive waveform editing while working in a multitrack project.
This preface covers the following:
•About Soundtrack Pro (p. 11)
•About the Soundtrack Pro Documentation (p. 12)
•Additional Resources (p. 12)
About Soundtrack Pro
Soundtrack Pro provides film and video professionals streamlined workflows for editing everything from individual audio files to large multitrack sound projects, including synchronizing audio and video, editing sound in place, working with automatic dialogue replacement (ADR), analyzing and fixing common audio problems like clicks and pops, and creating stereo and surround sound design. Add interoperability with the other applications in Final Cut Studio to this list of features, and you have a professional-quality audio application designed to meet the needs of the most discerning audio editors and mixers.
11

Soundtrack Pro features two types of projects: audio file projects and multitrack projects. You use audio file projects to edit individual audio files. This is sometimes known as waveform editing. However, unlike most waveform editing applications, Soundtrack Pro allows you to edit your audio files nondestructively by keeping track of the actions you have performed on your audio file. You can edit down to the file’s individual sample level and perform tasks ranging from audio repair to sound design. You can perform edits nondestructively using actions, which include processing effects and other operations. You can analyze audio files for a range of common audio problems, including clicks and pops, hum, and phase issues, and automatically fix problems that are found.
Multitrack projects look and function similarly to Final Cut Pro projects. You arrange a multitrack project’s audio clips on the tracks in the Timeline. Multitrack projects contain the features you expect from a high-performance and professional-quality audio editor, including features to synchronize audio and video, work with ADR and multitake editing, and automate volume, pan, and other changes over time using envelopes. You can record over multiple channels to the Timeline or the File Editor or to multiple tracks in the Timeline.
About the Soundtrack Pro Documentation
Soundtrack Pro comes with various documentation that will help you get started as well as provide detailed information about the application.
•Soundtrack Pro User Manual: This is a comprehensive document that describes the Soundtrack Pro interface, commands, and menus, and gives step-by-step instructions for creating Soundtrack Pro projects and for accomplishing specific tasks. It is written for users of all levels of experience.
•Soundtrack Pro Effects Reference: Soundtrack Pro includes a comprehensive collection of powerful effect plug-ins. This document introduces you to the individual effects and their parameters.
Additional Resources
Along with the documentation that comes with Soundtrack Pro, there are a variety of other resources you can use to find out more about Soundtrack Pro.
Soundtrack Pro Website
For general information and updates, as well as the latest news on Soundtrack Pro, go to:
• http://www.apple.com/finalcutstudio/soundtrackpro
12 |
Preface Welcome to Soundtrack Pro |

Apple Service and Support Websites
For software updates and answers to the most frequently asked questions for all Apple products, go to the general Apple Support web page. You’ll also have access to product specifications, reference documentation, and Apple and third-party product technical articles.
• http://www.apple.com/support
For software updates, documentation, discussion forums, and answers to the most frequently asked questions for Soundtrack Pro, go to:
• http://www.apple.com/support/soundtrackpro
For discussions forums for all Apple products from around the world, where you can search for an answer, post your question, or answer other users’ questions, go to:
• http://discussions.apple.com
Preface Welcome to Soundtrack Pro |
13 |

Setting Up Your System |
1 |
|
The way you set up your system depends on the audio equipment you plan to use. You can use your computer’s speaker or headphone jack to monitor the audio output from SoundtrackPro. For better results, you may want to connect external monitors or speakers to your system, so that you can monitor the audio output at a higher level of quality. You may want to connect other external audio equipment such as an audio interface or a mixer, particularly if you plan to record your own audio in Soundtrack Pro.
For information on system and hardware requirements, see the Read Before You Install document on the installation DVD.
For information on installing the software, see the Installing Your Software booklet.
This chapter covers the following:
•System Considerations (p. 15)
•Connecting Equipment (p. 17)
•Example Hardware Setups (p. 21)
System Considerations
To achieve the most effective results, you should consider the following issues when setting up your system:
•Editing and managing digital audio files can require intensive processing by your computer. For more information, see Processor Speed and RAM.
•Storing digital audio files can require a large amount of hard disk space. For more information, see Hard Disks.
•To make the most of Soundtrack Pro, you may wish to use a variety of audio input and output devices. For more information, see Setting the Audio Input and Output and Audio MIDI Setup.
•Audio units plug-ins from other manufacturers can extend the capabilities of Soundtrack Pro. For more information, see Adding Audio Units Plug-ins to Your Computer.
15

Processor Speed and RAM
Digital audio files require intensive processing by your computer. If you plan to work on longer or more complex projects, or use multiple effects plug-ins in your projects, a computer with a faster processor can facilitate your productivity.
Soundtrack Pro is optimized for use with computers that have a multiprocessor architecture. Working with Soundtrack Pro projects on a multiprocessor-equipped computer can make your workflow more efficient, especially when creating longer or more complex projects.
If you plan to work on large projects, it’s useful to have extra random-access memory, or RAM, installed in your computer. Additional RAM allows you to play back more files simultaneously, use a greater number of effects plug-ins, and keep several multimedia applications open at the same time.
Hard Disks
In addition to having a computer with a fast processor and a lot of extra RAM, it’s also a good idea to have a large hard disk with plenty of available space to store the media (audio and video) files you use with Soundtrack Pro. As you work with the application, you’ll likely want to acquire a large collection of sounds to use in your Soundtrack Pro projects. Hard disk performance is a critical aspect of your editing system: the storage capacity and data rate of your disks must match or exceed the requirements of the audio (and video) formats you are using.
If you store media files on an external hard disk, make sure the disk has a fast enough seek time and a high enough sustained data transfer rate for use with video and audio files. Consult the manufacturer’s specifications.
Important: Every minute of stereo digital audio (recorded using a 44.1 kHz sample rate and 16-bit depth) requires roughly 10 MB of hard disk space. If you plan to record large amounts of audio in Soundtrack Pro, you may want to record to a hard disk dedicated to storage for your Soundtrack Pro projects.
Setting the Audio Input and Output
You can set the default input and output devices for Soundtrack Pro with the Audio MIDI Setup utility.
To select a default output device
Do one of the following:
µDouble-click Audio MIDI Setup in the Utilities folder, then choose the device from the Default Output pop-up menu.
µChoose Apple menu > System Preferences, click Sound, then click Output. Select the audio interface in the list that appears.
16 |
Chapter 1 Setting Up Your System |

To select a default input device
Do one of the following:
µDouble-click Audio MIDI Setup in the Utilities folder, then choose the device from the Default Input pop-up menu.
µChoose Apple menu > System Preferences, click Sound, then click Input. Select the audio interface in the list that appears.
Audio MIDI Setup
The Audio MIDI Setup utility is a program that comes with Mac OS X for adjusting a computer’s audio input and output settings and managing MIDI devices. You can select audio channel input and output devices, configure output speakers, set clock rates, and control levels. You may also be able to open a configuration utility provided by your audio device.
For more information, go to http://developer.apple.com/audio/overview.html.
Adding Audio Units Plug-ins to Your Computer
Soundtrack Pro includes an extensive set of professional-quality effects plug-ins. Soundtrack Pro uses effects in the Audio Units plug-in format, the native plug-in format of Mac OS X.
Audio Units plug-ins are also available from third-party manufacturers. When adding third-party effects to your computer, be sure to read the documentation, including any Read Me and installation files, that came with the plug-in. Supported Audio Units effects plug-ins appear in the Effects window under the manufacturer’s name.
Soundtrack Pro does not support VST, ASIO, MAS, or RTAS effects plug-ins.
Connecting Equipment
You can use a variety of audio equipment with Soundtrack Pro for both recording and playback. For information on connecting a specific piece of equipment to your computer, read the documentation that came with the equipment. For general information about connecting a control surface to your computer, see Connecting Control Surfaces.
Final Cut Studio editing systems can be configured to meet the most demanding professional requirements. An advanced editing system can be built by expanding the basic system described in the Final Cut Pro User Manual. The following list includes equipment commonly used in Final Cut Studio editing systems:
•Macintosh computer with Final Cut Studio installed: The core of your editing system
•Professional video and audio devices: For capturing footage and outputting finished projects. (For more information about video and audio devices, see Working with Professional Video and Audio Equipment.)
Chapter 1 Setting Up Your System |
17 |
•Externalvideoandaudiomonitors: For viewing and listening to your program in its final image and audio quality
•Video and audio interfaces: For connecting professional and non-FireWire devices to your editing system
•RS-422 serial device control interfaces: For remote device control during capture and output
•Video, audio, and remote device control cables: For separate video, audio, and remote device control connections. Unlike a basic DV editing system that uses a solitary FireWire cable to transfer video, audio, and remote control signals, many professional configurations require separate cables for each of these signals.
•Additional scratch disks: One or more internal or external hard disks, a RAID, or a connection to a storage area network (SAN)
•Controlsurfaces: Hardware controls that let you mix and edit your projects with greater flexibility and precision than using a mouse to move onscreen controls
Video and Audio Input and Output Devices
An input device is used to transfer footage into your computer. For output, you record your finished movie to an output device. Basic editing systems use a DV camcorder or deck as both an input and output device. Professional editing systems may use multiple video decks to capture and output to different video formats. Although Soundtrack Pro does not support video capture from devices such as camcorders or VTRs, it does support recording from a variety of digital audio devices.
To connect non-FireWire devices to your computer, you also need a third-party video or audio interface. For more information, see Video Interfaces.
Video Device
This is a VTR or camcorder you connect to your computer to capture and output media. The connectors and signal format on your video device determine what kind of video interface your computer needs to connect to your device.
Audio Device
This is a device, such as a digital audio tape (DAT) recorder or multitrack audio recorder, that lets you capture or output audio independently from video.
18 |
Chapter 1 Setting Up Your System |

Note: When using external audio devices, it’s a good idea to connect them before opening Soundtrack Pro.
Video and Audio Interfaces
An interface is a device that adds physical video or audio connectors to your computer so that you can connect your Final Cut Studio system to other professional equipment (such as video or audio decks and monitors).
Interfaces provide input and output connectors that aren’t included with your computer. For example, if you want to output multiple audio channels to an analog audio mixer or digital multitrack, you need an audio interface that has XLR, 1/4" tip-ring-sleeve (TRS), AES/EBU, or ADAT Lightpipe output connectors.
You may also want to consider adding a third-party interface to your system if:
•You need to capture or output many audio channels at once
•You are integrating Final Cut Studio into a professional broadcast environment that requires SDI, HD-SDI, or other non-FireWire video and audio connections
•You need to capture, edit, and output full-resolution, uncompressed video signals instead of DV video (which is compressed)
•You are digitizing video from an older analog VTR (such as a Betacam SP deck) that does not have digital video outputs or remote control via FireWire
Third-party video and audio interfaces can be installed in one of your computer’s PCI Express slots, connected to the USB port, or connected via FireWire.
For more information about selecting and connecting an audio interface for use with Soundtrack Pro, see Setting Up an Audio Interface.
External Audio and Video Monitoring
In the final stages of post-production, external video and audio monitors are essential to ensure the quality of your movie. Editing systems focused on these final phases of post-production are often called finishing systems.
Chapter 1 Setting Up Your System |
19 |

External Audio Speakers and Monitors
You can play back audio through your computer’s speakers or headphone jack, but the audio output may not be high enough for you to evaluate your music at a professional level of quality. Connecting external speakers or monitors to your system allows you to hear the audio output with greater fidelity and a wider dynamic range. During the final mix, it is important to monitor your audio so that it matches the listening environment where the final project will be shown. For detailed information on connecting external speakers to your audio interface, see the documentation that came with the speakers.
Setting Up a Proper Audio Monitoring Environment
Room shape and material are just as important as the quality of the speakers themselves. Every surface in a room potentially reflects sound, and these reflections mix together with the sound originating from the speakers. Rooms with parallel walls can create standing waves, which are mostly low-frequency sound waves that reinforce and cancel each other as they bounce back and forth.
Standing waves cause some frequencies to be emphasized or attenuated more than others, depending on your listening position. When you mix in a room that creates standing waves, you may adjust certain frequencies more than necessary. However, you may not notice until you play back your audio in a different listening environment, in which those frequencies may sound overbearing or nonexistent.
Tip: A much cheaper alternative to building new walls is to mount angled pieces of material to the existing walls to eliminate parallel surfaces.
If the material in a room is very reflective, the room sounds “brighter” because high frequencies are easily reflected. Mounting absorbing material (such as acoustic foam) on the walls can reduce the brightness of a room. A “dead room” is one that has very little reflection (or reverberation). Try to cover any reflective surfaces in your monitoring environment.
Amplifiers
If you are recording audio from microphones and are not running the microphone’s signal through a mixer with a microphone pre-amplifier, you need to connect an amplifier to boost the microphone’s signal before sending it to the computer. If you are connecting monitors or speakers that are not self-powered, you also need to connect them through an amplifier.
20 |
Chapter 1 Setting Up Your System |
Mixers
Connecting a mixer to your system allows you to record audio from multiple microphones or instruments simultaneously, to play back the output from your computer through connected monitors or speakers, and to control the volume levels of both the audio input and output. Professional-quality mixers have a number of additional features, including equalization (EQ) controls, auxiliary sends and returns for adding external effects, and separate monitor and mix level controls. Mixers may also include inboard preamplification for microphones, making the use of a separate amplifier unnecessary.
Control Surfaces
Soundtrack Pro supports control surfaces that use the Mackie Control, Logic Control, and Euphonix EuCon protocols. For information on connecting and using control surfaces, see Using Control Surfaces with Soundtrack Pro.
External Video Monitors
When you design and edit a video soundtrack, it’s ideal to watch the video on a monitor similar to the one you will use for the final screening. An external video monitor can display color, frame rate, and interlaced scanning more accurately than your computer display. (For information on connecting professional video devices, see Connecting Professional Video Devices.)
If you are working on an NTSC or a PAL project, you should watch it on an external video monitor that shows the video interlaced. For more information about external video monitoring, see the Final Cut Pro User Manual.
Example Hardware Setups
The following sections provide several examples of different hardware setups:
•Setup with Powered Speakers
•Setup with a USB Audio Interface
•Setup with a FireWire Interface and a Control Surface
•Setup with a Video Output Device
•Setup with a PCI Express Video Interface Card with Breakout Box
•Setup for Stereo Mixing
•Setup for Surround Mixing
Chapter 1 Setting Up Your System |
21 |
Setup with Powered Speakers
With this setup, you can monitor the audio output through a set of connected powered speakers.
This setup uses the following equipment:
•Your computer and display
•A set of powered speakers, including speaker wire and a power adaptor
Speakers
Power cables
Speaker cables
Computer
Setup with a USB Audio Interface
With this setup, you can record audio input from microphones and musical instruments, and monitor audio output, through a USB audio interface.
This setup uses the following equipment:
•Your computer and display
•USB audio interface (from 2 to 8 channels) with USB cable to connect to your computer
•Microphone
•Musical instruments (guitar, bass, and keyboard)
•Cables to connect microphones and instruments to the audio interface
•Set of monitors or speakers
Monitors
|
Microphone |
|
Power cables |
|
Speaker |
|
cables |
|
USB |
|
cable |
|
Audio interface |
Computer |
Instrument |
22 |
Chapter 1 Setting Up Your System |
Setup with a FireWire Interface and a Control Surface
With this setup, you can record audio input from several sources simultaneously and monitor audio output channels independently, through a mixer connected to a FireWire audio interface.
This setup uses the following equipment:
•Your computer and display
•FireWire audio interface with FireWire cable to connect to your computer
•Control surface and MIDI interface with USB cable to connect MIDI interface to your computer
•MIDI cables to connect control surface to MIDI interface
•Set of powered monitors or speakers
•Speaker cables
Monitors
Power cables
Audio interface
FireWire |
Speaker cables |
cable |
|
Midi interface
|
|
|
|
|
|
|
|
|
|
|
|
|
|
|
|
|
|
|
|
|
|
|
|
|
|
|
Computer |
|
|
Control surface |
|||||||||||||||||||||||
Setup with a Video Output Device
With this setup, you can play video and audio through an external video output device. Because using a video output device can result in increased latency, you may want to combine this setup with an audio-only setup, and switch between the two setups.
This setup uses the following equipment:
•Your computer and display
•Video output device (FireWire device or PCI Express card)
•High-quality video monitor
Chapter 1 Setting Up Your System |
23 |

• Audio monitors
Video monitor |
Audio monitors |
|||
|
|
|
|
|
|
|
|
|
|
|
|
|
|
|
Speaker
cables
FireWire
cable
Video output device
Computer |
|
|
|
|
|
|
|
|
|
|
|
|
|
|
|
|
|
|
|
|
|
|
|
|
|
|
|
|
|
|
|
|
|
|
|
|
|
|
|
|
|
|
|
|
|
|
|
|
|
|
|
|
|
|
|
|
|
|
|
|
|
|
|
|
|
|
Mixer |
|
|
|
|
|
|
|
|||||||||
Setup with a PCI Express Video Interface Card with Breakout Box
Many PCI Express cards aren’t big enough to fit all of the necessary video and audio connectors. In these situations, a breakout box is connected to the PCI Express card via a multipin connector on a long cable, and the connectors are accessible on the breakout box instead of on the back of the PCI Express card. A breakout box is also useful because it allows you to place the connectors somewhere more convenient than the back of your computer, such as on an equipment rack or a desktop.
This setup uses the following equipment:
•Your computer and display
•Video interface (PCI Express card with breakout box)
•High-quality video monitor
•Audio speakers
BNC connector
|
|
|
|
|
|
|
|
|
|
|
|
|
|
|
|
|
|
|
|
|
|
|
|
|
|
|
|
|
|
|
|
|
|
|
|
|
|
|
|
|
|
|
|
|
|
|
|
|
|
|
|
|
|
|
|
|
|
|
|
|
|
|
|
|
|
|
|
Computer |
Breakout box |
|
|
|
|
|
|
|
|
|
Analog or digital VTR |
||||||||||||||||||||||
(with PCI Express card) |
|
|
|
|
|
|
|
|
|
|
|
|
|
|
|
|
|
|
|
|
|
|
|
|
|
|
|
|
|
|
|
|
|
24 |
Chapter 1 Setting Up Your System |

Setup for Stereo Mixing
By default, Soundtrack Pro is set up for stereo mixing. Most video editing suites use nearfield monitors, which are speakers designed to be listened to at fairly close range. Speakers should be at least a foot or two away from any walls to prevent early reflections of sound that combine with and muddy the original sound.
Position the speakers as far from your listening position as they are from each other (forming an equilateral triangle). For example, if the distance between the speakers is six feet, you should place yourself six feet from each speaker. The apparent width of the sound stage, or stereo image, increases as the distance between the speakers increases. However, if the two speakers get too far apart, sound information appearing in the center (between both speakers) starts to disappear.
Setup for Surround Mixing
For complete instructions on setting up the surround mixing tools in Soundtrack Pro, see Setting Up Soundtrack Pro for Surround.
Chapter 1 Setting Up Your System |
25 |

The Soundtrack Pro Interface |
2 |
Soundtrack Pro is designed to handle every aspect of creating audio for a video or film project, from multitrack recording to advanced audio processing and mixing. You can use Soundtrack Pro together with Final Cut Pro as a complete audio post-production solution that is powerful, yet also elegant and flexible.
This chapter covers the following:
•Soundtrack Pro Window Organization (p. 28)
•Project Pane (p. 35)
•Toolbar (p. 36)
•Transport Controls (p. 36)
•Timeline (p. 37)
•File Editor (p. 41)
•Mixer (p. 43)
•Multitake Editor (p. 45)
•Conform (p. 46)
•Bin (p. 46)
•Meters Tab (p. 48)
•Recording Tab (p. 49)
•Browser (p. 50)
•Search Tab (p. 51)
•Favorites Tab (p. 53)
•Video Tab (p. 54)
•Project Tab (p. 54)
•Details Tab (p. 58)
•Effects Tab (p. 62)
•Tracks Tab (p. 63)
•Actions Tab (p. 64)
27
•Analysis Tab (p. 65)
•HUDs (p. 66)
Soundtrack Pro Window Organization
There are several panes that comprise the Soundtrack Pro window that you’ll use while you are creating audio projects. You may want to open Soundtrack Pro so you can view these panes and familiarize yourself with the interface.
To open Soundtrack Pro
µIn the Finder, double-click the Soundtrack Pro icon in the Applications folder.
You may also choose to add the Soundtrack Pro icon to the Dock for easier access. For more information, see Mac Help.
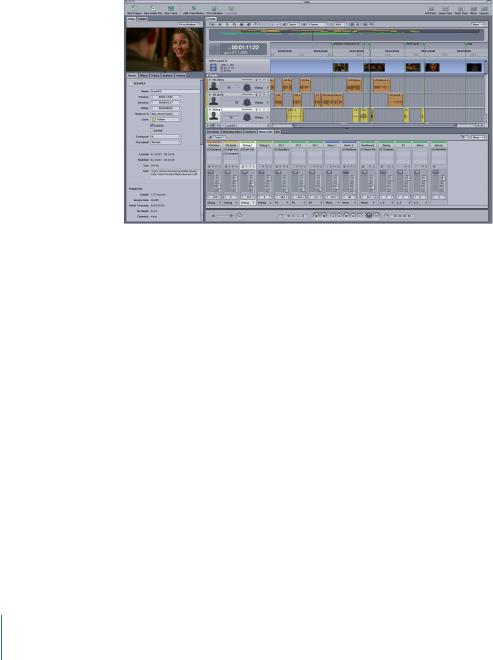
The Soundtrack Pro window is arranged into several areas.
Project pane
Left pane |
Right pane |
Lower pane
Transport controls (project pane)
•Project pane: This is reserved as the central “canvas” for the multitrack Timeline and for individual audio file projects.
•Left, lower, right panes: Task-specific tabs are docked in the left, lower, and right panes. By default, the tabs are grouped by function and are laid out for a streamlined audio post-production workflow.
•Transportcontrols: Use these controls at the bottom of the window to play back projects that you open in the project pane.
28 |
Chapter 2 The Soundtrack Pro Interface |
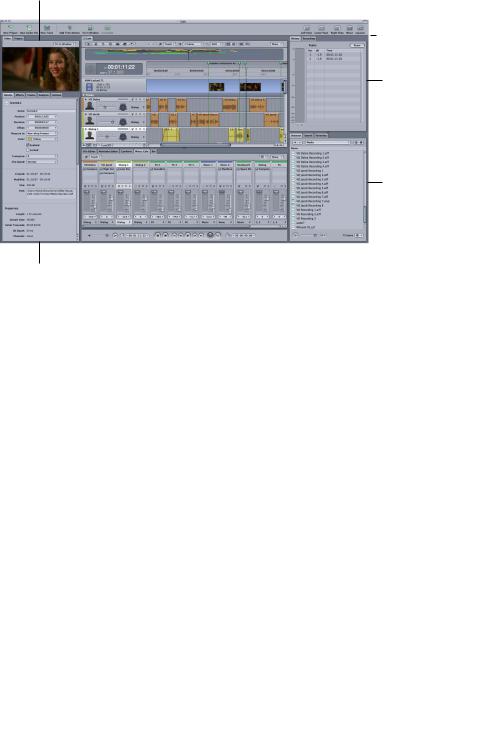
Below is the standard, default layout of the Soundtrack Pro window. You can easily rearrange the tabs and resize the panes to suit your needs and then save the custom layouts for future use.
Video tab |
|
Standard layout |
|
||
|
|
|
 Toolbar
Meters tab
Browser tab
|
|
|
|
|
|
|
|
|
|
|
|
|
|
Details tab |
|
Transport controls |
|
Mixer tab |
||
|
|
|||||
Note: At any time, you can revert to the default layout by choosing Window > Layouts > Standard, or pressing F1. Also, you can save any custom layouts you create. For more information on managing layouts, see Using Project Layouts.
Chapter 2 The Soundtrack Pro Interface |
29 |
Showing and Hiding the Panes
Tabs are grouped by function to optimize your workflow. For example, the media tabs related to input and output functions (Meters, Recording, Search, Browser, and Favorites) are located in the right pane by default. When you are finished with media input, you can close the entire right pane by choosing Window > Toggle Right Pane, and thereby allow more horizontal space for the project pane and the lower pane. If you hide a pane, then later choose to show a tab that is in the hidden pane, the pane reappears and shows all tabs in that pane.
30 |
Chapter 2 The Soundtrack Pro Interface |
Loading...