


Workgroup Server 8150/110

K
Administrator’s Guide
for the Workgroup Server 8150/110

© 1995 Apple Computer, Inc. All rights reserved.
Under the copyright laws, this manual may not be copied,
in whole or in part, without the written consent of Apple.
Your rights to the software are governed by the
accompanying software license agreement.
The Apple logo is a trademark of Apple Computer, Inc.,
registered in the United States and other countries. Use of
the “keyboard” Apple logo (Option-Shift-K) for
commercial purposes without the prior written consent of
Apple may constitute trademark infringement and unfair
competition in violation of federal and state laws.
Every effort has been made to ensure that the information
in this manual is accurate. Apple is not responsible for
printing or clerical errors.
Apple Computer, Inc.
1 Infinite Loop
Cupertino, CA 95014-2084
(408) 996-1010
Apple, the Apple logo, AppleShare, AppleTalk, EtherTalk,
LaserWriter, LocalTalk, Mac, Macintosh, PlainTalk, and
StyleWriter are trademarks of Apple Computer, Inc.,
registered in the United States and other countries.
AppleCD, Apple Desktop Bus, AppleScript, AppleSearch,
AudioVision, Balloon Help, Disk First Aid, Finder,
GeoPort, Power Macintosh, PowerTalk, QuickDraw, and
QuickTime are trademarks of Apple Computer, Inc.
Adobe, Adobe Illustrator, Adobe PhotoShop, and
PostScript are trademarks of Adobe Systems Incorporated,
which may be registered in certain jurisdictions.
Creo is a registered trademark of Creo Systems Inc.
Helvetica and Times are registered trademarks of
Linotype Company.
IBM is a registered trademark of International Business
Machines Corporation.
Macintosh Basics was developed using VideoWorks
Interactive. VideoWorks Interactive is a trademark of
Macromedia, Inc. (formerly MacroMind, Inc.).
Microsoft is a registered trademark, and Windows is a
trademark of Microsoft Corporation.
Motorola is a registered trademark of Motorola Corporation.
NuBus is a trademark of Texas Instruments.
QuarkXPress is a registered trademark of Quark, Inc.
PowerPC is a trademark of International Business
Machines Corporation, used under license therefrom.
Retrospect Remote is a trademark of Dantz
Development Corporation.
Simultaneously published in the United States and Canada.
Mention of third-party products is for informational
purposes only and constitutes neither an endorsement nor
a recommendation. Apple assumes no responsibility with
regard to the performance or use of these products.
K Apple Computer, Inc.

Communications regulation information / vii
Laser information / ix
Preface Abou t This Gui de / xi
1Setting Up Your Ser ver / 1
Your server at a glance / 2
Security issues / 4
Physically isolating the system / 4
Using a locking cable / 4
Installing an expansion card / 5
Connecting a monitor / 5
Connecting the monitor’s power cord / 6
Connecting the monitor cable / 7
Connecting the mouse and keyboard / 9
Connecting other devices / 9
Plugging in the server / 10
Turning the server on / 11
Setting the server to restart automatically after a power failure / 13
Problems turning on your server? / 14
Setting the system time and date / 14
Turning the server off / 15
Con tents

2Connecting to the Network / 17
Connecting to an Ethernet network / 18
Connecting to thin coaxial Ethernet / 19
Connecting to twisted-pair Ethernet / 20
Connecting to other types of Ethernet / 21
Connecting to a LocalTalk network / 22
If you need to switch the network connection / 23
3Expanding Your Server and Connecting Other Equipment / 25
Installing an expansion card / 26
Power requirements / 26
Installing the card / 26
Expanding memory / 33
Installing other internal devices / 33
Connecting hard disks and other SCSI devices / 33
Setting the SCSI ID number / 34
Connecting a SCSI device / 35
Installing a device driver / 37
Do you need to initialize a hard disk? / 38
Connecting a printer / 39
Connecting an additional monitor / 39
Connecting a trackball or other input device / 40
Connecting a microphone / 40
Connecting a GeoPort Telecom Adapter or modem / 41
4Using Software With Your Server / 43
Using Power Macintosh programs / 44
Virtual memory / 44
Shared libraries / 44
Using older Macintosh programs / 45
iv Contents

Using server application programs / 46
Setting the system time and date / 46
Order of installing and starting programs / 46
Setting up your server to restart programs automatically / 47
Additional capabilities for your server system / 48
Backing up your files / 48
5Using a DATDrive and Tape Cassettes / 49
Compatible tapes / 50
Tapes supplied with the server / 50
Starting up the tape drive / 50
Inserting tape cassettes / 51
Status lights / 52
The caution signal / 52
Removing tape cassettes / 53
Forcing the ejection of a tape cassette / 53
Locking a cassette / 53
Avoiding high humidity / 53
Cleaning the tape-drive heads / 54
6Troubleshooting / 55
When you run into trouble / 55
Take your time / 55
Start over / 56
Solutions to common problems / 57
When you need to reinstall system software / 66
Reinstalling system software / 66
Starting up from the CD-ROM drive / 67
Starting up from the floppy drive / 67
About using the Installer program / 68
Creating startup floppy disks / 70
Contents v

What to do if your server’s performance decreases / 72
Doing a clean installation of system software / 72
If there’s a problem with your CD-ROM drive software / 75
Repairing a damaged disk / 76
Try these suggestions first /77
How to test a hard disk / 77
How to repair a hard disk or floppy disk / 78
If Disk First Aid cannot correct the problem / 80
Appendi x A Safety, Maintenance, and Health Information / 81
Important server safety instructions / 81
Handling your computer equipment / 82
Handling the monitor / 83
Handling the keyboard/ 83
Handling floppy disks/ 83
Ejecting a disk/ 85
If you can’t eject a floppy disk/ 85
Power supply/ 85
Cleaning your equipment / 86
Cleaning the server case / 86
Cleaning the monitor / 86
Cleaning the mouse / 86
Health-related information about computer use / 88
Musculoskeletal discomfort / 88
Eye fatigue / 89
Arranging your office / 90
Avoiding fatigue / 91
What about electromagnetic emmissions? / 92
vi Contents

Appendi x BGetting Help/93
Learning the basics / 94
Reviewing the basics / 95
Getting answers in Macintosh Guide / 96
Getting answers with the Topics button / 97
Getting answers with the Index button / 99
Getting answers with the Look For button / 100
Tips for using Macintosh Guide / 102
Identifying objects on the screen / 103
Learning useful shortcuts / 104
Appendi x C Special Keys on Your Keyboard / 107
Appendi x D Using Stereo Audio / 109
About your server’s sound ports / 110
Connecting an audio device / 111
Choosing audio input options / 111
Choosing audio output options / 113
Recording an alert sound / 114
Connecting external stereo speakers / 115
Playing audio CDs / 116
Index / 117
Contents vii

Communications regulation inform ation
viii Communications regulation information
FCC statement
This equipment has been tested and found
to
comply with the limits for a Class A digital device
pursuant to Part 15 of the Federal Communications
Commission (FCC) rules. These limits are
designed to provide reasonable protection against
such interference when the equipment is operated
in a commercial environment. This equipment
generates, uses, and can radiate radio-frequency
energy and, if not installed and used in accordance
with the instructions in this manual, may cause
interference to radio communications. Operation
of this equipment in a residential area is likely to
cause interference, in which case the user, at the
user’s own expense, will be required to correct the
interference.
IMPORTANT
Changes or modifications to this
product are not authorized by Apple Computer,
Inc., and could void the FCC certification and
negate your authority to operate the product. This
product was tested for FCC compliance under
conditions that included the use of shielded cables
and connectors between system components. It is
important that you use shielded cables and
connectors to reduce the possibility of causing
interference to radios, television sets, and other
electronic devices. For Apple peripheral devices,
you can obtain the proper shielded cables through
an Apple-authorized dealer. For non-Apple
peripheral devices, contact the manufacturer or
dealer for assistance.
DOC statement
DOC Class A Compliance
This digital apparatus does not exceed the Class A
limits for radio noise emissions from digital
apparatus set out in the radio interference
regulations of the Canadian Department of
Communications.
Observation des normes—Classe A
Le présent appareil numérique n’émet pas de bruits
radioélectriques dépassant les limites applicables
aux appareils numériques de la Classe A prescrites
dans les règlements sur le brouillage
radioélectrique édictés par le Ministère des
Communications du Canada.
VCCI statement
CE statement
This equipment has been designed, tested, and found
compliant with the Class A limits for Information
Technology Equipment of EN55022. These limits
are designed to provide reasonable protection
against radio interference when the equipment is
operated in a commercial environment.
This equipment generates, uses, and may radiate
radio-frequency energy and, if not properly installed
and used in accordance with the instruction manual,
may result in interference to radio communications.
Operation of this equipment is a residential area
may cause radio interference, in which case the
user will be required to correct the interference at
his own expense.
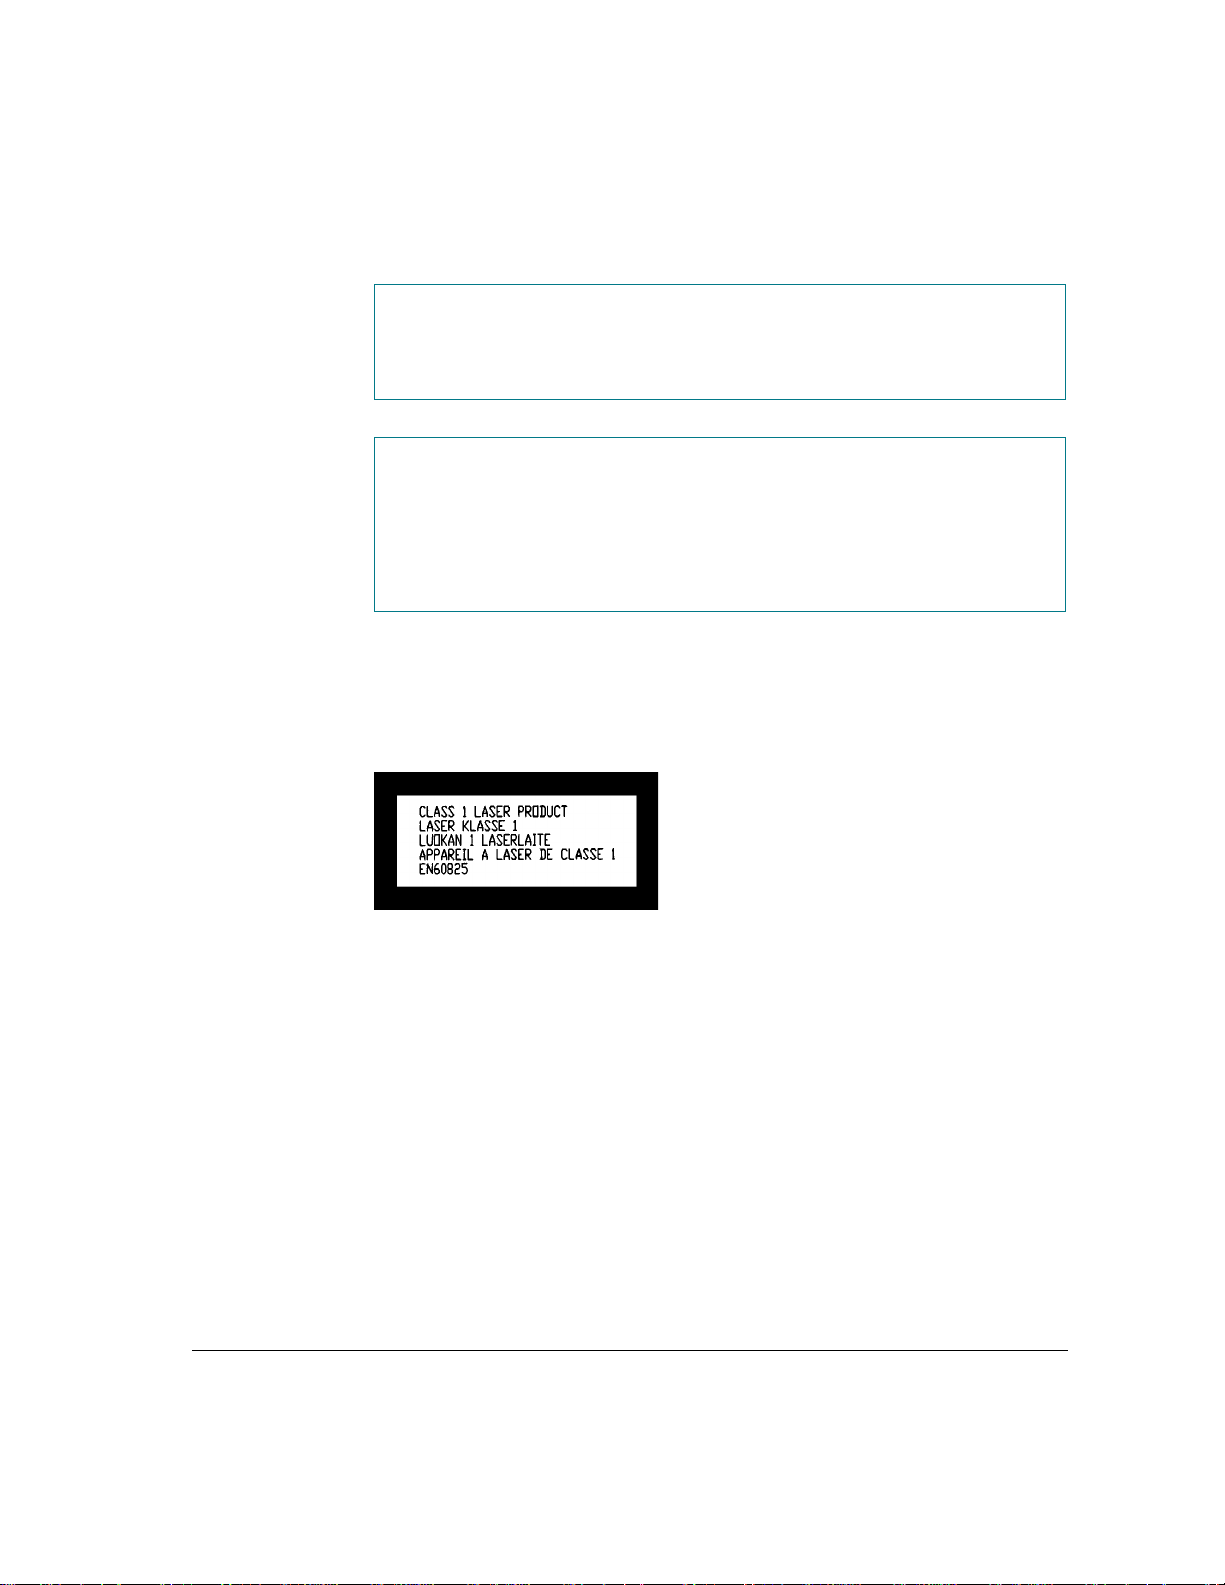
Laser information
Your computer is a Class 1 laser product. The following Class 1 and service
warning labels are on the CD-ROM drive inside the computer. The Class 1
label indicates that the drive meets minimum safety requirements.
Class 1 label
WARNING
Do not attempt to disassemble the cabinet containing the laser.
The laser beam used in this product is harmful to the eyes. The use of
optical instruments, such as magnifying lenses, with this product
increases the potential hazard to your eyes. For your safety, have this
equipment serviced only by an Apple-authorized service provider.
WARNING
Making adjustments or performing procedures other than
those specified in your equipment’s documentation may result in
hazardous exposure.
Laser information ix


This guide tells you how to set up your Workgroup Server 8150/110 and
connect it to a LocalTalk or Ethernet network. The guide also provides
information about expanding your server, using software, and troubleshooting
problems that may arise.
Note: For easier reading, the Workgroup Server 8150/110 will be referred to
as the Workgroup Server 8150 throughout the remainder of this guide.
About your Workgroup Server 8150 and Power Macintosh software
Your Workgroup Server 8150 is powered by the new PowerPC microprocessor
(or “chip”). This microprocessor was designed by Apple Computer, Inc.,
Motorola, Inc., and IBM Corporation. The PowerPC microprocessor uses
Reduced Instruction Set Computer (RISC) technology to deliver very high
performance at the lowest possible cost. The PowerPC RISC microprocessor
represents the state of the art in microprocessor design.
Your Workgroup Server 8150 will run almost all of your existing Macintosh
software, but for best performance and greatest speed, look for software programs
designed especially for Power Macintosh computers. You’ll find Power
Macintosh programs at any software store that carries products for Macintosh.
Who s h ould read this guide
This guide is intended for the person who sets up the server and connects it to
an existing network. You should be familiar with basic Macintosh terms,
concepts, and techniques. If you’re new to the Macintosh environment, see
Appendix B, “Getting Help,” after setting up your server system. You also
need to know some details of your existing network to choose the appropriate
procedures for connecting the server to your network.
Preface Ab o ut T his Guide

What this guide contains
Here’s a brief summary of what you’ll find in this guide:
m Chapter 1, “Setting Up Your Server,” explains how to connect the monitor,
keyboard, and mouse, and how to start up your server for the first time.
m Chapter 2, “Connecting to the Network,” describes how to connect the
server to an Ethernet or LocalTalk network.
m Chapter 3, “Expanding Your Server and Connecting Other Equipment,”
describes how to install an expansion card, add memory to the server, and
connect additional internal and external devices.
m Chapter 4, “Using Software With Your Server,” discusses running Power
Macintosh software and server application programs (including network
services).
m Chapter 5, “Using a DAT Drive and Tape Cassettes,” explains the use of the
optional DAT drive and describes the types of tape cassettes that are
appropriate for use with the drive.
m Chapter 6, “Troubleshooting,” helps you solve problems with the server.
This chapter also explains how to reinstall system software.
m Appendix A, “Safety, Maintenance, and Health Information,” suggests how
you can create a healthful and safe server environment and keep your server
equipment in good working order.
m Appendix B, “Getting Help,” describes how to use the various kinds of on-
screen help available in the Guide menu.
m Appendix C, “Special Keys on Your Keyboard,” describes the uses of unique
keys as shortcuts for menu commands and alternatives to using the mouse.
m Appendix D, “Using Stereo Audio,” explains how to use your server’s
stereo audio capabilities.
xii Preface

How to use this guide
Familiarize yourself with your server’s basic components. See the section
“Your Server at a Glance” in Chapter 1.
Consider security issues and placement of your server. Read the section
“Security Issues” in Chapter 1 for important information about protecting your
server from unauthorized access.
If you want to add an expansion card or internal drive to the server: Install
the card or internal device according to the instructions in Chapter 3,
“Expanding Your Server and Connecting Other Equipment.” Then return to
Chapter 1 to connect the monitor and keyboard.
If you want to connect external peripheral devices to your server: After you
connect the monitor and keyboard to the server, as described in Chapter 1, turn
to the appropriate instructions in Chapter 3, then return to Chapter 1.
Connect to the network to complete the setup process. See Chapter 2,
“Connecting to the Network,” for details.
If you are new to Macintosh: After setting up the hardware and turning your
server on, refer to Appendix B, “Getting Help,” to learn how to use the
features of Macintosh system software and application programs.
Be sure to read other sections of the book that are relevant to your work
environment. Also, be sure to keep this book in a handy location; if you
experience problems while using your server, you may need to refer to
Chapter 6, “Troubleshooting.”
For on -scree n help and information
There are several valuable sources of help and information that you can view
directly on your server’s monitor screen, as described in this section.
Workgroup Server Read Me
It is important that you read the Workgroup Server Read Me file, which
contains late-breaking information about your server. This file is located on the
server’s hard disk and on the Workgroup Server Software CD-ROM disc. You
may want to print this file for future reference.
Preface xiii

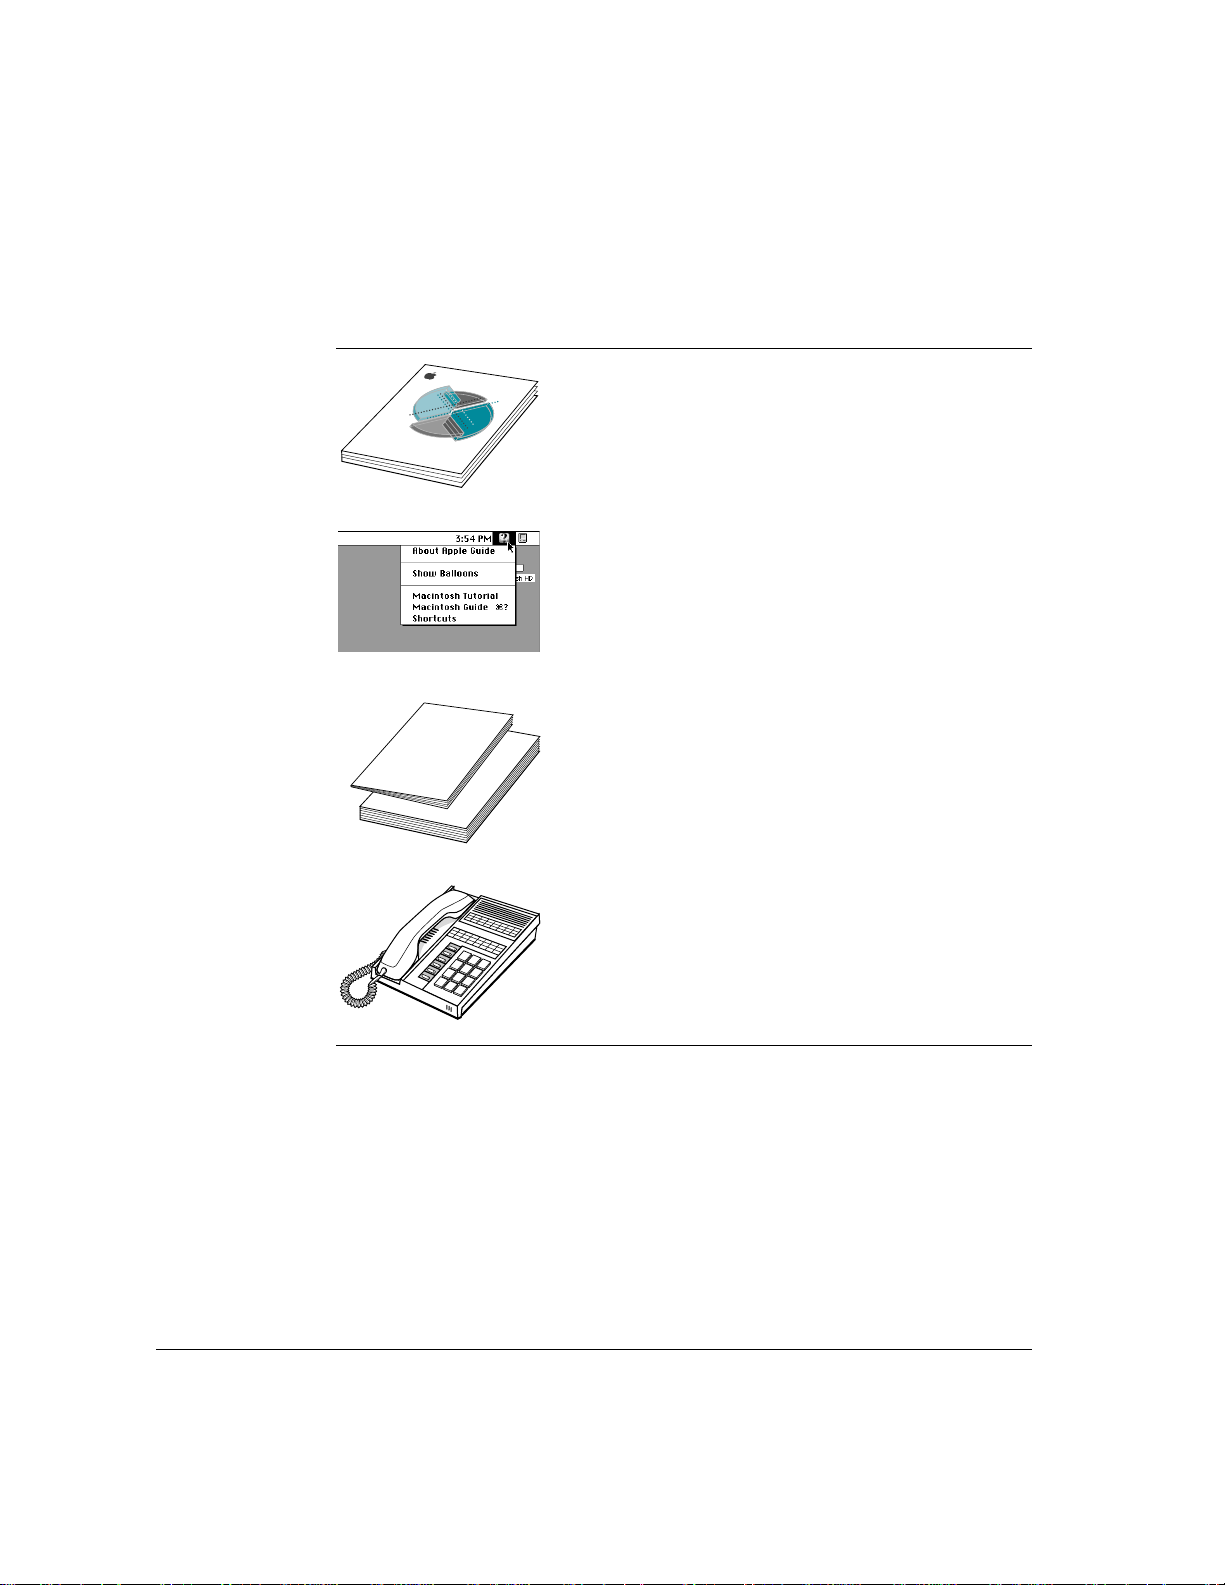
The Guide menu
Starting with system software version 7.5, you have instant access to new
kinds of help when using your system and application programs. You can see
your options in the Guide (h) menu in the upper-right corner of the screen.
You’ll find the instructions available in Macintosh Guide particularly useful
when you have questions or encounter problems with your system software.
For more details on the types of on-screen help available, refer to Appendix B,
“Getting Help,” and explore your options in the Guide menu.
Workgroup Server Electronic Library
For your convenience, electronic versions of your server’s documentation are
provided on your server’s hard disk and on the Workgroup Server Software
CD-ROM disc. You’ll find these documents in a folder called the Electronic
Library. To read a document, just double-click to open it. You’ll find on-screen
help available in the document.
The Electronic Library folder contains electronic versions of the
following documents:
m this book, the Administrator’s Guide
m the Technical Information booklet for the Workgroup Server 8150
m the Apple RAID Software Administrator’s Guide
m other user’s guides for software that may have come with your server
xiv Preface

Other reference material
In addition to this guide, you may need to consult the following sources of
information.
m Technical Information See this booklet for the technical specifications of
your server.
m The user’s guide for the CD-ROM drive that came with your server. See this
guide for information about using CD-ROM discs, playing audio compact
discs and audio tracks on CD-ROM discs, and working with Photo CD
discs.
m For information about server application programs included with your
Workgroup Server 8150, such as Apple RAID Software and Retrospect
Remote, refer to the documentation for those programs included in the
server accessory kit.
m There are a number of network services, such as AppleShare, AppleSearch,
and Apple Remote Access, that can be installed on your Workgroup
Server 8150. Refer to the documentation included with those services for
installation and operation information.
m For late-breaking information about your server and system software, see
the Workgroup Server Read Me file, located on the server’s hard disk and
on the Workgroup Server Software CD-ROM disc.
Preface xv
Where to find answer s
When you have questions about using your server, there are several places you
can look for answers.
In this book
Use this book to help you set up your server and learn about
it, or to find solutions to problems.
In the Guide menu
The Guide menu (marked with the
h
icon) is your main source
of information about system software. To learn how to get
different kinds of help from the Guide menu, see Appendix B in
this book.
In other manuals
For answers to questions about other equipment or about
application programs you have purchased, see the manuals that
came with the equipment or programs.
From Apple’s customer support hotline
If you can’t find an answer in any of the materials provided,
call the customer support hotline. (The phone number for the
hotline is in the service and support information that came with
your server.)
Administrator’s Guide
xvi Preface

Setting up your server involves connecting a monitor, mouse, and keyboard,
expanding your system to suit your needs, and connecting to the network.
First, acquaint yourself with your server’s features, as shown in the next
section, “Your Server at a Glance.” Also, be sure to read the section “Security
Issues” for important information about protecting your server from
unauthorized access. Then, if you want to install an expansion card or install
other internal devices, see the appropriate sections in Chapter 3 before
returning to the setup procedures in this chapter. Once you’ve connected the
monitor, mouse, and keyboard, you may need to refer to Chapter 3 again if
you’re connecting external devices.
You complete the setup process by configuring your network connection, as
described in Chapter 2.
1 Setting Up Your Server
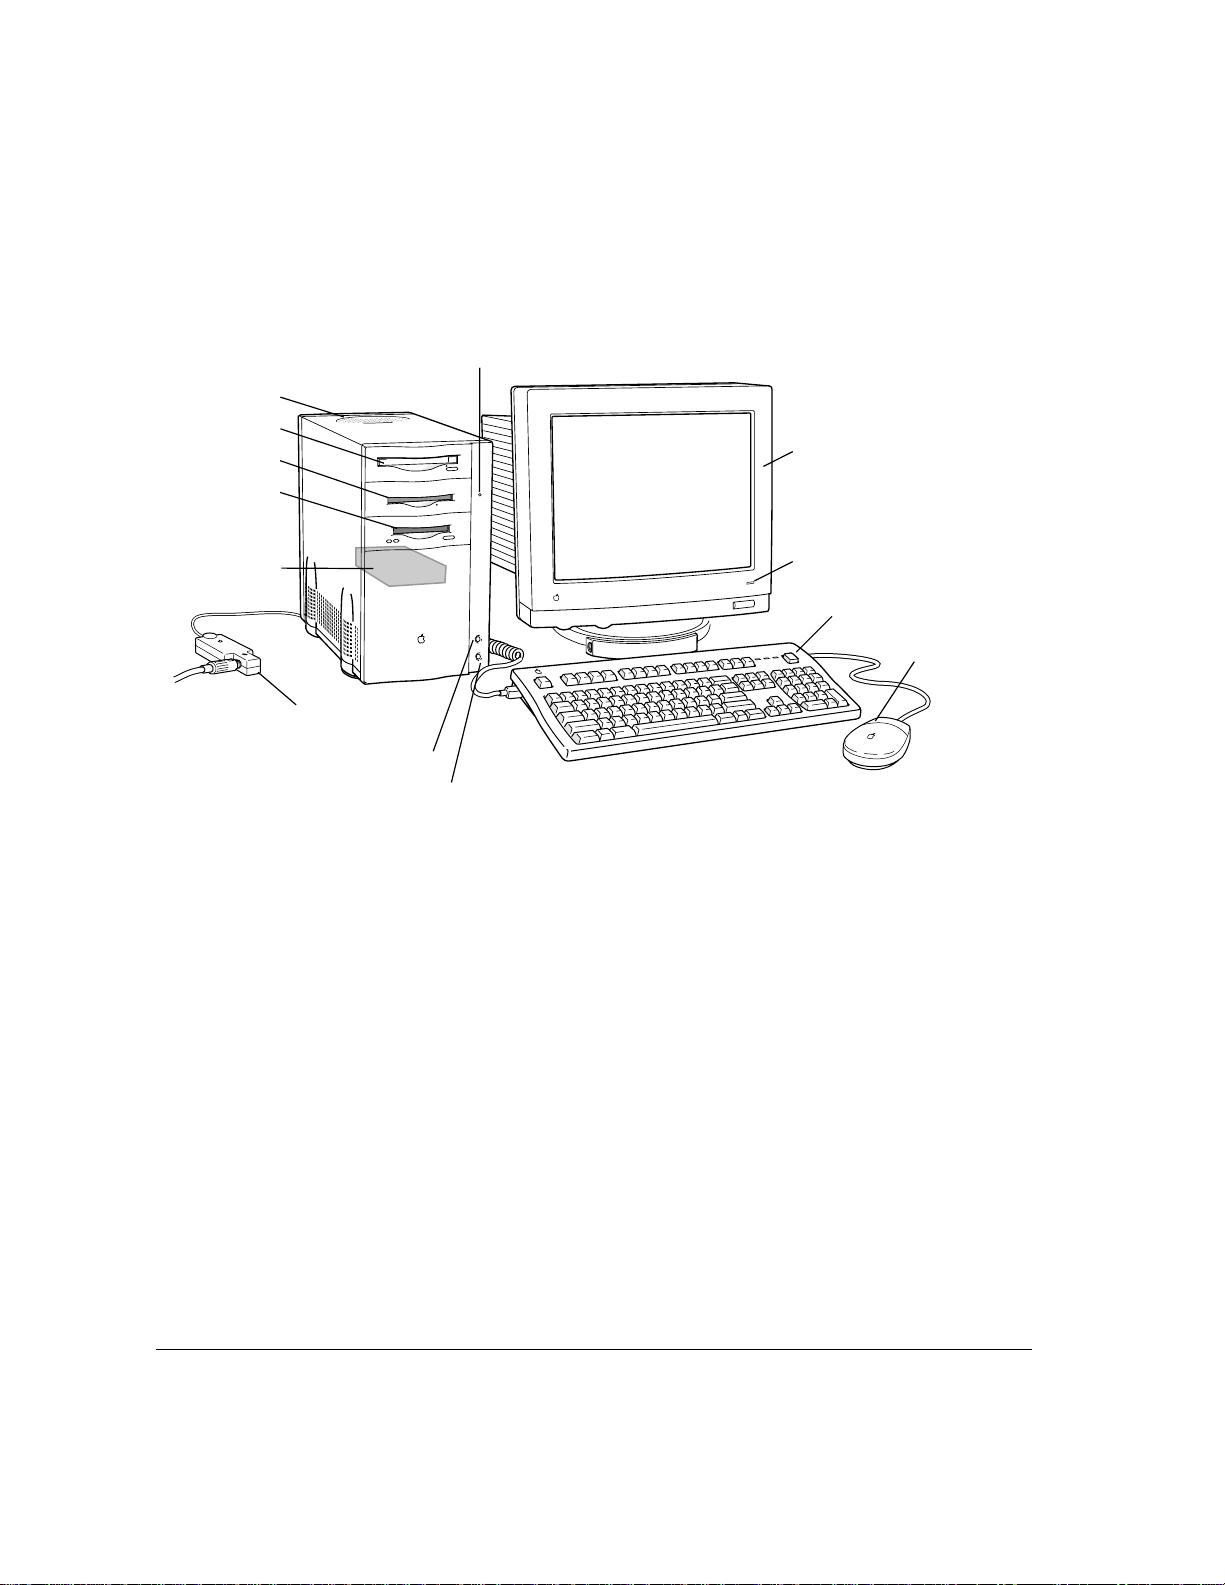
Your server at a glance
The following figure shows the basic components of your Workgroup
Server 8150, assembled and connected to a network.
Monitor
Power On key
Mouse
CD-ROM drive
Floppy disk drive
Interrupt switch
¥
Reset switch
Hard disk drive
(internal)
P
Media adapter
(transceiver)
ª
To the network
DAT drive or
second hard disk
(optional)
Power light
Monitor power light
Speaker
2 Chapter 1 / Setting Up Your Server

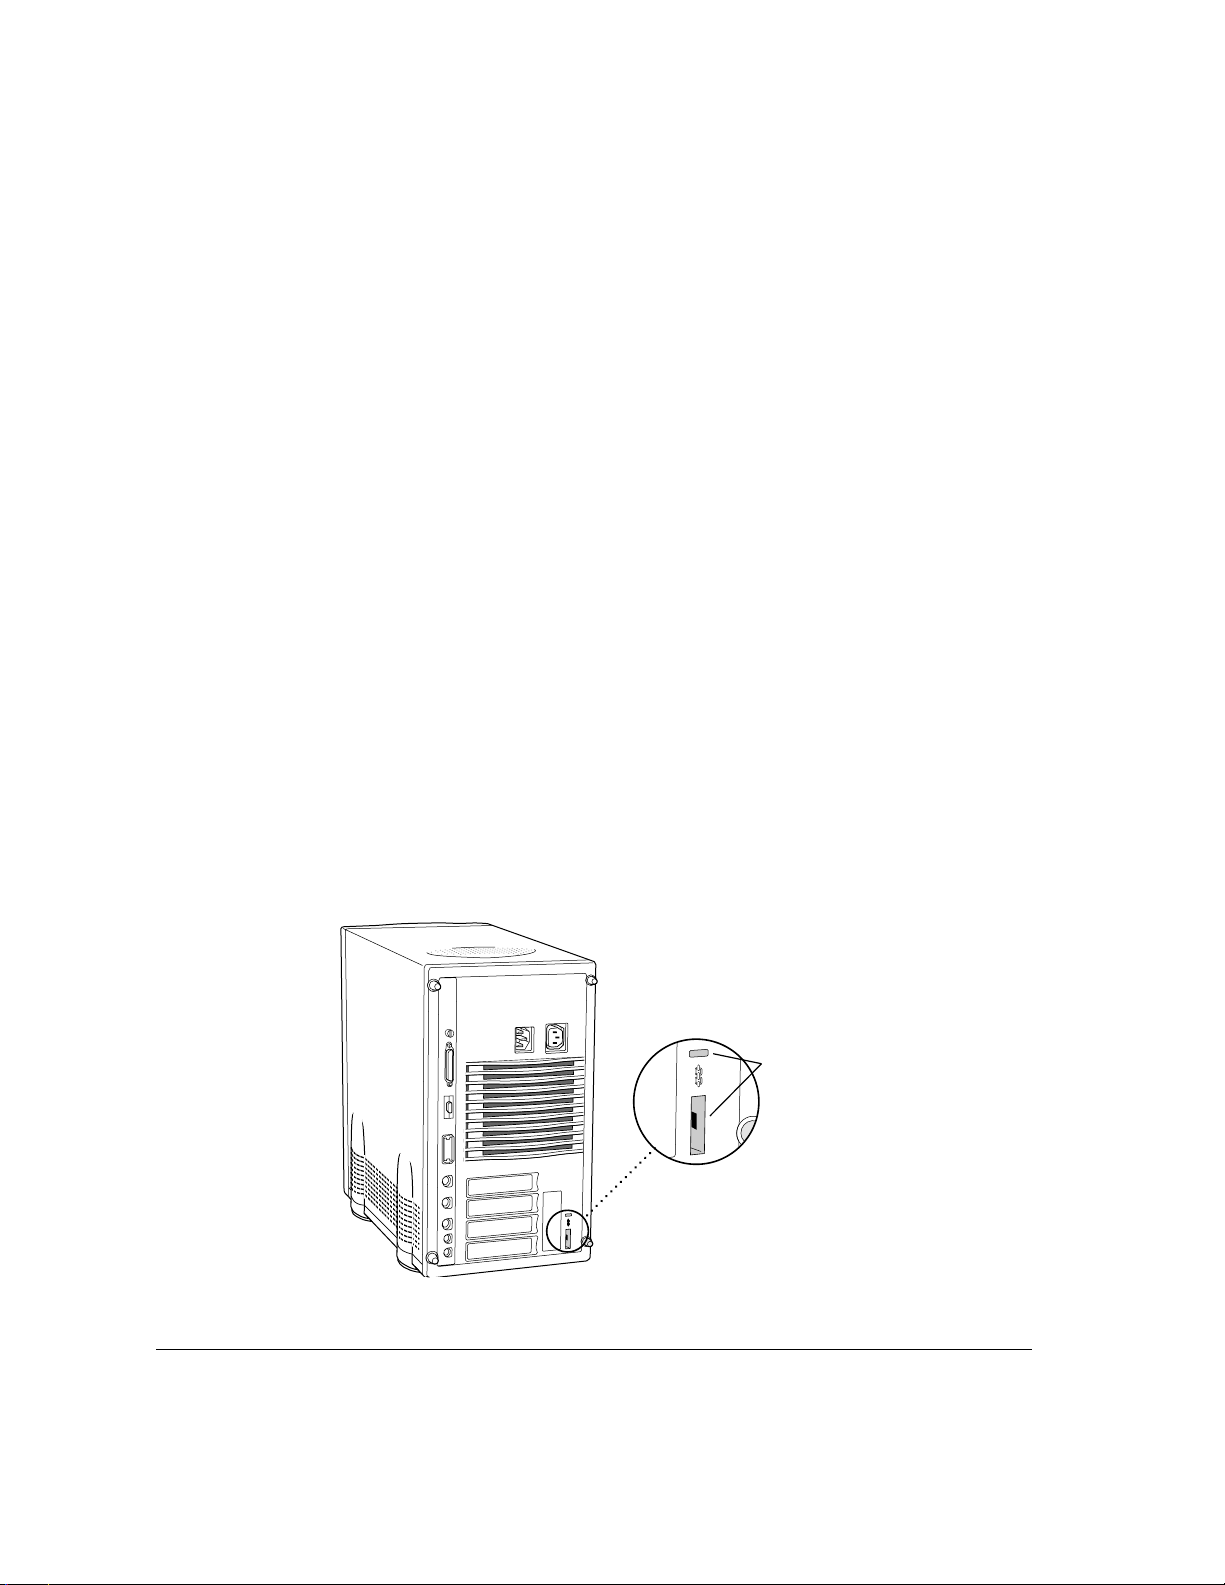
The ports on the back of the Workgroup Server 8150 and the icons that
identify them are shown in the following figure. During setup, you’ll connect
hardware to some of these ports.
Monitor
power
socket
High-density monitor port
™
Connects a monitor to your server.
SCSI port
g
Connects your server to SCSI devices such
as hard disk drives, scanners, and printers.
Ethernet port
G
Connects your server to a high-speed network.
Sound output port
_
Connects your server to headphones,
speakers, or other audio output devices.
ADB port
V
Connects your server to input
devices, such as a keyboard or a trackball.
≈
Sound input port
Connects your server to a microphone
or other audio input device.
≤
Power plug
NuBus slots (3)
F
Security lock ports
Printer port
[
Connects your server to a printer,
LocalTalk network, or GeoPort Adapter.
Modem port (GeoPort)
W
Connects an external modem or
GeoPort Adapter to your server.
I
Power switch
Processor-direct
slot (1)
Your server at a glance 3
Security issues
The Workgroup Server 8150 lets you concentrate valuable or sensitive
information on one system that can be physically isolated and more carefully
monitored than would be possible if that information were stored on personal
computers. Before you set up the server, you may want to consider two
measures that you can take to secure the hardware components: physically
isolating the system and using a locking cable to secure the system.
Physically isolating the system
It is important to note that even if software security features (such as password
protection or locking screen savers) are in use on the server, it is still possible
to disconnect peripheral devices from your server. There is no better way to
protect hardware components than by physically isolating the server system—
locking it either in a well-ventilated cabinet or in a room with controlled
access. Depending on your security needs, the nature of the data stored on the
server and its external drives may warrant the effort.
Using a locking cable
As an alternative to isolating the system completely in an area of controlled
access, you can purchase a locking cable and attach it to your server. The back
panel has a built-in port for a locking cable. Follow the instructions supplied
with the locking cable to secure it to your server.
F
Security
lock ports
4 Chapter 1 / Setting Up Your Server

By itself, a locking cable cannot prevent unauthorized use of the server, but it
can prevent the server (and its peripheral devices if they are also secured by
locking cables) from being removed.
Installing an expansion card
If you purchased any expansion cards for your server, install them now (see
“Installing an Expansion Card” in Chapter 3 for instructions). If you don’t
have an expansion card, go on to the next section, “Connecting a Monitor.”
Connecting a monitor
Your server has one high-density monitor port that accepts a monitor with a
screen 16 inches or smaller (measured diagonally).
Note: You can use a larger monitor by installing a monitor card. See
“Installing an Expansion Card” in Chapter 3.
You can connect many types of monitors to your server, including:
m Most standard monitors. See the Technical Information booklet that came
with your server for a more detailed list. To connect a standard monitor, you
must use the monitor cable adapter supplied with your server.
m Apple AudioVision monitors. AudioVision monitors include built-in
speakers, a microphone, video, and an Apple Desktop Bus (ADB) port (for
an input device such as a keyboard).
This section contains instructions for connecting either kind of monitor. To
connect a monitor from a manufacturer other than Apple, refer also to the
instructions that came with the monitor.
Connecting a monitor 5
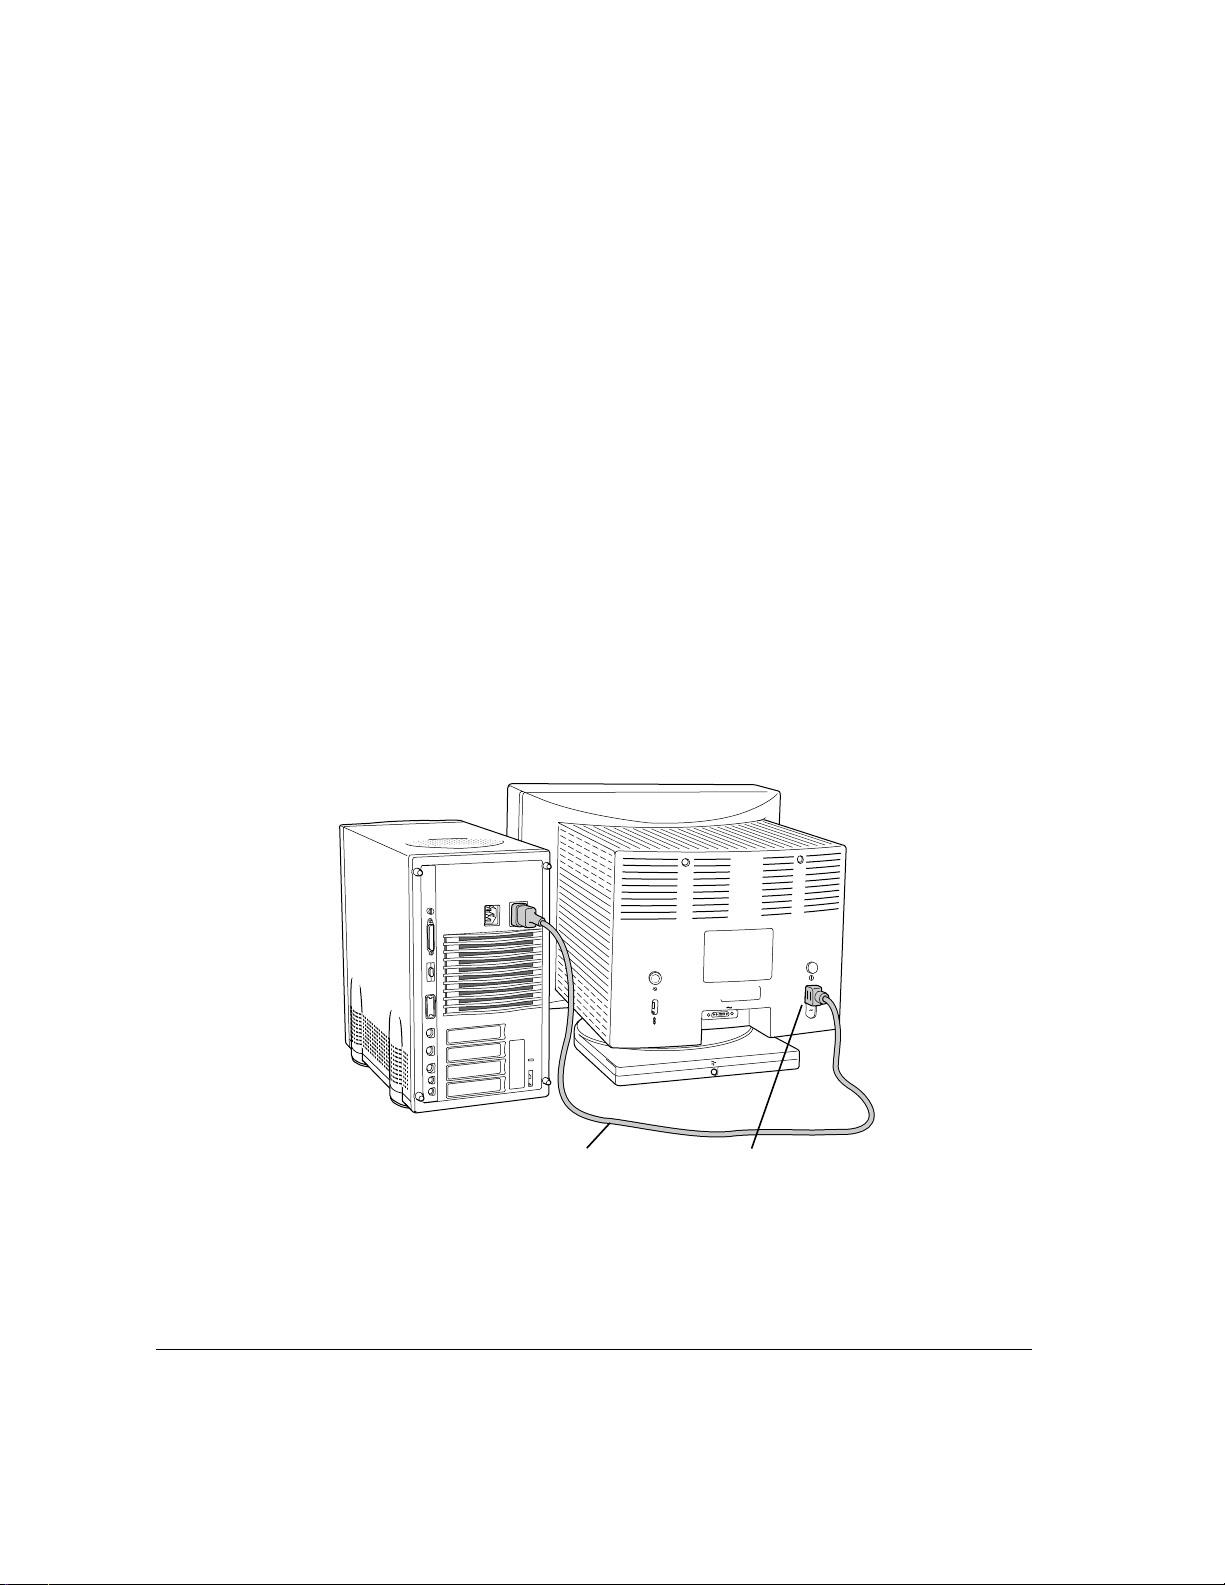
Connecting the monitor’s power cord
Monitors have two cords to connect: a power cord and a monitor cable. To
connect the monitor power cord:
1 Place the monitor where you will be using it.
Keep in mind these considerations:
m Allow a few inches for air circulation around the server and monitor.
m Make sure the top of the screen is slightly below eye level when you’re
sitting at the keyboard.
m Position the monitor to minimize glare and reflections on the screen from
overhead lights and windows.
m Consult “Arranging Your Office” in Appendix A for suggestions about
locating your server equipment.
2 Connect the monitor’s power cord to the monitor.
On some monitors, the cord is already attached.
3 Plug in the monitor’s power cord.
Monitor power socketMonitor power cord
6 Chapter 1 / Setting Up Your Server
Some power cords are designed to plug into the back of your server. You can also
plug the power cord into a grounded electrical outlet (an adapter may be needed).
Note: If you have an Apple AudioVision monitor, plug the monitor’s power
cord into the back of the server, not into an outlet.
Some monitors have to be connected to a grounded power outlet, not to the
server’s power socket. Check the information that came with the monitor.
Connecting the monitor cable
After you plug in the monitor’s power cord, connect the monitor cable to the
server’s monitor port.
To connect the monitor cable:
1 Attach the monitor cable to the monitor.
On some monitors, the cable is already attached.
High-density monitor port
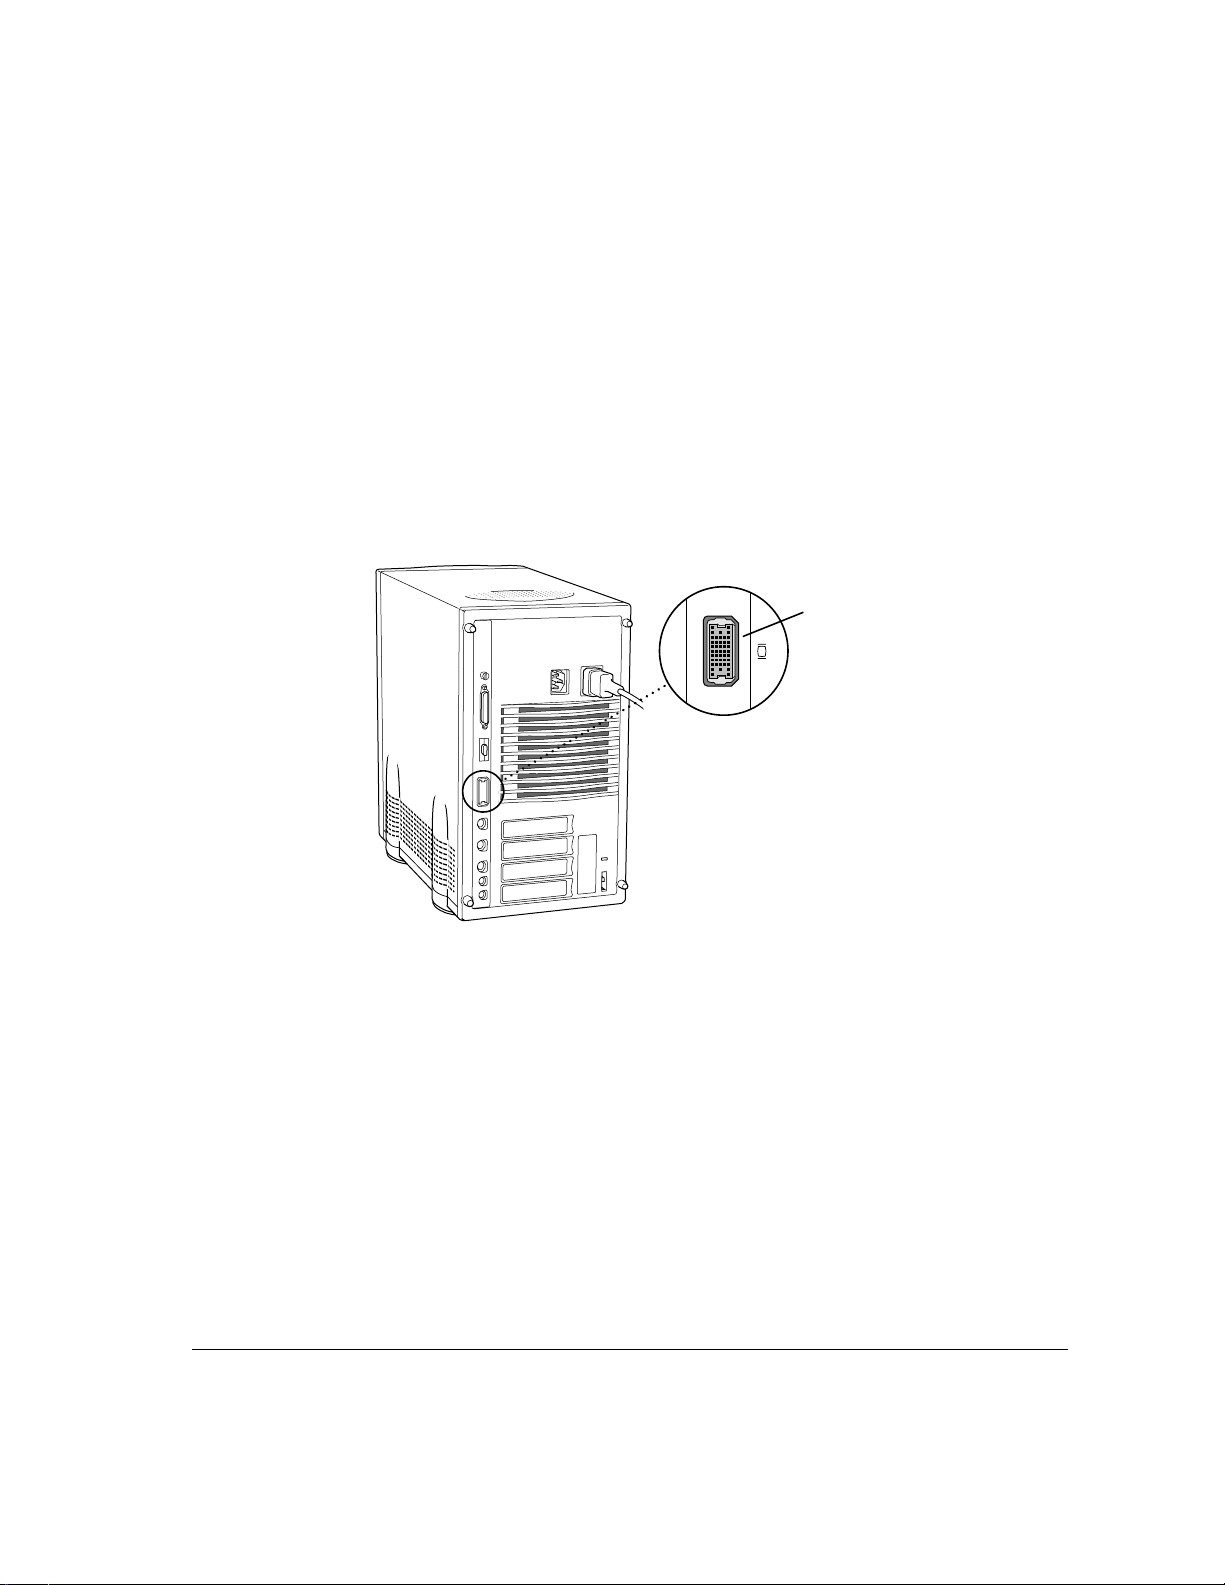
Connecting a monitor 7
2 If you have a standard monitor, attach the monitor cable adapter to the monitor cable.
The monitor cable adapter comes with your server.
3 Attach the monitor cable or adapter to the server’s monitor port.
The monitor port is marked with the icon ™. To connect the cable, firmly
push it into the connector until you hear a click.
If you have an AudioVision monitor, see the information that came with the
monitor to use its special features.
Monitor cable
Monitor cable
Monitor cable adapter
: connect
a standard monitor cable to this
adapter, then attach the adapter
to the monitor port.
8 Chapter 1 / Setting Up Your Server
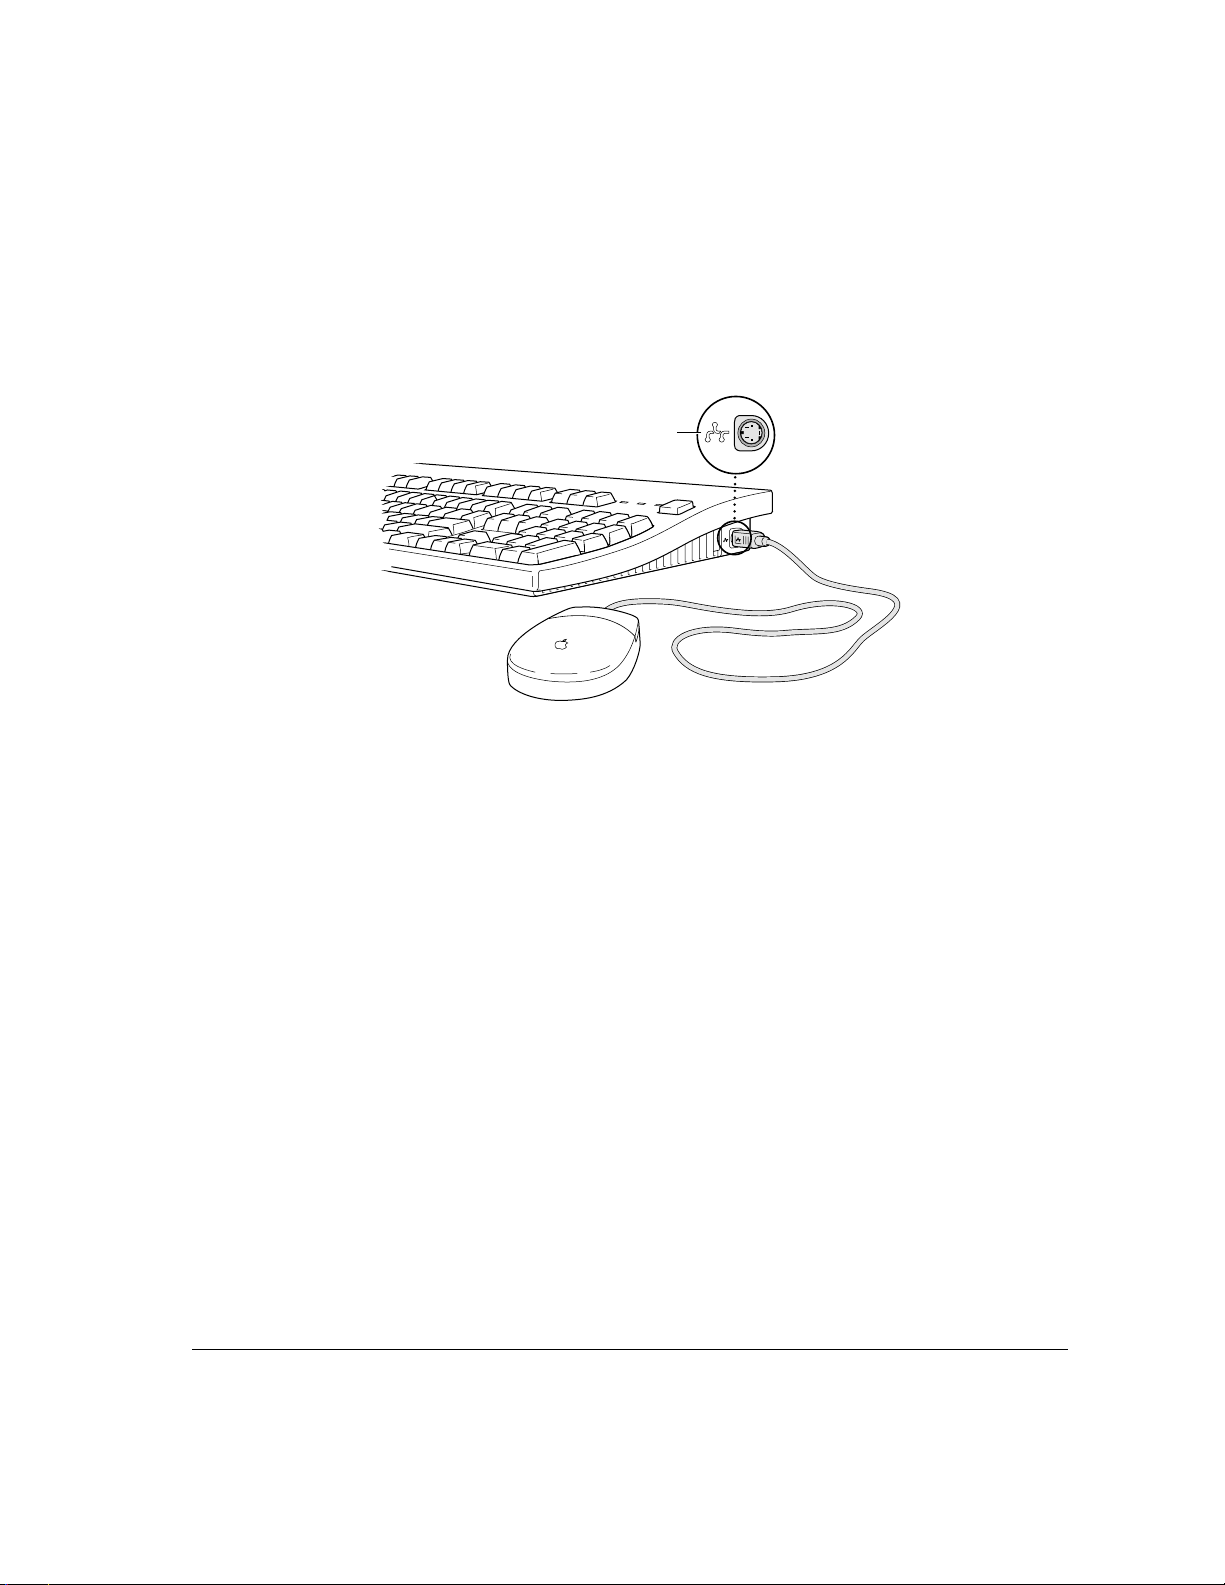
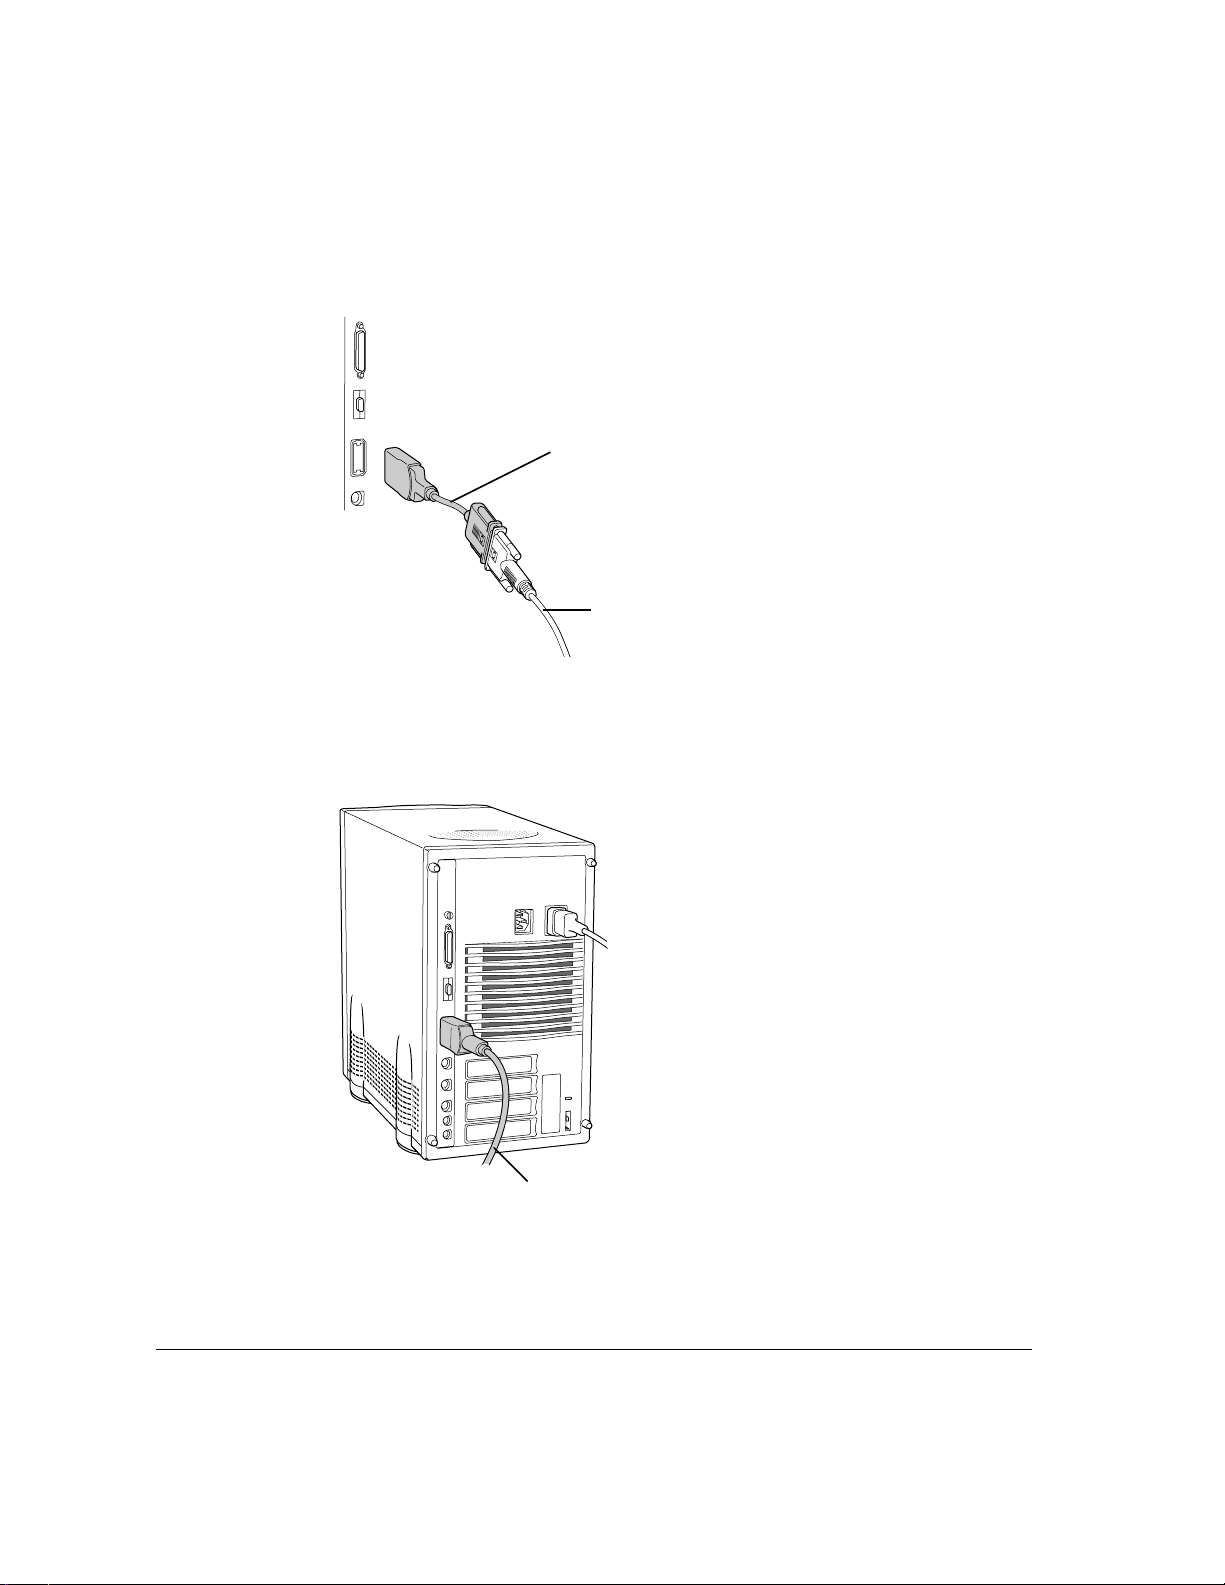
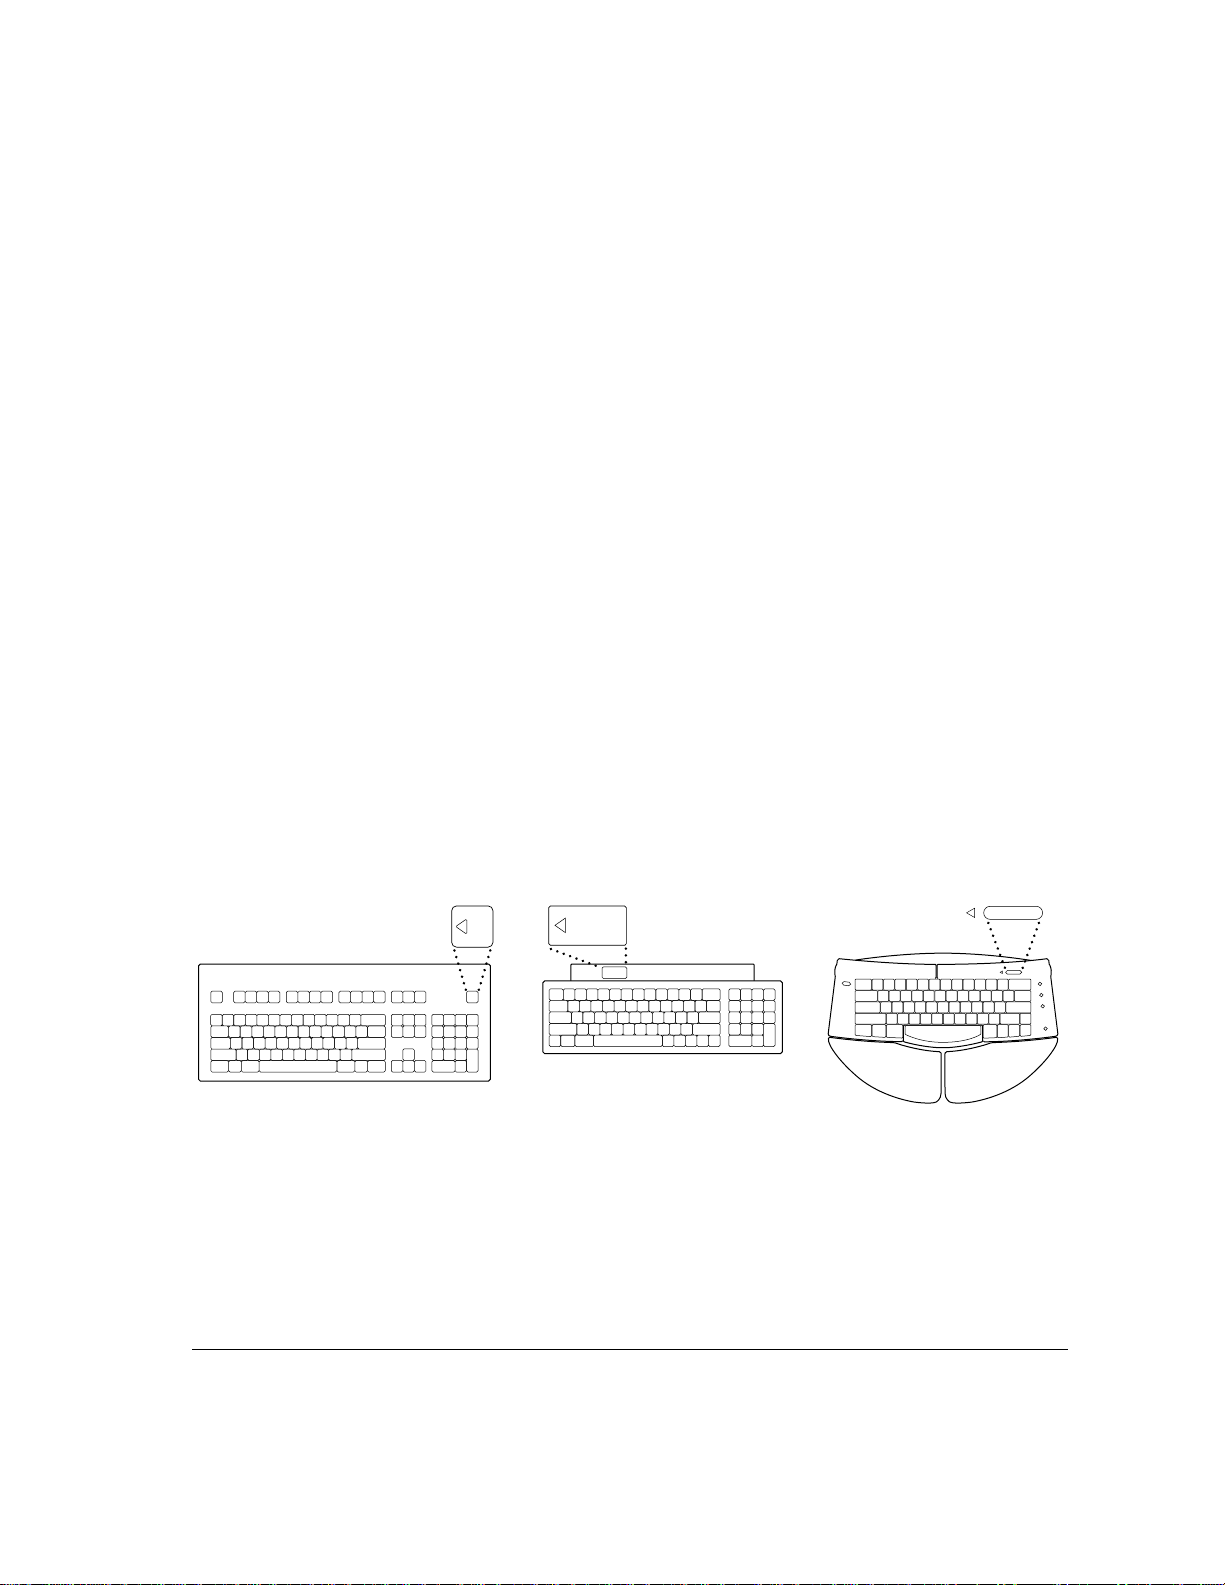
Connecting the mouse and keyboard
You have a choice of several keyboards for your server. They are all connected
the same way.
1 Plug the mouse cable into the port on either side of the keyboard.
Most right-handed people prefer to use the mouse with their right hand; most
left-handed people prefer to use the mouse with their left hand. Plug the mouse
into the port on the side you prefer.
The plug and the port are marked with the same icon (◊). Align the icons
before you insert the plug. The positions of the port and icon on your keyboard
may be different from those pictured.
Note: The ◊ port is called the Apple Desktop Bus (ADB) port.
2 Plug the keyboard cable (both ends are the same) into the other port on the keyboard.
3 Plug the keyboard cable into the port on the back of the server marked with the
◊
icon.
Some monitors have a ◊ port to which you can connect the keyboard or
mouse. See the information that came with your monitor.
Connecting other devices
If you want to connect other devices to your server, such as an external hard
disk or a printer, follow the instructions in Chapter 3.
ADB icon
Connecting other devices 9
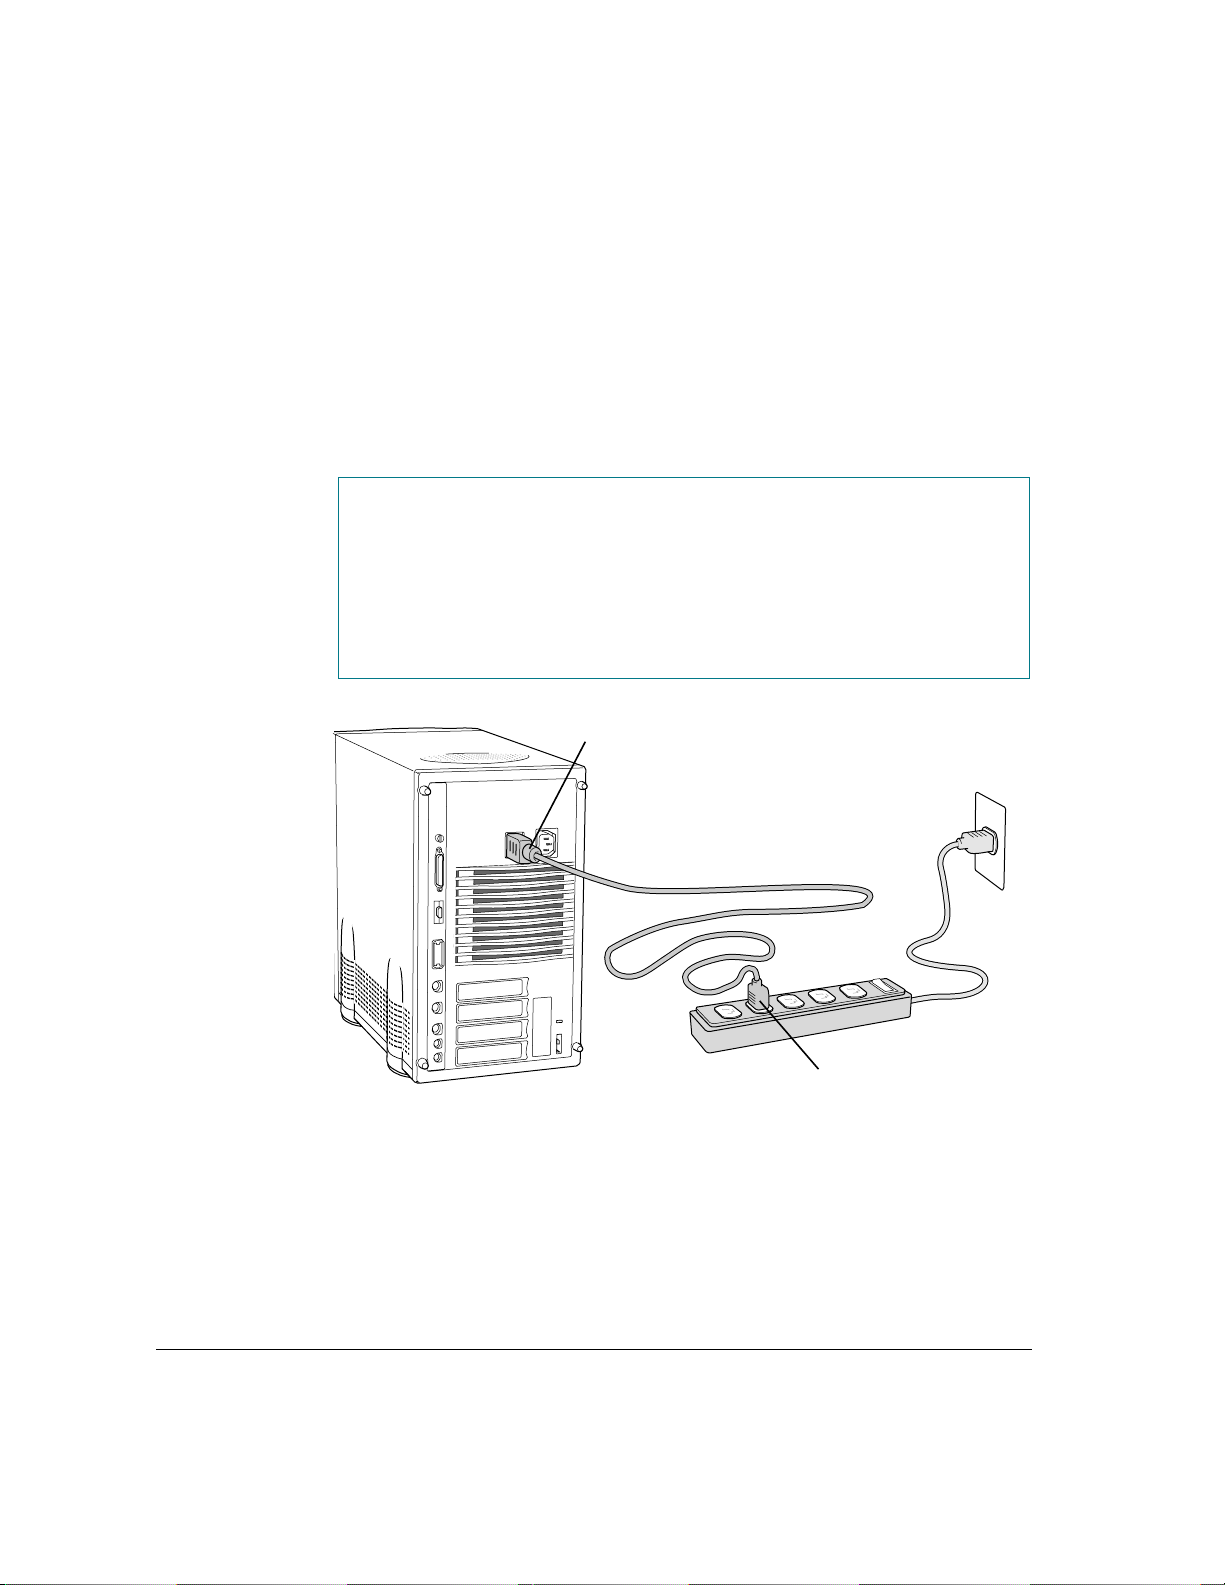
Plugging in the server
To plug in the server:
1 Plug the socket end of the server’s power cord into the recessed power plug (marked
with the symbol
≤
) on the back of the server.
2 Plug the other end of the power cord into a three-hole grounded outlet or power strip.
Choose a power outlet to which you have easy access.
IMPORTANT
Be sure at least one end of the power cord is within easy reach so
that you can unplug the server when you need to.
Power cord plug
Power cord socket
WARNING
This equipment is intended to be electrically grounded. Your
server is equipped with a three-wire grounding plug—a plug that has a
third (grounding) pin. This plug will fit only a grounded AC outlet. This
is a safety feature. If you are unable to insert the plug into the outlet,
contact a licensed electrician to replace the outlet with a properly
grounded outlet. Do not defeat the purpose of the grounding plug!
10 Chapter 1 / Setting Up Your Server
Turning the server on
Before turning the server on, make sure it is in its upright position; the
Workgroup Server 8150 is not designed to run on its side.
To turn on the server for the first time, follow these steps.
1 Turn on the monitor.
See the information that came with your monitor for the location of the power
switch. On Apple monitors, the power switch has this icon: I.
Note: You only need to turn on the monitor once if it is plugged into the
server. From now on, the monitor will turn off automatically when you shut
down the server, and it will turn on automatically when you start up the server.
(If the monitor is not plugged into the server, it must be turned on separately
each time you turn on the server.)
2 Turn on all external devices.
External devices may include hard disk drives, CD-ROM drives, or tape-backup
drives. The server checks only once—at startup—for the presence of external
devices, so you need to turn on the devices before you turn on the server.
3 Turn on your server by pressing the Power On key.
You’ll find the Power On key at the top of the keyboard. You can recognize
this key by the triangle outline.
Turning the server on 11
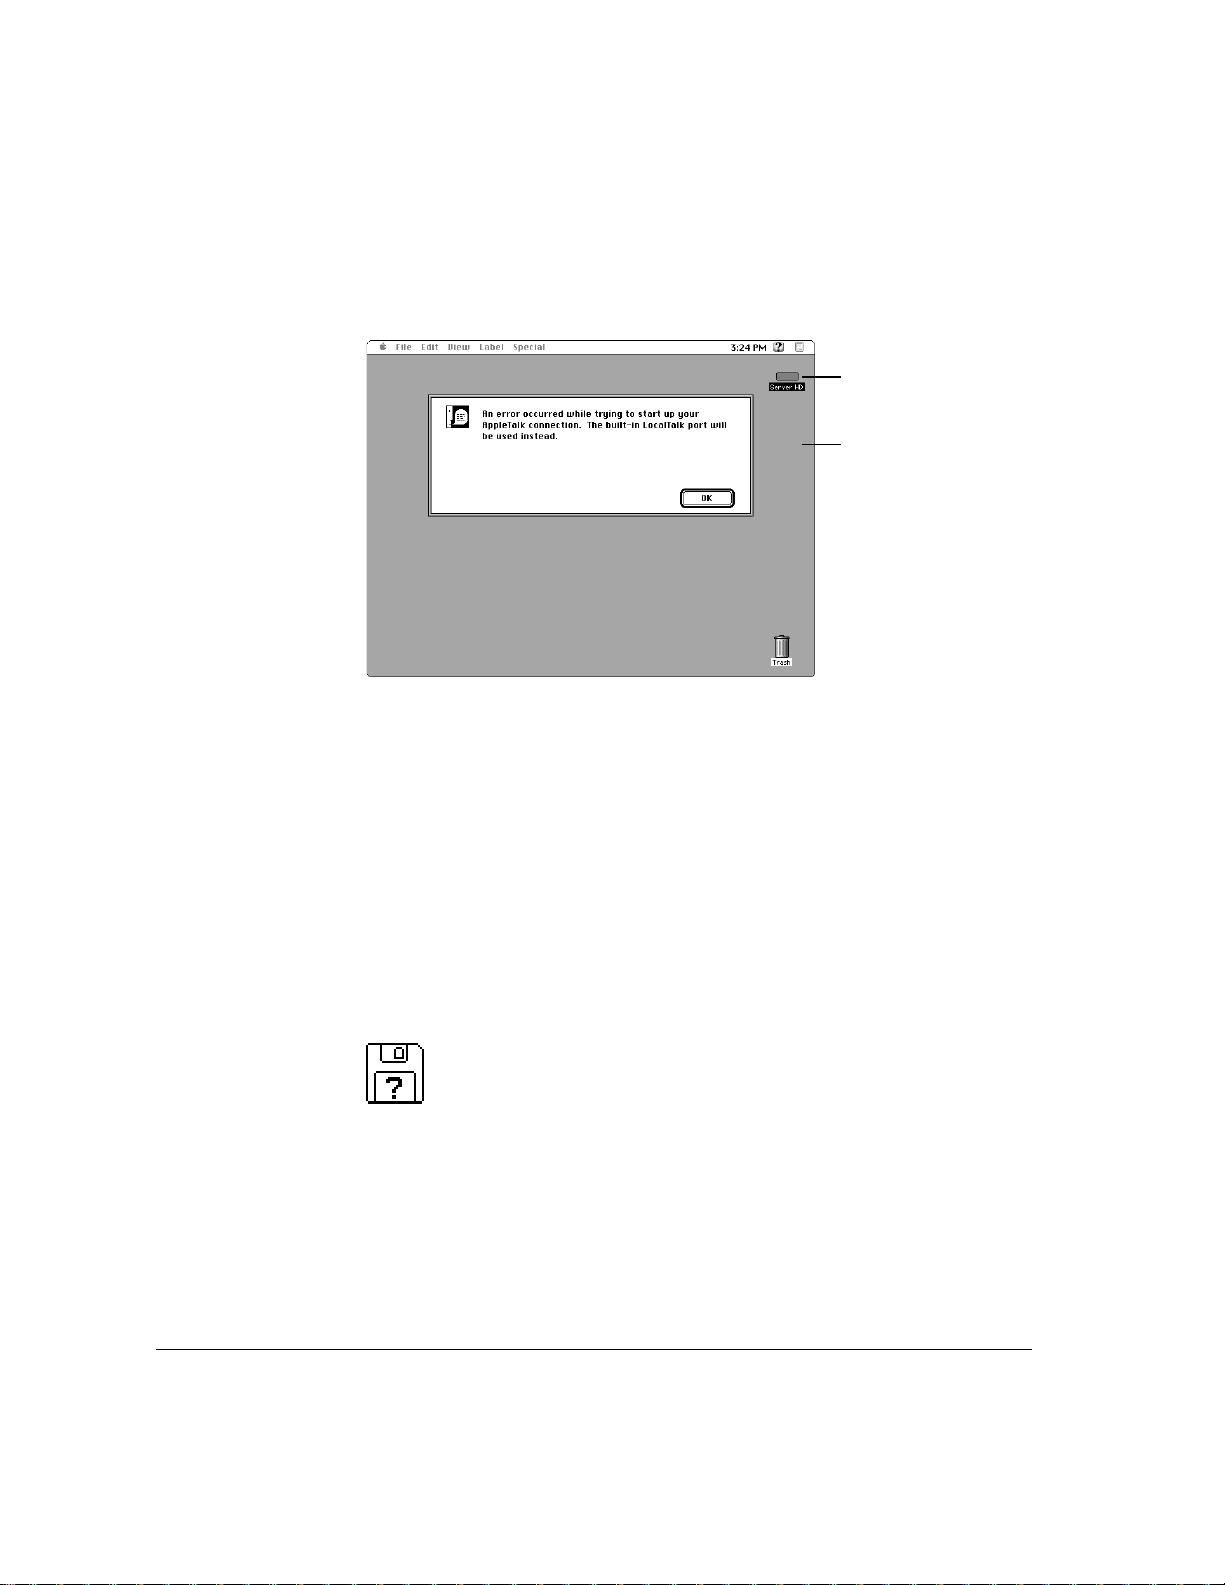
4 Check to see what’s on your screen, then click the OK button to dismiss the dialog box.
m If you see a system message on the desktop, as shown in the following
figure, your system software is already set up correctly.
Why the message about your network connection? The Workgroup Server
system software is preset for Ethernet networks. When you start up your
server for the first time (before connecting a network cable), you’ll see a
dialog box alerting you that the system temporarily switched the network
connection from built-in EtherTalk (software for Ethernet) to LocalTalk.
However, if you shut down the server and connect to an Ethernet network
later (as described in Chapter 2), the next time you start up, the system will
automatically make the correct network connection for you.
m If you see a blinking question mark, you need to install system software on
the server’s hard disk. (System software is a set of programs the computer
uses to start itself up.)
See “Reinstalling System Software” in Chapter 6 of this book for
information on installing system software.
Startup disk icon
Macintosh desktop
12 Chapter 1 / Setting Up Your Server
m If you see anything else on your screen, or if you see nothing at all, see the
section “Problems Turning On Your Server?” later in this chapter.
IMPORTANT
If you need to turn off your server at any point, see “Turning the
Server Off” later in this chapter. It is very important to use the correct
procedure for shutting down your server before turning it off.
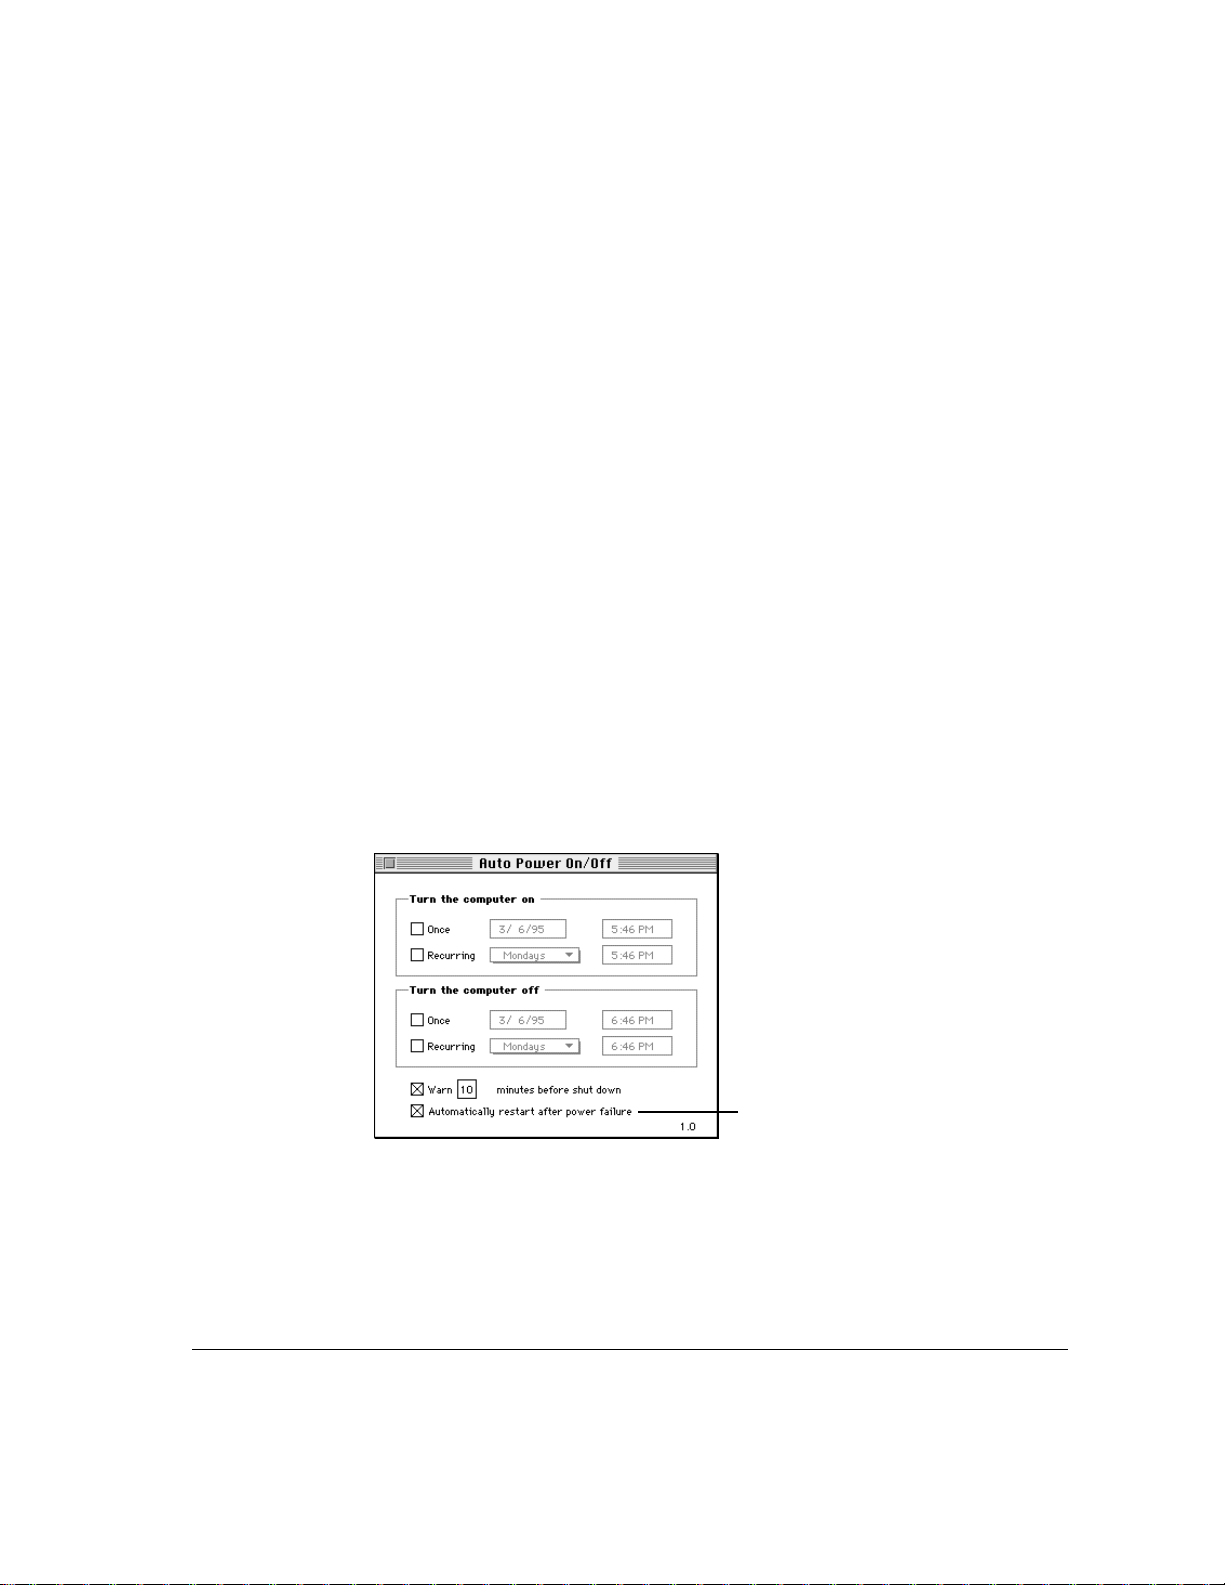
Setting the server to restart automatically after a power failure
The Auto Power On/Off control panel provides a convenient way to specify
when your Workgroup Server 8150 shuts down or restarts. For quick recovery
after a power outage, you can set the server to restart as soon as power is
restored.
To specify automatic restart, follow these steps.
1 Open the Auto Power On/Off control panel located in the Control Panels folder.
The control panel displays your options for automatically shutting down and
restarting the server at a certain time or on a regular basis.
2Click the “Automatically restart after power failure” option so that a checkmark appears
in the box.
The option takes effect as soon as you set it.
This option sets the server to
restart automatically.
Turning the server on 13

Problems turning on your server?
If you don’t see anything on the screen, check these items to see if you can
identify the problem:
m Is the server plugged into a power source? If it is plugged into a power strip,
is the power strip turned on?
m Is the power light on the front panel on?
m Are the keyboard and mouse cables connected correctly? (Don’t disconnect
the keyboard or mouse cables while your server is on. You could damage
your equipment.)
m Is the monitor power cord plugged in?
m Is the monitor turned on? (Check the power light on the front of the
monitor.)
m Is the monitor’s cable attached firmly to both the monitor and server?
m Are the brightness and contrast controls on the monitor adjusted correctly?
(On Apple monitors, the brightness control is marked with the symbol
¤
and the contrast control is marked with the symbol O
.)
Setting the system time and date
It’s important that you set the current time and date for your server so that the
system can correctly log system events and record file activity. You set the
time and date in the Date & Time control panel. When setting the time, you
can also specify whether time is displayed on a 12-hour or 24-hour clock. To
get step-by-step instructions for setting the system time and date, see the
“Setting Options” topic of Macintosh Guide, available in the Guide (h) menu.
Note: If you’re new to Macintosh, now is a good time to refer to Appendix B,
“Getting Help.”
14 Chapter 1 / Setting Up Your Server
 Loading...