


Apple
QuickTake100
User’s Guide for Macintosh
K Apple Computer, Inc.
© 1994 Apple Computer, Inc. All rights reserved.
Under the copyright laws, this manual may not be copied, in whole or in part, without the written consent of Apple. Your rights to the software are governed by the accompanying software license agreement.
The Apple logo is a trademark of Apple Computer, Inc., registered in the U.S. and other countries. Use of the “keyboard” Apple logo (Option-Shift-K) for commercial purposes without the prior written consent of Apple may constitute trademark infringement and unfair competition in violation of federal and state laws.
Every effort has been made to ensure that the information in this manual is accurate. Apple is not responsible for printing or clerical errors.
Apple Computer, Inc. 1 Infinite Loop
Cupertino, CA 95014-6299 (408) 996-1010
© Image Software 1992, 1993, 1994.
Portions Copyright Eastman Kodak Company.
Apple, the Apple logo, AppleTalk, EtherTalk, LocalTalk, Macintosh, and PowerBook are trademarks of Apple Computer Inc., registered in the U.S. and other countries. Apple SuperDrive, GeoPort, QuickTake, and QuickTime are trademarks of Apple Computer, Inc.
Adobe, Adobe Illustrator, Adobe Photoshop, and PostScript are trademarks of Adobe Systems Incorporated, which may be registered in certain jurisdictions.
Classic is a registered trademark licensed to Apple Computer, Inc.
ExposurePro is a registered trademark of Baseline Publishing, Inc.
Helvetica and Times are registered trademarks of Linotype Company.
QMS is a registered trademark of QMS, Inc.
QuarkXPress is a registered trademark of Quark, Inc.
SuperPaint is a registered trademark of Aldus Corporation.
Tektronix is a registered trademark of Tektronix, Inc.
Windows is a trademark of Microsoft Corporation.
Simultaneously published in the United States and Canada.
Mention of third-party products is for informational purposes only and constitutes neither an endorsement nor a recommendation. Apple assumes no responsibility with regard to the performance or use of these products.

Contents
Communications regulation information vi
1 Getting Started With the QuickTake 100 Camera |
1 |
||||
Do you have what you need? |
2 |
|
|
||
System requirements |
2 |
|
|
|
|
Your camera at a glance |
3 |
|
|
|
|
Charging the batteries |
4 |
|
|
|
|
Installing the batteries |
5 |
|
|
|
|
Installing the QuickTake software |
6 |
|
|||
Custom installation |
7 |
|
|
|
|
What if you upgrade your Macintosh system software? |
8 |
||||
What next? |
8 |
|
|
|
|
2 Using the Camera to Take Pictures |
9 |
|||
Turning on the camera |
10 |
|
|
|
Taking pictures |
11 |
|
|
|
Focal range and flash range |
11 |
|
||
iii

Using the controls |
12 |
|
|
|
Flash settings |
12 |
|
|
|
Resolution settings |
13 |
|
||
Pictures taken and pictures available |
14 |
|||
Battery level |
14 |
|
|
|
Timer |
15 |
|
|
|
Waking the camera |
16 |
|
|
|
3 Using the Camera With Your Macintosh |
17 |
|||||
Connecting the camera to your Macintosh |
|
18 |
||||
Looking at the pictures in the camera |
20 |
|
||||
Transferring pictures to your Macintosh |
21 |
|||||
Opening pictures on the Macintosh |
22 |
|
|
|||
Opening a picture in the image window |
|
22 |
||||
Opening a slide table |
23 |
|
|
|
||
Working with your pictures |
24 |
|
|
|
||
Editing slide names |
25 |
|
|
|
|
|
Getting information about a slide |
25 |
|
|
|||
Opening a slide to a full-size image |
26 |
|||||
Zoom views in the image window |
27 |
|
|
|||
Changing the printed size of a picture |
|
27 |
||||
Cropping a picture |
28 |
|
|
|
|
|
Changing the bit depth of a picture |
29 |
|
||||
Copying a picture to another application |
|
29 |
||||
Rotating a picture |
30 |
|
|
|
|
|
Saving a picture |
31 |
|
|
|
|
|
Printing your pictures |
33 |
|
|
|
|
|
Printing a slide table |
33 |
|
|
|
|
|
Printing a single image |
34 |
|
|
|
||
iv Contents

|
Naming the camera |
35 |
|
|
|
|
|
|
Setting the clock in the camera |
36 |
|
|
|||
|
Taking pictures from the Macintosh |
37 |
|
||||
|
Erasing pictures from the camera |
38 |
|
|
|||
|
Using the camera with a power adapter |
39 |
|
||||
|
Traveling with the camera |
40 |
|
|
|
||
|
Using the battery booster pack with the camera |
40 |
|||||
4 |
QuickTake Software Menu Commands 41 |
|
|||||
|
The File menu |
42 |
|
|
|
|
|
|
The Edit menu |
46 |
|
|
|
|
|
|
The Image menu |
47 |
|
|
|
|
|
|
The Camera menu |
49 |
|
|
|
|
|
|
The Windows menu |
50 |
|
|
|
|
|
5 |
Maintenance and Troubleshooting |
51 |
|
||||
|
Caring for your camera |
51 |
|
|
|
|
|
|
Solving problems |
52 |
|
|
|
|
|
Appendix A |
Specifications |
55 |
|
|
|
|
|
Appendix B |
Battery Information |
57 |
|
|
|
|
|
Appendix C |
Using the Camera with a Windows-Based PC |
61 |
|||||
Appendix D |
Using QuickTake Setup |
63 |
|
|
|
||
|
Index 65 |
|
|
|
|
|
|
Contents v

Communications regulation information
Radio and television interference
The equipment described in this manual generates, uses, and can radiate radio-frequency energy. If it is not installed and used properly—that is, in strict accordance with Apple’s instructions—it may cause interference with radio and television reception.
This equipment has been tested and found to comply with the limits for a Class B digital device in accordance with the specifications in Part 15 of FCC rules. These specifications are designed to provide reasonable protection against such interference in a residential installation. However, there is no guarantee that interference will not occur in a particular installation.
You can determine whether your computer system is causing interference by turning it off. If the interference stops, it was probably caused by the computer or one of the peripheral devices.
If your computer system does cause interference to radio or television reception, try to correct the interference by using one or more of the following measures:
mTurn the television or radio antenna until the interference stops.
mMove the computer to one side or the other of the television or radio.
mMove the computer farther away from the television or radio.
mPlug the computer into an outlet that is on a different circuit from the television or radio. (That is, make certain the computer and the television or radio are on circuits controlled by different circuit breakers or fuses.)
If necessary, consult an Apple-authorized service provider or Apple. See the service and support information that came with your Apple product. Or, consult an experienced radio/television technician for additional suggestions. You may find the following booklet helpful: Interference Handbook (stock number 004-000-00493-1). This booklet, prepared by the Federal Communications Commission, is available from the U.S. Government Printing Office, Washington, DC 20402.
IMPORTANT Changes or modifications to this product not authorized by Apple Computer, Inc., could void the FCC Certification and negate your authority to operate the product.
This product was tested for FCC compliance under conditions that included the use of Apple peripheral devices and Apple shielded cables and connectors between system components. It is important that you use Apple peripheral devices and shielded cables and connectors between system components to reduce the possibility of causing interference to radios, television sets, and other electronic devices. You can obtain Apple peripheral devices and the proper shielded cables and connectors through an Apple-authorized dealer. For non-Apple peripheral devices, contact the manufacturer or dealer for assistance.
vi Communications Regulation Information
FCC statement
This device complies with Part 15 of the FCC rules. Operation is subject to the following two conditions:
(1)this device may not cause harmful interference, and
(2)this device must accept any interference received, including interference that may cause undesired operation.
This equipment has been tested and found to comply with the limits for a Class B digital device in accordance with the specifications in Part 15 of FCC rules. See instructions if interference to radio or television reception is suspected.
DOC statement
DOC Class B Compliance This digital apparatus does not exceed the Class B limits for radio noise emissions from digital apparatus as set out in the interference-causing equipment standard entitled “Digital Apparatus,” ICES-003 of the Department of Communications.
Observation des normes—Classe B Cet appareil numérique respecte les limites de bruits radioélectriques applicables aux appareils numériques de Classe B prescrites dans la norme sur le matériel brouilleur : “Appareils Numériques”, NMB-003 édictée par le ministre des Communications.
VCCI statement
Communications Regulation Information |
vii |

1 |
Getting Started |
With the QuickTake 100 Camera |
The QuickTake 100 is an easy-to-use camera that produces high-quality pictures you can quickly transfer to your Macintosh computer. With the QuickTake 100 you can capture images, and with your Macintosh you can manipulate and modify those images to suit your purposes. The QuickTake 100 is a valuable new tool for graphic artists, publishing professionals, and anyone who wants to use images to communicate.
IMPORTANT Save this manual. It contains important safety and operating instructions.
In this chapter
mAn inventory of items you need
mSystem requirements
mFeatures of the camera
mHow to charge NiCad batteries
mInstalling batteries in the camera
mInstalling the QuickTake software
1
Do you have what you need?
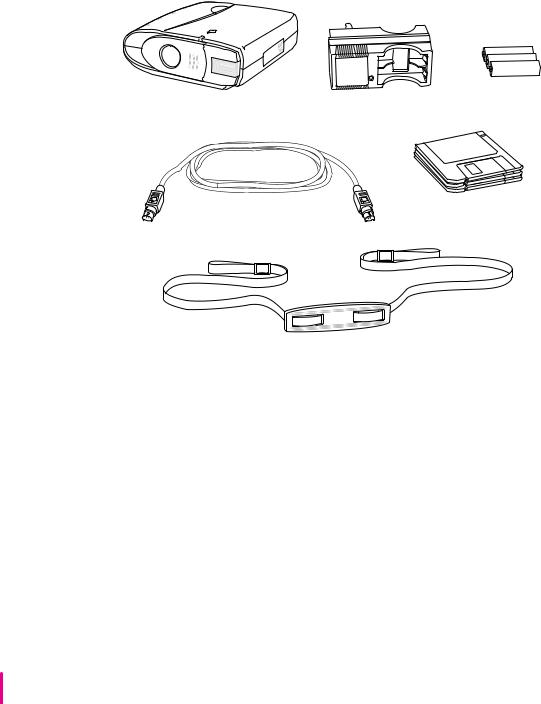
Before you begin, unpack the QuickTake 100 package. Be sure you have the items shown in this illustration:
|
Battery charger |
Rechargeable NiCad |
QuickTake 100 camera |
batteries |
Serial cable |
QuickTake software |
Neck strap
System requirements
To use the QuickTake 100 camera with your computer, you need
ma Macintosh with a 68020 or higher central processing unit (any Macintosh except a Macintosh Plus, SE, Classic, Portable, or PowerBook 100)
msystem software version 7.0.1• (with Tune-Up 1.1.1) or a later version
m4 MB of RAM with 8 MB of virtual memory or 8MB of RAM
man Apple SuperDrive (or any floppy drive that can read high-density disks)
ma hard drive with at least 10 MB available
2 Chapter 1

Your camera at a glance
This illustration shows the front, rear, and bottom of the camera.
Front view |
|
|
Sliding lens cover |
|
Shutter release |
(opened) |
|
|
Timer light |
|
|
Camera lens |
|
Serial port and |
|
|
|
Viewfinder lens (with light sensors |
|
power adapter port |
above and below, for the light meter) |
Built-in flash |
(behind the cover) |
Rear view
Control panel display
Viewfinder |
Battery compartment |
Control buttons
Bottom view
Adjustable neck strap |
|
Tripod mounting hole |
Neck strap |
|
attachment points |
Getting Started With the QuickTake 100 Camera |
3 |
Charging the batteries
The three NiCad batteries you received with the QuickTake 100 must be charged before you can use them. Use the battery charger that came with the camera.
1 Insert the batteries into the charger.
When batteries are charging, this red light glows.
Make sure you position the + and – ends of each battery as indicated on the battery charger.
2Plug the battery charger into an electrical outlet.
It takes five hours to fully charge three NiCad batteries. (Be sure to fully charge the batteries the first time you use them.) If you want to take pictures right away, you can use three AA non-rechargeable batteries (not included) in the camera. For information about battery care, see Appendix B.
WARNING To reduce the risk of injury, charge only rechargeable nickelcadmium batteries in the battery charger that came with the QuickTake 100 camera. Charging other types of batteries may cause them to leak or explode, resulting in personal injury and property damage.
3Unplug the battery charger, remove the batteries, and install them in the camera.
See instructions for installing batteries on the next page.
4 Chapter 1
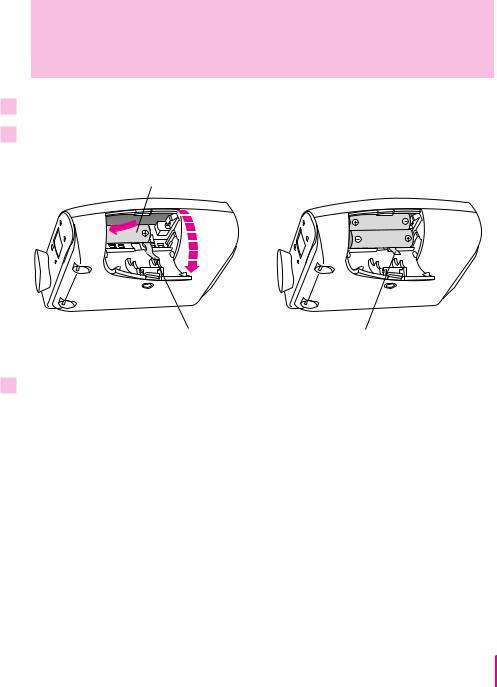
Installing the batteries
1
2
3
Use the three NiCad batteries that came with your camera. If the NiCad batteries are being charged, you can substitute three AA non-rechargeable batteries in the camera.
WARNING Do not mix different types of batteries in the camera. Use only three NiCad batteries or three AA non-rechargeable batteries. Mixing batteries may cause a fire or a small explosion.
Flip open the door to the battery compartment.
Insert the batteries into the camera.
Position the – and + ends of each battery as indicated on the door.
Arrange the ribbon under the batteries so you can use it to pull them out when you need to replace them.
Close the battery compartment door.
See also: Appendix B, “Battery Information.”
Getting Started With the QuickTake 100 Camera |
5 |

Installing the QuickTake software
Before you can transfer images from your camera to your Macintosh computer, you need to install the necessary software on your Macintosh. You’ll need the QuickTake disks that came with your camera. The disks contain
mthe Installer, a program that installs everything you need
mQuickTake 1.0, a program that transfers pictures from the camera to your Macintosh
mother files needed by the QuickTake 100 camera
IMPORTANT If you have system software version 7.0.1• on your Macintosh, you must turn on AppleTalk before you install QuickTake software. Open the Chooser and make sure that AppleTalk is active.
1Insert the appropriate installation disk into a floppy disk drive.
The choice depends on whether you have a Power Macintosh or not.
m If you have a Power Macintosh, insert QuickTake for Power Macintosh. m Otherwise, insert QuickTake Install Disk 1.
If necessary, open the disk icon.
Use the Installer to install the QuickTake software.
For important late-breaking information, open the Read Me.
2Double-click the Installer icon to open it.
3In the Welcome dialog box that appears, click OK.
6 Chapter 1

4 In the Installer dialog box, click Install.
Make sure you install the QuickTake software on the disk you use as your startup disk.
When you’re ready to begin, click Install.
To switch to a different disk, click Switch Disk.
A status box keeps you informed of progress during installation.
5When you see a message on your screen, follow directions and insert the next disk.
Near the end of the process, you’ll be asked to insert the first disk again.
6When you see a message reporting that the installation was successful, click Restart.
The Installer restarts your Macintosh. You’ll find a new folder containing the QuickTake software on your hard disk.
Custom installation
If you click the Customize button in the Installer, you’ll see a list of specific items you can install individually. To ensure that all the necessary software is installed, use Easy Install instead.
Getting Started With the QuickTake 100 Camera |
7 |

What if you upgrade your Macintosh system software?
If you decide to replace or upgrade your Macintosh system software after you’ve installed the QuickTake software, you may not be able to open the QuickTake application program. To fix this problem, reinstall the QuickTake software.
As an alternative, you can use the custom Installer:
1Insert the appropriate installation disk into a floppy disk drive.
The choice depends on whether you have a Power Macintosh or not.
m If you have a Power Macintosh, insert QuickTake for Power Macintosh. m Otherwise, insert QuickTake Install Disk 1.
If necessary, open the disk icon.
Use the Installer to install the QuickTake software.
2Double-click the Installer icon to open it.
3In the Welcome dialog box that appears, click OK.
4In the Installer dialog box, click Customize.
5Choose Shared Library Manager from the list.
6Click Install.
7When you see a message reporting that the installation was successful, click Restart.
You have reinstalled the Shared Library Manager, and you can open the QuickTake program again.
What next?
To begin taking pictures, go on to Chapter 2.
8 Chapter 1

2 Using the Camera to Take Pictures
Because the QuickTake 100 camera is small and light and runs on batteries, you can take pictures with it anywhere.
In this chapter
mTurning on the camera
mTaking pictures
mUsing the controls
mWaking the camera from sleep
9
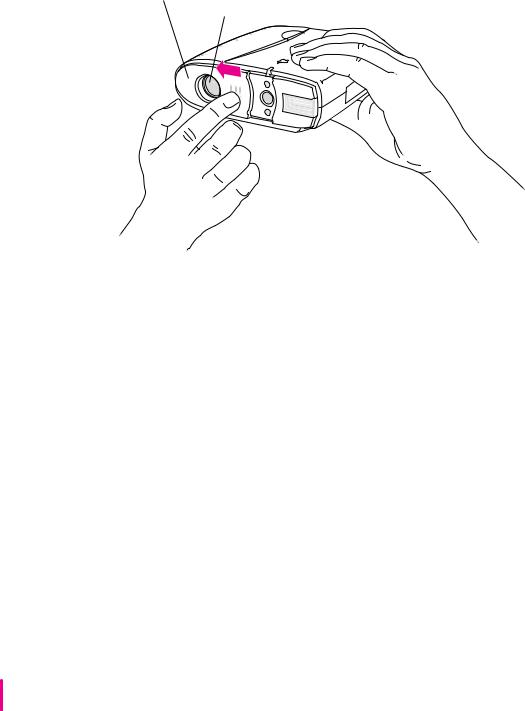
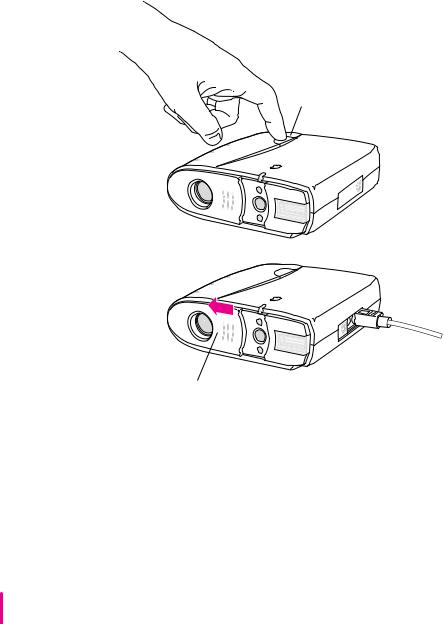
Turning on the camera
To turn the camera on, slide open the lens cover.
Lens cover |
Be careful not to touch |
|
the camera lens. |
10 Chapter 2
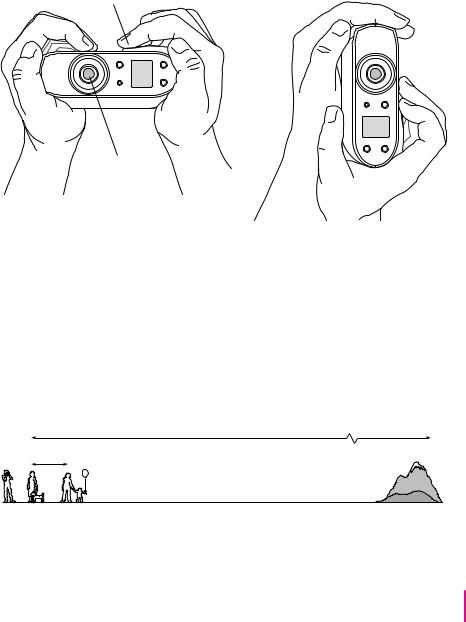
Taking pictures
Look straight through the viewfinder and take time to frame the subject you want to photograph. Hold the camera steady, and press the shutter release. Because the camera delays briefly before taking the picture, be sure to hold it still until you hear the shutter click. When the camera is ready for the next picture (in a few seconds), a green light glows in the viewfinder. The pictures can remain in the camera’s memory up to one year (or until you erase them).
Press the shutter release.
Viewfinder
You can hold the camera horizontally or vertically.
Focal range and flash range
Try to keep a distance of at least four feet between you and the object you want to photograph. The camera can focus on objects as close as four feet and as far away as infinity. Objects closer than four feet may be out of focus, but objects in the range between four feet and infinity will be properly focused.
The flash can illuminate objects as close as four feet and as far away as nine feet.
Focus
Flash
4' |
9' |
(Distance) |
Infinity |
Using the Camera to Take Pictures |
11 |
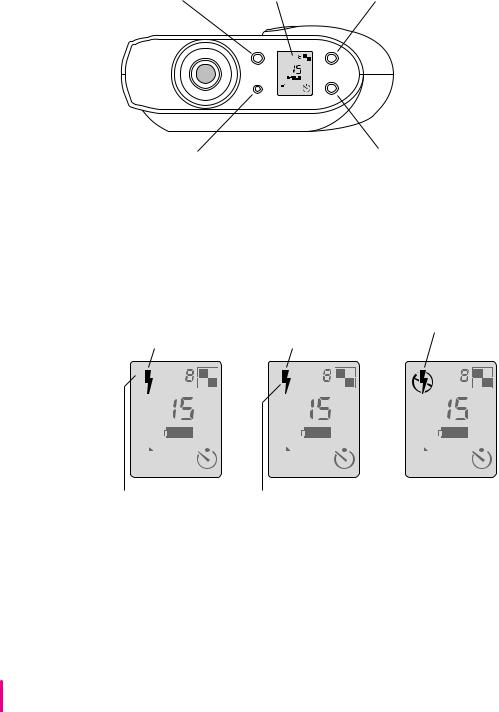
Using the controls
When the camera is on, the control panel display appears.
Flash button |
Control panel display |
Resolution button |
A
|
|
|
|
|
|
|
|
Erase All button |
|
Timer button |
|||||
(explained in Chapter 3) |
|
|
|||||
Flash settings
There are three possible settings for the flash. Each time you press the flash button, you cycle from one setting to the next.
To let the camera’s light sensor determine when to flash, press the button until you see this icon.
For a flash with every picture, press the button
until you see this icon.
To turn off the flash, press the button until you see this icon.
A
|
|
|
|
|
|
|
|
|
|
|
|
|
|
|
|
|
|
|
|
|
|
|
|
|
|
|
|
|
|
|
|
|
|
|
|
|
|
|
|
|
|
|
|
|
|
|
|
|
|
|
|
|
|
|
|
|
|
|
|
|
|
|
|
|
|
|
|
|
|
|
|
|
|
|
|
|
|
|
|
A stands for automatic. |
When your subject is in |
|
|
||||||||||||
When you turn on or |
shadow, and the background |
|
|
||||||||||||
wake the camera, this |
is brighter, use this setting. |
|
|
||||||||||||
setting always appears. |
|
|
|
|
|
|
|
|
|
|
|||||
12 Chapter 2

Resolution settings
There are two possible settings for resolution. Each time you press the resolution button, you toggle from one setting to the other.
For standard resolution, press the button until you see this icon.
For high resolution, press the button until you see this icon.
A |
A |
mStandard resolution means 320 x 240 pixels. You can take up to 32 standard-resolution pictures.
mHigh resolution means 640 x 480 pixels. Each picture contains more detail. You can take a maximum of eight high-resolution pictures; they take more space in memory than standard-resolution pictures.
mYou can mix highand standard-resolution pictures on the camera, all in 24-bit color.
Using the Camera to Take Pictures |
13 |
Pictures taken and pictures available
The number in the center of the control panel shows how many pictures you’ve taken. The smaller number next to the resolution icon shows how many pictures you can take before the camera is full.
Pictures taken |
|
|
|
|
|
|
|
|
|
Pictures you can take at the |
||||||
|
|
|
|
|
|
|
|
|
|
|
|
|
|
|
|
selected resolution |
A |
|
A |
|
This number changes when you |
||||||||||||
|
|
|||||||||||||||
|
|
|
|
|
|
|
|
|
|
|
|
|
|
|
|
|
|
|
|
|
|
|
|
|
|
|
|
|
|
|
|
|
change the resolution setting. |
|
|
|
|
|
|
|
|
|
|
|
|
|
|
|
|
The camera automatically switches |
|
|
|
|
|
|
|
|
|
|
|
|
|
|
|
|
to standard resolution when there |
|
|
|
|
|
|
|
|
|
|
|
|
|
|
|
|
isn’t enough memory for a |
|
|
|
|
|
|
|
|
|
|
|
|
|
|
|
|
high-resolution picture. |
|
|
|
|
|
|
|
|
|
|
|
|
|
|
|
|
|
|
|
|
|
|
|
|
|
|
|
|
|
|
|
|
|
|
Battery level
Just below the center of the panel is a battery icon. It tells you how much power is left in your batteries.
A |
A |
A |
|
|
|
|
|
|
|
|
|
|
|
|
|
|
|
|
|
|
|
|
|
|
|
|
|
|
|
|
|
|
|
|
|
|
|
|
|
|
|
|
|
|
|
|
|
|
|
|
|
|
|
|
|
|
|
|
|
|
|
|
|
|
|
|
|
|
|
|
|
|
|
|
|
|
|
|
|
|
|
|
|
|
|
|
|
|
|
|
|
|
Batteries fully |
Batteries running low |
Batteries empty |
|||||||||||||||
charged (or power |
|
|
|
|
|
|
Recharge them or replace |
||||||||||
adapter connected) |
|
|
|
|
|
|
|||||||||||
|
|
|
|
|
|
them with fresh batteries. |
|||||||||||
|
|
|
|
|
|
|
|
|
|
|
|
||||||
If the batteries run out, the pictures in your camera are safe, but you need fresh batteries to take any more pictures. For information about battery care, see Appendix B.
14 Chapter 2

Timer
The timer gives you 10 seconds before the camera takes a picture.
1 Press the timer button.
A

 When the timer is on, the timer icon blinks.
2Press the shutter and prepare for the picture.
On the top front of the camera, a red indicator light glows steadily for eight seconds, then it blinks rapidly for another two seconds. When time is up, the camera takes the picture.
Using the Camera to Take Pictures |
15 |
Waking the camera
To conserve battery power, the camera goes to sleep after 60 seconds of inactivity (or after 5 minutes of inactivity when connected to your Macintosh). To wake it, you can press and release the shutter, or close and reopen the sliding lens cover.
If the camera is connected to your Macintosh, you must close and reopen the lens cover to wake it. Pressing the shutter won’t work.
To wake the camera, press and release the shutter.
Or close and reopen the lens cover.
16 Chapter 2

3 Using the Camera With Your Macintosh
When you finish taking pictures (or when the camera is full), you can connect it to your Macintosh computer and transfer the pictures to the computer.
In this chapter
mConnecting the camera to your Macintosh
mLooking at the pictures on the camera
mTransferring pictures to your Macintosh
mWorking with pictures
mSaving a picture
mPrinting your pictures
mNaming the camera
mSetting the clock in the camera
mTaking pictures from your Macintosh
mErasing pictures from the camera
mUsing the camera with an AC power adapter
17
 Loading...