


C H A P T E R
1
Setting Up Your Software
System requirements for using
QuickTime VR Authoring Studio
This section describes the hardware and software you need to use QuickTime VR
Authoring Studio.
Minimum system configuration
mMac OS–based computer with a PowerPC™ processor
m16 MB RAM available for the QuickTime VR Authoring Studio application program
m40 MB of space available on your hard disk
mCD-ROM drive
If you plan to create complex QTVR scenes or make high-resolution panoramas and object movies, you may need a system that exceeds the minimum requirements.
System requirements for playing QTVR media
The QTVR media you create with QuickTime VR Authoring Studio can be played on any Mac OS or Windows® computer, either from a local disk or over the Internet using a World Wide Web browser.
Mac OS
The computer must have a 68030, 68040, or PowerPC processor. In addition, the computer should have the following software installed:
mQuickTime extension version 2.5 or later
mQuickTime VR extension version 2.0.1 or later
mMoviePlayer version 2.5 or SimpleText
1
If you’re playing the QTVR media over the Internet, you also need a World Wide Web browser with the QuickTime plug-in version 2.0 installed.
Windows
The computer must have a 486 or Pentium processor. In addition, the computer should have the following software installed:
mQuickTime for Windows version 3.0 or later
mQuickTime VR components version 2.1 or later
mMoviePlayer version 3.0 or later
If you’re playing the QTVR media over the Internet, you also need a World Wide Web browser with the QuickTime plug-in version 2.0 installed.
What’s included with QuickTime VR Authoring Studio
The QuickTime VR Authoring Studio package includes a CD-ROM disc that contains the following:
mQuickTime VR Authoring Studio application program
mLenses file that contains files for a variety of camera lenses (You’ll need this for stitching panoramas.)
mMoviePlayer 2.5
mQuickTime VR 2.0.1
mQuickTime 2.5
mQTVR Sample Source Material folder (You’ll use this as you complete the tutorials in Chapters 3 through 7.)
mQTVRConverter (You use this to convert QTVR 1.0 files to QTVR 2.0 files.)
mSimpleText 1.4
mQTVR Examples folder
2Chapter 1
Installing QuickTime VR Authoring Studio
Before you install QuickTime VR Authoring Studio, be sure to have your QuickTime VR Authoring Studio serial number available. You will not be able to use the application until you enter the serial number.
To install QuickTime VR Authoring Studio, follow these steps:
1Insert the QuickTime VR Authoring Studio CD into your CD-ROM drive.
2Open the QuickTime VR Authoring Studio CD icon, then double-click the Installer icon. The Installer window opens.
3Follow the onscreen installation instructions.
4After the installation is complete, double-click the QuickTime VR Authoring Studio icon. A dialog box appears.
5Enter the serial number that came with the QuickTime VR Authoring Studio. You only need to enter the serial number the first time you use the program.
Setting Up Your Software 3

C H A P T E R
2
Introduction to
QuickTime VR Authoring Studio
QuickTime VR Authoring Studio is a set of authoring tools that lets you create QTVR panoramas, objects, and scenes. With its powerful and easy-to-use graphical user interface, QuickTime VR Authoring Studio lets users quickly produce professional-quality media that can be played back with MoviePlayer on Mac OS or Windows computers and over the Internet using a World Wide Web browser with the QuickTime plug-in.
QuickTime VR Authoring Studio’s five authoring tools are
mPanorama Maker, for converting a rendered image or a single panoramic image into a QTVR panorama
mPanorama Stitcher, for stitching together a series of images into a single QTVR panorama
mObject Maker, for making QTVR objects
mScene Maker, for creating virtual reality scenes that allow users to move through the scene and select destinations or manipulate objects
mProject Manager, for managing complex projects and automating processing tasks
5
What you can do with QuickTime VR Authoring Studio
QuickTime VR Authoring Studio has several features that help you create QTVR media easily and efficiently. Using these features, you can
mtake advantage of the easy-to-use graphical user interface
With its menus, windows, and dialog boxes, QuickTime VR Authoring Studio offers you the same easy-to-use graphical user interface that you enjoy in the Mac OS. As a result, you’ll be working productively right away and will have more time to concentrate on creating compelling QTVR media.
mcreate Internet-savvy objects and panoramas
QTVR media that you create on your Mac OS computer can be played on a Mac OS or Windows computer that has Internet access, Web browser software, and the QuickTime plug-in. QTVR media does not require as much disk space as video, so it can be delivered more quickly over the Internet than video can.
mautomate tasks
You can achieve greater efficiency and productivity by using QuickTime VR Authoring Studio’s Project Manager to automate common operations in QuickTime VR Authoring Studio, such as creating objects and panoramas. Once you set the Project Manager in motion, you are free to do other tasks.
morganize complex projects
The Project Manager helps you organize the media resources you’ll use for large projects, such as creating a virtual space.
6Chapter 2
QTVR media types
There are three types of QTVR media you can create with QuickTime VR Authoring Studio: panoramas, objects, and scenes.
Panoramas
A QTVR panorama lets you view a scene, such as a room or an outdoor vista, from a variety of angles. A full panorama can be panned horizontally 360 degrees to provide the illusion that you are standing in the center of the panorama. Several examples of panoramas are on the
QuickTime VR Authoring Studio CD-ROM disc.
You view a QTVR panorama by pressing the mouse button and dragging the pointer over the image in the direction you want to view. You can also zoom in on parts of the image for a closer look by clicking the zoom button in the lower-left area of the MoviePlayer playback window.
Objects
A QTVR object lets you view a three-dimensional object, such as a teacup, a statue, or a dinosaur bone, from a variety of angles. Several examples of objects are on the QuickTime VR Authoring Studio CD-ROM disc.
You can rotate a QTVR object by pressing the mouse button and dragging the pointer over the image in the direction you want to rotate it. You can also zoom in on parts of the image for a closer look by clicking the zoom button in the lower-left area of the MoviePlayer playback window.
Scenes
A QTVR scene is a collection of QTVR panoramas, objects, and other media. Each media element in a scene is called a node. A scene resembles a panorama, but unlike a simple panorama, you can interact with parts of the scene. Scenes have hot spots—areas that are linked to other media. For example, a hot spot in a museum scene could link to another room in the museum, or it could allow you to manipulate one of the objects in the museum. Hot spots can also link to World Wide Web sites and a variety of other media.
Introduction to QuickTime VR Authoring Studio |
7 |
Creating a QTVR scene
Creating a QTVR scene involves four steps:
mplanning the project
mcreating source material
musing a QuickTime VR Authoring Studio tool
mchecking the final product
Planning the project
During the planning stage, you determine the type of experience you want to deliver to your audience. For example, will you use real-world images or computer-generated images? Will you include many panoramas within a scene for navigational freedom, or only a few? Will you include QTVR objects that can be picked up and manipulated? Will you include links to Web pages to which users can go for additional information? Often, your decisions involve a tradeoff between creative preferences and resource limitations.
If you plan to develop a real-world scene from photographic or video images, you may want to do some preliminary steps, including the following:
mDraw a floor plan to depict the layout of the scene and the location of each node.
mMark the locations of the nodes on the floor plan with pins, stickers, or other materials to facilitate the photography process.
mCreate a scene log or notebook in which you and others involved with the photo shoot and postproduction can keep track of production details.
mCreate a storyboard for each scene.
mBuild a database that will allow you to track your project through its completion.
The time you invest in planning your project will pay off in the subsequent stages of development.
Creating source material
Source material can take a number of forms:
mimages taken with a digital camera
mimages captured through a video camera
mimages taken with a film camera, then converted to digital form using a flatbed or film scanner
mimages contained on a PhotoCD
mimages created with a rendering program
8Chapter 2
Some of the techniques and equipment used to photograph or capture images for a QTVR scene are different from the techniques used for standard photography. Chapter 8 contains guidelines for creating high-quality source material and describes some of the special setups you can use to photograph objects and panoramas.
Using a QuickTime VR Authoring Studio tool
You can use the Scene Maker or Project Manager to create a QTVR scene. You can drag panoramas and objects created with the Object Maker, Panorama Stitcher, or Panorama Maker directly into the Scene Maker window.
Checking the final product
Once you’ve created the scene, you should check the hot spots to be sure each hot spot links to the appropriate destination and to the correct view for that destination. You should also test the scene on the system your audience is likely to use. If you plan to make the QTVR scene viewable on the Internet, be sure to test the scene using a World Wide Web browser with the QuickTime plug-in version 2.0 or later.
How to get started on your first QTVR project
1Install the software.
For instructions, see Chapter 1, “Setting Up Your Software.”
2Learn to use QuickTime VR Authoring Studio’s five authoring tools.
“Fundamentals of the QuickTime VR Authoring Studio Interface” and “Setting QuickTime VR Authoring Studio Preferences,” later in this chapter, provide a general orientation to QuickTime VR Authoring Studio’s user interface and show how you can customize QuickTime VR Authoring Studio for your use.
Chapters 3 through 7 contain step-by-step guides to using each of QuickTime VR Authoring Studio’s five tools. As you work through each chapter, use the source material provided on the QuickTime VR Authoring Studio CD so you can focus on learning how to use the tools.
3Read Chapter 8, “Creating Source Material.”
Once you know how to use the QuickTime VR Authoring Studio tools, read Chapter 8 for tips on creating your own QTVR source material. These tips focus on the differences between conventional photographic techniques and techniques for QTVR photography
(or videography). You’ll also find information about QTVR equipment rigs.
Introduction to QuickTime VR Authoring Studio |
9 |
Fundamentals of the QuickTime VR Authoring
Studio interface
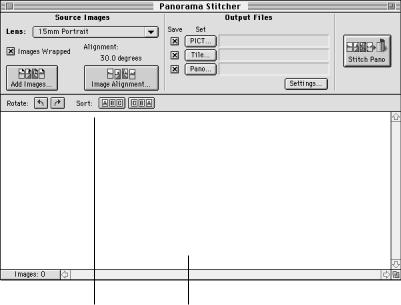
When you open one of QuickTime VR Authoring Studio’s five tools, the window for that tool appears. The windows for the Object Maker, Panorama Maker, Panorama Stitcher, and Scene Maker have similar layouts. Each has a section for defining source images, another for defining output files (the files the tool creates as it processes your QTVR media), a process button, and a section where you can view source material.
|
|
You save output files by clicking the |
|
You define locations and |
||||
|
|
checkbox next to the file you want to |
|
names for output files here. |
||||
|
|
save. You can save intermediate files |
|
The number and type of files |
||||
|
|
|
as well as final QTVR media files. |
|
depend on the tool. |
|||
|
||||||||
You define source |
|
|
|
|
|
|
|
This area |
|
|
|
|
|||||
images here. The |
|
|
|
contains a |
||||
number and type of |
|
|
|
button |
||||
buttons that appear |
|
|
|
associated |
||||
depend on the tool. |
|
|
|
with a |
||||
|
|
|
|
|
|
|
|
process, such |
|
|
|
|
|
|
|
|
as stitching a |
|
|
|
|
|
|
|
|
panorama |
|
|
|
|
|
|
|
|
|
|
|
|
|
|
|
|
|
or creating |
|
|
|
|
|
|
|
|
a scene. |
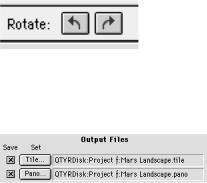
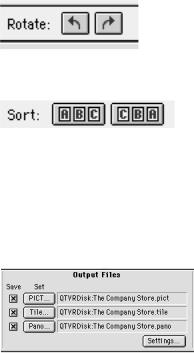
You use the Rotate and Sort buttons to move images in the bottom part of the window.
Images used in panoramas and objects are displayed in this part of the window. Icons for scene nodes and Project Manager elements appear in this area.
10 Chapter 2
Setting QuickTime VR Authoring Studio preferences
You can change QuickTime VR Authoring Studio’s default preferences by choosing Preferences from the Edit menu.
The Preferences window has six tabs. Click a tab to set the preferences related to that topic.
General
mShow Help Labels—If this option is selected, labels appear when you place the pointer over buttons in the tool windows.
Make
mDisplay Images In Progress Window—Select this option if you want the images in your QTVR media project to appear in a progress window as the images are being processed. Selecting this option can increase processing time.
Introduction to QuickTime VR Authoring Studio |
11 |
mDisplay QuickTime VR Movie After Make Is Complete—If this option is selected, a playback window appears automatically after an object, panorama, or scene is created.
mUse Temporary Memory When Necessary—You may need to select this option if you are making high-resolution QTVR media or media that contains a lot of source images. If this option is selected, QuickTime VR Authoring Studio uses some of your hard disk space as virtual memory.
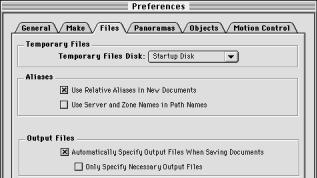
Files
mTemporary Files—The QuickTime VR Authoring Studio tools create intermediate files while processing your QTVR media. You can specify the location where the temporary files will be saved.
mAliases—Select whether you want to use relative aliases, and whether you want to include the full path name in the filenames for output files. A relative alias records the location of a file relative to the QuickTime VR Authoring Studio document it is associated with.
mOutput Files—Select the checkbox labeled Automatically Specify Output Files When Saving Documents if you do not want to name output files each time you create a scene, object, or panorama. If you want to name the final QTVR file, but don’t care about the names of the intermediate files, then select the checkbox labeled Only Specify Necessary Output Files.
12 Chapter 2

Panoramas
mCompression—You can select a default compression method for making panoramas. Details on selecting a compression method appropriate for panoramas are in Appendix A.
mTiles—You can specify a tiling scheme if you do not want the Panorama Maker or the Panorama Stitcher tools to set the tiling scheme automatically. For more information on tiling, see Chapters 3 and 4.
mFiles suffixes—If you do not want to use the default file suffixes shown, type new file suffixes in the “Panorama image file,” “Panorama Node file,” and “Tile file” boxes. These file types are explained in Chapter 4.
Objects
mCompression—You can select a default compression method for making objects. Details on selecting a compression method appropriate for objects are in Appendix A.
mFiles suffixes—If you do not want to use the default file suffixes shown, type new file suffixes in the “Movie file” and “Object file” boxes. These file types are explained in Chapter 5.
Introduction to QuickTime VR Authoring Studio |
13 |
mPreload—Select to have frames of your object movie loaded before they are played.
mCache hint—Select to have each frame of the object movie kept in memory as long as possible when playing the object movie.
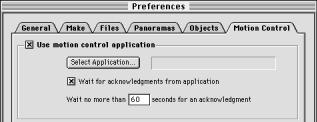
Motion Control
mUse motion control application—If you have a camera attached to your computer, you can capture images directly into the Object Maker window. (See “Capturing Images Directly” in Chapter 5 for more information.) You can use a motion control application to control the movement of the turntable the object is mounted on, or to control the movement of the camera.
mSelect Application—If you click this button, a dialog box appears that lets you select a motion control application.
mWait for acknowledgments from application—If this option is selected, QuickTime VR Authoring Studio waits a specified amount of time for the motion control application to send a signal before capturing each image. This assures the object is not moving when the image is captured.
14 Chapter 2

C H A P T E R
3
Making a Panorama
From an Existing Panoramic Image
You can create a QTVR panorama in one of two ways using QuickTime VR Authoring Studio:
mby first creating a single panoramic image with a 3D rendering or CAD application or a panoramic camera, and then converting the image to a QTVR panorama using the Panorama Maker
mby capturing a series of images and then stitching the images together using the Panorama Stitcher
This chapter shows you how to use the Panorama Maker.
It’s recommended that you learn the features of the Panorama Maker by using the panoramic image provided on the QuickTime VR Authoring Studio CD. Once you have mastered using the Panorama Maker, see Chapter 8, “Creating Source Material,” for tips on creating your own images.
15
Using the Panorama Maker
To make a panorama from a single panoramic image, follow these steps:
1Double-click the QuickTime VR Authoring Studio icon.
2Choose New from the File menu, then select Panorama Maker. A dialog box appears.
3Type a name for your Panorama Maker document.
A Panorama Maker document is a record of your Panorama Maker session. If you quit QuickTime VR Authoring Studio before you make the panorama, you can open the document later to continue your work. You can also open the Panorama Maker document to make changes to a panorama you’ve already finished.
4Click Save.
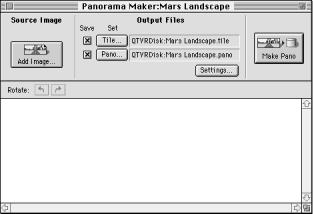
The Panorama Maker window appears.
16 Chapter 3
5Click Add Image.
A dialog box appears. Select the image you want to use for your panorama and click
Open. You can use any image that is in a format supported by QuickTime, such as PICT, TIFF, JPEG, and GIF.
Shortcut: Instead of clicking Add Image, you can drag the image file you want to use to the bottom section of the Panorama Maker window.
The image you select appears in the Panorama Maker window.
6Check to be sure the image is oriented properly.
Normally the image should be in landscape orientation. If the image is in portrait orientation, you may need to rotate it 90 degrees or –90 degrees. The left arrow rotates the image counterclockwise; the right arrow rotates it clockwise.
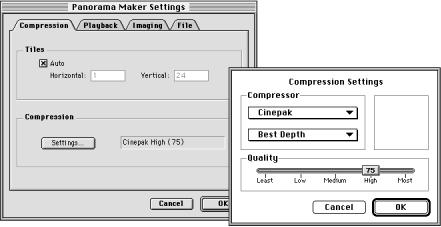
7If you want the tile movie file to have a different name or location from the one listed next to the Tile button, click Tile. In the dialog box that appears, enter a name and location for the tile movie file.
The tile movie is an intermediate step in the creation of a panorama. To make the tile movie, the Panorama Maker compresses your image and divides it into equal-sized sections called tiles. You can view a tile movie using a standard QuickTime player.
Be sure to click the checkbox next to the Tile button if you want to save the tile movie. There are two reasons you may want to save the tile movie:
m To save time—If you decide to remake the panorama later and you saved the tile movie, the Panorama Maker does not have to repeat the compression step.
m To play the panorama from your hard disk—If you don’t flatten the panoramic movie file (see step 14), you must save the tile movie to be able to view your panorama.
8If you want your panorama to have a different name or location from the one listed next to the Pano button, click Pano. In the dialog box that appears, enter a name and location for the panorama file.
The panorama file is the final QTVR panorama. To save your panorama, make sure there is an X in the checkbox next to the Pano button.
Making a Panorama From an Existing Panoramic Image 17
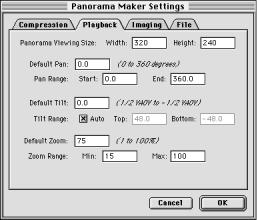
9Click Settings.
The Panorama Maker Settings window opens with the Compression tab selected.
If there is an X in the checkbox labeled Auto, the Panorama Maker will calculate the optimal number of tiles to dice your panorama into. You should use the Auto setting unless you understand the concept of tiling and want the Panorama Maker to use a specific dicing scheme. You can find out more about tiling in Virtual Reality Programming with QuickTime VR 2.0.
10If you want to change the type, depth, or quality of compression, click the Settings button.
The Compression Settings window opens. For details on selecting a compression method, see Appendix A.
11Click OK to close the Compression Settings window.
18 Chapter 3
12Click the Playback tab and adjust the playback settings.
The playback settings determine the orientation, viewing size, and field of view of the panorama when the user opens it.
mPanorama Viewing Size—Type the width and height, in pixels, of the playback window.
mDefault Pan—If you want your panorama to open with a pan angle other than zero, type a pan angle. The pan angle is the horizontal distance (in degrees) from the “starting point” of the panorama.
mPan Range—If the panorama covers a full 360 degrees, enter 0 degrees for Start and 360 degrees for End. If the panorama is less than 360 degrees, enter the values that specify the scope of the panorama. For example, if the panorama covers 210 degrees of the horizon, enter 0 degrees for Start and 210 degrees for End.
mDefault Tilt—If you want your panorama to open with a tilt angle other than zero, type a tilt angle. The tilt angle is the distance (in degrees) above or below the “horizon” of the panorama.
mTilt Range—Click the checkbox labeled Auto if you want the Panorama Maker to calculate the tilt range automatically. Otherwise, enter values to specify the tilt angles for the top and bottom of the panorama.
mDefault Zoom—If you want your panorama to open with a zoomed-in view, type the percentage of zoom.
mZoom Range—Enter the minimum and maximum zoom angle for your panorama.
Making a Panorama From an Existing Panoramic Image 19
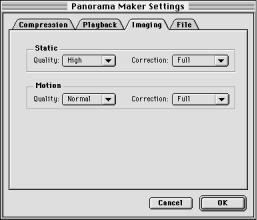
13 Click the Imaging tab and adjust the imaging settings.
Imaging settings determine the quality and speed of the image during playback. (They do not affect the quality of the stored panorama.) Static settings affect the panoramic image when it is not moving. Motion settings affect the panoramic image while it is being moved by the viewer.
The quality settings determine the general display quality of the panorama. The lower the quality settings, the faster the responsiveness to the user. In most cases, you should choose the Normal quality setting for motion and the High quality setting for static.
The correction settings determine how much the image is processed to make it look correct on the screen. You should usually choose Full correction when the image is a true panorama. You can choose None when the image is planar, such as a map.
Note: You should use the same correction settings for both static and motion to avoid discontinuity between viewing the moving and the static image.
14 Click the File tab.
mFlattening—If you plan to distribute your panorama to other users, be sure the checkbox labeled Flatten To Data Fork is selected. Panoramic movies that are not flattened will not play unless the tile movie file is in the same location as the panoramic movie file.
Note: Files must be flattened to play on Windows computers.
20 Chapter 3
mCopyright—Adding copyright information to your QTVR panorama is optional. When you use MoviePlayer to view your panorama, you can see the copyright information by choosing Show Copyright from the Movie menu.
15Click OK.
The Panorama Maker Settings window closes.
16Click Make Pano.
It takes a few minutes for the Panorama Maker to create the panorama. When it is done, a playback window opens.
Making a Panorama From an Existing Panoramic Image 21
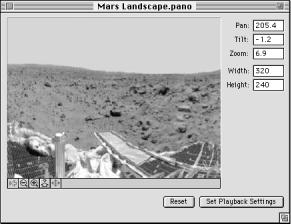
Using this window, you can view the panorama and adjust the playback settings. These settings determine how the panorama looks when it is first opened. If you make any adjustments you want to save, click Set Playback Settings, then remake the panorama with the new settings.
17Close the playback window, then close the Panorama Maker window.
Choose Quit from the File menu if you are done using QuickTime VR Authoring Studio.
22 Chapter 3

C H A P T E R
4
Stitching a Panorama
From a Series of Images
This chapter shows you how to create a panorama from multiple images. The source material for a stitched panorama can be images taken with a film or digital camera, images captured from a video camera or video media, or 3D rendered graphics. It’s recommended that you learn the features of the Panorama Stitcher by using the source material provided on the QuickTime VR Authoring Studio CD. Once you have mastered using the Panorama Stitcher, see Chapter 8, “Creating Source Material,” for tips on capturing or photographing images
for panoramas.
Using the Panorama Stitcher
To make a panorama from a series of images, follow these steps:
1Double-click the QuickTime VR Authoring Studio icon.
2Choose New from the File menu, then select Panorama Stitcher. A dialog box appears.
3Type a name for your Panorama Stitcher document.
A Panorama Stitcher document is a record of your Panorama Stitcher session. If you quit QuickTime VR Authoring Studio before you stitch the panorama, you can open the
document later to continue your work. You can also open the Panorama Stitcher document to make changes to a panorama you’ve already finished.
23
4Click Save.
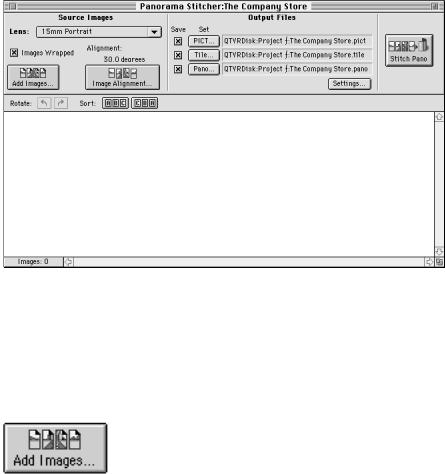
The Panorama Stitcher window appears.
5Open the Lens pop-up menu and choose the lens you used to photograph your images.
If your lens does not appear in the menu, choose Edit, then click New. Add the appropriate information. For details on how to add a new lens, see “Adding a Lens” later in this chapter.
If you are using the images from the QuickTime VR Authoring Studio CD, choose 18mm Portrait.
6Click Add Images.
A dialog box appears. Select the images you want to use for your panorama and click Open. You can use any images that are in a format supported by QuickTime, such as PICT, TIFF, JPEG, and GIF.
Shortcut: Instead of clicking Add Images, you can drag the folder containing the images you want to use to the bottom section of the Panorama Stitcher window.
The images you select appear in the Panorama Stitcher window in alphanumeric order by filename. If the file-naming scheme you used does not result in the proper sequence of images for your panorama, you need to rename your files before you add them to the Panorama Stitcher window.
24 Chapter 4
7Click to select the checkbox labeled Images Wrapped if the images give a 360-degree view of the scene.
If this option is selected, the Panorama Stitcher connects the first image to the last image. Do not wrap the images if you are creating a partial panorama. The sample images on the
QuickTime VR Authoring Studio CD form a 360-degree panorama.
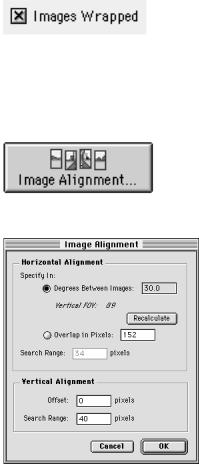
8Click Image Alignment.
The Image Alignment window opens.
9Enter the appropriate information in the Horizontal Alignment section.
Enter the number of degrees between each image. For example, if you captured 12 images for a 360-degree panorama, each image is 30 degrees from the next.
The Panorama Stitcher calculates the amount of overlap in pixels based on the number of degrees between images and the length of lens you used to capture the images. If you change the lens length or the degrees between images, click Recalculate.
If you want the Panorama Stitcher to search for the best horizontal alignment, enter a value in the box labeled Search Range. The Panorama Stitcher looks for similarities between images within the pixel range you specify.
Stitching a Panorama From a Series of Images 25
10If your images were not captured on a level plane, enter the appropriate information in the Vertical Alignment section.
If you are not able to keep the camera absolutely level when you shoot your images, adjacent images may be vertically misaligned. You can estimate the vertical offset (in pixels) to compensate for the misalignment. You can also enter a search range that the Panorama Stitcher uses to align the image.
Note: If your images do not align properly, see “Aligning Images” later in this chapter for information on how to use the Pair Alignment feature of the Panorama Stitcher.
11Click OK.
12Check to be sure the images are oriented properly and in the correct order.
Click each image you want to rotate, then click one of the rotation arrows to rotate the image counterclockwise or clockwise.
13Click one of the Sort buttons if you want to change the order of the images.
You can sort your images in alphanumeric or reverse alphanumeric order.
Note: You can also change the order of images by dragging the image you want to move to a new position in the series of images.
14If you want the PICT file to have a different name or location from the one listed next to the PICT button, click PICT. In the dialog box that appears, enter a name and location for the PICT file.
The PICT file is an intermediate step in the creation of a panorama. To create the PICT file, the Panorama Stitcher stitches your images into one file, then stores it in the location you specify. If you want to save the PICT file for later use, click the checkbox next to the PICT button.
26 Chapter 4
There are three reasons you may want to save the PICT file:
mTo save time—If you save the PICT file and you later decide to remake your panorama, the Panorama Stitcher skips the stitching step, so processing time is much shorter.
mTo retouch the image—If you want to make changes to the image, you can change the PICT file, then remake the panorama.
mTo diagnose problems—If your panorama does not look the way you think it should, the PICT file may help you determine the problem.
15If you want the tile movie file to have a different name or location from the one listed next to the Tile button, click Tile. In the dialog box that appears, enter a name and location for the tile movie file.
The tile movie is an intermediate step in the creation of a panorama. To make the tile movie, the Panorama Stitcher creates a PICT image, then compresses it and divides it into equalsized sections called tiles. You can view a tile movie using a standard QuickTime player.
Be sure to click the checkbox next to the Tile button if you want to save the tile movie. There are two reasons you may want to save the tile movie:
m To save time—If you decide to remake the panorama later and you saved the tile movie, the Panorama Stitcher does not have to repeat the compression step.
m To play the panorama from your hard disk—If you don’t flatten the panoramic movie file (see step 24), you must save the tile movie to be able to view your panorama.
16If you want your panorama to have a different name or location from the one listed next to the Pano button, click Pano. In the dialog box that appears, enter a name and location for the panorama file.
The panorama file is the final QTVR panorama. To save your panorama, make sure there’s an X in the checkbox next to the Pano button.
17Click Settings.
The Stitch Settings window opens with the Image tab selected.
Stitching a Panorama From a Series of Images 27
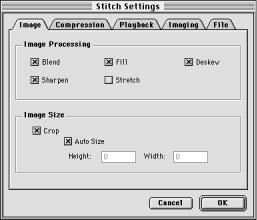
18 Select the image options appropriate for the panorama.
Image Processing
These options determine the types of processing applied to the stitched image. All except Stretch are selected by default.
mBlend—Softens sharp edges within an image and where images overlap.
mFill—Fills the edge of the image not covered by pixels from the source images with the first non-black color identified by the Panorama Stitcher.
mDeskew—Compensates for slight rotation in images that occurs when you capture the images.
mSharpen—Sharpens blurry images by increasing the contrast of adjacent pixels.
mStretch—Stretches the source images as needed so they can be aligned more accurately.
Image Size
mCrop—Removes pixels from the top and bottom of the stitched image to give a clean edge and hide the boundaries of the original images. It is selected by default.
mAuto Size—Lets the size of the stitched image be determined by the size of the source images. If you want to specify the size, be sure the Auto Size checkbox is not selected. Then enter values (in pixels) in the Height and Width boxes.
Important If you are specifying the size, you should check the Tiles setting in the Compression tab. Height must be a multiple of 4 times the number of vertical tiles. Width must be a multiple of 4 times the number of horizontal tiles. If you use the default tiling scheme of 24 vertical tiles and 1 horizontal tile, height must be divisible by 96, and width must be divisible by 4.
28 Chapter 4

19 Click the Compression tab.
If there is an X in the checkbox labeled Auto, the Panorama Stitcher will calculate the optimal number of tiles to dice your panorama into. You should use the Auto setting unless you understand the concept of tiling and want the Panorama Stitcher to use a specific dicing scheme. You can find out more about tiling in Virtual Reality Programming with QuickTime VR 2.0.
20If you want to change the type, depth, or quality of compression, click the Settings button.
The Compression Settings window opens. For details on selecting a compression method, see Appendix A.
21Click OK to close the Compression Settings window.
22Click the Playback tab and adjust the playback settings.
The playback settings determine the orientation, viewing size, and field of view of the panorama when the user opens it.
Stitching a Panorama From a Series of Images 29
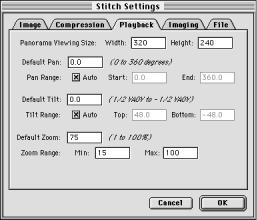
mPanorama Viewing Size—Type the width and height, in pixels, of the playback window.
mDefault Pan—If you want your panorama to open with a pan angle other than zero, type a pan angle. The pan angle is the horizontal distance (in degrees) from the “starting point” of the panorama.
mPan Range—If the panoramic image covers a full 360 degrees, enter 0 degrees for Start and 360 degrees for End. If the panorama is less than 360 degrees, enter the values that correctly specify the scope of the panorama. For example, if the panorama covers 210 degrees of the horizon, enter 0 degrees for Start and 210 degrees for End.
mDefault Tilt—If you want your panorama to open with a tilt angle other than zero, type a tilt angle. The tilt angle is the distance (in degrees) above or below the “horizon” of the panorama.
mTilt Range—Click the checkbox labeled Auto if you want the Panorama Stitcher to calculate the tilt range automatically. Otherwise, enter values to specify the tilt angles for the top and bottom of the panorama.
mDefault Zoom—If you want your panorama to open with a zoomed-in view, type the percentage of zoom.
mZoom Range—Enter the minimum and maximum percentage of zoom for your panorama.
30 Chapter 4
 Loading...