


 Loading...
Soundtrack Pro
User Manual
Apple Computer, Inc.
© 2005 Apple Computer, Inc. All rights reserved.
Under the copyright laws, this manual may not be copied, in whole or in part, without the written consent of Apple. Your rights to the software are governed by the accompanying software license agreement.
The Apple logo is a trademark of Apple Computer, Inc., registered in the U.S. and other countries. Use of the “keyboard” Apple logo (Option-Shift-K) for commercial purposes without the prior written consent of Apple may constitute trademark infringement and unfair competition in violation of federal and state laws.
Every effort has been made to ensure that the information in this manual is accurate. Apple Computer, Inc. is not responsible for printing or clerical errors.
Apple Computer, Inc. 1 Infinite Loop
Cupertino, CA 95014-2084 408-996-1010 www.apple.com
Apple, the Apple logo, AppleScript, DVD Studio Pro, iTunes, Final Cut, Final Cut Pro, FireWire, Logic, Mac, Mac OS, Macintosh, QuickTime, and Soundtrack are trademarks of Apple Computer, Inc., registered in the U.S. and other countries.
Finder is a trademark of Apple Computer, Inc.
Apple Care is a service mark of Apple Computer, Inc., registered in the U.S. and other countries.
Production stills from the films “Koffee House Mayhem” and “A Sus Ordenes” provided courtesy of Refuge Films. “Koffee House Mayhem” © 2004 Jean-Paul Bonjour;
“A Sus Ordenes” © 2004 Eric Escobar. http://www.refugefilms.com
Other company and product names mentioned herein are trademarks of their respective companies. Mention of third-party products is for informational purposes only and constitutes neither an endorsement nor a recommendation. Apple assumes no responsibility with regard to the performance or use of these products.

1 Contents
Preface |
7 |
An Introduction to Soundtrack Pro |
|
7 |
What Is Soundtrack Pro? |
|
9 |
Resources for Learning About Soundtrack Pro |
|
10 |
Soundtrack Pro Onscreen User Manual |
|
10 |
Apple Websites |
Chapter 1 |
13 |
Setting Up Your System |
|
13 |
System Considerations |
|
15 |
Connecting Audio Equipment |
|
19 |
Example Hardware Setups |
Chapter 2 |
23 |
The Soundtrack Pro Interface |
|
24 |
Project Window |
|
33 |
Media and Effects Manager |
|
40 |
Utility Window |
Chapter 3 |
45 |
Getting Started With Soundtrack Pro |
|
45 |
Two Kinds of Projects |
|
47 |
Setting Up Your Workspace |
|
50 |
Playing Projects |
|
56 |
Locating and Adding Audio Files |
|
68 |
Previewing Audio Files |
|
71 |
Using Undo and Redo |
|
72 |
Using Snap |
|
74 |
Reconnecting Media Files |
|
75 |
Setting Soundtrack Pro Preferences |
Chapter 4 |
81 |
Working With Multitrack Projects |
|
81 |
Creating and Opening Multitrack Projects |
|
82 |
Closing Multitrack Projects |
|
82 |
Setting Project Properties |
|
86 |
Setting the Project Length |
|
86 |
Saving Multitrack Projects |
|
87 |
Adding Audio Files to a Multitrack Project |
3
|
89 |
Viewing and Editing Clip Properties |
|
90 |
Tracks, Busses, and Outputs |
Chapter 5 |
93 |
Working in the Timeline |
|
94 |
Moving Around in the Timeline |
|
99 |
Working With Tracks, Busses, and Outputs in the Timeline |
|
107 |
Editing Audio Clips in the Timeline |
|
119 |
Working With Markers |
Chapter 6 |
123 |
Working in the Mixer |
|
124 |
Steps in Mixing |
|
125 |
Working With Channel Strips in the Mixer |
|
134 |
Working With Effects and Sends in the Mixer |
|
138 |
Setting the Overall Project Volume Level |
|
140 |
Listening to a Temporary Mono Mix |
|
140 |
Recording Audio in the Mixer |
|
140 |
Recording Automation in the Mixer |
|
141 |
Creating Multiple Mixes |
|
141 |
Things to Keep in Mind While Mixing |
Chapter 7 |
143 |
Working in the Waveform Editor |
|
144 |
Getting Started With Audio File Projects |
|
152 |
Playing Audio Files in the Waveform Editor |
|
154 |
Editing Audio Files in the Waveform Editor |
|
161 |
Processing Audio Files |
|
170 |
Working With Actions |
|
177 |
Analyzing an Audio File |
|
181 |
Using Markers in the Waveform Editor |
|
181 |
Scripting Actions in the Waveform Editor |
Chapter 8 |
183 |
Working With Video in Soundtrack Pro |
|
183 |
Supported Video File Formats |
|
184 |
Adding a Video to a Project |
|
185 |
Playing the Video |
|
188 |
Viewing Video Details |
|
189 |
Working With a Video’s Audio |
|
190 |
Using the Time Display and Time Ruler With Video |
|
191 |
Using Markers With Video |
|
194 |
Removing a Video From a Project |
Chapter 9 |
195 |
Working With Audio Effects |
|
195 |
Realtime and Processing Effects |
|
196 |
Audio Effects Included With Soundtrack Pro |
|
207 |
Working With Realtime Effects |
4 |
Contents |
|
|
|
216 |
Working With Processing Effects |
|
217 |
Working With Effect Presets |
Chapter 10 |
219 |
Working With Automation |
|
219 |
Working With Envelopes |
|
228 |
Recording Automation Data |
|
229 |
Working With Timeslices |
Chapter 11 |
235 |
Recording Audio in Soundtrack Pro |
|
235 |
Getting Ready to Record |
|
236 |
Recording Audio in the Timeline |
|
239 |
Saving Recorded Clips |
|
240 |
Recording Audio in the Mixer |
|
240 |
Recording Audio in the Waveform Editor |
Chapter 12 |
243 |
Using Control Surfaces With Soundtrack Pro |
|
243 |
Connecting Control Surfaces |
|
244 |
Adding and Deleting Control Surfaces |
|
245 |
Premapped Controls |
|
245 |
Mapping Commands to Control Surface Buttons |
|
246 |
Recording Control Surface Automation |
Chapter 13 |
247 |
Exporting Multitrack Projects |
|
248 |
Exporting a Project Mix |
|
248 |
Exporting Selected Tracks, Busses, and Outputs |
|
250 |
Exporting With Compressor |
|
252 |
Distributing a Multitrack Project and its Media Files Together |
Chapter 14 |
253 |
Using Soundtrack Pro With Apple Professional Applications |
|
253 |
Using Soundtrack Pro With Final Cut Pro |
|
258 |
Using Soundtrack Pro With Motion |
|
260 |
Using Soundtrack Pro With DVD Studio Pro |
|
261 |
Using Soundtrack Pro With Other Applications |
Appendix A |
263 |
Using Apple Loops Utility |
|
263 |
What Is Apple Loops Utility? |
|
264 |
The Apple Loops Utility Interface |
|
269 |
Opening Files in Apple Loops Utility |
|
270 |
Tagging Files in Apple Loops Utility |
|
271 |
Working With Transients |
|
273 |
Saving Changes to Files |
|
273 |
Removing Files From the Assets Drawer |
|
274 |
Apple Loops Utility Preferences |
|
275 |
Apple Loops Utility Keyboard Shortcuts |
Contents |
5 |
|
|
Appendix B |
279 |
Soundtrack Pro Keyboard Shortcuts |
|
279 |
General and File |
|
279 |
Windows, Tabs, and Layouts |
|
280 |
Project Playback and Setting the Playhead |
|
281 |
General Editing |
|
281 |
Editing Audio Clips in the Timeline |
|
282 |
Adjusting Audio Clips in the Timeline |
|
282 |
Navigating in the Timeline |
|
283 |
Editing Audio Files in the Waveform Editor |
|
284 |
Tracks and Markers |
|
284 |
Video Out |
|
285 |
Recording |
Appendix C |
287 |
Audio Basics |
|
287 |
Basic Audio Concepts |
|
289 |
Recording Sound |
Appendix D |
293 |
Solutions to Common Problems and Customer Support |
|
294 |
Solutions to Common Problems |
|
295 |
Calling AppleCare Support |
Index |
297 |
|
6 |
Contents |
|
|

An Introduction to Soundtrack Pro
Preface
Soundtrack Pro gives you the tools you need to create high-quality soundtracks for your video productions.
Recent years have seen a revolution in working with digital audio, matching the revolution in digital video editing and postproduction. Now, using a personal computer with a fast processor and enough RAM, video editors and other creative professionals can manipulate the audio for their video projects with the same power and flexibility as the video.
What Is Soundtrack Pro?
Soundtrack Pro is a new professional audio application for Macintosh computers that gives you the tools to perform a wide range of audio postproduction tasks. Using Soundtrack Pro, you can edit audio files, repair field recordings, perform multitrack arranging and mixing, synchronize audio and video, analyze and fix common audio problems, and perform creative sound design.
You can work in two kinds of projects in Soundtrack Pro: multitrack projects and audio file projects. In multitrack projects, you add and arrange audio clips on the Timeline, where you can edit audio clips, synchronize audio and video, and automate volume, pan, and other changes over time using envelopes. You can also record audio directly to a track in the Timeline. You mix multitrack projects in the Mixer, which includes a channel strip for each track, bus, and output in the project. In both the Timeline and the Mixer you can add and adjust professional-quality realtime effects, including compression, EQ, and reverb. You can export your project mix to an audio file or to a QuickTime movie, export using Compressor, and also export individual tracks, busses, and outputs.
7
In audio file projects, you can edit audio files in the Waveform Editor for tasks ranging from audio repair to sound design. In the Waveform Editor, you can perform precise edits down to the individual sample level. You can perform edits nondestructively using actions, which include processing effects and other operations, and can turn off or completely reorder actions. You can analyze audio files in the Waveform Editor for a range of common audio problems, including clicks and pops, hum, and phase issues, and automatically fix problems detected by analysis.
Soundtrack Pro is designed to work with Final Cut Pro and with other Apple professional applications, allowing you to send video and audio files back and forth between the applications as you work on both the video and the audio. Soundtrack Pro also includes a large selection of Apple Loops that you can use to add Foley effects, background ambience, sound effects, and music transitions to your projects. Apple Loops tagged as looping files automatically match the tempo and key of the project, allowing you to use them in the same project.
Soundtrack Pro includes the following features:
ÂPowerful audio editing: You can edit audio files nondestructively in the Waveform Editor. You can edit audio files graphically with sample accurate precision, and process files using actions, which can be reordered and turned on or off individually.
ÂAnalysis and repair of common audio problems: The Waveform Editor features analysis of audio files. You can choose which problems to analyze the file for, then fix the problems detected by analysis either individually or in a single operation. Selected problems are highlighted in the waveform display for easy viewing.
ÂAdvanced mixing capabilities: You can mix multitrack projects in the Mixer, which displays a virtual mixing console for a project. Using the channel strips in the Mixer, you can adjust levels, mute and solo tracks, and add realtime effects. You can create submixes using busses, and send audio to multiple physical outputs using outputs.
ÂAdd professional-quality effects: Soundtrack Pro includes high-quality effects plug-ins from the Logic Pro effects library that you can use in your projects, including the Space Designer convolution reverb. You can also install third-party effects in the Audio Units plug-in format.
ÂRecord and edit automation: You can record movements to sliders and other onscreen controls, play back the automation, and edit it in the Timeline.
ÂSupport for control surfaces: In addition to recording movements of onscreen controls, you can connect a supported control surface, and record automation of control surface movements.
8 |
Preface An Introduction to Soundtrack Pro |
|
|
ÂSynchronized video display: You can add a video to a project and view it in the Video tab, or display the video on an external video monitor. Audio/video synchronization is accurate both onscreen and on the external monitor, up to HD resolutions. You can accurately place audio clips to sync with specific frames or points in time in the video.
ÂAudio recording capability: You can record audio directly in tracks in the Soundtrack Pro Timeline, including recording multiple takes.
ÂIntegrated workflow with Final Cut Pro: You can send a clip from the Final Cut Pro Timeline to Soundtrack Pro and edit the clip in the Waveform Editor. When you save the clip, it is automatically updated in your Final Cut Pro project. You can also send clips or sequences to a Soundtrack Pro multitrack project.
Resources for Learning About Soundtrack Pro
This manual describes the Soundtrack Pro interface, commands, and menus, and gives step-by-step instructions for creating Soundtrack Pro projects and for accomplishing specific tasks. It also includes information on setting up your system and on audio basics. It is designed to provide the information you need to get up to speed quickly so you can take full advantage of the intuitive interface and powerful features of Soundtrack Pro.
If you want to start by learning how to set up audio hardware to use with Soundtrack Pro, read Chapter 1,“Setting Up Your System,” on page 13. If you want to learn about the features and controls in the Soundtrack Pro interface, read Chapter 2,
“The Soundtrack Pro Interface,” on page 23. If you want to jump right in and start using the application, skip ahead to Chapter 3,“Getting Started With Soundtrack Pro,” on page 45. If you want to read about editing audio files in the Waveform Editor, turn to Chapter 7,“Working in the Waveform Editor,” on page 143.
In addition to this manual, Soundtrack Pro provides other sources of support.
Preface An Introduction to Soundtrack Pro |
9 |
|
|
Soundtrack Pro Onscreen User Manual
The Soundtrack Pro onscreen user manual allows you to access information directly onscreen while you’re working in Soundtrack Pro. To view this information, choose Help > Soundtrack Pro User Manual. The Soundtrack Pro onscreen user manual is a fully hyperlinked version of the Soundtrack Pro User Manual, enhanced with many features that make locating information quick and easy.
ÂThe homepage provides quick access to various features, including Late-Breaking News, the index, and the Soundtrack Pro website.
ÂA comprehensive bookmark list allows you to quickly choose what you want to see and takes you there as soon as you click the link.
In addition to these navigational tools, the Soundtrack Pro onscreen user manual gives you other means to locate information quickly:
ÂAll cross-references in the text are linked. You can click any cross-reference and jump immediately to that location. Then, you can use the Preview Back button to return to where you were before you clicked the cross-reference.
ÂThe table of contents and index are also linked. If you click an entry in either of these sections, you jump directly to that section of the user manual.
ÂYou can also use the Find dialog to search the text for specific words or a phrase.
Apple Websites
There are a variety of Apple websites that you can visit to find additional information.
Soundtrack Pro Website
For general information and updates, as well as the latest news on Soundtrack Pro, go to:
 http://www.apple.com/soundtrackpro
Apple Service and Support Website
For software updates and answers to the most frequently asked questions for all Apple products, including Soundtrack Pro, go to:
 http://www.apple.com/support/soundtrackpro
You’ll also have access to product specifications, reference documentation, and Apple and third-party product technical articles.
10 |
Preface An Introduction to Soundtrack Pro |
|
|
Other Apple Websites
Start at the Apple homepage to find the latest and greatest information about Apple products:
 http://www.apple.com
QuickTime is industry-standard technology for handling video, sound, animation, graphics, text, music, and 360-degree virtual reality (VR) scenes. QuickTime provides a high level of performance, compatibility, and quality for delivering digital video. Go to the QuickTime website for information on the types of media supported, a tour of the QuickTime interface, specifications, and more:
 http://www.apple.com/quicktime
FireWire is one of the fastest peripheral standards ever developed, which makes it great for use with multimedia peripherals, such as video camcorders and the latest highspeed hard disk drives. Visit this website for information about FireWire technology and available third-party FireWire products:
 http://www.apple.com/firewire
For information about seminars, events, and third-party tools used in web publishing, design and print, music and audio, desktop movies, digital imaging, and the media arts, go to:
 http://www.apple.com/pro
For resources, stories, and information about projects developed by users in education using Apple software, including Soundtrack Pro, go to:
 http://www.apple.com/education
Go to the Apple Store to buy software, hardware, and accessories direct from Apple and to find special promotions and deals that include third-party hardware and software products:
 http://www.apple.com/store
Preface An Introduction to Soundtrack Pro |
11 |
|
|

1 |
Setting Up Your System |
1 |
|
||
|
|
|
The way you set up your system depends on the audio equipment you plan to use.
You can use your computer’s speaker or headphone jack to monitor the audio output from Soundtrack Pro. For better results, you may want to connect external monitors or speakers to your system, so that you can monitor the audio output at a higher level of quality. You may want to connect other external audio equipment such as an audio interface or a mixer, particularly if you plan to record your own audio in Soundtrack Pro.
ÂFor information on system and hardware requirements, see the Read Before You Install document on the installation DVD.
ÂFor information on installing the software, see the Installing Your Software booklet.
System Considerations
To achieve the most effective results, you should consider the following issues when setting up your system.
Processor Speed and RAM
Digital audio files require intensive processing by your computer. If you plan to work on longer or more complex projects, or use multiple effects plug-ins in your projects, a computer with a faster processor can facilitate your productivity.
Soundtrack Pro is optimized for use with computers that have a multiprocessor architecture. Working with Soundtrack Pro projects on a multiprocessor-equipped computer can make your workflow more efficient, especially when creating longer or more complex projects.
If you plan to work on large projects, it’s useful to have extra random-access memory, or RAM, installed in your computer. Additional RAM allows you to play back more files simultaneously, use a greater number of effects plug-ins, and keep several multimedia applications open at the same time.
13
Hard Disk Space
It’s also a good idea to have a large hard disk with plenty of available space to store the media (audio and video) files you use with Soundtrack Pro. As you work with the application, you’ll likely want to acquire a large collection of sounds to use in your Soundtrack Pro projects. You can use audio files stored on a CD-ROM disc or other external media, but playback performance may not be as good as if the audio files are installed on a local hard disk, especially when using a large number of files.
If you store media files on an external hard disk, make sure the disk has a fast enough seek time and a high enough sustained data transfer rate for use with multimedia files. Consult the manufacturer’s specifications.
Dedicated Hard Disk
If you plan to record your own audio in Soundtrack Pro, remember that every minute of stereo digital audio (recorded using a 44.1 kHz sample rate and 16-bit depth) requires roughly 10 MB of hard disk space. If you plan to record large amounts of audio, you may want to record to a dedicated hard disk.
Setting the Audio Input and Output
By default, Soundtrack Pro uses the input and output devices set in your computer’s System Preferences for audio input and output. You can set the default input and output devices for Soundtrack Pro in the Recording pane of the Soundtrack Pro Preferences window, and change them for individual recording sessions in the Recording tab. For information on changing the default input and output devices Soundtrack Pro uses, see “Setting Soundtrack Pro Preferences” on page 75.
Adding Audio Units Plug-Ins to Your Computer
Soundtrack Pro includes an extensive set of professional-quality effects plug-ins. Soundtrack Pro uses effects in the Audio Units plug-in format, the native plug-in format of Mac OS X.
Audio Units plug-ins are also available from third-party manufacturers. When adding third-party effects to your computer, be sure to read the documentation, including any Read Me and installation files, that came with the plug-in. Supported Audio Units effects plug-ins appear in the Effects window under the manufacturer’s name.
Soundtrack Pro does not support VST, ASIO, MAS, or RTAS effects plug-ins.
14 |
Chapter 1 Setting Up Your System |
|
|
Connecting Audio Equipment
You can use a variety of audio equipment with Soundtrack Pro for both recording and playback. For information on connecting a specific piece of equipment to your computer, read the documentation that came with the equipment.
When using external audio devices, it’s a good idea to connect them before opening Soundtrack Pro.
Soundtrack Pro does not support video input from devices such as camcorders or videocassette decks.
Audio Interfaces
You can connect an audio interface to your computer, and then connect microphones and musical instruments to the audio interface for recording. You can also connect output devices, such as monitors or speakers, a mixer, or an amplifier to the audio interface.
When choosing an audio interface, check the manufacturer’s specifications to make sure the interface is compatible with Mac OS X v10.3. Some audio interfaces require driver software, while others are supported without the need for a driver. If the device requires a driver, make sure an up-to-date driver is included with the device, or is available from the manufacturer.
All digital audio interfaces can be susceptible to latency, a noticeable delay between the time the audio signal is produced and the time you hear it. When connecting an audio interface, you should connect the interface directly to the computer, rather than connecting it through a hub or daisy-chaining it through another device. Connecting an audio interface through a hub or an intermediary device can cause an unacceptable amount of latency, particularly with slower protocols such as USB.
Soundtrack Pro supports input from digital audio interfaces up to a maximum sample rate of 96 kHz and a maximum bit depth of 24 bits. If you connect an interface that uses sample rates or bit depths outside the range supported by Soundtrack Pro, an alert message appears, telling you that data from the audio interface is not compatible with the application.
Chapter 1 Setting Up Your System |
15 |
|
|

FireWire (IEEE 1394)
FireWire is a professional and consumer standard for both audio and video equipment. The combination of fast data-transfer rates, high storage capacities, and plug-and-play connection makes FireWire an attractive choice for working with digital audio files.
FireWire is included on all current Macintosh computers, and a number of FireWire audio interfaces are available.
There are two kinds of FireWire connectors: a 4-pin connector (typically found on video equipment) and a 6-pin connector (used for computer and audio equipment).
FireWire 400 (6-pin) (Sometimes labeled iLINK)
FireWire 400 (4-pin)
USB (Universal Serial Bus)
USB is a consumer standard used on computer peripherals and other devices. USB offers a lower data-transfer rate than FireWire, but supports plug-and-play operation and the ability to connect several devices in sequence (daisy-chaining). Some USB devices draw their power over the USB cable, while others require a separate power connection. USB is included on all current Macintosh computers.
There are two kinds of USB connectors: an A connector, typically used to connect a device to a USB hub, and a B connector, typically used to connect devices together, and also to connect a device to a computer. USB audio interfaces should always be directly connected to your computer, not connected via a hub or to the computer’s display, keyboard, or another peripheral.
USB (Universal Serial Bus)
16 |
Chapter 1 Setting Up Your System |
|
|
PCI (Peripheral Connect Interface)
PCI interfaces, unlike FireWire and USB interfaces, require that you install a dedicated sound card in your computer. PCI provides high bandwidth and fast data-transfer rates, allowing you to record and play back large numbers of files at the highest possible sample rates and bit depths.
PCMCIA
PCMCIA is a consumer standard for connecting devices to a laptop computer. PCMCIA provides a lower data-transfer rate than FireWire or USB, but provides a compact, affordable solution for connecting an audio interface to your computer, while keeping your USB and FireWire ports available for other devices. Most current Macintosh laptop computers support PCMCIA connections via a built-in card slot.
Audio Cabling
There are several types of audio cables and connectors used on professional and consumer audio equipment, at a range of prices and levels of quality. When connecting microphones and musical instruments to an audio interface or a mixer, make sure the interface has the proper input jacks for the type of connectors and cables you plan to use.
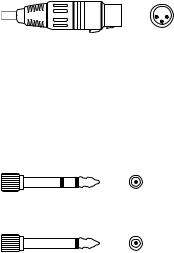
XLR
XLR cables and connectors are used on professional-quality microphones, monitors, and other musical equipment. They provide a high-quality, balanced signal at +4 dB level.
XLR connector (balanced)
1/4-Inch Audio
1/4-inch connectors (sometimes called “phone plugs”) are used on a wide variety of professional and consumer musical equipment, including musical instruments and amplifiers, speakers, and external effects devices. They can be either balanced (+4 dB) or unbalanced (–10 dB). Some devices require Tip-Ring-Sleeve (TRS) connectors to transfer the audio signal.
1/4-inch Tip-Ring Sleeve (TRS) connector
1/4-inch Tip-Ring (TR) connector
Chapter 1 Setting Up Your System |
17 |
|
|
RCA
RCA connectors are used on consumer audio equipment such as home stereo systems and videocassette recorders.
RCA connector (unbalanced)
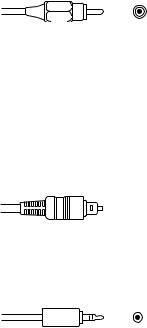
Optical Digital (AES-EBU and S/PDIF)
AES-EBU and S/PDIF are both used to provide an optical digital connection to professional and consumer audio equipment, including audio interfaces, DAT (digital audio tape) machines, hardware samplers. Both carry a stereo digital signal. AES-EBU is balanced, and has an operating level of 5 volts, while S/PDIF is unbalanced and has an operating level of roughly 1/2 volt. There are adapter cables available to convert between the two protocols. S/PDIF carries additional information with the audio signal, including SCMS copy-protection information.
S/PIDF optical digital connector
1/8-Inch Miniplug
Miniplug connectors are used for audio input and output to computers and on some consumer electronic devices, particularly portable ones.
Stereo miniplug connector (unbalanced)
Audio Output
Being able to monitor the audio output of your projects at a high level of quality is crucial to achieving professional results. In general, you should use the best output equipment your budget allows.
Speakers and Monitors
You can play back audio through your computer’s speakers or headphone jack, but the audio output may not be high enough for you to evaluate your music at a professional level of quality. Connecting external speakers or monitors to your system allows you to hear the audio output with greater fidelity and a wider dynamic range. In general, you should use the highest-quality speakers or monitors you can afford in order to hear your projects at the highest level of audio quality.
For detailed information on connecting external speakers to your audio interface, see the documentation that came with the speakers.
18 |
Chapter 1 Setting Up Your System |
|
|
Amplifiers
If you are recording audio from microphones, and are not running the microphone’s signal through a mixer with a microphone pre-amplifier, you need to connect an amplifier to boost the microphone’s signal before sending it to the computer. If you are connecting monitors or speakers that are not self-powered, you also need to connect them through an amplifier.
Mixers
Connecting a mixer to your system allows you to record audio from multiple microphones or instruments simultaneously, to play back the output from your computer through connected monitors or speakers, and to control the volume levels of both the audio input and output. Professional-quality mixers have a number of additional features, including equalization (EQ) controls, auxiliary sends and returns for adding external effects, and separate monitor and mix level controls. Mixers may also include inboard pre-amplification for microphones, making the use of a separate amplifier unnecessary.
Control Surfaces
Soundtrack Pro supports control surfaces that use the Mackie Control and Logic Control protocols. For information on connecting and using control surfaces, see Chapter 12,“Using Control Surfaces With Soundtrack Pro,” on page 243.
Example Hardware Setups
The following sections provide several examples of different hardware setups.
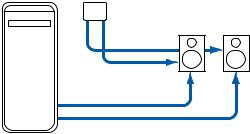
Setting Up a System Using Powered Speakers
With this setup, you can monitor the audio output through a set of connected powered speakers.
This setup uses the following equipment:
ÂYour computer and display
ÂA set of powered speakers, including speaker wire and a power adaptor
Speakers
Power cables
Speaker cables
Computer
Chapter 1 Setting Up Your System |
19 |
|
|

Setting Up a System Using a USB Audio Interface
With this setup, you can record audio input from microphones and musical instruments, and monitor audio output, through a USB audio interface.
This setup uses the following equipment:
ÂYour computer and display
ÂUSB audio interface (from 2 to 8 channels) with USB cable to connect to your computer
ÂMicrophone
ÂMusical instruments (guitar, bass, and keyboard)
ÂCables to connect microphones and instruments to the audio interface
ÂSet of monitors or speakers
Monitors
Microphone
Speaker
cables
Computer USB
cable
Audio interface
Computer |
Instrument |
20 |
Chapter 1 Setting Up Your System |
|
|
Setting Up a System Using a FireWire Interface and a Control Surface
With this setup, you can record audio input from several sources simultaneously, and monitor audio output channels independently, through a mixer connected to a FireWire audio interface.
This setup uses the following equipment:
ÂYour computer and display
ÂFireWire audio interface with FireWire cable to connect to your computer
ÂControl surface and MIDI interface with USB cable to connect MIDI interface to your computer
ÂMIDI cables to connect control surface to MIDI interface
ÂSet of powered monitors or speakers
ÂSpeaker cables
Monitors
Power cables
Audio interface
FireWire |
Speaker cables |
cable |
|
Midi interface
|
|
|
|
|
|
|
|
|
|
|
|
|
|
|
|
|
|
|
|
|
|
|
|
|
|
|
Computer |
|
|
Control surface |
|||||||||||||||||||||||
Chapter 1 Setting Up Your System |
21 |
|
|
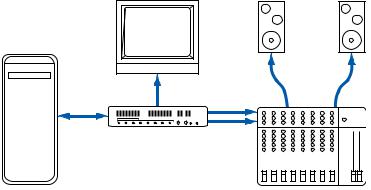
Setting Up a System Using a Video Output Device
With this setup, you can play video and audio through an external video output device. Because using a video output device can result in increased latency, you may want to combine this setup with an audio-only setup (as shown in the preceding pages), and switch between the two setups.
This setup uses the following equipment:
ÂYour computer and display
ÂVideo output device (Firewire device or PCI card)
ÂHigh-quality video monitor
ÂAudio speakers
Video monitor
FireWire
cable
Audio monitors
Speaker
cables
Video output device
Computer |
|
|
|
|
|
|
|
|
|
|
|
|
|
|
|
|
|
|
|
|
|
|
|
|
|
|
|
|
|
|
|
|
|
|
|
|
|
|
|
|
|
|
|
|
|
|
|
|
|
|
|
|
|
|
|
|
|
|
|
|
|
|
|
|
|
|
Mixer |
|
|
|
|
|
|
|
|||||||||
22 |
Chapter 1 Setting Up Your System |
|
|

2 |
The Soundtrack Pro Interface |
2 |
|
||
|
|
|
In Soundtrack Pro, you work in four main windows: the Project window, the Mixer, the Media and Effects Manager, and the Utility window.
Project window
Utility window
Media and Effects
Manager
ÂThe Project window includes the Timeline, where you arrange audio clips, and the Waveform Editor, where you edit audio files.
ÂThe Mixer is where you mix multitrack projects. It includes channel strips for each track, bus, and output, as well as other controls.
ÂThe Media and Effects Manager is where you locate and preview audio and video files to add to your project, and also where you add and adjust realtime effects.
ÂThe Utility window has tabs where you can add and view a video in a project, see the master level meters, get details on clips and other items, and set up recording.
23
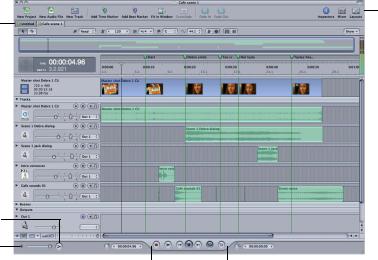
Project Window
The Project window is the “canvas” where you work on your projects. For multitrack projects, the Timeline is where you arrange and edit audio clips. For audio file projects, the Waveform Editor is where you edit audio files.
Toolbar
Tabs
Mono Mix button
Master volume slider
Playhead Position |
|
|
|
|
|
|
|
|
Transport |
|
Selection Length |
||
|
|
|
||||
value slider |
|
|
controls |
|
value slider |
|
ÂToolbar: Includes tools for common functions. You can customize which tools appear in the Toolbar.
ÂTabs: You can switch between any projects open in the Timeline or Waveform Editor.
ÂTransport controls: Control playback and the position of the playhead, and turn recording on or off. (For more information, see “Transport Controls” on page 25.)
ÂMaster volume slider: Adjusts the overall volume when you play the project. The volume level defaults to 0 dB when you create a project. Adjusting the master volume slider does not affect export volume.
ÂMono Mix button: Click to listen to a temporary mono mix of the project.
ÂPlayhead Position value slider: Displays the current playhead position. You can move the playhead by clicking the arrows, dragging, or typing a value.
ÂSelection Length value slider: Displays the length of the current Timeslice (in the Timeline) or selection (in the Waveform Editor). You can change the Timeslice or selection length by clicking the arrows, dragging, or typing a value.
24 |
Chapter 2 The Soundtrack Pro Interface |
|
|
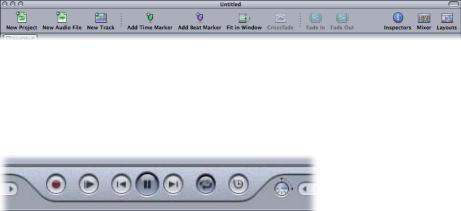
Toolbar
The Toolbar is located at the top of the Project window. When you first open Soundtrack Pro, the Toolbar includes buttons for creating a new project, creating a new audio file, showing the Mixer and the Utility window, managing layouts, adding markers, and other common functions. You can customize the Toolbar, adding buttons for functions you want to access frequently. For information about customizing the Toolbar, see “Customizing the Toolbar” on page 49.
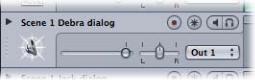
Transport Controls
You use the transport controls to control playback, set the position of the playhead, start recording, and activate the playback region.
Play from Beginning |
|
Go to Beginning |
|
Cycle |
|
|
|||
|
|
|
|
|
Record |
|
Play |
|
Go to End |
|
MIDI Sync |
|
|
|
||||
|
|
|
ÂRecord button: Starts and stops the recording process.
ÂPlay from Beginning button: Starts playback from the beginning of the project.
ÂGo to Beginning button: Moves the playhead to the beginning of the project, or to the beginning of the playback region if it is active.
ÂPlay/Pause button: Starts playback at the current playhead position. If the project is playing, stops playback.
ÂGo to End button: Moves the playhead to the end of the project, or to the end of the playback region if it is active.
ÂCycle button: Activates the playback region, if one is set in the Time ruler.
ÂMIDI Sync button: Synchronizes playback with incoming MIDI Clock and MIDI Timecode (MTC) signals.
For information on using the transport controls, see “Controlling Playback With the Transport Controls” on page 55.
Chapter 2 The Soundtrack Pro Interface |
25 |
|
|

Timeline
The Timeline gives you a visual representation of a multitrack project, showing the position of clips, the playhead, and other items in time. The Timeline is organized into three groups of horizontal rows called tracks, busses, and outputs. You can add and arrange audio clips in tracks, use busses to create submixes, and send audio to physical output channels using outputs. You can control the sound of each track, bus, and output using the controls in its header.
Automation |
|
|
|
Global Timeline |
|
Mode pop-up |
|
Project controls |
view |
||
|
|||||
|
|
|
|
|
|
Timeline editing tools
Level meters
Time display
Time ruler
Track area
Audio tracks
Timeline controls |
|
|
Scroll bar |
|
ÂTimeline editing tools: Select items using the Selection (arrow) tool, or split audio clips using the Split (razor) tool.
ÂAutomation Mode pop-up menu: Choose the mode for recording automation using either the onscreen controls or an external control surface.
ÂProject controls: Set the project’s time signature, tempo, key, sample rate, time format, and other properties using these controls.
ÂShow pop-up menu: Choose whether the video track, audio tracks, busses, outputs, and master envelopes are visible in the Timeline.
ÂGlobal Timeline view: Shows a miniature view of the entire Timeline and the playhead position, and lets you move quickly to different parts of a project.
ÂTime display: Shows the current playhead position in both Time-based and Beatsbased formats. You can set the playhead by typing a new playhead position in the time display.
26 |
Chapter 2 The Soundtrack Pro Interface |
|
|
ÂLevel meters: As the project plays, the level meters show the volume level of the first output (Output 1).
ÂTime ruler: You can precisely position clips, the playhead, and other items to a specific point in time (minutes, seconds, frames) or to a musical beat using the Time ruler.
ÂTrack area: Includes horizontal rows for tracks, busses, and outputs. Also includes the playhead, envelopes, and markers.
ÂHeaders: Each track, bus, and output has a header with an icon, name, volume slider, and other controls. (For more information, see “Headers” on page 27.)
ÂTimeline controls: Includes controls to show the master envelopes, turn snap on or off, set the track height, and zoom in or out. (For more information, see “Timeline Controls” on page 28.)
ÂScroll bar: Moves the Timeline horizontally so you can see different parts of the project.
Headers
Each track, bus, and output in the Timeline has a header that includes the track name, track icon, and a set of track controls.
|
|
|
|
|
Name field |
|
Record Enable button |
|
Effects button |
|||||||||||
|
|
|
|
|
|
|||||||||||||||
|
||||||||||||||||||||
Envelopes disclosure |
|
|
|
|
|
|
|
|
|
|
|
|
|
|
Mute button |
|||||
|
|
|
|
|
|
|
|
|
|
|
|
|
||||||||
|
|
|
|
|
|
|
|
|
|
|
|
|
|
|
||||||
triangle |
|
|
|
|
|
|
|
|
|
|
|
|
|
|
|
|
Solo button |
|||
|
|
|
|
|
|
|
|
|
|
|
|
|
|
|
||||||
Drag handle |
|
|
|
|
|
|
|
|
|
|
|
|
|
|
|
|
|
|
Output pop-up menu |
|
|
|
|
|
|
|
|
|
|
|
|
|
|
|
|
|
|
||||
|
|
|
|
|
|
|
|
|
|
|
|
|
|
|
|
|
|
|||
|
|
|
|
|
|
|
|
|
|
|
|
|
|
|
|
|
|
|
|
|
|
|
|
|
|
Icon |
|
Volume slider |
|
|
|
Pan slider |
|||||||||
|
||||||||||||||||||||
|
|
|
|
|
|
|
||||||||||||||
ÂDrag handle: Click to select the track, bus, or output and drag to reorder it in the Timeline.
ÂIcon: You can choose an icon for the track, bus, or output, making it easy to quickly distinguish them in a large project.
ÂName field: You can type a new name for the track, bus, or output in the name field.
ÂRecord Enable button: Enables (or disables) the track for recording when you click the Record button. Only tracks have Record Enable buttons, not busses or outputs.
ÂMute button: Mutes (or unmutes) the track, bus, or output.
ÂSolo button: Solos (or unsolos) the track, bus, or output. Soundtrack Pro supports both multiple solo and exclusive solo.
ÂEffects button: Displays the Effects tab of the Media and Effects Manager with the track, bus, or output effects settings.
ÂEnvelopes disclosure triangle: Shows the track, bus, or output envelopes in the area directly below the track.
Chapter 2 The Soundtrack Pro Interface |
27 |
|
|
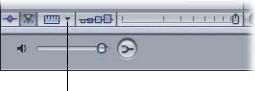
ÂVolume slider: Sets the track, bus, or output relative volume in the overall mix.
ÂOutput pop-up menu: Choose an output for the track or bus, or choose the physical output channels for the output from the menu.
ÂPan slider: Sets the pan position of the track or bus. Appears in track and bus headers only, not in output headers.
For detailed information on using the track controls, see “Using the Track Controls” on page 102.
Timeline Controls
The lower-left corner of the Timeline contains controls for various aspects of Timeline display and operation.
Master Envelopes button |
|
|
Snap button |
|
Track Height control |
||
|
|
|
|||||
|
|
|
|
|
|
Zoom control |
|
|
|
|
|
|
|
||
|
|
|
|
|
|
||
Snap To Value pop-up menu
ÂMaster Envelopes button: Shows or hides the master envelopes.
ÂSnap button: Turns snap on or off.
ÂSnap To Value pop-up menu: Sets the value to which items in the Timeline snap.
ÂTrack Height control: Sets the height of tracks, busses, and outputs to one of four settings, from Reduced to Large.
ÂZoom control: Click the control or drag the slider to change the zoom level. You can zoom in to edit clips precisely, or zoom out to display more of the Timeline.
For information about using master envelopes, see “Master Envelopes” on page 220. For information about snap, see “Using Snap” on page 72. For information about using the Track Height control and zoom control, see “Moving Around in the Timeline” on page 94.
28 |
Chapter 2 The Soundtrack Pro Interface |
|
|

Mixer
You mix your project in the Mixer. Each track, bus, and output has a channel strip in the Mixer with volume controls, mute and solo buttons, slots for adding effects, and other controls. You can view the levels for each track, bus, and output using level meters in its channel strip. You can also record audio and automate volume and pan changes in the Mixer.
Automation Mode |
Channel Strip and Mixer |
pop-up menu |
pop-up menus |
Project pop-up menu
Channel strips
ÂProject pop-up menu: Choose which project to work on from the pop-up menu.
ÂAutomation Mode pop-up menu: Choose the automation mode from the pop-up menu.
ÂChannel Strip and Mixer pop-up menus: Show or hide different sections of the channel strips and of the Mixer window.
ÂChannel strips: Each track, bus, and output has a channel strip with controls and level meters.
Chapter 2 The Soundtrack Pro Interface |
29 |
|
|

Drag handle
Pan slider and value slider
Volume fader and value slider
Record Enable button
Each channel strip includes the following controls:
Icon
Effects slots
Output pop-up menu
Level meters and peak indicator
Mute and Solo buttons
Name
ÂDrag handle: Click to select the channel strip and drag to reorder it in the Mixer.
ÂIcon: Icons let you visually distinguish channel strips in the Mixer. Click an icon to change it.
ÂEffects slots: Show the effects and sends for the channel strip, and let you add effects and sends.
ÂOutput pop-up menu: Choose an output for the track or bus channel strip or choose the physical output channels for the output channel strip from the menu.
ÂPan slider and value slider: Set the channel strip’s pan position by dragging the slider or changing the value in the value slider. You can automate pan changes by dragging the slider with the project set to the appropriate automation mode. Appear in track and bus channel strips only, not in output channel strips.
ÂVolume fader and value slider: Set the channel strip’s volume level by dragging the fader or changing the value in the value slider. You can automate volume changes by dragging the slider with the project set to the appropriate automation mode.
ÂLevel meters with peak indicator: Show the volume level of the channel strip in real time as the project plays. The peak indicator shows the highest level played, and changes color to indicate that clipping has occurred.
30 |
Chapter 2 The Soundtrack Pro Interface |
|
|
Loading...