


 Loading...
ð
SettingUpYour
StudioDisplay
15-inch flat panel monitor
K Apple Computer, Inc.
© 1999 Apple Computer, Inc. All rights reserved.
Under the copyright laws, this manual may not be copied, in whole or in part, without the written consent of Apple. Your rights to the software are governed by the accompanying software license agreement.
The Apple logo is a trademark of Apple Computer, Inc., registered in the U.S. and other countries. Use of the “keyboard” Apple logo (Option-Shift-K) for commercial purposes without the prior written consent of Apple may constitute trademark infringement and unfair competition in violation of federal and state laws.
Every effort has been made to ensure that the information in this manual is accurate. Apple is not responsible for printing or clerical errors.
Apple Computer, Inc. 1 Infinite Loop
Cupertino, CA 95014-2084 408-996-1010 http://www.apple.com
Apple, the Apple logo, ColorSync, Mac, Macintosh, and Power Macintosh are trademarks of Apple Computer, Inc., registered in the U.S. and other countries.
Finder is a trademark of Apple Computer, Inc.
ENERGY STAR is a U.S. registered trademark.
PANTONE® and other Pantone, Inc. trademarks are the property of Pantone, Inc. Portions © Pantone, Inc. 1995.
VESA Display Data Channel (DDC) is a trademark of the Video Electronics Standards Association.
Simultaneously published in the United States and Canada.
Mention of third-party products is for informational purposes only and constitutes neither an endorsement nor a recommendation. Apple assumes no responsibility with regard to the performance or use of these products.

Contents
1 About Your Apple Studio Display 5
|
Important Safety Instructions |
5 |
|
|
||
|
Setting Up Your Display |
6 |
|
|
|
|
|
What’s Next 10 |
|
|
|
|
|
|
Finding Answers 12 |
|
|
|
|
|
2 |
Installing the Apple Displays Software 13 |
|||||
|
About Your Apple Displays Software |
14 |
|
|||
|
Adjusting the Display |
14 |
|
|
|
|
3 |
Troubleshooting |
15 |
|
|
|
|
4 |
Using Your Display Stands |
19 |
|
|||
|
Storing the Keyboard |
22 |
|
|
|
|
|
Changing the Display Stand |
22 |
|
|
||
5 |
Safety, Health, and Maintenance |
27 |
||||
|
Healthy Use of Your Computer Equipment |
28 |
||||
|
General Maintenance |
29 |
|
|
|
|
|
Protecting Your Display From Theft |
30 |
|
|||
|
Do You Need to Install a Graphics Card? 30 |
|||||
|
Conserving Energy |
31 |
|
|
|
|
|
Appendix |
|
|
|
|
|
|
Technical Information |
33 |
|
|
||
|
Communications Regulation Information |
37 |
||||
3
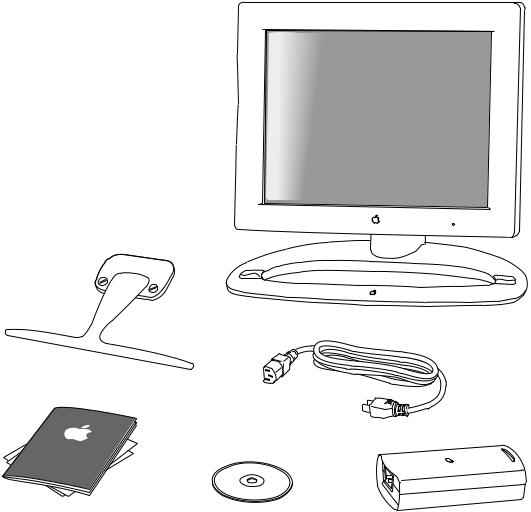
Flip-out stand
Power cord
Manual and service |
|
|
and support materials |
Software |
Power adapter |

C H A P T E R
1
About Your Apple Studio Display
Important Safety Instructions
mTurn off the computer before setting up your Apple Studio Display. Leave the computer plugged into a grounded outlet.
Important The only way to disconnect the monitor’s power completely is to unplug the power cord from the computer or electrical outlet. Make sure at least one end of the power cord is within easy reach so that you can unplug the display if you need to.
mDon’t press or put hard objects against the screen.
mRead all the setup instructions carefully before you plug your display into a power source.
Warning Use only the power adapter that came with your display. Adapters for other computer equipment may look similar, but they may damage your display.
This equipment is intended to be electrically grounded. This is a safety feature. Your power cord has a plug that has a third grounding pin. Be sure to connect it only to a grounded outlet. If you are unable to insert the plug into the outlet, contact a licensed electrician to replace the outlet with a properly grounded outlet. Do not defeat the purpose of the grounding plug!
If your power cord connects directly to the power socket on your computer, be sure that the computer is grounded.
For additional safety information, see Chapter 5, “Safety, Health, and Maintenance.”
Choosing a Good Location for Your Display
When determining where to place your display, keep the following points in mind:
mMake sure the power adapter cable, power cord, and display cables easily reach from the back of the display to your computer and an electrical outlet or power strip.
mAll cables should be unobstructed when you adjust the display. If you don’t allow enough clearance, the connectors might be damaged when the cables hit an obstruction.
5

Setting Up Your Display
Step 1: Place the display cable in the cable guide.
 Cable guide
Important Make sure you leave some slack in the cable so you can tilt, swivel, and turn the display.
6Chapter 1
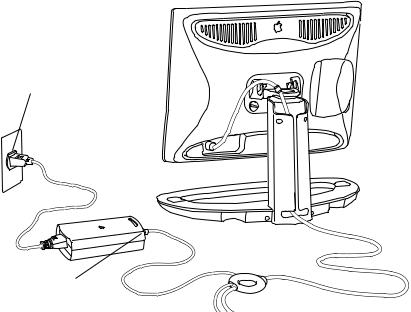
Step 2: Plug in the display’s power adapter.
Plug the power adapter cord into a grounded wall outlet
or power strip. (Some cords may connect to the power socket in the back of your computer.)
Plug the display’s power cable into the power adapter.
About Your Apple Studio Display |
7 |
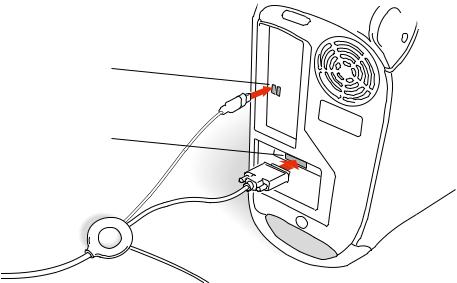
Step 3: Plug In the display’s DVI and USB connectors.
Plug the USB connector into the computer here.
Plug the DVI connector into the computer here.
Although your graphics card may have two monitor ports, connect your Apple Studio Display to the Digital Visual Interface (DVI) port only.
Important You can use only one monitor connected to your graphics card at a time.
8Chapter 1
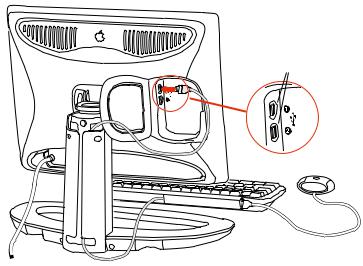
Step 4: Connect a USB keyboard to the display, if desired.
Connect your
USB keyboard here.
1
2
|
About Your Apple Studio Display |
9 |
|
Step 5: Press the monitor power button.
Both your computer and your monitor start up. After a few moments, the Macintosh desktop appears on the screen.
If nothing appears or you see other problems, see Chapter 3, “Troubleshooting,” for more information.
How Do I Turn Off the Display?
Your monitor power button shuts down or puts to sleep both your monitor and computer at the same time. Press the monitor power button again to start up or wake the monitor and computer.
You can change the power button setting so that pressing the monitor power button affects the monitor only. To change the power button setting, you use the Preferences section of the Monitors control panel. For more information about sleep settings and the Energy Saver or Monitors control panel, see Mac Help.
What’s Next
Congratulations—you’ve finished setting up your display. Next, you need to install the software that came with your display.
10 Chapter 1

¤Brightness controls
Keyboard storage pads
Power adapter
¤ |
® |
Security ring
Power indicator light
® Power button
Carrying handle
USB port cover
Desktop stand
DVI connector
USB connector
About Your Apple Studio Display |
11 |
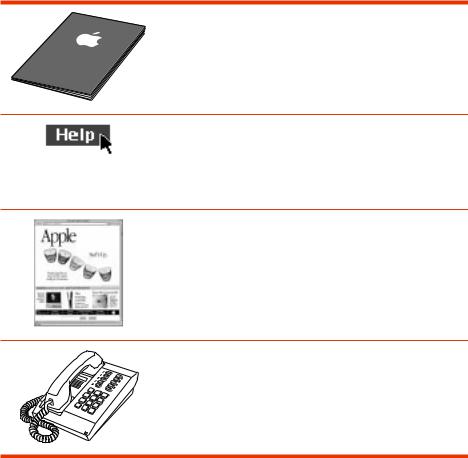
Finding Answers
When you have questions about your display, there are several places to look for answers.
In this manual
Use this manual to find out how to set up your display, install the software, and find solutions to common problems.
In Mac Help
If you need help using the Apple Displays Software or adjusting the display, open the Help menu and choose Mac Help. Type the topic you want information about and click Search, or use the table of contents to find your topic.
On the Internet
Apple maintains a number of sites on the World Wide Web that provide product information, software updates, and technical support information. You can view Apple’s home page at www.apple.com
Over the telephone
If you can’t find answers in any of the materials provided, call the Apple Assistance Center. (See the service and support information that came with this display.)
12 Chapter 1
Loading...