


 Loading...
User’s |
R2.06 |
Manual |
FieldMate |
|
Versatile Device Management |
|
Wizard |
IM 01R01A01-01E
IM 01R01A01-01E
9th Edition

|
|
|
|
Toc-1 |
|
|
|
|
|
||
FieldMate |
|
|
|
||
Versatile Device Management Wizard |
|
|
|||
|
|
|
IM 01R01A01-01E |
9th Edition |
|
|
|
|
|||
CONTENTS |
|
|
|||
A |
Foreword |
|
A-2 |
||
|
A-1 |
Product Registration................................................................................ |
|||
|
A-2 Terms and Conditions of the Software License.................................... |
A-3 |
|||
|
A-3 |
Package...................................................................................................... |
A-6 |
||
|
A-4 Symbol Marks in the User’s Manual....................................................... |
A-8 |
|||
B |
Packaging and Installation |
B-1 |
|||
|
B-1 |
About FieldMate........................................................................................ |
|||
|
|
B-1-1 |
Overview............................................................................................................ |
B-1 |
|
|
|
B-1-2 |
Packaging.......................................................................................................... |
B-2 |
|
|
|
B-1-3 |
Installing FieldMate/Device Files.................................................................... |
B-3 |
|
|
|
B-1-4 |
User Registration............................................................................................. |
B-11 |
|
|
|
B-1-5 |
About FieldMate.............................................................................................. |
B-14 |
|
|
B-2 |
PC Configuration.................................................................................... |
B-17 |
||
|
B-3 Notes on FOUNDATION fieldbus H1 Device Interface........................ |
B-18 |
|||
|
|
B-3-1 Notes on NI-FBUS........................................................................................... |
B-18 |
||
|
|
B-3-2 Notes on FFusb............................................................................................... |
B-19 |
||
|
B-4 Notes on PROFIBUS............................................................................... |
B-20 |
|||
|
B-5 Notes on HART Bluetooth Modem........................................................ |
B-21 |
|||
C |
Operation Environment |
C-1 |
|||
|
C-1 |
Hardware Environment............................................................................ |
|||
|
C-2 |
Software Environment.............................................................................. |
C-2 |
||
|
C-3 |
System Configuration/Connection Examples....................................... |
C-3 |
||
D |
Overview |
|
D-1 |
||
|
D-1 |
Basic........................................................................................................... |
|
||
|
D-2 |
Advance..................................................................................................... |
D-2 |
||
|
D-3 |
Functions................................................................................................... |
D-3 |
||
IM 01R01A01-01E 9th Edition : May 31, 2013-00

Toc-2
E Specifications Common to FieldMate Basic and Advance
E-1 Specifications Common to FieldMate Basic and Advance.................. |
E-1 |
||
|
E-1-1 Overview of Window Configuration................................................................ |
E-1 |
|
|
E-1-2 |
Main Window...................................................................................................... |
E-5 |
|
E-1-3 |
Configuration Function................................................................................... |
E-10 |
E-2 |
Segment Viewer...................................................................................... |
E-11 |
|
E-3 |
Device Adjustment/Setting Functions.................................................. |
E-17 |
|
|
E-3-1 Basic Device Communication Setting.......................................................... |
E-17 |
|
|
E-3-2 |
DTM Works....................................................................................................... |
E-19 |
|
E-3-3 |
Parameter Manager......................................................................................... |
E-41 |
|
E-3-4 |
DD Menu........................................................................................................... |
E-52 |
E-4 |
Device Viewer.......................................................................................... |
E-55 |
|
|
E-4-1 |
Diagnostic Information................................................................................... |
E-55 |
|
E-4-2 |
Trend Information............................................................................................ |
E-58 |
E-5 |
Operation Log.......................................................................................... |
E-64 |
|
|
E-5-1 |
Overview........................................................................................................... |
E-64 |
|
E-5-2 |
History............................................................................................................... |
E-65 |
F Advance
F-1 |
Overview.................................................................................................... |
|
F-2 |
|
|
F-1-1 Device Maintenance Information Management Function............................. |
F-6 |
||
|
|
F-1-1-1 |
Device Maintenance Information........................................................ |
F-6 |
|
|
F-1-1-2 Components of the Device Maintenance Information........................ |
F-7 |
|
|
|
F-1-1-3 Registering Device Maintenance Information.................................. |
F-14 |
|
|
|
F-1-1-4 Importing and Exporting Device Maintenance Information.............. |
F-20 |
|
|
F-1-2 User Management Function........................................................................... |
F-23 |
||
F-2 Main Window (General).......................................................................... |
F-24 |
|||
|
F-2-1 |
Menu.................................................................................................................. |
|
F-26 |
|
F-2-2 |
Configuration Function................................................................................... |
F-31 |
|
F-3 |
Parameter Manager................................................................................ |
F-32 |
||
F-4 |
Device Navigator..................................................................................... |
F-43 |
||
|
F-4-1 |
Device Maintenance Info ................................................................................ |
F-49 |
|
|
|
F-4-1-1 Device Maintenance Info (Device Info)............................................ |
F-51 |
|
|
|
F-4-1-2 Device Maintenance Info (Memo).................................................... |
F-54 |
|
|
|
F-4-1-3 Device Maintenance Info (Document).............................................. |
F-56 |
|
|
|
F-4-1-4 Device Maintenance Info (History)................................................... |
F-57 |
|
|
|
F-4-1-5 Device Maintenance Info (Parameter)............................................. |
F-57 |
|
|
|
F-4-1-6 Device Maintenance Info (DTM Data).............................................. |
F-58 |
|
F-5 |
Segment Viewer...................................................................................... |
F-59 |
||
|
F-5-1 |
Built-in Connection......................................................................................... |
F-61 |
|
|
F-5-2 |
User Defined Connection............................................................................... |
F-68 |
|
|
|
F-5-2-1 |
FDT Project....................................................................................... |
F-69 |
IM 01R01A01-01E 9th Edition : May 31, 2013-00

|
|
|
|
Toc-3 |
|
|
|
|
|
|
|
F-5-2-2 Relation between FDT Project and Device Maintenance Info......... |
F-89 |
|
|
|
F-5-2-3 Relation between FDT Project and .NET Framework*...................... |
F-92 |
|
F-6 |
History |
..................................................................................................... |
|
F-93 |
F-7 |
Acquiring Device Serial Numbers......................................................... |
F-97 |
||
|
F-7-1 |
Devices............................................................................................................. |
|
F-97 |
|
F-7-2 |
Device Maintenance Information................................................................... |
F-97 |
|
|
F-7-3 |
Export................................................................................................................ |
|
F-98 |
F-8 |
Relation between Main Window and DTM Works.............................. |
F-100 |
||
|
F-8-1 |
Startup............................................................................................................ |
|
F-100 |
|
F-8-2 |
DTM Data........................................................................................................ |
|
F-105 |
G FieldMate Setup |
|
G-1 |
||
G-1 |
Modem Configuration.............................................................................. |
|||
|
G-1-1 |
HART Modem Configuration........................................................................... |
G-1 |
|
|
G-1-2 |
BRAIN Modem Configuration.......................................................................... |
G-2 |
|
G-2 |
Options...................................................................................................... |
|
G-3 |
|
G-3 |
User Manager (Advance Only)............................................................... |
G-6 |
||
G-4 |
FOUNDATION fieldbus Interface Selection........................................... |
G-8 |
||
H HART Device Tag Display Mode |
H-1 |
|||
H-1 |
Overview.................................................................................................... |
|
||
H-2 |
Specification of HART Device Tag.......................................................... |
H-2 |
||
H-3 |
Setting or Changing Device Tag Mode................................................... |
H-3 |
||
H-4 |
Device Tag Assignment............................................................................ |
H-5 |
||
|
H-4-1 |
Devices not Registered in the Database........................................................ |
H-5 |
|
|
|
H-4-1-1 |
Tag Mode........................................................................................... |
H-6 |
|
|
H-4-1-2 Tag + Descriptor Mode...................................................................... |
H-7 |
|
|
|
H-4-1-3 |
Descriptor Mode................................................................................ |
H-8 |
|
|
H-4-1-4 |
Message Mode.................................................................................. |
H-9 |
|
|
H-4-1-5 |
Long Tag Mode................................................................................ |
H-10 |
|
H-4-2 |
Devices Registered in the Database............................................................. |
H-11 |
|
|
|
H-4-2-1 Operations on Device Tag/Address Assignment............................. |
H-12 |
|
|
|
H-4-2-2 Operations on Device Maintenance Information............................. |
H-14 |
|
|
H-4-3 |
Registering a New Device in the Database.................................................. |
H-16 |
|
H-5 |
Device Tag Display Mode on Each Window......................................... |
H-17 |
||
IM 01R01A01-01E 9th Edition : May 31, 2013-00

Toc-4
IISA100 device configuration
I-1 |
Introduction................................................................................................ |
|
I-1 |
|
I-2 |
Field Wireless Gateway............................................................................. |
I-2 |
||
|
I-2-1 |
Connection Example.......................................................................................... |
I-2 |
|
|
I-2-2 |
Operation Procedure.......................................................................................... |
I-3 |
|
|
I-2-3 |
Gateway Setting.................................................................................................. |
I-4 |
|
|
I-2-4 |
ISA100 Device Recognition............................................................................... |
I-7 |
|
I-3 |
HART adaptor........................................................................................... |
|
I-21 |
|
|
I-3-1 |
Configuration example.................................................................................... |
I-21 |
|
|
I-3-2 HART Device Recognition............................................................................... |
I-22 |
||
I-4 |
ISA100 Device Information Update........................................................ |
I-28 |
||
I-5 |
Infrared Communication......................................................................... |
I-29 |
||
|
I-5-1 |
System Requirements...................................................................................... |
I-29 |
|
|
I-5-2 |
Connection Example........................................................................................ |
I-30 |
|
|
I-5-3 |
Operation Procedure........................................................................................ |
I-31 |
|
|
I-5-4 Infrared Adapter (ACTiSYS IR224UN)............................................................ |
I-32 |
||
|
|
I-5-4-1 |
Driver Installation............................................................................... |
I-32 |
|
|
I-5-4-2 |
Device Checks................................................................................... |
I-32 |
|
I-5-5 |
Infrared Adapter Setting.................................................................................. |
I-33 |
|
|
I-5-6 |
ISA100 Device Recognition............................................................................. |
I-34 |
|
I-6 |
DTM Start.................................................................................................. |
|
I-37 |
|
|
I-6-1 |
Online Start........................................................................................................ |
I-37 |
|
|
I-6-2 |
Offline Start....................................................................................................... |
I-38 |
|
I-7 |
ISA100 Device Maintenance Information (Advance Only).................. |
I-42 |
||
|
I-7-1 |
Device Registration.......................................................................................... |
I-44 |
|
|
|
I-7-1-1 |
Online registration............................................................................. |
I-44 |
|
|
I-7-1-2 |
Offline registration............................................................................. |
I-47 |
|
I-7-2 |
Device Maintenance Information.................................................................... |
I-49 |
|
I-8 |
Comparison of functions between routes via HART modem and via |
I-51 |
||
|
HART adaptor........................................................................................... |
|
||
J Adding/Deleting Device Files
J-1 |
Device Files Setup.................................................................................... |
J-1 |
J-2 |
Device Files Media.................................................................................... |
J-3 |
J-3 |
DTM Setup............................................................................................... |
J-14 |
J-4 |
Yokogawa Type B/C DTM Library Overview........................................ |
J-16 |
IM 01R01A01-01E 9th Edition : May 31, 2013-00

|
|
Toc-5 |
|
|
|
Appendix |
List of Sources and Messages |
App.-1 |
Appendix A |
||
Appendix B |
Usage Examples of Offline Function in Type B/C DTM.... |
App.-6 |
Appendix C |
Device Replacement Tool.................................................. |
App.-23 |
Appendix D |
User Definition of Vendor Name and Model Name......... |
App.-34 |
Appendix E |
Software Download Function for FOUNDATION |
|
|
fieldbus................................................................................ |
App.-35 |
Appendix F |
Troubleshooting Information............................................ |
App.-44 |
Appendix G |
Troubleshooting for USB Modem..................................... |
App.-45 |
Appendix H |
FieldMate Provisioning Device Tool................................. |
App.-46 |
Appendix I |
How to clear VCR (NI-FBUS only)..................................... |
App.-56 |
Appendix J |
Assignment Change of FDT 1.2 and FDT 2.0 DTM ......... |
App.-58 |
Appendix K |
Importing Type B Yokogawa DTM Data to Type C |
|
|
Yokogawa DTM................................................................... |
App.-61 |
Appendix L |
FieldMate Related Documents.......................................... |
App.-62 |
Revision Information
IM 01R01A01-01E 9th Edition : May 31, 2013-00

<A Foreword> |
A-1 |
A Foreword
Thank you for purchasing FieldMate.
This document describes the following.
•How to install FieldMate
•The functions and operating procedures of FieldMate
To ensure correct use, read this document thoroughly before starting operation. After reading the document, keep it in a convenient location for quick reference. It is useful when a question arises during operation.
Note
•The contents of this manual are subject to change without prior notice as a result of improvements in the software’s performance and functions. Display contents illustrated in this manual may differ slightly from what actually appears on your screen.
•Every effort has been made in the preparation of this manual to ensure the accuracy of its contents. However, should you have any questions or find any errors, please contact your nearest Yokogawa representative.
•Copying or reproducing all or any part of the contents of this manual without the permission of Yokogawa Electric Corporation is strictly prohibited.
•Use of this product (software and this manual) on more than one computer at the same time is prohibited. Use by more than one user is also prohibited.
•Transfer or lending of this product to any third party is prohibited.
•Yokogawa Electric Corporation provides no guarantees other than for physical deficiencies found on the original disk or this manual upon opening the product package.
•Yokogawa Electric Corporation shall not be held responsible by any party for any losses or damage, direct or indirect, caused by the use of the product.
•Please read it carefully, and do not lose it as a new one cannot be issued.
•The content of this manual describes FieldMate R2.06 and Device Files R3.05.
•License numbers will not be reissued. Please keep your license numbers in a safe place.
Trademarks
All the brand names or product names of Yokogawa Electric used in this document are either trademarks or registered trademarks of Yokogawa Electric Corporation.
All the brand names or product names of other companies mentioned in this document are either trademarks or registered trademarks of their respective holders.
IM 01R01A01-01E 9th Edition : May 31, 2013-00

<A Foreword> |
A-2 |
A-1 Product Registration
YOKOGAWA provides registered users with a variety of information and services.
Users must complete the product registration form by going to the following Web page: https://voc.yokogawa.co.jp/PMK/Top.do
IM 01R01A01-01E 9th Edition : May 31, 2013-00

<A Foreword> |
A-3 |
A-2 Terms and Conditions of the
Software License
Yokogawa Electric Corporation
Field Device Management Software Package “FieldMate” License Agreement
IMPORTANT - PLEASE READ THIS AGREEMENT CAREFULLY:
BYINSTALLING, COPYING OR OTHERWISE USING THE ENCLOSED SOFTWARE PRODUCT, YOUAGREE TO BE BOUND BYTHETERMSAND CONDITIONS OF THIS
SOFTWARE LICENSE AGREEMENT (“AGREEMENT”).
Please be sure to sign up and register your software license number, your PC specific information and other necessary items on the User Registration Website designated by
Yokogawa Electric Corporation. All obligations of Yokogawa Electric Corporation under this Agreement, support against your inquiries, provision of version up information, etc. will be executed or provided to you subject to your registration by User Registration Website. In case there is no registration, Yokogawa Electric Corporation might decline to provide such services to you.
IFYOU DO NOTAGREE TO THETERMSAND CONDITIONS OFTHISAGREEMENT, DO NOTINSTALL, COPY OR USE THE SOFTWARE PRODUCTAND PROMPTLY RETURN ITTO THE PLACE OF PURCHASE.
1.Grant of License
(1)Subject to the terms and conditions of this Agreement, Yokogawa Electric Corporation (“Licensor”) hereby grants to you (“Licensee”) a non-exclusive and non-transferable right to use the enclosed Field Device Management Software Package “FieldMate” and associated materials and documentation in printed or electronic format (“Licensed Software”), in consideration of full payment by Licensee to the Licensor of the license fee separately agreed upon by the parties hereto.
(2)Licensee shall have the right to use the Licensed Software in the operating environment identified by the Licensor, either (a) to the extent specified in the contract specification agreed upon by both parties, or (b) if not specified, for a single user on a single computer.
(3)Licensee may use the Licensed Software solely for its own internal data processing operations to set up field instruments having communication functions. Use of the Licensed Software for any purpose other than those as expressly specified in the documentation provided by Licensor shall be prohibited and any result or damage therefrom shall be at Licensee’s own risk and responsibility
(4)Licensee may make one identical copy of the Licensed Software (in this context, excluding any associated materials and documentation) for backup purpose, which shall be maintained by Licensee with strict care. Such copy shall bear Licensor’s proprietary notice as the original does. No other copies shall be made without Licensor’s prior written consent.
(5)The Licensed Software may contain software which Licensor is licensed from third parties (“Third Party Software”). Licensee agrees to use the Third Party Software in accordance with the terms and conditions as set forth by licensors of such Third Party Software and agrees to be bound thereby.
(6)In no event shall Licensee make any use of the Licensed Software in any other manner than stipulated hereunder.
(7)Licensee agrees to use any Third Party Software solely as runtime use software which shall be used solely as part of and with the integrated Licensed Software, and shall not make any further use of Third Party Software for any other purposes or in any other manner.
IM 01R01A01-01E 9th Edition : May 31, 2013-00

<A Foreword> |
A-4 |
|
|
2. Restriction
Licensee shall not: (a) remove any product identification, proprietary notices, or other notices or restrictions from the Licensed Software; (b) transfer, sell, assign, sublicense or otherwise convey the Licensed Software to another party without Licensor’s written consent; or (c) cause, permit or attempt the reverse engineering, disassembly, decompilation, translation or adaptation of
the Licensed Software. Any transfer of the Licensed Software is subject to Licensor’s transfer policies and fees.
3. Copyright / Ownership
The Licensed Software, including but not limited to any technology, algorithm, know-how, process and others contained therein, is the proprietary property and trade secret of Licensor or a third party who grant to Licensor the right of sub-licensing and is protected by copyright and other intellectual property laws and treaties. Licensee acquires only the right to use the Licensed Software and does not acquire any rights, expressed or implied, in the Licensed Software or media containing the Licensed Software other than those specified in thisAgreement. Licensor shall at all times retain all rights, titles, and interests, including intellectual property rights, in the Licensed Software and such media. The Licensee may not disclose or divulge the aforesaid proprietary property and trade secret to any other individual or entity than the Licensee’s personnel who reasonably need to know and the Licensee shall impose strictly confidential obligations with respect to such proprietary property and trade secret on such Licensee’s personnel.
4.Warranty / Liability
(1)THE LICENSED SOFTWARE SHALL BE PROVIDED TO LICENSEE ON AN “AS IS”
BASIS. UNLESS OTHERWISE EXPRESSLY PROVIDED BYLICENSOR, LICENSOR AND THE SUPPLIERS WHO PROVIDE OR LICENSE PART OF THE LICENSED SOFTWARETO LICENSOR (“SUPPLIERS”) HEREBY EXPRESSLY DISCLAIMANYAND ALLIMPLIED WARRANTIES OFANYKIND WHATSOEVER, INCLUDING WITHOUT LIMITATION WARRANTY OF UNINTERRUPTED OR ERROR-FREE OPERATION, SATISFACTORY QUALITY, NON-INFRINGEMENT, MERCHANTABILITY OR FITNESS FORAPARTICULAR PURPOSE,AND SHALLNOT BE LIABLE TO LICENSEE FOR ANY DAMAGE OR LOSS CAUSED BYUSE OR INABILITYTO USE OFTHE LICENSED SOFTWARE. LICENSORAND SUPPLIERS DISCLAIMANYANDALLLIABILITYAND
WILL HAVE NO LIABILITY FOR VIOLATION, MISAPPROPRIATION OR INFRINGEMENT
OF INTELLECTUALPROPERTY RIGHTS OFANYTHIRD PARTY, UNLESS ITIS CAUSED BYLICENSOR OR SUPPLIERS’GROSS NEGLIGENCE OR WILLFUL MISCONDUCT.
(2)IN NO EVENTSHALLLICENSORAND SUPPLIERS BE LIABLE, WHETHER IN
CONTRACT, TORT OR OTHERWISE AND WHETHER OR NOT LICENSOR AND
SUPPLIERS HAVE BEENADVISED OFTHE POSSIBILITYOF SUCH LOSS OR DAMAGE, FOR CONSEQUENTIAL, INCIDENTAL, INDIRECT OR EXEMPLARY DAMAGES, LOSS OF PROFITS, LOSS OF REVENUE, LOSS OF BUSINESS OR
GOODWILL, LOSS OF DATA OR LOSS OF AVAILABILITY. IN NO EVENT SHALL
LICENSORAND SUPPLIERS’AGGREGATE LIABILITY EXCEED THEAMORTIZED BALANCE OFTHEAMOUNT PAID BY LICENSEE FOR USE OFTHE CONCERNED
PART OF THE LICENSED SOFTWARE.
(3)THIS PARAGRAPH 4 STATES THE ENTIRE WARRANTY AND LIABILITY OF LICENSOR
AND SUPPLIERS IN CONNECTION WITHTHE LICENSED SOFTWARE. THIS PARAGRAPH 4ALLOCATES RISKS UNDER THISAGREEMENT BETWEEN LICENSEE AND LICENSOR/SUPPLIERSAND COMPRISES FUNDAMENTALELEMENTS OF THIS
LICENSE. LICENSOR’S PRICING OF THE LICENSED SOFTWARE REFLECTS THIS ALLOCATION OF RISKS AND LIMITATION OF LIABILITY.
IM 01R01A01-01E 9th Edition : May 31, 2013-00
<A Foreword> |
A-5 |
|
|
(4)LICENSEE SHALLINDEMNIFY, DEFENDAND HOLD LICENSORAND SUPPLIERS FROMANYCLAIMS, DEMANDS, LIABILITIES, LOSSES, DAMAGES, JUDGMENTS OR SETTLEMENTS, INCLUDINGALLREASONABLE COSTSAND EXPENSES RELATED THERETO INCLUDINGATTORNEY’S FEES, DIRECTLY OR INDIRECTLY RESULTING
FROM ANY CLAIM MADE OR POTENTIAL CLAIM BY A THIRD PARTY AGAINST
LICENSOR OR SUPPLIERSARISING OUTOFANYACT OR USE OF LICENSED
SOFTWARE BY LICENSEE.
5.Term and Termination
(1)This Agreement shall become effective upon the Licensee installs, copies or otherwise commences to use the Licensed Software and remain in full force until and terminate when
(a) Licensor terminates this Agreement according to paragraph 5 (2); or (b) the Licensee actually ceases to use the Licensed Software, whichever comes earlier.
(2)Licensor shall have the right to immediately terminate this Agreement without any notice to Licensee, if Licensee breaches any of the terms and conditions hereof.
(3)Upon termination of thisAgreement, Licensee shall immediately, in accordance with instructions by Licensor, return all copies of the Licensed Software in its possession to Licensor or its designee and erase all copies of the Licensed Software installed in any computer hereunder.
(4)The license fee paid by the Licensee to the Licensor in consideration of the use of the Licensed Software hereunder shall be non-refundable unless otherwise expressly provided herein.
(5)The provisions of the paragraphs 3, 4, 5 and 6 shall survive any expiration or termination of this Agreement.
6.General Provisions
(1)This Agreement shall be governed by and construed in accordance with the laws of Japan. All disputes, controversies or differences which may arise between the parties hereto, out of or in relation to or in connection with thisAgreement shall be finally settled by arbitration in Tokyo, Japan in accordance with the Commercial Arbitration Rules of the Japan
CommercialArbitrationAssociation. The award rendered by the arbitrator(s) shall be final and binding upon the parties hereto.
(2)This Agreement shall supersede any prior representations, discussions, undertakings, communications or advertising with respect to the Licensed Software.
(3)If any part of this Agreement is found void or unenforceable under any laws or regulations and Licensor deems it is not reasonable to license without such void or unenforceable part, Licensor is entitled to modify the terms of this Agreement or terminate this Agreement at its option without owing any liability to Licensee.
(4)Licensee agrees that the Licensed Software shall not be shipped, transferred or exported to any country or used in any manner prohibited by any export administration laws, restrictions or regulations of Japan, the United States and other countries that may be applicable to the
Licensed Software.
(5)This English text shall be original and prevail translation versions in all respects.
IM 01R01A01-01E 9th Edition : May 31, 2013-00

<A Foreword> |
A-6 |
A-3 Package
Checking the Contents of the Package
Open the package and check the following prior to use. If the delivered product is the wrong one, some items are missing, or there is a problem with the appearance, contact the place of purchase.
Contents of the package
AUSB HARTModem or a USB FieldMate Modem is only included in the package if the /B option (USB FieldMate Modem) was selected.
License Sheet: |
1 |
Getting Started: |
1 |
FieldMate CD-ROM: |
1 |
Part Number: F9197DS |
|
Device Files DVD-ROM: |
1 |
Part Number: F9197DT |
|
USB FieldMate Modem (Optional)
Part Number: F9197UC
Media Handling
Please store your original Media carefully. Install the products on your hard disk, and run the products from your hard disk during actual use.
IM 01R01A01-01E 9th Edition : May 31, 2013-00

<A Foreword> |
A-7 |
|
|
Media Handling Guidelines
Make sure to take the following precautions.
 IMPORTANT
•Do not store the product near large amounts of refuse or dust.
•Do not touch the surface of the Media with no printed characters.
Dirt or sweat from fingertips can damage the Media. Do not write anything on the Media.
•Pencil lead or residue from erasers can damage the Media.
•Do not bend or scratch the Media.
Doing so can cause it to become unreadable.
•Never place anything on top of the Media.
Doing so can cause deformities that can render the Media useless.
•Do not drop the Media from high locations as doing so can cause damage or deformities.
•Do not place the Media in direct sunlight or near heat sources.
•Never allow solvents such as alcohol, benzene, or Freon to come into contact with the
Media.
•Take care when placing the Media into the Media drive.
•While the Media is being accessed, do not remove the Media from the Media drive, cut the power to the PC, or reset the computer.
•Store the Media in its original jewel case.
Do not leave the Media in the Media drive after use. It can become deformed or damaged unless it is kept in its case.
Required Software to Read
Adobe Reader of Adobe Systems Incorporated is required to view the user’s manual. If Adobe Reader is not installed on the PC to be used, please download from home page of Adobe Systems Incorporated.
IM 01R01A01-01E 9th Edition : May 31, 2013-00

<A Foreword> |
A-8 |
A-4 Symbol Marks in the User’s Manual
The symbol marks appearing in the user’s manual have the following meanings.
 WARNING
Indicates a potentially hazardous situation which, if not avoided, could result in death or serious injury.
 CAUTION
Indicates a potentially hazardous situation which, if not avoided, may result in minor or moderate injury. It may also be used to alert against unsafe practices.
 IMPORTANT
Indicates that operating the hardware or software in this manner may damage it or lead to system failure.
 NOTE
NOTE
Draws attention to information essential for understanding the operation and features.
IM 01R01A01-01E 9th Edition : May 31, 2013-00

<B Packaging and Installation> |
B-1 |
B Packaging and Installation
B-1 About FieldMate
B-1-1 Overview
FieldMate is provided on a set of Media “FieldMate Software” and “Device Files” along with a license sheet, Getting Started User’s Manual and USB FieldMate modem (optional).
FieldMate can be installed on your PC using the installer stored in the Media. However, to continue using it, you must register with us within 30 days after installation and then input an activation key.
You can register usage via our User Registration Web site. When registering, you need to provide the license number and Hard disc serial number (Volume Serial Number) of the PC, drive C, in which FieldMate is installed.
FieldMate CD-ROM License sheet |
Device Files DVD-ROM (3) A window appears prompting you to register usage with Yokogawa. |
License |
The license number and PC-specific information are displayed. |
number |
|
(2) Start up FieldMate
(1) Install FieldMate. Install the device files.
(5)Enter the Activation key in the User Registration window.
(4)Register usage via our User Registration Web Site to obtain the activation key.
B010101E.ai
Figure B-1-1 Basic Flow of Installation and User Registration
IM 01R01A01-01E 9th Edition : May 31, 2013-00

<B Packaging and Installation> |
B-2 |
B-1-2 Packaging
Items Packaged with the FieldMate R2.06 CD-ROM
Table B-1-1 Items Packaged with the FieldMate R2.06 CD-ROM
Category |
Object |
Programs
FieldMate program
USB FieldMate modem driver
Items Packaged with the Device Files R3.05 DVD-ROM
Table B-1-2 |
Items Packed with the Device Files R3.05 DVD-ROM |
|
|
|
|
|
Category |
Object |
|
|
Yokogawa HART device DTM |
|
|
|
|
|
Yokogawa FDT 2.0 HART DTM |
|
|
|
|
|
Yokogawa FOUNDATION fieldbus H1 device DTM |
|
|
|
|
|
Yokogawa PROFIBUS device DTM |
|
|
|
|
|
Yokogawa BRAIN device DTM |
|
|
|
|
|
Yokogawa ISA100 device DTM |
|
|
|
Device files |
|
Other manufacturers’ HART device DTM |
|
|
|
|
|
Built-In DTM for HART device |
|
|
|
|
|
Built-In DTM for FOUNDATION fieldbus H1 device |
|
|
|
|
|
FOUNDATION fieldbus H1 device DD |
|
|
|
|
|
HART device DD |
|
|
|
|
|
ISA100 Built-in DTM |
|
|
|
|
|
Yokogawa ISA100 Communication DTM |
|
|
|
IM 01R01A01-01E 9th Edition : May 31, 2013-00
<B Packaging and Installation> |
B-3 |
B-1-3 Installing FieldMate/Device Files
Overview of Installation Procedure
 NOTE
NOTE
•For details on installing the NI-FBUS driver, refer to the documentation of National Instruments.
•For details on installing the FFusb driver, refer to the documentation of Softing.
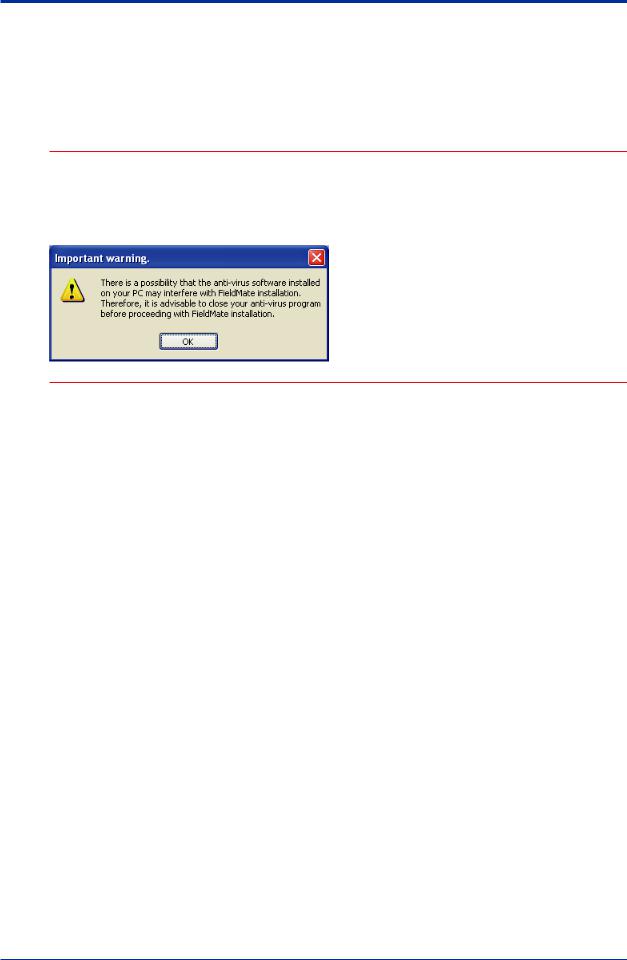
•If the window below appears during installation, please follow the procedure.And press
“Cancel” in the next window.
B010301E.ai
IM 01R01A01-01E 9th Edition : May 31, 2013-00
<B Packaging and Installation> |
B-4 |
|
|
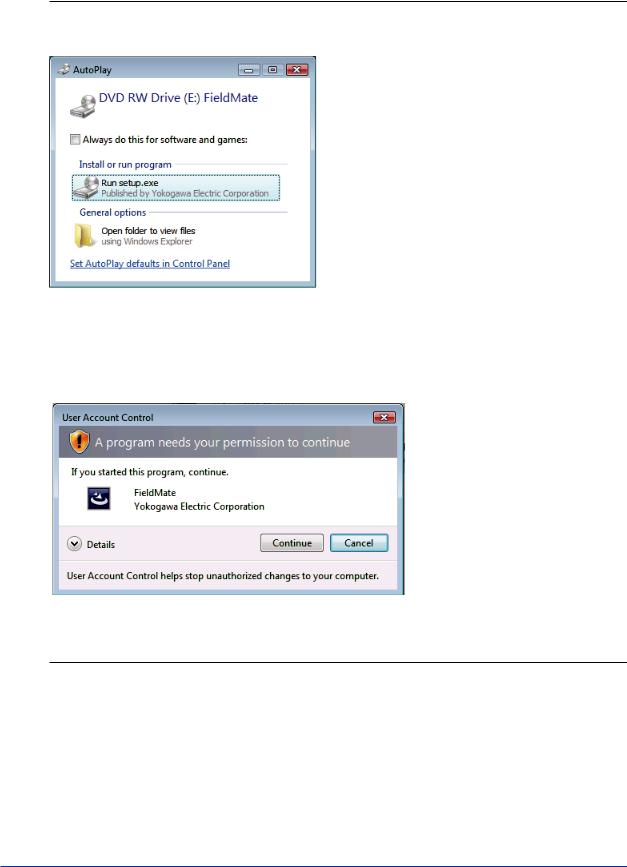
Installation Procedure
1.Log on as a user with administrator privileges.
2.Insert the FieldMate Media in the Media drive. Installation starts automatically.
TIP Due to user account control, the following windows may be displayed.And confirmation operation is required.
(1) Auto Play
B010302E.ai
Figure B-1-2
Click “Run setup.exe” and proceed.
(2)UserAccount Control
B010303E.ai
Figure B-1-3
Click “Continue” and proceed.
IM 01R01A01-01E 9th Edition : May 31, 2013-00
<B Packaging and Installation> |
B-5 |
|
|
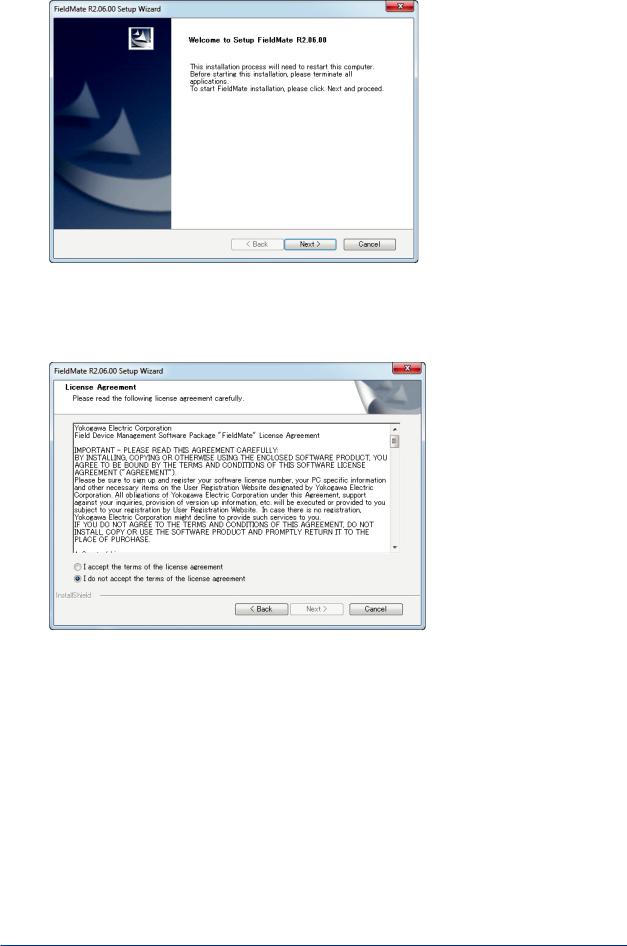
B010304E.ai
Figure B-1-4
3.The License Agreement window appears. Read the information carefully and if you agree with it, click the NEXTbutton.
B010305E.ai
Figure B-1-5
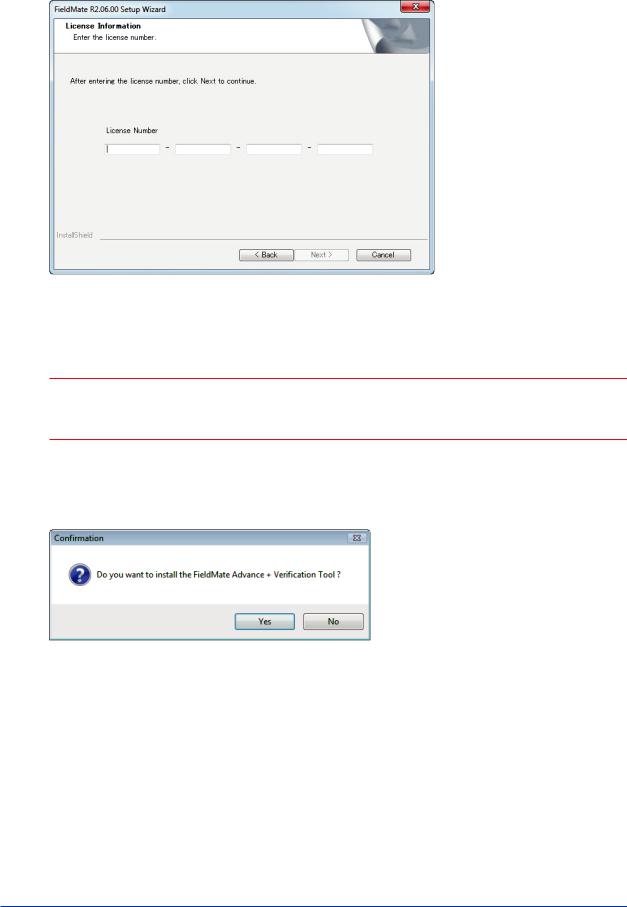
4.The Enter License Number window appears.
IM 01R01A01-01E 9th Edition : May 31, 2013-00
<B Packaging and Installation> |
B-6 |
|
|
5.Enter the license number. You can proceed to Step 6 after you enter the correct license number.
B010306E.ai
Figure B-1-6
 NOTE
NOTE
Enter the license number carefully. Make sure to type the number “0”, the capital letter “O”, the number “1“, and the capital letter “I” correctly. The system will reject incorrect entries. The wrong license number will generate an invalid Activation key.
6.The confirmation window appears informing you that FieldMate Basic orAdvance is installed. When license number forAXF verification Tool (/VF option) is input, the window for this option is appeared on the display.
B010307E.ai
Figure B-1-7
IM 01R01A01-01E 9th Edition : May 31, 2013-00

<B Packaging and Installation> |
B-7 |
|
|
7.Select the Yokogawa DTM, or select whether to install other manufacturers’ DD/DTM.
The following dialog box appears after you enter the license number and other information in FieldMate Installer.
This is selected by default. When this is selected, all the Yokogawa device DTM libraries, assigned files, Yokogawa device DD, Device Viewer definition file, Yokogawa Built-in DTM, and the following items* will be installed.
When this is selected, a Yokogawa device DTM Installer window for the protocol checked in the check box appears for installation. This window enables you to select whether to install or not for each device (see Part J-2). The following items* will also be installed.
When this is selected, only the following items* will be installed.
When this is checked, the Device File Installer window will be called up after the above Yokogawa device DTM libraries and the following items* are installed (see Part J-2). This is unchecked by default.
(*): HART device vendor name/model name file, FF-H1 device vendor name/ model name file, BRAIN device model name file, and ISA100 device vender name/model name
B010308E.ai
Figure B-1-8
8.Select the drive for installation. Default is C drive.
B010309E.ai
Figure B-1-9
IM 01R01A01-01E 9th Edition : May 31, 2013-00
<B Packaging and Installation> |
B-8 |
|
|
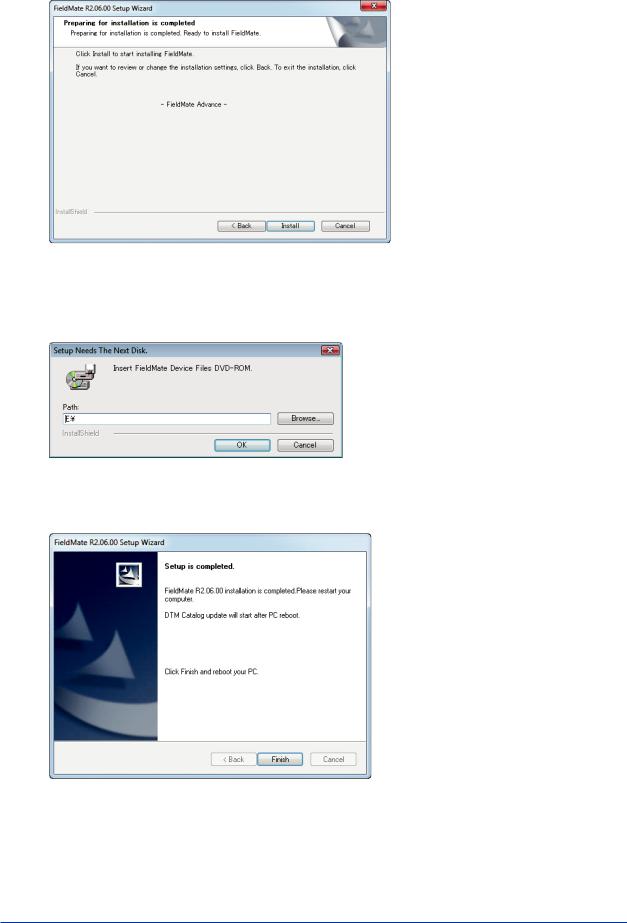
9.Installation will start.
B010310E.ai
Figure B-1-10
10.The Replace Media window appears. Insert the Device Files DVD-ROM. Click “OK” and proceed.
B010311E.ai
Figure B-1-11
11. When the installation is finished, a prompt to restart the PC appears. Restart the PC.
B010312E.ai
Figure B-1-12
IM 01R01A01-01E 9th Edition : May 31, 2013-00
<B Packaging and Installation> |
B-9 |
|
|
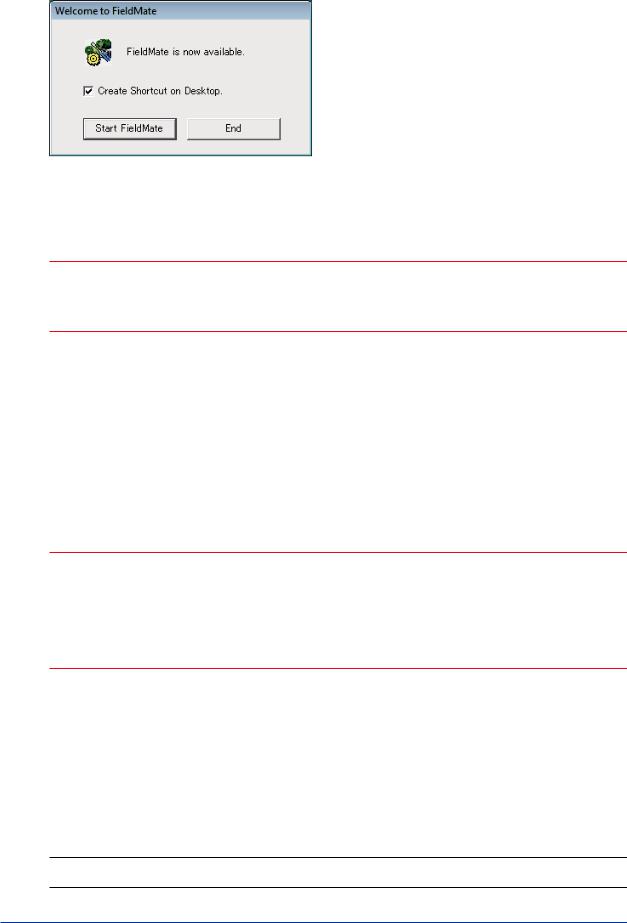
12. After restart PC, the following window is displayed.
B010313E.ai
Figure B-1-13
 NOTE
NOTE
If installation does not start automatically after inserting the FieldMate Media, double-click the following file to execute it.
FieldMate Media\FM\Setup.exe
Objects to be Installed
Contents to be installed automatically
Out of the contents that are packaged in FieldMate R2.06/Device Files R3.05 Media, FieldMate software, USB FieldMate modem driver and Yokogawa device files.
 NOTE
NOTE
The USB FieldMate modem driver is installed automatically.
Check that “Silicon Laboratories CP210x USB to UARTBridge (Driver Removal)” is installed using Programs and Features in the Control Panel.
If the installation is not performed correctly, double-click the following file. FieldMate Media\USB_Modem_Driver\FMModemInstaller.exe
Contents to be selectively installed
Yokogawa device DTM: All DTMs or DTM for each communication protocol can be selected. The object is all Yokogawa device related files for individual communication protocols stored in the
Device Files Media.
Device files (DD/DTM) of other manufacturers: The object is HARTand FOUNDATION fieldbus
DD/DTMs. DD and DTM can be selected for each vendor, model, or revision.
SEE
ALSO For the installation procedure of device file media, refer to Part J, “Adding/Removing DD/DTM.”
IM 01R01A01-01E 9th Edition : May 31, 2013-00

<B Packaging and Installation> |
B-10 |
|
|
Precautions for Installation
•If you are installingAdvance on a PC on which Basic is already installed, you will be prompted to confirm whether to uninstall Basic. Remove Basic automatically and then install
Advance.
•Installation is not possible in any of the following cases.Amessage will appear to notify you that installation is not possible and then the installer will end.
(1)When attempting to install Basic on a PC on which Advanced is already installed. In this case, install Basic after uninstalling Advance.
(2)When attempting to install the FieldMate on a PC on which Plant Resource Manager (PRM) is installed.
(3)When attempting to install the FieldMate on a PC on which Mass Flow Configuration
Software FSA210 is installed.
(4)When Fieldmate BASIC Lite is already installed, uninstall Fieldmate BASIC Lite first before installation.
Uninstall FieldMate
Uninstall FieldMate from Programs and Features in the Control Panel of Windows.
*: When uninstalling FieldMate, device DTMs will not be uninstalled. Uninstall DTMs also from Programs and Features in the
Control Panel of Windows. |
|
|
Table B-1-3 |
FieldMate and Yokogawa Device DTM |
|
|
|
|
|
Programs |
Representation on Add or Remove Programs |
FieldMate |
|
Yokogawa FieldMate |
|
|
|
|
|
HART DTMLibrary |
|
|
|
|
|
Yokogawa BRAIN DTM R1.02 |
|
|
|
|
|
Yokogawa DTMLibrary HART 2013-X |
|
|
|
Device DTM |
Yokogawa DTMLibrary FOUNDATION fieldbus 2013-X |
|
|
|
|
|
|
Yokogawa DTMLibrary PROFIBUS 2013-X |
|
|
|
|
|
Yokogawa Device DTM Library 4.0 |
|
|
|
|
|
Yokogawa ISA100 Communication DTM |
|
|
|
Windows Start Menu Specifications
Start All Programs YOKOGAWA FieldMate
FieldMate
Manuals User Registration and Documents
Tools Device Replacement Tool
DTM Setup |
|
Export FieldMate Info. |
|
FieldMate Setup |
|
PRM Setup |
(Advance Only) |
PRM Synchronization |
(Advance Only) |
Provisioning Device Tool
Software Download for FOUNDATION fieldbus
Start All Programs Yokogawa Device DTM Library Read me
Installed Yokogawa Device DTM List is displayed. Refer to PART J for details.
IM 01R01A01-01E 9th Edition : May 31, 2013-00

<B Packaging and Installation> |
B-11 |
B-1-4 User Registration
Overview of User Registration Procedure
After installing FieldMate, the user is requested to register with us within 30 days, acquire an activation key, and then enter it in FieldMate. This allows you to continue to use it.
You can register usage via our User Registration Web site. When registering, you need to provide the license number and Hard disc serial number (Volume Serial Number) of the PC, drive C, in which FieldMate is installed (8 digit without hyphen).
To obtain the Hard disc serial number, select Start Programs Accessories Command Prompt and input “dir” on the PC in which FieldMate is running.
If you have not yet registered, the dialog shown below appears after the FieldMate Login window.
Indicates the remaining period (30 days to 1 day).
Clicking this button displays the
Entering Activation key dialog.
Clicking this button displays the
 Segment Viewer or History window.
B010401E.ai
Figure B-1-14 User Registration Request Window – 1
If 30 days have passed without entering an activation key, the dialog shown below appears after the FieldMate Login window, then only the User Registration window appears.
B010402E.ai
Figure B-1-15 User Registration Request Window – 2
IM 01R01A01-01E 9th Edition : May 31, 2013-00

<B Packaging and Installation> |
B-12 |
|
|
You can register via the User Registration Web site. Upon registering, you will receive an
Activation key; enter it in the window shown below to continue using FieldMate. This window can be accessed from the User Registration Request window by clicking the Help menu of FieldMate User Registration, or by clicking the Help menu of FieldMate About FieldMate FieldMate Users site.
Click this button to start Internet Explorer and display our User Registration Web site.
Click this button to display the
Entering Activation key dialog.
B010403E.ai
Figure B-1-16 User Registration Window (Registration not Completed Yet)
IM 01R01A01-01E 9th Edition : May 31, 2013-00
<B Packaging and Installation> |
B-13 |
|
|
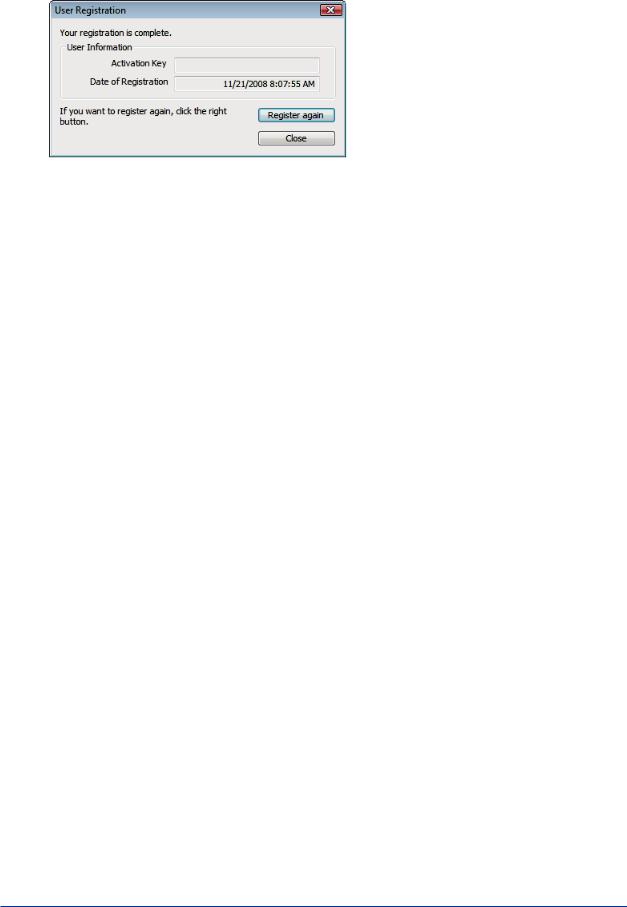
After completing user registration, the window below can be displayed by clicking “User
Registration” in the Help menu of FieldMate.
B010404E.ai
Figure B-1-17 User Registration Window (after Completion of User Registration)
IM 01R01A01-01E 9th Edition : May 31, 2013-00
<B Packaging and Installation> |
B-14 |
B-1-5 About FieldMate
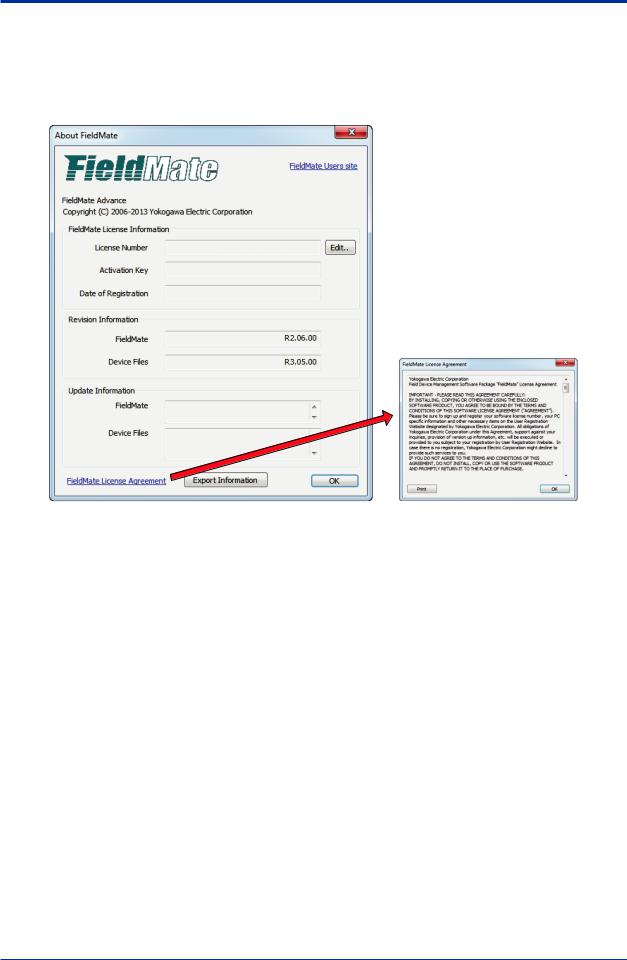
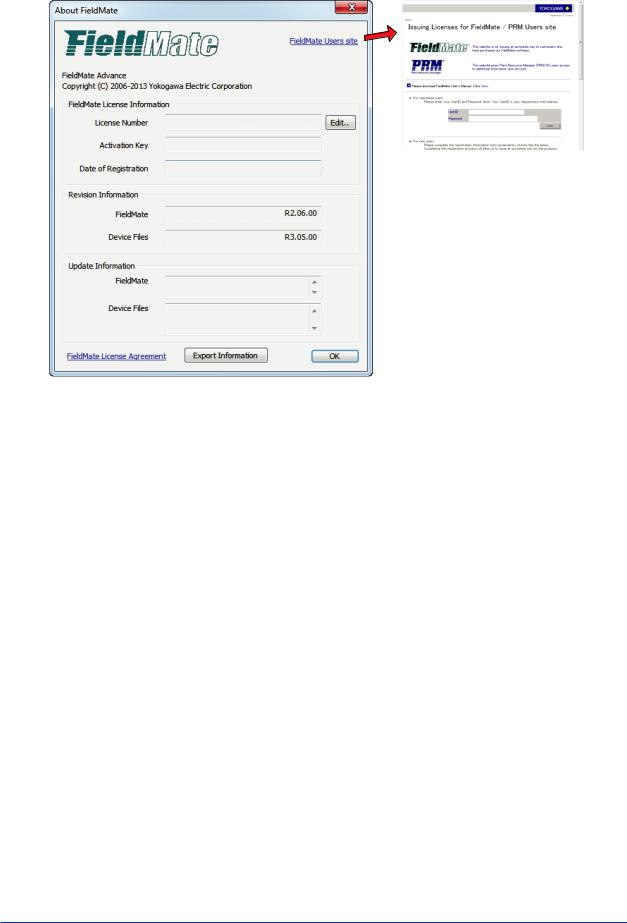
You can display the About FieldMate dialog box by selecting About FieldMate in the Help menu.
1.Click FieldMate License Agreement to display and/or print the Software License Terms (however, they are not editable).
B010501E.ai
Figure B-1-18 |
About FieldMate |
IM 01R01A01-01E 9th Edition : May 31, 2013-00
<B Packaging and Installation> |
B-15 |
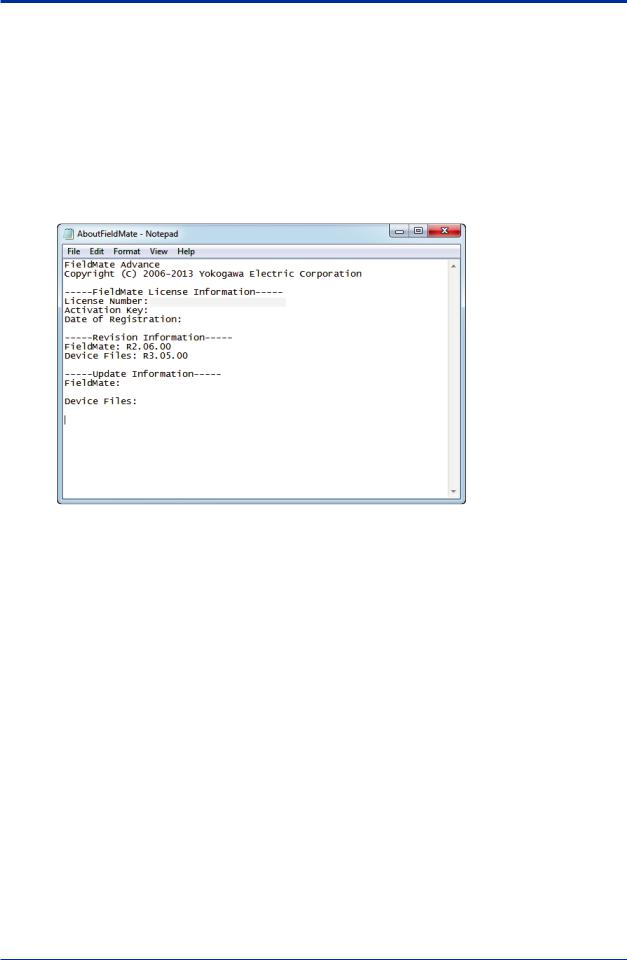
2.The revisions of installed FieldMate/Device Files and the numbers of Update programs applied to them can be displayed and saved.
In the Update programs Information area, the revisions of installed FieldMate/Device Files and the numbers of Update programs applied to them are displayed. The information can be exported to an external file.
To save the information to an external file, click the Export Information button.
•Default file name:AboutFieldMate.txt
•File type: text
Output
It shows an example of the exported information in the AboutFieldMate.txt.
B010503E.ai
Figure B-1-19 Example of the Exported Information in the AboutFieldMate.txt file
IM 01R01A01-01E 9th Edition : May 31, 2013-00
<B Packaging and Installation> |
B-16 |
|
|
3.Click FieldMate Users site to go to the FieldMate Users site.
B010504E.ai
Figure B-1-20 |
About FieldMate |
IM 01R01A01-01E 9th Edition : May 31, 2013-00
Loading...