


PSR-9000 PRO V2
Table of contents
 Loading...

Contents
1. Introduction .................................................................................................................3
2. Important! – Backup Before Installation ................................................................... 4
3. Installing Your New Software...................................................................................... 8
Installing the Main and Sub Programs.................................................................... 8
4. The New Features........................................................................................................ 9
New Split Points ...................................................................................................... 9
New Fingerings..................................................................................................... 10
Stop Accompaniment............................................................................................ 14
Song Chain ........................................................................................................... 14
Next Song Reservation......................................................................................... 15
HD Sleep Time Control......................................................................................... 15
Panel Sustain Rate Control................................................................................... 16
Sustain Mode (new for the PSR-9000) ................................................................. 17
Improved Music Database Display........................................................................ 17
Improved Mixing Console Voice Display ............................................................... 18
Improved Mixing Console Effect Type Display ...................................................... 18
Disk Direct Style Registration ............................................................................... 19
Style Creator & Disk Direct Styles ........................................................................ 20
Style Manager & Preset Styles ............................................................................. 21
5. Power Tips.................................................................................................................. 22
2-note Chords ....................................................................................................... 22
Maintaining Effects When Multitrack Recording.................................................... 22
Single-part Activation............................................................................................ 23
SMF Song Name Converter.................................................................................. 23
Parameter Lock – Reverb Type............................................................................. 24
Reverb Effect Return Level and Parameter Lock .................................................. 24
Selecting an XG Voice ..........................................................................................25
Selecting a Voice/Style/Song/Reg.Memory via PC Keyboard............................... 25
Program Change Display...................................................................................... 25
Song Chord Detection .......................................................................................... 26
Instant Access to Any Function Menu................................................................... 26
Revoice................................................................................................................. 28
Tap Tempo Sound ................................................................................................. 28
Reducing Mic Sibilance ........................................................................................ 28
Mic Compressor.................................................................................................... 29
Vocal Harmony Mode............................................................................................ 29
Talk Button ............................................................................................................ 30
Password .............................................................................................................. 30
Simultaneous Parameter Change......................................................................... 31
Keyboard Transpose and Song Transpose............................................................ 31
Using Multi Pads to Change Scale Tuning ............................................................ 32
Song File Directory ...............................................................................................32
Song Selection via Registration Memory.............................................................. 32
Touch Limit for Harmony/Echo.............................................................................. 33
Sub Line Out......................................................................................................... 33
Register Bank View............................................................................................... 34
Auto Exit Time....................................................................................................... 34
MIDI Templates .....................................................................................................35
Using the MFC10 with the 9000 ........................................................................... 35
2
1. Introduction
Although the PSR-9000 and 9000Pro are two of the most powerful music workstations
available, this software update adds even more features and power.
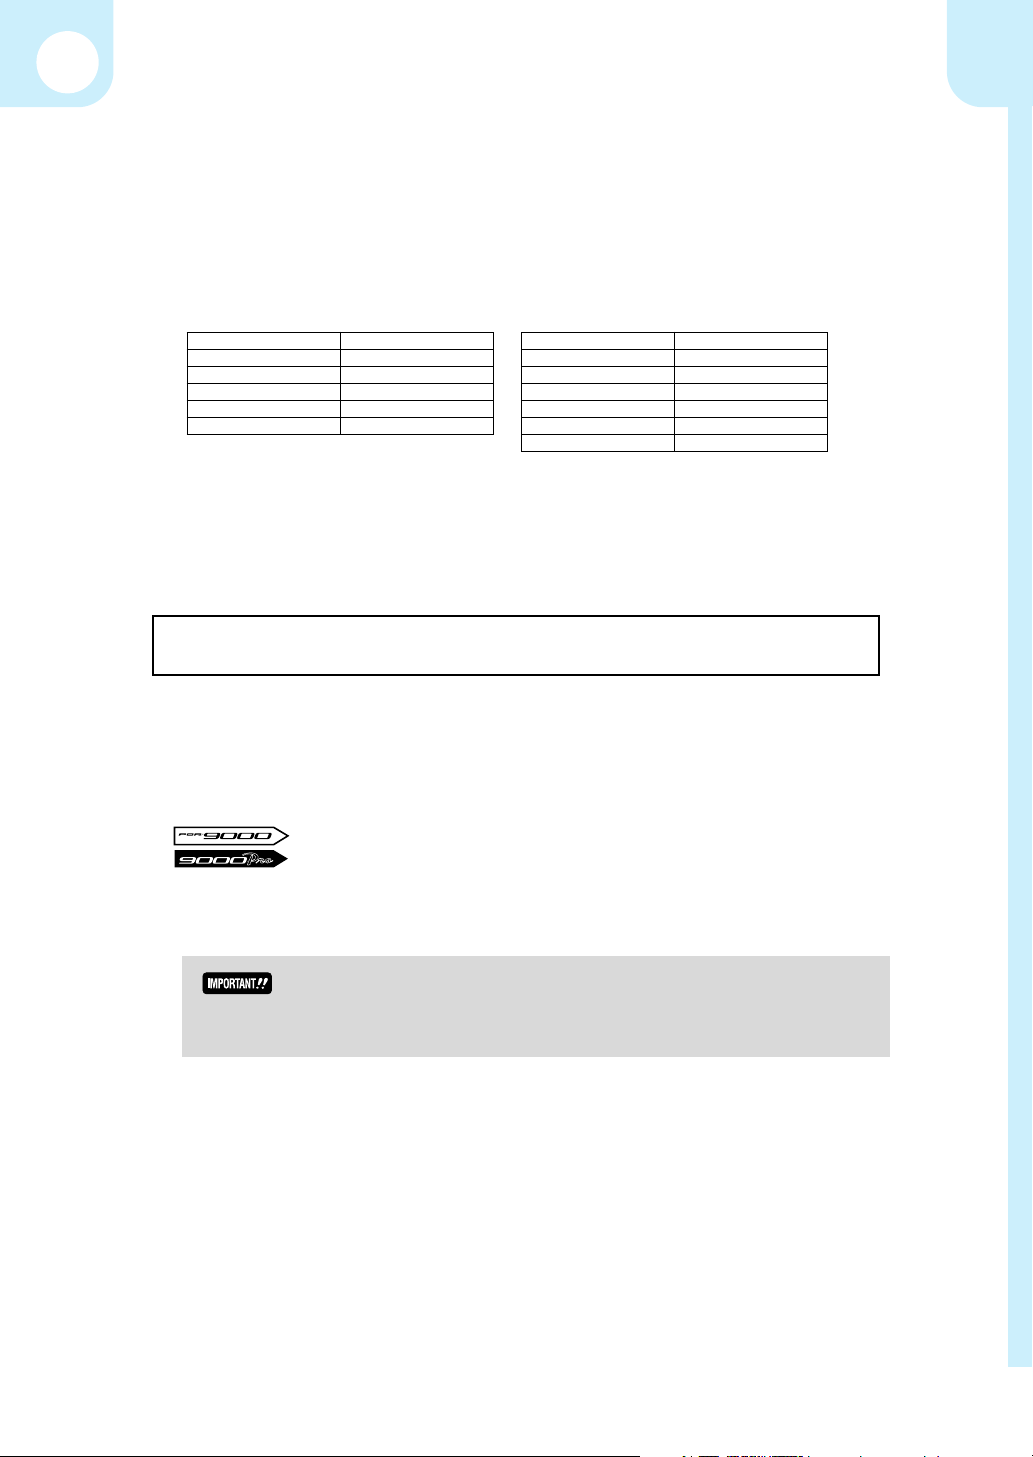
Before we move on to the installation procedure, make sure that the following floppy
disks have been prepared. If you do not have them yet, download the necessary files
from the Yamaha PK Club web site (http://www.yamahaPKclub.com/).
PSR-9000 9000Pro
Disk Name File Name Disk Name File Name
MAIN PROGRAM 1 p9000m.001 MAIN PROGRAM 1 p9000pm.001
MAIN PROGRAM 2 p9000m.002 MAIN PROGRAM 2 p9000pm.002
MAIN PROGRAM 3 p9000m.003 MAIN PROGRAM 3 p9000pm.003
MAIN PROGRAM 4 p9000m.004 MAIN PROGRAM 4 p9000pm.004
SUB PROGRAM p9000s.bin MAIN PROGRAM 5 p9000pm.005
About the Example Displays In This Manual ............
Although the PSR-9000 and 9000Pro allow you to select displays in a number of languages, the
example displays shown in this manual are all in English.
The illustrations and displays as shown in this owner’s manual are for instructional
purposes only, and may be different from your instrument.
SUB PROGRAM p9000ps.bin
Page References ..................................................
In many cases this manual will refer you to specific pages in the PSR-9000 or 9000Pro Owner’s
Manual. Such references will be indicated as follows:
page xx
page xx
• If you’re not thoroughly familiar with the handling and use of floppy disks, please refer to the precautions on page 5 of the PSR-9000 or 9000Pro Owner’s Manual.
3

2. Important! – Backup Before Installation
If you have made any changes to the Flash Style, OTS, or Music Database contents
that you want to keep, we recommend that you back up your data to floppy disk before
installing the new software.
You’ll need one or two blank floppy disks for this!
Also, the new operating system allots 30 kilobytes more Custom Voice memory than
preceding operating system software. We recommend that you back up the Custom
Voice data if you’re upgrading from a previous operating, but in the case that you want
to re-install a previous operating system after upgrading, you will definitely need to use
the Save To Disk function to save any Custom Voice data you want to keep to disk (the
amount of Custom Voice memory will be reduced and thus the Custom Voice memory
will be initialized).
page 129
page 153
If you haven’t made any changes to the settings listed above, or don’t want to keep any
changes you’ve made, you can skip straight ahead to “Installing Your New Software”
on page 8.
Backing Up Your Data............................................
There are several ways to back up your data, depending on the types of changes you have made and
the data you want to keep. Look over the options presented below and choose the one that best suits
your backup requirements.
All Data
This method will let you back up any combination of Setup, Style, OTS, Music Database, Registration, and Multi Pad data. This backup option uses the Disk/SCSI Backup function.
page 130
page 154
1.
Press the [DISK/SCSI] button.
2.
Press the LCD [D] button (BACKUP/RESTORE).
3.
Press the LCD [A] button (BACKUP).
2. 3.
A
B
C
D
E
A
B
C
D
E
MENU
DISK
/
SCSI
MIDIFUNCTION
4
2. Important! – Backup Before Installation
2. Important! – Backup Before Installation
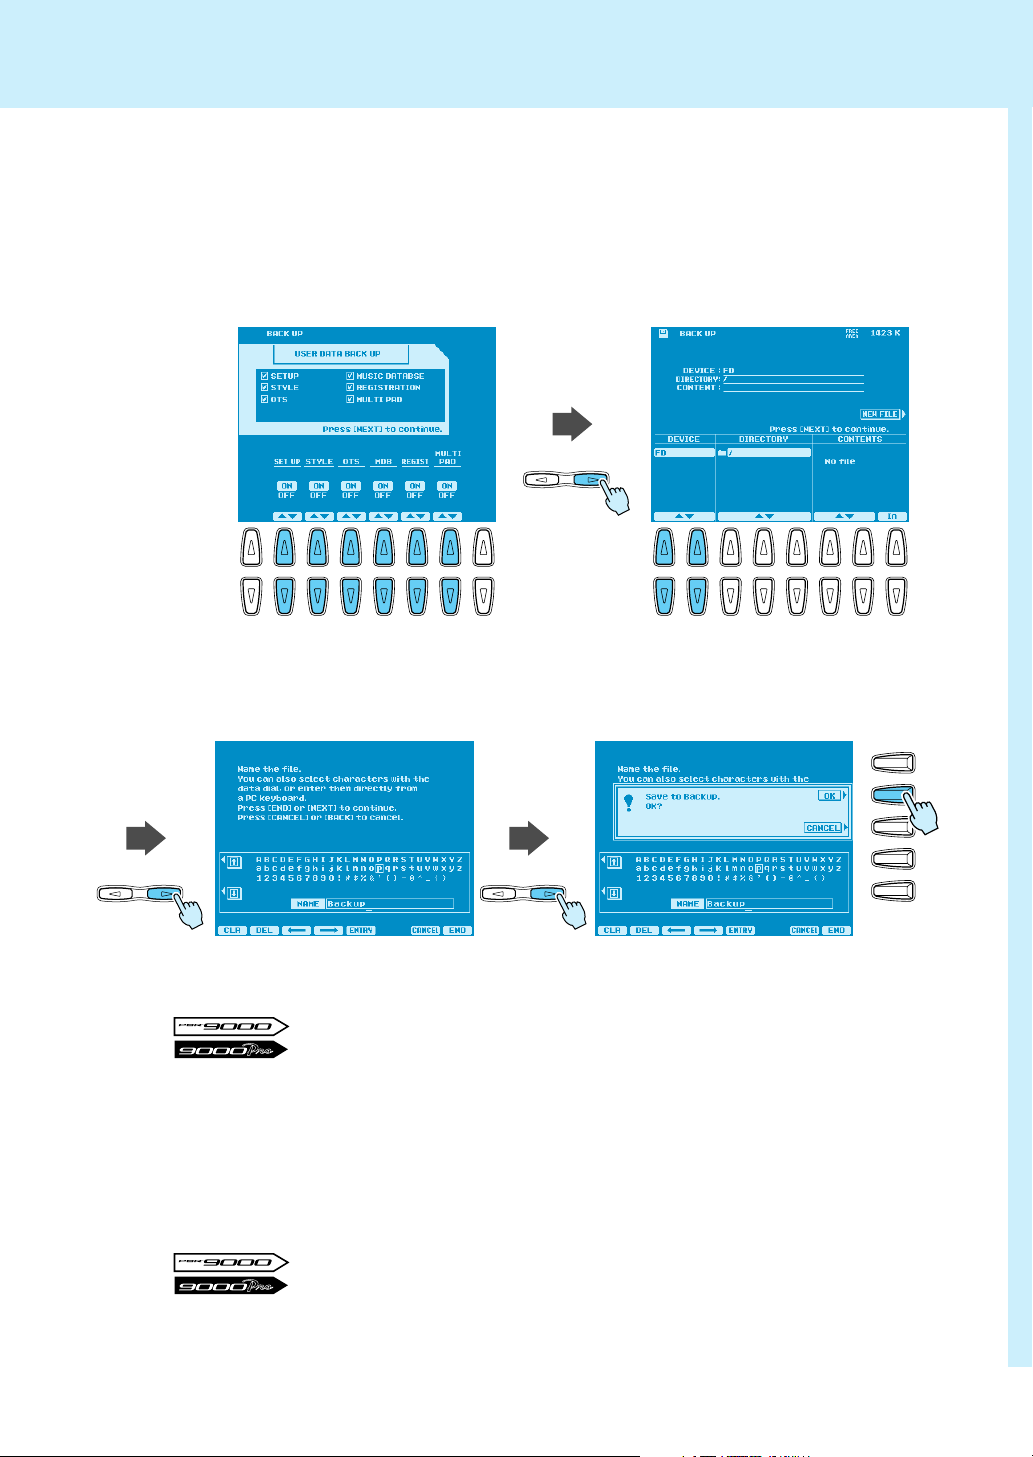
4.
Use the LCD [2] ~ [7] buttons to select the types of data you want to back up.
5.
Press the [NEXT] button and, when applicable, use the LCD [1]/[2] buttons to select
the disk you want to back up to (if you’re backing up to floppies a blank floppy disk
which is not write protected must be present in the floppy disk drive). If you choose to
back up to hard disk, you may also need to select the directory to which the data will
be saved.
4. 5.
PAGE CONTROL
NEXTBACK
1234567812345678
Press the [NEXT] button and enter an appropriate name for your backup file.
6.
7.
Press the [NEXT] button and then the LCD [G] button (OK) to save the selected data to
the specified disk.
6. 7.
PAGE CONTROL
NEXTBACK
PAGE CONTROL
NEXTBACK
After installing the new software you can use the Restore function to reload the saved data.
page 130
page 154
Individual Flash Styles
If you only have a few Flash Styles you need to back up, the “All Data” method described above
might not be what you need. Here’s how you can backup individual Flash Styles, or a group of
Flash Styles as required.
This backup option uses the Save Style From Flash ROM function.
page 63
page 75
F
G
H
I
J
5

2. Important! – Backup Before Installation
2. Important! – Backup Before Installation
1.
Press any FLASH STYLE button.
2.
Press the LCD [7] or [8] button to go to the STYLE MANAGER.
3.
Press the LCD [B] button to select the SAVE STYLE FROM FLASH ROM function.
2. 3.
12345678
A
B
C
D
E
Use the LCD [3]/[4] buttons to select the Flash Style category containing the styles you
4.
want to back up.
A
B
5. 6.
Use the LCD [C] button to choose whether you want to back up a single style (SIN-
5.
C
D
E
12345678
4.
5.
F
G
H
I
J
GLE), a group of adjacent styles in the style list (MULTI), or all styles in the selected category (ALL). If you selected “SINGLE” use the LCD [5]/[6] buttons to select the style
you want to back up. If you selected “MULTI” use the LCD [5]/[6] buttons to expand
the highlighted region in the STYLE list to include all the styles you want to back up. If
you selected “ALL” all styles in the list will automatically be highlighted.
Use the LCD [H] button to choose whether you want to save the selected styles with or
6.
without OTS data.
6

2. Important! – Backup Before Installation
2. Important! – Backup Before Installation
7.
Press the [NEXT] button and, when applicable, use the LCD [1]/[2] buttons to select
the disk you want to back up to (if you’re backing up to floppies a blank floppy disk
which is not write protected must be present in the floppy disk drive). If you choose to
back up to hard disk, you may also need to select the directory to which the data will
be saved.
PAGE CONTROL
NEXTBACK
12345678
8.
Press the [NEXT] button and then the LCD [G] button (YES) to save the selected data to
the specified disk
F
G
H
PAGE CONTROL
NEXTBACK
I
J
After installing the new software you can use the Load Style Into Flash ROM function to reload the
saved data.
page 62
page 74
Using the Registration Memory To Save Music Database Settings
Although all Music Database data can be saved by using the “All Data” method described above,
individual Music Database settings cannot be saved to disk. A convenient way to backup Music
Database settings is to save them to the Registration Memory.
page 28
page 28
7

3. Installing Your New Software
Once you’ve backed up any personal data you want to keep, as described in the preceding section, you can go ahead and install the new operating system.
Installing the Main and Sub Programs
• Don’t turn off the power during the software installation process! Also, don’t eject any of the program disks while they are loading! Doing so can result in incomplete and/or corrupted data,
requiring complete system re-installation.
1.
Turn the 9000 power ON while holding the [START/
STOP] button. The PROGRAM INSTALLER page will
appear.
Press the LCD [B] button to begin the MAIN PROGRAM
2.
load procedure.
START/STOP
POWER
ON OFF
A
2.
5.
3.
Insert the MAIN PROGRAM 1 disk and press the [START/
B
C
D
E
STOP] button. Wait until the first disk is loaded, then follow the instructions on the LCD and insert/load the
remaining MAIN PROGRAM disks in the same way
(always be sure to insert the disk specified by the
instructions on the LCD).
4.
When the main program has been fully loaded “Completed” will appear on the LCD.
Press the [EXIT] button to return to the PROGRAM INSTALLER menu.
5.
Press the LCD [C] button to begin the SUB PROGRAM load procedure.
6.
Insert the SUB PROGRAM disk and press the [START/STOP] button, then wait for the
SUB PROGRAM is fully loaded.
7.
When “Completed” appears on the LCD, press the [EXIT] button twice. The 9000 will
restart with the new operating system.
• The display may flicker a little when the 9000 is restarted under the new operating system — this is normal.
8

4. The New Features
New Split Points ...................................................
Previous versions of the operating system allowed one split point to be specified to separate the
auto-accompaniment/left-hand section and the right-hand section of the keyboard. The new operating system allows three split points:
●
ACMP SPLIT POINT
Separates the auto-accompaniment section of the keyboard from the left- and right-hand
sections.
●
LEFT SPLIT POINT
Separates the left- and right-hand sections of the keyboard.
●
RIGHT 3 SPLIT POINT
Allows a separate split point to be specified for the R3 voice. This means that you could,
for example, assign only the top octave of the keyboard to a percussion or sound-effect
voice.
Access: [FUNCTION] ➔ SPLIT POINT/FINGERING
You can set the split points by
pressing the desired key while
holding the corresponding
LCD button.
Use the appropriate LCD buttons to set the split points as required, or use the DIRECT SETTING
functions to directly specify the corresponding split point via the keyboard.
• The “A” (ACMP) split point cannot be set higher than the “L” (LEFT) or “R” (RIGHT 3) split point, and vice
versa. In the same way the “R” split point cannot be set lower than the “L” or “A” split point.
• When the “L” and “A” split points are set at different keys, the LEFT voice can be played between the “L”
and “A” split points when the Auto Accompaniment function is on. When the “L” and “A” split points are set
to the same key, the LEFT voice can be played anywhere to the left of the “L” and “A” split points.
9
4. The New Features
New Fingerings ....................................................
New fingerings have been added for even greater auto-accompaniment versatility. The available
fingering modes are listed below.
●
Single Finger
Same as in previous versions.
●
Multi Finger
Same as in previous versions.
●
Fingered
This is the most standard fingering mode including two-note fingerings as shown in the fingering
chart on pages 11 and 12.
●
Fingered Advanced
This mode is ideal for jazz-type chord voicings
which omit the root and/or 5th. The Fingered
Advanced mode also allows two-note fingerings.
See the fingering chart on pages 12 and 13 for
details.
●
Fingered Pro
Chords are only detected (changed) when three
or more notes are played. This makes it possible
to play one- or two-note lines (e.g. obbligato or
riff melody) with the left part without causing a
chord change.
●
Fingered Pro Advanced
This is a “pro” version of the Fingered Advanced
mode — i.e. chords are only detected when three
or more notes are played.
●
On Bass
The lowest note played becomes the bass note.
All other fingerings are the same as in the Fingered mode.
●
On Bass Advanced
The lowest note played becomes the bass note.
All other fingerings are the same as in the Fingered Advanced mode.
●
On Bass Pro
The lowest note played becomes the bass note.
All other fingerings are the same as in the Fingered Pro mode.
●
On Bass Pro Advanced
The lowest note played becomes the bass note.
All other fingerings are the same as in the Fingered Pro Advanced mode.
●
Full Keyboard
Fingerings are the same as in the Fingered
Advanced mode, but chord detection occurs over
the entire keyboard. Arpeggios are not supported
in this mode.
●
AI Full Keyboard (9000Pro Only)
This Full Keyboard mode is suitable for the
piano performance with the both hands (e.g.
arpeggios and melody). Chords can be presumed
even one or two notes are played. There is a limit
to the types of chords that can be detected. See
the fingering chart of the Fingered Advanced
mode on page 13.
• This fingering mode may not be suitable for some
performance.
10
• Notes in parentheses can be omitted.
• If you play any three adjacent keys (including black keys), the chord sound will be canceled and only the
rhythm instruments will continue playing (Chord Cancel function).
• The chord fingerings listed are all in “root” position, but other inversions can be used – with the exceptions
described on Note column.
• The auto accompaniment will sometimes not change when related chords are played in sequence (e.g.
some minor chords followed by the minorseventh).
• Two-note fingerings will produce a chord based on the previously played chord.
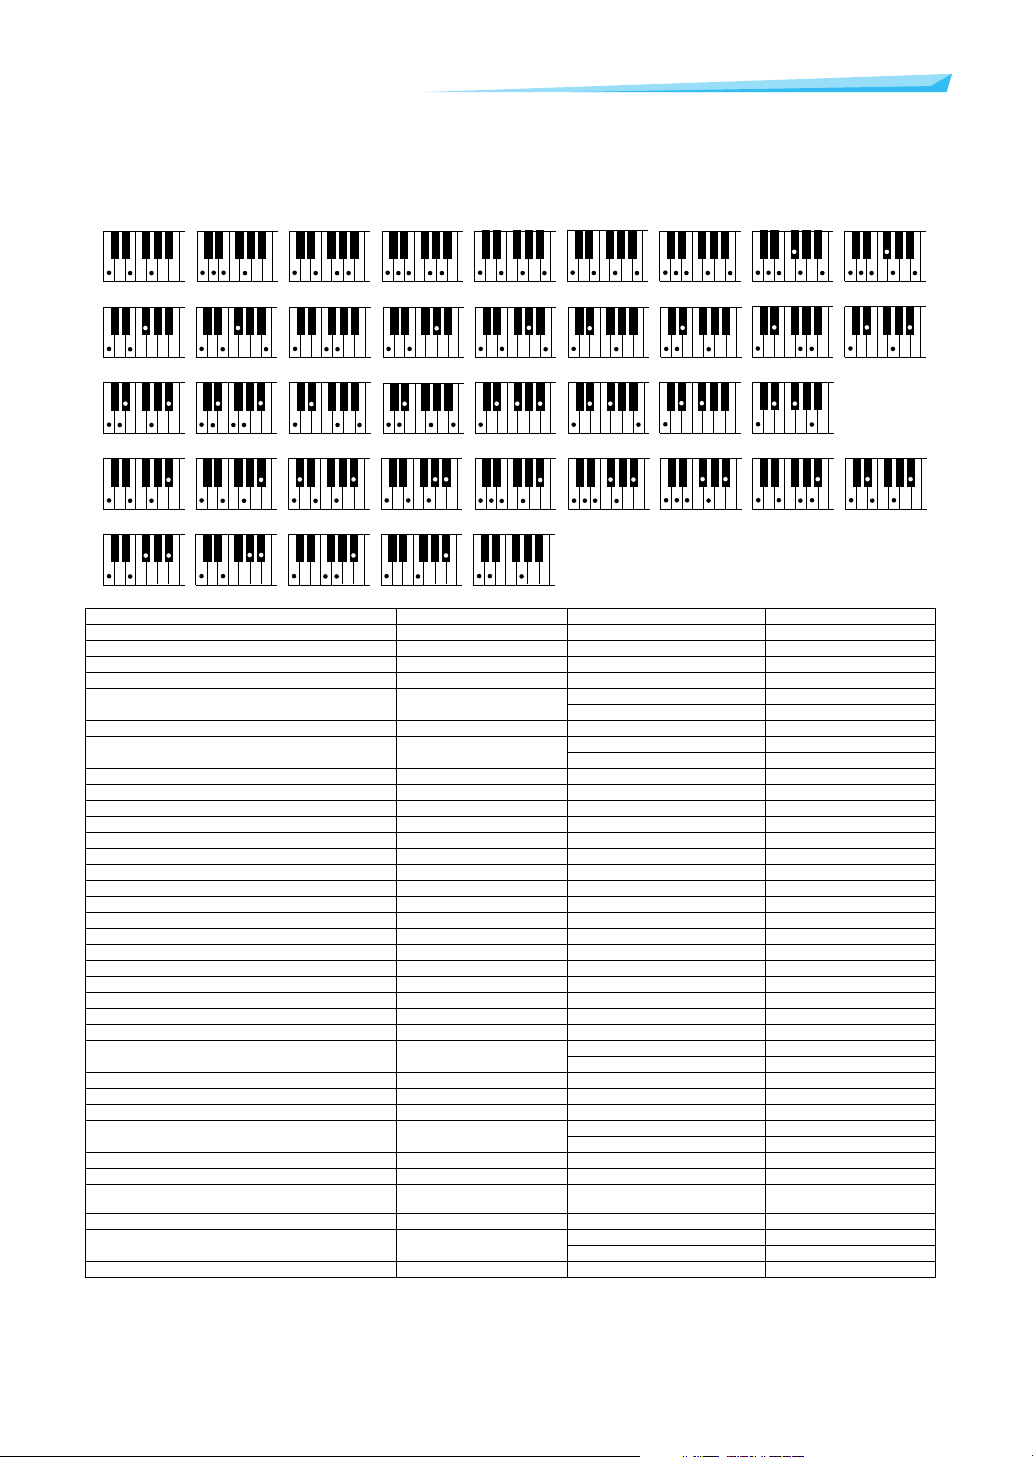
■
Chord Types Recognized in the Fingered Mode
●
Example for “C” chords
(9)
C
C
C
6
(9)
C
6
CM or
4. The New Features
(9)
CM
7
7
(#11)
CMCM or
7
(b5)
C
(9)
Cm
7
( )
C or
7
( )
b5
C
7
CM
7
Cm
7
( )
( )
C aug
7
Cm
Cdim
( )
(9)
( )
( )
b5
(
11)
Csus
CmM
( )
(b9)
C
7
C sus or
7
4
7
( )
( )
4
Caug
CmM
C
7
(b13)
( )
(9)
7
( )
CM aug
7
( )
b5
Cm
7
(9)
C
7
C
1+2+5
( )
( )
( )
Cm
b5
CmM
7
(#11)
C or
7
( )
( )
Cm
Cdim
(13)
C
7
6
Cm
7
C
7
( )
Chord Name [Abbreviation] Display for root “C” Normal Voicing Note
Major [M] C 1 - 3 - 5
Add ninth [(9)] C(9) 1 - 2 - 3 - 5
Sixth [6] C6 1 - (3) - 5 - 6 Root position only
Sixth ninth [6(9)] C6(9) 1 - 2 - 3 - (5) - 6 Root position only
Major seventh [M7] CM7
Major seventh ninth [M7(9)] CM7(9) 1 - 2 - 3 - (5) - 7
Major seventh add sharp eleventh [M7(
Flatted fifth [(
Major seventh flatted fifth [M7
Suspended fourth [sus4] Csus4 1 - 4 - 5 Root position only
Augmented [aug] Caug 1 - 3 -
b
5)] C(b5) 1 - 3 - b5
#
11)] CM7#11
b
5] CM7b5 1 - 3 - b5 - 7
Major seventh augmented [M7aug] CM7aug 1 - (3) Minor [m] Cm 1 Minor add ninth [m(9)] Cm(9) 1 - 2 Minor sixth [m6] Cm6 1 Minor seventh [m7] Cm7 1 Minor seventh ninth [m7(9)] Cm7(9) 1 - 2 Minor seventh eleventh [m7(11)] Cm7_11 1 - (2) Minor major seventh [mM7] CmM7 1 Minor major seventh ninth [mM7(9)] CmM7_9 1 - 2 Minor seventh flatted fifth [m7
Minor major seventh flatted fifth [mM7
Diminished [dim] Cdim 1 -
b
5] Cm7b5 1 - b3 - b5 - b7 Except 1st inversion
b
5] CmM7b5 1 - b3 - b5 - 7
Diminished seventh [dim7] Cdim7 1 -
Seventh [7] C7
Seventh flatted ninth [7(
Seventh add flatted thirteenth [7(
Seventh ninth [7(9)] C7(9) 1 - 2 - 3 - (5) -
b
9)] C7(b9) 1 - b2 - 3 - (5) - b7
b
13)] C7b13 1 - 3 - 5 - b6 - b7
Seventh add sharp eleventh [7(#11)] C7#11
Seventh add thirteenth [7(13)] C7(13) 1 - 3 - (5) - 6 - b7
Seventh sharp ninth [7(#9)] C7(#9) 1 - #2 - 3 - (5) - b7
Seventh flatted fifth [7b5] C7b5 1 - 3 - b5 - b7
Seventh augmented [7aug] C7aug 1 - 3 - #5 - b7
Seventh suspended fourth [7sus4] C7sus4
One plus two plus five [1+2+5] C1+2+5 1 - 2 - 5 Root position only
1 - 3 - (5) - 7
1 - (3) - 5 - 7
#
1 - (2) - 3 1 - 2 - 3 -
1 - 3 - (5) 1 - (3) - 5 -
1 - (2) - 3 - #4 - 5 - b7
1 - 2 - 3 - #4 - (5) - b7
1 - 4 - 5 - b7
1 - 4 - b7 Root position only
4 - 5 - 7
#
4 - (5) - 7
#
5 Root position only
#
5 - 7
b
3 - 5
b
3 - 5
b
3 - 5 - 6 Root position only
b
3 - (5) - b7 Except 1st inversion
b
3 - (5) - b7
b
3 - 4 - 5 - (b7) Except 1st inversion
b
3 - (5) - 7
b
3 - (5) - 7
b
3 - b5
b
3 - b5 - 6 Root position only
b
7
b
7
b7
The lowest note can be the
root note or b7th note.
( )
7
( )
(#9)
( )
11
Loading...