


SPECIAL MESSAGE SECTION
This product utilizes batteries or an external power supply (adapter). DO NOT connect this product to any power supply or adapter other than one described in the manual, on the name plate, or specifically recommended by Yamaha.
This product should be used only with the components supplied or; a cart, rack, or stand that is recommended by Yamaha. If a cart, etc., is used, please observe all safety markings and instructions that accompany the accessory product.
SPECIFICATIONS SUBJECT TO CHANGE:
The information contained in this manual is believed to be correct at the time of printing. However, Yamaha reserves the right to change or modify any of the specifications without notice or obligation to update existing units.
This product, either alone or in combination with an amplifier and headphones or speaker/s, may be capable of producing sound levels that could cause permanent hearing loss. DO NOT operate for long periods of time at a high volume level or at a level that is uncomfortable. If you experience any hearing loss or ringing in the ears, you should consult an audiologist.
IMPORTANT: The louder the sound, the shorter the time period before damage occurs.
NOTICE:
Service charges incurred due to a lack of knowledge relating to how a function or effect works (when the unit is operating as designed) are not covered by the manufacturer’s warranty, and are therefore the owners responsibility. Please study this manual carefully and consult your dealer before requesting service.
ENVIRONMENTAL ISSUES:
Yamaha strives to produce products that are both user safe and environmentally friendly. We sincerely believe that our products and the production methods used to produce them, meet these goals. In keeping with both the letter and the spirit of the law, we want you to be aware of the following:
Battery Notice:
This product MAY contain a small non-rechargeable battery which (if applicable) is soldered in place. The average life span of this type of battery is approximately five years. When replacement becomes necessary, contact a qualified service representative to perform the replacement.
This product may also use “household” type batteries. Some of these may be rechargeable. Make sure that the battery being charged is a rechargeable type and that the charger is intended for the battery being charged.
When installing batteries, do not mix batteries with new, or with batteries of a different type. Batteries MUST be installed correctly. Mismatches or incorrect installation may result in overheating and battery case rupture.
Warning:
Do not attempt to disassemble, or incinerate any battery. Keep all batteries away from children. Dispose of used batteries promptly and as regulated by the laws in your area. Note: Check with any retailer of household type batteries in your area for battery disposal information.
Disposal Notice:
Should this product become damaged beyond repair, or for some reason its useful life is considered to be at an end, please observe all local, state, and federal regulations that relate to the disposal of products that contain lead, batteries, plastics, etc. If your dealer is unable to assist you, please contact Yamaha directly.
NAME PLATE LOCATION:
The name plate is located on the bottom of the product. The model number, serial number, power requirements, etc., are located on this plate. You should record the model number, serial number, and the date of purchase in the spaces provided below and retain this manual as a permanent record of your purchase.
Model
Serial No.
Purchase Date
92-BP (bottom) PLEASE KEEP THIS MANUAL
2
PRECAUTIONS
PLEASE READ CAREFULLY BEFORE PROCEEDING
* Please keep these precautions in a safe place for future reference.
 WARNING
Always follow the basic precautions listed below to avoid the possibility of serious injury or even death from electrical shock, short-circuiting, damages, fire or other hazards. These precautions include, but are not limited to, the following:
•Do not open the instrument or attempt to disassemble the internal parts or modify them in any way. The instrument contains no user-serviceable parts. If it should appear to be malfunctioning, discontinue use immediately and have it inspected by qualified Yamaha service personnel.
•Do not expose the instrument to rain, use it near water or in damp or wet conditions, or place containers on it containing liquids which might spill into any openings.
•If the AC adaptor cord or plug becomes frayed or damaged, or if there is a sudden loss of sound during use of the instrument, or if any unusual smells or smoke should appear to be caused by it, immediately turn off the power switch, disconnect the adaptor plug from the outlet, and have the instrument inspected by qualified Yamaha service personnel.
•Use the specified adaptor (PA-6 or an equivalent recommended by Yamaha) only. Using the wrong adaptor can result in damage to the instrument or overheating.
•Before cleaning the instrument, always remove the electric plug from the outlet. Never insert or remove an electric plug with wet hands.
•Check the electric plug periodically and remove any dirt or dust which may have accumulated on it.
 CAUTION
Always follow the basic precautions listed below to avoid the possibility of physical injury to you or others, or damage to the instrument or other property. These precautions include, but are not limited to, the following:
•Do not place the AC adaptor cord near heat sources such as heaters or radiators, and do not excessively bend or otherwise damage the cord, place heavy objects on it, or place it in a position where anyone could walk on, trip over, or roll anything over it.
•When removing the electric plug from the instrument or an outlet, always hold the plug itself and not the cord.
•Do not connect the instrument to an electrical outlet using a multipleconnector. Doing so can result in lower sound quality, or possibly cause overheating in the outlet.
•Unplug the AC power adaptor when not using the instrument, or during electrical storms.
•Always make sure all batteries are inserted in conformity with the +/- polarity markings. Failure to do so might result in overheating, fire, or battery fluid leakage.
•Always replace all batteries at the same time. Do not use new batteries together with old ones. Also, do not mix battery types, such as alkaline batteries with manganese batteries, or batteries from different makers, or different types of batteries from the same maker, since this can cause overheating, fire, or battery fluid leakage.
•Do not dispose of batteries in fire.
•Do not attempt to recharge batteries that are not intended to be charged.
•If the instrument is not to be in use for a long time, remove the batteries from it, in order to prevent possible fluid leakage from the battery.
•Keep batteries away from children.
•Before connecting the instrument to other electronic components, turn off the power for all components. Before turning the power on or off for all components, set all volume levels to minimum. Also, be sure to set the volumes of all components at their minimum levels and gradually raise the volume controls while playing the instrument to set the desired listening level.
•Do not expose the instrument to excessive dust or vibrations, or extreme cold or heat (such as in direct sunlight, near a heater, or in a car during the day) to prevent the possibility of panel disfiguration or damage to the internal components.
•Do not use the instrument near other electrical products such as televisions, radios, or speakers, since this might cause interference which can affect proper operation of the other products.
•Do not place the instrument in an unstable position where it might accidentally fall over.
•Before moving the instrument, remove all connected adaptor and other cables.
•When cleaning the instrument, use a soft, dry cloth. Do not use paint thinners, solvents, cleaning fluids, or chemical-impregnated wiping cloths. Also, do not place vinyl, plastic or rubber objects on the instrument, since this might discolor the panel or keyboard.
•Do not rest your weight on, or place heavy objects on the instrument, and do not use excessive force on the buttons, switches or connectors.
•Use only the stand/rack specified for the instrument. When attaching the stand or rack, use the provided screws only. Failure to do so could cause damage to the internal components or result in the instrument falling over.
•Do not place objects in front of the instrument's air vent, since this may prevent adequate ventilation of the internal components, and possibly result in the instrument overheating.
•Do not operate the instrument for a long period of time at a high or uncomfortable volume level, since this can cause permanent hearing loss. If you experience any hearing loss or ringing in the ears, consult a physician.
■SAVING USER DATA
•Always save data to a floppy disk frequently, in order to help prevent the loss of important data due to a malfunction or user operating error.
Yamaha cannot be held responsible for damage caused by improper use or modifications to the instrument, or data that is lost or destroyed.
Always turn the power off when the instrument is not in use. Make sure to discard used batteries according to local regulations.
(4)-4
3
1

Congratulations!
You are the proud owner of a fine electronic keyboard. The Yamaha PSR-540 PortaTone combines the most advanced tone generation technology with state-of-the- art digital electronics and features to give you stunning sound quality with maximum musical enjoyment. A large graphic display and easy-to-use interface also greatly enhance the operability of this advanced instrument. In order to make the most of your PortaTone’s features and extensive performance potential, we urge you to read the manual thoroughly while trying out the various features described. Keep the manual in a safe place for later reference.
Packing List
Please check that these items have been packed with your PSR-540.
• PSR-540 |
• Music Stand (page 14) |
• Sample Disk |
|
|
• Owner’s Manual |
|||
|
|
|
|
|
|
|
|
|
|
|
|
|
|
|
|
|
|
|
|
|
|
|
|
|
|
|
|
|
|
|
|
|
|
|
|
|
|
|
|
|
|
4
2
How to use the manual
Setting Up
Important Features
Basic Operation
Contents
Panel Controls
Panel Display Indications
Function Tree
Appendix
Troubleshooting
Index
page 12
Before going on to any other part of the manual, we strongly suggest you read this section first. It shows you how to get started playing and using your new PSR-540.
page 8
Once you’ve set up the PSR-540, you should read through this section
— and explore the relevant page references — to familiarize yourself with the enormous variety of features and functions of the PSR-540.
page 17
This section introduces you to the basic operating conventions of the PSR-540, such as editing values and changing settings, and shows you how to use the convenient Help and Direct Access functions.
page 6
All topics, features, functions and operations are listed here in the order they appear in the manual, for easy reference.
page 10
Use this section to find out about all of the buttons and controls of the PSR-540.
page 16
This section explains the display indications of the PSR-540 and how to read them for optimum operation.
page 22
This lists all functions of the PSR-540 according to their hierarchical structure, letting you easily see the relationship of the various functions and quickly locate desired information.
page 131
This contains various important lists such as the Voice list, Preset Style list, Effect list, MIDI data format and MIDI implementation chart.
page 134
If the PSR-540 does not function as expected or you have some problem with the sound or operation, consult this section before calling your Yamaha dealer or service center. Most common problems and their solutions are covered here in a very simple and easy-to-under- stand way.
page 152
This section alphabetically lists virtually all topics, features, functions and operations with their respective page numbers, letting you quickly and easily find the information you need.
The illustrations and LCD screens as shown in this owner’s manual are for instructional purposes only, and may be different from your instrument.
5
3

Contents
Packing List |
4 |
How to use the manual |
5 |
Important Features |
8 |
Panel logos ................................................... |
9 |
Panel Controls and Terminals |
10 |
Top Panel Controls ..................................... |
11 |
Rear Panel Controls ................................... |
11 |
Setting Up |
12 |
Power supply connections ..................................... |
12 |
Connecting a footswitch ......................................... |
13 |
Audio equipment connections ................................ |
13 |
Connecting external MIDI devices ......................... |
14 |
Music stand ................................................ |
14 |
Demo Song Playback |
15 |
Panel Display Indications |
16 |
Basic Operation |
17 |
Calling up the Operation Displays .......................... |
17 |
How to Read the Menu/Message Display and |
|
“Easy Navigator”............................................... |
18 |
Menu Selection ...................................................... |
19 |
Changing (Editing) Values ..................................... |
20 |
Naming .................................................................. |
21 |
Direct Access ......................................................... |
21 |
Function Tree |
22 |
Direct Access Chart ................................... |
24 |
Mode |
25 |
Style Mode ............................................................. |
25 |
Song Mode ............................................................ |
25 |
Record Mode ......................................................... |
25 |
Disk Mode .............................................................. |
25 |
6
Playing Voices |
26 |
Selecting a Voice ................................................... |
26 |
Playing Two Voices (R1, R2) Simultaneously ......... |
27 |
Playing Different Voices with |
|
the Left (L) and Right (R1, R2) Hands ............. |
28 |
Functions of the Keyboard ..................................... |
29 |
Transpose .............................................................. |
30 |
Pitch Bend Wheel .................................................. |
30 |
Sustain ................................................................... |
30 |
Keyboard Percussion ............................................. |
31 |
Auto Accompaniment |
32 |
Using Auto Accompaniment (rhythm track only) .... |
32 |
Using Auto Accompaniment (all tracks) ................. |
33 |
Accompaniment Sections ...................................... |
34 |
Tempo/Tap ............................................................. |
36 |
Accompaniment Track Muting ................................ |
37 |
Accompaniment Volume Control ............................ |
37 |
Chord Fingerings ................................................... |
38 |
Accompaniment Split Point .................................... |
40 |
Synchro Stop ......................................................... |
41 |
One Touch Setting ................................................. |
42 |
The Multi Pads |
43 |
Playing the Multi Pads ........................................... |
43 |
Chord Match .......................................................... |
43 |
Selecting a Multi Pad Bank .................................... |
44 |
Turning Chord Match On/Off .................................. |
44 |
Multi Pad Bank List ..................................... |
45 |
Digital Effects |
46 |
Reverb ................................................................... |
46 |
Chorus ................................................................... |
48 |
DSP ....................................................................... |
49 |
System Effects and Insertion Effects ..................... |
50 |
Harmony/Echo ....................................................... |
50 |
Registration Memory |
54 |
Registering the Panel Settings .............................. |
55 |
Recalling the Registered Panel Settings ............... |
55 |
Selecting a Registration Bank ................................ |
56 |
Naming the Registration Banks ............................. |
56 |
Disk Operations |
57 |
Using the Floppy Disk Drive (FDD) and |
|
Floppy Disks ......................................... |
58 |
Sample Disk ........................................................... |
59 |
Format ................................................................... |
60 |
Save ....................................................................... |
60 |
Load ....................................................................... |
62 |
Song Copy ............................................................. |
64 |
Delete .................................................................... |
67 |
4

Contents
Disk Song Playback |
68 |
Song Playback ....................................................... |
68 |
Song Track Muting ................................................. |
70 |
Song Volume Control ............................................. |
70 |
Playing from a Specified Measure ......................... |
71 |
Repeat Play ........................................................... |
72 |
Song Transpose ..................................................... |
73 |
Part Settings |
74 |
Voice Change ........................................................ |
75 |
Mixer ...................................................................... |
76 |
Parameter Edit ....................................................... |
77 |
Other Functions (Utility) |
118 |
Metronome ........................................................... |
118 |
Part Octave .......................................................... |
119 |
Master Tuning ...................................................... |
119 |
Scale Tuning ........................................................ |
119 |
Split Point ............................................................. |
119 |
Touch Sensitivity .................................................. |
120 |
Voice Set .............................................................. |
120 |
Footswitch ............................................................ |
121 |
Pitch Bend Range ................................................ |
122 |
Song Recording |
78 |
Quick Recording .................................................... |
80 |
Multi Track Recording ............................................ |
82 |
Re-recording — Punch In/Out and Start Measure . 84 |
|
Quantize ................................................................ |
86 |
Editing Setup Data ................................................. |
88 |
Naming User Songs ............................................... |
90 |
Clearing User Song Data ....................................... |
91 |
Multi Pad Recording |
92 |
Multi Pad Recording............................................... |
92 |
Chord Match .......................................................... |
94 |
Naming User Pads ................................................. |
94 |
Clearing User Pad Data ......................................... |
95 |
Style Recording |
96 |
Style Recording — Rhythm Track .......................... |
98 |
Style Recording — |
|
Bass/Phrase/Pad/Chord Tracks ...................... |
100 |
Quantize .............................................................. |
102 |
Naming User Styles ............................................. |
104 |
Clearing User Style Data ..................................... |
104 |
MIDI Functions |
106 |
What’s MIDI? ....................................................... |
106 |
What You Can Do With MIDI ................................ |
108 |
MIDI Data Compatibility ....................................... |
109 |
Connecting to a Personal Computer .................... |
110 |
MIDI Template ...................................................... |
112 |
MIDI Transmit Setting ........................................... |
114 |
MIDI Receive Setting ........................................... |
115 |
Local Control ........................................................ |
116 |
Clock .................................................................... |
116 |
Initial Data Send .................................................. |
117 |
Appendix |
123 |
Voice List ............................................................. |
123 |
Panel Voice List ........................................ |
123 |
XG Voice List ............................................ |
125 |
Drum Kit List ........................................................ |
128 |
Style List .............................................................. |
130 |
About the Digital Effects (Reverb/Chorus/DSP) ... |
131 |
Reverb Type List ....................................... |
132 |
Chorus Type List ....................................... |
132 |
DSP Type List ........................................... |
132 |
Harmony/Echo Type List ...................................... |
133 |
Troubleshooting ................................................... |
134 |
Data Backup & Initialization ................................. |
135 |
Alert Message List ............................................... |
136 |
MIDI Data Format ................................................ |
138 |
MIDI Implementation Chart .................................. |
150 |
Index .................................................................... |
152 |
Specifications ....................................................... |
155 |
7
5
Important Features
Since the PSR-540 has such a wealth of advanced features and functions, you may be at a loss as to how to explore its capabilities and how to best use them for your music. You needn’t worry. The PSR-540 is very easy to play and use, and each function — no matter how advanced — can be mastered easily.
That’s what this section is designed for. It will help you master the PSR-540. It introduces you to the important features of the PSR-540 with short explanations and page references. Read through the features you’re interested in, then turn to the relevant pages in the manual for instructions and other details.
Basic operations
•The PSR-540 is packed with sophisticated feature and functions, yet it’s also exceptionally easy
to use. Panel operations are exceptionally quick and easy, especially with the aid of relevant “Easy
Navigator” messages that automatically appear in the display. (Æ Page 18)
•A convenient Direct Access function lets you
instantly call up the specific menu or display you need. (Æ Page 21)
Listening to the PSR-540
• The PSR-540 features a wide variety of songs in various musical genres. (Æ Page 15)
•In addition, 20 songs are provided in the included disk. (Æ Page 59)
•The powerful auto accompaniment function gives you a total of 106 styles (rhythm and accompani-
ment patterns), providing professional sounding backing parts for your performance. (Æ Page 32)
•Special Multi Pads let you instantly and easily play short
rhythmic and melodic sequences for adding impact and variety to your performance. (Æ Page 43)
Playing the PSR-540
•The PSR-540 keyboard has 61 keys with full touch-response capability that lets you play with
extraordinary expressiveness and dynamic control. (Æ Page 26)
•The PSR-540 lets you perform with a huge variety of musical instrument voices. (Æ Page 26)
There are two different types of voices: panel voices (the original PSR-540voices) and XG voices.
*The PSR-540 features 215 panel voices, 12 drum kits and 480 XG voices
•With the R1, R2 and L voices, you can play two
different voices in a layer, and even play two different voices with your right and left hands. (Æ Pages 27, 28)
8
Auto accompaniment (styles)
•The auto accompaniment feature puts a full backing band
at your fingertips, with a total of 106 styles (rhythm and accompaniment patterns). (Æ Page 32)
•The One Touch Setting feature lets you instantly call up the appropriate voice, effect and other settings for the
selected accompaniment style — with the touch of a single button. (Æ Page 42)
•You can also create your original accompaniment styles by recording them directly from the keyboard. (Æ Page 96)
Multi Pads
•By simply pressing one of the Multi Pads, you can play short rhythmic or melodic phrases. (Æ Page 43)
•You can also create your original Multi Pad phrases by recording them directly from the keyboard. (Æ Page 92)
Registration Memory
•The convenient Registration Memory feature lets you save virtually all panel settings to one of 128 Registration
Memory settings, and then instantly recall all your custom panel settings by pressing a single button. (Æ Page 54)
Song Recording
•Use the powerful song recording features create your own complete, fully orchestrated compositions and save them
floppy disk as a User song. Each User song lets you record up to sixteen independent tracks. (Æ Page 78)
*To quickly and easily mold your musical ideas into complete songs, use the Quick Recording method. (Æ Page 80)
*To build up a song part-by-part and track-by-track, use the Multi Track Recording method. (Æ Page 82)
*You can also “fine tune” the recorded song data with the PSR-540’s comprehensive song editing functions. (Æ Pages 84-91)
6
Important Features
Digital Effects
•A comprehensive set of professional-sounding digital effects are built into the PSR-540, letting you enhance the sound of your performance in a wide variety of ways.
These include Reverb, Chorus, DSP and Harmony/Echo. (Æ Page 46)
*Reverb recreates the rich spacial ambiance of various
performance environments, such as a concert hall or a night club. (Æ Page 46)
*Chorus enriches the voices by making them sound
warmer and thicker — as if several instruments were playing together at the same time. (Æ Page 48)
*The DSP effects let you process the sound in special,
unusual ways — such as applying distortion or tremolo to a specific part. (Æ Page 49)
*Harmony/Echo lets you enhance your right-hand
melodies with a variety of harmony and echo effects. (Æ Page 50)
Disk Drive
•The PSR-540 also features a built-in disk drive that lets you save all your important original data (such as User
songs, User styles, User Multi Pads, Registration Memory, etc.) to floppy disk for future recall. (Æ Page 57)
MIDI
•MIDI (Musical Instrument Digital Interface) is a worldwide standard interface that allows various electronic music instruments, computers and other devices to communicate with each other. The MIDI features let you seamlessly integrate the PSR-540 into a variety of systems and applications:
*Play other instruments from the PSR-540. (Æ Page 108)
*Play the sounds of the PSR-540 (including the auto accompaniment) from a connected keyboard. (Æ Page 108)
*Connect the PSR-540 directly to a computer, for
advanced recording, editing and playing back of song data. (Æ Page 110)
*Use pre-programmed templates to instantly configure
the PSR-540 for your specific MIDI system/application. (Æ Page 112)
Panel logos
The logos printed on the PSR-540 panel indicate standards/formats it supports and special features it includes.
GM System Level 1
“GM System Level 1” is an addition to the MIDI standard which guarantees that any data conforming to the standard will play accurately on any GM-compatible tone generator or synthesizer from any manufacturer.
XG
XG is a new Yamaha MIDI specification which significantly expands and improves on the GM System Level 1 standard with greater voice handling capacity, expressive control and effect capability while retaining full compatibility with GM. By using the PSR-540’s XG voices, it is possible to record XG-compatible song files.
DOC
The DOC voice allocation format provides data playback compatibility with a wide range of Yamaha instruments and MIDI devices, including the Clavinova series.
Style File Format
The Style File Format — SFF — is Yamaha’s original style file format which uses a unique conversion system to provide high-quality automatic accompaniment based on a wide range of chord types. The PSR-540 uses the SFF internally, reads optional SFF style disks, and creates SFF styles using the Style Recording feature.
9
7

Panel Controls and Terminals
u
y

 i
i
o
 !0
!0
@7
001 Grand Piano |
|
||||||
!2CHORD |
BACK |
NEXT |
|
TRACK(1~16) |
0 ~ 9 |
VOICE LR12 |
|
dim6 513 |
EASY |
STYLE |
|
||||
START/STOP |
KEYBOARD |
NAVIGATOR |
PART DIAL |
/YES |
SONG |
|
|
119 |
|
|
|
|
|
|
|
mM 7augsus4 |
|
|
|
|
FUNCTION |
||
TRANSPOSE |
REGIST- |
TEMPO |
MEASURE |
BEAT |
|
DSP(FAST) |
TOUCH |
|
RATION |
|
|
|
|
SUSTAIN |
HARMONY |
!1 |
REC |
REC |
REC REC REC |
REC REC REC |
REC |
REC REC |
REC REC REC REC REC |
|||||||||
1 |
2 |
3 |
4 |
5 |
6 |
7 |
8 |
9 |
10 |
11 |
12 |
13 |
14 |
15 |
16 |
|
t |
!4 |
|
|
|
|
|
|
|
|
|
|
|
|
|
|
@8 |
|
|
|
|
|
|
|
|
|
|
|
|
|
|
|
|
|
|
!3 |
|
|
|
|
|
|
|
|
|
|
|
|
|
|
|
q w |
!5 !6 !7 !8 !9 @0 @9 #0#1#2 |
|||||||||||||||
e r |
@1@2 @3@4@5 |
|
|
|
@6 |
|
||||||||||
$0 |
|
|
|
|
||||||||||||
#3#4#5#6#7#8#9$1 |
|
|
|
|
|
|
|
|
|
|
$2 |
|
|
$3 |
||
|
|
|
|
|
|
|
|
|
|
|
|
|
|
|
||
$4
C1 |
|
|
|
D1 |
|
E1 |
|
F1 |
|
|
G1 |
|
|
A1 |
|
|
B1 |
|
C2 |
|
|
D2 |
|
|
E2 |
|
F2 |
|
|
G2 |
|
|
A2 |
|
|
B2 |
C3 |
|
D3 |
|
|
E3 |
F3 |
|
|
G3 |
|
|
A3 |
|
B3 |
C4 |
|
|
|
D4 |
|
|
E4 |
|
F4 |
|
|
|
G4 |
|
|
|
A4 |
|
B4 |
|
C5 |
|
|
|
D5 |
|
|
E5 |
|
F5 |
|
|
|
G5 |
|
|
CLICK |
36 |
T |
37 |
38 |
S |
39 |
40 |
R |
41 |
42 |
L |
43 |
44 |
L |
45 |
46 |
M |
47 |
H |
48 |
49 |
M |
50 |
51 |
H |
52 |
L |
53 |
54 |
H |
55 |
56 |
L |
57 |
58 |
M 59 |
M 60 |
C 61 |
H |
62 |
R 63 |
64 |
R |
65 |
66 |
S |
67 |
68 |
C 69 |
70 |
R 71 |
H |
72 |
L |
73 |
74 |
H |
75 |
L |
76 |
H |
77 |
L |
78 |
H |
79 |
L |
80 |
81 |
82 |
H |
83 |
L |
84 |
S |
85 |
L |
86 |
87 |
H |
88 |
L |
89 |
M |
90 |
O |
91 |
92 |
|
|
|
|
|
|
|
|
|
|
|
|
|
|
|
|
|
|
|
|
|
|
|
L |
H |
1 |
|
1 |
|
|
|
|
|
2 |
|
2 |
|
|
|
|
|
|
|
|
|
|
|
|
|
|
|
|
|
|
|
|
|
$7 |
$8 |
$9 |
$6 |
$5 %0 |
10
8
Panel Controls and Terminals
A5 |
|
B5 |
C6 |
93 |
94 |
95 |
96 |
Top Panel Controls |
|
q STANDBY/ON switch ................................. |
15 |
w MASTER VOLUME control ........................ |
15 |
e DEMO button ............................................. |
15 |
r RECORD button................. |
17, 25, 78, 92, 96 |
t DIRECT ACCESS button ..................... |
21, 24 |
y DSP button ................................................. |
49 |
u FAST/SLOW button ................................... |
49 |
i TOUCH button ......................................... |
120 |
o SUSTAIN button ......................................... |
30 |
!0HARMONY/ECHO button .......................... |
50 |
!1BACK button, NEXT button ........................ |
17 |
!2LCD display ................................................ |
16 |
!3VOICE CHANGE button ............................. |
75 |
MIXER button ............................................. |
76 |
!4TRACK 1 - 16 buttons .......................... |
37, 70 |
!5FUNCTION button ........................ |
17, 77, 118 |
!6SONG button.................................. |
17, 25, 68 |
!7STYLE button ................................. |
17, 25, 32 |
!8VOICE L button .......................................... |
28 |
!9VOICE R1 button ....................................... |
27 |
@0VOICE R2 button ....................................... |
27 |
@1ACMP ON/OFF button ......................... |
25, 33 |
@2FINGERING button .................................... |
38 |
Rear Panel Controls |
|
$5PHONES/OUTPUT jack ............................. |
13 |
$6FOOT SWITCH jack ................................... |
13 |
$7TO HOST connector ................................ |
107 |
$8HOST SELECT switch ............................. |
110 |
$9MIDI IN/OUT connectors .......................... |
107 |
%0DC IN 10-12V jack ..................................... |
12 |
@3TEMPO/TAP button .................................... |
36 |
@4TRANSPOSE button .................................. |
30 |
@5ACMP/SONG VOLUME button ............ |
37, 70 |
@6PART ON/OFF |
|
VOICE L button ..................................... |
28 |
VOICE R1 button .................................. |
27 |
VOICE R2 button .................................. |
27 |
@7Number buttons |
|
[1]-[0], [-/NO], [+/YES] ........................... |
20 |
@8EXIT button ................................................ |
17 |
@9Data dial ..................................................... |
20 |
#0DISK LOAD button ............................... |
17, 62 |
#1DISK SAVE button ............................... |
17, 60 |
#2DISK UTILITY button ..................... |
17, 64, 67 |
#3SYNC STOP button ................................... |
41 |
#4SYNC START button .................................. |
33 |
#5START/STOP button ............................ |
32, 69 |
#6INTRO button ............................................. |
34 |
#7MAIN/AUTO FILL A button ......................... |
34 |
#8MAIN/AUTO FILL B button ......................... |
34 |
#9ENDING/rit. button ..................................... |
34 |
$0REGISTRATION MEMORY buttons |
........... 54 |
$1ONE TOUCH SETTING buttons ................ |
42 |
$2MULTI PAD buttons .................................... |
43 |
$3Disk Drive ................................................... |
58 |
$4PITCH BEND wheel ................................... |
30 |
11
9
Setting Up
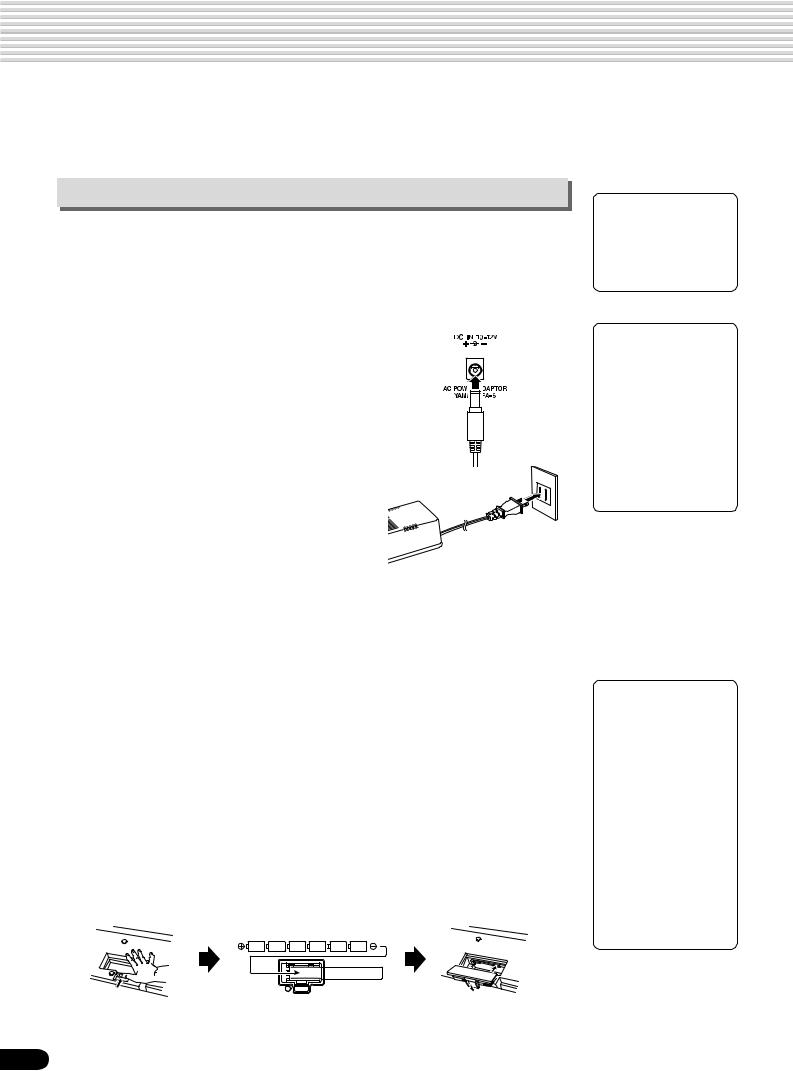
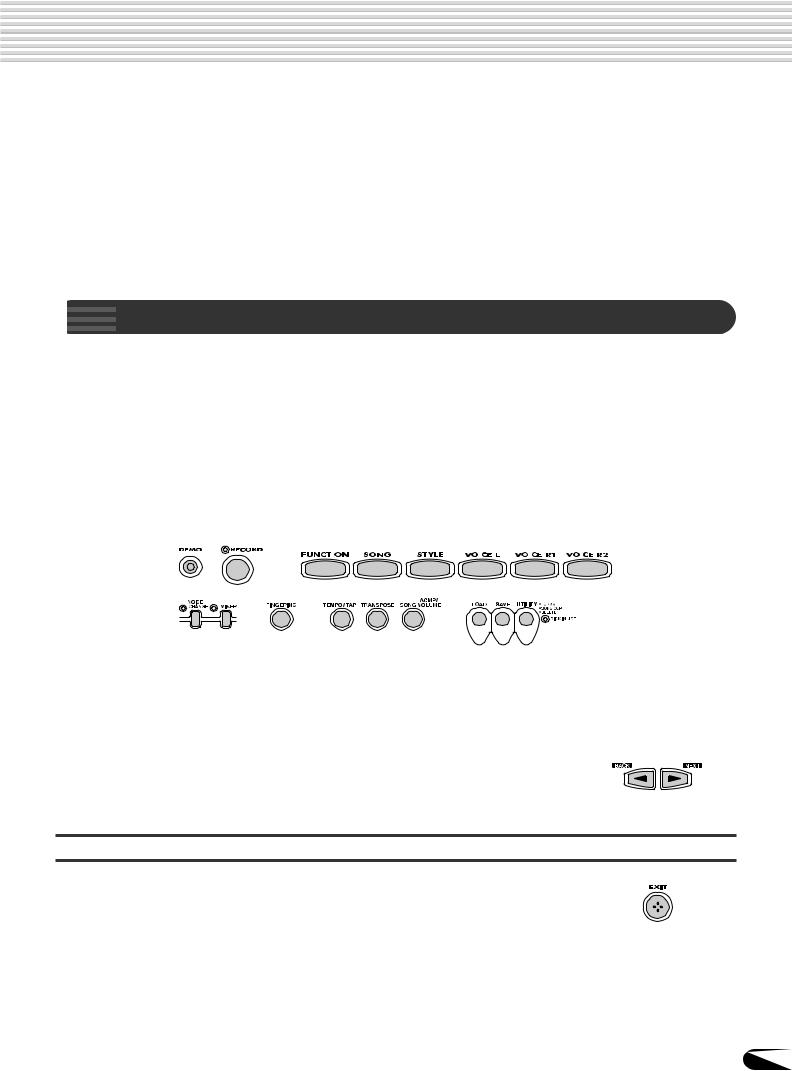
This section contains information about setting up your PSR-540 and preparing to play. Be sure to go through this section carefully before turning the power on.
Power supply connections
Although the PSR-540 will run either from an optional AC adaptor or batteries, Yamaha recommends use of the more environmentally safe AC adaptor. Follow the instructions below according to the power source you intend to use.
■ Using An Optional AC Power Adaptor
 CAUTION
• Never interrupt the power supply (e.g. remove the batteries or unplug the AC adaptor) during any PSR540 record operation! Doing so can result in a loss of data.
 WARNING
1 Make sure that the STANDBY/ON switch of the PSR-540 is set to STANDBY.
2 Connect the AC adaptor (PA-6 or other adaptor specifically recommended by Yamaha) to the power supply jack.
3 Plug the AC adaptor into an AC outlet.
When turning the power OFF, simply reverse the procedure.
■ Using Batteries
For battery operation the PSR-540 requires six 1.5V SUM-1, “D” size, R-20 or equivalent batteries. When the batteries need to be replaced, “Battery Low” may appear on top of the display, the volume may be reduced, the sound may be distorted, and other problems may occur. When this happens, turn the power off and replace the batteries. Replace the batteries as follows:
1 Open the battery compartment cover located on the instrument’s bottom panel.
2 Insert the six new batteries, being careful to follow the polarity markings on the inside of the compartment.
3 Replace the compartment cover, making sure that it locks firmly in place.
•Use ONLY a Yamaha PA-6 AC Power Adaptor (or other adaptor specifically recommended by Yamaha) to power your instrument from the AC mains. The use of other adaptors may result in irreparable damage to both the adaptor and the PSR-540.
•Unplug the AC Power Adaptor when not using the PSR-540, or during electrical storms.
 CAUTION
•When the batteries run down, replace them with a complete set of six new batteries. NEVER mix old and new batteries.
•Do not use different kinds of batteries (e.g. alkaline and manganese) at the same time.
•If the instrument is not to be in use for a long time, remove the batteries from it, in order to prevent possible fluid leakage from the battery.
•Plugging or unplugging the AC power adaptor while the batteries are installed will reset the PSR-540 to the defaults.
12
10
Setting Up
Important Notes on Battery Use
• Since the PSR-540 consume a considerable amount of power, Yamaha recommends the use of an AC power adaptor rather than batteries. The batteries should be considered an auxiliary power source for data backup.
•The floppy disk drive, in particular, uses a large amount of power, so it is important to always use an AC power adaptor when performing disk-intensive operations such as song recording/playback or data load/save. If you attempt to use battery power for these operations and the batteries do fail, you will lose not only the data you’re recording or saving, but also other data in internal memory including user styles, user pads, registration memory, etc.
•Taking the above precautions into consideration, always use an AC power adaptor when using the PSR-540 for an important performance or when creating important data.
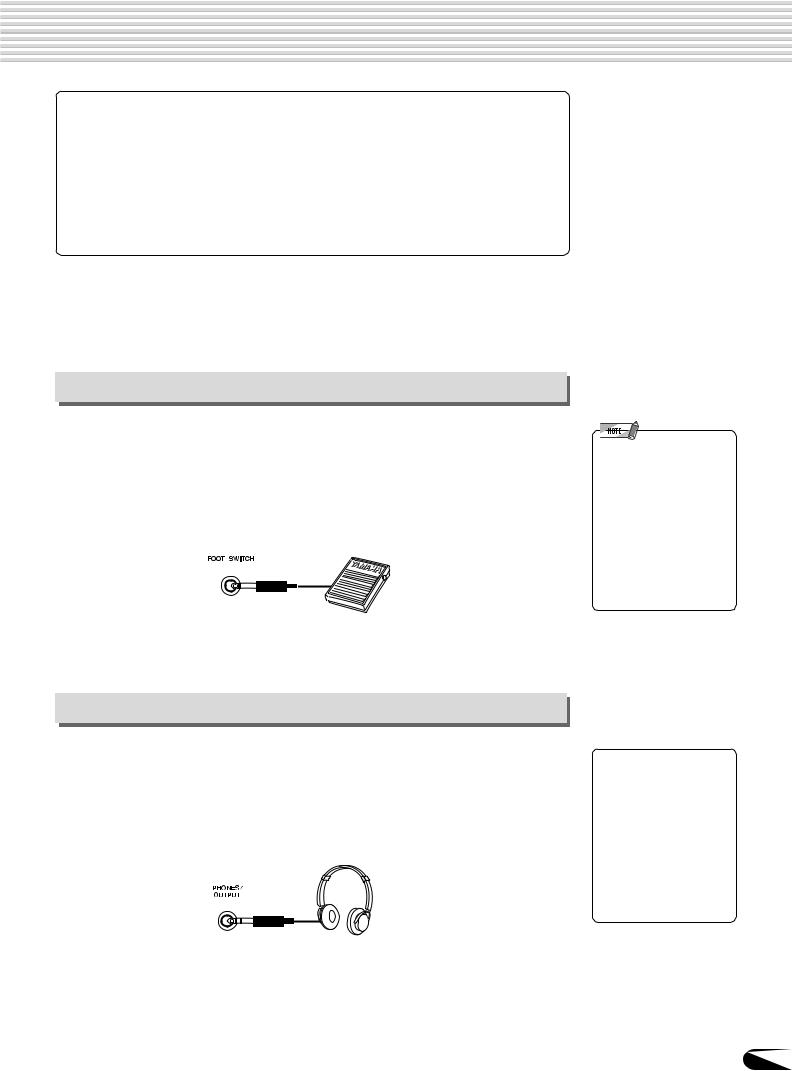
Connecting a footswitch
■ FOOT SWITCH jack
The sustain function lets you produce a natural sustain as you play by pressing a footswitch. Plug an optional Yamaha FC4 or FC5 footswitch into this jack and use it to switch sustain on and off. The footswitch connected to this jack can also be set to replicate the functions of some panel buttons, doing things like starting and stopping accompaniment (page 121).
•Be sure that you do not press the footswitch while turning the power on. If you do, the ON/OFF status of the footswitch will be reversed.
•When the sustain or sostenuto pedal functions are being used (page 121), some voices may sound continuously or have a long decay after the notes have been released while the pedal is held.
Audio equipment connections
■ PHONES/OUTPUT jack
A standard pair of stereo headphones can be plugged in here for private practice or late-night playing. The internal stereo speaker system is automatically shut off when a pair of head phones is plugged into the PHONES/OUTPUT jack.
Do not listen with the headphones at high volume for long periods of time. Doing so may cause hearing loss.
 CAUTION
• Connect the PSR-540 to external equipment only after turning off power for all devices. To prevent damage to the speakers, set the volume of the external devices at the minimum setting before connecting them. Failure to observe these cautions may result in electric shock or equipment damage.
13
11
Setting Up
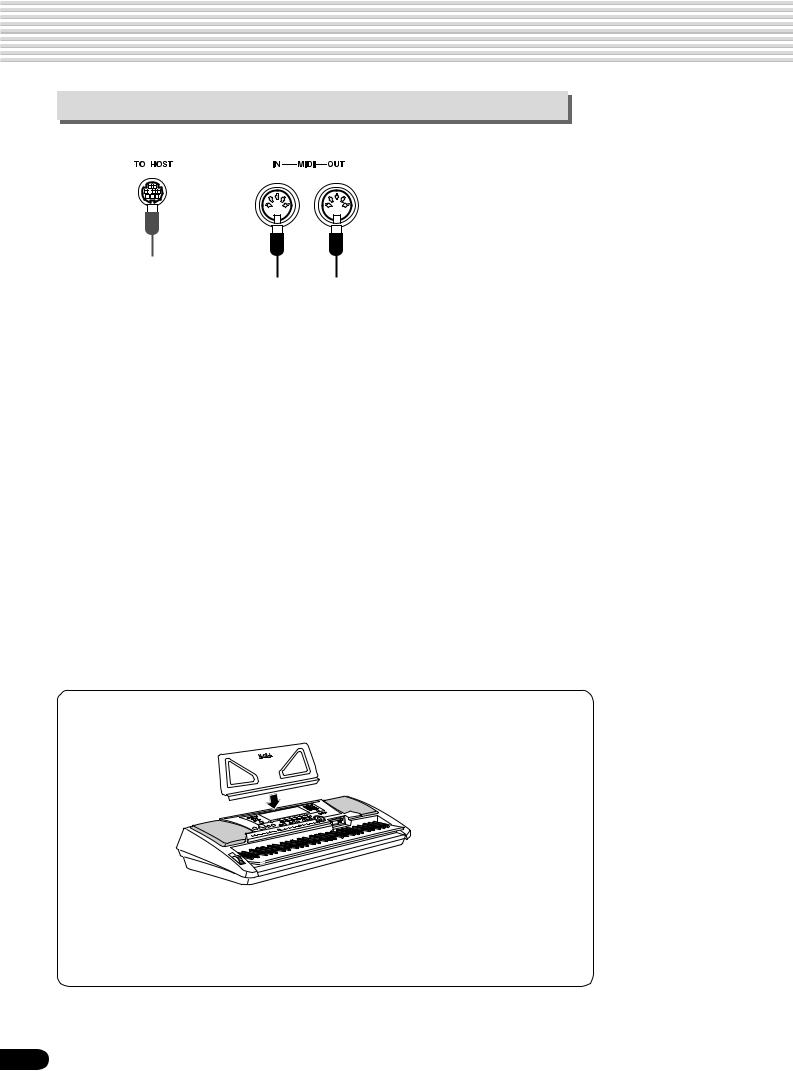
Connecting external MIDI devices
For more information on using MIDI, refer to page 107.
Music stand
The PSR-540 is supplied with a music stand that can be attached to the instrument by inserting it into the slot at the rear of the control panel.
14
12

Demo Song Playback
Once you’ve set up your PSR-540, try listening to the pre-programmed demonstration songs. A total of 5 demo songs are provided.
1 Turn the power ON by pressing the [STANDBY/ON] switch.
Press the [STANDBY/ON] switch again to turn the power OFF.
|
001 Grand Piano |
|
|
|
|
|||||||||||||||||||||||||||||||||||||||||||
|
CHORD |
|
|
|
|
|
BACK |
|
|
NEXT |
|
|
|
|
|
TRACK(1~16) |
0 ~ 9 |
|
|
VOICE LR12 |
||||||||||||||||||||||||||||
|
|
|
dim6 |
119 |
|
|
|
|
EASY |
|
|
STYLE |
||||||||||||||||||||||||||||||||||||
|
|
|
513 |
|
START/STOP KEYBOARD NAVIGATOR |
PART DIAL |
|
|
|
/YES |
|
SONG |
|
|
|
|
||||||||||||||||||||||||||||||||
|
|
|
mM 7augsus4 |
|
|
|
|
|
|
|
|
|
|
|
|
|
|
|
|
|
|
|
|
|
|
|
|
|
|
|
|
|
|
|
|
FUNCTION |
||||||||||||
|
TRANSPOSE |
|
|
REGIST- |
|
|
|
|
|
TEMPO |
|
|
|
|
MEASURE |
|
|
|
|
BEAT |
|
|
|
|
|
|
DSP(FAST) |
TOUCH |
||||||||||||||||||||
|
|
|
|
|
|
|
|
|
|
|
|
|
|
|
|
|
|
|
|
|
|
|
|
|
|
|
|
|
|
|||||||||||||||||||
|
|
|
|
|
|
|
|
RATION |
|
|
|
|
|
|
|
|
|
|
|
|
|
|
|
|
|
|
|
|
|
|
|
|
|
|
|
|
|
SUSTAIN |
HARMONY |
|||||||||
|
|
|
|
|
|
|
|
|
|
|
|
|
|
|
|
|
|
|
|
|
|
|
|
|
|
|
|
|
|
|
|
|
|
|
|
|
|
|
|
|
||||||||
|
|
REC |
|
|
REC |
|
|
REC |
|
|
REC |
|
|
REC |
|
|
REC |
REC |
REC |
|
|
REC |
|
REC |
|
|
REC |
REC |
|
REC |
|
REC |
|
|
REC |
|
|
REC |
||||||||||
|
|
|
|
|
|
|
|
|
|
|
|
|
|
|
|
|
|
|
|
|
|
|
|
|
|
|
|
|
|
|
|
|
|
|
|
|
|
|
|
|
|
|
|
|
|
|
|
|
1 |
2 |
3 |
4 |
5 |
6 |
7 |
8 |
9 |
10 |
11 |
12 |
13 |
14 |
15 |
16 |
|||||||||||||||||||||||||||||||||
|
|
|
|
|
|
|
|
|
|
|
|
|
|
|
|
|
|
|
|
|
|
|
|
|
|
|
|
|
|
|
|
|
|
|
|
|
|
|
|
|
|
|
|
|
|
|
|
|
2 Press the [DEMO] button to start demo playback. |
|
|
|
|
|
|
|
|
|
|
|
|
||||||||||||||||||||||||||||||||||||
1MyHeartGoOn
My Heart Will Go On (Love Theme From ‘Titanic’)
from the Paramount and Twentieth Century Fox Motion Picture TITANIC Music by James Horner
Lyrics by Will Jennings
Copyright © 1997 by Famous Music Corporation, Ensign Music Corporation, TCF Music Publishing, Inc., Fox Film Music Corporation and Blue Sky Rider Songs All Rights for Blue Sky Rider Songs Administered by Irving Music, Inc. International Copyright Secured All Rights Reserved
 CAUTION
•Even when the switch is in the “STANDBY” position, electricity is still flowing to the instrument at the minimum level. When you are not using the PSR-540 for a long time, make sure you unplug the AC power adaptor from the wall AC outlet, and/or remove the batteries from the instrument.
•If you play the PSR-540 with the volume at its maximum level when the batteries are used, the life of the batteries will be shorter.
•While playing back Demo song #001, try playing the Multi Pads (page 45) with bank #14 (WaterSE). This bank has been recorded especially to enhance the above song.
3
4
Set a volume level with the [MASTER VOLUME] control.
Skip to the beginning of a different demo song.
Use the data dial, the [+/YES] button, the [-/NO] button or the number buttons
[1]-[0].
2 SweetTrumpet
5 Press the [DEMO] button again to stop the demo song.
15
13
Panel Display Indications
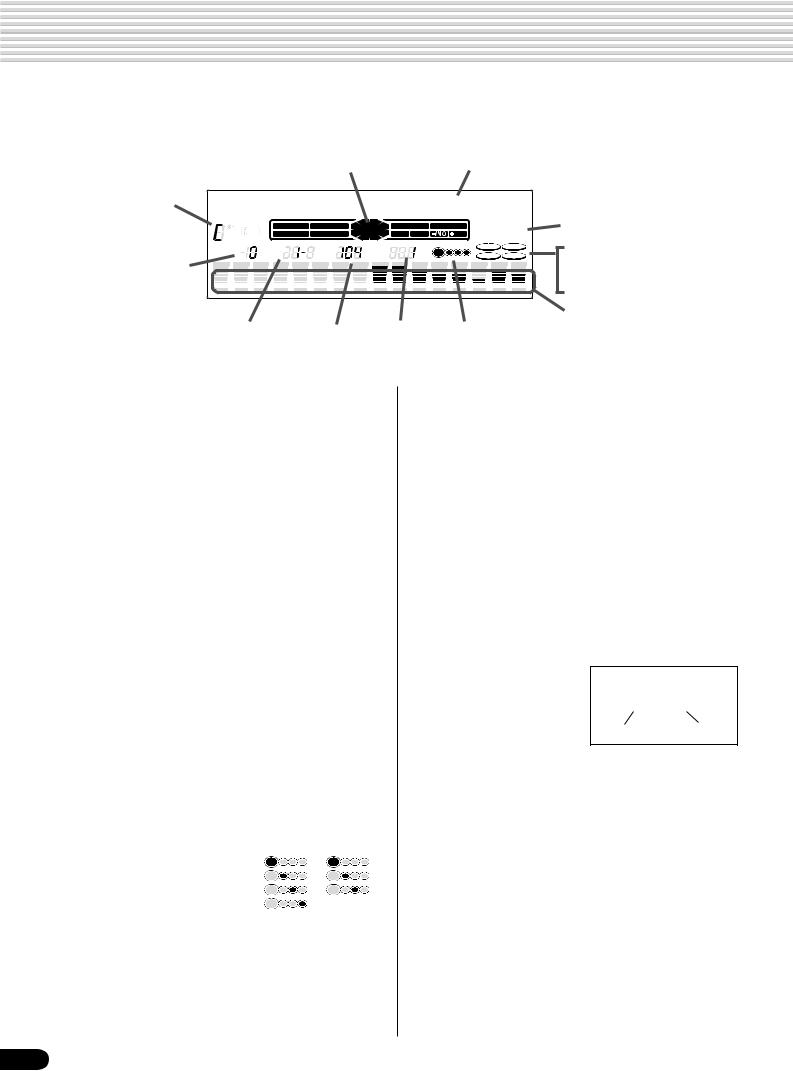
The PSR-540 features a large multi-function display that shows all important settings for the instrument. The section below briefly explains the various icons and indications in the display.
e Easy Navigator q Menu/message display
!3Chord 001 Grand Piano
|
|
CHORD |
|
|
|
|
|
BACK |
|
NEXT |
|
|
|
|
|
|
|
TRACK(1~16) |
0 ~ 9 |
|
|
VOICE LR12 |
||||||||||||||||||||||||||||
|
|
|
|
dim6 |
119 |
|
|
|
|
|
EASY |
|
|
STYLE |
||||||||||||||||||||||||||||||||||||
|
|
|
|
|
START/STOP |
KEYBOARD |
|
NAVIGATOR |
PART |
|
DIAL |
|
|
|
/YES |
|
SONG |
|
|
|
|
|
||||||||||||||||||||||||||||
|
|
|
|
513 |
|
|
|
|
|
|
|
|
|
|
|
|
||||||||||||||||||||||||||||||||||
|
|
|
|
mM 7augsus4 |
|
|
|
|
|
|
|
|
|
|
|
|
|
|
|
|
|
|
|
|
|
|
|
|
|
|
|
|
|
|
|
|
FUNCTION |
|||||||||||||
|
|
TRANSPOSE |
|
|
REGIST- |
|
|
|
|
TEMPO |
|
|
|
|
MEASURE |
|
|
|
|
BEAT |
|
|
|
|
|
|
DSP(FAST) |
TOUCH |
||||||||||||||||||||||
|
|
|
|
|
|
|
|
|
|
|
|
|
|
|
|
|
|
|
|
|
|
|
|
|
|
|
|
|
|
|
||||||||||||||||||||
|
|
|
|
|
|
|
|
|
RATION |
|
|
|
|
|
|
|
|
|
|
|
|
|
|
|
|
|
|
|
|
|
|
|
|
|
|
|
|
SUSTAIN |
HARMONY |
|||||||||||
rTranspose |
|
|
REC |
|
|
REC |
|
|
REC |
|
|
REC |
|
REC |
|
REC |
REC |
|
|
REC |
|
|
REC |
|
REC |
|
REC |
REC |
|
|
REC |
|
REC |
|
|
REC |
|
|
REC |
|||||||||||
|
|
|
|
|
|
|
|
|
|
|
|
|
|
|
|
|
|
|
|
|
|
|
|
|
|
|
|
|
|
|
|
|
|
|
|
|
|
|
|
|
|
|
|
|
|
|
|
|
|
|
|
1 |
2 |
3 |
4 |
5 |
6 |
7 |
8 |
9 |
10 |
11 |
12 |
13 |
14 |
15 |
16 |
|
|||||||||||||||||||||||||||||||||
|
|
|
|
|
|
|
|
|
|
|
|
|
|
|
|
|
|
|
|
|
|
|
|
|
|
|
|
|
|
|
|
|
|
|
|
|
|
|
|
|
|
|
|
|
|
|
|
|
|
|
|
|
|
|
|
|
|
|
|
|
|
|
|
|
|
|
|
|
|
|
|
|
|
|
|
|
|
|
|
|
|
|
|
|
|
|
|
|
|
|
|
|
|
|
|
|
|
|
|
|
|
|
t Registration bank |
|
|
|
yTempo |
|
|
u Measure |
|
|
i Beat indicators |
|||||||||||||||||||||||||||||||||||||||
|
and number |
|
|
|
|
|
|
|
|
|
|
|
|
|
|
|
|
|
|
|
|
|
|
|
|
|
|
|
|
|
|
|
|
|
|
|
|
|
|
|
|
|
||||||||
w Menu indication
o DSP (FAST) !0TOUCH !1SUSTAIN !2HARMONY
!4Song tracks / Accompaniment tracks
q Menu/message display
This shows the menu for each function of the PSR-540. It also displays the relevant messages for the current operation.
See the “Basic Operation” section (page 17) for details on the menu/message display.
w Menu indication
This indicates the items shown in the menu display, and the button to be pressed. Refer to “Basic Operation” (page 17) for details.
e Easy Navigator
This indicates the buttons to be pressed. Refer to “Basic Operation” (page 18) for details.
rTranspose
Shows the current transpose value (page 30).
t Registration bank-number
Shows the current selected registartion memory bank and number (page 56).
yTempo
Shows the current tempo of accompaniment/song playback (page 36).
u Measure |
|
|
|
|
|
Indicates the current |
4/4 time |
3/4 time |
measure number during |
1st beat |
|
2nd beat |
|
|
song recording and |
3rd beat |
|
playback. |
4th beat |
|
|
|
|
|
|
|
i Beat indicators
Flashes at the current tempo and indicates the current beat during accompaniment and song playback.
o DSP (FAST)
“DSP” appears when the DSP effect is turned on (page 49).
“FAST” appears when the DSP FAST/SLOW effect is turned on (page 49).
!0TOUCH
Appears when the touch sensitivity is turned on (page 120).
!1SUSTAIN
Appears when the sustain is turned on (page 30).
!2HARMONY
Appears when the HARMONY effect is turned on (page 50).
!3Chord
Displays the current chord name during AUTO ACCOMPANIMENT playback or SONG recording/playback (page 33).
Cm
Root |
Chord type |
!4Song tracks / Accompaniment tracks
•In the Song mode (page 25) and the Demo Song mode (page 15):
The icons of all tracks indicate the on/off status and volume/velocity settimgs.
•In the Style mode (page 25):
The icons of tracks 9 - 16 indicate the on/off status and volume/velocity settings for each of the eight accompaniment tracks.
• In the Record mode (page 25):
The icons of all tracks indicate the on/off status and volume/velocity settimgs. The “REC” marks indicate the recording status.
16
14
Basic Operation
This section introduces you to the basic operations common to the various functions of the PSR-540. In particular, you’ll learn how to use the menu/message display at the center of the front panel.
|
.....................................................................• Calling up the Operation Displays |
page 17 |
|
• How to read the Menu/message display and the “Easy Navigator” ................... |
page 18 |
|
• Menu Selection .................................................................................................. |
page 19 |
|
• Changing (Editing) Values ................................................................................. |
page 20 |
|
• Naming .............................................................................................................. |
page 21 |
|
• Direct Access ..................................................................................................... |
page 21 |
|
|
|
 Calling up the Operation Displays
Press the buttons listed below in order to call up the appropriate displays for the various functions of the PSR-540.
......................................................• DEMO button |
|
page 15 |
......................................................• MIXER button |
|
page 76 |
|||
• RECORD button ............................. |
pages 25, 78, 92, 96 |
• FINGERING button ............................................. |
|
page 38 |
||||
• FUNCTION button .................................... |
pages 77, 118 |
• TEMPO/TAP button ............................................. |
|
page 36 |
||||
• SONG button .............................................. |
pages 25, 68 |
• TRANSPOSE button ........................................... |
|
page 30 |
||||
• STYLE button .............................................. |
pages 25, 32 |
• ACMP/SONG VOL button ........................... |
|
pages 37, 70 |
||||
• VOICE L button ................................................... |
|
page 28 |
• DISK LOAD button ............................................. |
|
page 62 |
|||
• VOICE R1 button ................................................ |
|
page 27 |
• DISK SAVE button ............................................. |
|
page 60 |
|||
• VOICE R2 button ................................................ |
|
page 27 |
• DISK UTILITY button ................................. |
|
pages 64, 67 |
|||
• VOICE CHANGE button ...................................... |
|
page 75 |
|
|
|
|
|
|
|
|
|
|
|
|
|
|
|
|
|
|
|
|
|
|
|
|
|
|
|
|
|
|
|
|
|
|
|
|
|
|
|
|
|
|
Pressing one of these buttons instantly calls up the relevant display for the selected function.
See the function tree chart for details (page 22).
If you’ve selected several different functions’ displays in succession, you can “retrace your steps” and revisit each display by using the [BACK] and [NEXT] buttons at the left side of the display. Of course you can also directly select the desired displays by pressing the appropriate buttons (as listed above).
How to leave the current display
As shown in the function tree chart (page 22), there is a wide varierty of functions on the PSR-540, each with its own corresponding display. In order to leave the display of each function press the [EXIT] button.
Since the PSR-540 has so many different displays, you may occasionally find yourself confused as to which operation’s display is currently shown. If this happens, you can return to “home base” by pressing the [EXIT] button several times. This returns the PSR-540 to the default display — the same display that appears when the power is turned on.
17
15
Basic Operation
 How to Read the
  Display and “Easy
Depending on the selected function or operation, the PSR-540 shows a variety of displays and indications. Included in these are “Easy Navigator” messages that guide you through the various operations.
Let’s take a look at some examples:
● Voice
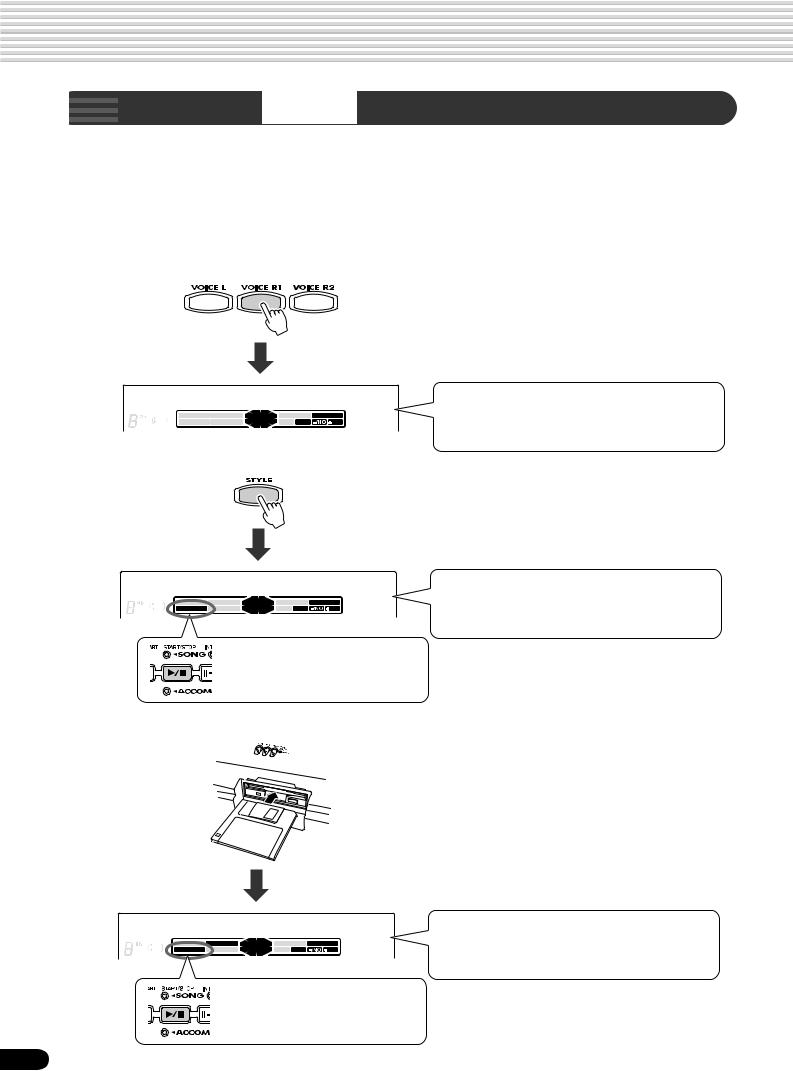
Press the [VOICE R1] button.
001 Grand Piano
CHORD |
|
BACK |
NEXT |
|
TRACK(1~16) |
0 ~ 9 |
VOICE LR12 |
dim6 |
119 |
EASY |
STYLE |
||||
513 |
START/STOP |
KEYBOARD |
NAVIGATOR |
PART DIAL |
/YES |
SONG |
|
mM 7augsus4 |
|
|
|
|
|
FUNCTION |
|
● Style
This message means: “The current voice for voice R1 (Grand Piano) is shown at top. You can change this voice by using the data dial, the [+/YES] button, the [-/NO] button or the number buttons [1]-[0].”
Press the [STYLE] button.
001 8Beat 1
CHORD |
|
BACK |
NEXT |
|
TRACK(1~16) |
0 ~ 9 |
VOICE LR12 |
dim6 |
119 |
EASY |
STYLE |
||||
513 |
START/STOP |
KEYBOARD |
NAVIGATOR |
PART DIAL |
/YES |
SONG |
|
mM 7augsus4 |
|
|
|
|
|
FUNCTION |
|
This message also means: “You can start the accompaniment by pressing the [START/STOP] button.
This message means: “The current style (8Beat 1) is shown at top. You can change this style by using the data dial, the [+/YES] button, the [-/NO] button or the number buttons [1]-[0].”
● Song
Insert the sample disk into the disk drive.
001 CLUB_XG
CHORD |
|
BACK |
NEXT |
|
TRACK(1~16) |
0 ~ 9 |
VOICE LR12 |
dim6 |
119 |
EASY |
STYLE |
||||
513 |
START/STOP |
KEYBOARD |
NAVIGATOR |
PART DIAL |
/YES |
SONG |
|
mM 7augsus4 |
|
|
|
|
|
FUNCTION |
|
This message also means: “You can start the current song by pressing the [START/STOP] button.
18
This message means: “The current song (CLUB_XG) is shown at top. You can change this song by using the data dial, the [+/YES] button, the [-/NO] button or the number buttons [1]-[0].”
16

Basic Operation
● Disk
Insert an unformatted disk into the disk drive.
Format OK?
CHORD |
|
BACK |
NEXT |
|
TRACK(1~16) |
0 ~ 9 |
VOICE LR12 |
dim6 |
119 |
EASY |
STYLE |
||||
513 |
START/STOP |
KEYBOARD |
NAVIGATOR |
PART DIAL |
/YES |
SONG |
|
mM 7augsus4 |
|
|
|
|
|
FUNCTION |
|
This message means: “Press the [+/YES] button to execute the Format operation.”
 Menu Selection
For certain operations on the PSR-540 (such as selecting voices, demo songs and styles), you’ll need to select different menus in the display.
For example, the display below (for selecting the function) appears when you press the
[FUNCTION] button.
F1 Multi Pad
CHORD |
|
BACK |
NEXT |
|
TRACK(1~16) |
0 ~ 9 |
dim6 |
119 |
EASY |
||||
513 |
START/STOP |
KEYBOARD |
NAVIGATOR |
PART DIAL |
/YES |
|
mM 7augsus4 |
|
|
|
|
|
|
VOICE LR12
STYLE SONG
FUNCTION
In this case you can select the function by turning the data dial, or move the cursor by pressing the [+/YES]/[-/NO] buttons.
F1 Multi Pad
CHORD |
|
BACK |
NEXT |
|
TRACK(1~16) |
0 ~ 9 |
dim6 |
119 |
EASY |
||||
513 |
START/STOP |
KEYBOARD |
NAVIGATOR |
PART DIAL |
/YES |
|
mM 7augsus4 |
|
|
|
|
|
|
VOICE LR12
STYLE SONG
FUNCTION
[-/NO] button |
|
|
|
[+/YES] button |
|
|
|
||
|
|
|
|
|
F2 Regist
CHORD |
|
BACK |
NEXT |
|
dim6 |
119 |
EASY |
||
513 |
START/STOP |
KEYBOARD |
NAVIGATOR |
|
mM 7augsus4 |
|
|
|
|
Memory
TRACK(1~16) |
0 ~ 9 |
VOICE LR12 |
|
STYLE |
|||
PART DIAL |
/YES |
SONG |
|
FUNCTION |
|||
|
|
[-/NO] button |
|
|
|
[+/YES] button |
|
|
|
||
|
|
|
|
|
F3
CHORD
6 119 dim 513  mM 7augsus4
DigitalEffect
BACK |
NEXT |
EASY TRACK(1~16) |
0 ~ 9 |
VOICE LR12 |
|
STYLE |
|||||
START/STOP |
KEYBOARD |
NAVIGATOR |
PART DIAL |
/YES |
SONG |
|
|
|
|
|
FUNCTION |
[-/NO] button |
|
|
|
[+/YES] button |
|
|
|
||
|
|
|
|
|
The display below (for selecting voices) appears when you press the [VOICE R1]
button.
001 Grand Piano
CHORD |
|
BACK |
NEXT |
|
TRACK(1~16) |
0 ~ 9 |
dim6 |
119 |
EASY |
||||
513 |
START/STOP |
KEYBOARD |
NAVIGATOR |
PART DIAL |
/YES |
|
mM 7augsus4 |
|
|
|
|
|
|
VOICE LR12
STYLE SONG
FUNCTION
In this case you can also select the voice by using the data dial or the [+/YES]/[-/NO] buttons as above; you can also input the voice number directly by using the number buttons [1]-[0] (see the next page).
19
17
Basic Operation
 Changing (Editing) Values
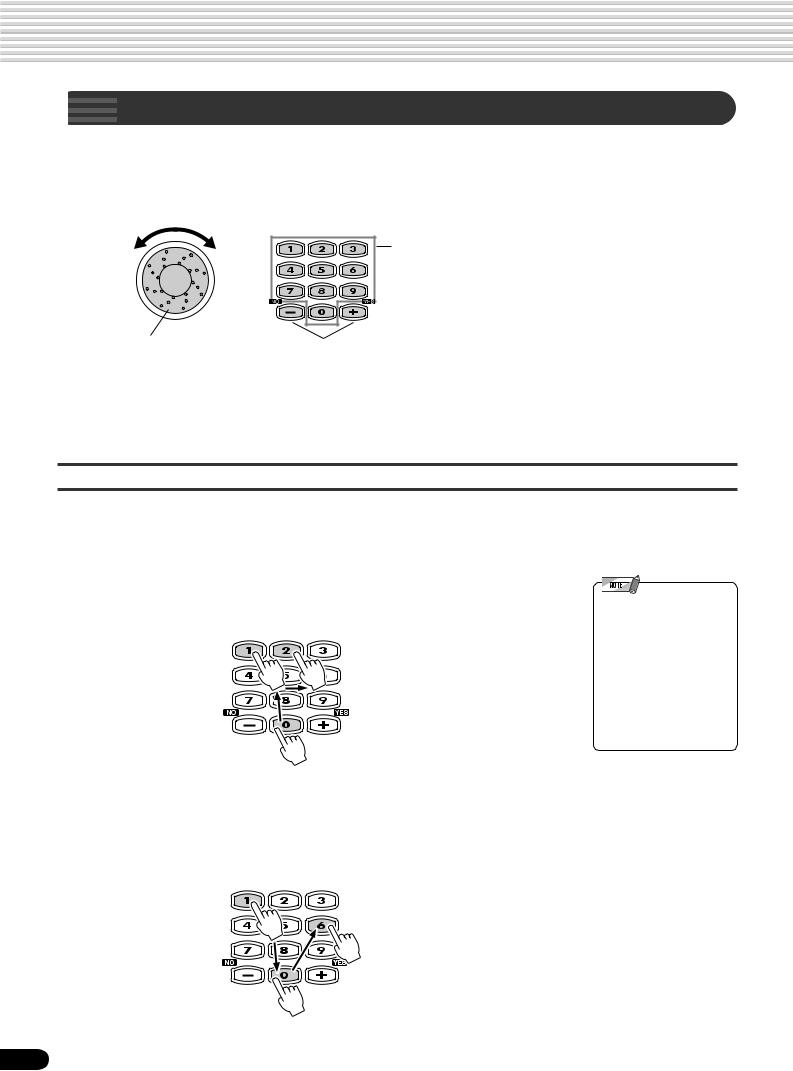
This section shows you how to set numeric values on the PSR-540, such as voice number, song/style number and various parameters. Input the values by using the number buttons [1]-[0] or the [+/YES]/[-/NO] buttons.
Number buttons [1]-[0] described below.
Rotating the data dial to the right (clockwise) increases the value, while rotating it to the left (counter-clock- wise) decreases it.
Pressing the [+/YES] button increases the displayed value by 1. Pressing the [-/NO] button decreases the displayed value by 1. Pressing and holding either button causes a continuous increase and decrease.
For items that have initial default values, pressing the [+/
YES] and the [-/NO] buttons together at the same time will return the setting to the initial value.
Numeric entry
The explanations here apply only to numbers that have a maximum of three digits, such as those for voices and styles.
• Entering oneor two-digit numbers
Oneor two-digit voice numbers can be entered with leading zeroes: e.g. “12” can be entered as “012” by pressing the [0], [1] and [2] buttons in sequence.
•Oneor two-digit numbers can also be entered without leading zeroes.
To select number “12”, for example, simply press the [1] button and then the [2] button. The bars below the number on the display will flash for a few seconds, and then disappear when the selected number has been recognized by the PSR-540.
• Entering three-digit numbers
The number buttons can be used to directly enter the number of the desired voice, thereby immediately selecting that voice without having to step through a number of other voices. To select number 106, for example, press the [1], [0] and [6] number buttons in sequence.
20
18
Basic Operation
 Naming
The allows you to create your own original data such as songs, styles and registration memory settings. You can also freely name the data as desired.
The following data types can be named.
• Disk files (User songs, etc) ............................... |
pages 61, 65, 66, 90 |
• User Styles ......................................................................... |
page 104 |
• User Pad banks .................................................................... |
page 94 |
• Registration Memory banks .................................................. |
page 56 |
The example display below appears when naming a song on a floppy disk (page 65).
Nam=xxxxxxxx–
Cursor
To enter an original name, use the keyboard.

 Letters and characters are marked above the corresponding keys.
C1
Entering a character |
Each key on the keyboard enters a different character, as |
|
marked directly above the key. |
|
|
Moving the cursor |
The A#5 and B5 keys move the cursor backward and |
|
forward within the file name. |
Entering a lower-case character |
The C1 key functions as a shift key that shifts between |
|
lowerand upper-case characters: hold the Shift key |
|
while pressing a character key to enter the lower-case |
|
character. |
|
|
Delete |
The Delete key (C6) deletes the character at the cursor |
|
position. |
|
|
•Lowercase letters cannot be used for disk file names.


 Direct Access
By using the [DIRECT ACCESS] button, you can instantly call up the desired display.
For example, pressing the [DIRECT ACCESS] button and the [REGISTRATION
MEMORY] button at the same time automatically selects the display for inputting the
Registration Memory bank name.
 R.Name =Regist01–
Cursor
See page 24 for the Direct Access Chart.
21
19

Function Tree
Button |
|
Menu/message display |
Function |
|
See page |
|||
|
|
|
|
|
|
|
|
|
DEMO |
|
|
01 MyHeartGoOn .................. |
Demo song selection ................................................................... |
|
15 |
||
|
|
|
||||||
|
|
|
|
|
|
|
|
|
VOICE R1 |
|
|
001 Grand Piano ................... |
Voice R1 selection ....................................................................... |
|
26 |
||
|
|
|
||||||
|
|
|
|
|
|
|
|
|
VOICE R2 |
|
|
001 Grand Piano ................... |
Voice R2 selection ....................................................................... |
|
27 |
||
|
|
|
||||||
|
|
|
|
|
|
|
|
|
VOICE L |
|
|
001 Grand Piano ................... |
Voice L selection.......................................................................... |
|
28 |
||
|
|
|
||||||
|
|
|
|
|
|
|
|
|
STYLE |
|
|
001 8Beat 1 ........................... |
Accompaniment Style selection .................................................. |
|
32 |
||
|
|
|
||||||
|
|
|
|
|
|
|
|
|
SONG |
|
|
001 CLUB_XG ...................... |
Song selection ............................................................................. |
|
68 |
||
|
|
|
||||||
|
|
|
.................................S. Menu |
...................................................................Song menu selection |
|
69 |
||
|
|
|
|
|||||
|
|
|
|
|
PlyMode ....................... |
Song play method selection ........................................................ |
|
69 |
|
|
|
|
|
|
|||
|
|
|
|
|
Measure ....................... |
Song Measure from which to start playback ............................... |
|
71 |
|
|
|
|
|
|
|||
|
|
|
|
|
AbRepeat ..................... |
Song repeat setting ..................................................................... |
|
72 |
|
|
|
|
|
|
|||
|
|
|
|
|
S.Trans ......................... |
Song transpose setting ................................................................ |
|
73 |
|
|
|
|
|
|
|||
|
|
|
|
|
|
|
|
|
VOICE CHANGE |
|
|
T01=001 Grand Pno ............. |
Voice selection of R1/R2/L/Style track/Song track ....................... |
|
75 |
||
|
|
|
||||||
|
|
|
|
|
|
|
|
|
MIXER |
|
|
Volume R1 ............................. |
Volume adjustment of Voice R1/R2/L ................. |
1,2,3 |
76........ |
||
|
|
|||||||
|
|
|
...........................Volume Ph1 |
.........................Volume adjustment of the accompaniment track |
|
76 |
||
|
|
|
|
|||||
|
|
|
Volume T01 ........................... |
Volume adjustment of the song track .......................................... |
|
76 |
||
|
|
|
|
|||||
|
|
|
|
|
|
|
|
|
ACMP/SONG VOL |
|
|
Acmp Volume ........................ |
Accompaniment Volume setting .................................................. |
|
37 |
||
|
|
|
||||||
|
|
|
.........................Song Volume |
....................................................................Song Volume setting |
|
70 |
||
|
|
|
|
|||||
|
|
|
|
|
|
|
|
|
TRANSPOSE |
|
|
Transpose ............................. |
Transpose setting ........................................................................ |
|
30 |
||
|
|
|
||||||
|
|
|
|
|
|
|
|
|
TEMPO/TAP |
|
|
Tempo ................................... |
Tempo setting .............................................................................. |
|
36 |
||
|
|
|
||||||
|
|
|
|
|
|
|
|
|
FINGERING |
|
|
FingerMode ........................... |
Fingering selection ...................................................................... |
|
38 |
||
|
|
|
||||||
|
|
|
|
|
|
|
|
|
DISK LOAD |
|
|
Ld .......................................... |
Loading data from a disk ............................................................. |
|
62 |
||
|
|
|
||||||
|
|
|
|
|
|
|
|
|
DISK SAVE |
|
|
Sv .......................................... |
Saving data to a disk ................................................................... |
|
60 |
||
|
|
|
||||||
|
|
|
|
|
|
|
|
|
DISK UTILTY |
|
|
Menu |
|
|
|
||
|
|
|
|
|
||||
|
|
|
|
|
..........................Format |
.........................................................................Formatting a disk |
|
60 |
|
|
|
|
|
|
|||
|
|
|
|
|
SongCopy .................... |
Copying a song in a disk ............................................................. |
|
64 |
|
|
|
|
|
|
|||
|
|
|
|
|
Delete ........................... |
Deleting a file in a disk ................................................................ |
|
67 |
|
|
|
|
|
|
|||
22
20
Function Tree
Button |
|
Menu/message display |
Function |
|
See page |
|||||
|
|
|
|
|
|
|
|
|
|
|
FUNCTION |
|
|
F1 Multi Pad |
|
|
|
||||
|
|
|
|
|
||||||
|
|
|
|
|
............................Bank |
.....................................Multi pad bank selection |
..............4 |
44 |
||
|
|
|
|
|
||||||
|
|
|
|
|
C.Match ........................ |
Chord match on/off setting ................................. |
5 .............. |
43 |
||
|
|
|
|
|
||||||
|
|
|
F2 Regist Memory |
|
|
|
||||
|
|
|
|
|
|
|||||
|
|
|
|
|
Bank ............................ |
Registration Memory bank selection ................. |
6 .............. |
56 |
||
|
|
|
|
|
||||||
|
|
|
|
|
R.Name |
Namimg Registration Memory bank |
7 |
56 |
||
|
|
|
|
|
||||||
|
|
|
F3 DigitalEffect |
|
|
|
||||
|
|
|
|
|
|
|||||
|
|
|
|
|
Reverb |
|
|
|
||
|
|
|
|
|
|
|
|
|||
|
|
|
|
|
|
|
Type .................... |
Reverb type selection .................................................................. |
|
46 |
|
|
|
|
|
|
|
|
|||
|
|
|
|
|
|
|
Return Level ........ |
Reverb return level setting ........................................................... |
|
47 |
|
|
|
|
|
|
|
|
|||
|
|
|
|
|
Chorus |
|
|
|
||
|
|
|
|
|
|
|
|
|||
|
|
|
|
|
|
|
Type .................... |
Chorus type selction .................................................................... |
|
48 |
|
|
|
|
|
|
|
|
|||
|
|
|
|
|
|
|
Return Level |
Chorus return level setting |
|
48 |
|
|
|
|
|
|
|
|
|||
|
|
|
|
|
Dsp |
|
|
|
||
|
|
|
|
|
|
|
|
|||
|
|
|
|
|
|
|
Type .................... |
DSP type selection ............................................. |
8 .............. |
49 |
|
|
|
|
|
|
|
||||
|
|
|
|
|
|
|
Return Level ........ |
DSP return level setting ............................................................... |
|
49 |
|
|
|
|
|
|
|
|
|||
|
|
|
|
|
Harmony |
|
|
|
||
|
|
|
|
|
|
|
|
|||
|
|
|
|
|
|
|
Type .................... |
Harmony/Echo type selection............................. |
9 .............. |
50 |
|
|
|
|
|
|
|
||||
|
|
|
|
|
|
|
Harmony Vol ........ |
Harmony /Echo volume setting ................................................... |
|
52 |
|
|
|
|
|
|
|
|
|||
|
|
|
|
|
|
|
H.Part .................. |
Harmony part setting ................................................................... |
|
53 |
|
|
|
|
|
|
|
|
|||
|
|
|
F4 Utility |
|
|
|
||||
|
|
|
|
|
|
|||||
|
|
|
|
|
Metronom ..................... |
Metronome on/off setting.................................... |
10 ........... |
118 |
||
|
|
|
|
|
||||||
|
|
|
|
|
Octave .......................... |
Part octave setting .............................................. |
11,12,13 . 119 |
|||
|
|
|
|
|
||||||
|
|
|
|
|
Tuning .......................... |
Master tuning setting .................................................................. |
|
119 |
||
|
|
|
|
|
|
|||||
|
|
|
|
|
SC.Tune |
Scale tuning setting |
|
119 |
||
|
|
|
|
|
|
|||||
|
|
|
|
|
Split ............................ |
Split point setting ................................................ |
14 ........... |
119 |
||
|
|
|
|
|
||||||
|
|
|
|
|
TouchSns |
Touch sensitivity setting |
15 |
120 |
||
|
|
|
|
|
||||||
|
|
|
|
|
VoiceSet ....................... |
Voice set on/off setting ............................................................... |
|
120 |
||
|
|
|
|
|
|
|||||
|
|
|
|
|
Pedal ............................ |
Selecting footswitch function .............................. |
16 ........... |
121 |
||
|
|
|
|
|
||||||
|
|
|
|
|
PBRange |
Pitch bend range setting |
17 |
122 |
||
|
|
|
|
|
||||||
|
|
|
F5 Midi |
|
|
|
||||
|
|
|
|
|
|
|||||
|
|
|
|
|
......................Template |
............................................................MIDI template vselection |
|
112 |
||
|
|
|
|
|
|
|||||
|
|
|
|
|
Load OK? ..................... |
Loading the selected MIDI template setting ............................... |
|
112 |
||
|
|
|
|
|
|
|||||
|
|
|
|
|
Transmit Ch .................. |
MIDI transmit channel setting ..................................................... |
|
114 |
||
|
|
|
|
|
|
|||||
|
|
|
|
|
Receive Ch .................. |
MIDI receive channel setting ...................................................... |
|
115 |
||
|
|
|
|
|
|
|||||
|
|
|
|
|
Local ............................ |
Local control on/off setting ......................................................... |
|
116 |
||
|
|
|
|
|
|
|||||
|
|
|
|
|
Clock ............................ |
External /Internal clock selection ................................................ |
|
116 |
||
|
|
|
|
|
|
|||||
|
|
|
|
|
Init Send |
Initial data send |
|
117 |
||
|
|
|
|
|
|
|||||
|
|
|
F6 ParameterEdit |
|
|
|
||||
|
|
|
|
|
|
|||||
|
|
|
|
|
Octave R1 ................... |
Octave setting of voice R1/R2/L .................................................. |
|
77 |
||
|
|
|
|
|
|
|||||
|
|
|
|
|
Octave T01 .................. |
Octave setting of song track ........................................................ |
|
77 |
||
|
|
|
|
|
|
|||||
|
|
|
|
|
Pan R1 ........................ |
Pan setting of voice R1/R2/L ....................................................... |
|
77 |
||
|
|
|
|
|
|
|||||
|
|
|
|
|
Pan RhM |
Pan setting of accompaniment track |
|
77 |
||
|
|
|
|
|
|
|||||
|
|
|
|
|
Pan T01 ....................... |
Pan setting of song track ............................................................. |
|
77 |
||
|
|
|
|
|
|
|||||
|
|
|
|
|
RevDepth R1 |
Reverb depth setting of voice R1/R2/L |
|
77 |
||
|
|
|
|
|
|
|||||
|
|
|
|
|
RevDepth RhM |
Reverb depth setting of accompaniment track |
|
77 |
||
|
|
|
|
|
|
|||||
|
|
|
|
|
RevDepth T01 ............. |
Reverb depth setting of song track .............................................. |
|
77 |
||
|
|
|
|
|
|
|||||
|
|
|
|
|
ChoDepth R1 |
Chorus depth setting of voice R1/R2/L |
|
77 |
||
|
|
|
|
|
|
|||||
|
|
|
|
|
ChoDepth RhM |
Chorus depth setting of accompaniment track |
|
77 |
||
|
|
|
|
|
|
|||||
|
|
|
|
|
ChoDepth T01 |
Chorus depth setting of song track |
|
77 |
||
|
|
|
|
|
|
|||||
|
|
|
|
|
DspDepth R1 .............. |
DSP depth setting of voice R1/R2/L ........................................... |
|
77 |
||
|
|
|
|
|
|
|||||
|
|
|
|
|
DspDepth RhM ........... |
DSP depth setting of accompaniment track ............................... |
|
77 |
||
|
|
|
|
|
|
|||||
|
|
|
|
|
DspDepth T01 ............. |
DSP depth setting of song track ................................................. |
|
77 |
||
|
|
|
|
|
|
|||||
23
21

Function Tree |
|
|
|
Button |
Menu/message display |
Function |
See page |
RECORD |
Song |
|
|
|
QuickRec ..................... |
User Song Quick recording ......................................................... |
80 |
|
MultiRec ....................... |
User Song Multi track recording .................................................. |
82 |
|
Punch In/Out ....... |
Punch in/out setting ..................................................................... |
84 |
|
Rec Start ............. |
Measure from which to start playback ......................................... |
84 |
|
Edit |
|
|
|
Quantize .............. |
Quantize ...................................................................................... |
86 |
|
Setup Dt .............. |
Setup data editing ....................................................................... |
88 |
|
Name .................. |
Naming User Songs .................................................................... |
90 |
|
Clear ................... |
Clearing user song data .............................................................. |
91 |
|
Style |
|
|
|
Record ......................... |
User Style recording .................................................................... |
96 |
|
Edit |
|
|
|
Quantize .............. |
Quantize ..................................................................................... |
102 |
|
Name .................. |
Namimg User Styles .................................................................. |
104 |
|
Clear ................... |
Clearing user style data .............................................................. |
104 |
|
MultiPad |
|
|
|
Record ......................... |
User Pad recording ...................................................................... |
92 |
|
Edit |
|
|
|
ChdMatch ........... |
Chord match on/off setting .......................................................... |
94 |
|
Name .................. |
Naming user pads ....................................................................... |
94 |
|
Clear ................... |
Clearing user pad data ................................................................ |
95 |
 Direct Access Chart
|
Function Tree number/function |
Operation: |
+ button listed below |
|
|
|
|
1 |
Volume adjustment of Voice L |
PART ON/OFF [VOICE L] |
|
|
|
|
|
2 |
Volume adjustment of Voice R1 |
PART ON/OFF [VOICE R1] |
|
|
|
|
|
3 |
Volume adjustment of Voice R2 |
PART ON/OFF [VOICE R2] |
|
|
|
|
|
4 |
Multi pad bank selection |
MULTI PAD [STOP] |
|
|
|
|
|
5 |
Chord match on/off setting |
MULTI PAD [1]-[4] |
|
|
|
|
|
6 |
Registration Memory bank selection |
REGISTRATION MEMORY [1]-[4] |
|
|
|
|
|
7 |
Namimg Registration Memory bank |
REGISTRATION MEMORY [MEMORY] |
|
|
|
|
|
8 |
DSP type selection |
[DSP] |
|
|
|
|
|
9 |
Harmony/Echo type selection |
[HARMONY/ECHO] |
|
|
|
|
|
10 |
Metronome on/off setting |
[TEMPO/TAP] |
|
|
|
|
|
11 |
Part octave setting of Voice L |
[VOICE L] |
|
|
|
|
|
12 |
Part octave setting of Voice R1 |
[VOICE R1] |
|
|
|
|
|
13 |
Part octave setting of Voice R2 |
[VOICE R2] |
|
|
|
|
|
14 |
Split point setting |
[ACMP ON/OFF] |
|
|
|
|
|
15 |
Touch sensitivity setting |
[TOUCH] |
|
|
|
|
|
16 |
Selecting footswitch function |
Footswitch |
|
|
|
|
|
17 |
Pitch bend range setting |
Pitch bend wheel |
|
|
|
|
|
24
22
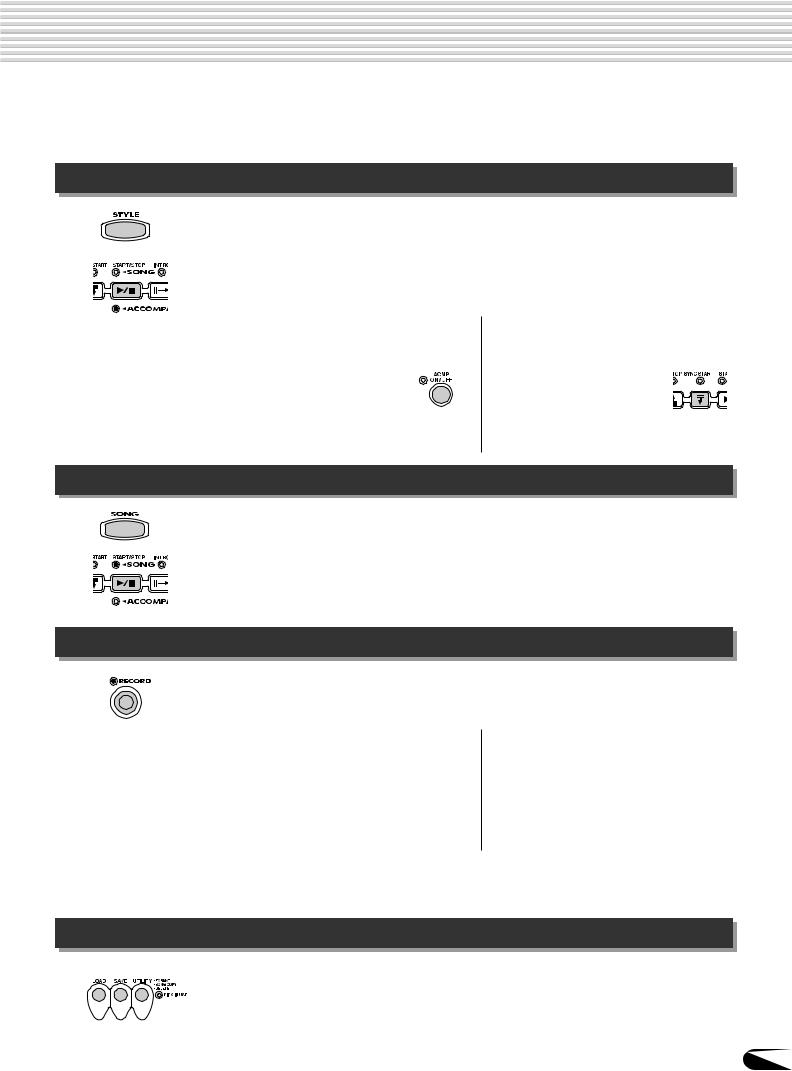
Mode
Depending on the panel operation used, the PSR-540 has several fundamentally different conditions (or methods of operation). Each of these condition is called a mode. This section explains the main modes of the instrument.
Style Mode page 32
Select this mode by pressing the [STYLE] button. (This is the default mode when the power is turned on.)
The Style mode is used for playing the full keyboard normally, and when using the auto accompaniment.
Styles are the rhythm/accompaniment pattterns which are played by the auto accompaniment feature.
● Auto accompaniment (ACMP) on/off |
● Synchronized Start standby |
|
.............................................. page 33 |
(SYNC START) on/off ................. |
page 33 |
The [ACMP ON/OFF] button |
The [SYNC START] button |
|
switches on and off. |
switches on and off. |
|
When auto accompaniment |
When Synchronized Start |
|
is on, the left side of the |
standby is on, the auto |
|
keyboard is used for playing/ |
accompaniment starts as |
|
indicating chords. |
soon as you play a key on |
|
|
the keyboard. |
|
Song Mode |
|
page 68 |
Select this mode by pressing the [SONG] button or inserting the disk that contains song data into the disk drive.
The Song mode is used for playing the full keyboard normally, and for playing back the songs.
Record Mode
Select this mode by pressing the [RECORD] button.
In the Record mode you can record your own original performances and songs, create original styles and Multi Pad phrases.
● Song record mode ..................... |
page 78 |
● Pad record mode ........................ |
page 92 |
• Rehearsal mode (Sync Start off) |
|
• Rehearsal mode (Sync Start off) |
|
• Record (Synchronized Start) standby |
• Record (Synchronized Start) standby |
||
• Recording |
|
• Recording |
|
●Style record mode ...................... page 96
•Rehearsal mode (Sync Start off)
•Record (Synchronized Start) standby
•Recording
When Record (Synchronized Start) standby is on, the recording starts as soon as you play a key on the keyboard.
Disk Mode |
page 57 |
|
Select this mode by pressing the [LOAD] button, [SAVE] button or the [UTILITY] |
|
button. |
|
In the Disk mode you can save and load important data. |
|
In the Disk mode, no panel operations can be executed (except for disk operations). |
25
23
Playing Voices
The PSR-540 has a huge selection of various musical instrument voices which you can play. Try out the different voices referring to the voice list at the end of this manual (page 123).
|
Select and play the voices of different musical instruments |
|
|
• Selecting a Voice ............................................................................................ |
page 26 |
|
• Keyboard Percussion ..................................................................................... |
page 31 |
|
Assign three different voices to the keyboard and play them |
|
|
• Playing Two Voices (R1, R2) Simultaneously ................................................. |
page 27 |
|
• Playing Different Voices with the Left (L) and Right (R1, R2) Hands ............. |
page 28 |
|
• Functions of the Keyboard ............................................................................. |
page 29 |
|
Other voice-related functions |
|
|
• Pitch Bend Wheel .......................................................................................... |
page 30 |
|
• Transpose ....................................................................................................... |
page 30 |
|
• Sustain ........................................................................................................... |
page 30 |
|
• Touch Sensitivity .......................................................................................... |
page 120 |
 Selecting a Voice
1 Press the [VOICE R1] button.
001 Grand Piano
|
|
|
CHORD |
|
|
|
|
|
BACK |
|
NEXT |
|
|
|
|
|
|
|
TRACK(1~16) |
0 ~ 9 |
|
|
VOICE LR12 |
|
||||||||||||||||||||||||||
|
|
|
|
|
dim6 |
119 |
|
|
|
|
|
EASY |
|
|
STYLE |
|
||||||||||||||||||||||||||||||||||
|
|
|
|
|
513 |
|
START/STOP |
KEYBOARD |
|
NAVIGATOR |
PART |
|
DIAL |
|
|
|
/YES |
|
SONG |
|
|
|
|
|||||||||||||||||||||||||||
|
|
|
|
|
mM 7augsus4 |
|
|
|
|
|
|
|
|
|
|
|
|
|
|
|
|
|
|
|
|
|
|
|
|
|
|
|
|
|
|
|
|
FUNCTION |
|
|||||||||||
|
|
|
TRANSPOSE |
|
|
REGIST- |
|
|
|
|
|
TEMPO |
|
|
|
|
MEASURE |
|
|
|
|
BEAT |
|
|
|
|
|
|
DSP(FAST) |
TOUCH |
|
|||||||||||||||||||
|
|
|
|
|
|
|
|
|
|
|
|
|
|
|
|
|
|
|
|
|
|
|
|
|
|
|
|
|
|
|
|
|||||||||||||||||||
|
|
|
|
|
|
|
|
|
|
RATION |
|
|
|
|
|
|
|
|
|
|
|
|
|
|
|
|
|
|
|
|
|
|
|
|
|
|
|
|
|
SUSTAIN |
HARMONY |
|
||||||||
|
|
|
|
|
|
|
|
|
|
|
|
|
|
|
|
|
|
|
|
|
|
|
|
|
|
|
|
|
|
|
|
|
|
|
|
|
|
|
|
|
|
|
|
|||||||
|
|
|
|
REC |
|
|
REC |
|
|
REC |
|
|
REC |
|
|
REC |
|
REC |
REC |
|
|
REC |
|
|
REC |
|
REC |
|
REC |
REC |
|
|
REC |
|
REC |
|
|
REC |
|
|
REC |
|
||||||||
|
|
|
|
|
|
|
|
|
|
|
|
|
|
|
|
|
|
|
|
|
|
|
|
|
|
|
|
|
|
|
|
|
|
|
|
|
|
|
|
|
|
|
|
|
|
|
|
|
|
|
|
1 |
2 |
3 |
4 |
5 |
6 |
7 |
8 |
9 |
10 |
11 |
12 |
13 |
14 |
15 |
16 |
|
|||||||||||||||||||||||||||||||||
|
|
|
|
|
|
|
|
|
|
|
|
|
|
|
|
|
|
|
|
|
|
|
|
|
|
|
|
|
|
|
|
|
|
|
|
|
|
|
|
|
|
|
|
|
|
|
|
|
|
|
2 Select a voice.
Use the data dial, the [+/YES] button, the [-/NO] button or the number buttons
[1]-[0].
Refer to the Voice List (page 123).
•The voice selected here is called voice R1 (RIGHT 1). See page 29 for more information on voice R1.
002 Bright Piano
3 Play the keyboard and adjust the volume.
26
24

Playing Voices
 Playing Two Voices (R1, R2)
1 Press the [PART ON/OFF VOICE R2] button.
2 Play the voices.
Two different voices are sounded simultaneously in a layer.
Voice R1 (RIGHT 1) is the first voice of the layer and is meant to be played with the right hand. The second voice is called voice R2 (RIGHT 2) and is also played with the right hand.
Selecting a voice for VOICE R2
1 Press the [VOICE R2] button.
002 Bright Piano
2 |
Select a voice. |
Use the data dial, the [+/YES] button, the [-/NO] button or the number buttons |
|
|
[1]-[0]. |
Refer to the Voice List (page 123).
The voices available for selection here (VOICE R2) are the same as those available for VOICE R1 (selected on page 26).
3 Play the voice.
27
25
Playing Voices
 Playing Different Voices with the Left (L) and Right (R1, R2) Hands
1 Press the [PART ON/OFF VOICE L] button.
2 Play the voices.
The notes you play with your right and left hands sound two different voices.


 • The point on the keyboard that separates voice L and Split Point voice R1 is called the “split
point” (page 29).
 Voice L
  Voice R1
Voice R1 (RIGHT 1) is meant to be played with the right hand. Voice L (LEFT) is played with the left hand.
Selecting a voice for VOICE L
1
2
Press the [VOICE L] button.
002 Bright Piano
Select a voice.
Use the data dial, the [+/YES] button, the [-/NO] button or the number buttons
[1]-[0].
Refer to the Voice List (page 123).
The voices available for selection here (VOICE L) are the same as those available for VOICE R1 (selected on page 26).
3 Play the voices.
 Split Point
 Voice L
  Voice R1
28
26
Playing Voices
Split Point
The point on the keyboard that separates voice L and voice R1/R2 is called the “split point”.
The split point is set to F#2 at the factory setting, however you can set this to any key you wish. Refer to page 119 for instructions on setting the split point.
Split Point (F#2)
•Each key has a note name; for example, the lowest (farthest left) key on the keyboard corresponds to C1, and the highest (farthest right) key to C6. (See below for details.)
 Voice L
  Voice R1/R2
 Functions of the Keyboard
As explained above, the keyboard of the PSR-540 can sound three different voices. Here’s a short summary of the various ways of playing voices.
● Playing a Single Voice
Voice R1
● Playing Two Voices
Voice R1 + R2
●Playing Separate Voices with the Right and Left Hands
Voice L 
 Voice R1
Voice L 
 Voice R1 + R2
In addition, the keyboard of the PSR-540 has other important functions besides playing voices (as shown below).
● Auto Accompaniment Section
When the auto accompaniment is set to on (page 33), the key range of voice L becomes the range for playing/ indicating chords.

 Voice R1/R2 Auto accompaniment
section
● Naming
The keyboard can also be used to name song files on a floppy disk, User Styles,
User Pad banks and Registration Memory banks (page 21).
Each key has a note name; for example, the lowest (farthest left) key on the keyboard corresponds to C1, and the highest (farthest right) key to C6.
C#1 D#1 F#1 G#1 A#1
C1 |
D1 |
E1 |
F1 |
G1 |
A1 |
B1 |
|
|
|
|
|
|
|
|
|
|
|
|
|
|
|
|
|
|
|
|
|
|
|
|
|
|
|
|
|
|
|
C1 - B1 |
|
C2 - B2 |
|
|
C3 - B3 |
|
|
C4 - B4 |
|
|
C5 - B5 C6 |
29 |
|||||||||||||||||||||||
|
|
|
|
|
|
|
|
|
|
|
|
|
|
|
|
|
|
|
|
|
|
|
|
|
|
|
|
|
|
|
|
|
|
|
|
|
27
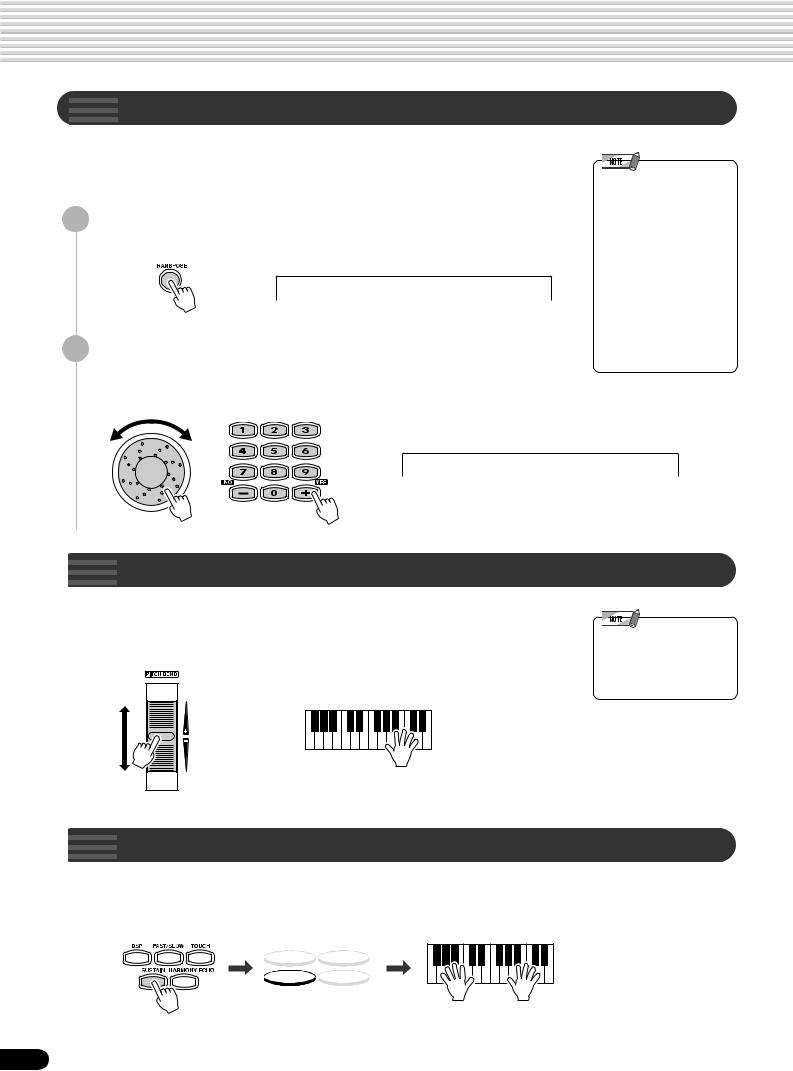
Playing Voices
This function allows the overall pitch of the PSR-540 to be transposed up or down by a maximum of one octave in semitone increments. The transpose range is from -12 to +12.
1 |
Press the [TRANSPOSE] button. |
|
|
|
Transpose |
= |
0 |
2 |
Set the transposition. |
|
|
Use the data dial, the [+/YES] button, the [-/NO] button or the number buttons |
|||
|
[1]-[0]. |
|
|
Transpose
•The Transpose function cannot be applied when a drum kit is the selected voice (page 31).
•Press the [+/YES] and [-/NO] buttons simultaneously to instantly reset the transpose value to “0”.
•The new TRANSPOSE value will take effect from the next key played.
•Minus values can be entered by using the number buttons while holding the [-/NO] button.
=4
 Pitch Bend Wheel
Use the PSR-540 pitch bend wheel to bend notes up (roll the wheel away from you) or down (roll the wheel toward you) while playing the keyboard. The pitch bend wheel is self-centering and will automatically return to nornal pitch when released.
•The maximum pitch bend range can be set via the Pitch Bend Range function in the Utility function group (page 122).
 Sustain
When the Sustain features is ON, all notes played on the keyboard have a longer sustain. Press the [SUSTAIN] button to turn the SUSTAIN effect ON or OFF.
DSP(FAST) TOUCH
SUSTAIN HARMONY
30
28
 Loading...