


 Loading...
2-899-690-14 (1)
Mini Hi-Fi
Component
System
Operating Instructions
MHC-RG595/RG495/RG295
© 2007 Sony Corporation

WARNING
To reduce the risk of fire or electric shock, do not expose this apparatus to rain or moisture.
To prevent fire, do not cover the ventilation of the apparatus with news papers, table-cloths, curtains, etc. And don’t place lighted candles on the apparatus.
To prevent fire or shock hazard, do not place objects filled with liquids, such as vases, on the apparatus.
Install this system so that the power cord can be unplugged from the wall socket immediately in the event of trouble.
Do not install the appliance in a confined space, such as a bookcase or built-in cabinet.
Batteries or batteries installed apparatus shall not be exposed to excessive heat such as sunshine, fire or the like.
This appliance is classified
as a CLASS 1 LASER product. This marking is located on the rear exterior.
Don’t throw away the battery with general house waste, dispose of it correctly as chemical waste.
NOTICE FOR THE CUSTOMERS IN THE UNITED KINGDOM
A moulded plug complying with BS1363 is fitted to this equipment for your safety and convenience.
Should the fuse in the plug supplied need to be replaced, a fuse of the same rating as the supplied one and approved by ASTA or BSI to BS1362, (i.e., marked with  or
or  mark) must be used.
If the plug supplied with this equipment has a detachable fuse cover, be sure to attach the fuse cover after you change the fuse. Never use the plug without the fuse cover. If you should lose the fuse cover, please contact your nearest Sony service station.
Disposal of Old Electrical & Electronic Equipment (Applicable in the European
Union and other European countries with separate
collection systems)
This symbol on the product or on its packaging indicates that this product shall not be treated as household waste. Instead it shall be handed over to the applicable collection point for
the recycling of electrical and electronic equipment. By ensuring this product is disposed of correctly, you will help prevent potential negative consequences for the environment and human health, which could otherwise be caused by inappropriate waste handling of this product. The recycling of materials will help to conserve natural resources. For more detailed information about recycling of this product, please contact your local Civic Office, your household
waste disposal service or the shop where you purchased the product.
Applicable accessories: Remote commander
The manufacturer of this product is Sony Corporation, 1-7-1 Konan Minato-ku Tokyo, 108-0075 Japan. The Authorized Representative for EMC and product safety is Sony Deutschland GmbH, Hedelfinger
Strasse 61, 70327 Stuttgart, Germany. For any service or guarantee matters please refer to the addresses given in separate service or guarantee documents.
Note on DualDiscs
A DualDisc is a two sided disc product which mates DVD recorded material on one side with digital audio material on the other side. However, since the audio material side does not conform to the Compact Disc (CD) standard, playback on this product is not guaranteed.
Music discs encoded with copyright protection technologies
This product is designed to playback discs that conform to the Compact Disc (CD) standard. Recently, various music discs encoded with copyright protection technologies are marketed by some record companies. Please be aware that among those discs, there are some that do not conform to the CD standard and may not be playable by this product.
MPEG Layer-3 audio coding technology and patents licensed from Fraunhofer IIS and Thomson.
2GB

Note on power cord plug shapes (Saudi Arabian model only)
For AC 220 V wall sockets:
1Make the appropriate voltage setting on the system. (only for models with a voltage selector)
2Make sure that the 13 A 3-pin plug (Type BF) is securely attached to the power cord. (The 13 A 3-pin plug is attached when shipped from the factory.)
For AC 127 V wall sockets:
1Make the appropriate voltage setting on the system. (only for models with a voltage selector)
2Remove the 13 A 3-pin plug using a screwdriver.
3Attach the supplied parallel blade plug (Type A).
3GB

Table of Contents |
|
Guide to parts and controls............... |
5 |
Getting Started |
|
Hooking up the system securely ....... |
8 |
Setting the clock.............................. |
10 |
Basic Operations |
|
Playing a CD/MP3 disc.................... |
11 |
Listening to the radio....................... |
12 |
Playing a tape.................................. |
13 |
Using optional audio components... |
14 |
Adjusting the sound......................... |
14 |
Changing the display ...................... |
15 |
Other Operations |
|
Creating your own CD program |
|
(Program Play)................................. |
16 |
Presetting radio stations.................. |
17 |
Recording onto a tape |
|
(CD Synchro recording/Manual |
|
recording) ........................................ |
18 |
Creating your own sound effect ...... |
19 |
Using the Timers.............................. |
19 |
Others |
|
Troubleshooting ............................... |
21 |
Messages ........................................ |
23 |
Precautions...................................... |
24 |
Specifications .................................. |
26 |
4GB

Guide to parts and controls
Unit
Remote
This manual mainly explains operations using the remote, but the same operations can also be performed using the buttons on the unit having the same or similar names.
/ (on/standby) button (page 10, 20, 22)
Press to turn on the system.
STANDBY indicator (page 15, 21)
Lights up when the system is turned off.
CD button (page 11)
Press to select the CD function.
TUNER/BAND button (page 12)
Press to select the TUNER function. Press to select FM or AM reception mode.
Unit:TAPE A/B button (page 13) Remote:TAPE button (page 13)
Press to select the TAPE function. Press to select TAPE A or TAPE B.
AUDIO IN button (page 14)
Press to select the AUDIO IN function.
FUNCTION button
Press to select the function.
SUBWOOFER indicator (MHCRG595/RG495 only) (page 14)
Lights up when the subwoofer is turned on.
SUBWOOFER button (MHCRG595/RG495 only) (page 14)
Press to turn on and off the subwoofer.
Continued
controls and parts to Guide
5GB
DISPLAY button (page 15)
Press to change the information on the display.
ILLUMINATION button (page 15)
Press to change the illumination pattern around the VOLUME control .
Buttons for synchro recording or manual recording (page 18) REC PAUSE/START button,
CD SYNC button
Press to record on a tape.
PUSH button (page 13)
Press to insert or eject a tape.
Playback buttons
(page 11, 12, 13)
Unit: (play/pause) button Remote: (play) button,
(pause) button
Press to start or pause playback.
(stop) button (page 11, 12, 13)
Press to stop playback.
/ (go back/go forward) button (page 11)
Press to select a track or file.
Unit:TUNING +/– button (page 12)
Remote: +/– (tuning) button (page 12)
Press to tune in the desired station.
 +/– (select folder) button (page 11)
Press to select a folder on an MP3 disc.
/ (rewind/fast forward) button (page 11, 13)
Press to find a point in a track or file.
MULTI JOG dial ( / (go back/go forward), +/– (tuning)) (page 11, 19)
Turn to select a track or file. Turn to tune in the desired station. (Same as the/ , +/– buttons on the remote)
PHONES jack
Connect the headphones.
AUDIO IN jack (page 14)
Connect to an audio component.
Unit:VOLUME control (page 11, 12, 13, 14)
Turn to adjust the volume.
Remote:VOLUME +/– button (page 11, 12, 13, 14)
Press to adjust the volume.
EQ BAND button (page 19)
Press to select the frequency band.
ENTER button (page 10, 16, 17, 20)
Press to enter the settings.
6GB

Sound buttons (page 14, 19) Unit: GROOVE button, SURROUND button
Remote: EQ button
Press to select the sound.
(open/close) button (page 11)
Press to insert and eject a disc.
DISC 1 – 3 button (page 11)
Press to select a disc. Press to switch to the CD function from other function.
Unit: DISC SKIP/EX-CHANGE button (page 11)
Press to select a disc. Press to exchange a disc while playing.
Remote: DISC SKIP button (page 11)
Press to select a disc.
Remote sensor (page 21)
CLOCK/TIMER SELECT button (page 20)
CLOCK/TIMER SET button
(page 10, 19)
Press to set the clock and the timers.
REPEAT/FM MODE button (page 11, 12)
Press to listen to a disc, a single track or file repeatedly. Press to select the FM reception mode (monaural or stereo).
Battery compartment lid (page 10)
CLEAR button (page 16)
Press to delete a pre-programmed track.
TUNER MEMORY button (page 17)
Press to preset the radio station.
PLAY MODE/TUNING MODE button (page 11, 12, 13)
Press to select the play mode of a CD, MP3 or tape.
Press to select the tuning mode.
SLEEP button (page 19)
Press to set the Sleep Timer.
controls and parts to Guide
7GB
Getting Started
Hooking up the system securely
When carrying this system |
|
|
1 |
Remove all discs to protect the CD mechanism. |
|
2 |
Press CD to select the CD function. |
|
3 |
Hold down on the unit, and press / on |
AM loop antenna |
|
the unit until “STANDBY” appears. |
|
|
|
|
4 |
After “LOCK” appears, unplug the power cord. |
|
|
|
|
Subwoofer (MHC-RG595/RG495 only)
Place the subwoofer vertically to obtain a better bass reproduction. Also, position the subwoofer:
–on a solid floor where resonance is unlikely to occur.
–at least a few centimeters away from the wall.
–away from the center of the room or place a bookshelf against a wall, to avoid generating a standing wave.
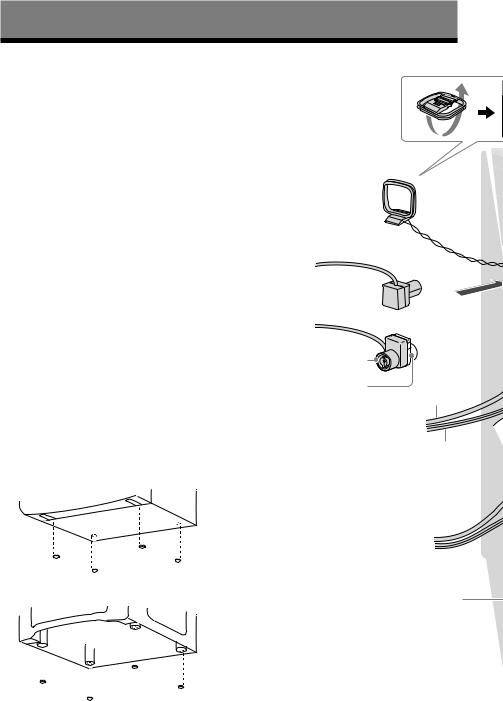
Speakers and subwoofer
Attach the supplied speaker pads to the bottom of the front speakers and subwoofer to prevent slipping.
Front speaker for all models, Subwoofer for MHC-RG495
FM lead antenna (Extend it horizontally.)
|
or |
Brown |
|
other regions |
|
White side for North |
Solid |
American model |
Subwoofer 

Striped (Black/ )
Front speaker (right)
Subwoofer for MHC-RG595 |
Solid (Red/ ) |
|
8GB

Antennas
Find a location and an orientation that provide good reception, and then set up the antenna. Keep the antennas away from the speaker cords to avoid picking up noise.
Started Getting
Speakers and subwoofer
Insert only the stripped portion of the cord.
Striped (Black/ ) |
Front speaker (left)
Power
For models with a voltage selector, set VOLTAGE SELECTOR to the local power line voltage.
Connect the power cord to a wall socket. The demonstration appears in the display.
If the plug does not fit the wall socket, detach the supplied plug adaptor (only for models equipped with an adaptor).
*Saudi Arabian model: 120 – 127 V
Wall socket
Continued
9GB
Loading...