


 Loading...
Operating Instructions
Hardware Guide
1 Guide to the Printer
2 Setting Up the Printer
3Installing Options
4Connecting the Printer
5 Configuration
6Loading Paper
7 Maintaining the Printer
8 Adjusting the Printer
9Troubleshooting
10Removing Misfed Paper
11Appendix
Read this manual carefully before you use this machine and keep it handy for future reference. For safe and correct use, be sure to read "Safety Information" before using the machine.
Introduction
This manual contains detailed instructions and notes on the operation and use of this machine. For your safety and benefit, read this manual carefully before using the machine. Keep this manual in a handy place for quick reference.
Do not copy or print any item for which reproduction is prohibited by law. Copying or printing the following items is generally prohibited by local law:
bank notes, revenue stamps, bonds, stock certificates, bank drafts, checks, passports, driver's licenses.
The preceding list is meant as a guide only and is not inclusive. We assume no responsibility for its completeness or accuracy. If you have any questions concerning the legality of copying or printing certain items, consult with your legal advisor.
Important
Contents of this manual are subject to change without prior notice.
In no event will the company be liable for direct, indirect, special, incidental, or consequential damages as a result of handling or operating the machine.
For good print quality, the manufacturer recommends that you use genuine toner from the manufacturer.
The manufacturer shall not be responsible for any damage or expense that might result from the use of parts other than genuine parts from the manufacturer with your office products.
Some illustrations in this manual might be slightly different from the machine.
Certain options might not be available in some countries. For details, please contact your local dealer.

TABLE OF CONTENTS |
|
How to Read This Manual................................................................................................................................. |
6 |
Symbols........................................................................................................................................................... |
6 |
Model-Specific Information............................................................................................................................... |
7 |
Positions of WARNING and CAUTION Labels............................................................................................... |
8 |
Power Switch Symbols................................................................................................................................... |
9 |
Manuals for This Printer................................................................................................................................... |
10 |
List of Options................................................................................................................................................... |
12 |
Operating Instructions...................................................................................................................................... |
13 |
Reading the HTML Manuals on the CD-ROMs......................................................................................... |
13 |
Reading the HTML Manuals That You Install on the Computer............................................................... |
13 |
1. Guide to the Printer |
|
Exterior: Front View.......................................................................................................................................... |
15 |
Exterior: Rear View........................................................................................................................................... |
17 |
Interior............................................................................................................................................................... |
19 |
Control Panel.................................................................................................................................................... |
21 |
Display Panel.................................................................................................................................................... |
23 |
Entering Characters.......................................................................................................................................... |
24 |
How to Enter Characters............................................................................................................................. |
25 |
2. Setting Up the Printer |
|
Printer Setup Procedure................................................................................................................................... |
29 |
Place to Install................................................................................................................................................... |
30 |
Unpacking........................................................................................................................................................ |
34 |
Turning the Printer's Power On and Off.......................................................................................................... |
40 |
Turning on the Power................................................................................................................................... |
40 |
Turning off the Power................................................................................................................................... |
42 |
Saving Energy.............................................................................................................................................. |
43 |
Selecting the Display Language...................................................................................................................... |
44 |
Test Printing....................................................................................................................................................... |
45 |
3. Installing Options |
|
Available Options............................................................................................................................................ |
47 |
Order of Option Installation........................................................................................................................ |
47 |
Where to Install Options............................................................................................................................. |
48 |
Caution When Re-installing the Controller Board..................................................................................... |
49 |
1

Attaching the Paper Feed Unit........................................................................................................................ |
51 |
Attaching the Envelope Feeder....................................................................................................................... |
54 |
Installing the Memory Expansion Units.......................................................................................................... |
56 |
Installing the Hard Disk................................................................................................................................ |
56 |
Installing the SDRAM Module.................................................................................................................... |
60 |
Installing the Interface Units............................................................................................................................. |
64 |
Installing the Gigabit Ethernet Board......................................................................................................... |
64 |
Installing the Wireless LAN Interface Board.............................................................................................. |
66 |
Installing the IEEE 1284 Interface Board................................................................................................... |
68 |
Installing the SD Memory Card Options........................................................................................................ |
71 |
Attaching the Duplex Unit................................................................................................................................ |
74 |
4. Connecting the Printer |
|
Ethernet Cable Connection............................................................................................................................. |
77 |
Reading the LED Lamps............................................................................................................................... |
80 |
USB Cable Connection.................................................................................................................................... |
81 |
Parallel Cable Connection.............................................................................................................................. |
83 |
5. Configuration |
|
Ethernet Configuration..................................................................................................................................... |
85 |
Specifying an IP Address (No DHCP)........................................................................................................ |
86 |
Receiving an IP Address Automatically (DHCP)........................................................................................ |
88 |
Configuring Network Settings When Using NetWare............................................................................. |
89 |
Setting the Ethernet Speed.......................................................................................................................... |
91 |
Wireless LAN Configuration........................................................................................................................... |
94 |
Setting the SSID............................................................................................................................................ |
96 |
Confirming Wireless Network Connectivity............................................................................................... |
97 |
Cautions When Using a Wireless LAN...................................................................................................... |
97 |
Setting Security Method of Wireless LAN...................................................................................................... |
99 |
Setting a WEP Key....................................................................................................................................... |
99 |
Setting WPA............................................................................................................................................... |
100 |
Configuring IEEE 802.1X.............................................................................................................................. |
104 |
Installing a Site Certificate........................................................................................................................ |
104 |
Installing Device Certificate...................................................................................................................... |
104 |
Setting Items of IEEE 802.1X for Ethernet................................................................................................ |
105 |
2

Setting Items of IEEE 802.1X for Wireless LAN...................................................................................... |
107 |
6. Loading Paper |
|
Supported Paper for Each Tray.................................................................................................................... |
111 |
Symbols...................................................................................................................................................... |
111 |
Standard Paper Feed Tray....................................................................................................................... |
111 |
Optional Paper Feed Tray........................................................................................................................ |
112 |
Bypass Tray................................................................................................................................................ |
113 |
Envelope Feeder........................................................................................................................................ |
113 |
Duplex Unit................................................................................................................................................ |
114 |
Supported Paper Types................................................................................................................................. |
115 |
Plain Paper................................................................................................................................................. |
115 |
Thick Paper................................................................................................................................................. |
115 |
Letterhead.................................................................................................................................................. |
116 |
Label Paper................................................................................................................................................ |
116 |
Special Paper............................................................................................................................................ |
116 |
Preprinted Paper........................................................................................................................................ |
117 |
Color Paper................................................................................................................................................ |
117 |
Recycled Paper.......................................................................................................................................... |
117 |
OHP transparencies.................................................................................................................................. |
117 |
Envelopes................................................................................................................................................... |
118 |
Storing Paper............................................................................................................................................. |
120 |
Non-Recommended Paper Types................................................................................................................ |
121 |
Print Area........................................................................................................................................................ |
122 |
Loading Paper in Trays.................................................................................................................................. |
124 |
Loading Paper into a Standard or Optional Paper Feed Tray.............................................................. |
124 |
Loading Paper onto Bypass Tray............................................................................................................. |
133 |
Loading Envelopes........................................................................................................................................ |
140 |
Loading Envelopes into the Bypass Tray................................................................................................. |
140 |
Loading Envelopes into the Envelope Feeder Unit................................................................................. |
146 |
Printing on Fixed-Orientation Paper............................................................................................................. |
151 |
Registering Unique Names to Paper Types................................................................................................. |
153 |
Registering Names to Paper Types.......................................................................................................... |
153 |
Setting User Paper Types to Trays............................................................................................................ |
153 |
3

Printing Using Registered Paper Types.................................................................................................... |
154 |
7. Maintaining the Printer |
|
Replacing the Print Cartridge........................................................................................................................ |
155 |
Replacing the Maintenance Kit.................................................................................................................... |
161 |
Before Replacing....................................................................................................................................... |
161 |
Replacing the Friction Pad........................................................................................................................ |
162 |
Replacing the Transfer Roller.................................................................................................................... |
164 |
Replacing the Paper Feed Roller.............................................................................................................. |
168 |
Replacing the Fusing Unit......................................................................................................................... |
171 |
Cautions When Cleaning.............................................................................................................................. |
177 |
Cleaning the Friction Pad and the Paper Feed Roller................................................................................. |
178 |
Cleaning the Registration Roller................................................................................................................... |
182 |
8. Adjusting the Printer |
|
Adjusting the Image Density......................................................................................................................... |
185 |
Adjusting Printing Position............................................................................................................................. |
187 |
Reducing Paper Curl...................................................................................................................................... |
190 |
9. Troubleshooting |
|
Error and Status Messages Appear on the Control Panel.......................................................................... |
191 |
Status Messages (in alphabetical order)................................................................................................. |
191 |
Alert Messages (in alphabetical order)................................................................................................... |
192 |
Panel Tones.................................................................................................................................................... |
197 |
Printer Does Not Print.................................................................................................................................... |
198 |
Checking the Port Connection.................................................................................................................. |
199 |
Other Printing Problems................................................................................................................................. |
201 |
When You Cannot Print Properly............................................................................................................. |
201 |
Paper Misfeeds Occur Frequently........................................................................................................... |
203 |
The printed image is different from the image on the computer............................................................ |
205 |
When Printer is Not Functioning Properly............................................................................................... |
206 |
Additional Troubleshooting........................................................................................................................... |
208 |
10. Removing Misfed Paper |
|
When Paper is Jammed................................................................................................................................. |
211 |
Paper Misfeed Message (A)......................................................................................................................... |
213 |
Removing Misfed Tray 1........................................................................................................................... |
213 |
4

Removing Misfed Bypass Tray................................................................................................................. |
215 |
Paper Misfeed Message (B)......................................................................................................................... |
218 |
Paper Misfeed Message (C)......................................................................................................................... |
220 |
Paper Misfeed Message (Y1)(Y2)............................................................................................................... |
225 |
Paper Misfeed Message (Z)......................................................................................................................... |
227 |
Removing Misfed Paper Inside the Cover............................................................................................... |
227 |
Removing Misfed Paper Inside the Duplex Unit...................................................................................... |
229 |
11. Appendix |
|
Moving and Transporting the Printer............................................................................................................ |
231 |
Moving the Printer in a Short Distance.................................................................................................... |
231 |
Consumables.................................................................................................................................................. |
233 |
Print Cartridge............................................................................................................................................ |
233 |
Maintenance Kit........................................................................................................................................ |
233 |
Specifications................................................................................................................................................. |
235 |
Mainframe................................................................................................................................................. |
235 |
Options....................................................................................................................................................... |
237 |
Trademarks..................................................................................................................................................... |
241 |
INDEX........................................................................................................................................................... |
243 |
5

How to Read This Manual
Symbols
This manual uses the following symbols:
Indicates points to pay attention to when using the machine, and explanations of likely causes of paper misfeeds, damage to originals, or loss of data. Be sure to read these explanations.
Indicates supplementary explanations of the machine's functions, and instructions on resolving user errors.
This symbol is located at the end of sections. It indicates where you can find further relevant information.
[ ]
Indicates the names of keys on the machine's display or control panels.


 (mainly Europe and Asia)


 (mainly North America)
Differences in the functions of Region A and Region B models are indicated by two symbols. Read the information indicated by the symbol that corresponds to the region of the model you are using. For details about which symbol corresponds to the model you are using, see p.7 "Model-Specific Information".
6
Model-Specific Information
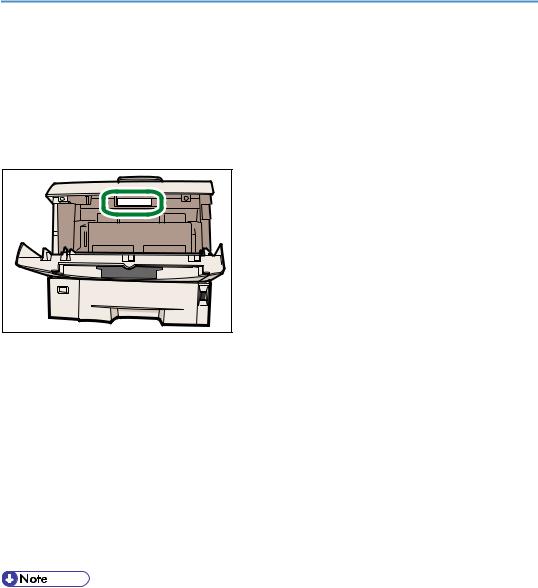
This section explains how you can identify the region your machine belongs to.
There is a label on the front cover of the printer, and it is located in the position shown below. The label contains details that identify the region your machine belongs to. Read the label.
CEE070 |
The following information is region-specific. Read the information under the symbol that corresponds to the region of your machine.


 (mainly Europe and Asia)
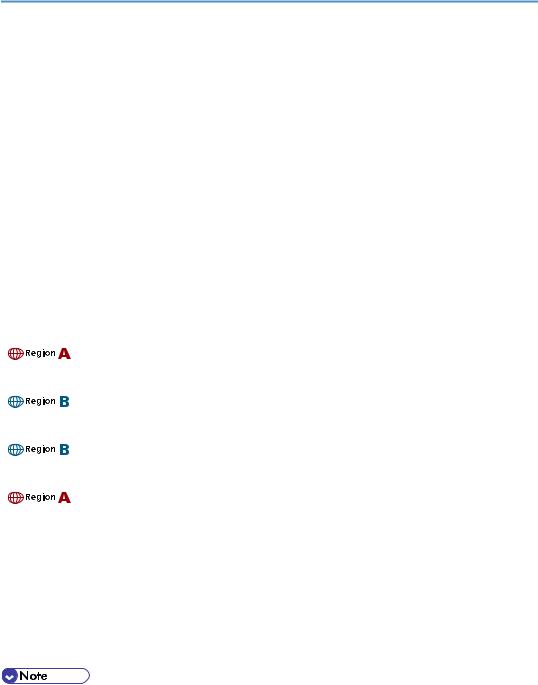
If the label contains the following, your machine is a region A model:
•CODE XXXX -22, -27
•220-240V


 (mainly North America)
If the label contains the following, your machine is a region B model:
•CODE XXXX -11, -17
•120V
•Dimensions in this manual are given in two units of measure: metric and inch. If your machine is a Region A model, refer to the metric units. If your machine is a Region B model, refer to the inch units.
7

Positions of WARNING and CAUTION Labels
This machine has labels for  WARNING and
  CAUTION at the positions shown below. For safety, please follow the instructions and handle the machine as indicated.
1 |
2 |
3 |
4 |
5 |
CEE060
CEE129
Do not incinerate toner or toner containers. Toner dust may cause flashback when exposed to open flames.
CEE130
The inside of this printer becomes very hot. Do not touch parts with this label (indicates a hot surface). Touching these parts may result in burns.
CEE131
The printer weights about 17.5 kg (38.6 lb.). When moving the printer, detach the optional paper feed and duplex units first, and then use the inset grips on both sides to lift the printer. Otherwise the printer could break or cause injury if dropped.
8
CEE132
The inside of this printer becomes very hot. Do not touch parts with this label (indicates a hot surface). Touching these parts may result in burns.
Power Switch Symbols
The meanings of the symbols for the switches on this machine are as follows:
•: POWER ON
• : POWER OFF
9

Manuals for This Printer
Read this manual carefully before you use this printer.
Refer to the manuals that are relevant to what you want to do with the printer.
•Media differ according to manual.
•The printed and electronic versions of a manual have the same contents.
•Adobe® Acrobat® Reader® /Adobe Reader® must be installed in order to view the manuals as PDF files.
•A Web browser must be installed in order to view the html manuals.
Safety Information
Contains information about safe usage of this printer.
To avoid injury and prevent damage to the printer, be sure to read this.
Quick Installation Guide
Contains procedures for removing the printer from its box, and connecting it to a computer.
Hardware Guide (This manual)
Contains information about paper; names and functions of the parts of this printer; and procedures such as installing options, replacing consumables, responding to error messages, and resolving jams.
Driver Installation Guide
Contains procedures for installing the printer driver. This manual is included on the driver CD-ROM.
Software Guide
Contains information about using this printer, its software, and its security functions.
Security Guide
This manual is for administrators of the printer. It explains security functions that you can use to prevent unauthorized use of the printer, data tampering, or information leakage. Be sure to read this manual when setting the enhanced security functions, or user and administrator authentication.
VM Card Extended Feature Settings Web Reference
Contains information about setting up the extended features settings using Web Image Monitor.
UNIX Supplement
Contains information about the usage of commands to operate this printer.
To obtain the "UNIX Supplement", visit our Web site or consult an authorized dealer.
This manual includes explanations of functions and settings that might not be available on this printer. This manual is provided in English only.
10

•In this manual, "Enhanced Locked Print NX" is abbreviated as "ELP-NX".
•Manuals provided are specific to printer types.
11
List of Options
This section provides a list of options for this printer, and how they are referred to as in this manual.
|
|
Option List |
Referred to as |
|
|
|
|
Paper Feed Unit TK1030 |
Paper feed unit |
||
|
|
|
|
Duplex Unit AD 1000 |
Duplex Unit |
||
|
|
|
|
Envelope Feeder Type 400 |
Envelope feeder |
||
|
|
|
|
Hard Disk Drive Type 4310 |
Hard disk |
||
|
|
|
|
Memory Unit Type G 128MB |
SDRAM module |
||
|
|
|
|
Memory Unit Type G 256 MB |
SDRAM module |
||
|
|
|
|
Gigabit Ethernet Board Type A |
Gigabit Ethernet board |
||
|
|||
|
|
|
|
Gigabit Ethernet Board Type C |
Gigabit Ethernet board |
||
|
|||
|
|
|
|
IEEE 802.11a/g Interface Unit Type L |
Wireless LAN interface unit |
||
|
|||
|
|
|
|
IEEE 802.11a/g Interface Unit Type M |
Wireless LAN interface unit |
||
|
|||
|
|
|
|
IEEE 1284 Interface Board Type A |
IEEE 1284 interface board |
||
|
|
|
|
SD card for NetWare printing Type G |
NetWare card |
||
|
|
|
|
VM CARD Type O |
VM card |
||
|
|
|
|
IPDS Unit Type 4310 |
IPDS card |
||
|
|
|
|
|
|
|
|
|
|
|
|
• For details about the specifications of each option, see p.235 "Specifications".
12

Operating Instructions
This section explains how to use HTML format manuals.
Reading the HTML Manuals on the CD-ROMs
1.Insert the CD-ROM into the CD-ROM drive of your computer.
2.Select a language and a product, and then click [OK].
3.Click [Read HTML manuals].
4.Click the title of manual you want to read.
•The browsers we recommend are Internet Explorer 6 or later, Firefox 3.5 or later, and Safari 4.0 or later.
•Non-recommended browsers can display the simplified manual only.
•If you are using an earlier or non-recommended browser and the simplified version of the documentation does not appear automatically, open index.htm, which can be found in the following folder on the CD-ROM: MANUAL_HTML\LANG\(language)\(manual)\unv
•Depending on your computer's operating environments, you can select the HTML manual from the following two versions:
•Standard version
•Simplified version
•If you want to read the HTML manuals on a Macintosh, insert the CD-ROM into the CD-ROM drive, and then click [Read HTML manuals].
•If JavaScript is disabled or unavailable in your browser, you will not be able to search or use certain buttons in the HTML documentation.
Reading the HTML Manuals That You Install on the Computer
For easy access, we recommend you install the manuals on your computer.
1.Insert the CD-ROM into the CD-ROM drive of your computer.
2.Select a language and a product, and then click [OK].
3.Click [Install manuals].
4.Install the HTML manuals following the on-screen instructions.
5.When the installation is complete, click [Finish].
6.Click [Exit].
13

7.Open the HTML manuals that you installed.
When opening the manuals from an icon, double-click the manual icon on the desktop. When opening the manuals from the [Start] menu, point to [All Programs], and then [Product Name].
8.Click the title of the manual you want to read.
•You need administrator permissions to install the manuals. Log in as an Administrators group member.
•The system requirements for installing the manuals are as follows:
•Operating system: Windows XP/Vista/7, Windows Server 2003/2003 R2/2008/2008 R2
•Minimum display resolution: 800 × 600 pixels
•If you cannot install a manual, copy the "MANUAL_HTML" folder to your computer's hard drive, and then run "Setup.exe".
•To delete an installed manual, on the [Start] menu, click [All Programs], then [Product Name], and then uninstall the data.
•Depending on the settings made during installation, menu folder names may differ.
14
1. Guide to the Printer
This chapter explains the names and functions of the printer's components.
Exterior: Front View |
1 |
|
CEE001
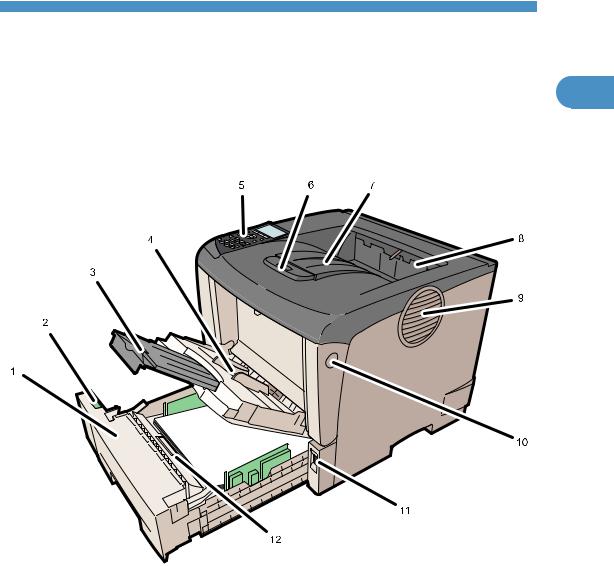
1.Standard Paper Feed Tray (Tray 1)
Up to 500 sheets of plain paper can be loaded.
2.Paper Size Dial
Adjust this dial according to the size and feed direction of the paper loaded in the paper tray.
3.Bypass Tray Extension
Pull this out when loading a sheet that is longer than B5 on the Bypass Tray.
4.Bypass Tray
Up to 100 sheets of plain paper can be loaded.
See p.111 "Supported Paper for Each Tray" and p.111 "Loading Paper".
15

1.Guide to the Printer
5.Control Panel
Contains keys for printer control and a display that shows the printer status.
6.Tray Extension
1Pull this out if the paper you are loading is longer than B5.
7.Standard Tray
Prints are delivered here printed side facing down.
8.Paper Exit Cover
Open this cover to remove jammed paper.
9.Vents
To prevent overheating, heat from internal components is released through these vents. Malfunctions and failure can result if these vents are blocked or obstructed.
10.Front Cover Release Button
Press this to open the front cover.
11.Power Switch
Press this to turn the printer's power on and off.
12.Friction Pad
This ensures only one sheet of paper is fed in at a time. If multi-sheet feeds occur, clean the friction pad carefully. If the message "Replacmnt Requrd:Maint. Kit" is displayed, replace the friction pad with a new one.
16
Exterior: Rear View
Exterior: Rear View
1
CEE003
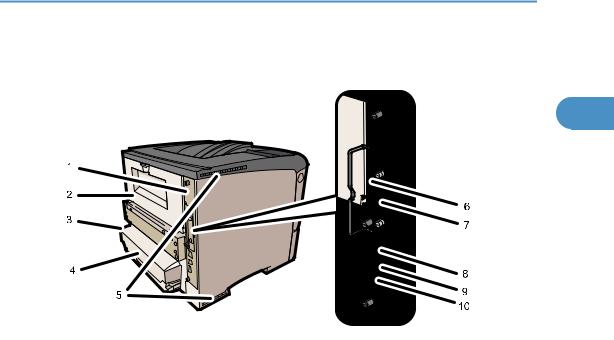
1.Controller Board
Slide this out to install options such as the SDRAM module or printer hard disk. Plug cables such as a USB cable and Ethernet cable into their connectors.
2.Rear Cover
Remove this to replace the fusing unit.
3.Power Connector
Connect the power cord to the printer here. Insert the other end of the cable into a nearby wall outlet.
4.Paper Tray Cover
Keeps paper in the tray free of dust.
5.Intake Vent
Prevents the printer's internal components overheating by letting in cool air through this vent.
Do not block or obstruct the ventilator areas. Doing so can result in malfunctions caused by build up of heat inside the printer.
6.SD Card Slots
Remove the cover and install SD cards here.
7.Optional Interface Board Slot
Insert an optional Wireless LAN interface unit, Gigabit Ethernet board, or 1284 interface board in this slot.
8.Ethernet Port
Use a network interface cable to connect the printer to the network.
9.USB Port B
Use a USB cable to connect the printer to a computer.
17

1.Guide to the Printer
10.USB Port A
Use a USB cable to connect the optional USB devices such as the authentication card reader.
1
18
Interior
Interior
Front view
1
CEE004
1.Print Cartridge
Contains toner and the photo conductor unit.
When "Replace Print Cartridge." appears on the display, replace this unit. See p.155 "Replacing the Print Cartridge".
2.Registration Roller
Feeds in sheets of paper for printing. Be sure to clean this roller if it becomes dirty. See p.182 "Cleaning the Registration Roller".
3.Guide Board
Open this to remove jammed paper.
4.Front Cover
Open this to access the printer's interior.
5.Transfer Roller Cover
Open this to replace the transfer roller.
6.Transfer Roller
When "Replacmnt Requrd:Maint. Kit" appears on the display, replace this roller.
19
1. Guide to the Printer
Rear view
1
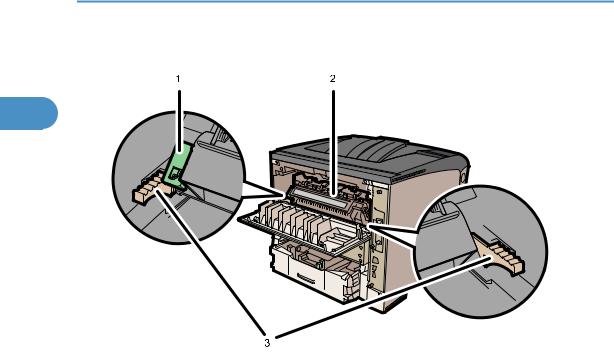
CEE100
1.Envelope lever
Use this lever if envelopes become wrinkled during printing. Raising or lowering the envelope lever according to the thickness of the paper you are printing on can improve print quality.
2.Fusing Unit
Fuses print images onto paper.
When "Replacmnt Requrd:Maint. Kit" appears on the display, replace this unit.
3.Fusing Unit Lock Levers
Lift these levers to replace the fusing unit.
20
Control Panel
Control Panel
1
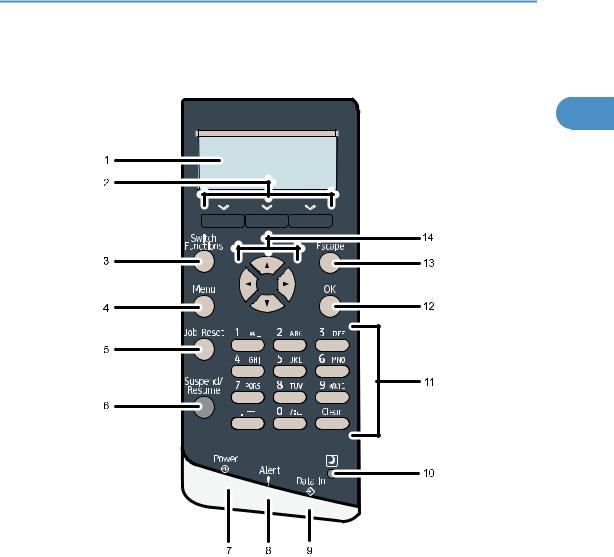
CEE121
1.Display
Displays current printer status and error messages.
Entering energy saver mode turns off the back light. For details about energy saver mode, see Software Guide.
2.Selection Keys
Correspond to the function items at the bottom line on the display.
Example: When this manual instructs you to press [Option], press the selection key on the left below the initial screen.
3.[Switch Functions] Key
Press this key to switch between the operation screen of the printer function and the function screens of the extended features currently in use.
4.[Menu] Key
Press this key to configure and check the current printer settings.
21

1.Guide to the Printer
5.[Job Reset] Key
When the printer is online, press this key to cancel an ongoing print job.
6.[Suspend/Resume] Key
1Press this to suspend the print job currently being processed. The indicator remains lit as long as the job is suspended.
To resume the job, press this key again. Resumption of a suspended job will occur automatically when the time specified in [Auto Reset Timer] elapses (default: 60 seconds).
For details about the [Auto Reset Timer] setting, see "Making Printer Settings Using the Control Panel", Software Guide.
7.Power Indicator
Lights up when the printer is ready to receive data from a computer. Flashes when the printer is warming up or receiving data. It is unlit when the power is off or while the printer is in energy saver mode.
8.Alert Indicator
Lights up or flashes when a printer error occurs. Steady red: printing is not possible.
Flashing yellow: the printer will soon require maintenance or a replacement consumable such as a print cartridge. Printing is possible, but print quality cannot be ensured.
Follow the instructions that appear on the display.
9.Data In Indicator
Flashes when the printer is receiving data from a computer. The data in indicator is lit if there is data to be printed.
10.Light Sensor
The sensor that detects the ambient light level when the ECO Night Sensor function is enabled.
11.Number Keys
Use these to enter characters or numbers.
12.[OK] Key
Use this key to confirm settings, or setting values, or move to the next menu level.
13.[Escape] Key
Press this key to cancel an operation or return to the previous display.
14.Scroll Keys
Press these keys to move the cursor in each direction.
When the [ ] [
] [ ] [
] [ ] [
] [ ] keys appear in this manual, press the scroll key of the same direction.
22
Display Panel
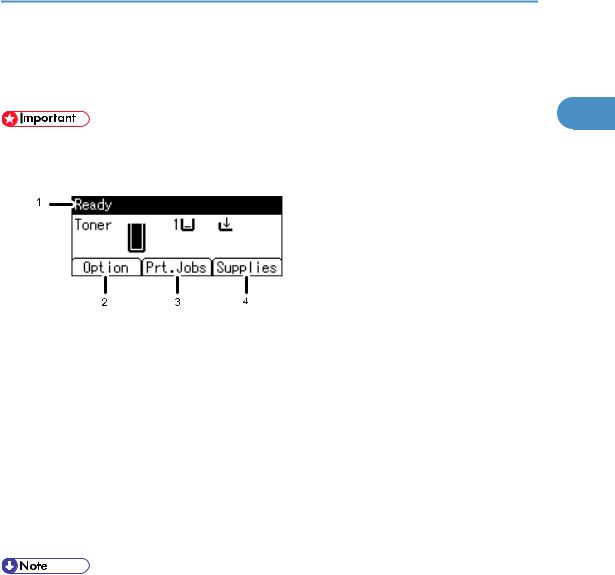
Display Panel
The items are highlighted when selected.
1
• Do not touch the display panel.
The following screen appears when you turn on the printer.
CEC235
1.Operational Status or Messages
Displays the printer status or the messages.
2.[Option]
Press to display the following items:
•Form Feed
•Error Log
3.[Prt.Jobs]
Press to display print jobs sent from a computer.
4.[Supplies]
Press to display the information of supplies for the printer.
•[Prt.Jobs] is displayed only when the hard disk is installed in the printer.
•By default, the remaining amount of toner is displayed. To not display the remaining amount of toner, press the [Menu] key, and then select [Maintenance] on the display. Select [General Settings], then [Display Supply Info], and then select [Off].
•Adjust the brightness if the screen is dark. To adjust the display contrast, press the [Menu] key, and then select [Maintenance] on the display. Select [General Settings] and then [Display Contrast].
23
|
1. Guide to the Printer |
||||||||||||||
|
|
|
|
|
|||||||||||
|
Entering Characters |
||||||||||||||
1 |
When you enter a character, it will be displayed at the position indicated by the cursor. If a character is |
||||||||||||||
already displayed at the cursor position, the entered character will be displayed before that. |
|||||||||||||||
|
|
|
|
|
|
|
|
|
|
|
|
|
|
|
|
|
|
|
|
|
|
|
|
|
|
|
|
|
|
|
|
|
|
|
|
|
|
|
|
|
|
|
|
|
|
|
|
|
|
|
|
|
|
|
|
|
|
|
|
|
|
|
|
|
|
|
|
|
|
|
|
|
|
|
|
|
|
|
|
|
|
|
|
|
|
|
|
|
|
|
|
|
|
|
|
|
|
|
|
|
|
|
|
|
|
|
|
|
|
|
|
|
|
|
|
|
|
|
|
|
|
|
|
|
|
|
|
|
|
|
|
|
|
|
|
|
|
|
|
|
|
|
|
|
|
|
|
|
|
|
|
|
|
|
|
|
|
|
|
|
|
|
|
|
|
|
|
|
|
|
|
|
|
|
|
|
|
|
|
|
|
|
|
|
|
|
|
|
|
|
|
|
|
|
|
|
|
|
|
|
|
|
|
|
|
|
|
|
|
|
|
|
|
|
|
|
|
|
|
|
|
|
|
|
|
|
|
|
|
|
|
|
|
|
|
|
|
|
|
|
|
|
|
|
|
|
|
|
|
|
|
|
|
|
|
CEE122
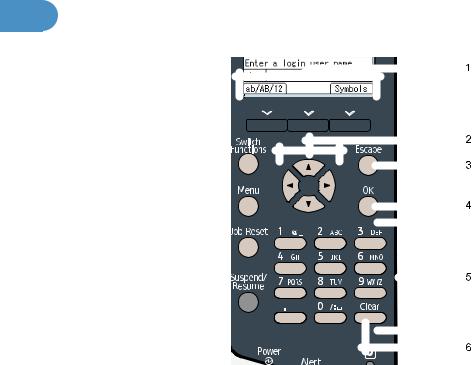
1.Selection Keys
Correspond to the function items on the bottom line of the display.
Example: When this manual instructs you to press [ab/AB/12], press the selection key on the left below the text input screen.
Press the left selection key to switch the input mode between lowercase, uppercase, and numeric characters. Press the right selection key to display a list of the symbols that you can enter.
2.Scroll Keys
Press to move the cursor in each direction.
When the [ ] [
] [ ] [
] [ ] [
] [ ] keys appear in this manual, press the scroll key showing the same direction.
3.[Escape] Key
Clears the entered text and numbers, and returns the display to its previous state.
4.[OK] Key
Confirms the entered text and numbers, and displays the next menu.
5.Number Keys
To enter text using the number keys, select text input mode by pressing [ab/AB/12].
24
Entering Characters
When you press a number key repeatedly, the character changes in the order indicated above the key you are pressing.
6. [Clear] Key
Deletes the character at the cursor position. You can delete a character at the far right side of a line even if the |
1 |
|
cursor is placed to the right of the character. |
||
|
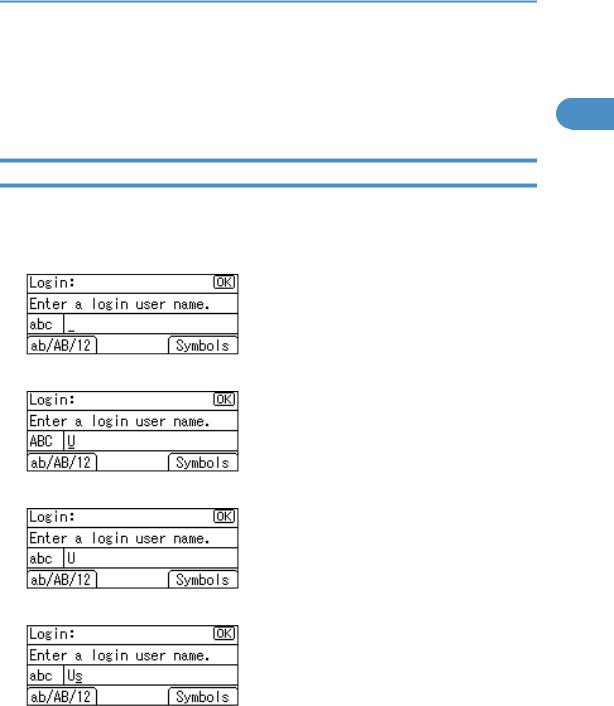
How to Enter Characters
Use the following procedure to enter text in the text input screen. ("User#2" is the text entered in this example.)
1.Press [ab/AB/12] to change the input mode to uppercase.
2.Press the [8 TUV] two more times, and then press the [ ] key. A letter "U" is entered.
3.Press [ab/AB/12] two more times to change the input mode to lowercase.
4.Press the [7 PQRS] key four times, and then press the [ ] key. A letter "s" is entered.
25
1.Guide to the Printer
5.Press the [3 DEF] two more times, and then press the [ ] key. A letter "e" is entered.
1
6.Press the [7 PQRS] key three times, and then press the [ ] key. A letter "r" is entered.
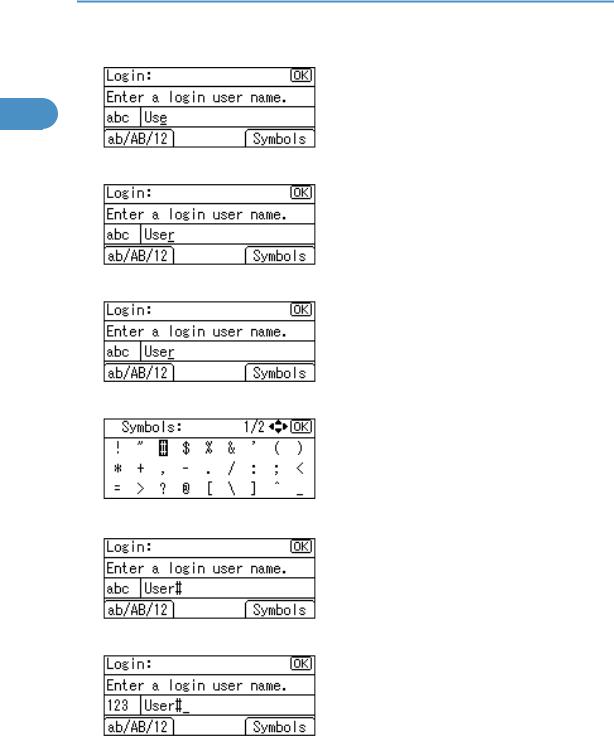
7.Press [Symbols] to display a list of the symbols you can enter.
8.Use the scroll keys to select "#", and then press the [OK] key.
The list of symbols disappears and a "#" symbol is entered.
9.Press [ab/AB/12] two more times to change the input mode to numeric.
26

Entering Characters
10. Press the [2 ABC] key. A number "2" is entered.
1
11. Press the [OK] key to proceed to the next menu.
27

1. Guide to the Printer
1
28
Loading...