


Operating Instructions
Copy Reference
1Placing Originals
2Copying
3Appendix
Read this manual carefully before you use this machine and keep it handy for future reference. For safe and correct use, be sure to read the Safety Information in "About This Machine" before using the machine.
Introduction
This manual contains detailed instructions and notes on the operation and use of this machine. For your safety and benefit, read this manual carefully before using the machine. Keep this manual in a handy place for quick reference.
Important
Contents of this manual are subject to change without prior notice. In no event will the company be liable for direct, indirect, special, incidental, or consequential damages as a result of handling or operating the machine.
Do not copy or print any item for which reproduction is prohibited by law.
Copying or printing the following items is generally prohibited by local law:
bank notes, revenue stamps, bonds, stock certificates, bank drafts, checks, passports, driver's licenses.
The preceding list is meant as a guide only and is not inclusive. We assume no responsibility for its completeness or accuracy. If you have any questions concerning the legality of copying or printing certain items, consult with your legal advisor.
Notes:
Some illustrations in this manual might be slightly different from the machine.
Certain options might not be available in some countries. For details, please contact your local dealer.
Depending on which country you are in, certain units may be optional. For details, please contact your local dealer.
Caution:
Use of controls or adjustments or performance of procedures other than those specified in this manual might result in hazardous radiation exposure.
Notes:
The model names of the machines do not appear in the following pages. Check the type of your machine before reading this manual. (For details, see “Machine Types”, About This Machine.)
•Type 1: 9016/DSm716/LD316/Aficio MP 1600
•Type 2: 9021d/DSm721d/LD320d/Aficio MP 2000
Certain types might not be available in some countries. For details, please contact your local dealer.
Two kinds of size notation are employed in this manual. With this machine refer to the inch version.
Manuals for This Machine
Refer to the manuals that are relevant to what you want to do with the machine.
 Important
Media differ according to manual.
The printed and electronic versions of a manual have the same contents.
Adobe Acrobat Reader/Adobe Reader must be installed in order to view the manuals as PDF files.
Depending on which country you are in, there may also be html manuals. To view these manuals, a Web browser must be installed.
About This Machine
Be sure to read the Safety Information in this manual before using the machine. This manual provides an introduction to the functions of the machine. It also explains the control panel, preparation procedures for using the machine, how to enter text, and how to install the CD-ROMs provided.
General Settings Guide
Explains User Tools settings, and Address Book procedures such as registering fax numbers, e-mail addresses, and user codes. Also refer to this manual for explanations on how to connect the machine.
Troubleshooting
Provides a guide to solving common problems, and explains how to replace paper, toner, and other consumables.
Security Reference
This manual is for administrators of the machine. It explains security functions that the administrators can use to protect data from being tampered with, or prevent the machine from unauthorized use.
Also refer to this manual for the procedures for registering administrators, as well as setting user and administrator authentication.
Copy Reference
Explains Copier functions and operations. Also refer to this manual for explanations on how to place originals.
Facsimile Reference
Explains Facsimile functions and operations.
Printer Reference
Explains Printer functions and operations.
Scanner Reference
Explains Scanner functions and operations.
i
Network Guide
Explains how to configure and operate the machine in a network environment, and use the software provided.
This manual covers all models, and includes descriptions of functions and settings that might not be available on this machine. Images, illustrations, and information about operating systems that are supported might also differ slightly from those of this machine.
Other manuals
•PostScript3 Supplement
•UNIX Supplement
•Manuals for DeskTopBinder Lite
•DeskTopBinder Lite Setup Guide
•DeskTopBinder Introduction Guide
•Auto Document Link Guide

 Note
Note
Manuals provided are specific to machine types.
For “UNIX Supplement”, please visit our Web site or consult an authorized dealer.
“PostScript3 Supplement” and “UNIX Supplement” include descriptions of functions and settings that might not be available on this machine.
ii

What You Can Do with This Machine
Available functions differ depending on the model and options.

 Reference
p.2 “Functions Requiring Optional Configurations”
Types of Duplex Copies
1 Sided 2 Pages → 2 Sided 1 Page
See p.47 “Duplex (Type 2 only)”.
2 Sided 1 Page → 2 Sided 1 Page
See p.47 “Duplex (Type 2 only)”.
1 Sided 4 Pages → Combine 2 Sided 1 Page
See p.53 “Two-Sided Combine (Type 2 only)”.
GCSHVY9J
iii

1 Sided 8 Pages → Combine 2 Sided 1 Page
See p.53 “Two-Sided Combine (Type 2 only)”.
GCSHVYAE |
1Front
2Back
2 Sided 2 Pages → Combine 2 Sided 1 Page
See p.53 “Two-Sided Combine (Type 2 only)”.
GCSHVY1E
2 Sided 4 Pages → Combine 2 Sided 1 Page
See p.53 “Two-Sided Combine (Type 2 only)”.
GCSHVY2E |
1Front
2Back
iv

Combining Multiple Pages onto a Single Page
See p.50 “One-Sided Combine”.
1 Sided 2 Pages → Combine 1 Sided 1 Page
GCSHVY7J |
1 Sided 4 Pages → Combine 1 Sided 1 Page
GCSHVY8J
2 Sided 1 Page → Combine 1 Sided 1 Page
GCSHVYOJ
v
2 Sided 2 Pages → Combine 1 Sided 1 Page
GCSHVYBJ
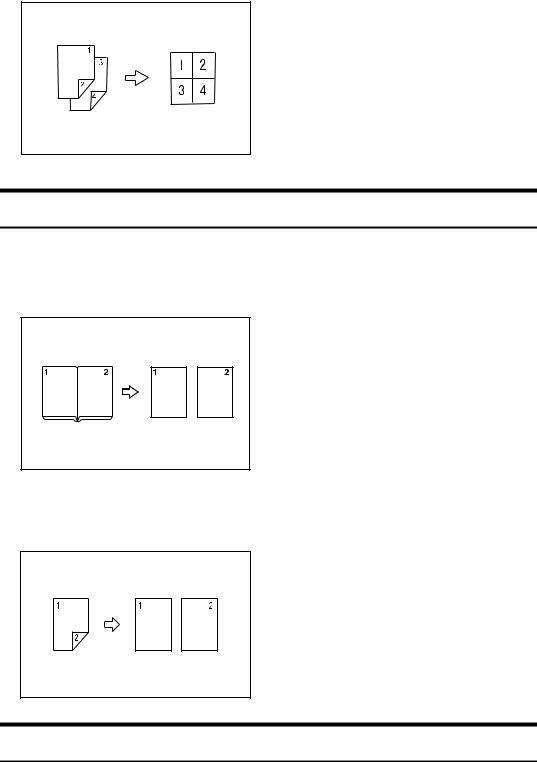
Copying Originals Such as Books
See p.56 “Series Copies”.
Bound Originals → 1 Sided 2 Pages
CP2B0100
2 Sided 1 Page → 1 Sided 2 Pages
Copying onto Envelopes
Envelope
See p.32 “When Copying onto Envelopes”.
vi

TABLE OF CONTENTS |
|
Manuals for This Machine ...................................................................................... |
i |
What You Can Do with This Machine.................................................................. |
iii |
Types of Duplex Copies ............................................................................................ |
iii |
Combining Multiple Pages onto a Single Page .......................................................... |
v |
Copying Originals Such as Books............................................................................. |
vi |
Copying onto Envelopes ........................................................................................... |
vi |
How to Read This Manual ..................................................................................... |
1 |
Symbols ..................................................................................................................... |
1 |
Names of Major Options ............................................................................................ |
1 |
Functions Requiring Optional Configurations.................................................... |
2 |
Display .................................................................................................................... |
3 |
Reading the Display ................................................................................................... |
3 |
Using the Keys on the Control Panel ......................................................................... |
4 |
User Tools Menu (Copier Features) ..................................................................... |
5 |
1. Placing Originals |
|
Originals ................................................................................................................. |
7 |
Sizes and Weights of Recommended Originals......................................................... |
7 |
Sizes Detectable by Auto Paper Select ..................................................................... |
9 |
Missing Image Area ................................................................................................. |
11 |
Placing Originals.................................................................................................. |
12 |
Original Orientation .................................................................................................. |
12 |
Placing Originals on the Exposure Glass................................................................. |
13 |
Placing Originals in the ADF or ARDF ..................................................................... |
14 |
Specifying the Original Size When a Paper Tray is Selected .................................. |
16 |
Specifying the Original Size When the Bypass Tray is Selected ............................. |
18 |
2. Copying |
|
Basic Procedure................................................................................................... |
23 |
Copying from the Bypass Tray........................................................................... |
25 |
Loading Paper on the Bypass Tray.......................................................................... |
25 |
When Copying onto Regular Size Paper ................................................................. |
27 |
When Copying onto Custom Size Paper.................................................................. |
28 |
When Copying onto OHP Transparencies ............................................................... |
29 |
When Copying onto Thick Paper ............................................................................. |
30 |
When Copying onto Envelopes................................................................................ |
32 |
Copy Functions.................................................................................................... |
36 |
Adjusting Image Density .......................................................................................... |
36 |
Original Type Setting................................................................................................ |
37 |
Selecting Copy Paper .............................................................................................. |
38 |
Preset Reduce/Enlarge ............................................................................................ |
40 |
Zoom ........................................................................................................................ |
42 |
Auto Reduce/Enlarge ............................................................................................... |
44 |
Sort........................................................................................................................... |
45 |
Duplex (Type 2 only) ................................................................................................ |
47 |
One-Sided Combine................................................................................................. |
50 |
Two-Sided Combine (Type 2 only)........................................................................... |
53 |
Series Copies........................................................................................................... |
56 |
|
vii |

3. Appendix |
|
Combination Chart............................................................................................... |
59 |
Supplementary Information ................................................................................ |
60 |
INDEX......................................................................................................... |
63 |
viii
How to Read This Manual

 Note
Note
For proper use of this product, be sure to read About This Machine first.
Supplementary information about the copier mode is described in “Supplementary Information”.

 Reference
p.60 “Supplementary Information”
Symbols
This manual uses the following symbols:
Indicates important safety notes.
Ignoring these notes could result in serious injury or death. Be sure to read these notes. They can be found in the “Safety Information” section of About This Machine.
Indicates important safety notes.
Ignoring these notes could result in moderate or minor injury, or damage to the machine or to property. Be sure to read these notes. They can be found in the “Safety Information” section of About This Machine.
Indicates points to pay attention to when using the machine, and explanations of likely causes of paper misfeeds, damage to originals, or loss of data. Be sure to read these explanations.
Indicates supplementary explanations of the machine's functions, and instructions on resolving user errors.
This symbol is located at the end of sections. It indicates where you can find further relevant information.
[ ]
Indicates the names of keys that appear on the machine's display panel.
{}
Indicates the names of keys on the machine's control panel.
Names of Major Options
Major options of this machine are referred to as follows in this manual:
•Auto document feeder → ADF
•Auto document feeder capable of scanning both sides of a sheet → ARDF
1
Functions Requiring Optional
Configurations
Certain functions require special machine configuration and extra options. See the table below.
Function |
Option |
Paper Tray Unit |
ARDF |
|
|
(1- or 2-tray type) |
|
|
|
|
|
Duplex (Type 2 Only) |
|
- |
- |
|
|
|
|
2 Sided→Duplex (Type 2 Only) |
|
- |
Required |
|
|
|
|
1 Sided→2 Sided Combine/Series (Type 2 Only) |
- |
- |
|
|
|
|
|
2 Sided→1 Sided Combine/Series |
|
- |
Required |
|
|
|
|
2 Sided→2 Sided Combine/Series (Type 2 Only) |
- |
Required |
|
|
|
|
|
Sort |
|
- |
- |
|
|
|
|
Rotate Sort |
|
Required* |
- |
|
|
|
|
* To use Rotate Sort with Type 1, an optional paper tray unit is required. (Type 2 supports Rotate Sort as standard.)
2

Display
This section explains how to read the display and how to use the selection keys on the copy display.

 Note
Note
The copy display is set as the default screen when the machine is turned on.
Reading the Display
Initial copy display
1.Displays operational status and messages.
2.Displays the current paper tray and selected items that appear in brackets.
AAI024S
3.Displays the number of copies set.
4.Displays frequently used functions.
3

Using the Keys on the Control Panel
1. Selection keys
Correspond to items at the bottom line on the display.
Example: initial copy display
•When the instruction “press [100%]” appears in this manual, press the left selection key.
•When the instruction “press [R/E]” appears in this manual, press the center selection key.
•When the instruction “press [Auto R/E]” appears in this manual, press the right selection key.
ARB039S
2. {Escape} key
Press to cancel an operation or return to the previous display.
3. {OK} key
Press to set a selected item or entered numeric value.
4. Scroll keys
Press to move the cursor to each direction one by one.
When {U}, {T}, {V}, or {W}key appears in this manual, press the scroll key of the same direction.
4
User Tools Menu (Copier Features)
This section describes items you can set in the copier feature. The copier features screen can be displayed by pressing the {User Tools/Counter} key. For details about how to set up these items, see General Settings Guide.
Item |
Description |
|
|
APS/ Auto R/E Priority |
You can select [Auto Paper Select Priority] (APS Priority) or [Auto R/E |
|
Priority] (Auto Reduce/Enlarge Priority). |
|
|
Auto Tray Switching |
If you load paper of the same size and in the same orientation in |
|
two or more trays, the machine automatically shifts to the other |
|
tray when the first tray runs out of paper (if [On] is selected). This |
|
function is called “Auto Tray Switching”. This setting specifies |
|
whether to use Auto Tray Switching or not. |
|
|
Original Type Setting |
You can adjust copy finish quality level according to original type. |
|
You can choose these functions after selecting [Original Type 1 |
|
(Text)] or [Original Type 2 (Photo)]. |
|
|
Duplex Mode Priority |
You can select the type of Duplex function effective when the ma- |
|
chine is turned on, reset, or modes are cleared. |
|
|
Orientation |
You can select the original orientation when using the Com- |
|
bine/Series, or two-sided originals to one-sided duplex function. |
|
The default setting is [Do not Specify]. |
|
|
Max. Number of Sets |
The maximum copy quantity can be set between 1 and 99 using |
|
the number keys. |
|
|
Original Count Display |
You can set to display the count of originals and copying pages on |
|
the display when [On] is selected. |
|
|
Reproduction Ratio |
You can select which reduce, enlarge, or input ratio is shown on |
|
the display with priority when [Reduce] or [Enlarge] is selected. |
|
|
Preset R/E Priority |
You can set the ratio with priority when [R/E] is selected. |
|
|
Duplex Margin |
Specify left margin on the back side of copies, and top margin on |
|
the front side. |
|
|
Rotate Sort |
Specify whether or not to select Rotate Sort when {Sort} key is |
|
pressed. |
|
|
Rotate Sort:Auto Continue |
If you select [Off] when the paper tray in use runs out of paper, the |
|
machine stops, allowing you to add paper so all copies can be ro- |
|
tate-sorted. |
|
|
Letterhead Setting |
If you select [On] for this function, the machine rotates the image |
|
correctly. |
|
|
Menu Protect |
You can prevent unauthenticated users from changing the user |
|
tools. |
|
|
5
6

1. Placing Originals
This chapter describes the types of originals you can set and how to place originals.
Originals
This section describes the types of originals that can be placed, paper sizes that are automatically detected, and missing image area.
Sizes and Weights of Recommended Originals
The following describes recommended paper sizes and weights, and non-rec- ommended originals for the ADF or ARDF.
Metric version
Where original is |
|
|
|
placed |
Original size |
Original weight |
|
|
|
|
|
Exposure glass |
Up to A3 |
-- |
|
|
|
|
|
ADF / ARDF |
One-sided originals: |
ADF: 52-105 g/m2 |
|
|
A3L – A5KL |
ARDF: 40-128 g/m |
2 |
|
|
|
|
|
|
|
|
|
Two-sided originals: * |
64–105 g/m2 * |
|
|
A3L – A5KL |
|
|
|
|
|
|
Inch version
Where original is |
|
|
placed |
Original size |
Original weight |
|
|
|
Exposure glass |
Up to 11" × 17" |
-- |
|
|
|
ADF / ARDF |
One-sided originals: |
ADF: 14-28 lb. |
|
11" × 17"L – 51/2" × 81/2"KL |
ARDF: 10-34 lb. |
|
|
|
|
Two-sided originals: * |
17–28 lb.* |
|
11" × 17"L – 51/2" × 81/2"KL |
|
|
|
|
* The optional ARDF is required.

 Note
Note
About 30 originals can be placed in the ADF.
About 50 originals can be placed in the ARDF.
7

|
|
Placing Originals |
|
|
|
|
|
Non-compatible originals for the ADF or ARDF |
|
|
|
|
|
Placing the following types of originals in the ADF or ARDF can cause paper |
|
|
misfeeds or light and black lines, or result in damage to the originals. Place these |
1 |
|
originals on the exposure glass instead. |
•Originals other than those specified in “Sizes and Weights of Recommended Originals”
•Stapled or clipped originals
•Perforated or torn originals
•Curled, folded, or creased originals
•Pasted originals
•Originals with any kind of coating, such as thermal fax paper, art paper, aluminum foil, carbon paper, or conductive paper
•Originals with perforated lines
•Originals with indexes, tags, or other projecting parts
•Sticky originals such as translucent paper
•Thin or highly flexible originals
•Thick originals such as postcards
•Bound originals such as books
•Transparent originals such as OHP transparencies or translucent paper
•Originals that are still wet with ink or correction fluid

 Note
Note
The original might become dirty if it is written with a pencil or a similar tool.
8

Originals
Sizes Detectable by Auto Paper Select
Sizes detectable from the exposure glass, and ADF or ARDF are:
Metric version |
|
|
|
1 |
Size A3L B4 JIS *1 |
A4KL B5 JIS *1 |
B5 JIS *1 |
A5KL 81/2" × 13" |
|
Location of the |
L |
L |
K |
L |
|
|
|
|
|
original |
|
|
|
|
Exposure glass |
|
× |
|
× *2 |
ADF / ARDF |
|
|
|
|
*1
*2
: Detectable × : Undetectable
JIS: Japanese Industrial Standard
If you want to make A5K paper detectable, contact your service representative.
Inch version
Size |
11" × 17"L |
81/2" × 14"L |
8" × 13"L |
81/2" × 11" |
51/2" × 81/2" |
Location of the |
|
|
|
KL |
KL |
|
|
|
|
|
|
original |
|
|
|
|
|
|
|
|
|
|
|
Exposure glass |
|
|
|
|
× *1 |
ADF / ARDF |
|
|
× |
|
|
|
|
|
|
|
|
 : Detectable × : Undetectable
*1 If you want to make 51/2" × 81/2"Kpaper detectable, contact your service representative.
9

Placing Originals
Maximum scanning area
Exposure glass
1 |
CP01AEE |
ADF or ARDF |
ARB051S

 Note
Note
When you copy custom size originals, make sure you specify the size of the originals. If not, the image may not be copied properly.

 Reference
p.16 “Specifying the Original Size When a Paper Tray is Selected”
p.18 “Specifying the Original Size When the Bypass Tray is Selected”
Sizes difficult to detect
It is difficult for the machine to detect the sizes of the following originals. Even if Auto Paper Select is set, the correct paper size may not be selected, so select the paper size manually.
•Originals with indexes, tags, or other projecting parts
•Transparent originals such as OHP transparencies or translucent paper
•Dark originals with a lot of text and drawings
•Originals which partially contain a solid image
•Originals which have solid images at their edges
10
|
|
|
|
|
|
|
|
|
|
|
|
|
|
|
Originals |
|
|
|
|
|
|
|
|
|
|
|
|
|
|
|
|
|
|
|
|
Missing Image Area |
|
|
|||||||||||||||
|
|
|
|
|
|
|
|
|
|
|
|
|
|
|
|
|
|
Even if you correctly place originals in the ADF or ARDF, or on the exposure |
|
|
|||||||||||||||
glass, margins of a few millimeters on all four sides of the original might not be |
|
|
|||||||||||||||
|
1 |
||||||||||||||||
copied. |
|
||||||||||||||||
|
|
|
|
|
|
|
|
|
|
|
|
|
|
|
|
|
|
|
|
|
|
|
|
|
|
|
|
|
|
|
|
|
|
|
|
|
|
|
|
|
|
|
|
|
|
|
|
|
|
|
|
|
|
|
|
|
|
|
|
|
|
|
|
|
|
|
|
|
|
|
|
|
|
|
|
|
|
|
|
|
|
|
|
|
|
|
|
|
|
|
|
|
|
|
|
|
|
|
|
|
|
|
|
|
|
|
|
|
|
|
|
|
|
|
|
|
|
|
|
|
|
|
|
|
|
|
|
|
|
|
|
|
|
|
|
|
|
|
|
|
|
|
|
|
|
|
|
|
|
|
|
|
|
|
|
|
|
|
|
|
|
|
|
|
|
|
|
|
|
|
|
|
|
|
|
|
|
|
|
|
|
|
|
|
|
|
|
|
|
|
|
|
|
|
|
|
|
|
|
|
|
|
|
|
|
|
|
|
|
|
|
|
|
|
|
|
|
|
|
|
|
|
|
|
|
|
|
|
|
|
|
|
|
|
|
|
|
|
|
|
|
|
|
|
|
|
|
|
|
|
|
GCGENK2E
1 0.5 mm (0.02") or more
2 0.5 mm (0.02") or more
3 2 ± 1.5 mm (0.08" ± 0.06")
4 2 ± 1.5 mm (0.08" ± 0.06")
11

Placing Originals
Placing Originals
1 |
This section describes the procedure for placing originals on the exposure glass |
and in the ADF or ARDF. |
|
|
Take care to place originals after any correction fluid and ink has completely dried. Not taking this precaution could cause marks on the exposure glass that will be copied onto paper.

 Reference
p.7 “Originals”
Original Orientation
You can set the original orientation in the following ways.
Originals |
ADF or |
Exposure |
|
ARDF |
glass |
|
|
set11EE |
|
|
set23EE |

 Note
Note
Originals should be aligned to the rear left corner when placing them on the exposure glass. However, some copy functions may produce different results depending on the orientation of the originals. For details, see the explanations of each function.

 Reference
p.47 “Duplex (Type 2 only)”
p.50 “One-Sided Combine”
p.53 “Two-Sided Combine (Type 2 only)”
p.56 “Series Copies”
12

Placing Originals
Placing Originals on the Exposure Glass
Place originals on the exposure glass.
Important |
1 |
Do not lift the exposure glass cover, ADF, or ARDF forcefully. Otherwise, it will be damaged, or the cover of the ADF or ARDF might open.
A Lift the exposure glass cover, ADF, or ARDF.
Be sure to lift the exposure glass cover, ADF, or ARDF by more than 30 degrees. Otherwise, the size of the original might not be detected correctly.
B Place the original face down on the exposure glass. The original should be aligned with the rear left corner.
Start with the first page to be copied.
AAI025S |
1 Positioning mark
2 Left scale
C Lower the exposure glass cover, ADF, or ARDF.
13
 Loading...