


Operating Instructions
Software Guide
1Preparing for Printing
2Setting Up the Printer Driver
3Other Print Operations
4Direct Printing from a Digital Camera (PictBridge)
5Making Printer Settings Using the Control Panel
6Monitoring and Configuring the Printer
7Using a Printer Server
8Special Operations under Windows
9Mac OS Configuration
10Security Measures Provided by this Printer
11Appendix
Read this manual carefully before you use this machine and keep it handy for future reference. For safe and correct use, be sure to read the Safety Information before using the machine.
Introduction
This manual contains detailed instructions and notes on the operation and use of this machine. For your safety and benefit, read this manual carefully before using the machine. Keep this manual in a handy place for quick reference.
Important
Contents of this manual are subject to change without prior notice. In no event will the company be liable for direct, indirect, special, incidental, or consequential damages as a result of handling or operating the machine.
Do not copy or print any item for which reproduction is prohibited by law. Copying or printing the following items is generally prohibited by local law:
bank notes, revenue stamps, bonds, stock certificates, bank drafts, checks, passports, driver's licenses.
The preceding list is meant as a guide only and is not inclusive. We assume no responsibility for its completeness or accuracy. If you have any questions concerning the legality of copying or printing certain items, consult with your legal advisor.
Caution:
Use of controls or adjustments or performance of procedures other than those specified in this manual might result in hazardous radiation exposure.
Trademarks
Microsoft, Windows, Windows NT are registered trademarks of Microsoft Corporation in the United States and/or other countries.
Adobe®, PostScript®, Acrobat®, PageMaker® and Adobe Type Manager are registered trademarks of Adobe Systems Incorporated.
PowerPC is a registered trademark of International Business Machines Corporation. PCL® is a registered trademark of Hewlett-Packard Company.
3Com is a trade mark of 3Com corporation.
Citrix® and MetaFrame® are registered trademarks of Citrix Systems, Inc UPnP is a trademark of the UPnP Implementers Corporation.
Apple, AppleTalk, EtherTalk, Macintosh, Mac OS and TrueType are trademarks of Apple Computer, Inc., registered in the U.S. and other countries.
BonjourTM is a trademark of Apple Computer, Inc.,
UNIX is a registered trademark in the United States and other countries, licensed exclusively through X/Open Company Limited.
IPS-PRINTTM Printer Language Emulation Copyright© 2000, Oak Technology, Inc., All Rights Reserved.
The Bluetooth® word mark and logos are owned by the Bluetooth SIG, Inc. and any use of such marks by Ricoh Company, Ltd. is under license.
Novell, NetWare are registered trademarks of Novell, Inc.
Netscape and Netscape Navigator are registered trademarks of Netscape Communications Corporation. PictBridge is a trademark.
Other product names used herein are for identification purposes only and might be trademarks of their respective companies. We disclaim any and all rights in those marks.
The proper names of the Windows operating systems are as follows:
•The product name of Windows® 95 is Microsoft® Windows 95.
•The product name of Windows® 98 is Microsoft® Windows 98.
•The product name of Windows® Me is Microsoft® Windows Millennium Edition (Windows Me).
•The product names of Windows® 2000 are as follows: Microsoft® Windows® 2000 Advanced Server Microsoft® Windows® 2000 Server
Microsoft® Windows® 2000 Professional
•The product names of Windows® XP are as follows: Microsoft® Windows® XP Professional
Microsoft® Windows® XP Home Edition
•The product names of Windows ServerTM 2003 are as follows: Microsoft® Windows ServerTM 2003 Standard Edition Microsoft® Windows ServerTM 2003 Enterprise Edition Microsoft® Windows ServerTM 2003 Web Edition
•The product names of Windows NT® 4.0 are as follows: Microsoft® Windows NT® Server 4.0
•Microsoft® Windows NT® Workstation 4.0
Some illustrations in this manual might be slightly different from the machine.
Manuals for This Printer
For particular functions, see the relevant parts of the manual.
Safety Information
Provides information on safe usage of this machine. To avoid injury and prevent damage to the machine, be sure to read this.
Quick Installation Guide
Contains procedures for removing the printer from its box, connecting it to a computer, and installing its driver.
Hardware Guide
Contains information about paper and procedures such as installing options, replacing consumables, responding to error messages, and resolving jams.
Software Guide (This manual)
Contain procedures for using this machine in a network environment, utilizing the software, and using security functions.
Security Guide
This manual is for administrators of the machine. It explains security functions that the administrators can use to protect data from being tampered, or prevent the machine from unauthorized use. Also refer to this manual for the procedures for registering administrators, as well as setting user and administrator authentication.
i
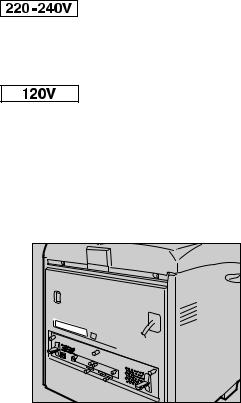
Description for the Specified Model
In this manual, the following items explain about the printer for the specified models:
This explains about the 220–240 V model printer. You can identify the model by checking the label on the rear of the printer.
Read if you purchase this model.
This explains about the 120 V model printer. You can identify the model by checking the label on the rear of the printer.
Read if you purchase this model.

 Note
Note
You can identify the printer's model by checking the label on the rear of the printer as shown.
AQC065S |
ii

How to Read This Manual
Symbols
This manual uses the following symbols:
Indicates important safety notes.
Ignoring these notes could result in serious injury or death. Be sure to read these notes. They can be found in the Safety Information.
Indicates important safety notes.
Ignoring these notes could result in moderate or minor injury, or damage to the machine or to property. Be sure to read these notes. They can be found in the Safety Information.
Indicates points to pay attention to when using the machine, and explanations of likely causes of paper misfeeds, damage to originals, or loss of data. Be sure to read these explanations.
Indicates supplementary explanations of the printer’s functions, and instructions on resolving user errors.
This symbol is located at the end of sections. It indicates where you can find further relevant information.
[ ]
Indicates the names of keys that appear on the printer’s display panel.
{}
Indicates the names of keys on the printer’s control panel.
iii

TABLE OF CONTENTS |
|
Manuals for This Printer......................................................................................... |
i |
Description for the Specified Model..................................................................... |
ii |
How to Read This Manual .................................................................................... |
iii |
Symbols .................................................................................................................... |
iii |
1. Preparing for Printing |
|
Quick Install............................................................................................................ |
1 |
Confirming the Connection Method..................................................................... |
3 |
Network Connection................................................................................................... |
3 |
Local Connection ....................................................................................................... |
6 |
Using the SmartDeviceMonitor Port .................................................................... |
7 |
Installing DeskTopBinder-SmartDeviceMonitor for Client .......................................... |
7 |
Installing the PCL or RPCS Printer Driver (TCP/IP)................................................... |
8 |
Installing the PCL or RPCS Printer Driver (IPP) ........................................................ |
9 |
Installing the PostScript 3 Printer Driver (Windows 95/98/Me - TCP/IP).................. |
11 |
Installing the PostScript 3 Printer Driver (Windows 95/98/Me - IPP) ....................... |
12 |
Installing the PostScript 3 Printer Driver (Windows 2000 - TCP/IP)......................... |
14 |
Installing the PostScript 3 Printer Driver (Windows 2000 - IPP) .............................. |
15 |
Installing the PostScript 3 Printer Driver (Windows XP, Windows Server 2003 - TCP/IP)... |
17 |
Installing the PostScript 3 Printer Driver (Windows XP, Windows Server 2003 - IPP)... |
18 |
Changing the Port Settings for SmartDeviceMonitor for Client ................................ |
19 |
Using the Standard TCP/IP Port ......................................................................... |
21 |
Installing the PCL or RPCS Printer Driver................................................................ |
21 |
Installing the PostScript 3 Printer Driver (Windows 2000) ....................................... |
22 |
Installing the PostScript 3 Printer Driver (Windows XP, Windows Server 2003) ..... |
24 |
Using the LPR Port .............................................................................................. |
26 |
Installing the PCL or RPCS Printer Driver................................................................ |
26 |
Installing the PostScript 3 Printer Driver (Windows 2000) ....................................... |
27 |
Installing the PostScript 3 Printer Driver (Windows XP, Windows Server 2003) ..... |
28 |
Using as the Windows Network Printer ............................................................. |
30 |
Installing the PCL or RPCS Printer Driver................................................................ |
30 |
Installing the PostScript 3 Printer Driver (Windows 95/98/Me) ................................ |
31 |
Installing the PostScript 3 Printer Driver (Windows 2000) ....................................... |
32 |
Installing the PostScript 3 Printer Driver (Windows XP, Windows Server 2003) ..... |
33 |
Using as the NetWare Print Server/Remote Printer.......................................... |
35 |
When using the PostScript 3 Printer Driver.............................................................. |
37 |
Form Feed................................................................................................................ |
37 |
Banner Page ............................................................................................................ |
37 |
Printing after Resetting the Printer ........................................................................... |
38 |
Installing the Printer Driver Using USB ............................................................. |
39 |
Windows Me - USB .................................................................................................. |
39 |
Windows 2000 - USB ............................................................................................... |
41 |
Windows XP, Windows Server 2003 - USB ............................................................. |
42 |
Troubleshooting USB ............................................................................................... |
43 |
iv

Printing with Parallel Connection....................................................................... |
44 |
Installing the PCL or RPCS Printer Driver................................................................ |
44 |
Installing the PostScript 3 Printer Driver (Windows 95/98/Me) ................................ |
45 |
Installing the PostScript 3 Printer Driver (Windows 2000) ....................................... |
46 |
Installing the PostScript 3 Printer Driver (Windows XP, Windows Server 2003) ..... |
47 |
Printing with Bluetooth Connection................................................................... |
48 |
Supported Profiles.................................................................................................... |
48 |
Printing with Bluetooth Connection .......................................................................... |
48 |
If a Message Appears during Installation .......................................................... |
51 |
Making Option Settings for the Printer .............................................................. |
52 |
Conditions for Bidirectional Communication ............................................................ |
52 |
If Bidirectional Communication is Disabled .............................................................. |
54 |
2. Setting Up the Printer Driver |
|
PCL - Accessing the Printer Properties............................................................. |
55 |
Windows 95/98/Me - Accessing the Printer Properties ............................................ |
55 |
Windows 2000 - Accessing the Printer Properties ................................................... |
56 |
Windows XP, Windows Server 2003 - Accessing the Printer Properties ................. |
58 |
Windows NT 4.0 - Accessing the Printer Properties ................................................ |
59 |
RPCS - Accessing the Printer Properties .......................................................... |
62 |
Windows 95/98/Me - Accessing the Printer Properties ............................................ |
62 |
Windows 2000 - Accessing the Printer Properties ................................................... |
63 |
Windows XP, Windows Server 2003 - Accessing the Printer Properties ................. |
65 |
Windows NT 4.0 - Accessing the Printer Properties ................................................ |
67 |
PostScript 3 - Setting Up for Printing ................................................................ |
70 |
Windows 95/98/Me - Accessing the Printer Properties ............................................ |
70 |
Windows 2000 - Accessing the Printer Properties ................................................... |
71 |
Windows XP, Windows Server 2003 - Accessing the Printer Properties ................. |
73 |
Windows NT 4.0 - Accessing the Printer Properties ................................................ |
74 |
Mac OS - Setting Up for Printing.............................................................................. |
76 |
3. Other Print Operations |
|
Printing a PDF File Directly................................................................................. |
77 |
Printing Method ........................................................................................................ |
77 |
Using Commands..................................................................................................... |
80 |
Unauthorized Copy Control ................................................................................ |
81 |
Using [Data security for copying] ................................................................................. |
81 |
Using [Mask type:] ..................................................................................................... |
83 |
Important Notice....................................................................................................... |
84 |
Using the Print Job Function.............................................................................. |
85 |
Using Keys ............................................................................................................... |
88 |
Printing from the Print Job Screen .................................................................... |
89 |
Sample Print............................................................................................................. |
89 |
Locked Print ............................................................................................................. |
92 |
Hold Print ................................................................................................................. |
95 |
Stored Print .............................................................................................................. |
98 |
Printing from the User ID Screen ..................................................................... |
103 |
Printing the Selected Print Job............................................................................... |
103 |
Printing All Print Jobs ............................................................................................. |
104 |
v

Form Feed........................................................................................................... |
106 |
Printing from a Selected Tray................................................................................. |
106 |
Canceling a Print Job ............................................................................................. |
107 |
Canceling a Print Job ........................................................................................ |
108 |
Canceling a Print Job Using the Control Panel ...................................................... |
108 |
Windows - Canceling a Print Job from the computer ............................................. |
108 |
Mac OS - Canceling a Print Job from the computer............................................... |
109 |
Checking the Error Log ..................................................................................... |
110 |
Collate ................................................................................................................. |
112 |
Spool Printing .................................................................................................... |
113 |
Setting Spool Printing............................................................................................. |
113 |
Viewing or Deleting spooled jobs using Web Image Monitor ................................. |
114 |
Cover................................................................................................................... |
115 |
Memory Capacity and Paper Size..................................................................... |
116 |
One-sided printing (600 × 600 dpi)......................................................................... |
116 |
One-sided printing (1200 × 600 dpi)....................................................................... |
116 |
One-sided printing (1200 × 1200 dpi)..................................................................... |
116 |
Duplex printing (600 × 600 dpi) .............................................................................. |
117 |
Duplex printing (1200 × 600 dpi) ............................................................................ |
117 |
Duplex printing (1200 × 1200 dpi) .......................................................................... |
117 |
4. Direct Printing from a Digital Camera (PictBridge) |
|
What is PictBridge? ........................................................................................... |
119 |
PictBridge Printing ............................................................................................ |
120 |
What Can Be Done on This printer................................................................... |
122 |
Index Printing ......................................................................................................... |
122 |
Trimming ................................................................................................................ |
123 |
Date and File Name Printing .................................................................................. |
123 |
Paper Size.............................................................................................................. |
123 |
Image Print Size..................................................................................................... |
124 |
Multi-Image-Layout ................................................................................................ |
125 |
Printing Quality....................................................................................................... |
126 |
Color Matching ....................................................................................................... |
126 |
Paper type Specification ........................................................................................ |
126 |
Form Printing.......................................................................................................... |
126 |
Camera Memo Printing .......................................................................................... |
126 |
Exiting PictBridge .............................................................................................. |
127 |
When PictBridge Printing Does Not Work....................................................... |
128 |
Other Reference Information ............................................................................ |
129 |
5. Making Printer Settings Using the Control Panel |
|
Menu Chart ......................................................................................................... |
131 |
Memory Erase Status Menu .............................................................................. |
134 |
Paper Input Menu............................................................................................... |
135 |
Changing the Paper Input Menu ............................................................................ |
135 |
Paper Input menu parameters ............................................................................... |
136 |
Maintenance Menu............................................................................................. |
140 |
Changing the maintenance menu .......................................................................... |
140 |
Maintenance menu parameters ............................................................................. |
141 |
vi

List/Test Print Menu........................................................................................... |
147 |
Printing a Configuration Page ................................................................................ |
147 |
Interpreting the configuration page ........................................................................ |
148 |
List/Test Print menu parameters ............................................................................ |
150 |
System Menu...................................................................................................... |
151 |
Changing the system menu ................................................................................... |
151 |
System menu parameters ...................................................................................... |
152 |
Print Settings Menu ........................................................................................... |
156 |
Changing the Print Settings Menu ......................................................................... |
156 |
Print Settings menu parameters............................................................................. |
156 |
Security Options Menu...................................................................................... |
164 |
Changing the Security Options menu .................................................................... |
164 |
Security Options menu parameters........................................................................ |
164 |
Host Interface Menu........................................................................................... |
166 |
Changing the Host Interface menu ........................................................................ |
166 |
Host Interface menu parameters............................................................................ |
167 |
Language Menu.................................................................................................. |
172 |
Changing the language menu ................................................................................ |
172 |
Language menu parameters .................................................................................. |
172 |
6. Monitoring and Configuring the Printer |
|
Using Web Image Monitor................................................................................. |
173 |
Displaying Top Page .............................................................................................. |
175 |
When user authentication is set ............................................................................. |
176 |
About Menu and Mode........................................................................................... |
177 |
Access in the Administrator Mode.......................................................................... |
178 |
Displaying Web Image Monitor Help...................................................................... |
179 |
Using SmartDeviceMonitor for Admin ............................................................. |
180 |
Installing SmartDeviceMonitor for Admin ............................................................... |
181 |
Changing the Network Interface Board Configuration............................................ |
182 |
Locking the Menus on the Printer's Control Panel ................................................. |
183 |
Changing the Paper Type ...................................................................................... |
183 |
Managing User Information.................................................................................... |
184 |
Configuring the Energy Saver Mode ...................................................................... |
187 |
Setting a Password ................................................................................................ |
187 |
Checking the Printer Status ................................................................................... |
188 |
Changing Names and Comments .......................................................................... |
189 |
Viewing and Deleting Spool Print Jobs ........................................................... |
190 |
Using SmartDeviceMonitor for Client .............................................................. |
191 |
Monitoring Printers ................................................................................................. |
191 |
Checking the Printer Status ................................................................................... |
191 |
When Using IPP with SmartDeviceMonitor for Client ............................................ |
192 |
Printer Status Notification by E-Mail................................................................ |
193 |
Auto E-mail Notification.......................................................................................... |
194 |
On-demand E-mail Notification .............................................................................. |
195 |
Mail authentication ................................................................................................. |
195 |
Sending On-demand E-mail................................................................................... |
196 |
vii
Remote Maintenance by telnet ......................................................................... |
199 |
Using telnet ............................................................................................................ |
199 |
access .................................................................................................................... |
200 |
appletalk................................................................................................................. |
201 |
autonet ................................................................................................................... |
201 |
bonjour(rendezvous) .............................................................................................. |
202 |
btconfig................................................................................................................... |
203 |
devicename............................................................................................................ |
204 |
dhcp ....................................................................................................................... |
204 |
diprint ..................................................................................................................... |
205 |
dns ......................................................................................................................... |
206 |
domainname .......................................................................................................... |
207 |
help ........................................................................................................................ |
208 |
hostname ............................................................................................................... |
208 |
ifconfig.................................................................................................................... |
209 |
info ......................................................................................................................... |
210 |
ipp .......................................................................................................................... |
210 |
ipv6......................................................................................................................... |
211 |
lpr ........................................................................................................................... |
211 |
netware .................................................................................................................. |
211 |
passwd ................................................................................................................... |
213 |
prnlog ..................................................................................................................... |
213 |
route ....................................................................................................................... |
213 |
set .......................................................................................................................... |
215 |
show....................................................................................................................... |
217 |
slp........................................................................................................................... |
217 |
smb ........................................................................................................................ |
218 |
snmp ...................................................................................................................... |
219 |
sntp ........................................................................................................................ |
222 |
spoolsw .................................................................................................................. |
222 |
ssdp........................................................................................................................ |
223 |
ssh.......................................................................................................................... |
223 |
status...................................................................................................................... |
224 |
syslog ..................................................................................................................... |
224 |
upnp ....................................................................................................................... |
225 |
web......................................................................................................................... |
225 |
wiconfig .................................................................................................................. |
226 |
wins ........................................................................................................................ |
229 |
SNMP................................................................................................................... |
230 |
Getting Printer Information over the Network................................................. |
231 |
Current Printer Status ............................................................................................ |
231 |
Printer configuration ............................................................................................... |
237 |
Understanding the Displayed Information ...................................................... |
238 |
Print Job Information .............................................................................................. |
238 |
Print Log Information.............................................................................................. |
238 |
Configuring the Network Interface Board ............................................................... |
239 |
Message List ...................................................................................................... |
246 |
System Log Information ......................................................................................... |
246 |
viii
7. Using a Printer Server
Preparing Printer Server ................................................................................... |
253 |
Printing notification via SmartDeviceMonitor for Client .......................................... |
253 |
Using NetWare ................................................................................................... |
255 |
Setting Up as a Print Server (NetWare 3.x) ........................................................... |
256 |
Setting Up as a Print Server (NetWare 4.x, 5/5.1, 6/6.5) ....................................... |
257 |
Using Pure IP in the NetWare 5/5.1 or 6/6.5 Environment..................................... |
259 |
Setting Up as a Remote Printer (NetWare 3.x) ...................................................... |
261 |
Setting Up as a Remote Printer (NetWare 4.x, 5/5.1, 6/6.5) .................................. |
263 |
8. Special Operations under Windows
Printing Files Directly from Windows .............................................................. |
267 |
Setup...................................................................................................................... |
267 |
Using a Host Name Instead of an IPv4 Address.................................................... |
268 |
Printing Commands................................................................................................ |
269 |
9. Mac OS Configuration
Mac OS................................................................................................................ |
273 |
Installing the PostScript 3 Printer Driver and PPD File .......................................... |
273 |
Setting Up PPD Files ............................................................................................. |
274 |
Creating a Desktop Printer Icon ............................................................................. |
274 |
Setting Up Options ................................................................................................. |
275 |
Installing the ColorSync Profiles ............................................................................ |
275 |
Installing Adobe Type Manager ............................................................................. |
276 |
Installing Screen fonts............................................................................................ |
277 |
Changing to EtherTalk ........................................................................................... |
277 |
Mac OS X ............................................................................................................ |
278 |
|
Installing the PPD Files .......................................................................................... |
278 |
|
Setting Up the PPD File ......................................................................................... |
278 |
|
Setting Up Options ................................................................................................. |
279 |
|
Using USB Interface............................................................................................... |
279 |
|
Using Bonjour (Rendezvous) ................................................................................. |
280 |
|
Changing to EtherTalk ........................................................................................... |
281 |
|
Configuring the Printer...................................................................................... |
282 |
|
Using PostScript 3 ............................................................................................. |
283 |
|
Job Type ................................................................................................................ |
283 |
|
User Code .............................................................................................................. |
293 |
|
Paper Size.............................................................................................................. |
293 |
|
Fit to Paper............................................................................................................. |
294 |
|
Input Slot ................................................................................................................ |
294 |
|
Resolution .............................................................................................................. |
294 |
|
Orientation Override............................................................................................... |
295 |
|
Duplex Printing....................................................................................................... |
295 |
|
Color Mode............................................................................................................. |
296 |
|
Gradation ............................................................................................................... |
296 |
|
Color Profile ........................................................................................................... |
297 |
|
Color Setting .......................................................................................................... |
298 |
|
Toner Saving/Level Color....................................................................................... |
298 |
|
Collate .................................................................................................................... |
299 |
|
Paper Type............................................................................................................. |
299 |
|
Black Over Print ..................................................................................................... |
299 |
ix |

Image Smoothing ................................................................................................... |
300 |
Separate into CMYK .............................................................................................. |
300 |
CMYK Simulation Profile........................................................................................ |
301 |
Dithering................................................................................................................. |
301 |
Gray Reproduction ................................................................................................. |
302 |
Color Matching ....................................................................................................... |
302 |
Printer Utility for Mac......................................................................................... |
303 |
Installing Printer Utility for Mac............................................................................... |
303 |
Starting Printer Utility for Mac ................................................................................ |
304 |
Printer Utility for Mac Functions ............................................................................. |
305 |
10.Security Measures Provided by this Printer |
|
Using Authentication and Managing Users..................................................... |
311 |
Preventing Information Leaks .......................................................................... |
312 |
Limiting and Controlling Access...................................................................... |
313 |
Enhanced Network Security ............................................................................. |
314 |
Configuring SSL Encryption............................................................................. |
315 |
11.Appendix |
|
Software and Utilities Included on the CD-ROM ............................................. |
317 |
Printer Drivers for This Printer................................................................................ |
318 |
SmartDeviceMonitor for Admin .............................................................................. |
319 |
DeskTopBinder - SmartDeviceMonitor for Client ................................................... |
320 |
Cautions to Take When Using in a network .................................................... |
322 |
Connecting a Dial-up Router to a Network............................................................. |
322 |
Using DHCP........................................................................................................... |
323 |
Configuring the WINS Server................................................................................. |
324 |
Using the Dynamic DNS Function.......................................................................... |
325 |
Installing Font Manager 2000............................................................................ |
327 |
Using Adobe PageMaker Version 6.0, 6.5, or 7.0 ............................................ |
328 |
When Using Windows Terminal Service/ |
|
MetaFrame........................................................................................................ |
329 |
Operating Environment .......................................................................................... |
329 |
Supported Printer Drivers....................................................................................... |
329 |
Limitations .............................................................................................................. |
329 |
Cautions When Using Bluetooth Interface Unit .............................................. |
331 |
Copyright Information about Installed Applications ...................................... |
332 |
expat ...................................................................................................................... |
332 |
JPEG LIBRARY ..................................................................................................... |
332 |
NetBSD .................................................................................................................. |
333 |
Samba(Ver 2.2.2-1.1)............................................................................................. |
335 |
RSA BSAFE® ......................................................................................................... |
335 |
INDEX....................................................................................................... |
336 |
x

1. Preparing for Printing
Quick Install
Windows 95/98/Me/2000/XP, and Windows Server 2003, users can easily install this software using the CD-ROM provided.
Using Quick Install, the PCL printer driver and/or RPCS printer driver, DeskTopBinder Lite and SmartDeviceMonitor for Client are installed under network environment, and the TCP/IP port will be set.
 Important
To install printer driver under Windows 2000/XP Professional, and Windows Server 2003, you must have an account that has Manage Printers permission. Log on as an Administrator.
The Quick Install is not available when using this printer under USB connection.
A B
Quit all applications currently running. Insert the CD-ROM into the CD-ROM drive.
The installer starts.
C Select an interface language, and then click [OK].
The default interface language is English.
D Click [Quick Install].
The software license agreement appears in the [License Agreement] dialog box.
E After reading the agreement, click [I accept the agreement.], and then click
[Next >].
F Select the printer model you want to use in the [Select Printer] dialog box.
For network connection via TCP/IP, select the printer whose IP address is displayed in [Connect To].
For parallel connection, select the printer whose printer port is displayed in
[Connect To].
G Click [Install].
The printer driver installation starts.
H Click [Finish].
A message about restarting the computer may appear. Restart the computer to complete installation.
I Click [Exit] in the first dialog box of the installer, and then take out the CDROM.
1

|
|
Preparing for Printing |
|
|
Note |
|
|
Auto Run may not work with certain operating system settings. If this hap- |
|
|
pens, launch “Setup.exe” on the CD-ROM root directory. |
|
|
To stop installation of the selected software, click [Cancel] before installa- |
1 |
|
|
|
tion is complete. |
Auto Run may not work with certain operating system settings. If this happens, launch “Setup.exe” on the CD-ROM root directory.
Select a printer to whose IP address is displayed in [Connect To] to install SmartDeviceMonitor for Client when using TCP/IP.
Download the printer driver from the supplier's web site when using under Windows NT 4.0.

 Reference
Quick Install is not available unless bidirectional communication between the printer and computer is enabled via parallel connection. See p.54 “If Bidirectional Communication is Disabled” for details about bidirectional communication between printer and computer.
If you connect using USB, see p.39 “Installing the Printer Driver Using USB”.
2

Confirming the Connection Method
Confirming the Connection Method
This printer supports network and local connection.
Before installing the printer driver, check how the printer is connected. Follow |
|
1 |
|
the driver installation procedure that is appropriate to the connection method. |
|
Network Connection
This printer can be used as a Windows printing port or network printer.
Using this printer as the Windows printing port
Network connections can be established through Ethernet and IEEE 802.11b.
Available ports are determined based on the combination of Windows operating system version and connection method used.
|
|
|
|
|
|
|
|
|
|
|
|
|
|
|
Ridoc IO Navi |
|
Ridoc IO Navi |
|
|
|
Ridoc IO Navi |
|
|
|
Ridoc IO Navi |
|
|
|
|
|
|
|
|
|
||||
|
|
-TCP/IP |
|
-TCP/IP |
|
|
|
-TCP/IP |
|
|
|
-TCP/IP |
|
|
-IPP |
|
-IPP |
|
|
|
-IPP |
|
|
|
-IPP |
|
|
|
||||||||||
|
|
|
|
Standard TCP/IP |
|
|
|
Standard TCP/IP |
|
|
|
LPR |
|
|
|
|
|
||||||||
|
|
|
|
LPR |
|
|
|
LPR |
|
|
|
|
Windows 95/98/Me |
Windows 2000 |
Windows XP/ |
Windows NT 4.0 |
|
|
Server 2003 |
ZZZ036S |
|
|
|
Windows 95/98
Connection Method |
Available Ports |
|
|
Ethernet/IEEE 802.11b |
SmartDeviceMonitor for Client port |
|
|
Windows Me
Connection Method |
Available Ports |
|
|
Ethernet/IEEE 802.11b |
SmartDeviceMonitor for Client port |
|
|
Windows 2000
Connection Method |
Available Ports |
|
|
Ethernet/IEEE 802.11b |
SmartDeviceMonitor for Client port |
|
Standard TCP/IP |
|
LPR port |
3

Preparing for Printing
Windows XP
|
|
Connection Method |
Available Ports |
|
|
|
|
|
|
Ethernet/IEEE 802.11b |
SmartDeviceMonitor for Client port |
|
|
|
Standard TCP/IP |
1 |
|
|
|
|
|
LPR port |
|
|
|
|
|
|
|
|
|
|
Windows Server 2003 |
|
|
|
|
|
|
|
|
Connection Method |
Available Ports |
|
|
|
|
|
|
Ethernet/IEEE 802.11b |
SmartDeviceMonitor for Client port |
|
|
|
Standard TCP/IP |
|
|
|
LPR port |
|
|
|
|
|
Windows NT 4.0 |
|
|
|
|
|
|
|
|
Connection Method |
Available Ports |
|
|
|
|
|
|
Ethernet/IEEE 802.11b |
SmartDeviceMonitor for Client port |
|
|
|
LPR port |
|
|
|
|

 Reference
See the explanation of how to install the printer driver for each type of port. For the SmartDeviceMonitor for Client port, see p.7 “Using the SmartDeviceMonitor Port”.
For the Standard TCP/IP port, see p.21 “Using the Standard TCP/IP Port”.
For the LPR port, see p.26 “Using the LPR Port”.
4

Confirming the Connection Method
Using as a network printer
This printer can be used as the Windows network printer, the NetWare print server, or the NetWare remote printer.
1
Important
In an IPv6 environment, Netware servers cannot be used.
Windows 2000/XP
Windows Server 2003
Windows NT 4.0 |
NetWare |
NetWare |
||||||||||||
Print Server |
Print Server |
File Server |
||||||||||||
|
|
|
|
|
|
|
|
|
|
|
|
|
|
|
|
|
|
|
|
|
|
|
|
|
|
|
|
|
|
|
|
|
|
|
|
|
|
|
|
|
|
|
|
|
|
|
|
|
|
|
|
|
|
|
|
|
|
|
|
|
|
|
|
|
|
|
|
|
|
|
|
|
|
|
|
|
|
|
|
|
|
|
|
|
|
|
|
|
|
|
|
|
|
|
|
|
|
|
|
|
|
|
|
|
|
|
|
|
|
|
|
|
|
|
|
|
|
|
|
Windows 95/98/Me |
Windows 2000 |
Windows XP/ |
Windows NT 4.0 |
|
|
Server 2003 |
|
|
|
|
ZZZ003S |

 Reference
See the explanation of how to install the printer driver for each type of network printer.
For the Windows network printer, see p.30 “Using as the Windows Network Printer”.
For the NetWare print server and remote printer, see p.35 “Using as the NetWare Print Server/Remote Printer”.
5

Preparing for Printing
Local Connection
Local connections can be established via parallel, USB, and Bluetooth connec- 1 tions.
Windows operating system version determines the available connection methods.
•Windows 95:
•Parallel connection
•Windows 98:
•Parallel connection
•Windows 98 SE/Me:
•USB, Parallel, and Bluetooth connections
•Windows 2000:
•USB, Parallel, and Bluetooth connections
•Windows XP:
•USB, Parallel, and Bluetooth connections
•Windows Server 2003:
•USB, Parallel, and Bluetooth connections
•Windows NT 4.0:
•Parallel connection

 Reference
See the explanation of how to install the printer driver for each method of connection.
For the USB connection, see p.39 “Installing the Printer Driver Using USB”. For the parallel connection, see p.44 “Printing with Parallel Connection”.
For the Bluetooth connection, see p.48 “Printing with Bluetooth Connection”.
6

Using the SmartDeviceMonitor Port
Using the SmartDeviceMonitor Port
Installing DeskTopBinder-SmartDeviceMonitor for Client |
|
|
1 |
||
|
|
|
 Important
To install SmartDeviceMonitor for Client under Windows 2000/XP Professional, Windows Server 2003, and Windows NT 4.0, you must have an account that has Manage Printers permission. Log on as an Administrator.
Install SmartDeviceMonitor for Client before installing the printer driver when using the SmartDeviceMonitor for Client port.
A B
Quit all applications currently running. Insert the CD-ROM into the CD-ROM drive.
The installer starts.
C Select an interface language, and then click [OK].
The default interface language is English.
D E
Click [DeskTopBinder - SmartDeviceMonitor for Client].
Select an interface language, and then click [Next >].
The default interface language is English.
F The message to quit all other applications appears. Quit all applications, and then click [Next >].
G Click [Yes]
H The DeskTopBinder Lite Setup dialog appears, and then click [Next >].
I The software license agreement appears in the [License Agreement] dialog box. After reading through its contents, click [Yes].
J Click [Full install] or [Custom Install].
[Full install] installs all required applications: DeskTopBinder Lite and SmartDeviceMonitor for Client.
[Custom Install] installs selected applications.
K Follow the instructions on the display and click [Next>] to proceed next step.
L After the installation is completed, select one of the options to restart the computer either now or later, and click [Complete].
Restart the computer to complete installation.

 Note
Note
Auto Run may not work with certain operating system settings. If this happens, launch “Setup.exe” on the CD-ROM root directory.
To stop installation of the selected software, click [Cancel] before installa-
tion is complete. |
7 |
|

1
8
Preparing for Printing
Installing the PCL or RPCS Printer Driver (TCP/IP)
 Important
To install this printer driver under Windows 2000/XP Professional, and Windows Server 2003, you must have an account that has Manage Printers permission. Log on as an Administrators or Power Users group member.
A Quit all applications currently running.
B Insert the CD-ROM into the CD-ROM drive.
The installer starts.
C Select an interface language, and then click [OK].
The default interface language is English.
D Click [PCL/RPCS Printer Drivers].
E The software license agreement appears in the [License Agreement] dialog box.
After reading the agreement, click [I accept the agreement.], and then click [Next >].
F Select the printer driver you want to use in the [Select Program] dialog box.
You can select several printer drivers.
G Click [Next >].
H Select the printer model you want to use.
The printer name can be changed in the [Change settings for 'Printer Name'] box.
I Double-click the printer name to display the printer settings.
The details shown in [Comment:], [Driver:], and [Port:] vary depending on the operating system, printer model, and port.
J Click [Port:], and then click [Add].
K Click [SmartDeviceMonitor], and then click [OK].
L Click [TCP/IP], and then click [Search].
A list of printers using TCP/IP appears.
M Select the printer you want to use, and then click [OK].
Only printers that respond to a broadcast from the computer appear. To use a printer not listed here, click [Specify Address], and then enter the IP address or host name of the printer.
N Check that the port of the selected printer is displayed in [Port:].
O Set a [User Code], if necessary.
Up to 8 numeric characters can be entered. No alphabetic characters or symbols are available.
Using the SmartDeviceMonitor Port
P Select the [Default Printer] check box to configure the printer as default.
Q Click [Continue].
Installation starts.
R After the installation is completed, select one of the options to restart the computer either now or later, and then click [Finish].
Restart the computer to complete installation.

 Note
Note
Auto Run may not work with certain operating system settings. If this happens, launch “Setup.exe” on the CD-ROM root directory.
Under Windows 95/98/Me, you cannot add an IPv4 address partially similar to the one already used. For example, if “192.168.0.2” is in use, “192.168.0.2xx” cannot be used. Similarly, if “192.168.0.20” is in use, “192.168.0.2” cannot be used.
This allows a SmartDeviceMonitor for Admin user to display and check statistics about the number of sheets which each user prints. For details, see SmartDeviceMonitor for Admin Help.

 Reference
A message appears if there is a newer version of the printer driver already installed. If there is, you cannot install the printer driver using Auto Run. If you still want to install the printer driver, install using [Add Printer]. See p.51 “If a Message Appears during Installation”.
Installing the PCL or RPCS Printer Driver (IPP)
 Important
To install printer driver under Windows 2000/XP Professional, and Windows Server 2003, you must have an account that has Manage Printers permission. Log on as an Administrators or Power Users group member.
A Quit all applications currently running.
B Insert the CD-ROM into the CD-ROM drive.
The installer starts.
C Select an interface language, and then click [OK].
The default interface language is English.
D Click [PCL/RPCS Printer Drivers].
E The software license agreement appears in the [License Agreement] dialog box.
After reading the agreement, click [I accept the agreement.], and then click [Next >].
F Select a printer driver you want to use in the [Select Program] dialog box.
You can select several printer drivers.
1
9

1
10
Preparing for Printing
G Select the printer model you want to use.
The printer name can be changed in the [Change settings for 'Printer Name'] box.
H Double-click the printer name to display the printer settings.
The details shown in [Comment:], [Driver:], and [Port:] vary depending on the operating system, printer model, and port.
I Click [Port:], and then click [Add].
J Click [SmartDeviceMonitor], and then click [OK].
K Click [IPP].
L In the [Printer URL] box, enter “http://printer's address/printer” as the printer's address.
If the server authentification is issued, to enable SSL( a protocol for encrypted communication), enter “https://printer's address/printer” (Internet Explorer 5.01, or a higher version must be installed).
(example IPv4 address: 192.168.15.16)
http://192.168.15.16/printer
https://192.168.15.16/printer
You can enter “http://printer's address/ipp” as the printer's address.
If you are using Firefox or Netscape under Windows XP SP2 or Windows Server 2003, you can enter IPv6 address as “http:// IPv6 printer's address/printer”.
M Enter a name for identifying the printer in [IPP Port Name]. Use a name different from the one of any existing port.
If a name is not specified here, the address entered in the [Printer URL] box becomes the IPP port name.
N Click [Detailed Settings] to make necessary settings.
For information about the settings, see SmartDeviceMonitor for Client Help.
O Click [OK].
P Check that the port of the selected printer is displayed in [Port:].
Q Set a [User Code], if necessary.
Up to 8 numeric characters can be entered. No alphabetic characters or symbols can be entered.
R Select the [Default Printer] check box to configure the printer as default.
S Click [Continue].
Installation starts.
T After the installation is completed, select one of the options to restart the computer either now or later, and then click [Finish].
Restart the computer to complete installation.

Using the SmartDeviceMonitor Port |
|
|
|
Note |
|
||
Auto Run may not work with certain operating system settings. If this hap- |
|
||
pens, launch “Setup.exe” on the CD-ROM root directory. |
|
||
This allows a SmartDeviceMonitor for Admin user to display and check |
|
||
1 |
|||
the number of sheets each user prints. For details, see SmartDeviceMonitor |
|||
for Admin Help.
To stop installation of the selected software, click [Cancel] before installation is complete.

 Reference
A message appears if there is a newer version of the printer driver already installed. If there is, you cannot install the printer driver using Auto Run. If you still want to install the printer driver, use [Add Printer]. See p.51 “If a Message Appears during Installation”.
Installing the PostScript 3 Printer Driver (Windows 95/98/Me - TCP/IP)
A B
Quit all applications currently running. Insert the CD-ROM into the CD-ROM drive.
The installer starts.
C Select an interface language, and then click [OK].
The default interface language is English.
D Click [PostScript 3 Printer Driver].
Add Printer Wizard starts.
E Click [Next >].
F Click [Local Printer], and then click [Next >].
A dialog box for selecting the printer manufacturer and model name appears.
G Select the name of the printer whose driver you want to install, and then click [Next >].
H In the [Available ports:] box, click [Printer Port], and then click [Next >].
I Change the printer name if you want, and then click [Next >].
Select the [Yes] check box to configure the printer as default.
J Specify whether or not to print a test page, and then click [Finish].
K On the [Start] menu, point to [Settings], and then click [Printers].
The [Printers] window appears.
L Click the icon of the printer you want to use. On the [File] menu, click [Properties].
11

Preparing for Printing
M
N
1O P
On the [Details] tab, click [Add Port…].
Click [DeskTopBinder-SmartDeviceMonitor] in the [Other] list, and then click [OK].
Click [TCP/IP], and then click [Search].
A list of printers using TCP/IP appears.
Select the printer you want to use, and then click [OK].
Only printers that respond to a broadcast from the computer appear. To use a printer not listed here, click [Specify Address], and then enter the IPv4 address or host name of the printer.
You cannot add an IPv4 address partially similar to the one already used. For example, if “192.168.0.2” is in use, “192.168.0.2xx” cannot be used. Similarly, if “192.168.0.20” is in use, “192.168.0.2” cannot be used.
Q R
S
Click [OK].
Check that the selected port is highlighted in [Printer to the following port], and then click [OK].
Restart the computer to complete installation.

 Note
Note
Auto Run may not work with certain operating system settings. If this happens, launch “Setup.exe” on the CD-ROM root directory.
A User Code can be set after the printer driver installation. For information about User Code, see the printer driver Help.
Installing the PostScript 3 Printer Driver (Windows 95/98/Me - IPP)
 Important
IPv6 cannot be used under Windows 95/98/Me.
A B
Quit all applications currently running. Insert the CD-ROM into the CD-ROM drive.
The installer starts.
C Select an interface language, and then click [OK].
The default interface language is English.
D Click [PostScript 3 Printer Driver].
Add Printer Wizard starts.
E Click [Next >].
F Click [Local Printer], and then click [Next >].
A dialog box for selecting the printer manufacturer and model name appears.
12

Using the SmartDeviceMonitor Port
G Select the name of the printer whose driver you want to install, and then click [Next >].
H In the [Available ports:] box, click [Printer Port], and then click [Next >]. |
1 |
I Change the printer name if you want, and then click [Next >]. |
Select the [Yes] check box to configure the printer as default.
J Specify whether or not to print a test page, and then click [Finish].
K On the [Start] menu, point to [Settings], and then click [Printers].
The [Printers] window appears.
L Click the icon of the printer you want to use. On the [File] menu, click [Properties].
M On the [Details] tab, click [Add Port…].
N Click [SmartDeviceMonitor] in the [Other] list, and then click [OK].
O Click [IPP].
P In the [Printer URL] box, enter “http://(printer's address)/printer” as the printer's address.
If the server authentification is issued, to enable SSL (a protocol for encrypted communication), enter “https://(printer's address)/printer” (Internet Explorer 5.01, or a higher version must be installed).
(example IPv4 address: 192.168.15.16)
http://192.168.15.16/printer
https://192.168.15.16/printer
You can enter “http://(printer's address)/ipp” as the printer's address.
Q Enter a name for identifying the printer in [IPP Port Name]. Use a name different from the one of any existing port.
If a name is not specified here, the address entered in the [Printer URL] box becomes the IPP port name.
R Click [Detailed Settings] to make necessary settings.
For information about the settings, see SmartDeviceMonitor for Client Help.
S T
U
Click [OK].
Check that the selected port is highlighted in [Printer to the following port], and then click [OK].
Restart the computer to complete installation.
13

|
|
Preparing for Printing |
|
|
Note |
|
|
Auto Run may not work with certain operating system settings. If this hap- |
|
|
pens, launch “Setup.exe” on the CD-ROM root directory. |
|
|
The printer driver with the selected language will be installed. The English |
1 |
|
|
|
printer driver is installed when the following language is selected: Cestina, |
Magyar, Polski, Portugues, Suomi.
A User Code can be set after the printer driver installation. For information about User Code, see the printer driver Help.
Installing the PostScript 3 Printer Driver (Windows 2000 - TCP/IP)
 Important
Installing this printer driver requires Administrators permission. Log on using an account that has Administrators permission.
A B
Quit all applications currently running. Insert the CD-ROM into the CD-ROM drive.
The installer starts.
C Select an interface language, and then click [OK].
The default interface language is English.
D Click [PostScript 3 Printer Driver].
Add Printer Wizard starts.
E Click [Next >].
F Click [Local printer], and then click [next >].
G Click [Create a new port...].
H Click [DeskTopBinder-SmartDeviceMonitor], and then click [Next >].
I Click [TCP/IP], and then click [Search].
A list of printers using TCP/IP appears.
J Select the printer you want to use, and then click [OK].
Only printers that respond to a broadcast from the computer appear. To use a printer not listed here, click [Specify Address], and then enter the IPv4 address or host name of the printer.
K Check that the name of the printer whose driver you want to install is selected, and then click [Next >].
L Change the printer name if you want, and then click [Next >].
Select the [Yes] check box to configure the printer as default.
14

Using the SmartDeviceMonitor Port
M N O
Specify whether or not to share the printer, and then click [Next >]. |
|
|
Specify whether or not to print a test page, and then click [Next >]. |
|
|
Click [Finish]. |
|
|
1 |
||
The printer driver installation starts. |
||
|
||
Note |
|
Auto Run may not work with certain operating system settings. If this happens, launch “Setup.exe” on the CD-ROM root directory.
The printer driver with the selected language will be installed. The English printer driver is installed when the following language is selected: Cestina, Magyar, Polski, Portugues, Suomi.
A User Code can be set after the printer driver installation. For information about User Code, see the printer driver Help.
Installing the PostScript 3 Printer Driver (Windows 2000 - IPP)
 Important
Installing this printer driver requires Administrators permission. Log on using an account that has Administrators permission.
IPv6 cannot be used under Windows 2000.
A B
Quit all applications currently running. Insert the CD-ROM into the CD-ROM drive.
The installer starts.
C Select an interface language, and then click [OK].
The default interface language is English.
D Click [PostScript 3 Printer Driver].
Add Printer Wizard starts.
E Click [Next >].
F Click [Local printer attached to this computer], and then click [Next >].
G Click [Create a new port:].
H Click [DeskTopBinder-SmartDeviceMonitor], and then click [Next >].
I Click [IPP].
15

Preparing for Printing
J In the [Printer URL] box, enter “http://(printer's address)/printer” as the printer's address.
|
If the server authentification is issued, to enable SSL (a protocol for encrypted |
1 |
communication), enter “https://(printer's address)/printer” (Internet Ex- |
plorer 5.01, or a higher version must be installed). |
(example IPv4 address: 192.168.15.16)
http://192.168.15.16/printer
https://192.168.15.16/printer
You can enter “http://(printer's address)/ipp” as the printer's address.
K Enter a name for identifying the printer in [IPP Port Name]. Use a name different from the name of any existing port.
If a name is not specified here, the address entered in the [Printer URL] box becomes the IPP port name.
L Click [Detailed Settings] to make necessary settings.
For information about the settings, see SmartDeviceMonitor for Client Help.
M Click [OK].
N Check that the name of the printer whose driver you want to install is selected, and then click [Next >].
O Change the printer name if you want, and then click [Next >].
P Click [Next >].
Q Specify whether or not to print a test page, and then click [Next >].
R Click [Finish].
The printer driver installation starts.

 Note
Note
Auto Run may not work with certain operating system settings. If this happens, launch “Setup.exe” on the CD-ROM root directory.
The printer driver with the selected language will be installed. The English printer driver is installed when the following language is selected: Cestina, Magyar, Polski, Portugues, Suomi.
A User Code can be set after the printer driver installation. For information about User Code, see the printer driver Help.
16

Using the SmartDeviceMonitor Port
Installing the PostScript 3 Printer Driver (Windows XP, Windows Server 2003 - TCP/IP)
Important |
1 |
Installing this printer driver requires Administrators permission. Log on using an account that has Administrators permission.
A B
Quit all applications currently running. Insert the CD-ROM into the CD-ROM drive.
The installer starts.
C Select an interface language, and then click [OK].
The default interface language is English.
D Click [PostScript 3 Printer Driver].
Add Printer Wizard starts.
E Click [Next >].
F Click [Local printer attached to this computer.], and then click [Next >].
G Click [Create a new port:].
H Click [DeskTopBinder-SmartDeviceMonitor], and then click [Next >].
I Click [TCP/IP], and then click [Search].
A list of printers using [TCP/IP] appears.
J Select the printer you want to use, and then click [OK].
Only printers that respond to a broadcast from the computer appear. To use a printer not listed here, click [Specify Address], and then enter the IPv4 address or host name of the printer.
K Check that the name of the printer whose driver you want to install is selected, and then click [Next >].
L Change the printer name if you want, and then click [Next >].
Select the [Yes] check box to configure the printer as default.
M Specify whether or not to print a test page, and then click [Next >].
N Click [Finish].
The printer driver installation starts.

 Note
Note
Auto Run may not work with certain operating system settings. If this happens, launch “Setup.exe”on the CD-ROM root directory.
The printer driver with the selected language will be installed. The English printer driver is installed when the following language is selected: Cestina, Magyar, Polski, Portugues, Suomi.
A User Code can be set after the printer driver installation. For information
about User Code, see the printer driver Help. |
17 |
|

Preparing for Printing
Installing the PostScript 3 Printer Driver (Windows XP, Windows Server 2003 - IPP)
1 Important
Installing this printer driver requires Administrators permission. Log on using an account that has Administrators permission.
A B
Quit all applications currently running. Insert the CD-ROM into the CD-ROM drive.
The installer starts.
C Select an interface language, and then click [OK].
The default interface language is English.
D Click [PostScript 3 Printer Driver].
Add Printer Wizard starts.
E F G H I J
Click [Next >].
Click [Local printer attached to this computer.], and then click [Next >]. Click [Create a new port:].
Click [DeskTopBinder-SmartDeviceMonitor], and then click [Next >]. Click [IPP].
In the [Printer URL] box, enter “http://(printer's address)/printer” as the printer's address.
If the server authentification is issued, to enable SSL (a protocol for encrypted communication), enter “https://(printer's address)/printer” (Internet Explorer 5.01, or a higher version must be installed).
(example IPv4 address: 192.168.15.16)
|
http://192.168.15.16/printer |
|
https://192.168.15.16/printer |
|
You can enter “http://(printer's address)/ipp” as the printer's address. |
|
If you are using Firefox or Netscape under Windows XP SP 2 or Windows |
|
Server 2003, you can enter IPv6 address as “http://IPv6 printer's ad- |
|
dress/printer”. |
|
K Enter a name for identifying the printer in [IPP Port Name]. Use a name dif- |
|
ferent from the one of any existing port. |
|
If a name is not specified here, the address entered in the [Printer URL] box be- |
|
comes the IPP port name. |
|
L Click [Detailed Settings] to make necessary settings. |
18 |
For information about the settings, see SmartDeviceMonitor for Client Help. |
|
 Loading...