


 Loading...
Operation Manual
For the safe use of your camera, be sure to read the Safety Precautions thoroughly before use.

Using These Manuals
The two manuals included are for your Caplio G3.
Please read this first:
Quick Start guide (printed manual)
This booklet is designed to help you enjoy your Caplio G3 right away by providing quick explanations: "Getting Ready to
Shoot", "Shooting Images", "Viewing Images", and
"Connecting to Your PC."
Before using your camera, first read this manual.
Please read as needed:
Operation Manual (this manual).
This explains how to use all the functions of your Caplio G3.
To get the most out of your Caplio G3, please read it through once and refer to it whenever necessary.
Using This Guide
Term
File: Refers to a file of still image, movie, and voice data.
Symbols
The following symbols are used in this guide:
Important
This indicates important information and restrictions.
Note
This indicates supplementary explanations and useful tips on camera operations.
Terms
This indicates an explanation of a technical term.
Reference
This indicates page(s) relevant to a particular function.
"p.xx" is used to refer you to pages in this manual.

Table of Contents
Using These Manuals ................................................ |
2 |
Using This Guide ....................................................... |
2 |
Chapter 1 Using Your Camera |
|
Section 1 Getting Started |
|
Checking that everything is Packed........................... |
6 |
Names of Parts .......................................................... |
7 |
How to Use the Mode Dial ......................................... |
8 |
Inserting the Batteries ................................................ |
9 |
Using the Rechargeable Battery .............................. |
10 |
Inserting the rechargeable battery..................... |
10 |
Removing the rechargeable battery .................. |
10 |
Using the AC Adaptor .............................................. |
11 |
Setting up the AC adaptor ................................. |
11 |
Removing the AC adaptor ................................. |
12 |
Turning the Power On/Off ........................................ |
13 |
To turn the camera On ...................................... |
13 |
To turn the camera Off ...................................... |
13 |
Setting the Date and Time ....................................... |
14 |
Inserting the SD Memory Card ................................ |
15 |
Inserting the SD Memory Card.......................... |
15 |
Removing the SD Memory Card........................ |
16 |
How to Use the LCD Monitor ................................... |
17 |
Screen Examples when Shooting Pictures........ |
17 |
The Screen During Playback............................. |
20 |
Switching the Screen Display............................ |
21 |
Button Functions ...................................................... |
22 |
Screens.................................................................... |
23 |
The Basics of the Shooting Menu/Playback Menu 27 |
|
The Basics of the Setup Screen........................ |
28 |
Section 2 Basic Shooting |
|
How to Hold the Camera.......................................... |
30 |
How to Focus ........................................................... |
31 |
Shooting Still Images ............................................... |
33 |
Check the Focus and Shoot .............................. |
33 |
(Half-press)........................................................ |
33 |
Capture the Moment Shooting (Full-press) ....... |
34 |
When the Subject is not Centered on Your Composition |
|
(Focus Lock)....................................................... |
35 |
Shooting with Scenery-Matching ............................. |
36 |
Combination of Scene Mode and Function.............. |
38 |
Shooting with Multi-Shot .......................................... |
39 |
Making Multi-Shot Settings (CONT. MODE) ..... |
40 |
Shooting with Multi-Shot.................................... |
41 |
Shooting with S Multi-Shot ................................ |
41 |
Shooting with M Multi-Shot................................ |
41 |
Shooting Movies ...................................................... |
42 |
Shooting with the Zoom ........................................... |
43 |
Shooting with the Digital Zoom ................................ |
44 |
Shooting Close-ups (Macro Photo).......................... |
45 |
Recording Voice Memo............................................ |
46 |
Section 3 Using Special Features for Improved Photography
Using the Flash........................................................ |
48 |
Using the Self-Timer ................................................ |
50 |
Shooting a Still Image with Sound |
|
(Image With Sound) ........................................... |
51 |
Changing the Exposure (EXPOSURE COMP.)....... |
53 |
Using Natural and Artificial Lighting |
|
(WHITE BALANCE)........................................... |
55 |
Shooting Consecutively with Different White Balance |
|
(WHITE BALANCE BRACKET).......................... |
58 |
Choosing Picture Quality Mode/Image Size |
|
(PIC QUALITY/SIZE).......................................... |
60 |
About Picture Quality Mode .............................. |
60 |
About Image Size.............................................. |
60 |
Changing Picture Quality Mode/Image Size of a |
|
Still Image ..................................................... |
61 |
Changing the Image Size for Shooting in TEXT |
|
Mode............................................................. |
62 |
Changing the Image Size of a Movie ................ |
63 |
Manual Focus Shooting (FOCUS)........................... |
64 |
Manual Focus Shooting .................................... |
64 |
Shooting at a Fixed Distance ............................ |
65 |
Changing the Light Metering (PHOTOMETRY)....... |
66 |
Sensitivity Settings (ISO SETTING) ........................ |
68 |
Changing the Edge Quality of Still Images |
|
(SHARPNESS)................................................... |
69 |
Shooting Consecutively with Different Exposures |
|
(AUTO BRACKET)............................................. |
70 |
Setting the Exposure Time (TIME EXPOSURE) ..... |
72 |
Shooting Pictures Automatically at Set Intervals |
|
(INTERVAL) ....................................................... |
73 |
Inserting the Date into a Still Image |
|
(DATE IMPRINT)................................................ |
75 |
Returning the Shooting Menu Settings to their Defaults |
|
(RESTORE DEFAULTS).................................... |
76 |
Displaying the Grid Guide on the LCD Monitor ....... |
77 |
Changing Shading for Shooting Text (DENSITY).... |
78 |
Section 4 Playing Back Still Images, Movies, and Sounds
Viewing the Photo You Just Took............................ |
80 |
Displaying an Enlarged View of the Still Image |
|
Displayed ...................................................... |
81 |
Deleting the Displayed Still Image or Movie...... |
82 |
Viewing a Still Image or Movie ................................ |
83 |
Viewing Still Images Recorded on an SD Memory |
|
Card .............................................................. |
83 |
Viewing Still Images Recorded on Internal Memory84 |
|
Viewing Movies ................................................. |
85 |
Adjusting the Movie Sound Volume .................. |
85 |
Playing Back Sound ................................................ |
86 |
Playing Back Sound .......................................... |
86 |
Playing Back Sound recorded with a Still Image ... |
87 |
Adjusting the Volume ........................................ |
87 |
Viewing at a Glance................................................. |
88 |
Enlarged Viewing..................................................... |
89 |
Viewing an S Multi-Shot or M Multi-Shot Still Image in |
|
Enlarged Display Mode ...................................... |
90 |
Showing Photos in Order Automatically |
|
(SLIDE SHOW) .................................................. |
91 |
Viewing on a Television........................................... |
92 |

Section 5 Deleting Still Images, Movies, and Sound |
|
Deleting Unwanted Still Images/Movies/Sounds ..... |
94 |
Deleting One Still Image.................................... |
94 |
Deleting All Frames at Once.............................. |
95 |
Deleting Multiple Frames at Once ..................... |
96 |
Write-protecting Your Images (PROTECT).............. |
97 |
Protecting the Displayed Still Image.................. |
97 |
Protecting All Still Images.................................. |
99 |
Protecting Multiple Still Images, Movies, or Sounds |
|
at Once........................................................ |
100 |
Copying the Contents of Internal Memory to a Memory |
|
Card (COPY TO CARD) ................................... |
101 |
Using a Printing Service (PRINT) .......................... |
102 |
Setting DPOF for the Still Image Displayed..... |
102 |
Setting DPOF for All Still Images..................... |
103 |
Setting DPOF for Multiple Still Images ............ |
104 |
Changing the Image Size (Resize) ........................ |
105 |
Section 6 Changing Camera Settings |
|
Getting the SD Memory Card Ready for Use |
|
(CARD FORMAT)............................................. |
107 |
Formatting Internal Memory (IN FORMAT)............ |
108 |
Changing Auto Power-Off Settings |
|
(AUTO POWER OFF) ...................................... |
109 |
Beep at Recording (BEEP SOUND) ...................... |
110 |
Changing File Name Settings (SEQUENTIAL NO.)111 |
|
Changing Image Confirmation Time |
|
(LCD CONFIRM.) ............................................. |
112 |
Adjusting the Brightness of the LCD Monitor |
|
(LCD BRIGHTNESS)........................................ |
113 |
Changing Power-Save Mode Settings |
|
(Power-Save).................................................... |
114 |
Changing the Display Language (LANGUAGE) .... |
115 |
Changing the Playback Method for Viewing on TV |
|
(VIDEO OUT MODE)........................................ |
116 |
Chapter 2 Playing back Images on a Computer (Pictures/Movies)
Section 1 Downloading Images to a Computer |
|
(For Windows) |
|
Using the Software Provided ................................. |
118 |
Software and OS Applicability Table ............... |
118 |
System Requirements............................................ |
119 |
Preparing to Download Images to Your Computer 120 |
|
Installation.............................................................. |
121 |
For Windows 98/98SE/Me/2000...................... |
121 |
Uninstalling the Software |
|
(For Windows 98/98SE/Me/2000) ................... |
122 |
For Windows XP.............................................. |
123 |
Uninstalling the Software |
|
(For Windows XP) ........................................... |
124 |
Installing Acrobat Reader....................................... |
125 |
Connecting the Camera to a Computer ................. |
126 |
Downloading Pictures to Your Computer............... |
127 |
For Windows 98/98SE/Me/2000/XP................ |
127 |
How to Use RICOH Gate La .................................. |
128 |
The RICOH Gate La Window .......................... |
128 |
How to Use the Optional settings .................... |
129 |
How to Use the Background Illustration Settings. 130 |
|
For Downloading Images Directly to Your Computer |
|
from an SD Memory Card ................................ |
131 |
Images in a PC Card....................................... |
131 |
Section 2 Downloading Images to a Computer |
|
(For Macintosh) |
|
Using the Software Provided ................................. |
133 |
Software and OS Applicability Table............... |
133 |
System Requirements ........................................... |
134 |
Preparing to Download Images to Your Computer 135 |
|
Installation ............................................................. |
136 |
For Mac OS 8.6 to 9.2.2.................................. |
136 |
For Mac OS X 10.1.2 to 10.2.1 ....................... |
137 |
Uninstalling the Software |
|
(For Mac OS 8.6 to 9.2.2) ........................... |
138 |
Uninstalling the Software |
|
(For Mac OS X 10.1.2 to 10.2.1)................. |
138 |
Connecting the Camera to a Computer................. |
139 |
Downloading Pictures to Your Computer .............. |
140 |
For Mac OS 8.6 to 9.2.2.................................. |
141 |
For Mac OS X ................................................. |
142 |
How to Use RICOH Gate La.................................. |
143 |
The RICOH Gate La Window.......................... |
143 |
How to Use Optional Settings ......................... |
144 |
Section 3 Displaying Thumbnail Images |
|
(How to Use DU-10) |
|
Starting and Exiting DU-10 .................................... |
146 |
DU-10 Window ................................................ |
146 |
Exiting DU-10 .................................................. |
146 |
Thumbnail Display Description .............................. |
147 |
Switching the Ordering of Images ......................... |
148 |
Changing the Display Size .................................... |
149 |
Viewing Images in a slide show............................. |
150 |
To View a slide show ...................................... |
150 |
Using Auto slide show..................................... |
151 |
How to Use the slide show Dialog Box ........... |
151 |
Viewing Image Information .................................... |
152 |
Using the File Menu ........................................ |
152 |
Using the Shortcut Menu................................. |
152 |
Displaying the Viewer Screen................................ |
153 |
Viewer Screen................................................. |
153 |
Appendices |
|
A. Specifications .................................................... |
155 |
B. Optional Accessories ........................................ |
157 |
C. SD Memory Card Recording Capacities ........... |
157 |
D. Using Your Camera Abroad.............................. |
158 |
E. Cautions on Use................................................ |
158 |
F. Care and Storage .............................................. |
159 |
G. Troubleshooting ................................................ |
160 |
H. Error Messages................................................. |
166 |
I. About the Warranty and Servicing...................... |
167 |
Ricoh Service Offices ............................................ |
170 |

Chapter 1 Using Your Camera
Section 1 Getting Started
This section explains how to get your camera ready, from taking it out of the package to preparing to shoot.

Chapter 1 / Section 1 Getting Started
Checking that everything is Packed
The following items should be included with the camera. Please make sure everything was packed.
CD-ROM
The software and the operation manual are included on this CD-ROM.
USB Cable
Warranty Card
Handstrap
Safety Precautions
Attaching the hand strap to the camera
Thread the tips of the strap through the camera's strap attachment pegs and attach them as shown.
AC Adaptor (AC-4a) |
Rechargeable Battery (DB-43, DB-40) |
Battery Charger(BJ-2) |
• Other products sold separately: PC Card Adaptor (FM-SD53)
• In the unlikely event that something is missing or damaged, please contact the store where you purchased the camera.
• After checking the contents of the warranty card, please keep it in a safe place.
6

Chapter 1 / Section 1 Getting Started
Names of Parts
It is necessary to know these in order to understand the explanations in this manual. Check the following.
TCamera
Front View
Shutter release button |
|
|
Power button |
|
|
Mode Dial |
|
|
Flash |
|
|
AF Window |
|
|
Viewfinder |
|
|
Speaker |
|
|
Microphone |
|
|
Terminal Cover |
|
|
Lens |
|
|
USB Terminal |
Right Side, |
|
Video Out Terminal |
||
looking from the front |
||
|
Rear View
Rear View
Bottom
Auto Focus LampViewfinder
Flash Lamp
D(Delete)/T(Self-timer) Button
Z(Wide-angle)/9(Thumbnail Display) Buttonz(Telephoto)/8(Enlarged View) Button
#/Q(Quick Review) Button!/F(Flash) Button
$Button
"/N(Macro)ButtonEButtonOButton
MButton
LCD Monitor
Battery/Card CoverStrap Attachment Peg
Power (DC in) Cable CoverTripod Screw Hole (underside)
Left Side, looking from the front
7

Chapter 1 / Section 1 Getting Started
How to Use the Mode Dial
The Mode Dial is on the top of the camera.
The Mode Dial is used to select the desired mode and operation for shooting and playback (still image viewing).
 Turn the Mode Dial to the symbol of the mode you want to use.
Mode Dial Symbols and Functions
Symbol |
Mode Name |
Function |
|
|
|
1 |
Setup Mode |
Allows you to set and confirm camera settings. |
|
|
|
2 |
Voice Memo Mode |
Allows you to record sounds. |
|
|
|
3 |
Movie Mode |
Allows you to record movies. |
|
|
|
4 |
Scene Mode |
Allows you to optimize the camera settings for six different scences. |
|
|
|
5 |
Shooting Mode |
Allows you to shoot still images. |
|
|
|
6 |
Playback Mode |
Allows you to play back your movies and still images or delete them. |
|
|
|
8

Chapter 1 / Section 1 Getting Started
Inserting the Batteries
The following batteries can be used in the camera. Please choose which kind to use according to your needs.
Battery Type |
Feature |
AA Alkaline Batteries |
You can obtain them anywhere, so they are convenient for travel. |
(LR6) (included) |
However, in a low-temperature environment the number of shots you can take will |
|
decrease. Warm the batteries before use. |
Rechargeable Battery |
This is a lithium-ion battery. This is economical because you can recharge it using the |
(DB-43 or DB-40) |
battery charger BJ-2 (sold separately) and use it over and over again. They last a long time, |
(sold separately) |
so they are convenient for travel. |
Nickel-Hydrogen Battery |
This is economical because you can recharge it and use it over and over again. Please use |
(available in stores) |
a recharger available in stores. |
Below is an indication of the number of images you can take.
Battery Type |
Number of Shots |
Number of Shots (In the Synchro-Monitor Mode: see p.21) |
|
|
|
AA Alkaline Batteries (LR6) |
approx. 50 |
approx. 60 |
Rechargeable Battery |
approx. 350 |
approx. 400 |
The number of shots is based on a temperature of 22 degrees celsius, shooting at 30-second intervals and one out of every two being shot with the flash.
If you set the camera to the Power-Save mode, the number of shots you can take will increase. In addition to the batteries, you can use the AC Adaptor (sold separately).
Insert the batteries following these steps.
 Make sure the camera power is off.
 Slide the battery/card cover to open.
The cover slides two steps.
Slide the cover two steps to open.
 Insert the two batteries, making sure they are facing the correct way.
When the batteries wear out
Just before the batteries wear out,  is displayed on the LCD Monitor. When this happens, replace the batteries with a fresh set.
•Other batteries, such as manganese dry cell (R6) and Ni-Cd, cannot be used.
•Please remove the batteries if you are not going to use it for a long period of time.
• The batteries may become hot after extended use. Touching the batteries immediately after use could result in burns to your fingers.
• With AA Alkaline Batteries (LR6), the number of shots may differ depending on the batteries.
9
Chapter 1 / Section 1 Getting Started
Using the Rechargeable Battery
The DB-43 or DB-40 rechargeable battery (sold separately) is convenient for extended use because it can be use over and over again.
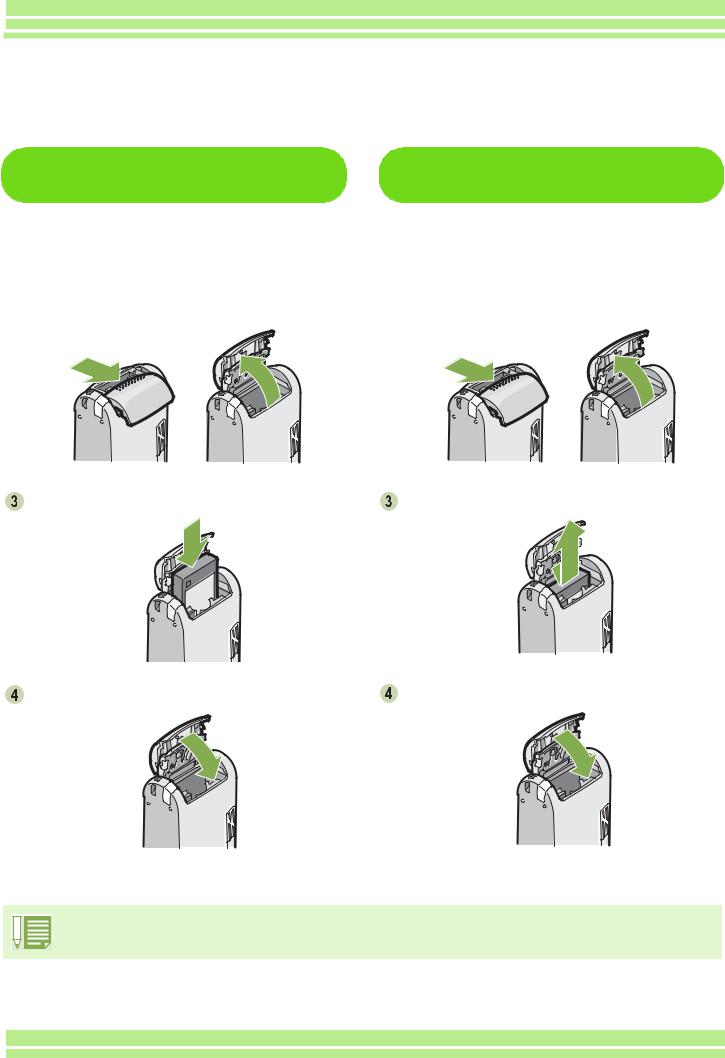
Inserting the rechargeable battery
 Make sure the camera power is off.
 Slide the battery/card cover to open.
The cover slides two steps.
Slide the cover two steps to open.
Removing the rechargeable battery
 Make sure the camera power is off.
 Slide the battery/card cover to open.
The cover slides two steps.
Slide the cover two steps to open.
Insert the rechargeable battery. |
Remove the battery. |
Close and slide the battery/card cover. |
Close and slide the battery/card cover. |
• Remove the batteries if you are not going to use the camera for a long period of time.
• For recharging the battery, use battery charger BJ-2 (sold separately).
10
Chapter 1 / Section 1 Getting Started
Using the AC Adaptor
When shooting or viewing still images for a long time, or when connecting to your computer, use of the
AC Adaptor (sold separately) is recommended.
Battery for use with the AC Adaptor


 AC Adaptor
Setting up the AC adaptor |
Open the power (DC input) cable cover and |
|
take the cable out. |
 Make sure the camera's power is off.
 Slide the battery/card cover to open.
The cover slides two steps.
Slide the cover two steps to open.
 Close and slide the battery/card cover.
 Plug the power cord into an outlet.
 Insert the AC Adaptor Battery .
•Be sure to firmly attach cables and plug in cords.
•When you are not using the camera, unplug the AC Adaptor from the camera and the power outlet.
• While in use, if you detach the AC Adaptor or unplug it from the outlet, data may be lost.
11

Chapter 1 / Section 1 Getting Started
Removing the AC adaptor
 Make sure the camera's power is off.
 Unplug the power plug from the outlet.
 Slide the battery/card cover to open.
The cover slides two steps.
Slide the cover two steps to open.
 Remove the battery.
 Close and slide the battery/card cover.
12

Chapter 1 / Section 1 Getting Started
Turning the Power On/Off
The camera is switched between On and Off as follows.
To turn the camera On |
To turn the camera Off |
Press the power button |
Press the power button |
The flash lamp and auto-focus lamp will flash altermately for several seconds.
Auto Power-off
• If the camera goes unused for a set period of time, it will automatically turn itself off to save power. To use the camera again, simply press the power switch.
At time of purchase, the Auto Power-off function is set to one minute.
• The Auto Power-off function does not work when connected to your computer.
Power-Save Mode
You can reduce the power consumption of the LCD Monitor and extend the life of your batteries. If you have activated Power-Save mode, the display on the LCD Monitor will turn off in Shooting Mode. When the LCD Monitor is dark, turn the SETUP Dial to check the Power-Save mode setting.
For how to change the Auto Power-off time, see p.109.
For how to set the Power-Save Mode, see p.114.
13

Chapter 1 / Section 1 Getting Started
Setting the Date and Time
You can take still images with the time or date stamped onto the picture.
Immediately after purchasing the camera, the date and time settings will not be correct, so be sure to set the date and time before using this feature.
To set the date and time, follow the steps below.
Buttons used here
 Make sure the power is on and then turn the Mode Dial to 1(Setup Mode).
The Setup screen is displayed on the LCD Monitor.
 Press the "button to select [DATE SETTINGS] and then press the Obutton.
Set the year, month, date and time by pressing !"#$.
If you hold down the !"buttons, you can increase/ decrease the value quickly.
 In [FORMAT], choose the Date and Time format.
 Check the display on the bottom of the screen and then press the Obutton.
Once you have set the date and time, the display returns to the Setup screen.
If the batteries are removed for about two weeks, the date and time settings will be lost. These settings must be made again.
14
Chapter 1 / Section 1 Getting Started
Inserting the SD Memory Card
You can record the still images and movies you have taken on SD Memory Cards (available in stores) or in the camera’s internal memory.
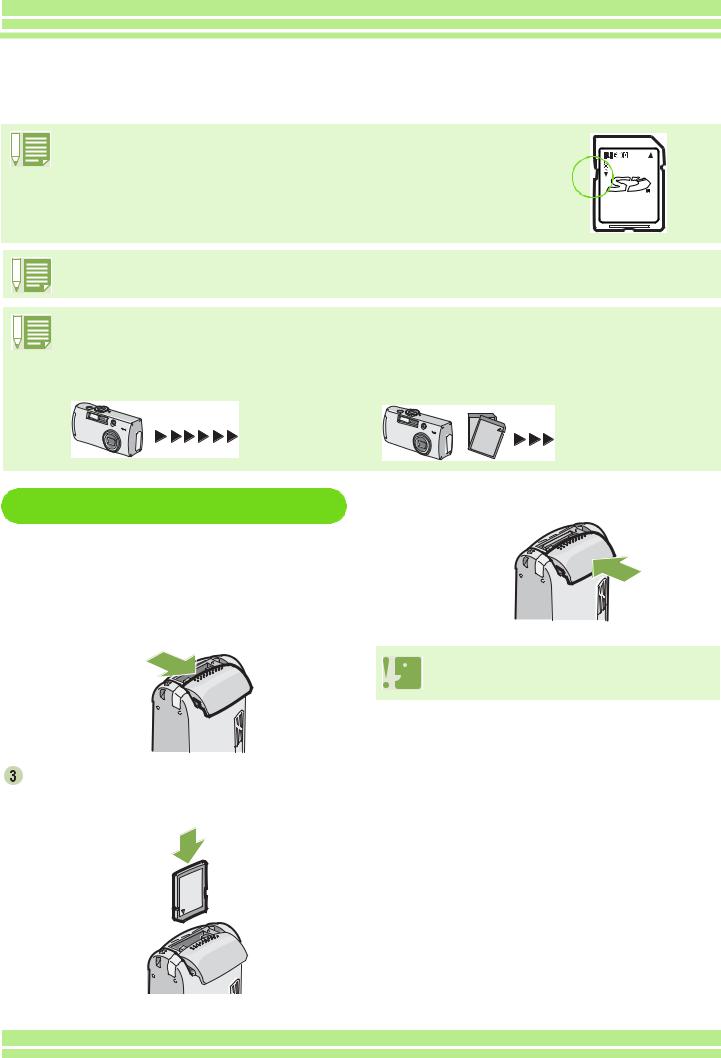
Write-protecting your images
If you move the card's write-protection switch to LOCK, your still images cannot be accidentally erased, and the memory card cannot be formatted. If you return the switch to the former position, it is once again possible to erase images and format the card.
It is recommended to switch to LOCK after recording important images.
The internal memory capacity is 8MB.
About where to record
When an SD Memory Card is not inserted, the camera records images in the internal memory; when an SD Memory Card is inserted, it records images on the SD Memory Card.
When no memory card is loaded |
When an SD Memory Card is loaded |
Records to |
Records to |
internal |
SD Memory |
memory |
Card |
Inserting the SD Memory Card
 Turn the power off.
 Slide the battery/card cover to open.
The cover slides two steps.
Slide the cover one step for card insertion or extraction.
Make sure the card is facing the right way and then push the card all the way in until it clicks
 Close and slide the battery/card cover.
When loading the SD Memory Card, take care not to get any dirt on the card's metal parts.
15

Chapter 1 / Section 1 Getting Started
Removing the SD Memory Card
 Make sure the camera's power is off.
 Slide the battery/card cover to open.
The cover slides two steps.
Slide the cover one step for card insertion or extraction.
Press the card gently and release it.
The card pops out just a little.
 Gently take the card out of the camera.
 Close and slide the battery/card cover.
16
Chapter 1 / Section 1 Getting Started
How to Use the LCD Monitor
The LCD Monitor can be used to view the subject when you are shooting an image, as well as for playing back movies and still images. Symbols and numbers indicating the camera's status and settings are displayed on the screen of the LCD Monitor.
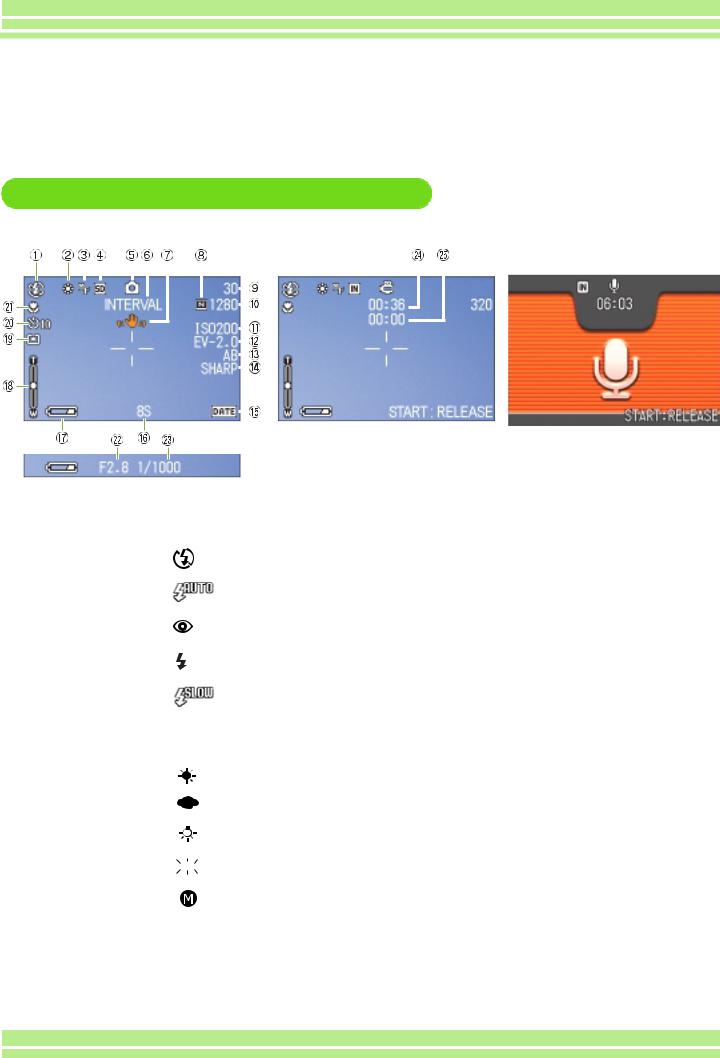
Screen Examples when Shooting Pictures
Still Image Mode |
|
Movie Mode |
Voice Memo Mode |
||||||||
|
|
|
|
|
|
|
|
|
|
|
|
|
|
|
|
|
|
|
|
|
|
|
|
|
|
|
|
|
|
|
|
|
|
|
|
|
|
|
|
|
|
|
|
|
|
|
|
|
|
|
|
|
|
|
|
|
|
|
|
|
|
|
|
|
|
|
|
|
|
|
|
|
|
|
|
|
|
|
|
|
|
|
|
|
|
|
|
|
|
|
|
|
|
|
|
|
|
|
|
|
|
|
|
|
|
|
|
|
|
|
|
|
|
|
|
|
|
|
|
|
|
|
|
|
|
|
|
|
|
|
|
|
|
|
|
|
|
|
|
|
|
|
|
|
|
|
Symbol |
Display Contents |
Refer to |
|
|
|
|
|
|
Flash |
|
|
Flash Off |
Current flash mode. |
p.48 |
|
|
|
|
|
|
|
|
|
|
|
|
|
|
|
Auto |
|
|
|
|
|
|
|
|
|
|
Red-eye reduction |
|
|
|
|
|
|
|
|
|
|
|
Forced Flash |
|
|
|
|
|
|
|
|
|
|
|
|
Slow Synchro |
|
|
|
|
|
|
|
|
WHITE BALANCE |
(No Display) |
White Balance set value. |
p.55 |
||
|
AUTO |
|
|
||
|
|
|
|
|
|
|
|
|
Daylight |
|
|
|
|
|
|
|
|
|
|
|
Overcast |
|
|
|
|
|
|
|
|
|
|
|
Tungsten light |
|
|
|
|
|
|
|
|
|
|
|
Fluorescent light |
|
|
|
|
|
|
|
|
|
|
|
|
|
|
|
|
|
One-push |
|
|
|
|
|
|
|
|
17

Chapter 1 / Section 1 Getting Started
Still Image Mode |
|
Movie Mode |
Voice Memo Mode |
||||||||
|
|
|
|
|
|
|
|
|
|
|
|
|
|
|
|
|
|
|
|
|
|
|
|
|
|
|
|
|
|
|
|
|
|
|
|
|
|
|
|
|
|
|
|
|
|
|
|
|
|
|
|
|
|
|
|
|
|
|
|
|
|
|
|
|
|
|
|
|
|
|
|
|
|
|
|
|
|
|
|
|
|
|
|
|
|
|
|
|
|
|
|
|
|
|
|
|
|
|
|
|
|
|
|
|
|
|
|
|
|
|
|
|
|
|
|
|
|
|
|
|
|
|
|
|
|
|
|
|
|
|
|
|
|
|
|
|
|
|
|
|
|
|
|
|
Symbol |
Display Contents |
Refer to |
|
|
|
|
FOCUS |
(No Display) |
Focus set value. |
p.64 |
|
AF(Auto-Focus) |
|
|
|
MF(Manual Focus) |
|
|
|
Snapshot |
|
|
|
|
|
|
|
(Infinite Telephoto) |
|
|
|
|
|
|
Recording |
|
Recording to internal memory. |
p.15 |
Destination |
|
|
|
|
Recording to an SD Memory Card. |
p.15 |
|
|
|
|
|
Flash Mode Types |
|
Still Image Shooting Mode. |
p.33 |
|
|
|
|
|
|
Movie Mode. |
p.42 |
|
|
|
|
|
|
Multi-Shot Mode. |
p.39 |
|
|
|
|
|
|
S Multi-Shot Mode |
p.39 |
|
|
|
|
|
|
M Multi-Shot Mode |
p.39 |
|
|
|
|
|
|
PORTRAIT Mode. |
p.36 |
|
|
|
|
|
|
SPORTS Mode. |
p.36 |
|
|
|
|
|
|
LANDSCAPE Mode. |
p.36 |
|
|
|
|
|
|
NIGHTSCAPE Mode. |
p.36 |
|
|
|
|
|
|
TEXT Mode. |
p.36 |
|
|
|
|
|
|
HIGH SENSITIVITY Mode. |
p.36 |
|
|
|
|
|
2 |
Voice Memo Mode. |
p.46 |
|
|
|
|
INTERVAL |
Interval |
Interval Shooting. |
p.73 |
|
|
|
|
Camera Shake |
|
May be displayed while adjusting focus. |
— |
|
|
|
|
Picture Quality |
Fine |
Picture Quality setting. |
p.60 |
|
|
|
|
|
|
|
|
|
Normal |
|
|
|
|
|
|
18

Chapter 1 / Section 1 Getting Started
Still Image Mode |
|
Movie Mode |
Voice Memo Mode |
||||||||
|
|
|
|
|
|
|
|
|
|
|
|
|
|
|
|
|
|
|
|
|
|
|
|
|
|
|
|
|
|
|
|
|
|
|
|
|
|
|
|
|
|
|
|
|
|
|
|
|
|
|
|
|
|
|
|
|
|
|
|
|
|
|
|
|
|
|
|
|
|
|
|
|
|
|
|
|
|
|
|
|
|
|
|
|
|
|
|
|
|
|
|
|
|
|
|
|
|
|
|
|
|
|
|
|
|
|
|
|
|
|
|
|
|
|
|
|
|
|
|
|
|
|
|
|
|
|
|
|
|
|
|
|
|
|
|
|
|
|
|
|
|
|
|
|
Symbol |
Display Contents |
Refer to |
Remaining Number of |
(Value) |
Number of photos that can be taken with |
— |
Still Images |
|
the current settings. |
|
|
|
|
|
Image Size |
(Setting Value) |
Image Size setting. |
p.60 |
ISO SETTING |
(Setting Value) |
ISO Speed set value. |
p.68 |
EXPOSURE COMP. |
(Setting Value) |
Exposure compensation set value. |
p.53 |
AUTO BRACKET |
AB |
Auto-Bracket Shooting. |
p.70 |
|
WB-BKT |
White Balance Bracket. |
p.58 |
SHARPNESS |
SOFT |
Sharpness (edge quality) set value. |
p.69 |
|
(No display) Standard |
|
|
|
SHARP |
|
|
Date/Time |
|
Date Imprint mode. |
p.75 |
|
|
|
|
TIME EXPOSURE |
(Setting Value) |
Indicates exposure time. |
p.72 |
Battery |
Insufficient Capacity |
Remaining Battery Power. |
— |
|
|
|
|
Zoom Bar |
- |
Zoom status. |
p.43 |
PHOTOMETRY |
(No Display) Multi |
Light Metering Method. |
p.66 |
|
Center |
|
|
|
|
|
|
|
Spot |
|
|
|
|
|
|
Self-timer |
After 10 Seconds |
Self-Timer Shooting. |
p.50 |
|
|
|
|
|
After 2 Seconds |
|
|
|
|
|
|
Macro Shooting |
|
Macro Shooting. |
p.45 |
|
|
|
|
Aperture Value |
- |
Aperture size. |
— |
Shutter Speed |
- |
Shutter speed. |
— |
|
|
|
|
Remaining Recording |
(Value) |
Length of time remaining for shooting with |
— |
Time |
|
the current settings. |
|
|
|
|
|
Recording Time |
(Value) |
Amount of time recorded. |
— |
• When shooting in particularly bright places, you may not be possible to prevent overexposure. In this case, the [!AE] symbol will be displayed.
• The LCD monitor may display messages to inform you of operational instructions or the camera status while in use.
19

Chapter 1 / Section 1 Getting Started
The Screen During Playback
Still Image Mode |
|
Movie Mode |
|
Voice Memo Mode |
||||||||||
|
|
|
|
|
|
|
|
|
|
|
|
|
|
|
|
|
|
|
|
|
|
|
|
|
|
|
|
|
|
|
|
|
|
|
|
|
|
|
|
|
|
|
|
|
|
|
|
|
|
|
|
|
|
|
|
|
|
|
|
|
|
|
|
|
|
|
|
|
|
|
|
|
|
|
|
|
|
|
|
|
|
|
|
|
|
|
|
|
|
|
|
|
|
|
|
|
|
|
|
|
|
|
|
|
|
|
|
|
|
|
|
|
|
|
|
|
|
|
|
|
Symbol |
Display Contents |
Refer to |
|
|
|
|
|
DPOF specified. |
p.102 |
|
|
|
|
|
PROTECT |
|
Protected status. |
p.97 |
|
|
|
|
Playback data source |
|
Indicates playback from internal memory. |
p.84 |
|
|
|
|
|
|
Indicates playback from an SD Memory Card. |
p.83 |
|
|
|
|
Mode Types |
|
Still Image Mode. |
p.83 |
|
|
|
|
|
|
Movie Mode. |
p.85 |
|
|
|
|
|
2 |
Voice Memo Mode. |
p.86 |
|
|
|
|
Picture Quality |
Fine |
Picture Quality setting. |
p.60 |
|
|
|
|
|
|
|
|
|
Normal |
|
|
|
|
|
|
Number of Playback |
|
The number of the file being played back. |
— |
Files |
|
|
|
|
|
|
|
Total number of files |
|
Total number of files recorded. |
— |
|
|
|
|
Image Size |
(Setting Value) |
Image size. |
p.60 |
|
|
|
|
Folder No |
- |
Number of the folder in which the file is saved. |
— |
|
|
|
|
File No |
- |
Number of the file being played back. |
— |
|
|
|
|
Shutter Speed |
- |
Shutter speed. |
— |
|
|
|
|
Aperture Value |
- |
Aperture size. |
— |
|
|
|
|
Battery |
Insufficient |
Remaining battery level. |
p.9 |
|
Capacity |
|
|
|
|
|
|
Playback Time |
(Time) |
Movie playback time. |
— |
|
|
|
|
Indicator |
|
Elapsed time of movie playback. |
— |
|
|
|
|
• The LCD monitor may display messages to inform you of operational instructions or the camera status while in use.
20
Chapter 1 / Section 1 Getting Started
Switching the Screen Display
If you press E, you can change the screen display mode, such as switching between display/ no display of symbols, etc.
TWhen Shooting |
|
|
|
|
Grid Guide |
|
|
Synchro-Monitor |
||
|
Display Symbols |
|
|
|
|
|
|
|||
|
|
|
No Display |
|
Display |
|
|
Mode |
||
|
|
|
|
|
|
|
|
|
|
|
|
|
|
|
|
|
|
|
|
|
|
|
|
|
|
|
|
|
|
|
|
|
|
|
|
|
|
|
|
|
|
|
|
|
|
|
|
|
|
|
|
|
|
|
Ebutton
ÅEIn the Synchro-Monitor Mode except with the following operations, the LCD Monitor is turned off (No Display). This is a useful mode to reduce power consumption.
Half-press the shutter button. The LCD Monitor is tuned on and you can confirm composition. After you finish shooting with Full-Press, the LCD Monitor will automatically turn off.
You can view the photo you just took (see p.80). By pressing the Q (Quick Review) button again, you can turn the LCD Monitor off.
The LCD Monitor Display is turned on and you can make various settings for shooting (see p.27). By pressing the Mbutton again, you can turn the LCD Monitor off.
•You cannot turn the LCD Monitor Display on/off by pressing T(Self-timer), F(Flash) or N(Macro) buttons.
•Turning the LCD Monitor Display Off conserves battery life. In this case, shoot using just the Viewfinder.
•In Voice Memo Mode, you can turn the LCD Monitor Display off by pressing the Ebutton.
When the No Display or Grid Guide Display is on, symbols will appear for a few seconds right after you have pressed Self-timer, Flash or Macro button.
For how to display the grid guide, see p.77.
TWhen Playing Back
Display Symbols |
|
No Display |
||
|
|
|
|
|
|
|
|
|
|
|
|
|
|
|
|
|
|
|
|
Ebutton
• In Voice Memo Mode, you can turn the LCD Monitor Display off by pressing the Ebutton.
21

Chapter 1 / Section 1 Getting Started
Button Functions
The following table summarizes the functions of the camera's buttons.
Power Button, see p.13.
Mode Dial, see p.8.
Shutter Button, see p.30.
Button |
Shooting Mode |
Playback Mode |
Menu display |
||||
|
|
|
|
|
|
|
|
D(Delete)/ |
If you press the button in |
If you press the button |
|
|
|
||
T(Self-timer) Button |
Shooting Mode, self-timer |
during Playback Mode, you |
|
|
|
||
|
mode is activated and you |
can delete the still image or |
|
|
|
||
|
can take photos using the |
movie that is displayed on |
|
|
|
||
|
self-timer (see p.50). |
the LCD Monitor (see |
|
|
|
||
|
|
|
|
p.94). |
|
|
|
|
|
|
|
|
|
|
|
!( F: Flash) Button |
Switches between Flash/ |
In Voice Playback Mode, |
|
|
|
||
|
Flash Off and other Modes |
press the button to adjust |
|
|
|
||
|
(see p.48). |
the sound volume (see |
|
|
|
||
|
|
|
|
||||
|
|
|
|
p.86). |
|
|
|
|
|
|
|
|
|
|
|
"(N: Macro) Button |
You can take close-ups |
In Voice Playback Mode, |
|
|
|
||
|
(see p.45). |
press the button to adjust |
|
|
|
||
|
|
|
|
the sound volume (see |
|
|
|
|
|
|
|
|
|
|
|
|
|
|
|
p.86). |
|
|
|
|
|
|
|
|
|
|
|
#(Q: Quick Review) |
The last still image you took |
Displays the previous still |
|
|
|
||
Button |
is displayed (see p.80). |
image or movie (see p.83). |
|
|
|
||
|
|
|
|||||
$Button |
|
|
|
Displays the next still |
|
|
|
|
|
|
|
image or movie (see p.83). |
|
|
|
|
|
|
|
|
|
|
|
|
|
|
|
|
|
|
|
!"#$Button |
|
|
|
Displays the still image (or |
Moves the frame left, |
||
|
|
|
|
movie) on the right, left, |
right, up and down (see |
||
|
|
|
|
above or below in |
p.27). |
||
|
|
|
|
||||
|
|
|
|
Thumbnail Display mode. |
|
|
|
|
|
|
|
(see p.88). |
|
|
|
|
|
|
|
|
|
|
|
Z(Wide-angle)/ |
If you press the button in |
If you press the button in |
|
|
|
||
9(Thumbnail Display) |
Shooting Mode, you can |
Playback Mode, the LCD |
|
|
|
||
Button |
shoot with the wide-angle |
Monitor display is split, |
|
|
|
||
|
zoom (see p.43). |
allowing you to see sets of |
|
|
|
||
|
|
|
|
||||
|
|
|
|
still images at one glance |
|
|
|
|
|
|
|
(6 images at once) (see |
|
|
|
|
|
|
|
p.88). |
|
|
|
|
|
|
|
|
|
|
|
z(Telephoto)/ |
If you press the button in |
If you press the button in |
|
|
|
||
9(Enlarged View) |
Shooting Mode, you can |
Playback Mode, image is |
|
|
|
||
Button |
shoot with the telephoto |
displayed on the LCD |
|
|
|
||
|
|
|
|||||
|
zoom (see p.43). |
Monitor up to 3.4 times |
|
|
|
||
|
|
|
|
larger (see p.89). |
|
|
|
|
|
|
|
|
|
|
|
E |
Switches the display of symbols on the LCD Monitor (see p.21). |
||||||
Button |
|
|
|
|
|
|
|
|
|
|
|
|
|
||
OButton |
This is used for operating menus on the LCD monitor (see p.23). |
||||||
MButton |
This button is used for setting the various shooting methods (see p.23), or |
||||||
|
downloading still images onto your computer (see p.127, p.140). |
||||||
|
|
|
|
|
|
|
|
22
Chapter 1 / Section 1 Getting Started
Screens
Default values set when you purchased your camera are surrounded by brackets in the selection options.
TShooting Menu (Shooting Mode)
In Shooting Mode, display by pressing the Mbutton.
Setting |
|
|
|
|
|
|
Option |
|
Refer to |
|
|
|
|
|
|
|
|
|
|
EXPOSURE COMP. |
-2.0 ~ +2.0 |
|
|
|
p.53 |
||||
|
|
|
|
|
|
|
|
|
|
WHITE BALANCE |
[ |
] / |
|
(Daylight)/ |
(Overcast)/ |
(Tungsten light)/ |
p.55 |
||
|
|
|
|||||||
|
|
|
|
(Fluorescent light)/ |
(One Push) |
|
|
||
|
|
|
|
|
|
||||
|
|
|
|
|
|
|
|||
PIC QUALITY/SIZE |
F2048/N2048/F1280/[N1280]/N640 |
|
p.60 |
||||||
|
|
|
|
|
|
|
|
||
FOCUS |
[AF]/MF/SNAP/∞ |
|
|
p.64 |
|||||
|
|
|
|
|
|
|
|
||
CONT. MODE |
[OFF]/CONT/SCONT/MCONT |
|
|
p.39 |
|||||
|
|
|
|
|
|
|
|
||
PHOTOMETRY |
[MULTI]/CENTRE/SPOT |
|
|
p.66 |
|||||
|
|
|
|
|
|
|
|
||
ISO SETTING |
[AUTO]/25/200/400/800 |
|
|
p.68 |
|||||
|
|
|
|
|
|
|
|
||
SHARPNESS |
SHARP/[NORMAL]/SOFT |
|
|
p.69 |
|||||
|
|
|
|
|
|
|
|
||
AUTO BRACKET |
ON/[OFF]/WNB-BKT |
|
|
p.70 |
|||||
|
|
|
|
|
|
|
|
|
|
IMAGE WITH SOUND |
ON/[OFF] |
|
|
|
p.51 |
||||
|
|
|
|
|
|
|
|
||
TIME EXPOSURE |
[OFF]/1/2/4/8 seconds |
|
|
p.72 |
|||||
|
|
|
|
|
|
|
|
|
|
INTERVAL |
|
|
|
|
|
|
|
|
p.73 |
|
|
|
|
|
|
|
|
||
|
|
|
|
|
|
|
|
||
DATE IMPRINT |
[Off]/Date/Date and Time |
|
|
p.75 |
|||||
|
|
|
|
|
|
|
|
|
|
RESTORE DEFAULTS |
|
|
|
|
|
|
|
|
p.76 |
|
|
|
|
|
|
|
|
||
|
|
|
|
|
|
|
|
|
|
23

Chapter 1 / Section 1 Getting Started
TShooting Menu (Movie Mode)I
In Movie Mode, display by pressing the Mbutton.
Setting |
|
|
|
|
Option |
|
Refer to |
|
|
|
|
|
|
|
|
MOVIE SIZE |
[320] / 160 |
|
|
|
p.42 |
||
|
|
|
|
|
|
|
|
WHITE BALANCE |
[ |
] / |
(Daylight)/ |
(Overcast)/ |
(Tungsten light)/ |
p.55 |
|
|
|
||||||
|
|
|
(Fluorescent light)/ |
(One Push) |
|
|
|
|
|
|
|
|
|||
|
|
|
|
|
|
||
FOCUS |
[AF]/MF/SNAP/∞ |
|
|
p.64 |
|||
|
|
|
|
|
|
|
|
TShooting Menu (Scene Mode/except in Text Mode)
In Scene Mode, display by pressing the Mbutton.
Setting |
|
|
|
|
Option |
|
Refer to |
|
|
|
|
|
|
|
|
EXPOSURE COMP. |
-2.0 to +2.0 |
|
|
|
p.53 |
||
|
|
|
|
|
|
|
|
WHITE BALANCE |
[ |
] / |
(Daylight)/ |
(Overcast)/ |
(Tungsten light)/ |
p.55 |
|
|
|
||||||
|
|
|
(Fluorescent light)/ |
(One Push) |
|
|
|
|
|
|
|
|
|||
|
|
|
|
|
|||
PIC QUALITY/SIZE |
F2048/N2048/F1280/[N1280]/N640 |
|
p.60 |
||||
|
|
|
|
|
|||
FOCUS |
[AF]/SNAP/∞ (except the Landscape Mode) |
|
p.64 |
||||
|
|
|
|
|
|
|
|
IMAGE WITH SOUND |
ON/OFF |
|
|
|
p.51 |
||
|
|
|
|
|
|
||
DATE IMPRINT |
[OFF]/DATE/TIME |
|
|
p.75 |
|||
|
|
|
|
|
|
|
|
24
Chapter 1 / Section 1 Getting Started
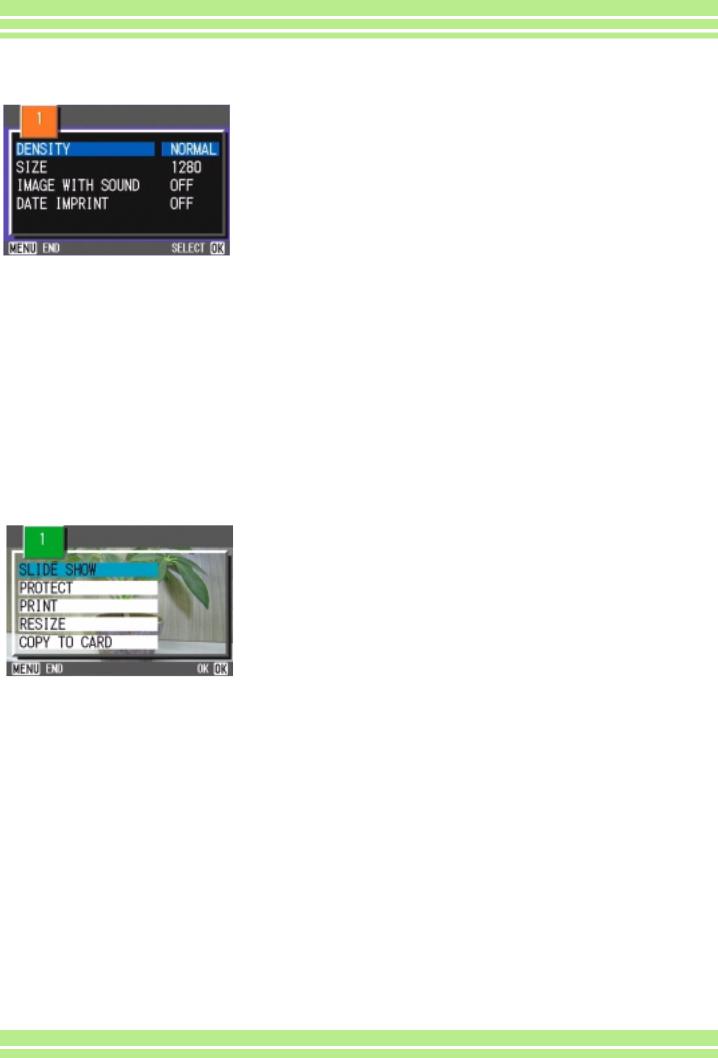
TShooting Menu (Text Mode)
In Text Mode, display by pressing the Mbutton.
Setting |
|
Option |
Refer to |
|
|
|
|
DENSITY |
DEEP/[NORMAL]/LIGHT |
|
p.78 |
|
|
|
|
SIZE |
2048/[1280] |
|
p.60 |
|
|
|
|
IMAGE WITH SOUND |
ON/[OFF] |
|
p.51 |
|
|
|
|
DATE IMPRINT |
[OFF]/DATE/TIME |
|
p.75 |
|
|
|
|
TPlayback Menu
In Playback Mode, display by pressing the Mbutton.
Setting |
|
|
Option |
Refer to |
|
|
|
|
|
SLIDE SHOW |
ON/[OFF] |
p.91 |
||
|
|
|
|
|
PROTECT |
Select/Release 1 FILE/ Select/Release ALL FILES |
p.97 |
||
|
|
|
|
|
Select/Release 1 FILE/ Select/Release ALL FILES |
p.102 |
|||
|
|
|
|
|
RESIZE |
1280/640 |
|
p.105 |
|
|
|
|
|
|
COPY TO CARD |
|
|
|
p.101 |
|
|
|
||
|
|
|
|
|
25
Chapter 1 / Section 1 Getting Started
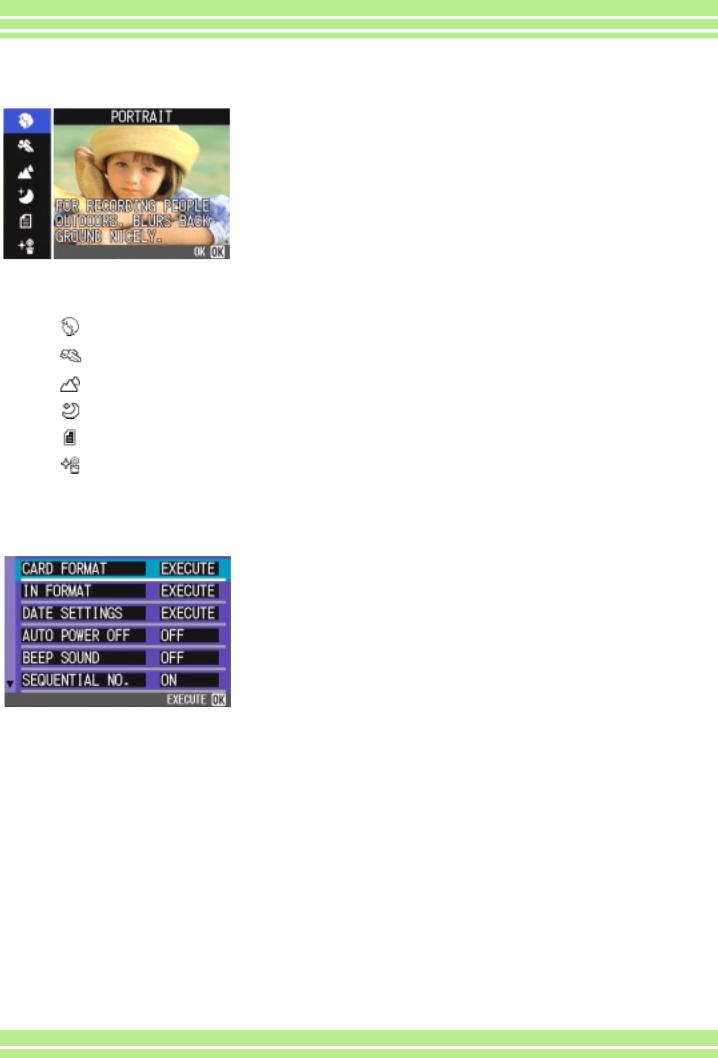
TScene Selection Screen (Scene Mode)
In Scene Mode, the screen is displayed when you select a scene.
Symbol |
|
Setting Content |
Refer to |
|
|
|
|
|
PORTRAIT |
|
p.36 |
|
|
|
|
|
SPORTS |
|
p.36 |
|
|
|
|
|
LANDSCAPE |
|
p.36 |
|
|
|
|
|
NIGHTSCAPE |
|
p.36 |
|
|
|
|
|
TEXT MODE |
|
p.36 |
|
|
|
|
|
HIGH SENSITIVITY |
|
p.36 |
|
|
|
|
TSetup Screen (Setup Mode)
This screen is displayed in Setup Mode.
Setting |
|
|
|
Option |
Refer to |
|
|
|
|
|
|
CARD FORMAT |
|
|
|
|
p.107 |
|
|
|
|
||
IN FORMAT |
|
|
|
|
p.108 |
|
|
|
|
||
DATE SETTINGS |
|
|
|
|
p.14 |
|
|
|
|
||
AUTO POWER OFF |
OFF/[1]/5/30 Minutes |
p.109 |
|||
BEEP SOUND |
ON/[OFF] |
p.110 |
|||
SEQUENTIAL NO. |
ON/[OFF] |
p.111 |
|||
IMAGE CONFIRMATION TIME |
OFF/[1]/2/3 Seconds |
p.112 |
|||
LCD BRIGHTNESS |
|
|
|
|
p.113 |
|
|
|
|
||
POWER SAVE |
ON/[OFF] |
p.114 |
|||
LANGUAGE |
JPN/[ENG]/FRE/GER/CHI |
p.115 |
|||
VIDEO OUT MODE |
[NTSC]/PAL |
p.116 |
|||
26

Chapter 1 / Section 1 Getting Started
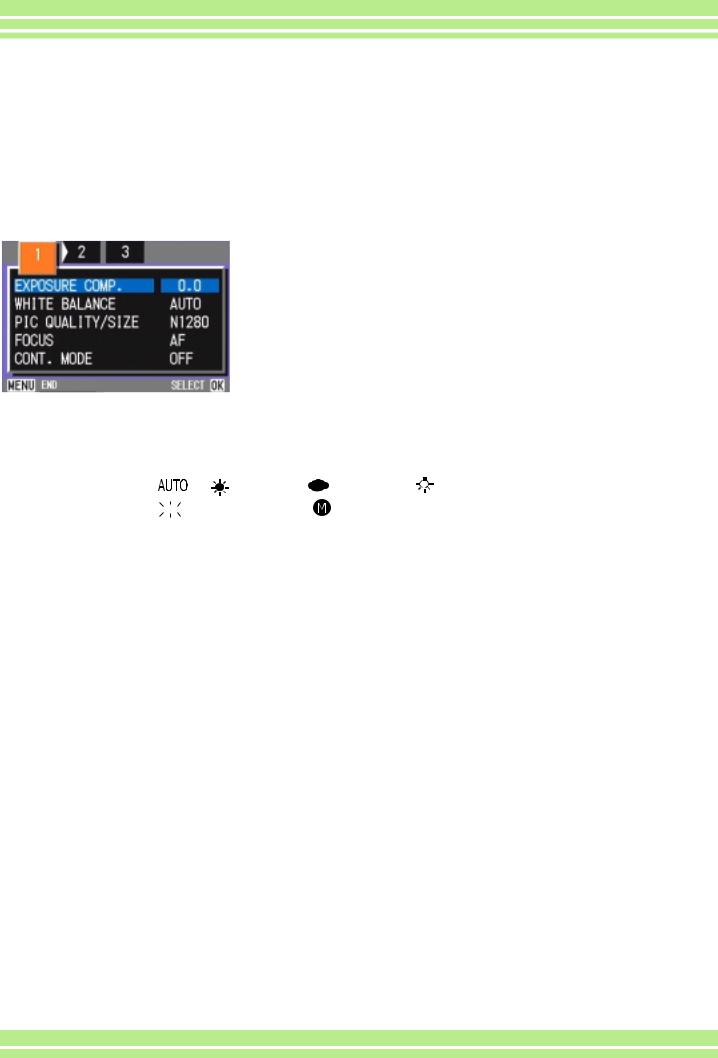
The Basics of the Shooting
Menu/Playback Menu
Operation
To display the menu: |
Turn the Mode Dial to 5(Shooting Mode) or 6(Playback Mode). |
|||
|
||||
|
Press the Mbutton. |
|||
|
The menu appears. On the menu screen, you can move between screens by |
|||
|
pressing the #$buttons and between items by pressing the !"buttons. |
|||
|
|
|
|
|
|
|
|
|
|
|
|
|
|
|
|
|
|
|
|
To switch between menu screens |
Press the #$buttons. |
|
(Shooting Menu): |
||
You can switch the menu screen from [1] to [3]. |
||
|
|
|
To select an item: |
Press the !"buttons to select the desired item. |
|
|
||
|
Press the Obutton. |
|
|
|
|
To select a setting value (shoot- |
Press the !"buttons to select the desired item. |
|
ing menu): |
||
Press the Obutton. |
||
|
||
|
|
|
To implement a confirmation |
Press the $button to select [YES]. |
|
screen (shooting menu): |
||
Press the Obutton. |
||
|
||
|
|
|
To select an item you want to |
Press the !" buttons to select the item you want to imple- |
|
implement (playback menu): |
||
ment. |
||
|
||
|
Press the Obutton. |
|
|
|
|
To return to the shooting screen/ |
Press the Mbutton. |
|
playback screen: |
||
|
• On the setting selection screen, the item with the orange T displayed is the current setting. Even if you change the setting by moving the blue indicator, until you finalize the setting the orange indicator remains to show what the previous setting was.
•The menu screen sequence is slightly different depending on the item for which the setting change is being made. For a detailed explanation of each of the items, see Section 2 or Section 3.
27

Chapter 1 / Section 1 Getting Started
The Basics of the Setup Screen
|
Operation |
To display the Setup Screen: |
Turn the Mode Dial to 1(Setup Mode). |
|
The Setup Screen is displayed.
To select an item: |
Press the !"buttons to select the desired item. |
|
|
||
|
|
|
To select a setting value: |
Press the #$buttons to select the desired item. |
|
|
||
|
|
|
When you have selected [EXE- |
Press the Obutton. |
|
CUTE]: |
||
The following screen is displayed, so make the necessary |
||
|
||
|
settings. |
|
|
|
|
To close the Setup Screen: |
Switch the Mode Dial to another mode. |
|
|
The sequence of operations is slightly different depending on the item for which the setting change is being made. For a detailed explanation of each of the items, see Section 6 .
28

Section 2 Basic Shooting
The basics of shooting are explained here, from how to hold your camera to how to shoot still images and movies.

Chapter 1 / Section 2 Basic Shooting
How to Hold the Camera
If the camera moves when you press the shutter button, your still images might not come out clearly
(due camera shake).
Hold the camera as below for best results.
 Hold the camera with both hands and lightly press both elbows against your body.
 Put your finger on the shutter button.
•Be careful when you are shooting not to get a finger, your hair, or the strap in front of the lens or the flash.
•To prevent camera shake, hold the camera securely with both hands when you shoot or use a tripod. Consider using a tripod to prevent camera shake in the following situations:
•When shooting in a dark place, if you do not use the flash or if you use the Slow Synchro mode.
•When you shoot with the zoom.
30
Loading...