


 Loading...
Operating Instructions
General Settings Guide
1Connecting the Machine
2System Settings
3Copier / Document Server Features
4Facsimile Features
5Printer Features
6Scanner Features
7Registering Addresses and Users for Facsimile/Scanner Functions
8Other User Tools
9Appendix
Read this manual carefully before you use this machine and keep it handy for future reference. For safe and correct use, be sure to read the Safety Information in "About This Machine" before using the machine.

Introduction
This manual contains detailed instructions and notes on the operation and use of this machine. For your safety and benefit, read this manual carefully before using the machine. Keep this manual in a handy place for quick reference.
Important
Contents of this manual are subject to change without prior notice. In no event will the company be liable for direct, indirect, special, incidental, or consequential damages as a result of handling or operating the machine.
Notes:
Some illustrations in this manual might be slightly different from the machine.
Certain options might not be available in some countries. For details, please contact your local dealer.
Depending on which country you are in, certain units may be optional. For details, please contact your local dealer.
Notes:
The model names of the machines do not appear in the following pages. Check the type of your machine before reading this manual.
•Type 1: C3535/DSc535/LD435c/Aficio MP C3500
•Type 2: C4540/C4540g/DSc545/DSc545g/LD445c/Aficio MP C4500/Aficio MP C4500G
Certain types might not be available in some countries. For details, please contact your local dealer.
Two kinds of size notation are employed in this manual. With this machine refer to the inch version.
Manuals for This Machine
Refer to the manuals that are relevant to what you want to do with the machine.
About This Machine
Be sure to read the Safety Information in this manual before using the machine. This manual provides an introduction to the functions of the machine. It also explains the control panel, preparation procedures for using the machine, how to enter text, and how to install the CD-ROMs provided.
General Settings Guide
Explains User Tools settings, and Address Book procedures such as registering fax numbers, e-mail addresses, and user codes. Also refer to this manual for explanations on how to connect the machine.
Troubleshooting
Provides a guide to solving common problems, and explains how to replace paper, toner, staples, and other consumables.
Security Reference
This manual is for administrators of the machine. It explains security functions that the administrators can use to protect data from being tampered, or prevent the machine from unauthorized use.
Also refer to this manual for the procedures for registering administrators, as well as setting user and administrator authentication.
Copy/ Document Server Reference
Explains Copier and Document Server functions and operations. Also refer to this manual for explanations on how to place originals.
Facsimile Reference
Explains Facsimile functions and operations.
Printer Reference
Explains Printer functions and operations.
Scanner Reference
Explains Scanner functions and operations.
Network Guide
Explains how to configure and operate the machine in a network environment, and use the software provided.
This manual covers all models, and includes descriptions of functions and settings that might not be available on this machine. Images, illustrations, and information about operating systems that are supported might also differ slightly from those of this machine.
i
Other manuals
•PostScript3 Supplement
•UNIX Supplement
•Manuals for DeskTopBinder Lite
•DeskTopBinder Lite Setup Guide
•DeskTopBinder Introduction Guide
•Auto Document Link Guide

 Note
Note
Manuals provided are specific to machine types.
Adobe Acrobat Reader/Adobe Reader must be installed in order to view the manuals as PDF files.
For "UNIX Supplement", please visit our Web site or consult an authorized dealer.
"PostScript3 Supplement" and "UNIX Supplement" include descriptions of functions and settings that might not be available on this machine.
ii

TABLE OF CONTENTS |
|
Manuals for This Machine ...................................................................................... |
i |
How to Read This Manual ..................................................................................... |
1 |
Symbols ..................................................................................................................... |
1 |
Display Panel.......................................................................................................... |
2 |
Accessing User Tools ........................................................................................... |
3 |
Changing Default Settings ......................................................................................... |
3 |
Quitting User Tools .................................................................................................... |
4 |
Menu Protect.............................................................................................................. |
4 |
1. Connecting the Machine |
|
Connecting to the Interfaces ................................................................................ |
5 |
Connecting to the Ethernet Interface ......................................................................... |
6 |
Connecting to the USB Interface................................................................................ |
8 |
Connecting to the IEEE 1394 Interface...................................................................... |
9 |
Connecting to the IEEE 1284 Interface.................................................................... |
10 |
Connecting to the IEEE 802.11b (Wireless LAN) Interface...................................... |
11 |
Network Settings.................................................................................................. |
14 |
Settings Required to Use the Printer/LAN-Fax ........................................................ |
14 |
Settings Required to Use Internet Fax ..................................................................... |
17 |
Settings Required to Use E-mail Function ............................................................... |
21 |
Settings Required to Use Scan to Folder Function .................................................. |
25 |
Settings Required to Use the Network Delivery Scanner......................................... |
28 |
Settings Required to Use Network TWAIN Scanner ................................................ |
31 |
Settings Required to Use Document Server ............................................................ |
33 |
Using Utilities to Make Network Settings ................................................................. |
36 |
Connecting the Machine to a Telephone Line and Telephone ........................ |
45 |
Connecting the Telephone Line ............................................................................... |
45 |
Selecting the Line Type............................................................................................ |
45 |
2. System Settings |
|
General Features.................................................................................................. |
47 |
Output tray settings .................................................................................................. |
50 |
Tray Paper Settings ............................................................................................. |
51 |
Timer Settings...................................................................................................... |
57 |
Interface Settings................................................................................................. |
59 |
Network .................................................................................................................... |
59 |
Parallel Interface ...................................................................................................... |
63 |
IEEE 1394 ................................................................................................................ |
64 |
IEEE 802.11b ........................................................................................................... |
66 |
Print List ................................................................................................................... |
67 |
File Transfer ......................................................................................................... |
69 |
Administrator Tools............................................................................................. |
76 |
Program / Change / Delete LDAP Server ................................................................ |
84 |
Programming the LDAP server ................................................................................ |
85 |
iii

|
3. Copier / Document Server Features |
|
|
General Features.................................................................................................. |
91 |
|
Reproduction Ratio.............................................................................................. |
96 |
|
Edit ...................................................................................................................... |
100 |
|
Stamp .................................................................................................................. |
106 |
|
Background Numbering ......................................................................................... |
106 |
|
Preset Stamp ......................................................................................................... |
107 |
|
User Stamp ............................................................................................................ |
110 |
|
Date Stamp ............................................................................................................ |
111 |
|
Page Numbering .................................................................................................... |
113 |
|
Input/Output ....................................................................................................... |
116 |
|
Adjust Color Image ............................................................................................ |
119 |
|
Settings for the Document Server.................................................................... |
120 |
|
4. Facsimile Features |
|
|
General Features................................................................................................ |
121 |
|
Scan Settings ..................................................................................................... |
124 |
|
Send Settings ..................................................................................................... |
125 |
|
Reception Settings ............................................................................................ |
128 |
|
Initial Settings .................................................................................................... |
134 |
|
Reception File Setting ....................................................................................... |
139 |
|
Reception Report e-mail ........................................................................................ |
140 |
|
Program / Change / Delete Scan Size .............................................................. |
141 |
|
Deleting a scan size ............................................................................................... |
143 |
|
Registering Fax Information ............................................................................. |
144 |
|
Registering Fax Information ................................................................................... |
145 |
|
Changing Fax Information...................................................................................... |
147 |
|
Deleting Fax Information ........................................................................................ |
147 |
|
Forwarding ......................................................................................................... |
148 |
|
Programming an End Receiver .............................................................................. |
149 |
|
Quitting the forwarding function ............................................................................. |
151 |
|
Forwarding Mark .................................................................................................... |
151 |
|
Parameter Settings ............................................................................................ |
152 |
|
Changing the User Parameters.............................................................................. |
158 |
|
Special Senders to Treat Differently ................................................................ |
159 |
|
Authorized Reception............................................................................................. |
160 |
|
Reception File Print Quantity ................................................................................. |
161 |
|
Forwarding ............................................................................................................. |
161 |
|
Print 2 Sided........................................................................................................... |
161 |
|
Memory Lock.......................................................................................................... |
162 |
|
Paper Tray ............................................................................................................. |
162 |
|
Programming/Changing Special Senders .............................................................. |
163 |
|
Authorized RX (Authorized Reception) .................................................................. |
165 |
|
Reception File Print Qty ......................................................................................... |
165 |
|
Forwarding ............................................................................................................. |
166 |
|
Print 2 Sided........................................................................................................... |
167 |
|
Memory Lock.......................................................................................................... |
167 |
|
Paper Tray per Sender........................................................................................... |
167 |
|
Programming Initial Set Up of a Special Sender.................................................... |
168 |
|
Deleting a Special Sender...................................................................................... |
171 |
iv |
|
|

Box Settings ....................................................................................................... |
172 |
Programming/Changing Personal Boxes ............................................................... |
172 |
Deleting Personal Boxes........................................................................................ |
175 |
Programming/Changing Information Boxes ........................................................... |
176 |
Deleting Information Boxes .................................................................................... |
179 |
Programming/Changing Transfer Boxes................................................................ |
180 |
Deleting Transfer Boxes......................................................................................... |
183 |
Printing the Box List ............................................................................................... |
184 |
5. Printer Features |
|
Test Print ............................................................................................................ |
185 |
Printing the configuration page .............................................................................. |
186 |
Maintenance ....................................................................................................... |
188 |
System ................................................................................................................ |
189 |
Host Interface ..................................................................................................... |
193 |
PCL Menu ........................................................................................................... |
194 |
PS Menu.............................................................................................................. |
196 |
PDF Menu ........................................................................................................... |
197 |
6. Scanner Features |
|
General Settings ................................................................................................ |
199 |
Scan Settings ..................................................................................................... |
201 |
Send Settings ..................................................................................................... |
203 |
7. Registering Addresses and Users for Facsimile/Scanner |
|
Functions |
|
Address Book..................................................................................................... |
205 |
Managing names in the Address Book .................................................................. |
208 |
Sending fax by Quick Dial ...................................................................................... |
208 |
Sending e-mail by Quick Dial ................................................................................. |
208 |
Sending scanned files to a shared folder directly................................................... |
209 |
Preventing unauthorized user access to shared folders from the machine ........... |
209 |
Managing users and machine usage ..................................................................... |
209 |
Registering Names ............................................................................................ |
210 |
Registering Names................................................................................................. |
210 |
Changing a Registered Name................................................................................ |
212 |
Deleting a Registered Name .................................................................................. |
213 |
Authentication Information ............................................................................... |
214 |
Registering a User Code........................................................................................ |
215 |
Changing a User Code........................................................................................... |
216 |
Deleting a User Code............................................................................................. |
218 |
Displaying the Counter for Each User.................................................................... |
219 |
Printing the Counter for Each User ........................................................................ |
219 |
Printing the Counter for All Users........................................................................... |
221 |
Clearing the Number of Prints................................................................................ |
222 |
Fax Destination .................................................................................................. |
223 |
Fax Destination ...................................................................................................... |
225 |
IP-Fax Destination.................................................................................................. |
231 |
v

E-mail Destination.............................................................................................. |
236 |
Registering an E-mail Destination.......................................................................... |
236 |
Changing an E-mail Destination............................................................................. |
238 |
Deleting an E-mail Destination............................................................................... |
239 |
Registering Folders ........................................................................................... |
240 |
Using SMB to Connect........................................................................................... |
240 |
Using FTP to Connect............................................................................................ |
246 |
Using NCP to Connect ........................................................................................... |
251 |
Registering Names to a Group ......................................................................... |
257 |
Registering a Group ............................................................................................... |
257 |
Registering Names to a Group............................................................................... |
258 |
Adding a Group to Another Group ......................................................................... |
260 |
Displaying Names Registered in a Group .............................................................. |
261 |
Removing a Name from a Group ........................................................................... |
262 |
Deleting a Group Within Another Group ................................................................ |
263 |
Changing a Group Name ....................................................................................... |
265 |
Deleting a Group .................................................................................................... |
266 |
Registering a Protection Code ......................................................................... |
267 |
Registering a Protection Code to a Single User..................................................... |
267 |
Registering a Protection Code to a Group User..................................................... |
269 |
Registering SMTP and LDAP Authentication.................................................. |
270 |
SMTP Authentication ............................................................................................. |
270 |
LDAP Authentication .............................................................................................. |
272 |
8. Other User Tools |
|
Maintenance ....................................................................................................... |
275 |
Changing the Display Language ...................................................................... |
276 |
Inquiry ................................................................................................................. |
277 |
Counter ............................................................................................................... |
279 |
Displaying the Total Counter.................................................................................. |
279 |
9. Appendix |
|
Specifications for the Main Unit ....................................................................... |
281 |
Specifications for Options ................................................................................ |
286 |
Information about Installed Software............................................................... |
292 |
expat ...................................................................................................................... |
292 |
NetBSD .................................................................................................................. |
292 |
Sablotron................................................................................................................ |
294 |
JPEG LIBRARY ..................................................................................................... |
295 |
SASL ...................................................................................................................... |
295 |
MD4........................................................................................................................ |
296 |
MD5........................................................................................................................ |
296 |
Samba(Ver 3.0.4)................................................................................................... |
297 |
RSA BSAFE® ......................................................................................................... |
297 |
Open SSL............................................................................................................... |
298 |
Open SSH .............................................................................................................. |
303 |
Open LDAP ............................................................................................................ |
308 |
INDEX....................................................................................................... |
310 |
vi

How to Read This Manual
Symbols
This manual uses the following symbols:
Indicates important safety notes.
Ignoring these notes could result in serious injury or death. Be sure to read these notes. They can be found in the "Safety Information" section of About This Machine.
Indicates important safety notes.
Ignoring these notes could result in moderate or minor injury, or damage to the machine or to property. Be sure to read these notes. They can be found in the "Safety Information" section of About This Machine.
Indicates points to pay attention to when using the machine, and explanations of likely causes of paper misfeeds, damage to originals, or loss of data. Be sure to read these explanations.
Indicates supplementary explanations of the machine’s functions, and instructions on resolving user errors.
This symbol is located at the end of sections. It indicates where you can find further relevant information.
[ ]
Indicates the names of keys that appear on the machine’s display panel.
{}
Indicates the names of keys on the machine’s control panel.
1

Display Panel
The display panel shows machine status, error messages, and function menus.
The function items displayed serve as selector keys. You can select or specify an item by lightly pressing them.
When you select or specify an item on the display panel, it is highlighted like  . Keys appearing as
  cannot be used.
 Important
A force or impact of more than 30 N (about 3 kgf) will damage the display panel.
To display the following screen, press the {User Tools/Counter}key to display the User Tools menu, and then press [System Settings].
Using the System Settings menu screen as an example, this section explains how to use the machine’s display panel.
AQT006S
1.The menu tabs for various settings appear. To display the setting you want to specify or change, press the appropriate menu tab.
2.A list of settings appears. To specify or change a setting, press the appropriate key in the list.
3.Press this to quit the User Tools menu.
2
Accessing User Tools
User Tools allow you to change or set defaults.

 Note
Note
Operations for system settings differ from normal operations. Always quit User Tools when you have finished.
Any changes you make with User Tools remain in effect even if the main power switch or operation switch is turned off, or the {Energy Saver}or {Clear Modes} key is pressed.
Default settings are shown in bold type.

 Reference
p.4 “Quitting User Tools”
Changing Default Settings
This section describes how to change the settings of User Tools.
 Important
If Administrator Authentication Management is specified, contact your administrator.
A Press the {User Tools/Counter} key.
AQT007S |
B Select the menu.
To change the System Settings, press [System Settings].
To change the Copier / Document Server Features, press [Copier / Document Server Features].
To change the Facsimile Features, press [Facsimile Features].
To change the Printer Features, press [Printer Features].
To change the Scanner Features, press [Scanner Features].
To adjust color registration or gradation, press [Maintenance]. To change the language used on the display, press [Español].
To check the telephone numbers to contact for repairs, or to order consumables, press [Inquiry].
To check the counter, press [Counter].
3

C Select the user tool you want to change.
D Change settings by following instructions on the display, and then press
[OK].

 Note
Note
To cancel changes made to settings and return to the initial display, press the {User Tools/Counter} key.

 Reference
p.47 “System Settings”
p.91 “Copier / Document Server Features”
p.121 “Facsimile Features”
p.185 “Printer Features”
p.199 “Scanner Features”
p.275 “Other User Tools”
Quitting User Tools
This section describes how to end User Tools.
A Press the {User Tools/Counter} key.
AQT007S |
Note |
You can also quit User Tools by pressing [Exit]. |
Menu Protect
Using Menu Protect, you can prevent unauthenticated users from changing the user tools. Menu Protect can be specified for each of the following user tools menus.
•Copier / Document Server Features
•Facsimile Features
•Printer Features
•Scanner Features
For details, consult your administrator.
4

1. Connecting the Machine
This chapter describes how to connect the machine to the network and specify the network settings.
Connecting to the Interfaces
This section explains how to identify the machine’s interface and connect the machine according to the network environment.
1. IEEE 1394 ports (optional)
Ports for connecting the IEEE 1394 interface cable
2. USB2.0 port
Port for connecting the USB2.0 interface cable
3. 10BASE-T/100BASE-TX port
Port for connecting the 10BASE-T or 100BASE-TX cable
4. IEEE 1284 port (optional)
AQT002S
5. Wireless LAN port (optional)
Port for using the wireless LAN

 Note
Note
You cannot install two or more of the options below: IEEE 1394 interface board, IEEE 1284 interface board, IEEE 802.11b wireless LAN
Port for connecting the IEEE 1284 interface cable
5

Connecting the Machine
Connecting to the Ethernet Interface
Connect 10BASE-T or 100BASE-TX cable to the Ethernet interface.
1 Important
If the main power switch is on, turn it off.
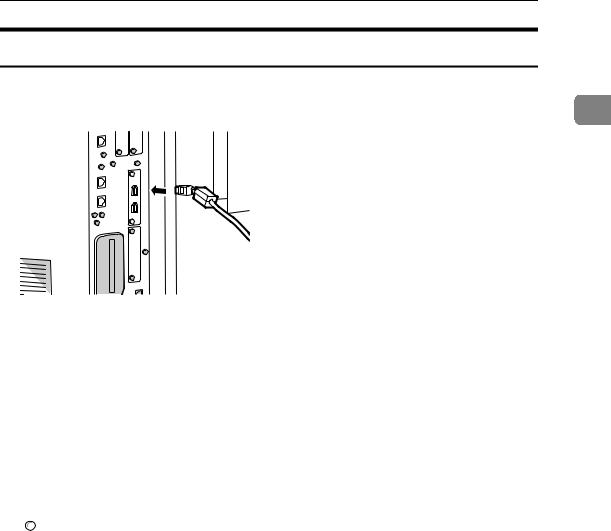
A A ferrite core for the Ethernet cable is supplied with this machine. Make a loop in the cable about 3cm (1.2 inch) (1) from the machine end of the cable. Attach the ferrite core.
AEV047S
B C
Make sure the main power switch of the machine is off.
Connect the Ethernet interface cable to the 10BASE-T/100BASE-TX port.
AQS015S
D Connect the other end of the Ethernet cable to a network connection device such as a hub.
6

Connecting to the Interfaces
E Turn on the main power switch of the machine.
1
AME005S
AIndicator (green)
Lights up green when the machine is connected correctly to the network.
BIndicator (yellow)
Lights up yellow when 100 BASE-TX is in operation. Goes off when 10 BASE-T is in operation.

 Note
Note
For details about installing the printer driver, see "Preparing the Machine", Printer Reference.

 Reference
"Turning On the Power", About This Machine
"Preparing the Machine", Printer Reference
7

Connecting the Machine
Connecting to the USB Interface
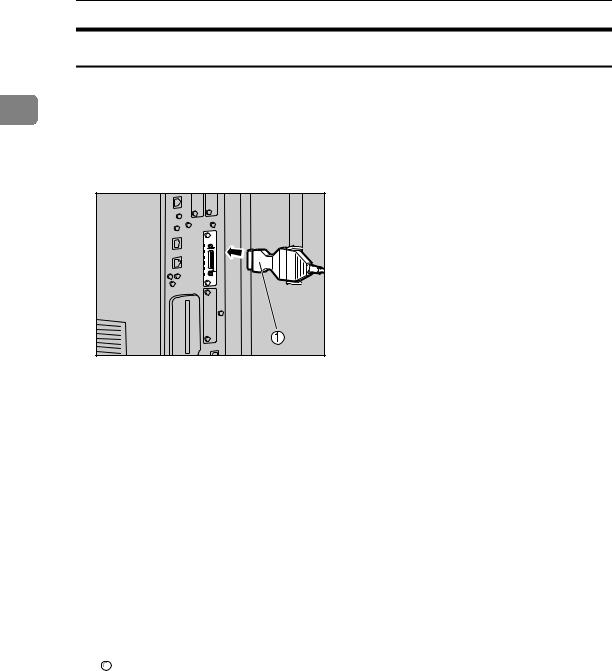
Connect the USB2.0 interface cable to the USB2.0 port.
1 A Connect the USB2.0 interface cable to the USB2.0 port.
AQS014S
B Connect the other end to the USB2.0 port on the host computer.

 Note
Note
This machine does not come with a USB interface cable. Make sure you purchase the appropriate cable for the machine and your computer.
The USB2.0 interface board is supported by Windows Me / 2000 / XP, Windows Server 2003, Mac OS X 10.3.3 or higher.
•For Windows Me:
Make sure to install "USB Printing Support". When used with Windows Me, only a speed equal to that of USB1.1 is possible.
•For Mac OS:
To use Macintosh, the machine must be equipped with the optional PostScript 3 unit. When used with Mac OS X 10.3.3 or higher, a transfer speed of USB2.0 is supported.
For details about installing the printer driver, see "Preparing the Machine", Printer Reference.

 Reference
"Preparing the Machine", Printer Reference
8
Connecting to the Interfaces
Connecting to the IEEE 1394 Interface
Connect the IEEE 1394 interface cable to the IEEE 1394 interface board.
A Connect the IEEE 1394 interface cable to the IEEE 1394 port. |
|
|||
1 |
||||
|
|
|
|
|
|
|
|
|
|
AQS016S
B Connect the other end of the cable into the interface connector on the host computer.
Check the shape of the connector to the computer. Connect the cable firmly.

 Note
Note
Use the interface cable supplied with the IEEE 1394 interface board.
Two interface ports are available for connecting the IEEE 1394 interface cable. Either is one can be used.
For details about installing the printer driver, see "Preparing the Machine", Printer Reference.

 Reference
"Turning On the Power", About This Machine
"Preparing the Machine", Printer Reference
9
Connecting the Machine
Connecting to the IEEE 1284 Interface
Connect the IEEE 1284 interface cable to the IEEE 1284 interface board.
1A Make sure the main power switch on the machine is off.
B Turn off the main power switch of the host computer.
C Connect the IEEE 1284 interface cable to the IEEE 1284 port.
AQS017S
Use the conversion connector (1) supplied with the IEEE 1284 interface board.
D Connect the other end of the cable into the interface connector on the host computer.
Check the shape of the connector to the computer. Connect the cable firmly.
E F
Turn on the main power switch of the machine.
Turn on the host computer.
When using Windows 95/98/Me/2000/XP and Windows Server 2003, a printer driver installation screen might appear when the computer is turned on. If this happens, click [Cancel] on the screen.

 Note
Note
For details about installing the printer driver, see "Preparing the Machine", Printer Reference.

 Reference
"Turning On the Power", About This Machine
"Preparing the Machine", Printer Reference
10

Connecting to the Interfaces
Connecting to the IEEE 802.11b (Wireless LAN) Interface
Connect to the IEEE 802.11b (wireless LAN) interface.
Note |
1 |
Check the settings of the IPv4 address and subnet mask of this machine.
For details about how to set the IPv4 address and subnet mask from the control panel of the machine, see "Interface Settings".

 Reference
p.59 “Network”
Setup Procedure
Set up IEEE 802.11b (wireless LAN) according to the following procedure:
AME006S
11
Connecting the Machine

 Note
Note
Select [802.11 Ad-hoc Mode] mode when connecting Windows XP as a wireless LAN client using Windows XP standard driver or utilities, or when not using the infrastructure mode.
1You can specify either "WEP" or "WPA" to the Security Method.
Specify "WPA", when [Communication Mode] is set to [Infrastructure Mode].
For details about how to specify wireless LAN settings from the control panel on the machine, see "IEEE 802.11b".
For details about how to specify wireless LAN settings from other than the control panel on the machine, see "Using Utilities to Make Network Settings".
For details about the setting items, see "IEEE 802.11b".

 Reference
p.66 “IEEE 802.11b”
p.36 “Using Utilities to Make Network Settings”
Checking the Connection
Check the wireless LAN connection.
Make sure the LED of the IEEE 802.11b interface unit is lit.
When using in infrastructure mode
1
2
ZGDH600J
1.If [LAN Type] on the [Interface Settings] / [Network] screen is not set to [IEEE 802.11b], it does not light, even if the main power is on.
2.If it is connected properly to the network, the LED is green when in infrastructure mode. If the LED is blinking, the machine is searching for devices.
12
Connecting to the Interfaces
When using in adhoc mode / 802.11 ad hoc mode
1
1
2
ZGDH600J
1.If the IEEE 802.11b interface unit is functioning, the LED lights up in orange.
2.If it is connected properly to the network, the LED is green when in ad hoc mode or 802.11 ad hoc mode. If the LED is blinking, the machine is searching for devices. The LED will light after a few seconds.
Print the configuration page to verify settings.

 Note
Note
For more information about printing a configuration page, see "Print List".

 Reference
p.186 “Printing the configuration page”
Checking the Signal
When using in infrastructure mode, you can check the machine's radio wave status using the control panel.
APress [System Settings].
BPress [Interface Settings].
CPress [IEEE 802.11b].
DPress [Wireless LAN Signal].
The machine's radio wave status appears.
EAfter checking radio wave status, press [Exit].
FPress the {User Tools/Counter}key to return to the User Tools / Counter / Inquiry menu.

 Note
Note
To check the radio wave status, press [IEEE 802.11b] under [LAN Type] in Network menu of Interface Settings.

 Reference
p.36 “Using Utilities to Make Network Settings”
p.66 “IEEE 802.11b”
13

Connecting the Machine
Network Settings
This section describes the network settings you can change with User Tools (Sys- 1 tem Settings). Make settings according to functions you want to use and the in-
terface to be connected.
 Important
These settings should be made by the system administrator, or with the advice of the system administrator.
Settings Required to Use the Printer/LAN-Fax
This section lists the settings required for using the printer or LAN-Fax function.
Ethernet
This section lists the settings required for using the printer or LAN-Fax function with an Ethernet connection.
For details about how to specify the settings, see "Interface Settings".
Menu |
User Tool |
Setting Requirements |
|
|
|
Interface Settings/Network |
Machine IPv4 Address |
Necessary |
|
|
|
Interface Settings/Network |
IPv4 Gateway Address |
As required |
|
|
|
Interface Settings/Network |
Machine IPv6 Address |
As required |
|
|
|
Interface Settings/Network |
IPv6 Gateway Address |
As required |
|
|
|
Interface Settings/Network |
IPv6 Stateless Address Autoconfigu- |
As required |
|
ration |
|
|
|
|
Interface Settings/Network |
DNS Configuration |
As required |
|
|
|
Interface Settings/Network |
DDNS Configuration |
As required |
|
|
|
Interface Settings/Network |
Domain Name |
As required |
|
|
|
Interface Settings/Network |
WINS Configuration |
As required |
|
|
|
Interface Settings/Network |
Effective Protocol |
Necessary |
|
|
|
Interface Settings/Network |
NCP Delivery Protocol |
As required |
|
|
|
Interface Settings/Network |
NW Frame Type |
As required |
|
|
|
Interface Settings/Network |
SMB Computer Name |
As required |
|
|
|
Interface Settings/Network |
SMB Work Group |
As required |
|
|
|
Interface Settings/Network |
Ethernet Speed |
As required |
|
|
|
Interface Settings/Network |
LAN Type |
Necessary |
|
|
|
Interface Settings/Network |
Permit SNMPv3 Communication |
As required |
|
|
|
Interface Settings/Network |
Permit SSL/TLS Communication |
As required |
|
|
|
Interface Settings/Network |
Host Name |
As required |
14
|
|
Network Settings |
||
|
|
|
|
|
Menu |
User Tool |
Setting Requirements |
|
|
|
|
|
|
|
Interface Settings/Network |
Machine Name |
As required |
|
|
|
|
|
|
|
Note |
|
|
|
|
IPv6 can be used only for the printer function. |
|
|
1 |
|
For the Effective Protocol setting, check that the protocol you want to use is set to [Active].
[LAN Type] is displayed when the wireless LAN board is installed. If Ethernet and IEEE 802.11b (wireless LAN) are both connected, the selected interface has priority.

 Reference
p.59 “Interface Settings”
IEEE 1394 (IPv4 over 1394)
This section lists the settings required for using the printer or LAN-Fax function with an IEEE 1394 connection.
For details about how to specify the settings, see "Interface Settings".
Menu |
User Tool |
Setting Requirements |
|
|
|
Interface Settings/IEEE 1394 |
IPv4 Address |
Necessary |
|
|
|
Interface Settings/IEEE 1394 |
DDNS Configuration |
As required |
|
|
|
Interface Settings/IEEE 1394 |
Host Name |
As required |
|
|
|
Interface Settings/IEEE 1394 |
Domain Name |
As required |
|
|
|
Interface Settings/IEEE 1394 |
WINS Configuration |
As required |
|
|
|
Interface Settings/IEEE 1394 |
IPv4 over 1394 |
Necessary |
|
|
|
Interface Settings/Network |
IPv4 Gateway Address |
As required |
|
|
|
Interface Settings/Network |
DNS Configuration |
As required |
|
|
|
Interface Settings/Network |
Effective Protocol |
Necessary |
|
|
|

 Note
Note
[IEEE 1394] appears when the IEEE 1394 interface board is installed.
For the Effective Protocol setting, check that the protocol you want to use is set to [Active].

 Reference
p.59 “Interface Settings”
15

Connecting the Machine
IEEE 802.11b (wireless LAN)
This section lists the settings required for using the printer or LAN-Fax function with an IEEE 802.11b (wireless LAN) connection.
|
|
|
|
|
1 |
|
For details about how to specify the settings, see "Interface Settings". |
||
|
|
|
|
|
|
|
Menu |
User Tool |
Setting Requirements |
|
|
|
|
|
|
|
Interface Settings/Network |
Machine IPv4 Address |
Necessary |
|
|
|
|
|
|
|
Interface Settings/Network |
IPv4 Gateway Address |
As required |
|
|
|
|
|
|
|
Interface Settings/Network |
Machine IPv6 Address |
As required |
|
|
|
|
|
|
|
Interface Settings/Network |
IPv6 Gateway Address |
As required |
|
|
|
|
|
|
|
Interface Settings/Network |
IPv6 Stateless Address Autoconfigu- |
As required |
|
|
|
ration |
|
|
|
|
|
|
|
|
Interface Settings/Network |
DNS Configuration |
As required |
|
|
|
|
|
|
|
Interface Settings/Network |
DDNS Configuration |
As required |
|
|
|
|
|
|
|
Interface Settings/Network |
Domain Name |
As required |
|
|
|
|
|
|
|
Interface Settings/Network |
WINS Configuration |
As required |
|
|
|
|
|
|
|
Interface Settings/Network |
Effective Protocol |
Necessary |
|
|
|
|
|
|
|
Interface Settings/Network |
NCP Delivery Protocol |
As required |
|
|
|
|
|
|
|
Interface Settings/Network |
NW Frame Type |
As required |
|
|
|
|
|
|
|
Interface Settings/Network |
SMB Computer Name |
As required |
|
|
|
|
|
|
|
Interface Settings/Network |
SMB Work Group |
As required |
|
|
|
|
|
|
|
Interface Settings/Network |
LAN Type |
Necessary |
|
|
|
|
|
|
|
Interface Settings/Network |
Permit SNMPv3 Communication |
As required |
|
|
|
|
|
|
|
Interface Settings/Network |
Permit SSL/TLS Communication |
As required |
|
|
|
|
|
|
|
Interface Settings/Network |
Host Name |
As required |
|
|
|
|
|
|
|
Interface Settings/Network |
Machine Name |
As required |
|
|
|
|
|
|
|
Interface Settings/ |
Communication Mode |
Necessary |
|
|
IEEE 802.11b |
|
|
|
|
|
|
|
|
|
Interface Settings/ |
SSID Setting |
As required |
|
|
IEEE 802.11b |
|
|
|
|
|
|
|
|
|
Interface Settings/ |
Channel |
As required |
|
|
IEEE 802.11b |
|
|
|
|
|
|
|
|
|
Interface Settings/ |
Security Method |
As required |
|
|
IEEE 802.11b |
|
|
|
|
|
|
|
|
|
Interface Settings/ |
Transmission Speed |
As required |
|
|
IEEE 802.11b |
|
|
|
|
|
|
|
16

Network Settings |
|
|
|
Note |
|
||
For the Effective Protocol setting, check that the protocol you want to use is |
|
||
set to [Active]. |
|
||
[IEEE 802.11b] and [LAN Type] are displayed when the wireless LAN interface |
|
||
1 |
|||
board is installed. If both Ethernet and wireless LAN (IEEE 802.11b) are con- |
|||
nected, the selected interface takes precedence.

 Reference
p.59 “Interface Settings”
Settings Required to Use Internet Fax
This section lists the settings required for using Internet Fax.
Ethernet
This section lists the settings required for using Internet Fax with an Ethernet connection.
For details about how to specify the settings, see "Interface Settings" and "File Transfer".
Menu |
User Tool |
Setting Requirements |
|
|
|
Interface Settings/Network |
Machine IPv4 Address |
Necessary |
|
|
|
Interface Settings/Network |
IPv4 Gateway Address |
Necessary |
|
|
|
Interface Settings/Network |
DNS Configuration |
As required |
|
|
|
Interface Settings/Network |
DDNS Configuration |
As required |
|
|
|
Interface Settings/Network |
Domain Name |
As required |
|
|
|
Interface Settings/Network |
WINS Configuration |
As required |
|
|
|
Interface Settings/Network |
Effective Protocol |
Necessary |
|
|
|
Interface Settings/Network |
Ethernet Speed |
As required |
|
|
|
Interface Settings/Network |
LAN Type |
Necessary |
|
|
|
Interface Settings/Network |
Permit SNMPv3 Communication |
As required |
|
|
|
Interface Settings/Network |
Permit SSL/TLS Communication |
As required |
|
|
|
Interface Settings/Network |
Host Name |
As required |
|
|
|
File Transfer |
SMTP Server |
Necessary |
|
|
|
File Transfer |
SMTP Authentication |
As required |
|
|
|
File Transfer |
POP before SMTP |
As required |
|
|
|
File Transfer |
Reception Protocol |
As required |
|
|
|
File Transfer |
POP3 / IMAP4 Settings |
As required |
|
|
|
File Transfer |
Administrator's E-mail Address |
As required |
|
|
|
File Transfer |
E-mail Communication Port |
Necessary |
17

1
18
Connecting the Machine
Menu |
User Tool |
Setting Requirements |
|
|
|
File Transfer |
E-mail Reception Interval |
As required |
|
|
|
File Transfer |
Max. Reception E-mail Size |
As required |
|
|
|
File Transfer |
E-mail Storage in Server |
As required |
|
|
|
File Transfer |
Program / Change / |
As required |
|
Delete E-mail Message |
|
|
|
|
File Transfer |
Fax E-mail Account |
Necessary |
|
|
|

 Note
Note
For the Effective Protocol setting, check that the protocol you want to use is set to [Active].
[LAN Type] is displayed when the wireless LAN interface board is installed. If both Ethernet and wireless LAN (IEEE 802.11b) are connected, the selected interface takes precedence.
SMTP Server and Fax E-mail Account must be specified in order to send Internet Fax.
When POP before SMTP is set to [On], also make setting for Reception Protocol and POP3 / IMAP4 Settings.
When SMTP Authentication is set to [On], also make setting for Administrator's E-mail Address.
E-mail Communication Port and Fax E-mail Account must be specified in order to use the reception function.
When setting POP before SMTP to [On], check POP3 port number in E-mail Communication Port.

 Reference
p.59 “Interface Settings”
p.69 “File Transfer”
IEEE 1394 (IPv4 over 1394)
This section lists the settings required for using Internet Fax with an IEEE 1394 connection.
For details about how to specify the settings, see "Interface Settings" and "File Transfer".
Menu |
User Tool |
Setting Requirements |
|
|
|
Interface Settings/IEEE 1394 |
IPv4 Address |
Necessary |
|
|
|
Interface Settings/IEEE 1394 |
DDNS Configuration |
As required |
|
|
|
Interface Settings/IEEE 1394 |
Host Name |
As required |
|
|
|
Interface Settings/IEEE 1394 |
Domain Name |
As required |
|
|
|
Interface Settings/IEEE 1394 |
WINS Configuration |
As required |
|
|
|
Interface Settings/IEEE 1394 |
IPv4 over 1394 |
Necessary |
|
|
|

|
|
Network Settings |
|
|
|
|
|
|
|
Menu |
User Tool |
Setting Requirements |
|
|
|
|
|
|
|
Interface Settings/Network |
IPv4 Gateway Address |
Necessary |
|
|
|
|
|
|
|
Interface Settings/Network |
DNS Configuration |
As required |
|
|
|
|
|
|
|
|
|
|
|
|
Interface Settings/Network |
Effective Protocol |
Necessary |
1 |
|
|
|
|||
|
|
|
|
|
File Transfer |
SMTP Server |
Necessary |
|
|
|
|
|
|
|
File Transfer |
SMTP Authentication |
As required |
|
|
|
|
|
|
|
File Transfer |
POP before SMTP |
As required |
|
|
|
|
|
|
|
File Transfer |
Reception Protocol |
As required |
|
|
|
|
|
|
|
File Transfer |
POP3 / IMAP4 Settings |
As required |
|
|
|
|
|
|
|
File Transfer |
Administrator's E-mail Address |
As required |
|
|
|
|
|
|
|
File Transfer |
E-mail Communication Port |
Necessary |
|
|
|
|
|
|
|
File Transfer |
E-mail Reception Interval |
As required |
|
|
|
|
|
|
|
File Transfer |
Max. Reception E-mail Size |
As required |
|
|
|
|
|
|
|
File Transfer |
E-mail Storage in Server |
As required |
|
|
|
|
|
|
|
File Transfer |
Program / Change / |
As required |
|
|
|
Delete E-mail Message |
|
|
|
|
|
|
|
|
File Transfer |
Fax E-mail Account |
Necessary |
|
|
|
|
|
|
|

 Note
Note
[IEEE 1394] is displayed when the IEEE 1394 interface board is installed.
For the Effective Protocol setting, check that the protocol you want to use is set to [Active].
SMTP Server and Fax E-mail Account must be specified in order to use the send function.
When POP before SMTP is set to [On], also make setting for Reception Protocol and POP3 / IMAP4 Settings.
When SMTP Authentication is set to [On], also make setting for Administrator's E-mail Address.
E-mail Communication Port and Fax E-mail Account must be specified in order to use the reception function.
When setting POP before SMTP to [On], check POP3 port number in E-mail Communication Port.

 Reference
p.59 “Interface Settings”
p.69 “File Transfer”
19

Connecting the Machine
IEEE 802.11b (wireless LAN)
This section lists the settings required for using Internet Fax with an IEEE 802.11b (wireless LAN) connection.
|
|
|
|
|
1 |
|
For details about how to specify the settings, see "Interface Settings" and "File |
||
|
|
Transfer". |
|
|
|
|
|
|
|
|
|
Menu |
User Tool |
Setting Requirements |
|
|
|
|
|
|
|
Interface Settings/Network |
Machine IPv4 Address |
Necessary |
|
|
|
|
|
|
|
Interface Settings/Network |
IPv4 Gateway Address |
Necessary |
|
|
|
|
|
|
|
Interface Settings/Network |
DNS Configuration |
As required |
|
|
|
|
|
|
|
Interface Settings/Network |
DDNS Configuration |
As required |
|
|
|
|
|
|
|
Interface Settings/Network |
Domain Name |
As required |
|
|
|
|
|
|
|
Interface Settings/Network |
WINS Configuration |
As required |
|
|
|
|
|
|
|
Interface Settings/Network |
Effective Protocol |
Necessary |
|
|
|
|
|
|
|
Interface Settings/Network |
LAN Type |
Necessary |
|
|
|
|
|
|
|
Interface Settings/Network |
Permit SNMPv3 Communication |
As required |
|
|
|
|
|
|
|
Interface Settings/Network |
Permit SSL/TLS Communication |
As required |
|
|
|
|
|
|
|
Interface Settings/Network |
Host Name |
As required |
|
|
|
|
|
|
|
Interface Settings/ |
Communication Mode |
Necessary |
|
|
IEEE 802.11b |
|
|
|
|
|
|
|
|
|
Interface Settings/ |
SSID Setting |
As required |
|
|
IEEE 802.11b |
|
|
|
|
|
|
|
|
|
Interface Settings/ |
Channel |
As required |
|
|
IEEE 802.11b |
|
|
|
|
|
|
|
|
|
Interface Settings/ |
Security Method |
As required |
|
|
IEEE 802.11b |
|
|
|
|
|
|
|
|
|
Interface Settings/ |
Transmission Speed |
As required |
|
|
IEEE 802.11b |
|
|
|
|
|
|
|
|
|
File Transfer |
SMTP Server |
Necessary |
|
|
|
|
|
|
|
File Transfer |
SMTP Authentication |
As required |
|
|
|
|
|
|
|
File Transfer |
POP before SMTP |
As required |
|
|
|
|
|
|
|
File Transfer |
Reception Protocol |
As required |
|
|
|
|
|
|
|
File Transfer |
POP3 / IMAP4 Settings |
As required |
|
|
|
|
|
|
|
File Transfer |
Administrator's E-mail Address |
As required |
|
|
|
|
|
|
|
File Transfer |
E-mail Communication Port |
Necessary |
|
|
|
|
|
|
|
File Transfer |
E-mail Reception Interval |
As required |
|
|
|
|
|
|
|
File Transfer |
Max. Reception E-mail Size |
As required |
|
|
|
|
|
|
|
File Transfer |
E-mail Storage in Server |
As required |
|
|
|
|
|
20

|
|
Network Settings |
|
|
|
|
|
Menu |
User Tool |
Setting Requirements |
|
|
|
|
|
File Transfer |
Program / Change / |
As required |
|
|
Delete E-mail Message |
|
|
|
|
|
|
File Transfer |
Fax E-mail Account |
Necessary |
1 |
|
|
|
|
|
|
|

 Note
Note
For the Effective Protocol setting, check that the protocol you want to use is set to [Active].
[IEEE 802.11b] and [LAN Type] are displayed when the wireless LAN interface board is installed. If both Ethernet and wireless LAN (IEEE 802.11b) are connected, the selected interface takes precedence.
SMTP Server and Fax E-mail Account must be specified in order to use the send function.
When POP before SMTP is set to [On], you must also make settings for Reception Protocol and POP3 / IMAP4 Settings.
When SMTP Authentication is set to [On], you must also make settings for Administrator's E-mail Address.
E-mail Communication Port and Fax E-mail Account must be specified in order to use the reception function.
When setting POP before SMTP to [On], check POP3 port number in E-mail Communication Port.

 Reference
p.59 “Interface Settings”
p.69 “File Transfer”
Settings Required to Use E-mail Function
This section lists the settings required for sending e-mail.
Ethernet
This section lists the settings required for sending e-mail with an Ethernet connection.
For details about how to specify the settings, see "Interface Settings" and "File Transfer".
Menu |
User Tool |
Setting Requirements |
|
|
|
Interface Settings/Network |
Machine IPv4 Address |
Necessary |
|
|
|
Interface Settings/Network |
IPv4 Gateway Address |
Necessary |
|
|
|
Interface Settings/Network |
DNS Configuration |
As required |
|
|
|
Interface Settings/Network |
DDNS Configuration |
As required |
|
|
|
Interface Settings/Network |
Domain Name |
As required |
|
|
|
21

Connecting the Machine
|
|
Menu |
User Tool |
Setting Requirements |
|
|
|
|
|
|
|
Interface Settings/Network |
WINS Configuration |
As required |
|
|
|
|
|
|
|
Interface Settings/Network |
Effective Protocol |
Necessary |
|
|
|
|
|
|
|
|
|
|
1 |
|
Interface Settings/Network |
Ethernet Speed |
As required |
|
|
|||
|
|
|
|
|
|
|
Interface Settings/Network |
LAN Type |
Necessary |
|
|
|
|
|
|
|
Interface Settings/Network |
Permit SNMPv3 Communication |
As required |
|
|
|
|
|
|
|
Interface Settings/Network |
Permit SSL/TLS Communication |
As required |
|
|
|
|
|
|
|
Interface Settings/Network |
Host Name |
As required |
|
|
|
|
|
|
|
File Transfer |
SMTP Server |
Necessary |
|
|
|
|
|
|
|
File Transfer |
SMTP Authentication |
As required |
|
|
|
|
|
|
|
File Transfer |
POP before SMTP |
As required |
|
|
|
|
|
|
|
File Transfer |
Reception Protocol |
As required |
|
|
|
|
|
|
|
File Transfer |
POP3 / IMAP4 Settings |
As required |
|
|
|
|
|
|
|
File Transfer |
Administrator's E-mail Address |
As required |
|
|
|
|
|
|
|
File Transfer |
E-mail Communication Port |
As required |
|
|
|
|
|
|
|
File Transfer |
Program / Change / |
As required |
|
|
|
Delete E-mail Message |
|
|
|
|
|
|
|
|
File Transfer |
Scanner Resend Interval Time |
As required |
|
|
|
|
|
|
|
File Transfer |
Number of Scanner Resends |
As required |
|
|
|
|
|

 Note
Note
For the Effective Protocol setting, check that the protocol you want to use is set to [Active].
[LAN Type] is displayed when the wireless LAN interface board is installed. If both ethernet and wireless LAN (IEEE 802.11b) are connected, the selected interface takes precedence.
When POP before SMTP is set to [On], also make setting for Reception Protocol and POP3 / IMAP4 Settings.
When setting POP before SMTP to [On], check POP3 port number in E-mail Communication Port.

 Reference
p.59 “Interface Settings”
p.69 “File Transfer”
22
Loading...