


AFICIO MP 171L
Table of contents
 Loading...
Operating Instructions
Printer / Scanner Reference
Read this manual carefully before you use this machine and keep it handy for future reference. For safe and correct use, be sure to read the
Safety Information before using the machine.
Getting Started
Installing the Software
Using the Printer Function
Using the TWAIN Scanner Function
Troubleshooting
Appendix
1
2
3
4
5
6

Introduction
This manual contains detailed instructions and notes on the operation and use of this machine. For your
safety and benefit, read this manual carefully before using the machine. Keep this manual in a handy
place for quick reference.
Important
Contents of this manual are subject to change without prior notice. In no event will the company be li-
able for direct, indirect, special, incidental, or consequential damages as a result of handling or oper-
ating the machine.
Do not copy or print any item for which reproduction is prohibited by law.
Copying or printing the following items is generally prohibited by local law:
bank notes, revenue stamps, bonds, stock certificates, bank drafts, checks, passports, driver's licens-
es.
The preceding list is meant as a guide only and is not inclusive. We assume no responsibility for its
completeness or accuracy. If you have any questions concerning the legality of copying or printing cer-
tain items, consult with your legal advisor.
Caution:
Use of controls or adjustments or performance of procedures other than those specified in this manual
might result in hazardous radiation exposure.
Two kinds of size notation are employed in this manual. With this machine refer to the metric version.
Trademarks
Microsoft
®
, Windows
®
and Windows NT
®
are registered trademarks of Microsoft Corporation in the
United States and/or other countries.
Other product names used herein are for identification purposes only and might be trademarks of their
respective companies. We disclaim any and all rights to those marks.
The proper names of the Windows operating systems are as follows:
• The product name of Windows
®
98 is Microsoft
®
Windows
®
98
• The product name of Windows
®
Me is Microsoft
®
Windows
®
Millennium Edition (Windows Me)
• The product name of Windows
®
2000 are as follows:
Microsoft
®
Windows
®
2000 Advanced Server
Microsoft
®
Windows
®
2000 Server
Microsoft
®
Windows
®
2000 Professional
• The product name of Windows
®
XP are as follows:
Microsoft
®
Windows
®
XP Professional
Microsoft
®
Windows
®
XP Home Edition
• The product names of Windows Server
TM
2003 are as follows:
Microsoft
®
Windows Server
TM
2003 Standard Edition
Microsoft
®
Windows Server
TM
2003 Enterprise Edition
Microsoft
®
Windows Server
TM
2003 Web Edition
Notes:
Some illustrations in this manual might be slightly different from the machine.
Certain options might not be available in some countries. For details, please contact your local dealer.

i
Manuals for This Machine
The following manuals describe the operational procedures of this machine. For
particular functions, see the relevant parts of the manual.
Note
❒ Manuals provided are specific to machine type.
❒ Adobe Acrobat Reader is necessary to view the manuals as a PDF file.
❖ General Settings Guide
Provides an overview of the machine and describes System Settings (paper
trays, Key Operator Tools, etc.), and troubleshooting.
❖ Network Guide
Describes procedures for configuring the machine and computers in a net-
work environment.
❖ Copy Reference
Describes operations, functions, and troubleshooting for the machine’s copier
function.
❖ Printer/Scanner Reference (this manual)
Describes system settings, functions, troubleshooting and operations for the
machine's printer and scanner function.
❖ Other Manuals
• Manuals for This Machine
•Safety Information
• Quick Reference Copy Guide
• Quick Reference Printer / Scanner Guide

ii
TABLE OF CONTENTS
Manuals for This Machine ......................................................................................i
How to Read This Manual .....................................................................................1
1. Getting Started
Control Panel..........................................................................................................3
Reading the Display and Using Keys.........................................................................4
Connecting the Machine .......................................................................................5
Requirements.............................................................................................................5
Connecting the machine to the host using a USB cable............................................5
2. Installing the Software
Auto Run.................................................................................................................7
Installing the Printer Driver...................................................................................8
Installing the TWAIN Driver...................................................................................9
Software Supplied on CD-ROM ..........................................................................10
DDST Driver.............................................................................................................10
DDST TWAIN Driver ................................................................................................10
3. Using the Printer Function
Printer Features Menu .........................................................................................11
Adjusting Printer Features..................................................................................12
Printer Features Parameters...............................................................................13
Paper Input...............................................................................................................13
List/Test Print ...........................................................................................................13
Maintenance.............................................................................................................14
System .....................................................................................................................15
Host Interface...........................................................................................................16
Setting Paper on the Bypass Tray......................................................................17
Setting the paper size ..............................................................................................18
Setting custom size paper........................................................................................19
Setting thick paper or OHP transparencies ..............................................................20
Setting envelopes.....................................................................................................21
Setting Up the Printer Driver and Canceling a Print Job .................................22
Windows 98SE / Me - Accessing Printer Properties ................................................22
Windows 2000 / XP and Windows Server 2003 - Accessing Printer Properties ...... 23
Canceling a Print Job ...............................................................................................24
4. Using the TWAIN Scanner Function
TWAIN Scanner ....................................................................................................27
Preparation for Using the Network TWAIN Scanner.........................................28
TWAIN Scanner Screen...........................................................................................28
Setting Originals ..................................................................................................29
Placing Originals ......................................................................................................29
Scanning Originals ..............................................................................................32

iii
5. Troubleshooting
The Printer Function............................................................................................33
Error & Status Messages on the Display .................................................................33
The Machine Does Not Print ....................................................................................36
Other Printing Problems...........................................................................................38
The Scanner Function .........................................................................................40
When Scanning Is Not Performed as Expected .......................................................40
When an Error Message Appears on the Client Computer......................................41
6. Appendix
The Printer Function............................................................................................43
Collate ......................................................................................................................43
The Scanner Function .........................................................................................44
Relationship between Resolution and File Size .......................................................44
Specifications.......................................................................................................45
Printer.......................................................................................................................45
Scanner....................................................................................................................45
INDEX......................................................................................................... 46

iv

1
How to Read This Manual
Symbols
In this manual, the following symbols are used:
R
WARNING:
This symbol indicates a potentially hazardous situation which, if instructions
are not followed, could result in death or serious injury.
R
CAUTION:
This symbol indicates a potentially hazardous situation which, if instructions
are not followed, may result in minor or moderate injury, or damage to proper-
ty.
* The statements above are notes for your safety.
Important
If this instruction is not followed, paper might misfeed, originals might be dam-
aged, or data might be lost. Be sure to read this.
Preparation
This symbol indicates prior knowledge or preparation is required before opera-
tion.
Note
This symbol indicates precautions for operation, or actions to take after mal-op-
eration.
Limitation
This symbol indicates numerical limits, functions that cannot be used together,
or conditions in which a particular function cannot be used.
Reference
This symbol indicates a reference.
[]
Keys and buttons that appear on the computer's display.
[]
Keys that appear on the machine's display.
{}
Keys built into the machine's control panel.
{}
Keys on the computer's keyboard.

2

3
1. Getting Started
Control Panel
1. {Scanner} key
Press to activate the scanner function.
2. {Printer} key
Press to activate the printer function.
3. Indicators
Displays errors and machine status.
: Error indicator. See Network Guide and
General Settings Guide.
B:
Load Paper indicator. See
Copy Reference
.
D:
Add Toner indicator. See
Copy Reference
.
4. Display
Displays operation status and messages.
5. Selection keys
Correspond to items on the display. Press
to select the corresponding item.
6. Scroll keys
Press to select an item.
{U}: scroll upward
{T}: scroll downward
{V}: scroll right
{W}: scroll left
7. {User Tools/Counter} key
Press to change default or operation pa-
rameters according to requirement.
8. {Clear/Stop} key
Clear: clears an entered numeric value.
9. Main power indicator and On in-
dicator
The main power indicator lights when
the main power switch is turned on. The
On indicator lights when the operation
switch is turned on.
10. Operation switch
Press to turn the power on. The On indi-
cator lights. To turn the power off, press
again.
Note
❒ This key is inactivate during printing
or while setting printer defaults.
11. {Online} key
Press to switch the printer between on-
line and offline.
12. Data In indicator
Blinks while the printer is receiving data
from a computer or printing. Lit when
preparing to print.
13. {Escape} key
Press to cancel an operation or return to
the previous display.
14. {OK} key
Press to set a selected item or entered nu-
meric value.
15. Number keys
Press to enter numeric values.
17810
12
9
11
34 652
13 14 15
CGU018

Getting Started
4
1
Reading the Display and Using Keys
This section explains how to read the display and use the selection keys on the
initial display.
Note
❒ The copy display is set as the default screen when the machine is turned on.
You can change the settings in [System Settings]. See General Settings Guide.
1. Selection keys
Correspond to the function items at the
bottom line on the display.
Example: Basic screen
When the instruction "press [JobReset]"
appears in this manual, press the center
selection key.
2. {Escape} key
Press to cancel an operation or return to
the previous display.
3. {OK} key
Press to set a selected item or entered nu-
meric value.
4. Scroll keys
Press to move the cursor in each direc-
tion, step by step.
When the {U}, {T}, {V}, or {W} key ap-
pears in this manual, press the scroll key
of the same direction.
1234
CGU021
Connecting the Machine
5
1
Connecting the Machine
Reference
For details about connection using
Ethernet, see "Connecting the Net-
work Cable to the Network", Net-
work Guide.
Requirements
Before using this machine, make sure
all environmental and electrical re-
quirements are met. Connect the ma-
chine to the host computer using the
USB port or network interface unit.
Make sure all cables, connectors, and
electrical outlets necessary for attach-
ing the machine to the host computer
or network are close at hand.
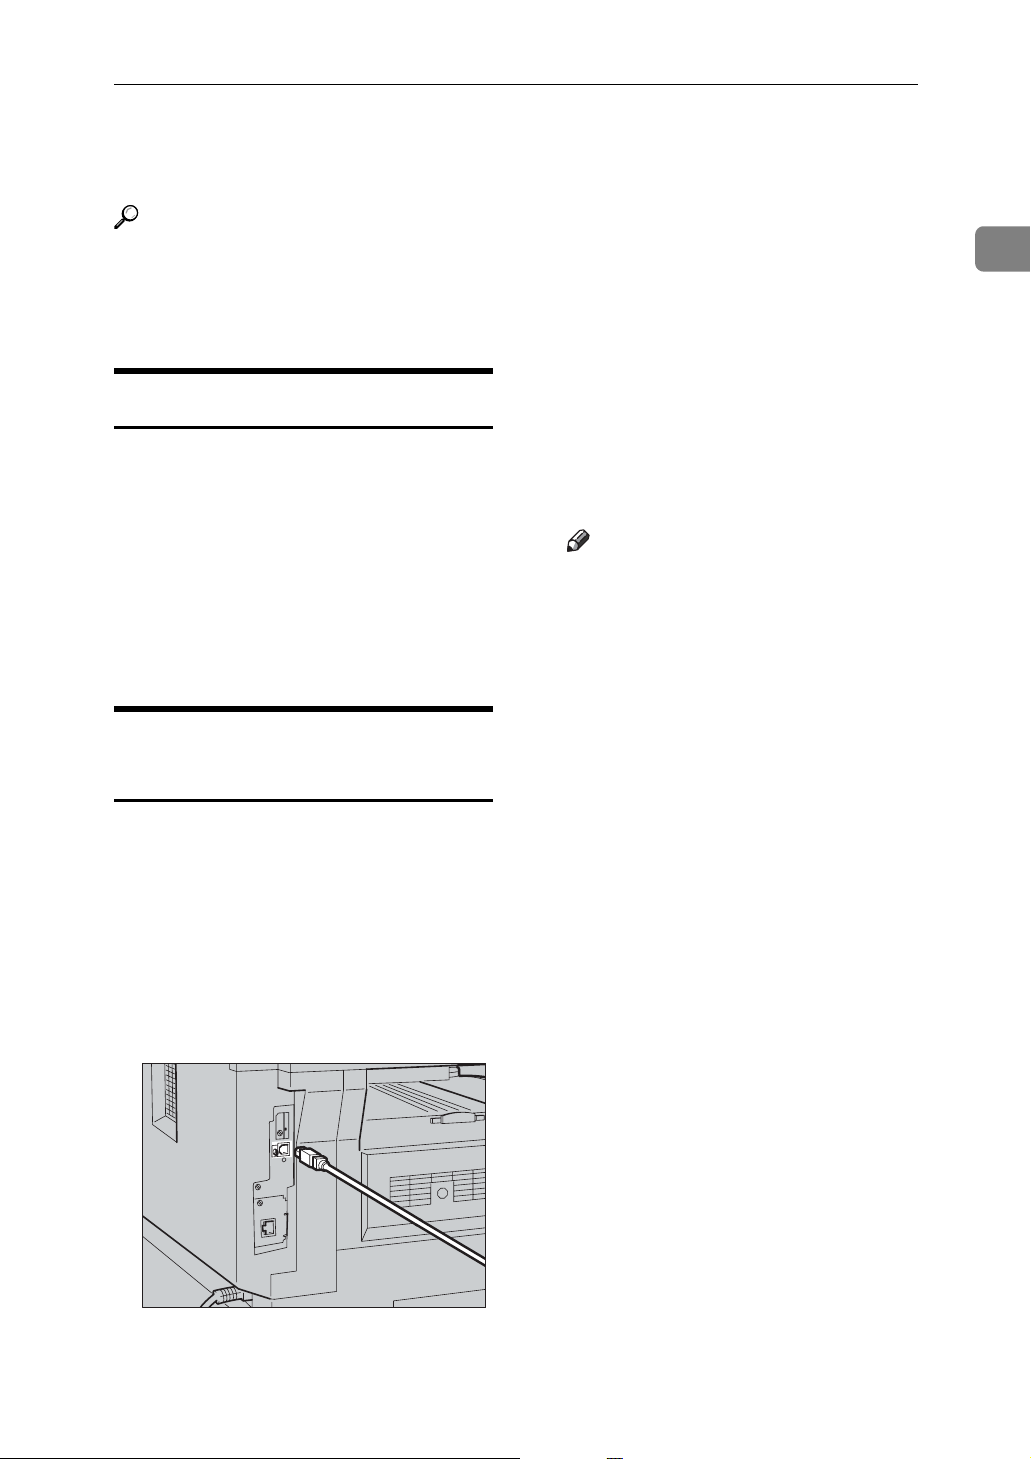
Connecting the machine to the
host using a USB cable
You can connect the machine to the
host computer using a USB cable.
Follow the procedure below to con-
nect the machine to the host computer
using a USB cable.
A Connect the USB 2.0 cable to the
USB port on the right side of the
machine's back cover.
B Connect the other end to the USB
port on the host computer.
The machine and computer are
now connected. The printer driver
and TWAIN driver must be in-
stalled next. For details about how
to install the printer driver and
TWAIN driver, see p.8 “Installing
the Printer Driver” and p.9 “In-
stalling the TWAIN Driver”.
Note
❒ If USB 2.0 is used with Win-
dows 98 SE/Me, only speeds
equivalent to those of USB 1.1
are possible.
CGU017

Getting Started
6
1

7
2. Installing the Software
This manual assumes you are familiar with general Windows procedures and
practices. If you are not, see the operating instructions that come with Windows
for details.
Auto Run
Inserting the CD-ROM into the CD-
ROM drive starts the installer auto-
matically. The installer helps you in-
stall the printer drivers and software
easily.
Note
❒ When “plug and play” starts, click
[Cancel] in [New Hardware Found],
[Device Driver Wizard] or [Found New
Hardware Wizard] dialog box, and
then insert the CD-ROM. The [New
Hardware Found], [Device Driver Wiz-
ard] or [Found New Hardware Wizard]
dialog box appears depending on
the version of Windows 98SE / Me
/ 2000 / XP or Windows Server
2003.
❒ Auto Run may not work with cer-
tain operating system settings. If
this happens, launch "Setup.exe"
on the CD-ROM root directory.
❒ To disable Auto Run, press the left
{SHIFT} key when inserting the
CD-ROM into the drive and keep it
pressed until the computer finish-
es reading from the CD-ROM.
Limitation
❒ Under Windows 2000 / XP or Win-
dows Server 2003, installing soft-
ware using Auto Run requires
Administrator permission. To in-
stall software using Auto Run, log
on using an account that has Ad-
ministrators permission.

Installing the Software
8
2
Installing the Printer Driver
To use the printer function, you must
first install the printer driver from the
supplied CD-ROM.
A Quit all applications currently
running.
B Insert the CD-ROM into the CD-
ROM drive.
The driver installer starts.
C Select an interface language, and
then click [OK].
The default interface language is
English.
D Click [DDST Printer Drivers].
The DDST Printer Drivers installer
starts.
E The software license agreement
appears in the [License Agreement]
dialog box. After reading through
its contents, click [I accept the agree-
ment.], and then click [Next >].
F Follow the instructions on the
display to install DDST Printer
Drivers.
If you are required to restart the
computer after installing DDST
Printer Drivers, restart the compu-
ter.
Note
❒ The printer driver has been in-
stalled, plug and play is ena-
bled, and the icon of the printer
connected to the “USB” port is
added to the [Printers] or [Print-
ers and Faxes] window.
❒
For details about using the print-
er
function via Ethernet under
Windows 98SE / Me, see "Using
the Printer Function", Network
Guide.
❒
For details about using the print-
er
function via Ethernet under
Windows 2000 / XP / Server
2003, see "Using the Printer
Function", Network Guide.

Installing the TWAIN Driver
9
2
Installing the TWAIN Driver
To use the scanner function, you must
first install the TWAIN driver on the
supplied CD-ROM.
A Quit all applications currently
running.
B Insert the CD-ROM into the CD-
ROM drive.
The driver installer starts.
C Select an interface language, and
then click [OK].
The default interface language is
English.
D Click [DDST TWAIN Driver].
The DDST TWAIN Driver installer
starts.
E Click [Close].

Installing the Software
10
2
Software Supplied on CD-ROM
This section explains the software on the CD-ROMs supplied with the printer option.
DDST Driver
The DDST drivers are included on the CD-ROMs that comes with this machine.
These drivers enable a client computer to communicate with the machine via a
printer language.
❖ System requirements
Operating system
• Microsoft Windows 98SE
• Microsoft Windows Me
• Windows 2000
•Windows XP
• Windows Server 2003
Hard disk space
• 80 MB or more
DDST TWAIN Driver
This driver is required for scanning originals on the machine.
You must install this driver to use the machine as a network TWAIN scanner.
❖ System requirements
•Hardware
PC/AT compatible
•CPU
Pentium 300 MHz or faster recommended
• Operating system
Microsoft Windows 98 (SE or later)
Microsoft Windows Millennium Edition
Microsoft Windows 2000 Professional
Microsoft Windows 2000 Server
Microsoft Windows XP Home Edition
Microsoft Windows XP Professional
•Memory
128 MB or more recommended
• Hard disk space
200 MB or more
•Connection
Ethernet/USB

11
3. Using the Printer Function
Printer Features Menu
There are five menu items in the Printer Features menu:
Reference
For more information about copier features and system settings, see Copy Ref-
erence and General Settings Guide.
•Paper Input
• List/Test Print
•Maintenance
•System
•Host Interface
You can select the following functions:
❖ Paper Input (See p.13 “Paper Input”)
❖ List/Test Print (See p.13 “List/Test Print”)
❖ Maintenance (See p.14 “Maintenance”)
❖ System (See p.15 “System”)
❖ Host Interface (See p.16 “Host Interface”)
Menu Default
Bypass Paper Size
Metric version: A4 / Inch version: 11 × 8
1
/
2
Auto Paper Select On
Duplex On
Menu Default
Operations Test ––
Menu Default
Menu Protect Off
Menu Default
Auto Continue Off
Edge Smoothing On
Toner Saving Off
Menu Default
I/O Timeout 15 seconds
Loading...