


AFICIO MP 1100
Table of contents
 Loading...
Printer/Scanner Unit Type
1350
Operating Instructions
Printer Reference
Preparing the Machine
1
Setting Up the Printer Driver
2
Other Print Operations
3
Saving and Printing Using the Document Server
4
The Functions and Settings of the Machine
5
Appendix
6
Read this manual carefully before you use this machine and keep it handy for future reference. For safe and correct use, be sure to read the
Safety Information in "About This Machine" before using the machine.

Introduction
This manual contains detailed instructions and notes on the operation and use of this machine. For your
safety and benefit, read this manual carefully before using the machine. Keep this manual in a handy
place for quick reference.
Important
Contents of this manual are subject to change without prior notice. In no event will the company be liable for direct, indirect, special, incidental, or consequential damages as a result of handling or operating the machine.
Do not copy or print any item for which reproduction is prohibited by law.
Copying or printing the following items is generally prohibited by local law:
bank notes, revenue stamps, bonds, stock certificates, bank drafts, checks, passports, driver's licenses.
The preceding list is meant as a guide only and is not inclusive. We assume no responsibility for its
completeness or accuracy. If you have any questions concerning the legality of copying or printing certain items, consult with your legal advisor.
Caution:
Use of controls or adjustments or performance of procedures other than those specified in this manual
might result in hazardous radiation exposure.
Two kinds of size notation are employed in this manual. With this machine refer to the metric version.
Trademarks
Microsoft
®
, Windows® and Windows NT® are registered trademarks of Microsoft Corporation in the
United States and/or other countries.
®
Adobe
, PostScript®, Acrobat®, PageMaker® and Adobe Type Manager are registered trademarks of
Adobe Systems Incorporated.
®
PCL
is a registered trademark of Hewlett-Packard Company.
Apple, AppleTalk, EtherTalk, Macintosh, Mac OS, and True Type are trademarks of Apple Computer,
Inc., registered in the U.S. and other countries.
Bonjour
IPS-PRINT
TM
is a trademark of Apple Computer, Inc.
TM
Printer Language Emulation Copyright© 2000, Oak Technology, Inc., All Rights Re-
served.
UNIX is a registered trademark in the United States and other countries, licensed exclusively through
X/Open Company Limited.
The Bluetooth
®
word mark and logos are owned by the Bluetooth SIG, Inc. and any use of such marks
by Ricoh Company, Ltd. is under license.
UPnP is a trademark of the UPnP Implementers Corporation.
NetWare is a registered trademark of Novell, Inc.
Other product names used herein are for identification purposes only and might be trademarks of their
respective companies. We disclaim any and all rights to those marks.
The proper names of the Windows operating systems are as follows:
• The product name of Windows
• The product name of Windows
• The product name of Windows
• The product name of Windows
®
95 is Microsoft® Windows® 95
®
98 is Microsoft® Windows® 98
®
Me is Microsoft® Windows® Millennium Edition (Windows Me)
®
2000 are as follows:
Microsoft® Windows® 2000 Professional
Microsoft® Windows® 2000 Server
Microsoft® Windows® 2000 Advanced Server
• The product name of Windows
®
XP are as follows:
Microsoft® Windows® XP Home Edition
Microsoft® Windows® XP Professional
• The product names of Windows Server
TM
2003 are as follows:
Microsoft® Windows ServerTM 2003 Standard Edition
Microsoft® Windows ServerTM 2003 Enterprise Edition
Microsoft® Windows ServerTM 2003 Web Edition
• The product name of Windows NT
®
4.0 are as follows:
Microsoft® Windows NT® Workstation 4.0
Microsoft® Windows NT® Server 4.0
Notes
Some illustrations in this manual might be slightly different from the machine.
Certain options might not be available in some countries. For details, please contact your local dealer.

Manuals for This Machine
Refer to the manuals that are relevant to what you want to do with the machine.
❖ About This Machine
Be sure to read the Safety Information in this manual before using the machine.
This manual provides an introduction to the functions of the machine. It also
explains the control panel, preparation procedures for using the machine,
how to enter text, and how to install the CD-ROMs provided.
❖ General Settings Guide
Explains User Tools settings, and Address Book procedures such as registering e-mail addresses, and user codes. Also refer to this manual for explanations on how to connect the machine.
❖ Trouble Shooting
Provides a guide to solving common problems, and explains how to replace
paper, toner, staples, and other consumables.
❖ Security Reference
This manual is for administrators of the machine. It explains security functions that the administrators can use to protect data from being tampered, or
prevent the machine from unauthorized use.
Also refer to this manual for the procedures for registering administrators, as
well as setting user and administrator authentication.
❖ Copy/Document Server Reference
Explains Copier and Document Server functions and operations. Also refer to
this manual for explanations on how to place originals.
❖ Printer Reference
Explains Printer functions and operations.
❖ Scanner Reference
Explains Scanner functions and operations.
❖ Network Guide
Explains how to configure and operate the machine in a network environment, and use the software provided.
This manual covers all models, and includes descriptions of functions and
settings that might not be available on this machine. Images, illustrations, and
information about operating systems that are supported might also differ
slightly from those of this machine.
i

❖ Other manuals
• Manuals for This Machine
•Safety Information
• Quick Reference Copy Guide
• Quick Reference Printer Guide
• Quick Reference Scanner Guide
• PostScript3 Supplement
•UNIX Supplement
• Manuals for DeskTopBinder Lite
• DeskTopBinder Lite Setup Guide
• DeskTopBinder Introduction Guide
•Auto Document Link Guide
Note
❒ Manuals provided are specific to machine types.
❒ Adobe Acrobat Reader/Adobe Reader must be installed in order to view the
manuals as PDF files.
❒ For “UNIX Supplement”, please visit our Web site or consult an authorized
dealer.
❒ “PostScript3 Supplement” and “UNIX Supplement” include descriptions of
functions and settings that might not be available on this machine.
ii

TABLE OF CONTENTS
Manuals for This Machine ......................................................................................i
How to Read This Manual .....................................................................................1
Symbols .....................................................................................................................1
Display Panel..........................................................................................................2
Initial Display ..............................................................................................................2
Simplified Display.......................................................................................................3
Job List ...................................................................................................................4
Job List screen ...........................................................................................................4
Checking jobs in the print queue................................................................................ 5
Changing the order of jobs.........................................................................................6
Holding print jobs .......................................................................................................7
Deleting jobs ..............................................................................................................7
Checking Job History .................................................................................................8
Printer Features Menu ...........................................................................................9
1. Preparing the Machine
Confirming the Connection Method...................................................................13
Network Connection.................................................................................................13
Local Connection .....................................................................................................16
Installing the Printer Driver.................................................................................17
Quick Install..............................................................................................................17
Installing the Printer Driver for the Selected Port.....................................................19
Using as a Windows Network Printer ................................................................30
Using as a NetWare Print Server / Remote Printer ...........................................32
Form Feed................................................................................................................34
Banner Page ............................................................................................................34
Printing after Resetting the Printer ...........................................................................34
Installing the Printer Driver Using USB .............................................................35
Windows Me - USB ..................................................................................................35
Windows 2000 - USB ...............................................................................................37
Windows XP, Windows Server 2003 - USB .............................................................38
Printing with Parallel Connection.......................................................................40
Installing the Printer Driver Using IEEE 1394 (SCSI print)...............................42
Windows 2000..........................................................................................................42
Windows XP, Windows Server 2003........................................................................44
Printing with Bluetooth Connection...................................................................46
Supported Profiles....................................................................................................46
Printing with Bluetooth Connection ..........................................................................47
Configuring Security Mode Settings.........................................................................48
Printing in the Security Mode ...................................................................................48
Making Option Settings for the Printer..............................................................49
Conditions for Bidirectional Communication ............................................................49
If Bidirectional Communication Is Disabled..............................................................51
Installing Font Manager 2000..............................................................................52
Using Adobe PageMaker Version 6.0, 6.5, or 7.0.............................................. 53
iii

2. Setting Up the Printer Driver
PCL - Accessing the Printer Properties.............................................................55
Windows 95 / 98 / Me - Accessing the Printer Properties........................................55
Windows 2000 - Accessing the Printer Properties ...................................................57
Windows XP, Windows Server 2003 - Accessing the Printer Properties .................59
Windows NT 4.0 - Accessing the Printer Properties ................................................61
RPCS - Accessing the Printer Properties .......................................................... 63
Windows 95 / 98 / Me - Accessing the Printer Properties........................................63
Windows 2000 - Accessing the Printer Properties ...................................................65
Windows XP, Windows Server 2003 - Accessing the Printer Properties .................67
Windows NT 4.0 - Accessing the Printer Properties ................................................69
3. Other Print Operations
Printing a PDF File Directly.................................................................................73
Printing Method ........................................................................................................73
Using DeskTopBinder Lite .......................................................................................73
Using commands .....................................................................................................76
Unauthorized Copy Control ................................................................................77
Using [Data security for copying] .................................................................................77
Using [Mask type:] .....................................................................................................79
Important Notice.......................................................................................................80
Using the Print Job Function..............................................................................81
Selecting the Initial Print Job List .............................................................................84
Printing from the Print Job Screen ....................................................................85
Sample Print.............................................................................................................85
Locked Print ............................................................................................................. 89
Hold Print .................................................................................................................93
Stored Print ..............................................................................................................96
Printing from the Jobs Per User ID Screen .....................................................100
Printing the Selected Print Job...............................................................................100
Printing All Print Jobs .............................................................................................102
Form Feed...........................................................................................................104
Printing from a Selected Tray.................................................................................104
Canceling a Print Job .............................................................................................105
Canceling a Print Job ........................................................................................106
Canceling a Print Job Using the Control Panel ......................................................106
Windows - Canceling a Print Job from the computer.............................................107
Checking the Error Log .....................................................................................108
Spool Printing ....................................................................................................109
User Defined Pages ...........................................................................................110
Printing with the Finisher..................................................................................111
Staple .....................................................................................................................112
Punch .....................................................................................................................114
Collate ....................................................................................................................116
Covers.................................................................................................................119
Chaptering ..........................................................................................................123
No slip sheet ..........................................................................................................123
Inserting chapter slip sheets ..................................................................................124
Slip Sheet............................................................................................................125
iv

Tab Sheet............................................................................................................127
Z-fold ...................................................................................................................128
Folding Positions....................................................................................................128
Notes on the Z-fold Function..................................................................................129
4. Saving and Printing Using the Document Server
Accessing the Document Server...................................................................... 131
5. The Functions and Settings of the Machine
Mainframe ...........................................................................................................133
Functions................................................................................................................133
Interface .................................................................................................................133
List of the Setting Items ....................................................................................134
Web Image Monitor................................................................................................134
telnet ......................................................................................................................139
Settings that can be used with PostScript 3...........................................................139
6. Appendix
Specifications.....................................................................................................141
Options...................................................................................................................143
INDEX....................................................................................................... 146
v

vi
How to Read This Manual
Symbols
This manual uses the following symbols:
Indicates important safety notes.
Ignoring these notes could result in serious injury or death. Be sure to read these
notes. They can be found in the “Safety Information” section of About This Machine.
Indicates important safety notes.
Ignoring these notes could result in moderate or minor injury, or damage to the
machine or to property. Be sure to read these notes. They can be found in the
“Safety Information” section of About This Machine.
Indicates points to pay attention to when using the machine, and explanations
of likely causes of paper misfeeds, damage to originals, or loss of data. Be sure
to read these explanations.
Indicates supplementary explanations of the machine’s functions, and instructions on resolving user errors.
This symbol is located at the end of sections. It indicates where you can find further relevant information.
[ ]
Indicates the names of keys that appear on the machine’s display panel.
{ }
Indicates the names of keys on the machine’s control panel.
1
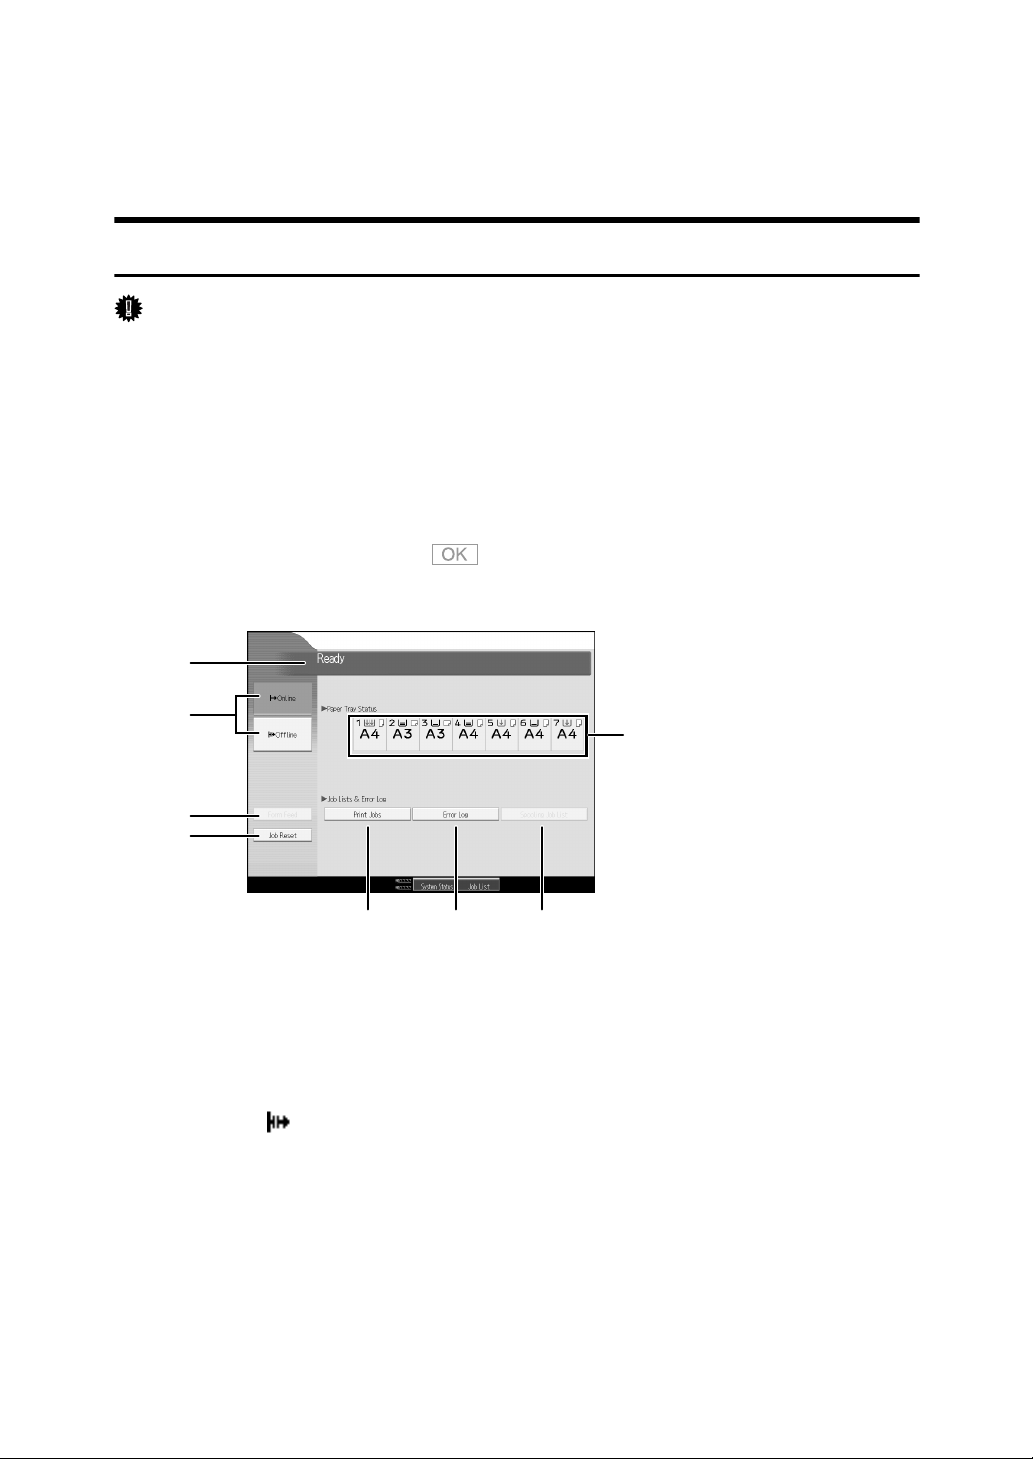
Display Panel
This section describes configuration using the display panel when the printer
function is selected.
Initial Display
Important
❒ The machine switches to offline when you make settings when the machine
is online. After you complete the setting, the machine switches to online automatically.
❒ If you make a setting when the machine is offline, it will stay offline afterward.
❒ The function items displayed serve as selector keys. You can select or specify
an item by pressing it lightly.
❒ When you select or specify an item on the display panel, it becomes highlighted.
❒ Keys dimmed (for example, ) cannot be used.
1
2
3
4
5 6 7
1. Operational status or messages
Displays current machine status, such as
“Ready”, “Offline”, and “Printing...”. Information about the print job (user ID and
document name) appears in this section.
2. [fOnline] / [ Offline]
When you press these keys, the machine
switches between online and offline.
When the machine is online, it can receive data from the computer.
When the machine is offline, it cannot receive data from the computer.
8
APK102S
3. [Form Feed]
Press to print all the data left in the machine's input buffer.
• When the machine is online, the status
appears dimly.
• This function is not available with the
RPCS printer language.
4. [Job Reset]
Press to cancel the current print job.
If you press it when the machine is offline
and Hex Dump is selected, Hex Dump is
canceled.
5. [Print Jobs]
Press to display print jobs sent from a
computer.
2

6. [Error Log]
Press to display the error logs of print
jobs that sent from a computer.
Note
❒ When the power is turned on, the copier display is shown. This is a factory
default. This initial setting can be changed. See “System Settings”, General
Settings Guide.
7. [Spooling Job List]
Press to display spooled jobs.
8. Paper Tray Status indicators
The paper tray settings appear.
Simplified Display
This section explains how to switch to the simplified display.
When you press {Simplified Display}, the screen changes from the initial display
to the simplified display. Letters and keys are displayed at a larger size, making
operations easier.
APG011S
❖ Example of a simplified display
Note
❒ To return to the initial display, press {Simplified Display} again.
❒ Certain keys do not appear on the simplified display.
3
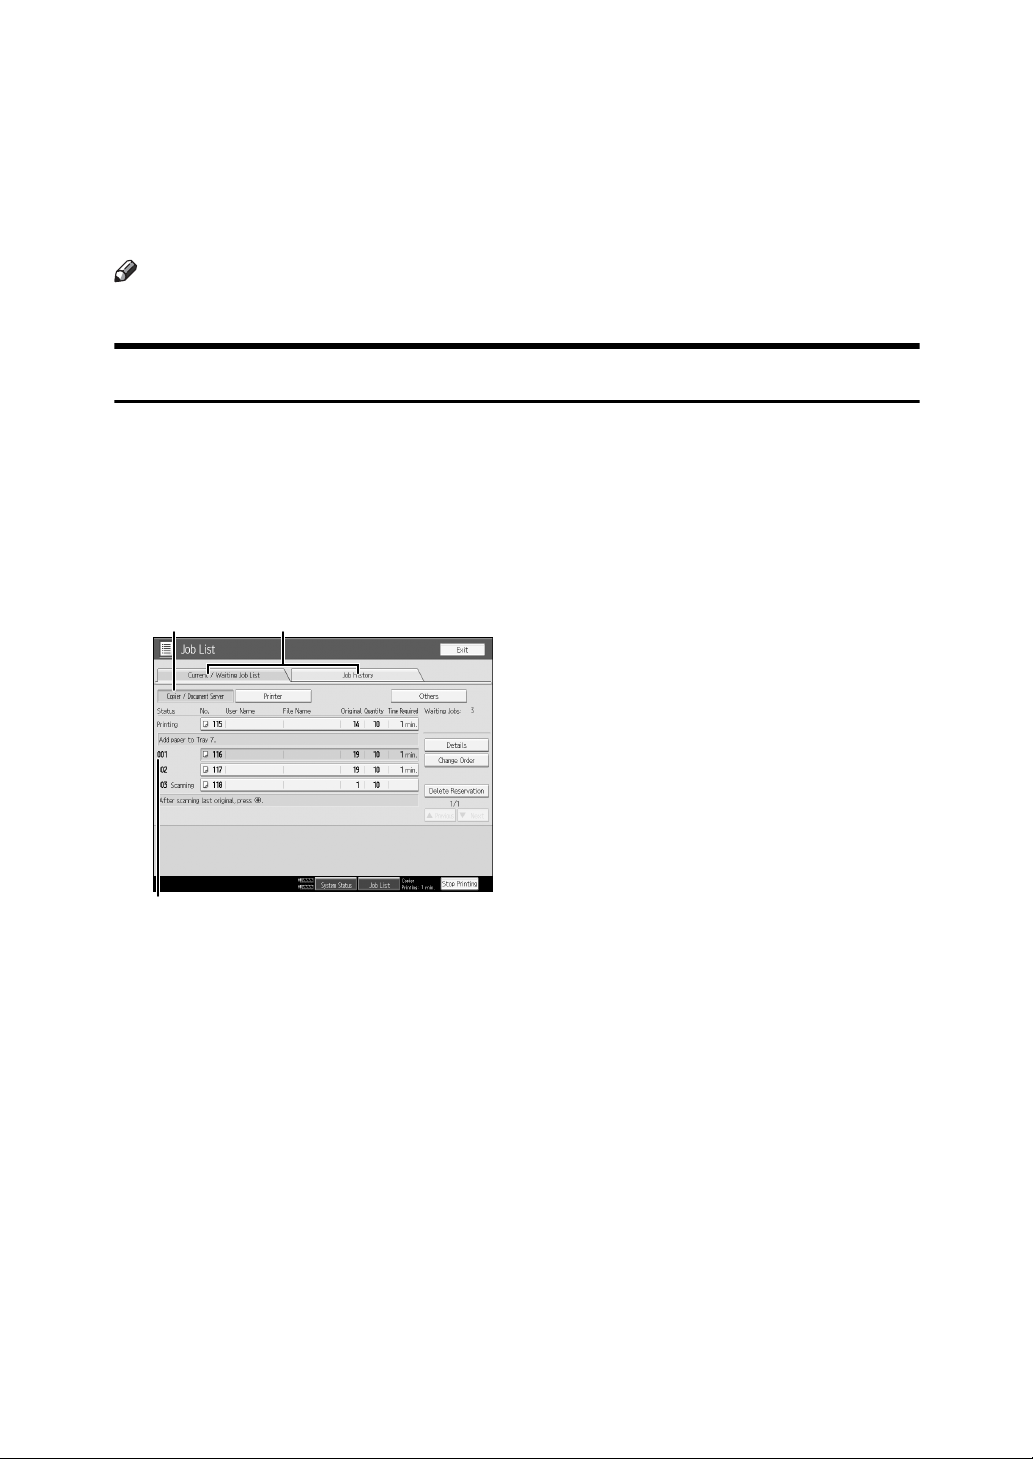
Job List
Jobs printed using Copy, Document Server, or Printer mode are temporarily
stored in the machine, and then executed in order. The Job List function allows
you to manage these jobs. For example, you can cancel incorrect job settings or
print an urgent document.
Note
❒ You cannot use the Job List function when Interrupt Copy is active.
Job List screen
This section explains displays and icons that appear in the Job List screen.
The Job List screen varies depending on whether [Job Order] is selected with
Print Priority for the System Settings. For details about the setting procedure, see
“Print Priority”, General Settings Guide.
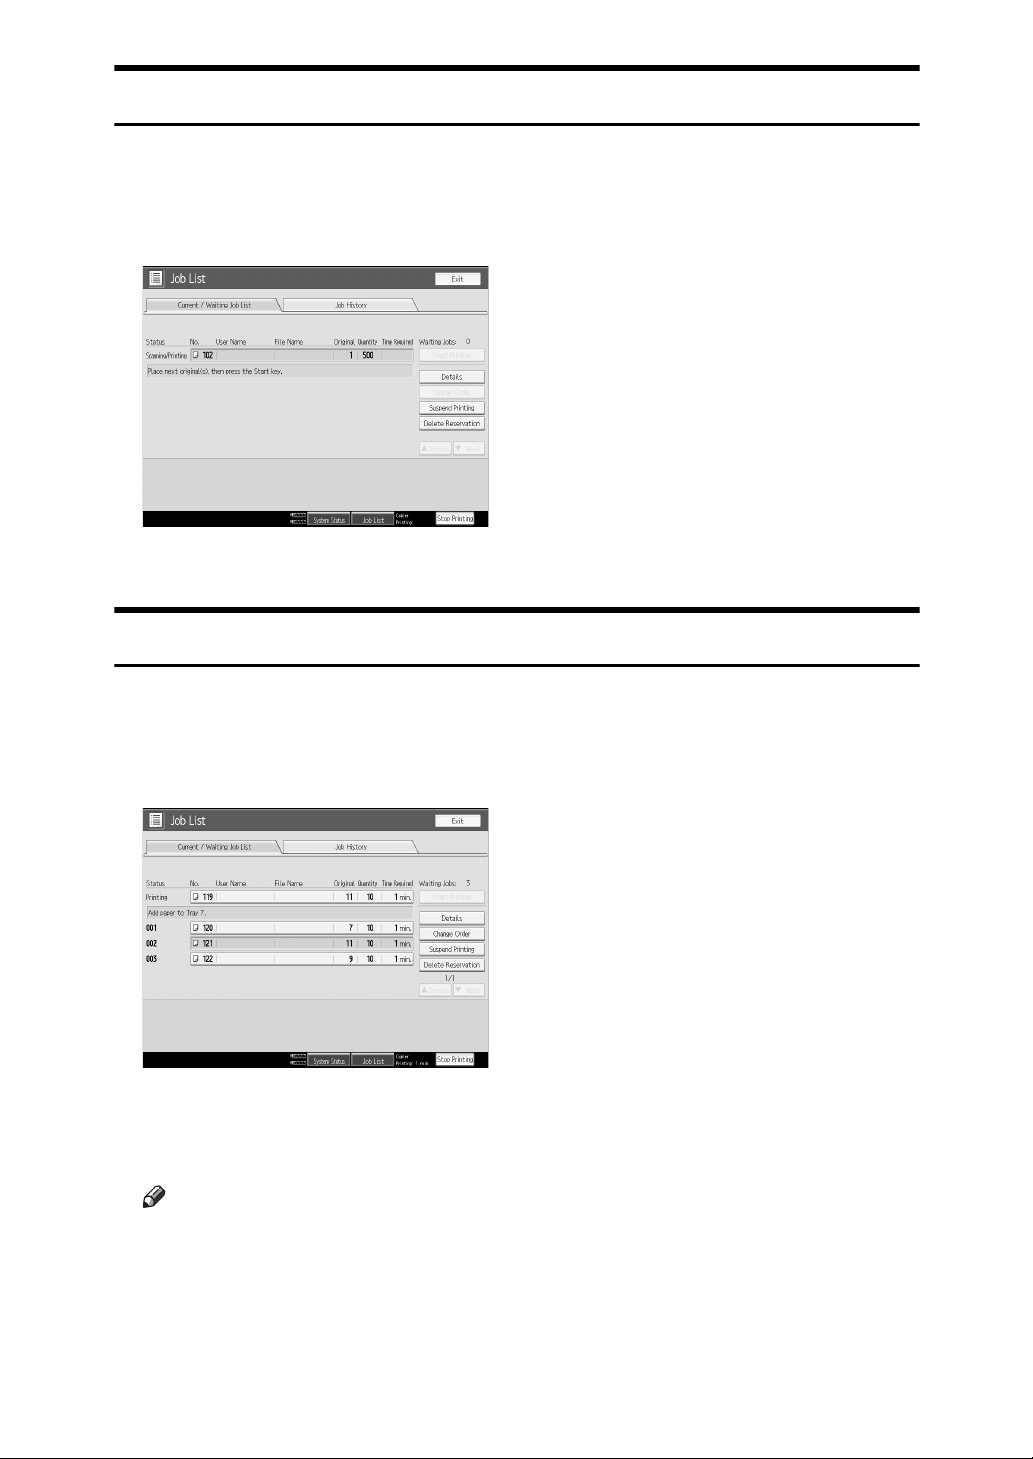
❖ When [Job Order] is not selected:
The job list is displayed for each of the functions.
21
3
APG017S
4
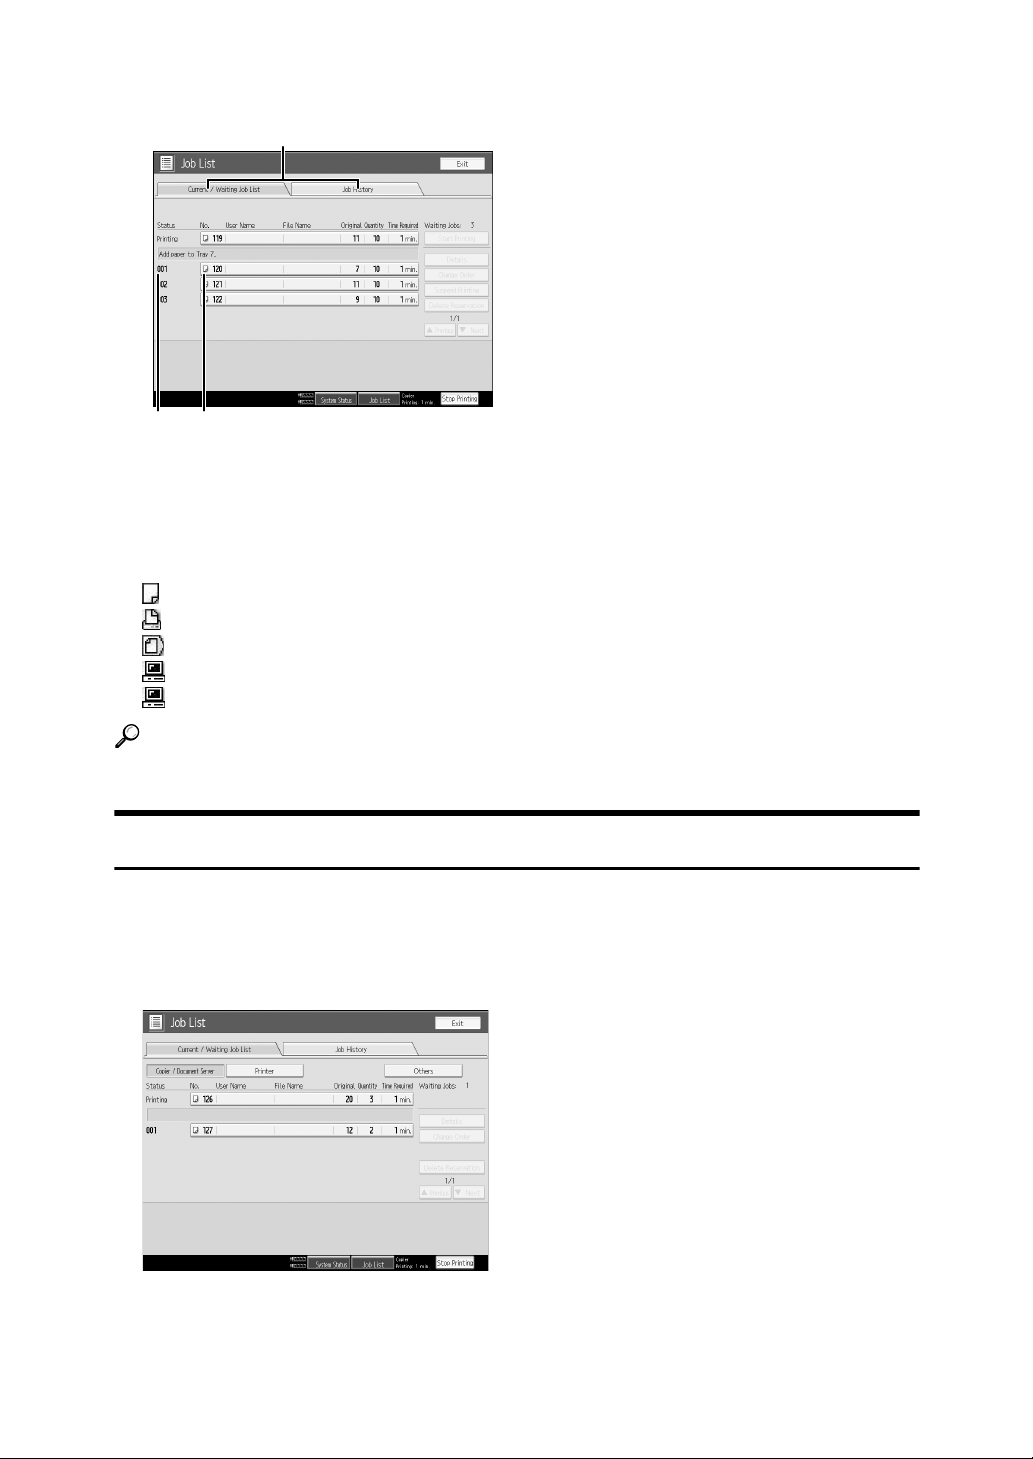
❖ When [Job Order] is selected:
The job list is displayed for all functions in the order of print jobs.
2
3 4
A Switches between job lists for each function.
B Switches between [Current / Waiting Job List] and [Job History].
C Displays reserved job numbers.
D Displays the function used to print jobs.
: Job printed using copy function.
: Job printed using printer function.
: Job printed using Document Server function.
: Job printed using DeskTopBinder.
: Job printed using Web Image Monitor.
Reference
“Print Priority”, General Settings Guide
APG018S
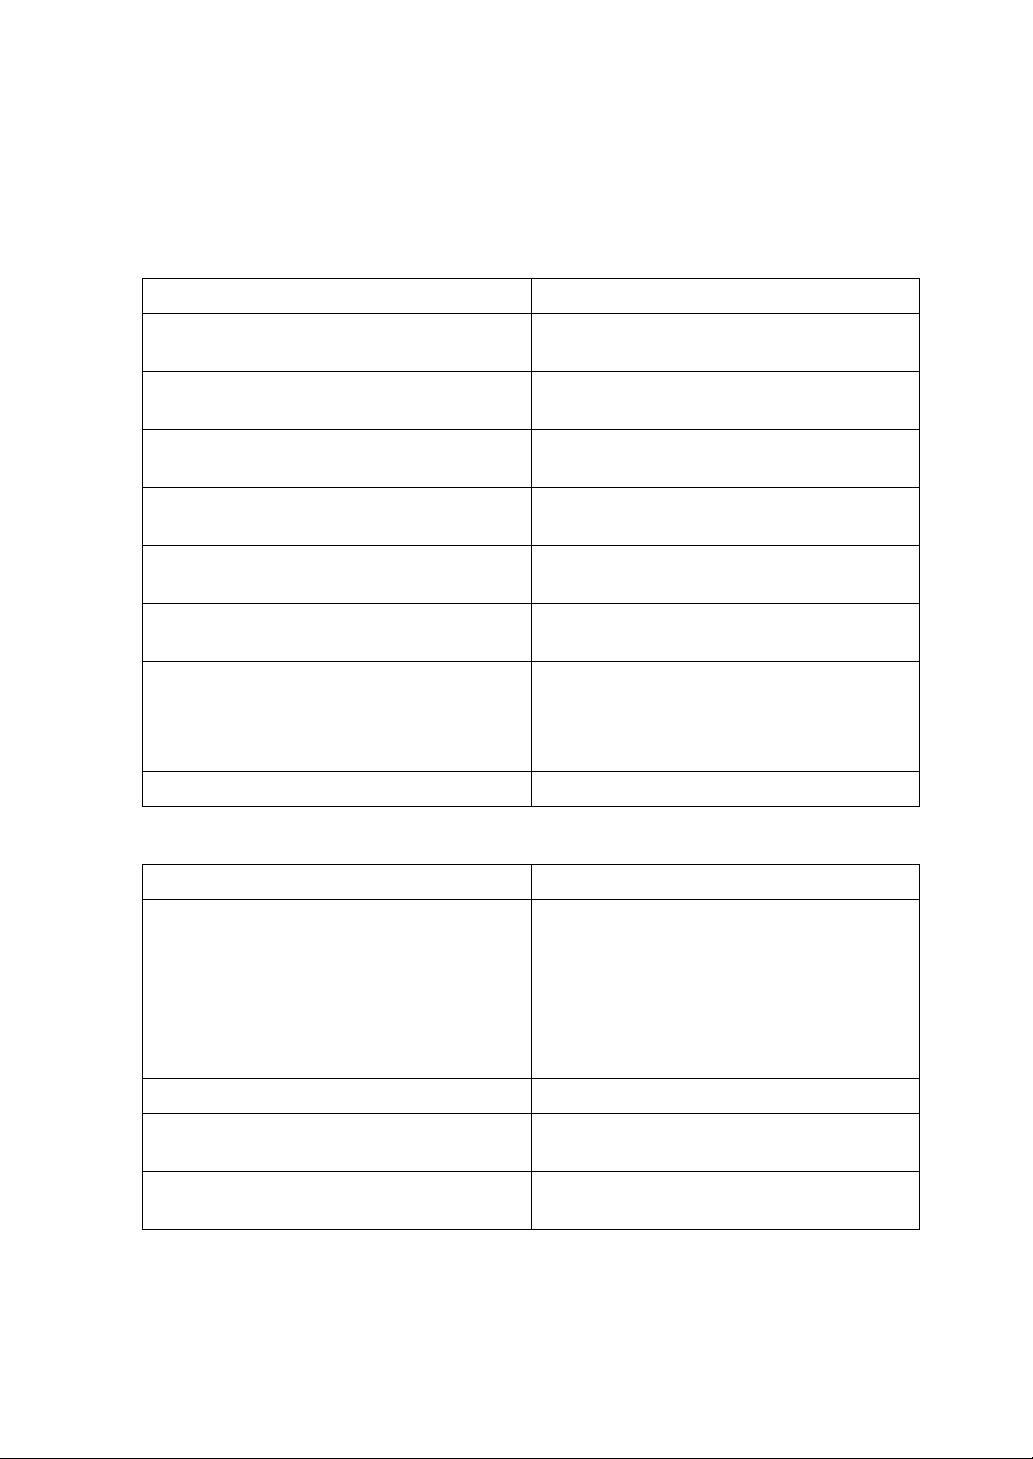
Checking jobs in the print queue
You can check the contents of jobs in the print queue.
A Press [Job List].
B Select the job you want to check.
C Press [Details], and then check the contents.
D Press [Exit].
5

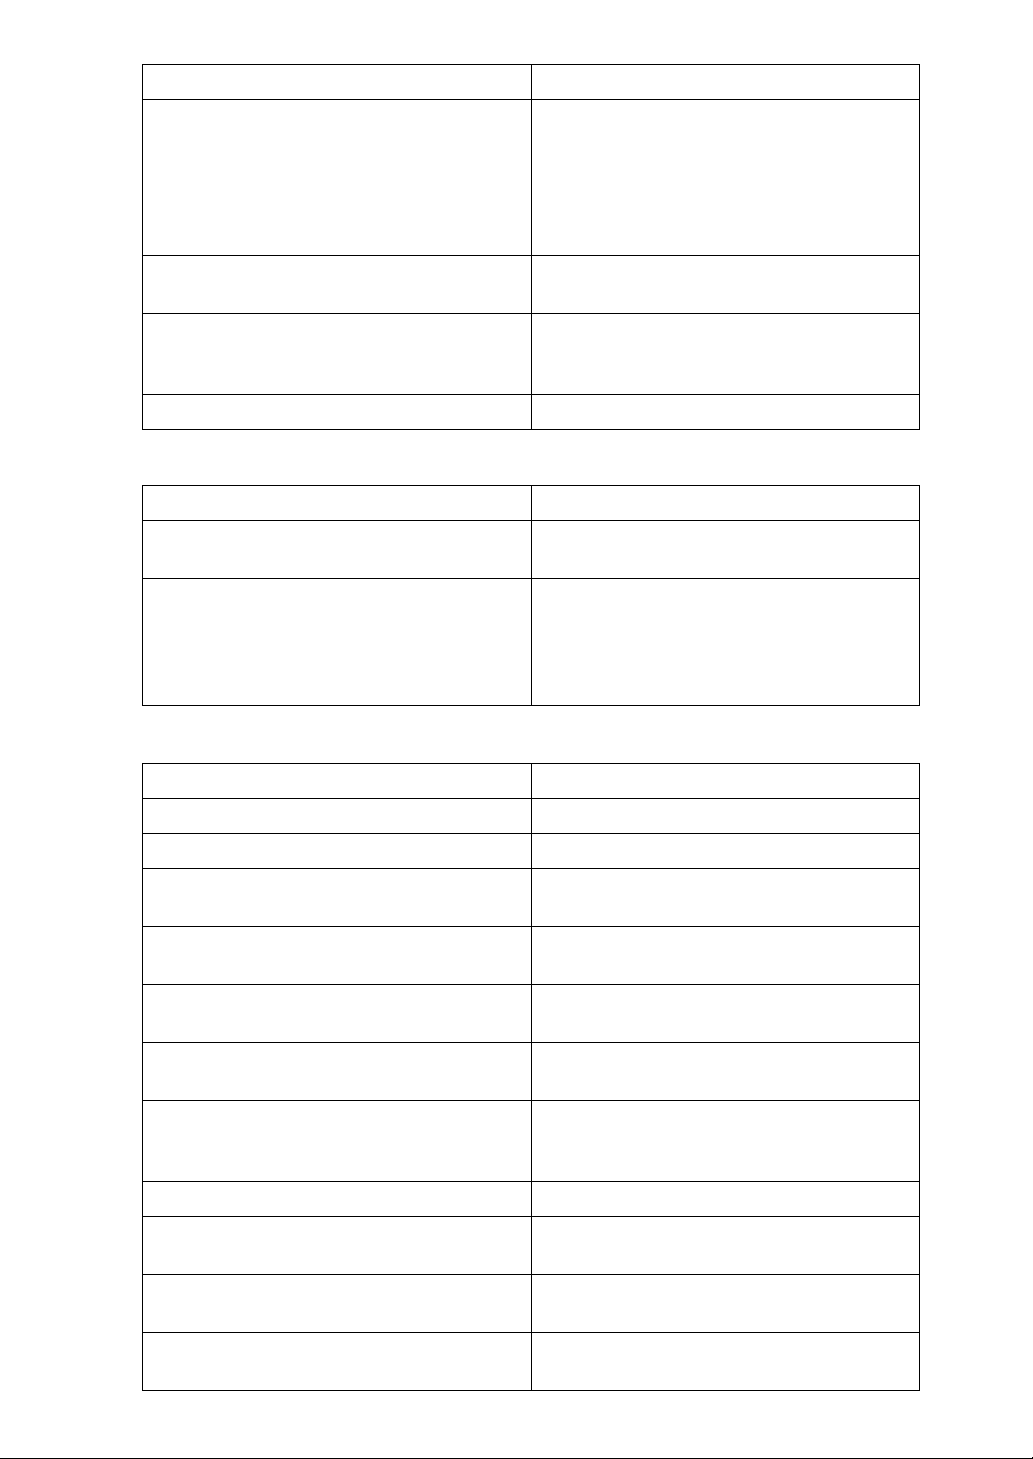
Changing the order of jobs
You can change the order in which print jobs in the job list are served:
A Press [Job List].
B Select the job whose order you want to change.
C Press [Change Order].
D Change the order using [Top], [Previous], or [Next].
E Press [OK].
6
Holding print jobs
The machine holds jobs that are queued and currently printing.
A Press [Job List].
B Select the job(s) to hold.
C Press [Suspend Printing].
Deleting jobs
You can delete job that is queued or currently printing.
A Press [Job List].
B Select the job you want to delete.
C Press [Delete Reservation].
D Press [Yes].
Note
❒ To delete multiple print jobs, select them in step B.
7

Checking Job History
You can view the history contents of printed jobs.
A Press [Job List].
B Press [Job History].
A list of completed print jobs appears.
C Press [Details] to check the contents of the displayed jobs.
D Press [Exit].
8
Printer Features Menu
The following explains settings and meanings of functions on Printer Feature.
Printer Feature screen appears when you press the {User Tools} key. For details,
see “Printer Features”, General Settings Guide.
❖ List / Test Print
Menu Description
Multiple Lists You can print the configuration page and error
log.
Configuration Page You can print the machine's current configu-
ration values.
Error Log You can print error logs listing all errors that
occurred during printing.
Menu List You can print a Menu List showing the ma-
chine's function menus.
PCL Configuration / Font Page You can print the current configuration and
installed PCL font list.
PS Configuration / Font Page You can print the current configuration and
installed PostScript font list.
PDF Configuration / Font Page You can print the current configuration and
installed PDF font list.
This menu can be selected only when the optional PostScript 3 unit is installed.
Hex Dump You can print in the Hex Dump mode.
❖ Maintenance
Menu Description
Menu Protect This function lets you protect menu settings
from accidental change. It makes it impossible to change menu settings with normal
procedures unless you perform the required
key operations.
In a network environment, only administrators can make changes to menu settings.
List / Test Print Lock You can lock the [List / Test Print] menu.
Delete All Temporary Print Jobs You can delete all print jobs temporarily
stored in the machine.
Delete All Stored Print Jobs You can delete all print jobs stored in the ma-
chine.
9

❖ System
Menu Description
Print Error Report You can print an error report when a printer
or memory error occurs.
Auto Continue You can select this to enable Auto Continue.
When it is On, printing continues after a system error occurs.
Memory Overflow Select this to have a memory overflow error
report printed.
Job Separation You can enable Job Separation.
Auto Delete Temporary Print Jobs You can select to automatically delete print
jobs temporarily stored in the machine.
Auto Delete Stored Print Jobs You can select to automatically delete print
jobs stored in the machine.
Initial Print Job List You can set the desired type of print job list
that appears on the screen when you press
[Print Jobs].
Memory Usage You can select the amount of memory used
in Font Priority or Frame Priority, according
to paper size or resolution.
Duplex You can select to have print on both sides of
each page.
Copies You can specify the number of print sets.
This setting is disabled if the number of pages to print has been specified with the printer
driver or another command.
Blank Page Print You can select whether or not to print blank
pages.
Toner Saving You can save toner.
Spool Image You can select to print spool images.
Reserved Job Waiting Time You can set Reserved Job Waiting Time.
Printer Language You can specify the printer language.
Sub Paper Size You can enable the Auto Substitute Paper
Size (A4↔LT) feature.
Page Size You can select the default paper size.
Letterhead Setting You can rotate original images when printing.
When printing, original images are always
rotated by 180 degrees. Therefore, output
might not be as expected when printing onto
letterhead or preprinted paper requiring orientation. Using this function, you can specify
image rotation.
10
Menu Description
Bypass Tray Setting Priority You can specify which of the two options,
(Printer) Driver / Command or Machine Settings, has priority for determining the paper
size for Multi Bypass Tray (Tray 7).
This option is used only when Multi Bypass
Tray (Tray 7) is installed.
Edge to Edge Print You can select whether or not to print on the
entire sheet.
Default Printer Language You can set the default printer language if
the machine cannot find the printer language
automatically.
Tray Switching You can set to switch the paper tray.
❖ Host Interface
Menu Description
I/O Buffer You can set the size of the I/O Buffer. Nor-
mally it is not necessary to change this setting.
I/O Timeout You can set how many seconds the machine
should wait before ending a print job. If data
from another port usually arrives in the middle of a print job, you should increase this
timeout period.
❖ PCL Menu
Menu Description
Orientation You can set the page orientation.
Form Lines You can set the number of lines per page.
Font Source You can set the storage location of the de-
fault font.
Font Number You can set the ID of the default font you
want to use.
Point Size You can set the point size you want to use for
the selected font.
Font Pitch You can set the number of characters per
inch for the selected font.
Symbol Set You can specify the set of print characters for
the selected font. The available options are as
follows:
Courier Font You can select a courier font type.
Extend A4 Width You can extend the printing area width
when printing on A4 sheet with PCL.
Append CR to LF When set to On, a carriage return will follow
each line feed: CR=CR, LF=CR−LF, FF=CR−FF.
Resolution You can set the print resolution in dots per
inch.
11

❖ PS Menu (optional)
Menu Description
Data Format You can select a data format.
Resolution You can set the print resolution in dots per
inch.
❖ PDF Menu (optional)
Menu Description
Change PDF Password You can set the password for the PDF file ex-
ecuting PDF Direct Print.
PDF Group Password You can set the group password already
specified with DeskTopBinder Lite.
Resolution You can set the print resolution in dots per
inch.
Note
❒ Depending on which optional units you have installed or the printer lan-
guage you have selected, some options are not displayed.
❒ Depending on the security settings, you might not be able to set certain op-
tions.
Reference
For details, see “Printer Features”, General Settings Guide.
For more information about copier features and system settings, see Copy
Reference and General Settings Guide.
12

1. Preparing the Machine
Confirming the Connection Method
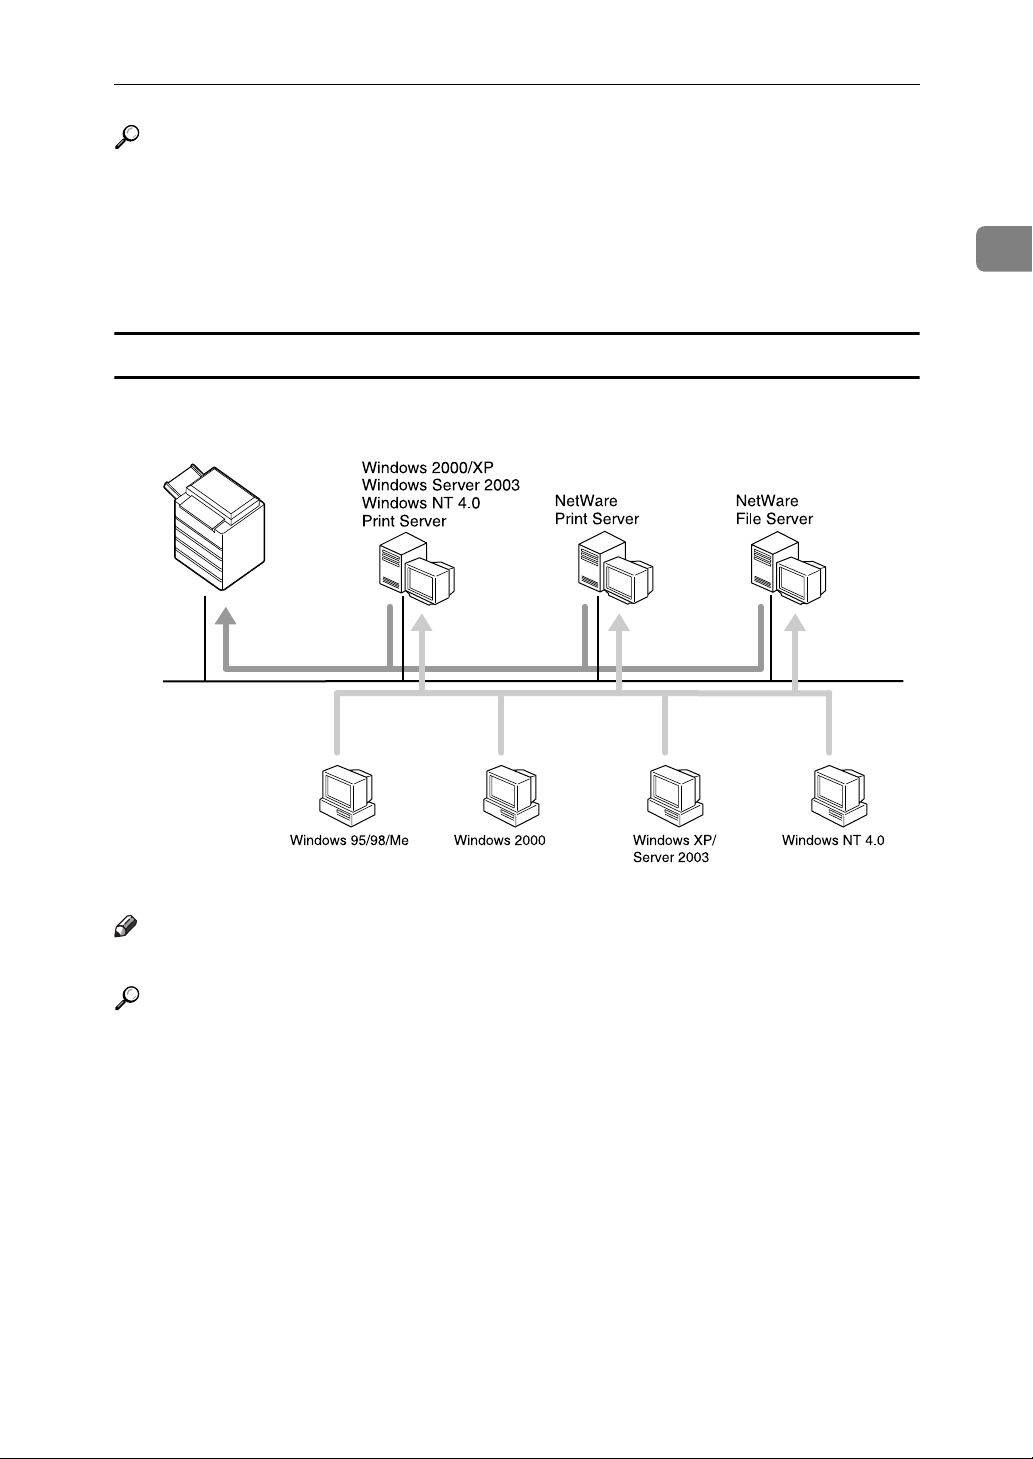
This machine supports network and local connection.
Before installing the printer driver, check how the machine is connected. Follow
the driver installation procedure that is appropriate to the connection method.
Network Connection
This machine can be used as a Windows printing port or network printer.
Using This Machine as the Windows Printing port
Network connections can be established through Ethernet, IEEE 802.11b, and
IEEE 1394 (IPv4 over 1394).
Available ports are determined based on the combination of Windows operating
system version and connection method used.
❖ Windows 95 / 98
Connection Method Available Ports
Ethernet / IEEE 802.11b DeskTop Binder-SmartDeviceMonitor for
Client port
IEEE 1394 (IPv4 over 1394) None
ZZZ035S
13
1
Preparing the Machine
❖ Windows Me
Connection Method Available Ports
Ethernet / IEEE 802.11b DeskTop Binder-SmartDeviceMonitor for
Client port
IEEE 1394 (IPv4 over 1394) DeskTop Binder-SmartDeviceMonitor for
Client port
❖ Windows 2000
Connection Method Available Ports
Ethernet / IEEE 802.11b DeskTop Binder-SmartDeviceMonitor for
Client port
Standard TCP/IP
LPR port
IEEE 1394 (IPv4 over 1394) None
❖ Windows XP
Connection Method Available Ports
Ethernet / IEEE 802.11b DeskTop Binder-SmartDeviceMonitor for
Client port
Standard TCP/IP
LPR port
IEEE 1394 (IPv4 over 1394) DeskTop Binder-SmartDeviceMonitor for
Client port
Standard TCP/IP
❖ Windows Server 2003
Connection Method Available Ports
Ethernet / IEEE 802.11b DeskTop Binder-SmartDeviceMonitor for
Client port
Standard TCP/IP
LPR port
IEEE 1394 (IPv4 over 1394) DeskTop Binder-SmartDeviceMonitor for
Client port
Standard TCP/IP
❖ Windows NT 4.0
Connection Method Available Ports
14
Ethernet / IEEE 802.11b DeskTop Binder-SmartDeviceMonitor for
Client port
LPR port
IEEE 1394 (IPv4 over 1394) None
Confirming the Connection Method
Reference
See the explanation about how to install the printer driver for each type of
port. For the DeskTop Binder-SmartDeviceMonitor for Client port, see p.19
“Using the DeskTop Binder-SmartDeviceMonitor for Client Port”.
For the Standard TCP/IP port, see p.26 “Using the Standard TCP/IP Port”.
For the LPR port, see p.28 “Using the LPR Port”.
Using as a network printer
This machine can be used as the Windows network printer, the NetWare print
server, or the NetWare remote printer.
1
Note
❒ In an IPv6 environment, Netware servers cannot be used.
Reference
See the explanation about how to install the printer driver for each type of
network printer.
For the Windows network printer, see p.30 “Using as a Windows Network
Printer”.
For the NetWare print server and remote printer, see p.32 “Using as a NetWare Print Server / Remote Printer”.
ZZZ036S
15

1
Preparing the Machine
Local Connection
Local connections can be established via parallel, USB, IEEE 1394 (SCSI print),
and Bluetooth connections.
Windows operating system version determines the available connection methods.
•Windows 95:
Parallel connections
• Windows 98:
Parallel connections
• Windows 98 SE / Me:
USB and Parallel connections
• Windows 2000:
USB, Parallel, IEEE 1394 (SCSI print), and Bluetooth connections
•Windows XP:
USB, Parallel, IEEE 1394 (SCSI print), and Bluetooth connections
• Windows Server 2003:
USB, Parallel, IEEE 1394 (SCSI print), and Bluetooth connections
• Windows NT 4.0:
Parallel connections
Reference
See the explanation about how to install the printer driver for each method of
connection.
For the USB connection, see p.35 “Installing the Printer Driver Using USB”.
For the parallel connection, see p.40 “Printing with Parallel Connection”.
For the IEEE 1394 (SCSI print) connection, see p.42 “Installing the Printer
Driver Using IEEE 1394 (SCSI print)”.
For the Bluetooth connection, see p.46 “Printing with Bluetooth Connection”.
16

Installing the Printer Driver
Installing the Printer Driver
This section explains how to install the printer driver. There are two ways to install the printer driver: using Quick Install, which installs the settings at once, or
installing the appropriate driver according to the port you want to use.
Quick Install
Windows 95 / 98 / Me / 2000 / XP, Windows Server 2003, and Windows NT 4.0
users can easily install this software using the supplied CD-ROM.
Using Quick Install, the PCL printer driver and/or RPCS printer driver, DeskTopBinder Lite and DeskTop Binder-SmartDeviceMonitor for Client are installed under network environment, and the TCP/IP port will be set.
Important
❒ To install printer driver under Windows 2000 / XP Professional, Windows
Server 2003, and Windows NT 4.0, you must have an account that has Manage Printers permission. Log on as an Administrator.
❒ If you connect using USB, refer to p.35 “Installing the Printer Driver Using
USB” and install the printer driver.
1
A Quit all applications currently running.
B Insert the CD-ROM into the CD-ROM drive.
The installer starts.
Auto Run may not work with certain operating system settings. If this happens, launch “Setup.exe” on the CD-ROM root directory.
C Select an interface language, and then click [OK].
The default interface language is English.
D Click [Quick Install].
The software license agreement appears in the [License Agreement] dialog box.
E After reading the agreement, click [I accept the agreement.], and then click
[Next >].
F Select the machine model you want to use in the [Select Printer] dialog box.
For network connection via TCP/IP, select the machine whose IP address is
displayed in [Connect To].
For parallel connection, select the machine whose printer port is displayed in
[Connect To].
G Click [Install].
The printer driver installation starts.
17

Preparing the Machine
H Click [Finish].
A message about restarting the computer appears. Restart the computer to
complete installation.
1
I Click [Exit] in the first dialog box of the installer, and then take out the CD-
ROM.
Note
❒ To stop installation of the selected software, click [Cancel] before installa-
tion is complete.
❒ Auto Run may not work with certain operating system settings. If this hap-
pens, launch “Setup.exe” on the CD-ROM root directory.
❒ Select a machine to whose IP address is displayed in [Connect To] to install
DeskTop Binder-SmartDeviceMonitor for Client when using TCP/IP.
Reference
Quick Install is not available unless bidirectional communication between
the machine and computer is enabled via parallel connection. See p.51 “If
Bidirectional Communication Is Disabled” for details about bidirectional
communication between the machine and computer.
18

Installing the Printer Driver for the Selected Port
Installing the Printer Driver
Using the DeskTop Binder-SmartDeviceMonitor for Client Port
Important
❒ To install DeskTop Binder-SmartDeviceMonitor for Client under Windows
2000 / XP Professional, Windows Server 2003, and Windows NT 4.0, you
must have an account that has Manage Printers permission. Log on as an Administrator.
❒ Install DeskTop Binder-SmartDeviceMonitor for Client before installing the print-
er driver when using the DeskTop Binder-SmartDeviceMonitor for Client port.
Installing DeskTop Binder-SmartDeviceMonitor for Client
A Quit all applications currently running.
B Insert the CD-ROM into the CD-ROM drive.
The installer starts.
C Select an interface language, and then click [OK].
The default interface language is English.
D Click [DeskTopBinder - SmartDeviceMonitor for Client].
E Select an interface language, and then click [Next >].
The default interface language is English.
1
F The message to quit all other applications appears. Quit all applications,
and then click [Next >].
G The software license agreement appears in the [License Agreement] dialog
box. After reading through its contents, click [Yes].
H Click [Full install] or [Custom Install].
[Full install] installs all required applications: DeskTopBinder Lite and Desk-
Top Binder-SmartDeviceMonitor for Client.
[Custom Install] installs selected applications.
I Follow the instructions on the display and click [Next >] to proceed next step.
J After the installation is completed, select one of the options to restart the
computer either now or later, and click [Complete].
Restart the computer to complete installation.
Note
❒ To stop installation of the selected software, click [Cancel] before installa-
tion is complete.
❒ Auto Run may not work with certain operating system settings. If this hap-
pens, launch “Setup.exe” on the CD-ROM root directory.
19

1
Preparing the Machine
Changing the Port Settings for DeskTop Binder-SmartDeviceMonitor for Client
Follow the procedure below to change the DeskTop Binder-SmartDeviceMonitor for Client settings, such as TCP/IP timeout, recovery/parallel printing, and
printer groups.
Windows 95 / 98:
A Open the [Printers] window from the [Start] menu.
B In the [Printers] window, click the icon of the printer you want to use. On
the [File] menu, click [Properties].
C Click the [Details] tab, and then click [Port Settings].
The [Port Settings] dialog box appears.
Windows 2000 / Windows NT 4.0:
A Open [Printers] window from [Start] menu.
B In the [Printers] window, click the icon of the printer you want to use. On
the [File] menu, click [Properties].
C On the [Ports] tab, click [Configure Port].
The [Configuration] dialog box appears.
20

Installing the Printer Driver
Windows XP, Windows Server 2003:
A Open the [Printers and Faxes] window from the [Start] menu.
The [Printers and Faxes] window appears.
B Click the icon of the machine you want to use. On the [File] menu, click
[Properties]. The printer properties appear.
C Click the [Ports] tab, and then click [Configure Port].
The [Port Configuration] dialog box appears.
Note
❒ For TCP/IP, timeout setting can be configured.
❒ User, proxy, and timeout settings can be configured for IPP.
❒ If no settings on the [Recovery/Parallel Printing] tab are available, follow the
procedure below.
A Click [Cancel] to close the [Port Configuration:] dialog box.
B Start DeskTop Binder-SmartDeviceMonitor for Client, and then right-
click the DeskTop Binder-SmartDeviceMonitor for Client icon on the
tasktray.
C Point to [Properties], and then click [Extended Features Settings].
D Select the [Set Recovery/Parallel Printing for each port] check box.
1
E Click [OK] to close the [Extended Features Settings] dialog box.
Reference
For information about these settings, see “Using DeskTop Binder-SmartDeviceMonitor for Client”, Network Guide, or DeskTop Binder-SmartDeviceMonitor for Client Help.
21

1
Preparing the Machine
Installing the PCL or RPCS Printer Driver (TCP/IP)
Important
❒ To install this printer driver under Windows 2000 / XP Professional, Win-
dows Server 2003, and Windows NT 4.0, you must have an account that has
Manage Printers permission. Log on as an Administrators or Power Users
group member.
A Quit all applications currently running.
B Insert the CD-ROM into the CD-ROM drive.
The installer starts.
C Select an interface language, and then click [OK].
The default interface language is English.
D Click [PCL/RPCS Printer Drivers].
E The software license agreement appears in the [License Agreement] dialog box.
After reading the agreement, click [I accept the agreement.], and then click [Next >].
F Select the printer driver you want to use in the [Select Program] dialog box.
You can select several printer drivers.
G Click [Next >].
H Select the machine model you want to use.
The printer name can be changed in the [Change settings for 'Printer Name'] box.
I Double-click the printer name to display the printer settings.
The details shown in [Comment:], [Driver:], and [Port:] vary depending on the
operating system, printer model, and port.
J Click [Port:], and then click [Add].
K Click [SmartDeviceMonitor], and then click [OK].
L Click [TCP/IP], and then click [Search].
A list of printers using TCP/IP appears.
M Select the printer you want to use, and then click [OK].
Only printers that respond to a broadcast from the computer appear. To use
a machine not listed here, click [Specify Address], and then enter the IP address
or host name of the machine.
N Check that the port of the selected printer is displayed in [Port:].
22
Loading...