


Printer/Scanner Unit
Type 2018
Operating Instructions
Scanner Reference
Network Scanner
Preparations for Use as a Network Scanner
Setting Originals
Sending Scan Files by E-mail
Using the Network Delivery Scanner Function
Using the Network TWAIN Scanner Function
Appendix
Read this manual carefully before you use this machine and keep it handy for future reference. For safe and correct use, be sure to read the Safety Information in the "Copy Reference" before using the machine.
Introduction
This manual contains detailed instructions and notes on the operation and use of this machine. For your safety and benefit, read this manual carefully before using the machine. Keep this manual in a handy place for quick reference.
The scanner function is available when the Printer/Scanner option is installed in the machine.
Caution:
Use of controls or adjustments or performance of procedures other than those specified in this manual might result in hazardous radiation exposure.
Two kinds of size notation are employed in this manual. With this machine refer to the metric version.
Manuals for This Machine
The following manuals describe the operational procedures of this machine. For particular functions, see the relevant parts of the manual.

 Note
Note
The manuals provided are specific to machine type.
Adobe Acrobat Reader is necessary to view the manuals as a PDF file.
Three CD-ROMs are provided:
•CD-ROM 1 "Operating Instructions for Printer / Scanner"
•CD-ROM 2 "Scanner Driver & Document Management Utilities"
•CD-ROM 3 "Operating Instructions for General Settings and Facsimile"
General Settings Guide (PDF file - CD-ROM3)
Provides an overview of the machine and describes System Settings (paper trays, Key Operator Tools, etc.), and troubleshooting.
Refer to this manual for Address Book procedures such as registering fax numbers, e-mail addresses, and user codes.
Network Guide (PDF file - CD-ROM1)
Describes procedures for configuring the machine and computers in a network environment.
Copy Reference
Describes operations, functions, and troubleshooting for the machine's copier function.
Facsimile Reference <Basic Features>
Describes operations, functions, and troubleshooting for the machine's facsimile function.
Facsimile Reference <Advanced Features>(PDF file - CD-ROM3)
Describes advanced functions and settings for key operators.
Printer Reference 1
Describes system settings and operations for the machine's printer function.
Printer Reference 2 (PDF file - CD-ROM1)
Describes operations, functions, and troubleshooting for the machine's printer function.
Scanner Reference (this manual) (PDF file - CD-ROM1)
Describes operations, functions, and troubleshooting for the machine's scanner function.
i
Manuals for DeskTopBinder Lite
DeskTopBinder Lite is a utility included on the CD-ROM labeled "Scanner Driver & Document Management Utilities".
•DeskTopBinder Lite Setup Guide (PDF file - CD-ROM2)
Describes the installation of DeskTopBinder Lite, and the operating environment for DeskTopBinder Lite in detail. This guide can be displayed from the [Setup] dialog box when DeskTopBinder Lite is installed.
•DeskTopBinder Lite Introduction Guide (PDF file - CD-ROM2) Describes operations with DeskTopBinder Lite and provides an overview of its functions. This guide is added to the [Start] menu when DeskTopBinder Lite is installed.
•Auto Document Link Guide (PDF file - CD-ROM2)
Describes operations and functions of Auto Document Link installed with DeskTopBinder Lite. This guide is added to the [Start] menu when DeskTopBinder Lite is installed.
Manuals for ScanRouter V2 Lite
ScanRouter V2 Lite is a utility included on the CD-ROM labeled "Scanner Driver & Document Management Utilities".
•ScanRouter V2 Lite Setup Guide (PDF file - CD-ROM2)
Describes the installation of ScanRouter V2 Lite, settings, and the operating environment for ScanRouter V2 Lite in detail. This guide can be displayed from the [Setup] dialog box when ScanRouter V2 Lite is installed.
•ScanRouter V2 Lite Management Guide (PDF file - CD-ROM2)
Describes delivery server management and operations, and provides an overview of ScanRouter V2 Lite functions. This guide is added to the [Start] menu when ScanRouter V2 Lite is installed.
Other manuals
•PostScript3 Supplement (PDF file - CD-ROM1)
•UNIX Supplement (available from an authorized dealer, or as a PDF file on our Web site)
ii

TABLE OF CONTENTS |
|
Manuals for This Machine...................................................................................... |
i |
How to Read This Manual ..................................................................................... |
1 |
Symbols ..................................................................................................................... |
1 |
Names of Major Options ............................................................................................ |
2 |
1. Network Scanner |
|
Outline..................................................................................................................... |
3 |
E-mail ......................................................................................................................... |
3 |
Network Delivery Scanner.......................................................................................... |
4 |
Network TWAIN Scanner ........................................................................................... |
5 |
Control Panel.......................................................................................................... |
6 |
Reading the Display and Using Keys......................................................................... |
8 |
2. Preparations for Use as a Network Scanner |
|
Initial Scanner Setup ............................................................................................. |
9 |
Scanner Features....................................................................................................... |
9 |
Scan Settings ........................................................................................................... |
12 |
Destination List Settings........................................................................................... |
14 |
Send Settings........................................................................................................... |
14 |
Installing Software............................................................................................... |
17 |
Auto Run Program ................................................................................................... |
17 |
Software for Using a Network TWAIN Scanner ....................................................... |
19 |
Software for Using the Network Delivery Scanner Function .................................... |
20 |
DeskTopBinder Lite.................................................................................................. |
21 |
Software Supplied on CD-ROM ............................................................................... |
21 |
3. Setting Originals |
|
Placing Originals.................................................................................................. |
27 |
Placing on the Exposure Glass ................................................................................ |
28 |
Placing in the Auto Document Feeder ..................................................................... |
29 |
Original Orientation and Scan Area ................................................................... |
31 |
For E-mail and a Network Delivery Scanner ............................................................ |
31 |
For a Network TWAIN Scanner................................................................................ |
33 |
Scanning Originals in Several Times using the Exposure Glass.................... |
34 |
4. Sending Scan Files by E-mail |
|
Preparation for Sending by E-mail ..................................................................... |
35 |
E-mail Screen........................................................................................................... |
36 |
Sending Scan Files by E-mail ............................................................................. |
37 |
Procedure for Sending by E-mail ............................................................................. |
37 |
Checking the Status of E-mail ............................................................................ |
49 |
iii

5. Using the Network Delivery Scanner Function |
|
Preparation for Delivering................................................................................... |
51 |
Network Delivery Scanner Screen ........................................................................... |
52 |
Delivering Scan Files........................................................................................... |
54 |
Delivery Procedure................................................................................................... |
54 |
Checking the Status of Delivery......................................................................... |
64 |
6. Using the Network TWAIN Scanner Function |
|
Preparation for Using the Network TWAIN Scanner......................................... |
65 |
Network TWAIN Scanner Screen............................................................................. |
65 |
Scanning Originals .............................................................................................. |
66 |
Functions of the TWAIN Driver ................................................................................ |
68 |
7. Appendix |
|
Relationship between Resolution and File Size................................................ |
69 |
When Using as E-mail or Network Delivery Scanner............................................... |
69 |
When Using as a Network TWAIN Scanner............................................................. |
69 |
Max. Number of Addresses Which Can Be Specified ...................................... |
70 |
Troubleshooting................................................................................................... |
71 |
When Scanning Is Not Performed as Expected....................................................... |
71 |
When the Delivery Function Does Not Work............................................................ |
71 |
When an Error Message Appears on the Control Panel .......................................... |
72 |
When an Error Message Appears on the Client Computer...................................... |
74 |
Specifications....................................................................................................... |
77 |
INDEX......................................................................................................... |
78 |
iv

How to Read This Manual
Symbols
In this manual, the following symbols are used:
 Important
If this instruction is not followed, paper might be misfed, originals might be damaged, or files might be lost. Be sure to read this.
 Preparation
This symbol indicates the prior knowledge or preparations required before operating.

 Note
Note
This symbol indicates precautions for operation or actions to take after misoperation.
 Limitation
This symbol indicates numerical limits, functions that cannot be used together, or conditions in which a particular function cannot be used.

 Reference
This symbol indicates a reference.
[ ]
Keys that appear on the machine's display panel.
[ ]
Keys and buttons that appear on the computer's display.
{}
Keys built into the machine's control panel.
{}
Keys on the computer's keyboard.
1

Names of Major Options
Major options of this machine are referred to as follows in this manual:
•Exposure Glass Cover
•Auto Document Feeder → ADF
•Auto Document Feeder capable of scanning both sides of a sheet → ARDF
•Printer/Scanner Unit Type 2018 → printer/scanner controller
The following software products are referred to using a general name:
•DeskTopBinder Lite and DeskTopBinder Professional*→ DeskTopBinder
•ScanRouter V2 Lite, ScanRouter EX Professional* and ScanRouter EX Enterprise*→ the ScanRouter delivery software
*Optional
2

1. Network Scanner
Outline
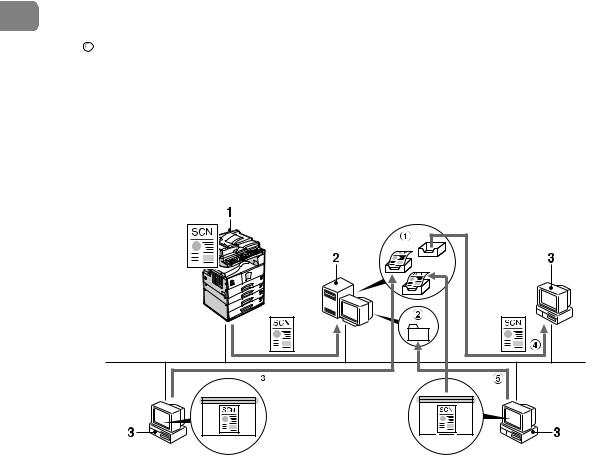
By installing the printer/scanner controller, the machine can be used as a network scanner.
As a network scanner, the machine can send scan files by e-mail, operate as a network delivery scanner, and operate as a network TWAIN scanner.
Scan files that are attached to an e-mail can be sent using the e-mail system through a LAN or the Internet.

 Reference
p.35 “Sending Scan Files by E-mail”
1. This machine
Scan files that are attached to an e-mail can be sent to an e-mail server.
2. E-mail server
An e-mail server is the SMTP server used for an e-mail system. It transfers a received e-mail to a specified destination through a LAN or the Internet.
AAH008S
3. Client computer
An e-mail with scan files attached is received from the e-mail server using e- mail software.
Check the contents of the file with an application appropriate for the file type.
3
|
|
Network Scanner |
|
|
|
|
|
Network Delivery Scanner |
|
|
|
|
|
The machine is used as a delivery scanner with the ScanRouter delivery soft- |
|
|
ware. Scan files are stored in the delivery server and delivered to the folders of |
1 |
|
|
|
client computers on the same network. |

 Reference
p.51 “Using the Network Delivery Scanner Function”

 Note
Note
When the optional ScanRouter EX Professional is used, the machine can also deliver scan files using e-mail, and the files can be viewed from a client computer using a Web browser.
|
AAH009S |
1. This machine |
3. Client computer |
Scan files are sent to the delivery server.
2. Delivery server
The ScanRouter delivery software is installed in this computer which is used as a delivery server.
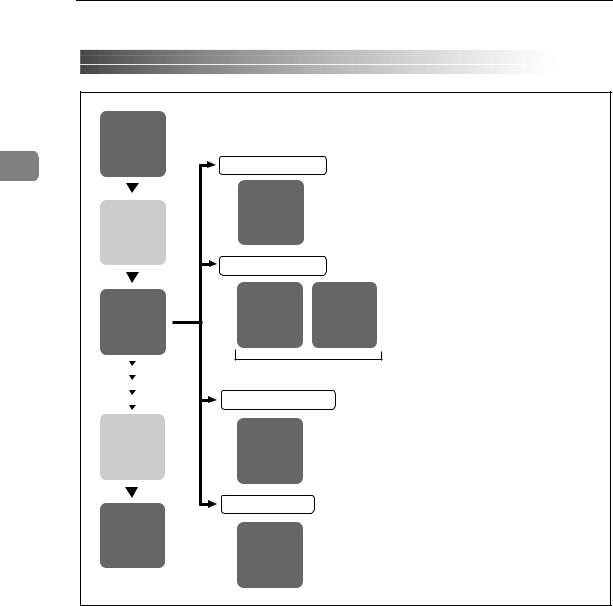
A received file is delivered to the in-tray of the specified destination. (A in the figure). According to the settings of the intray, the file is stored in the in-tray or in a Windows folder. (B in the figure)
The contents of stored files can be checked in the following ways:
•View the file in the in-tray using DeskTopBinder Lite to check the contents. (C in the figure)
•Use Auto Document Link to receive the file stored in the in-tray, and check the contents with an application appropriate for the file type. (D in the figure)
•Access the Windows folder where the file is stored via the network, and check the contents with an application appropriate for the file type. (E in the figure)
4
Outline

 Reference
For more information about ScanRouter V2 Lite, DeskTopBinder Lite, or Auto Document Link, see p.i “Manuals for This Machine”.
|
|
1 |
|
Network TWAIN Scanner |
|||
|
|||
|
|
|
|
The scanning function of this machine can be used from a client computer via a network (Ethernet, IEEE 1394 (IP over 1394) [optional], or IEEE 802.11b (Wireless LAN) [optional]).

 Reference
p.65 “Using the Network TWAIN Scanner Function”
1. This machine
The scanning function of the machine can be used from a client computer via a network.
AAH010S
2. Client computer
Originals are scanned using the TWAIN driver for the machine from an application.
5
Network Scanner
Control Panel
This illustration shows the control panel when options are installed.
1
1 |
2 |
3 |
4 |
5 |
6 |
7 |
8 |
9 |
1011 |
12 13 |
|
|
Search |
Check |
Job |
|
|
|
|
Destination |
Destination |
Information |
|
|
Commu- |
Receive File |
01 |
02 |
03 |
04 |
On Hook Dial |
nicating |
|
|
|
|
|
|
|
Immediate |
ABC |
DEF |
GHI |
JKL |
|
Start Manual |
Trans. |
|
|
|
|
|
Memory |
05 |
06 |
07 |
08 |
|
|
Reception |
Trans. |
|
|
|
OK |
Pause/ |
|
|
MNO |
PQR |
STU |
VWX |
Redial |
|
|
|
||||
Switch |
|
09 |
10 |
11 |
12 |
|
RX Mode |
Standard |
|
|
|
|
|
|
YZ |
@..___ |
- & |
|
|
|
|
Detail |
|
|
|||
Transmission |
Fine |
13 |
14 |
15 |
16 |
|
|
|
|
|
|
||
Stamp |
|
|
|
|
|
|
|
|
Shift |
Space |
Symbols |
|
|
1415
1.{Search Destination} key
Press to search for the destination from the Destination List.
2. {Check Destination} key
Press to check the destinations currently selected.
3. {Job Information} key
Press to check the status of sent and delivered e-mail.
4. {Scanner} key
Press to activate the scanner function.
5. Indicators
Display errors and machine status. h:Error indicator
B:Load Paper indicator D:Add Toner indicator

 Reference
For more information, see Copy
Reference.
6. Display
Displays operation status and messages.
7. Selection keys
Correspond to items on the display. Press to select the corresponding item.
16 |
17 18 19 |
20 |
21 |
AAH001S
8. Scroll keys
Press to select an item. {U}: scroll upward {T}: scroll downward {V}: scroll right
{W}: scroll left
9. {User Tools/Counter} key
Press to change default or operation parameters according to requirement.
10. {Clear Modes} key
Press to clear the current settings.
11. {Clear/Stop} key
Clear: clears an entered numeric value. Stop: stops scanning.
12. Main power indicator and On indicator
The main power indicator lights when the main power switch is turned on. The On indicator lights when the operation switch is on.
13. Operation switch
Press to turn the power on. The On indicator lights. To turn the power off, press again.

 Note
Note
This key is inactivate during scanning or while setting scanner defaults.
6

14. Quick Dial keys
Press to select the registered destination with a single touch, or to enter letters and symbols.

 Reference
For more information, see General
Settings Guide.

 Note
Note
You can register up to 32 destinations using the Quick Dial keys.
15. Quick Dial Flip Plate
Flip this plate down to access Quick Dial keys 01 through 16; flip it up to access keys 17 through 32.
16. {Lighter} and {Darker} keys
Press to change the image density setting. Select the image density in five increments, Lighter to Darker.
17. {Original Type} key
Press to select the original type registered with [Type 1(Text):] or [ Type 2(Photo):]. When the original type is selected, the corresponding indicator lights.
18. {Cancel} key
Press to cancel an operation or return to the previous display.
19. {OK} key
Press to set a selected item or an entered numeric value.
20. Number keys
Press to enter numeric values.
21. {Start} key
Press to start scanning or sending.
Control Panel
1
7
Network Scanner
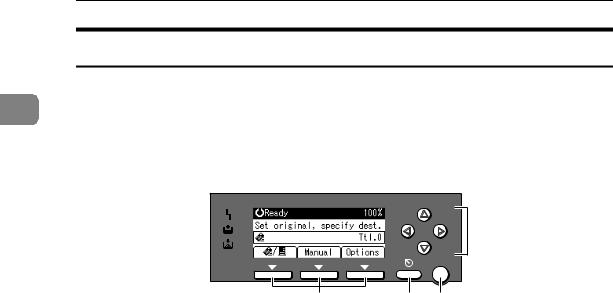
Reading the Display and Using Keys
This section explains how to read the display and use the selection key.
1
 Note
Note
The copy screen is set as the default screen when the machine is turned on. You can change the settings in [ System Settings ]. See General Setting Guide.
 4
4
|
|
OK |
|
1 |
2 |
3 |
AAH017S |
1. Selection keys
Correspond to items at the bottom line on the display.
Example: The E-mail screen
•When the instruction “press [ ]” is given in this manual, press the left selection key.
•When the instruction “press [Manual]” is given in this manual, press the centre selection key.
•When the instruction “press [Options]” is given in this manual, press the right selection key.
2. {Cancel} key
Press to cancel an operation or return to the previous display.
3. {OK} key
Press to set a selected item or an entered numeric value.
4. Scroll keys
Press to move the cursor in each direction, step by step.
When the {U},{T},{V}, or {W} key appears in this manual, press the scroll key of the same direction.
8

2. Preparations for Use as a Network Scanner
To use the machine as a network scanner, you must make settings required for use as a scanner as well as basic settings for use in a network.

 Reference
First, see General Settings Guide for details about how to make basic settings, and then make scanner settings.
For more information about settings for sending by e-mail, see Network Guide.
Initial Scanner Setup
This section explains all required settings and procedures for using the machine as a network scanner.
Scanner Features
The settings for using the network scanner functions of the machine are listed below. Make the necessary settings.

 Note
Note
Make settings for the items marked with if necessary.
Scan Settings
For explanations of settings, see p.12 “Scan Settings”.
|
Settings |
|
Default |
|
Deliv- |
TWAIN |
||
|
|
|
|
|
|
|
ery |
|
|
|
|
|
|
|
|
|
|
Scan Set- |
Default |
Reso- |
200dpi |
|
|
|
|
|
tings |
Scan |
lution |
|
|
|
|
|
|
|
Settings |
|
|
|
|
|
|
|
|
Scan |
Auto Detect |
|
|
|
|||
|
|
|
||||||
|
|
Size |
|
|
|
|
|
|
|
|
|
|
|
|
|
|
|
|
Original Setting |
1 Sided Original |
|
|
|
|||
|
|
|
|
|
|
|
||
|
Mixed Orig. Sizes |
Off |
|
|
|
|
||
|
Priority |
|
|
|
|
|
|
|
|
|
|
|
|
|
|
|
|
|
Orig. Orientation |
|
|
|
|
|
|
|
|
Priority |
|
|
|
|
|
|
|
|
|
|
|
|
|
|
||
|
Original Type |
Type 1(Text): |
|
Text |
|
|
|
|
|
Setting |
|
|
|
(Print) |
|
|
|
|
|
|
|
|
|
|
|
|
|
|
|
Type 2(Photo): |
|
Photo |
|
|
|
|
|
|
|
|
|
|
|
|

 Note
Note
[Original Setting] will be effective only when you have installed the optional ADF capable of scanning both sides of a sheet (ARDF).
9

Preparations for Use as a Network Scanner
Destination List Settings
For explanations of settings, see p.14 “Destination List Settings”.
|
|
|
Settings |
Default |
Deliv- |
TWAIN |
|
|
|
|
|
|
|
ery |
|
|
|
|
|
|
|
|
|
|
|
Destina- |
Destination List Pri- |
Delivery Server |
|
|
|
|
|
tion List |
ority |
|
|
|
|
|
|
Settings |
|
|
|
|
|
|
|
Update Server Dest. |
— |
|
|
|
|
|
|
|
|
|
|||
2 |
|
|
|
||||
|
|
List |
|
|
|
|
|
|
|
|
|
|
|
|
|
Send Settings
For explanations of settings, see p.14 “Send Settings”.
|
|
Settings |
Default |
Deliv- |
TWAIN |
|
|
|
|
|
|
ery |
|
|
|
|
|
|
|
|
|
Send Set- |
TWAIN Standby |
10 sec. |
|
|
|
|
tings |
Time |
|
|
|
|
|
|
|
|
|
|
|
|
|
File Type Priority |
Multi-page:TIFF |
|
|
|
|
|
|
|
|
|
|
|
|
Compression |
On |
|
|
|
|
|
|
|
|
|
|
|
|
Print&Del. Scanner |
On |
|
|
|
|
|
Journal |
|
|
|
|
|
|
|
|
|
|
|
|
|
Max. E-mail Size |
2048KB |
|
|
|
|
|
|
|
|
|
|
|
|
Divide & Send E-mail |
On (per max. size) |
|
|
|
|
|
|
|
|
|
|
|
|
E-mail Informatn. |
British English |
|
|
|
|
|
Language |
|
|
|
|
|
|
|
|
|
|
|
|
|
Sender's Name De- |
None |
|
|
|
|
|
fault |
|
|
|
|
|
|
|
|
|
|
|
|
|
|
|
|
|
|
Setting procedure
A Press the {User Tools/Counter} key.
ok Dial
se/ dial
AAH011S
10
Initial Scanner Setup
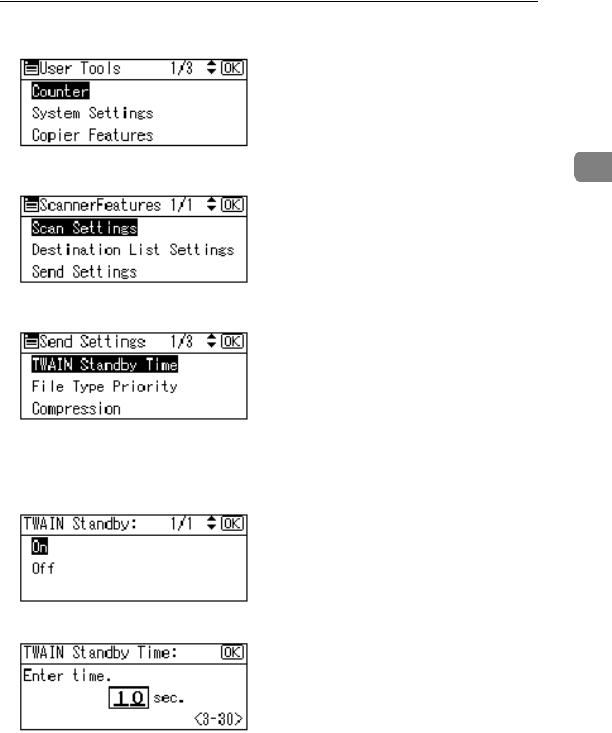
B Select [Scanner Features] using {U} or {T}, and then press the {OK} key.
C Select a menu using {U} or {T}, and then press the {OK} key. |
2 |
|
D Select a setting using {U} or {T}, and then press the {OK} key.
Example: TWAIN Standby Time setting
E Change the settings.
• Select an item using {U} or {T}, and then press the {OK} key.
• Enter numbers using the number keys, and then press the {OK} key.
The “programmed” message appears, and then the Send Settings screen returns.

 Note
Note
To cancel changing a setting, press the {Cancel} key. The setting returns to the previous condition.
F Press the {Cancel} key. |
|
The Scanner Features screen reappears. |
11 |

Preparations for Use as a Network Scanner
G Repeat steps C to F to make other settings.
H Press the {Cancel} key.
|
|
The main menu appears. |
|
|
|
|
|
Scan Settings |
|
|
|
2 |
|
This section explains how to set the |
|
|
defaults for scan settings. |
The scan settings consist of the following. For the list about settings and defaults, see p.9 “Scanner Features”.
Default Scan Settings
Resolution and scan size can be set.
•Resolution
Select the resolution from 100dpi, 200dpi, 300dpi, 400dpi, or 600dpi.
•Scan Size
Select the size of the original to be scanned.
When [Auto Detect] is selected, the auto detect function of the machine is used to set the original size.
When the size is specified, scanning is performed for that size, regardless of the actual size of the original. The following sizes can be
selected:
A3S, A4R, A4S, A5R, A5S, 11
× 17S, 81/2 × 14S, 81/2 × 13S, 81/2 × 11R, 81/2 × 11S, 51/2 ×
81/2R, 51/2 × 81/2S, B4 JISS (Japanese Industrial Standard), B5 JISR, B5 JISS, Custom size

 Note
Note
When [Custom Size] is selected, the dimensions of the scan area (width and height) can be specified.
When selecting [Custom Size] for [Scan Size], see p.13 “Selecting a custom size”.
Original Setting

 Note
Note
This setting is available only when you have installed the optional ADF capable of scanning both sides of a sheet (ARDF).
Set the default for whether originals are one-sided or two-sided and if two-sided, the relationship between those sides. When the originals are always the same, set this for the default to make operation easier. You can select [1 Sided Original], [2 sided Orig.(T toT )] (Top to Top), or [2 Sided Orig.(To toB
 )] (Top to Bottom).

 Reference
p.31 “Original Orientation and Scan Area”
Mixed Orig. Sizes Priority
This setting determines whether the original size is to be automatically detected when originals of different sizes are inserted in the ADF. You can select [On] or [Off].

 Note
Note
If the original size is specified when scanning, this setting is ignored.
When [Off] is selected, [Auto Detect] is selected for [Scan Size], and originals of different sizes are placed in the ADF, the maximum size of the originals is detected as the scan size.
12
Initial Scanner Setup
Orig. Orientation Priority
Select the default for original placement orientation. When originals are always positioned the same way, select that orientation as the default to make operation easier.

 Reference
p.31 “Original Orientation and
Scan Area”
Original Type Setting
Select the original type registered in [Type 1(Text):] or [Type 2(Photo):]. The original type that can be registered is as follows:
•Text (Print)
For standard originals containing mainly text (for print)
•Text (OCR)
For standard originals containing mainly text (for OCR)
•Text/Photo
For originals containing a mixture of text and photographs
•Photo
For originals containing photographs and other pictures

 Note
Note
You can register “Text (Print)” or ”Text (OCR)” in [Type 2(Photo):], or “Text/Photo” or ”Photo” in [Type 1(Text):].
Printer printing is best scanned with Text (Print). Text (OCR) is suitable for higher OCR accuracy.
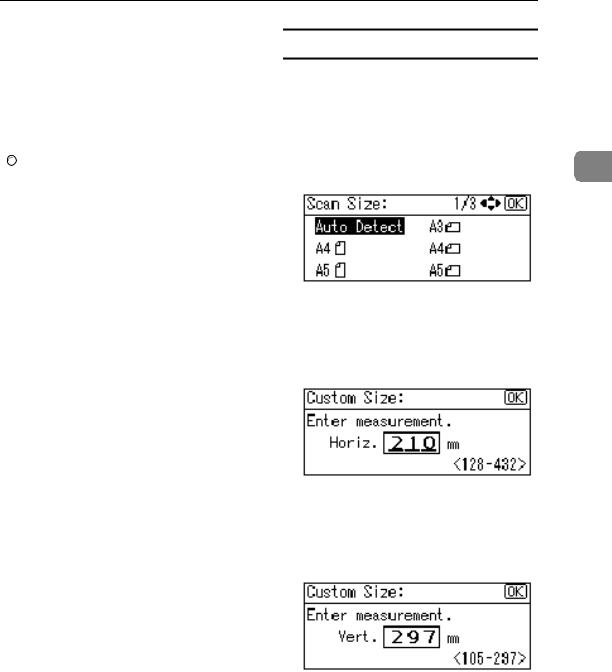
Selecting a custom size
When selecting [Custom Size] as the scan size, follow the procedure below.
A Select [Custom Size] on the Scan |
|
Size screen using the scroll keys, |
2 |
and then press the {OK} key. |
B Enter the width of the original using the number keys.
Enter the value in [Horiz.], and then press the {OK} or {#} key.
C Enter the height of the original using the number keys.
Enter the value in [Vert.], and then press the {OK} or {#} key.
The range of possible dimensions for original sizes is as follows:
•Original Size
Horiz.: 128 - 432 mm(5.1” - 17.0”)
Vert.: 105 - 297 mm(4.2” - 11.6”) The “Programmed” message appears, and then the Scan Size screen returns.
D Press the {User Tools/Counter} key.
13

Preparations for Use as a Network Scanner
Destination List Settings
This section explains how to set the defaults for the destination list displayed.
The destination list settings consist of the following. For the list about set- 2 tings and defaults, see p.9 “Scanner
Features”.
Destination List Priority
Select a destination list to be displayed when the machine is in the initial state. You can select either
[E-mail] or [Delivery Server].
Update Server Dest. List
To update the Delivery Server Destination List, press [Update Server Dest. List].
Ordinarily, the Delivery Server Destination List is automatically updated. This function allows updating at any time.
Send Settings
This section explains how to set the defaults for sending settings and how the machine switches to the network TWAIN scanner function.
The send settings consist of the following. For the list about settings and defaults, see p.9 “Scanner Features”.
TWAIN Standby Time
When the machine is being used to send e-mail or functioning as a network delivery scanner, a scanning request to the machine as a TWAIN scanner will switch the machine to the network TWAIN scanner function. This setting determines the delay until the machine switches to the network TWAIN scanner function.
•When [Off] is selected, the machine will switch to the network TWAIN scanner function at once.
•When [On] is selected, you can enter the delay time with the number keys (3 - 30 seconds). The machine will switch to the network TWAIN scanner function when the time set here passes after the last key operation.
File Type Priority
Select whether to send the file of scanned originals using a single page or multiple pages.
When sending using multiple pages, select either TIFF or PDF.
Compression
This setting determines whether a scan file is to be compressed.

 Note
Note
The actual time required for file transfer will vary depending on the file size and network load.
Compression reduces the time required for transferring the scan file.
Print&Del. Scanner Journal
Select whether to print the Scanner Journal automatically when the number of delivered e-mails reaches 50.
 Important
When the main power switch is turned off, all records are deleted.
14
|
Initial Scanner Setup |
|
||
Note |
When [Off] is selected, the e- |
|
|
|
mail is not sent if its size exceeds |
|
|||
When [On] is selected, all |
|
|||
the limit, and an error message |
|
|||
records are deleted after print- |
|
|||
appears. The scan file is discard- |
|
|||
ing. When [Off] is selected, |
|
|||
ed. |
|
|||
records that exceed the limit are |
|
|||
Set the maximum e-mail size |
|
|||
automatically deleted from the |
|
|||
oldest records. |
within the capacity of the SMTP |
|
||
|
server. |
|
||
Max. E-mail Size |
2 |
|||
E-mail Informatn. Language |
||||
|
||||
Select whether the size of an e-mail |
|
|||
Select a language for E-mail Infor- |
|
|||
with a scan file attached is limited |
|
|||
or not. |
mation Language for message, |
|
||
When [On] is selected, enter the |
date, key operator's e-mail address |
|
||
size limit (64 - 8580 KB) with the |
to be sent. |
|
||
number keys. |
Select one of the following 20 lan- |
|
||
Note |
guages: British English, American |
|
||
English, German, French, Italian, |
|
|||
When the SMTP limits the size, |
Spanish, Dutch, Portuguese, |
|
||
match that setting. |
Polish, Czech, Swedish, Finnish, |
|
||
Divide&Send Mail |
Hungarian, Norwegian, Danish, |
|
||
Japanese, Simplified Chinese, Tra- |
|
|||
This function is effective only |
ditional Chinese, Russian, and |
|
||
when [On] is selected for [Max. E- |
Hangul. |
|
||
mail Size]. |
Note |
|
||
When an e-mail with an attached |
|
|||
file exceeds the size specified in |
“E-mail Information Language” |
|
||
[Max. E-mail Size], select whether or |
is as follows (Example: When |
|
||
not to divide the file and send us- |
[British English] is selected): |
|
||
ing more than one e-mail. Select ei- |
“This E-mail was sent from.”, |
|
||
ther [On (per page)], [On (per max. |
“Scan Date”, and “Queries to: ”. |
|
||
size)], or [Off]. When [On (per max. |
These messages cannot be |
|
||
size)] is selected, enter the maxi- |
changed. |
|
||
mum number of divisions (2-130) |
Sender's Name Default |
|
||
with the number keys. |
|
|||
Select whether to register an ad- |
|
|||
Note |
|
|||
ministrator as a sender or to speci- |
|
|||
When [Multi-page:TIFF] or [Multi- |
fy a sender each time e-mail is sent. |
|
||
page:PDF] is selected for [File |
If the key operator code has been |
|
||
Type Priority], an attached scan |
set, enter the code with the number |
|
||
file will not be divided even if |
keys, and then press the {OK} key. |
|
||
[On (per page)] is selected. |
• Select [None] to specify the send- |
|
||
When [On (per max. size)] is se- |
er each time. |
|
||
lected, some received files may |
• Select [Key Op's E-mail Address] to |
|
||
not be able to be restored, de- |
specify an administrator as the |
|
||
pending on the type of e-mail |
sender. |
|
||
software. |
|
|
|
|
15

Preparations for Use as a Network Scanner
 Important
It is recommended that a sender's password be set to prevent the sender's name from being misused.
When [On] is selected for [Key Operator Code] in [Key Operator
2 |
Tools] of [System Settings] and |
|
[On: Partial] is set for the range, |
|
enter the key operator code |
when [Sender's Name Default] in [Send Settings] of [Scanner Features] is selected. For more information about System Settings, see General Settings Guide.
16

Installing Software
Installing Software |
|
||
The machine comes with three CD-ROMs containing various software. |
|
||
The CD-ROM labeled“Scanner Driver & Document Management Utilities” con- |
|
||
tains the necessary software to use the machine as a network scanner. The CD- |
|
||
ROM labeled “Printer Driver & Utilities” contains the necessary software to use |
|
||
the machine as a printer. |
|
||
2 |
|||
This section explains the software to use the machine as a network scanner. |
|||
|
|||
|
|
|
|
Auto Run Program |
|
||
|
|
|
|
When the CD-ROM is inserted into a client computer in Windows |
|
||
95/98/Me/2000/XP, or Windows NT 4.0, the installer starts automatically (Au- |
|
||
to Run) to install the TWAIN driver and various software. |
|
||

 Note
Note
Auto Run might not automatically work with certain operating system settings. In this case, launch “Set up.exe” located in the CD-ROM root directory.
If you want to install the software without using Auto Run, hold down the {Shift} key while inserting the CD-ROM. Keep the {Shift} key held down until the client computer has finished accessing the CD-ROM.
If [Cancel] is pressed during installation, the installation will be stopped and all the remaining software will not be installed. If [Cancel] has been pressed, reinstall the remaining software after restarting the client computer.
 Limitation
For installation in Windows 2000/XP, or Windows NT 4.0, log in as a member of the administrators group.
17
Preparations for Use as a Network Scanner
The installing sequence using Auto Run is as follows.
Installation Sequence
Insert the
CD-ROM.
2
The installer starts up.
Select
thesoftware.
The installation complete message is displayed.
Restart your PC.
TWAIN Driver Ver.3
TWAIN
Driver
ScanRouter V2 Lite
ScanRouter
ScanRouter V2
V2 Lite
Administration
Utility
Install all at once, or select and install individually.
DeskTopBinder Lite
DeskTopBinder
Lite
Acrobat Reader
Acrobat
Reader
AKN001S
For information about the software that can be installed by Auto Run, see p.21 “Software Supplied on CD-ROM”.
18

Installing Software
Software for Using a Network TWAIN Scanner
To use the machine as a network TWAIN scanner, it is essential to install the TWAIN driver.
If you do not have applications that work with TWAIN, it is necessary to also |
|
|
install DeskTopBinder Lite. For information about the installation of DeskTop- |
|
|
Binder Lite, see p.21 “DeskTopBinder Lite”. |
2 |
|
Preparation |
||
|
Before installation, check the operating environment for the TWAIN driver. See p.21 “Type2018 TWAIN Driver”.
Using Windows 95/98/Me/2000/XP, or Windows NT 4.0
Install the TWAIN driver using Auto Run.
A Start Windows, and then insert the supplied CD-ROM labeled “Scanner Driver & Document Management Utilities” into the CD-ROM drive of the client computer.
The CD-ROM Launcher screen appears.

 Reference
After the installation is complete, the “Type2018 TWAIN V3” folder is in the “Program” folder on the Start menu. Help can be displayed from here.
Be sure to read“Readme.txt”before use.
If the installer does not start automatically, see p.17 “Auto Run Program”.
B Click [TWAIN Driver].
The Software Setup screen appears.
C The installer of the TWAIN driver starts. Follow the instructions on the screen.

 Note
Note
When the installation is complete, a message to prompt you to restart the client computer may appear. In this case, restart the client computer.
19

Preparations for Use as a Network Scanner
Software for Using the Network Delivery Scanner Function
To use the machine as a network delivery scanner, it is essential to install ScanRouter V2 Lite on the delivery server. To check an in-tray or retrieve files, it is necessary to install DeskTopBinder Lite on the client computer.
Use Auto Run for installation.
2 |
Preparation |
Before installation, check the system requirements for the software. See p.21 “Software Supplied on CD-ROM”.
A Start Windows, and then insert the supplied CD-ROM labeled “Scanner Driver & Document Management Utilities” into the CD-ROM drive of the client computer.
The CD-ROM Launcher screen appears.
B Click the key of the software to be installed.
•Click [ScanRouter V2 Lite], and then the ScanRouter V2 Lite Setup screen appears.
•Click [DeskTopBinder Lite], and then the DeskTopBinder Lite Setup screen appears.
C Click [ScanRouter V2 Lite] or [DeskTopBinder Lite]. The installer of the software starts. Follow the instructions on the screen.

 Reference
For information about the subsequent installation procedure, see Setup Guide that can be displayed from the Setup screen of the respective software.
20

Installing Software
DeskTopBinder Lite
Use Auto Run for installation.
 Preparation
Before installation, check the system requirements for DeskTopBinder Lite.
See p.22 “DeskTopBinder Lite”.
A Start Windows, and then insert the supplied CD-ROM labeled “Scanner |
2 |
|
|
Driver & Document Management Utilities” into the CD-ROM drive of the |
|
client computer. |
|
The CD-ROM Launcher screen appears.
B Click [DeskTopBinder Lite].
The DeskTopBinder Lite Setup screen appears.
C Click [DeskTopBinder Lite]. The Installer of the DeskTopBinder Lite starts. Follow the instructions on the screen.

 Reference
For information about the subsequent installation procedure, see Setup Guide that can be displayed from the Setup screen of DeskTopBinder Lite.
Software Supplied on CD-ROM
List of files
CD-ROM |
Wizard for the TWAIN driver and utilities |
|||
Drive |
|
|
|
|
Drivers |
Twain |
TWAIN driver for Windows |
||
|
||||
|
|
|
95/98/Me/2000/XP, Windows NT 4.0 |
|
|
|
|
|
|
|
Utility |
RouterV2 |
ScanRouter V2 Lite , ScanRouter V2 Ad- |
|
|
|
|
ministration Utility |
|
|
|
|
|
|
|
|
DeskV2 |
DeskTopBinder Lite |
|
|
|
|
|
|
|
|
Acroread |
Acrobat Reader |
|
|
|
|
|
|
|
|
|
|
|
Type2018 TWAIN Driver
This driver is required to scan an original on the machine.
To use the machine as a network TWAIN scanner, this driver must be installed.
File storage folder
The files are stored in the following folder on the CD-ROM provided with this machine:
\DRIVERS\TWAIN
21
 Loading...