


 Loading...
FAX2900L/2900Li
Operator's Manual
TSTH120E
Read this manual carefully before you use this product and keep it handy for future reference.
For safety, please follow the instructions in this manual.

RICOH COMPANY, LTD.
15-5, 1 chome, Minami-Aoyama, Minato-ku, Tokyo Telephone: Tokyo 3479-3111
Ricoh shall not be responsible for any damage or expense that may result from the use of parts other than recommended parts.
For good copy quality, Ricoh recommends that you use genuine Ricoh toner.
TONER CASSETTES
RICOH FAX TONER CASSETTE TYPE 1430 BLACK is recommended for the best performance.
 Overseas Affiliates
U.S.A. |
Spain |
RICOH CORPORATION |
RICOH ESPAÑA S.A. |
5 Dedrick Place |
Avda. Litoral Mar, 12-14, |
West Caldwell, New Jersey 07006 |
08005 Barcelona |
Phone: +1-973-882-2000 |
Phone: +34-(0)93-295-7600 |
The Netherlands |
Italy |
|
RICOH EUROPE B.V. |
RICOH ITALIA SpA |
|
Groenelaan 3, 1186 AA, Amstelveen |
Via della Metallurgia 12, |
|
Phone: +31-(0)20-5474111 |
37139 Verona |
|
United Kingdom |
Phone: +39-(0)45-8181500 |
|
Hong Kong |
||
RICOH UK LTD. |
||
Ricoh House, |
RICOH HONG KONG LTD. |
|
1 Plane Tree Crescent, Feltham, |
23/F., China Overseas Building, |
|
Middlesex, TW13 7HG |
139, Hennessy Road, |
|
Phone: +44-(0)181-261-4000 |
Wan Chai, Hong Kong |
|
Germany |
Phone: +852-2862-2888 |
|
Singapore |
||
RICOH DEUTSCHLAND GmbH |
||
Mergenthalerallee 38-40, |
RICOH ASIA PACIFIC PTE.LTD. |
|
65760 Eschborn |
260 Orchard Road, |
|
Phone: +49-(0)6196-9060 |
#15-01/02 The Heeren, |
|
France |
Singapore 238855 |
|
Phone: +65-830-5888 |
||
RICOH FRANCE S.A. |
|
|
383, Avenue du Général de Gaulle |
|
|
BP 307-92143 Clamart Cedex |
|
|
Phone: +33-(0)1-40-94-38-38 |
|
Printed in The Netherlands
EE GB  H547-8601
Manual Operator’s 2900L/2900Li FAX

Optional Equipment
PAPER FEED UNIT TYPE 180 (Second Cassette)
A second paper feed unit can be added to the base machine.
BYPASS FEEDER TYPE 180(Multi-purpose Feeder)
A third paper feed unit can be added to the base machine.
FAX EXPANSION CARD TYPE 10
A1-Mbyte memory card can be added.
FAX EXPANSION CARD TYPE 20
A2-Mbyte memory card can be added.
FAX EXPANSION CARD TYPE 40
A4-Mbyte memory card can be added.
PC-FAX EXPANDER TYPE 190
This allows you to use the machine as a modem for an IBM PC/AT or compatible personal computer.
(Type 1 only)
ISDN INTERFACE UNIT TYPE 190
This allows you to send and receive using the ISDN (Integrated Service Digital Network). (Type 1 only)
The interface complies with the requirements of the Commission Decision 98/515/EC. 98/515/EC: Commission Decision of 17 June 1998 on a common technical regulation for the panEuropean integrated service digital network (ISDN) basic access (Amendment1).

 Note
Note
The model names of the machines do not appear in the following pages. Check the type of your machine before reading this manual.
•Type 1: FAX2900L
•Type 2: FAX2900Li

Declaration of Conformity
“The Product complies with the requirements of the EMC Directive 89/336/EEC and the Low Voltage Directive 73/23/EEC.”

Optional Equipment
PAPER FEED UNIT TYPE 180 (Second Cassette)
A second paper feed unit can be added to the base machine.
BYPASS FEEDER TYPE 180(Multi-purpose Feeder)
A third paper feed unit can be added to the base machine.
FAX EXPANSION CARD TYPE 10
A1-Mbyte memory card can be added.
FAX EXPANSION CARD TYPE 20
A2-Mbyte memory card can be added.
FAX EXPANSION CARD TYPE 40
A4–Mbyte memory card can be added.
PC-FAX EXPANDER TYPE 190
This allows you to use the machine as a modem for an IBM PC/AT or compatible personal computer.
(Type 1 only)
ISDN INTERFACE UNIT TYPE 190
This allows you to send and receive using the ISDN (Integrated Service Digital Network). (Type 1 only)
The interface complies with the requirements of the Commission Decision 98/515/EC. 98/515/EC: Commission Decision of 17 June 1998 on a common technical regulation for the panEuropean integrated service digital network (ISDN) basic access (Amendment1).

 Note
Note
The model names of the machines do not appear in the following pages. Check the type of your machine before reading this manual.
•Type 1: iNFOTEC3684
•Type 2: iNFOTEC3684 ISDN
This information is based on our present state of knowledge and is intended to provide general notes on our products and their uses.
It should not therefore be construed as guaranteeing specific properties of the products described or their suitability for particular applications.
Any existing industrial property rights must be observed. The quality of our products is guaranteed under our General Conditions of Sale.

Notice
RCAUTION:
Use of controls, adjustments or performance of procedures other than those specified herein may result in hazardous radiation exposure.
Shielded interconnect cables must be employed with this equipment to ensure compliance with the pertinent RF emission limits governing this device.
Although this equipment can use either loop disconnect or DTMF signalling, only the performance of the DTMF signalling is subject to regulatory requirements for correct operation. It is therefore strongly recommended that the equipment is set to use DTMF signalling for access to public or private emergency services. DTMF signalling also provides faster call set up.
Direct (or indirect reflected eye contact with the laser beam may cause serious eye damage. Safety precautions and interlock mechanisms have been designed to prevent any possible laser beam exposure to the operator.

 Note
Note
Some illustrations may be slightly different from your machine.
Certain options may not be available in some countries. For details, please contact your local dealer.
In accordance with IEC 60417, this machine uses the following symbols for the main power switch:
•a means POWER ON.
•b means POWER OFF.
Warning:
Changes or modifications not expressly approved by the party responsible for compliance could void the user's authority to operate the equipment.
Examples Of Indications
Symbols Rmean a situation that requires you take care.
Symbols vmean “Hot surface”.
Symbols nmean “Do not touch”.
i

ENERGY STAR Program
As an ENERGY STAR Partner, we have determined that this machine model meets the ENERGY STAR Guidelines for energy efficiency
The ENERGY STAR Guidelines intend to establish an international energy-sav- ing system for developing and introducing energy-efficient office equipment to deal with environmental issues, such as global warming. This product was designed to reduce the environmental impact associated with fax equipment by means of energy-saving features, such as Energy Saving Standby mode.
This fax automatically lowers its power consumption 5 minute after the last operation has been completed by default. To exit low power mode, press the {Energy Saver}key. The fax starts printing in about 40 seconds in the Energy Saving Standby mode or in about 30 seconds in the Fax Standby Mode. Please see the applicable page for details.
Specification
Type 1
Energy Saving Standby Mode |
Fax Standby Mode |
|
|
|
|
|
|
Power consump- |
2W |
Power consump- |
30W |
tion |
|
tion |
|
|
|
|
|
Default Time |
5 minutes |
Default Time |
5 minutes |
|
|
|
|
Print Start Time |
Within about 40 |
Print Start Time |
Within about 30 |
|
seconds |
|
seconds |
|
|
|
|
Type 2 machines, or Type 1 machines with the ISDN UNIT Type 190 installed
Energy Saving Standby Mode |
Fax Standby Mode |
|
|
|
|
|
|
Power consump- |
2.5W |
Power consump- |
30W |
tion |
|
tion |
|
|
|
|
|
Default Time |
5 minutes |
Default Time |
5 minutes |
|
|
|
|
Print Start Time |
Within about 40 |
Print Start Time |
Within about 30 |
|
seconds |
|
seconds |
|
|
|
|
|
|
|
|
Recycled paper
|
Please contact your sales or service representative for recommended recycled |
ii |
paper types that may be used in this machine. |
|

TABLE OF CONTENTS |
|
1.Safety |
|
Important Safety Instructions................................................................... |
1 |
When to Call Your Service Representative ............................................. |
3 |
Power And Grounding .............................................................................. |
4 |
Power Supply ................................................................................................ |
4 |
Grounding ..................................................................................................... |
4 |
Other Important Informations................................................................... |
5 |
General ......................................................................................................... |
5 |
Cold Weather Power-up................................................................................ |
5 |
Thunderstorms .............................................................................................. |
5 |
Operating Precautions .................................................................................. |
5 |
Copy Paper ................................................................................................... |
5 |
Symbols & Conventions Used in This Manual .............................................. |
6 |
2.Useful Functions |
|
Help List ..................................................................................................... |
7 |
Blank Sheet Detect .................................................................................... |
7 |
Quick Label ................................................................................................ |
8 |
3.Machine Layout |
|
Part Names................................................................................................. |
9 |
Operation Panel ....................................................................................... |
11 |
4.Faxing |
|
Recommended Types of Document ...................................................... |
15 |
Correct Size for the Document Delivery Tray.............................................. |
15 |
Page Condition............................................................................................ |
16 |
Memory Transmission And Immediate Transmission ......................... |
17 |
Memory Transmission (Memory Indicator Lit) ............................................. |
17 |
Immediate Transmission ............................................................................. |
20 |
Dialing with the Telephone Directory .......................................................... |
21 |
Receiving Telephone Calls & Fax Messages (Faxes/Phone Calls)..... |
22 |
Switching Between Fax and Telephone Mode............................................ |
22 |
Receiving the Fax Message in the Telephone Mode .................................. |
22 |
Printing Received Messages That Have Been Stored |
|
(Substitute Reception) ........................................................................... |
23 |
Faxing a Page with Very Fine Detail ...................................................... |
24 |
Resolution & Shading.................................................................................. |
24 |
iii

Optional Features for Transmission...................................................... |
25 |
Sending at a Specific Time (Send Later) .................................................... |
25 |
Printing the Page Number (Page Count) .................................................... |
25 |
Sending Your Identification at the Top of Your Message (TTI) ................... |
26 |
Sending by a Specific Time (Transmission Deadline)................................. |
26 |
Personal Codes........................................................................................... |
27 |
Using the Stamp ...................................................................................... |
28 |
Changing the Stamp Home Position Setting............................................... |
28 |
Redialing .................................................................................................. |
29 |
Automatic Redialing .................................................................................... |
29 |
Using the AI Redial key............................................................................... |
29 |
Storing & Editing Fax Numbers (Functions 31 & 32) ........................... |
30 |
Storing, Editing & Erasing Quick Dial Numbers (Function 31) .................... |
30 |
Storing, Editing & Erasing Speed Dial Numbers (Function 32) ................... |
31 |
Storing & Editing a Group of Fax Numbers (Function 33)................... |
33 |
Erasing Groups ........................................................................................... |
34 |
Programming the Group Key ...................................................................... |
34 |
Dial Options ............................................................................................. |
36 |
Programming the Dial Option Key............................................................... |
36 |
Using the Dial Options ................................................................................ |
36 |
Chain Dialing............................................................................................ |
38 |
Erasing a Stored Message before It Is Sent (Functions 21 & 22)........ |
39 |
Printing a Stored Message (Function 51).............................................. |
40 |
Locking Incoming Messages (Memory Lock) ....................................... |
41 |
Storing a Memory Lock ID........................................................................... |
41 |
Editing the Memory Lock ID ....................................................................... |
42 |
Switching Memory Lock on/off .................................................................... |
42 |
Programming Special Terminals for Lock in Memory ................................. |
43 |
Selecting which Messages to Lock in memory ........................................... |
43 |
Printing a Memory-locked Message (Function 55)...................................... |
43 |
Sending a Fax Using the External Telephone....................................... |
44 |
Answering the Telephone....................................................................... |
45 |
If the Telephone Rings Continuously ......................................................... |
45 |
Phoning and Faxing on the Same Call .................................................. |
46 |
To Talk before Sending a Fax..................................................................... |
46 |
5.5Other Features |
|
Verifying Communications, Errors, Counters, Etc............................... |
47 |
Automatically Printed Reports..................................................................... |
47 |
Report Formats ........................................................................................... |
48 |
Counters (function 94)................................................................................. |
49 |
Programming Keystrokes....................................................................... |
50 |
Storing a Keystroke Program ...................................................................... |
50 |
iv
Labeling a Program..................................................................................... |
51 |
Using a Program ......................................................................................... |
51 |
Erasing a Program / Changing the Program Label ..................................... |
52 |
Storing an Often Used Document (Auto Document)............................ |
53 |
Storing an Auto Document (Function 35).................................................... |
53 |
Using an Auto Document ............................................................................ |
54 |
Printing the Contents of an Auto Document (Function 53).......................... |
54 |
Erasing an Auto Document ......................................................................... |
55 |
Batch Transmission ................................................................................ |
56 |
Changing the Batch Transmission on/off .................................................... |
56 |
Closed Network (Transmission)............................................................. |
57 |
Sending Confidential Messages (Function 12)..................................... |
58 |
Confidential ID Override Option .................................................................. |
59 |
Transfer Request (Function 13) ............................................................. |
60 |
Storing Your Machine's Own Telephone Number ....................................... |
60 |
Storing the ID Code..................................................................................... |
61 |
Programming the ID Code .......................................................................... |
61 |
Editing the ID Code ..................................................................................... |
62 |
Making a Transfer Request......................................................................... |
62 |
Combining Transfer Request with Broadcasting......................................... |
64 |
Multi-step Transfer ...................................................................................... |
65 |
Programming the Personal Codes (Function 72) ................................. |
66 |
Storing a Personal Code ............................................................................. |
66 |
Editing or Erasing a Personal Code ............................................................ |
67 |
Tonal Signals ........................................................................................... |
69 |
Using the Tone Key..................................................................................... |
69 |
Rejecting Messages from Senders Who Don't Identify Themselves.... |
70 |
Receiving Confidential Messages.......................................................... |
71 |
Storing a Confidential ID ............................................................................. |
71 |
Editing the Confidential ID........................................................................... |
72 |
Printing a Confidential Fax Message (Function 54) .................................... |
72 |
Confidential File Report............................................................................... |
73 |
Closed Network (Reception)................................................................... |
74 |
Rejecting or Accepting Messages from Specified Senders |
|
(Authorized Reception) .......................................................................... |
75 |
About Authorized Reception ....................................................................... |
75 |
Entering a List of Senders to Treat Differently (Function 81) ...................... |
75 |
Switching Authorized Reception on / off (Function 62) ............................... |
75 |
Cassette Selection................................................................................... |
76 |
About Cassette Selection............................................................................ |
76 |
Entering a List of Senders to Treat Differently (Function 81) ...................... |
76 |
Selecting the Messages to Be Printed from the Main Cassette .................. |
76 |
Selecting the Cassette (Function 62) .......................................................... |
76 |
Multi-sort Document Reception ............................................................. |
78 |
v
About Multi-sort Reception.......................................................................... |
78 |
Switching Multi-sort Document on/off (Function 62) ................................... |
78 |
Setting the Number of Copies (Function 83)............................................... |
79 |
Programming the Special Terminals to Make Multi-sort-copies .................. |
79 |
Choosing How to Treat the Special Terminals ............................................ |
80 |
Programming a List of Senders to Treat Differently (Function 81)..... |
81 |
Programming the List of Senders (Special Senders) .................................. |
81 |
Editing the RTI/CSI for the Special Terminals............................................. |
82 |
Erasing the Special Terminal ...................................................................... |
84 |
Forwarding .............................................................................................. |
85 |
Programming the Forwarding Feature (Function 82) .................................. |
85 |
Editing the Forwarding Feature................................................................... |
87 |
Switching Forwarding on / off (Function 62)................................................ |
88 |
Selecting Which Messages to Forward....................................................... |
89 |
Switching Local Printing on / off .................................................................. |
89 |
Enabling and Disabling the Forwarding Mark ............................................. |
89 |
Wild Cards................................................................................................ |
90 |
Receiving Options ................................................................................... |
91 |
Reverse Order Printing ............................................................................... |
91 |
Printing a Center Mark ................................................................................ |
91 |
Checkered Mark.......................................................................................... |
91 |
Reducing the Page Length ......................................................................... |
91 |
Reception Time ........................................................................................... |
92 |
Two In One (Into 1) ..................................................................................... |
92 |
Reports You Can Printout Yourself ....................................................... |
93 |
Journal (Function 41) .................................................................................. |
93 |
File List (Function 42).................................................................................. |
93 |
Telephone Number List (Function 43)......................................................... |
93 |
Quick Label (Function 44) ........................................................................... |
93 |
Program List (Function 45).......................................................................... |
93 |
Energy Saving.......................................................................................... |
94 |
Introduction ................................................................................................. |
94 |
Entering Energy Saving mode .................................................................... |
96 |
Exiting Energy Saving mode ....................................................................... |
96 |
Selecting the Energy Saving mode type ..................................................... |
96 |
Reception in Energy Saving mode.............................................................. |
96 |
Saving Energy with the Power Saving Timer........................................ |
98 |
Setting the Power Saving time (Function 71).............................................. |
98 |
Switching the Power Saving Timer on / off (Function 62) .......................... |
99 |
Copying .................................................................................................. |
100 |
Calling to Request a Message (Polling) .............................................. |
101 |
Picking up Messages Stored Elsewhere (Polling Reception) ................... |
101 |
Operating Procedure................................................................................. |
101 |
Entering a Personal Code ......................................................................... |
101 |
Stored ID Override Option......................................................................... |
102 |
Leaving a Document to Be Picked up by Others (Polling Transmission).... |
103 |
vi

Free Polling (Function 15)......................................................................... |
103 |
Secured Polling (Function 14)................................................................... |
104 |
Stored ID Override .................................................................................... |
104 |
Options for Polling Transmission .............................................................. |
105 |
Canceling a Polling Transmission (Function 23)....................................... |
106 |
Printing a Polling Transmission File (Function 52).................................... |
106 |
User Function Keys (Function 36) ....................................................... |
108 |
Programming a User Function Code......................................................... |
108 |
Using a Function Program ........................................................................ |
109 |
Editing a Function Program....................................................................... |
109 |
Deleting a Function Program .................................................................... |
109 |
Dual Access ........................................................................................... |
110 |
6.Maintaining Your Machine |
|
Loading Paper in the Main Cassette.................................................... |
111 |
Loading Paper in the Second Cassette ............................................... |
114 |
Loading Paper in the Optional Multi-purpose Feeder........................ |
117 |
Replacing the Toner Cassette and Cleaning Pad............................... |
118 |
Toner Cassette....................................................................................... |
122 |
Replacing the Stamp ............................................................................. |
123 |
Cleaning the Rollers and Scanner ....................................................... |
124 |
Changing the Paper Size in the Main Cassette................................... |
125 |
How to change to the legal size ................................................................ |
130 |
Changing the Paper Size in the Second Cassette.............................. |
131 |
How to change to the legal size ................................................................ |
135 |
Changing the Paper Size in the Optional Multi-purpose Feeder....... |
136 |
Changing the Paper Size Settings ....................................................... |
138 |
7.Troubleshooting |
|
If an Indicator Lights up on the Operation Panel ............................... |
139 |
Clearing a Document Jam .................................................................... |
140 |
Clearing a Copy, Fax, or Print Jam ...................................................... |
142 |
Clear a Jam inside the Machine................................................................ |
142 |
Clear a Jam in the Cassette Entrance ...................................................... |
144 |
Clear a Jam in the Optional Second Cassette .......................................... |
145 |
Clear a Jam in the Upper Rear Unit .......................................................... |
146 |
Clear a Jam in the Lower Rear Unit .......................................................... |
147 |
If Messages You Receive Don't Fit on Your Paper............................. |
149 |
Breaking Down Large Format Messages .................................................. |
149 |
Communication Problems .................................................................... |
150 |
Adjusting the Printing Margins (Function 95)..................................... |
151 |
vii

Operating Difficulties ............................................................................ |
152 |
Displayed Error Messages.................................................................... |
157 |
Calling the Service Station ................................................................... |
159 |
Sending a Service Report ......................................................................... |
159 |
8.Technical Reference |
|
Access Code for Functions 61 to 95.................................................... |
161 |
User Parameters .................................................................................... |
162 |
User Parameter Hints................................................................................ |
169 |
Adjusting the Volume of Various Features (Function 92) ................. |
170 |
Selecting the Display's Language (Function 93)................................ |
171 |
Entering Characters .............................................................................. |
172 |
Entering Symbols ...................................................................................... |
172 |
Document & Paper Specifications ....................................................... |
173 |
Documents (Using the Auto Document Feeder) ....................................... |
173 |
Document Feeder Requirements .............................................................. |
173 |
Paper Requirements ................................................................................. |
173 |
Capabilities ............................................................................................ |
174 |
Stored Numbers (Long Term) ................................................................... |
174 |
Stored Destinations................................................................................... |
174 |
File Storage............................................................................................... |
174 |
Specifications ........................................................................................ |
175 |
Base Machine ........................................................................................... |
175 |
Optional Lower Paper Cassette ................................................................ |
175 |
Multi-purpose Feeder ................................................................................ |
176 |
9.ISDN |
|
Introduction............................................................................................ |
177 |
Setting up the Group 4 Interface.......................................................... |
178 |
Subaddress Key........................................................................................ |
178 |
Own ISDN-G4 Number ............................................................................. |
178 |
Programming the IG3 CSI......................................................................... |
178 |
Programming the Terminal ID ................................................................... |
178 |
Programming the G4 Subscriber 1............................................................ |
179 |
Programming the G4 Subscriber 2............................................................ |
179 |
Programming the G4 Subaddress............................................................. |
180 |
Programming the IG3 Subscriber 1........................................................... |
180 |
Programming the IG3 Subscriber 2........................................................... |
180 |
Programming the IG3 Subaddress............................................................ |
181 |
Operation................................................................................................ |
182 |
Dialing and Storing Telephone Numbers .................................................. |
182 |
Transmission Procedure ........................................................................... |
182 |
Storing a Telephone Number .................................................................... |
183 |
viii

Automatic Fallback from Group 4 Mode to Group 3 Mode........................ |
184 |
Terminal ID................................................................................................ |
185 |
Explanation of the Items in the Group 4 Identifier ..................................... |
186 |
Switching the Command Information Line On/Off..................................... |
187 |
Troubleshooting .................................................................................... |
188 |
Call Progress Signals (CPS) ..................................................................... |
188 |
10.Installation |
|
Before Installation ................................................................................. |
189 |
Machine Environment ........................................................................... |
190 |
Location..................................................................................................... |
190 |
Installing the Toner Cassette .............................................................. |
191 |
Installing the Main Paper Cassette ...................................................... |
194 |
Installing the Optional Second Cassette............................................. |
196 |
Attaching the Trays and Document Table........................................... |
198 |
Ventilation Grill Direction........................................................................... |
199 |
Installing the Optional Multi-purpose Feeder ..................................... |
200 |
Installing the Optional Memory Card................................................... |
202 |
Connecting the External Telephone .................................................... |
203 |
Connecting the Machine ....................................................................... |
204 |
Connecting up to the Telephone Line ................................................. |
205 |
Connecting the Power and Switching on............................................ |
206 |
Initial Settings & Adjustments.............................................................. |
207 |
Initial Settings (Function 61)...................................................................... |
208 |
Setting the Access Number....................................................................... |
210 |
Setting the Phone Line (Function 62)........................................................ |
211 |
Setting the Date & Time (Function 91)...................................................... |
211 |
Summer Time / Daylight Saving Time (Function 62) ................................ |
212 |
11.Function List |
|
Function List .......................................................................................... |
213 |
12.Laser Label |
|
Position of the Laser Label................................................................... |
217 |
13.BABT Notice |
|
BABT Notice........................................................................................... |
221 |
INDEX...................................................................................................... |
224 |
ix
x

1. Safety
Important Safety Instructions
All Safety messages in the main text of this manual are labeled WARNING or CAUTION. These mean the following:
WARNING: Important information to alert you to a situation that might cause serious injury and damage to your property if instructions are not followed properly.
CAUTION: Important information that tells how to prevent damage to your equipment or how to avoid a situation that might cause minor injury.
In addition to the warnings and cautions included in the text of this manual, please read and observe the following safety instructions.
A Read all of these instructions.
BSave these instructions for later use.
CFollow all warnings and cautions marked on the product.
DUnplug this product from the wall outlet before cleaning. Do not use liquid cleaners or aerosol cleaners. Use a damp cloth for cleaning.
EDo not use this product near water, for example, near bath tub, wash bowl, kitchen sink or laundry tub, in a wet basement or near a swimming pool.
FAvoid using a telephone (other than a cordless type) during an electrical storm. There may be a remote risk of electric shock from lightning.
GDo not use a telephone in the vicinity of a gas leak to report the leak.
HDo not place this product on an unstable cart, stand, or table. The product may fall, causing serious damage to the product or injuring the user.
ISlots and opening in the cabinet and the back or bottom are provided for ventilation; to ensure reliable operation of the product and to protect it from overheating, these openings must not be blocked or covered. The openings should never be blocked by placing the product on a bed, sofa, rug, or other similar surface. This product should not be placed in a built-in installation unless proper ventilation is provided.
JThis product should be operated from the type of power source indicated on the marking label. Using a different power source may result in injury or accident. If you are not sure of the type of power available, consult an authorized sales person or your local power company.
KThis product is equipped with a 3- wire grounding type plug, a plug having a third (grounding) pin. This plug will only fit into a grounding-type power outlet. This is a safety feature. If you are unable to insert the plug into the outlet, contact your electrician to replace your obsolete outlet. Do not defeat the purpose of the grounding type plug. (This does not apply in countries in which the 2-wire, nongrounded type of plug is used.)
1

Safety
L Do not allow anything to rest on the power cord. Do not locate this product where persons will walk on the cord.
1 M If an extension cord is used with this product, make sure that the total of the ampere ratings on the products plugged into the extension cord does not exceed the extension cord ampere rating. Also, make sure that the total of all products plugged into the wall outlet does not exceed 15 amperes.
NNever push objects of any kind into this product through cabinet slots as they may touch dangerous voltage points or short out parts that could result in a risk of fire or electric shock. Never spill liquid of any kind on the product.
ODo not attempt to service this product yourself, as opening or removing covers may expose you to dangerous voltage points or other risks.
Refer all servicing to qualified service personnel.
PDo not take apart or attempt any modifications to this machine. There is a risk of fire, electric shock, explosion or loss of sight.
QDo not incinerate used toner or toner containers. Toner dust might ignite when exposed to open flame. Dispose of the used toner containers according to local regulations for plastics.
RUnplug this product from the wall outlet and refer servicing to qualified service personnel under the following conditions:
•When the power cord or plug is damaged or frayed.
•If liquid has been spilled into the product.
•If the product has been exposed to rain or water.
•If the product does not operate normally when the operating instructions are followed. Adjust only those controls that are covered by the operating instructions since improper adjustment of other controls may result in damage and will often required extensive work by a qualified technician to restore the product to normal operation.
•If the product has been dropped or the cabinet has been damaged.
•If the product exhibits a distinct change in performance, indicating a need for service.
2

When to Call Your Service Representative
When to Call Your Service Representative
WARNING: Do not attempt any maintenance or troubleshooting other than that mentioned in this manual. This machine contains a laser beam generator and direct exposure to laser beams can cause permanent eye damage.
Unplug this product from the wall outlet and refer servicing to qualified service personnel under the following conditions:
AWhen the power cord or plug is damaged or frayed.
BIf liquid has been spilled into the product.
CIf the product has been exposed to rain or water.
DIf the product does not operate normally when the operator's manual are followed. Adjust only those controls that are covered by the operator's manual since improper adjustment of other controls may result in damage and will often require extensive work by a qualified technician to restore the product to normal operation.
EIf the product has been dropped or the cabinet has been damaged.
FIf the product exhibits a distinct change in performance, indicating a need for service.
GIf smoke is coming out, there is a strange smell or anything looks unusual.
HDo not use reuse stapled paper. Do not use aluminum foil, carboncontaining paper or other conductive paper. Otherwise, a fire might occur.
I After you move the machine, fix it |
|
|
with the caster fixture. Otherwise |
|
|
1 |
||
the machine might move or come |
||
|
||
down to cause a personal injury. |
|
JWhen removing misfed paper, do not touch the fusing section because could be very hot.
3

Safety
Power And Grounding
|
|
Power Supply |
1 |
||
|
|
|
APower requirements: 220-240V, 50/60 Hz
BInsert the power plug securely into the wall socket.
CMake sure that the wall outlet is near the machine and readily accessible.
DDo not connect other equipment to the same socket.
EDo not step on or set anything on the power cord.
FDo not connect other equipment to the same extension cord.
GBe sure that the power cord is not in a position where it would trip someone.
HThe wall outlet must be easily accessible.
IDo not damage, break or make any modifications to the power cord. Do not place heavy objects on it, pull it hard or bend it more than necessary. These actions could cause and electric shock or fire.
JDo not plug or unplug the power cord with wet hands or an electric shock might occur.
KWhen you move the machine, unplug the power cord from the wall outlet to avoid fire or electric shock.
LWhen you pull out the plug from the socket, grip the plug to avoid damaging the cord and causing fire or electric shock.
Grounding
Ground the machine and the lightning protection circuit in accordance with regulations. Do not ground to gas or water pipes, or to a telephone ground plug. Proper grounding is to the ground terminal of the power outlet. Be sure that the ground terminal of the power outlet is properly grounded.
The lightning protection circuit for the machine requires the machine to be properly grounded. If proper grounding is provided, about 90 % of lightning damage can be prevented. For safety, be sure to connect the machine to a three-prong grounded outlet.
4

Other Important Informations
Other Important Informations
General |
|
Cold Weather Power-up |
|
|
1 |
||||
|
|
|
|
|
ASince some parts of the machine are supplied with high voltage, make sure that you do not attempt any repairs or attempt to access any part of the machine except those described in this manual.
BDo not make modifications or replacements other than those mentioned in this manual.
CWhen not using the machine for a long period, disconnect the power cord.
DKeep the machine away from humidity and dust. A fire or an electric shock might occur.
EDo not reuse stapled paper. Do not use aluminum foil, carbon-con- taining paper or other conductive paper. Otherwise, a fire might occur.
FThis machine has been tested for safety using this supplier's parts and consumable. We recommend you only use these specified supplies.
GVentilate the room around every half an hour during a long copy run or while printing a long message.
Ozone
The machine generates ozone during operation. Normally, the ozone level is safe for operators. However, during a long copy run or while printing a long message, ozone odor may appear; in such a case, ventilate the room.
Avoid raising the room temperature abruptly when it is below 14°C, or
condensation may form inside the machine.
ARaise the room temperature to 20°C at less than 10°C per hour.
B Wait for 30 to 60 minutes.
C Turn the power on.
DDo not use the machine near a humidifier.
Thunderstorms
With proper grounding, about 90 % of lightning damage can be prevented. However, if possible, during severe electric storms turn the power switch off and disconnect the power cord and telephone line cord.
Operating Precautions
•While the machine is in operation, do not turn off the main switch or unplug the power cord.
•Keep corrosive liquids, such as acid, off the machine.
•Do not allow paper clips, staples, or other small metallic objects to fall inside the machine.
•The fusing unit may be very hot. Be careful when handling it.
Copy Paper
•60 to 90g/m2. copy paper is recommended.
5
Safety
•Do not use damp paper, or copies will be defective.
•Do not touch copy paper if your fingers are wet or oily; fingerprints
1may appear on the copy.
•Keep paper in a vinyl bag if it will not be used for a long time.
•Store in a cool dry place.
•Store flat. Do not stand upright.
•The following materials cannot be used in the paper cassettes: Post cards, Tracing paper, OHP sheets, Adhesive labels
•Do not overload the paper trays.
•If Multi-sheet Feeding occurs or dog-eared copies are made when using recycled paper in the paper tray, fan the recycled paper and load it in the paper tray again.
Symbols & Conventions Used
in This Manual
Documents:
A This is a step in a procedure.
THIS CORRESPONDS TO THE LCD DISPLAY.
A document is anything you put on the feed table of your machine whether you are faxing it or copying it.
Prints:
A print is anything that comes out of the machine: a fax message you received or a copy you made.
Procedures:
Procedures are described step by step. Perform them in order. When you see a display, it always shows what comes after performing the step it accompanies. Other illustrations accompanying steps help you find the right key or handle, or show you how to perform the step.
6

2. Useful Functions
Help List
Use the {No/Help}key to print the Help List.
This list explains the following procedures:
•Immediate Transmission
•Memory Transmission
•Erasing a stored message before it is sent.
•Storing & editing Quick Dial numbers.
•Printing a list of the Quick Dial numbers
•Storing & editing Speed Dial numbers.
•Printing a list of the Speed Dial numbers
•Printing the Journal
Blank Sheet Detect
This feature is designed to help you avoid making mistakes while scanning in documents.
If you try and scan in an almost completely blank document, an alarm sounds to warn you. Make sure the document is not blank and is set the correct way up.
•Transmission is not cancelled even if the machine detects the document as blank.
•With Immediate Transmission, the alarm sounds immediately.
•With Memory Transmission, the alarm sounds as soon as the document has been scanned. If you press the {Stop}key while the BLANK DOCUMENT message is shown, the "Cancel Transmission" display appears.
•As the alarm sounds, the BLANK DOCUMENT message appears.
•You can turn Blank Original Detect on or off with the User Parameters (function 63 Þ P.162 “User Parameters”). When shipped, this feature is turned on by default.
•This feature is not supported in Copy mode.
7

Useful Functions
Quick Label
Use this function to print a sheet showing the contents of each Quick Dial and User Function key. The size of the sheet matches the dimensions of the keys.
The following items are printed depending on what is stored in each key:
• Fax number label
2 • Group Dial label
•Program label
•User Function key
•Auto Document label
8
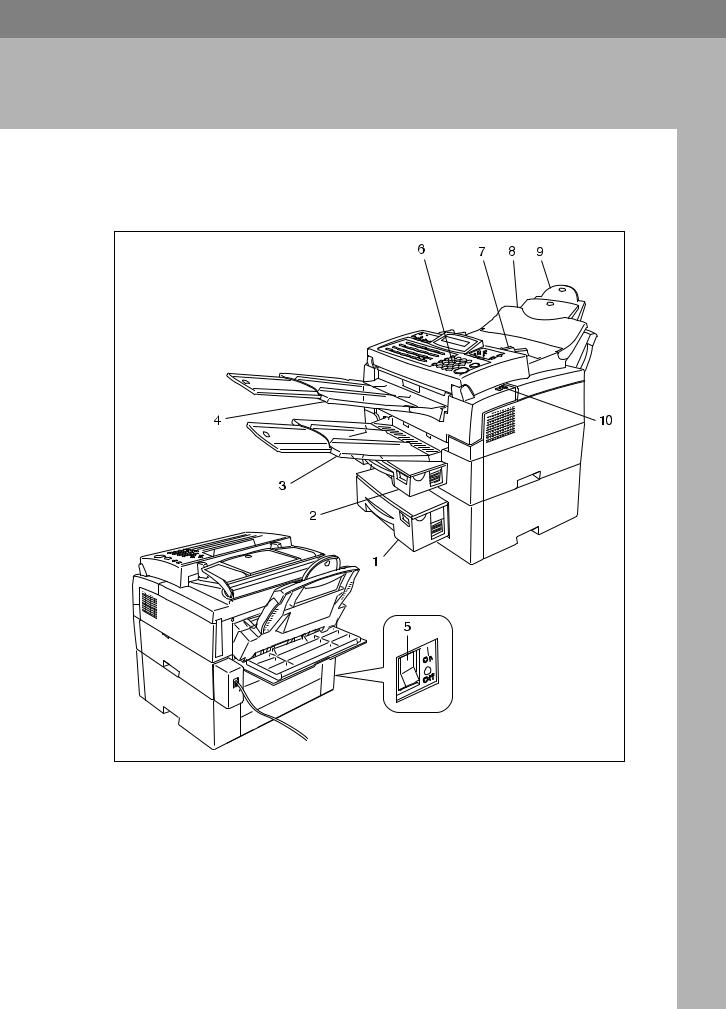
3. Machine Layout
Part Names
|
TSMH030E |
1. Second Paper Cassette |
3. Print Delivery Tray |
The optional Second paper cassette holds more paper.
Copies, incoming faxes, and prints are delivered here.
2. Main Paper Cassette |
4. Document Delivery Tray |
The main paper cassette holds copy paper.
Scanned documents are stacked on the document delivery tray.
9

Machine Layout
5. Main Switch
The main switch turns your machine on and off.
6. Operation Panel
Key panel for operating the machine.
7. Document Guide
Match the document guide to the size of your original documents.
8. Document Table
3 |
Document table holds up to 30 sheets |
|
|
|
which are fed one at a time. Place your |
|
|
|
original documents here. |
|
9. Multi-purpose Feeder (Bypass |
|
Feeder Type 180) (Option) |
|
Expands paper delivery capability to |
|
handle A4, Legal and F4 sizes. |
|
10. Cover Release Button |
|
Pull this catch to release the top cover. |
10

Operation Panel
Operation Panel
Type 1
3
F1 F2
Journal Stamp
TSMS011N
Type 2
F1 F2
Journal Stamp
TSMS021N
1.Add Paper indicator
Lights when a cassette is empty.
2.Add Toner indicator
Blinks when toner is about to run out and lights continuously when toner has run out.
3.Check Display indicator
The Check Display Indicator lights to tell you to read the display.
4.Receive File indicator
The Receive File indicator lights when an incoming message was re-
11

Machine Layout
ceived into memory. Blinks when confidential reception file or memory lock file is stored in the memory. (see P.139
“If an Indicator Lights up on the Operation Panel” ).
|
5. |
{Resolution}key. |
|
|
|
The resolution/Halftone is indicated |
|
|
|
by these three indicators and can be |
|
|
|
changed by the resolution/Halftone. |
|
|
|
When the Indicator is not lit, Standard |
|
|
|
is selected. |
|
3 |
6. |
||
Memory key/ indicator |
|||
|
When the Memory indicator is on, then memory transmission is in effect, if it is off, immediate transmission is in effect. Switch between the two with the {Memory}key.
7.{G4}Selector Key/Indicator
Press to select G4 mode. When this indicator is not lit, G3 is mode. The display backlight enhances readability.
8.Control panel Display
The Liquid Crystal Display guides you through tasks and informs you of the state of the machine. Messages appear here. The display consists of two 20-character lines.
9.{Speed Dial/Tel Directory}key
Press the {Speed Dial/Tel Directory}key using Speed Dialor the Telephone Directory Feature.
10.{Pause/Al Redial}key
The {Pause/Al Redial} key inserts a pause when you are dialing or storing a fax number. Or, press the key to redial the last number dialed. (The redial feature doesn't work once you've started dialing a new number.)
11. Arrow keys
T{Yes}accept
U {No} reject/ {Help} (Type 1 only) Print help list
W scroll left/ {Paper Size} The paper size selection screen for each cassette will appear.
Vscroll right/ {Option}Press to access the options.
12. Manual Receive indicator.
Lights when the reception mode is Telephone.
13. {Clear Modes}/ {Energy Saver}key
Clear Modes: Press to clear any selected settings and return the condition it was in just after being switched on.
Energy Saver: Hold a few seconds this to start or end the energy saver mode.
14. {Copy}key
Press this to copy the document now in the feeder.
15. {Reception Mode}key
Press this to select the reception mode (Tel or Fax).
16. {Function}key
Press the {Function} key and enter a two digit code to access functions 11 to 55. (For functions 61 to 95, enter 6, the access code on see P.161 “Access Code for Functions 61 to 95” and the function number.)
17. {Stop}key
Press the {Stop} key to stop a transmission or a document scanning, to stop a reception or to stop a long copy run. The machine will finish printing out the sheet being printed and then stop.
18. {Start}key
Press the {Start}key to start all tasks.
19. Ten key pad
Use the ten key pad (sometimes called the ten keys) to dial fax numbers, to enter the numbers of copies, etc.
20. {On Hook Dial}key (Type 1 only)
Press the {On Hook Dial} key to dial a phone call from the keypad without
12

Operation Panel
having to lift the phone or handset off the hook (phone or handset option needed).
21. {Clear}key
Press the {Clear} key to erase the last character or digit entered, or use the left and right arrow keys to move the cursor and then press Clear to erase whatever is at the cursor.
22. {Quick Dial} keys/ {User Function}
keys. |
3 |
|
There are 30 Quick Dial keys. Use them to store individual fax numbers (see P.30 “Storing & Editing Fax Numbers (Functions 31 & 32)” ) or groups (see P.33 “Storing & Editing a Group of Fax Numbers (Function 33)”
). You can also use these keys to enter characters (see P.172 “Entering Characters” ). In addition you can register Quick Dial 29 as the Dial Option key (see P.36 “Programming the Dial Option Key”.) You can also use Quick Dial 30 as a Group key (see P.34 “Programming the Group Key”.)
You can store one special function in each of the User Function Keys (F1, F2). There are 9 special functions see P.108 “User Function Keys (Function 36)”
23.{Help}key (Type 2 only)
Use to print the Help list.
24.{Subaddress}key (Type 2 only)
Use to enter a subaddress.
13

Machine Layout
3
14
4. Faxing
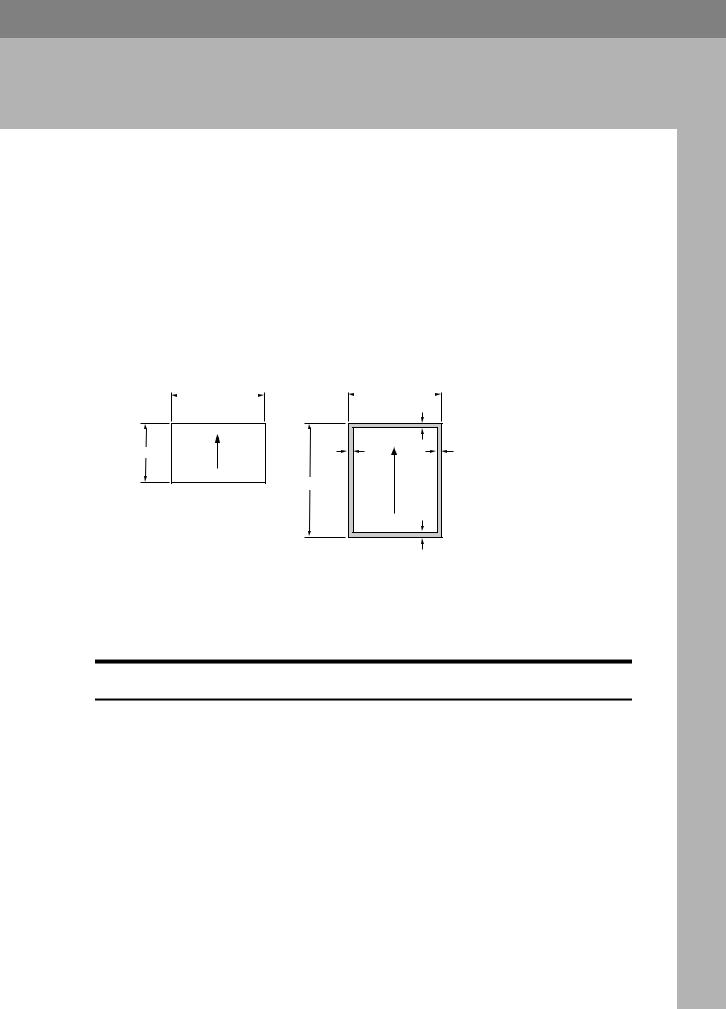
Recommended Types of Document
Before you send your document, make sure that it meets the following requirements.
 Important
Documents that do not meet these requirements can cause your machine to jam or may cause some components of the machine to become damaged or dirty.
Scanning area
Minimum size |
|
Maximum size |
|||||
|
|
148mm |
|
|
|
218mm |
|
|
|
|
|
|
|
||
|
|
|
|
||||
|
|
|
|
|
|
4mm |
|
105mm |
7mm |
7mm |
|
600mm |
|
|
Scanning direction |
|
|
|
5mm |
Scanning direction
GFSIZE0E
The part shaded will not be scanned, because it is outside the maximum scanning width range.
Correct Size for the Document Delivery Tray
•Thickness 0.05 to 0.2 mm (50 90 g/m2)
•Length and Width: See the above diagram.
If the page is too short, put it inside a document carrier or enlarge it with a copier.
If the page is too long, divide it into two or more sheets.
•Clearly Written
Small faint characters may not be transmitted clearly.
•Uniform Page Size
Do not use different sizes of document in the same transmission.
15
Loading...