


Aficio SP 100SF e
Table of contents
 Loading...
Operating Instructions
User Guide
For safe and correct use, be sure to read "Safety Information" before using the machine.


TABLE OF CONTENTS
1. Guide to the Machine
How to Read This Manual.................................................................................................................................5
Introduction.....................................................................................................................................................5
Legal Prohibition.............................................................................................................................................5
Disclaimer........................................................................................................................................................5
Model-Specific Information...............................................................................................................................6
Guide to Components........................................................................................................................................7
Exterior............................................................................................................................................................7
Interior.............................................................................................................................................................8
Control Panel..................................................................................................................................................9
Installing the Driver and Software...................................................................................................................11
Quick Install..................................................................................................................................................11
Upgrading or Deleting the Printer Driver...................................................................................................11
Installing the Smart Organizing Monitor...................................................................................................12
Initial Setup.......................................................................................................................................................13
What is Smart Organizing Monitor?..............................................................................................................14
2. Loading Paper
Supported Paper..............................................................................................................................................15
Non-Recommended Paper Types...................................................................................................................16
Print Area..........................................................................................................................................................17
Loading Paper..................................................................................................................................................20
Specifying Paper Type and Paper Size Using Control Panel...................................................................22
Specifying Paper Type and Paper Size Using Smart Organizing Monitor.............................................24
Placing Originals..............................................................................................................................................25
About Originals............................................................................................................................................25
Placing Originals on the Exposure Glass...................................................................................................27
Placing Originals in the Auto Document Feeder.......................................................................................27
3. Printing Documents
Basic Operation...............................................................................................................................................29
Printing on Both Sides of Sheets..................................................................................................................30
Canceling a Print Job...................................................................................................................................31
If a Paper Mismatch Occurs............................................................................................................................33
Continuing Printing Using Mismatched Paper...........................................................................................33
1

Resetting the Print Job..................................................................................................................................33
4. Copying Originals
Copier Mode Screen.......................................................................................................................................35
Basic Operation...............................................................................................................................................36
Canceling a Copy.......................................................................................................................................37
Making Enlarged or Reduced Copies............................................................................................................38
Specifying Reduce/Enlarge.......................................................................................................................39
Combining Multiple Pages..............................................................................................................................40
Specifying Combine....................................................................................................................................41
Copying Both Sides of an ID Card onto One Side of Paper........................................................................43
Copying an ID Card....................................................................................................................................43
Making 2-sided Copies...................................................................................................................................45
Specifying 2 Sided Copy............................................................................................................................46
Specifying the Scan Settings...........................................................................................................................49
Adjusting Image Density..............................................................................................................................49
Selecting the Document Type According to Original...............................................................................49
5. Scanning from a Computer
Basic Operation...............................................................................................................................................51
TWAIN Scanning.........................................................................................................................................51
Basic Operation for WIA Scanning...........................................................................................................52
6. Sending and Receiving a Fax
Fax Mode Screen.............................................................................................................................................53
Setting the Date and Time................................................................................................................................54
Entering Characters..........................................................................................................................................55
Registering Fax Destinations............................................................................................................................56
Registering Fax Destinations.......................................................................................................................56
Modifying or Deleting Fax Destinations.....................................................................................................57
Configuring Fax Destinations Using Smart Organizing Monitor.............................................................57
Sending a Fax..................................................................................................................................................59
Selecting Transmission Mode.....................................................................................................................59
Basic Operation for Sending a Fax............................................................................................................60
Specifying the Fax Destination....................................................................................................................62
Useful Sending Functions............................................................................................................................65
2

Specifying the Scan Settings.......................................................................................................................68
Receiving a Fax................................................................................................................................................70
Selecting Reception Mode..........................................................................................................................70
Lists/Reports Related to Fax............................................................................................................................73
7. Configuring the Machine Using the Control Panel
Basic Operation...............................................................................................................................................75
Copier Features Settings..................................................................................................................................76
Fax Features Settings.......................................................................................................................................78
Address Book Settings.....................................................................................................................................84
System Settings.................................................................................................................................................85
Printing Lists/Reports........................................................................................................................................90
Printing the Configuration Page..................................................................................................................90
Types of Report............................................................................................................................................90
Printer Features Settings...................................................................................................................................91
8. Configuring the Machine Using Smart Organizing Monitor
Checking the System Information....................................................................................................................93
Checking the Status Information.................................................................................................................93
Printing the Configuration Page..................................................................................................................94
Configuring the Machine Settings...................................................................................................................95
Tab Settings..................................................................................................................................................95
Updating the Firmware....................................................................................................................................96
9. Maintaining the Machine
Replacing the Print Cartridge..........................................................................................................................97
Cautions When Cleaning................................................................................................................................99
Cleaning the Inside of the Machine.............................................................................................................100
Cleaning the Exposure Glass........................................................................................................................101
Cleaning the Auto Document Feeder...........................................................................................................102
10. Troubleshooting
Common Problems.........................................................................................................................................103
Paper Feed Problems.....................................................................................................................................104
Removing Printing Jams.............................................................................................................................105
Removing Scanning Jams.........................................................................................................................108
Print Quality Problems...................................................................................................................................110
3

Checking the Condition of the Machine..................................................................................................110
Printer Problems.............................................................................................................................................111
Print Positions Do Not Match Display Positions......................................................................................112
Copier Problems............................................................................................................................................113
Scanner Problems..........................................................................................................................................114
Fax Problems..................................................................................................................................................115
Error and Status Indicate on the Control Panel...........................................................................................118
Messages on the Screen...........................................................................................................................118
Error and Status Messages Appear on the Smart Organizing Monitor...................................................121
11. Appendix
Notes About the Toner..................................................................................................................................123
Moving and Transporting the Printer............................................................................................................124
Disposal......................................................................................................................................................124
Where to Inquire.......................................................................................................................................124
Consumables..................................................................................................................................................125
Print Cartridge............................................................................................................................................125
Specifications of the Machine......................................................................................................................126
General Function Specifications..............................................................................................................126
Printer Function Specifications..................................................................................................................127
Copier Function Specifications.................................................................................................................128
Scanner Function Specifications...............................................................................................................128
Fax Function Specifications......................................................................................................................129
Trademarks.....................................................................................................................................................131
INDEX...........................................................................................................................................................133
4

1. Guide to the Machine
How to Read This Manual
Introduction
This manual contains detailed instructions and notes on the operation and use of this machine. For your
safety and benefit, read this manual carefully before using the machine. Keep this manual in a handy
place for quick reference.
Legal Prohibition
Do not copy or print any item for which reproduction is prohibited by law.
Copying or printing the following items is generally prohibited by local law:
bank notes, revenue stamps, bonds, stock certificates, bank drafts, checks, passports, driver's licenses.
The preceding list is meant as a guide only and is not inclusive. We assume no responsibility for its
completeness or accuracy. If you have any questions concerning the legality of copying or printing
certain items, consult with your legal advisor.
Disclaimer
Contents of this manual are subject to change without prior notice.
In no event will the company be liable for direct, indirect, special, incidental, or consequential damages
as a result of handling or operating the machine.
For good output quality, the manufacturer recommends that you use genuine toner from the
manufacturer.
Two kinds of size notation are employed in this manual.
Some illustrations or explanations in this guide may differ from your product due to improvement or
change in the product.
5
CHZ966
1. Guide to the Machine
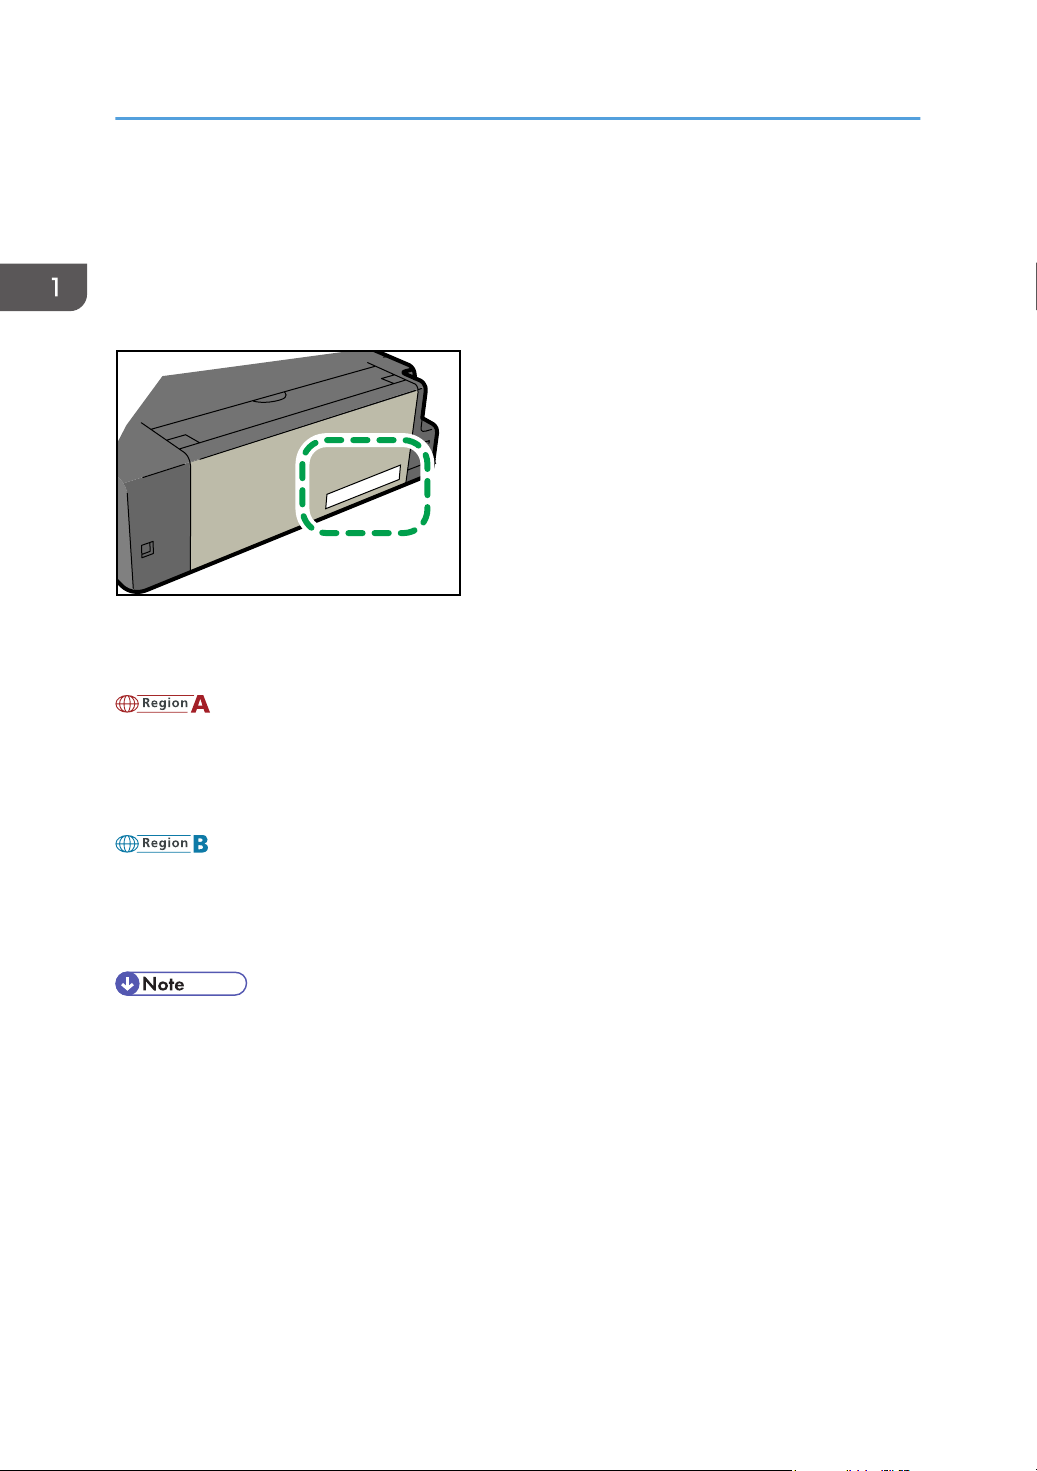
Model-Specific Information
This section explains how you can identify the region your machine belongs to.
There is a label on the rear of the machine, located in the position shown below. The label contains
details that identify the region your machine belongs to. Read the label.
The following information is region-specific. Read the information under the symbol that corresponds to
the region of your machine.
(mainly Europe and Asia)
If the label contains the following, your machine is a region A model:
• CODE XXXX -22, -27
• 220-240V
(mainly North America)
If the label contains the following, your machine is a region B model:
• CODE XXXX -11, -17
• 120V
• Dimensions in this manual are given in two units of measure: metric and inch. If your machine is a
Region A model, refer to the metric units. If your machine is a Region B model, refer to the inch
units.
6
CHZ967
1 24
3
675
10 11 12
9
14 16
15138
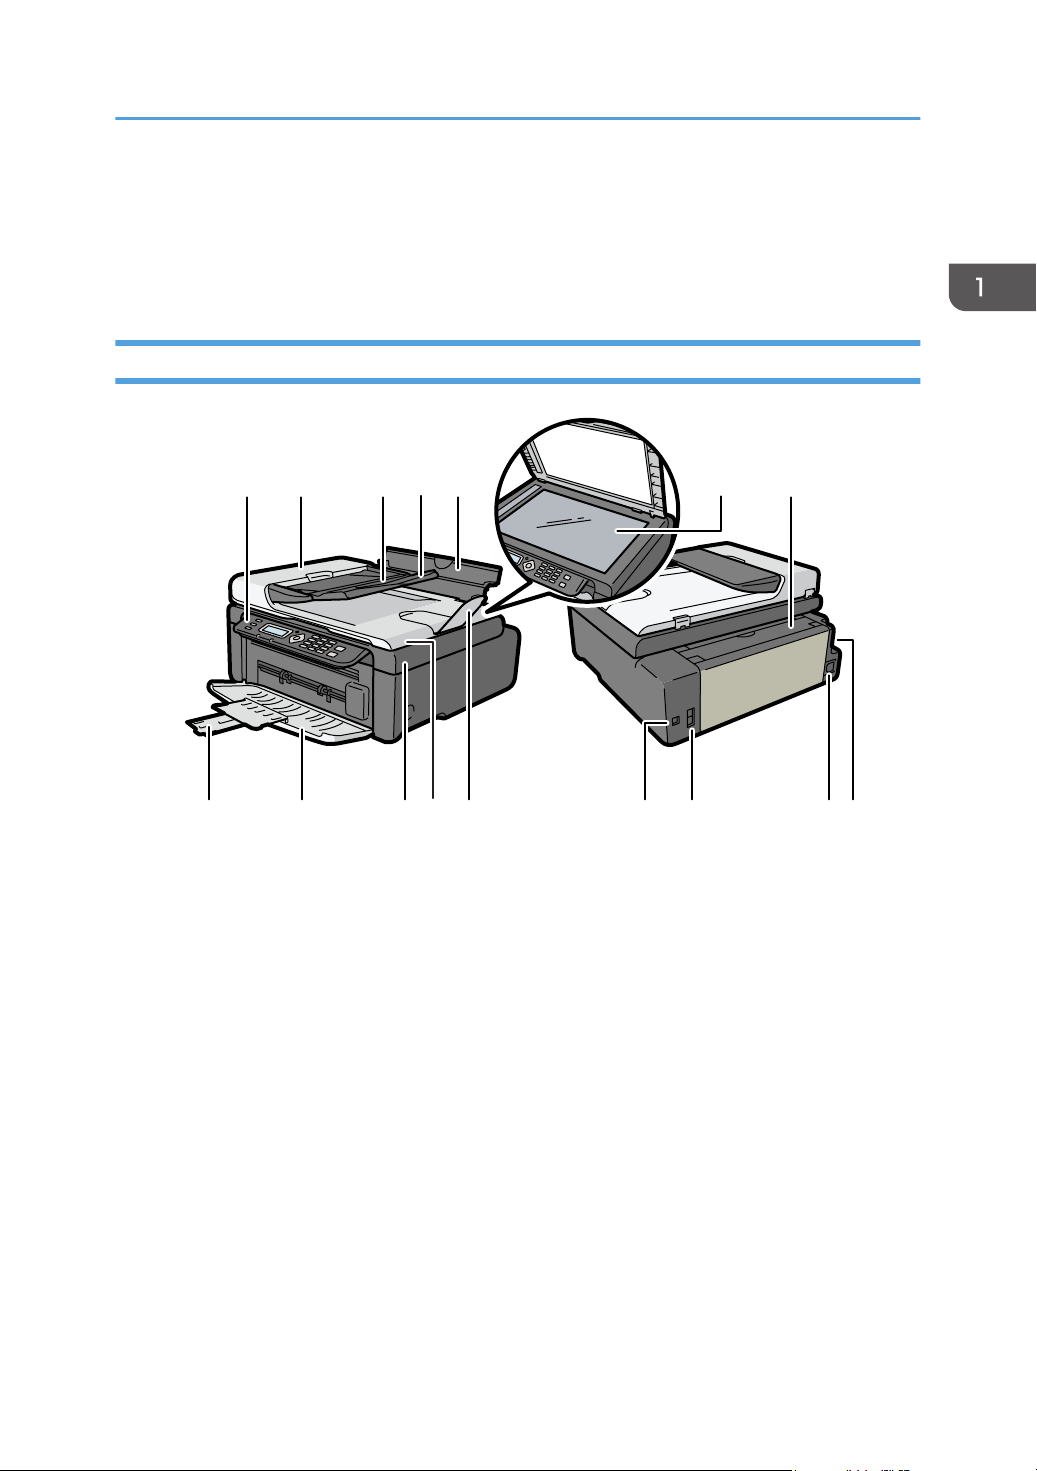
Guide to Components
Guide to Components
This section introduces the names of the various parts on the front and rear side of the machine and
outlines their functions.
Exterior
1. Control Panel
Contains a screen and keys for machine control.
2. ADF Cover
Open this cover to remove originals jammed in the ADF.
3. Input Tray for the ADF
Place stacks of originals here. They will feed in automatically. This tray can hold up to 15 sheets of plain
paper.
4. Tray Extension for the ADF
Pull out this tray extension to hold the originals.
5. Input Tray
This tray can hold up to 50 sheets of plain paper.
6. Exposure Glass
Place originals here sheet by sheet.
7
1
CHZ004
1. Guide to the Machine
7. Input Tray Cover
Set this cover up and pull out the paper source tray to load paper.
8. Tray Extension
Pull out and extend this tray extension to hold the output paper.
9. Front Cover
Open this cover to pull out the output tray before printing.
10. Maintenance Cover
Lift up this cover to replace consumables or clear a paper jam.
11. Auto Document Feeder (Exposure Glass Cover)
The auto document feeder (ADF) is integrated with the exposure glass cover. Open this cover to place
documents on the exposure glass.
12. Tray Extension
Pull out this tray extension to hold the originals.
13. USB Port
Use this port to connect the machine to a computer using a USB cable.
14. Line and TEL Connector
• Upper connector: External Telephone Connector. For connecting an external telephone.
• Lower connector: G3 (analog) Line Interface Connector. For connecting a telephone line.
15. Power Connector
Connect the power cord to the machine here. Insert the other end of the cable into a nearby wall outlet.
16. Power Switch
Use this switch to turn the power on or off.
8
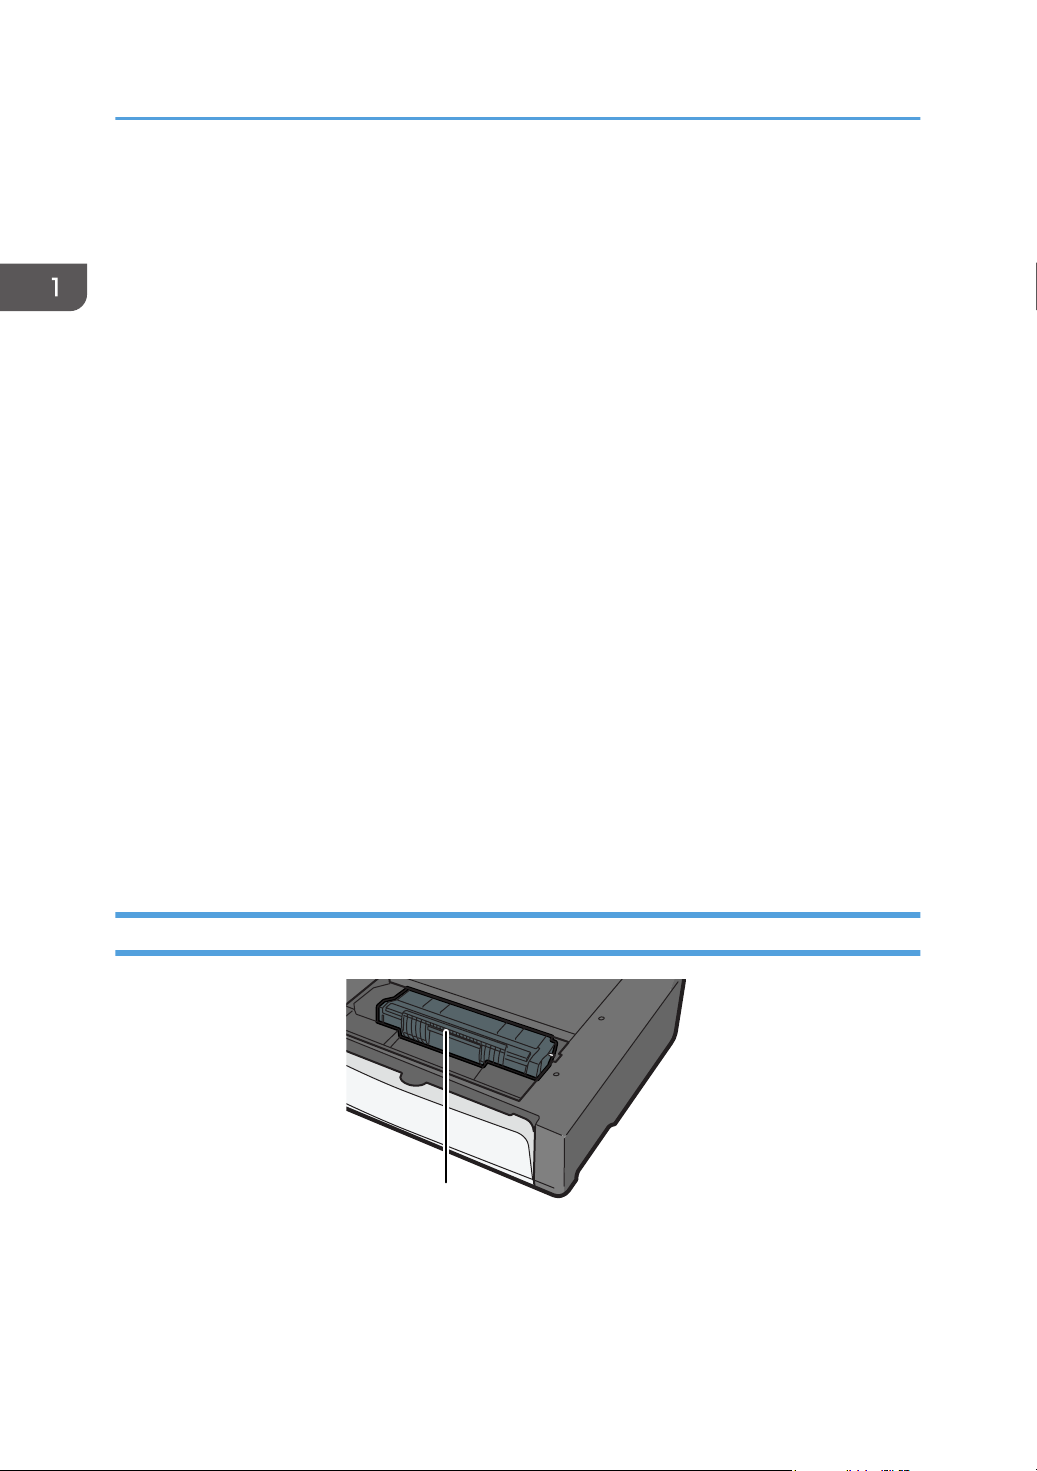
Interior
CHZ950
12 3 4 56
7891011 12
Guide to Components
1. Print Cartridge
A replacement consumable that is required to make prints on paper. It needs to be replaced after
approximately every 2000 pages printed. For details about replacing the cartridge, see p.97 "Replacing
the Print Cartridge".
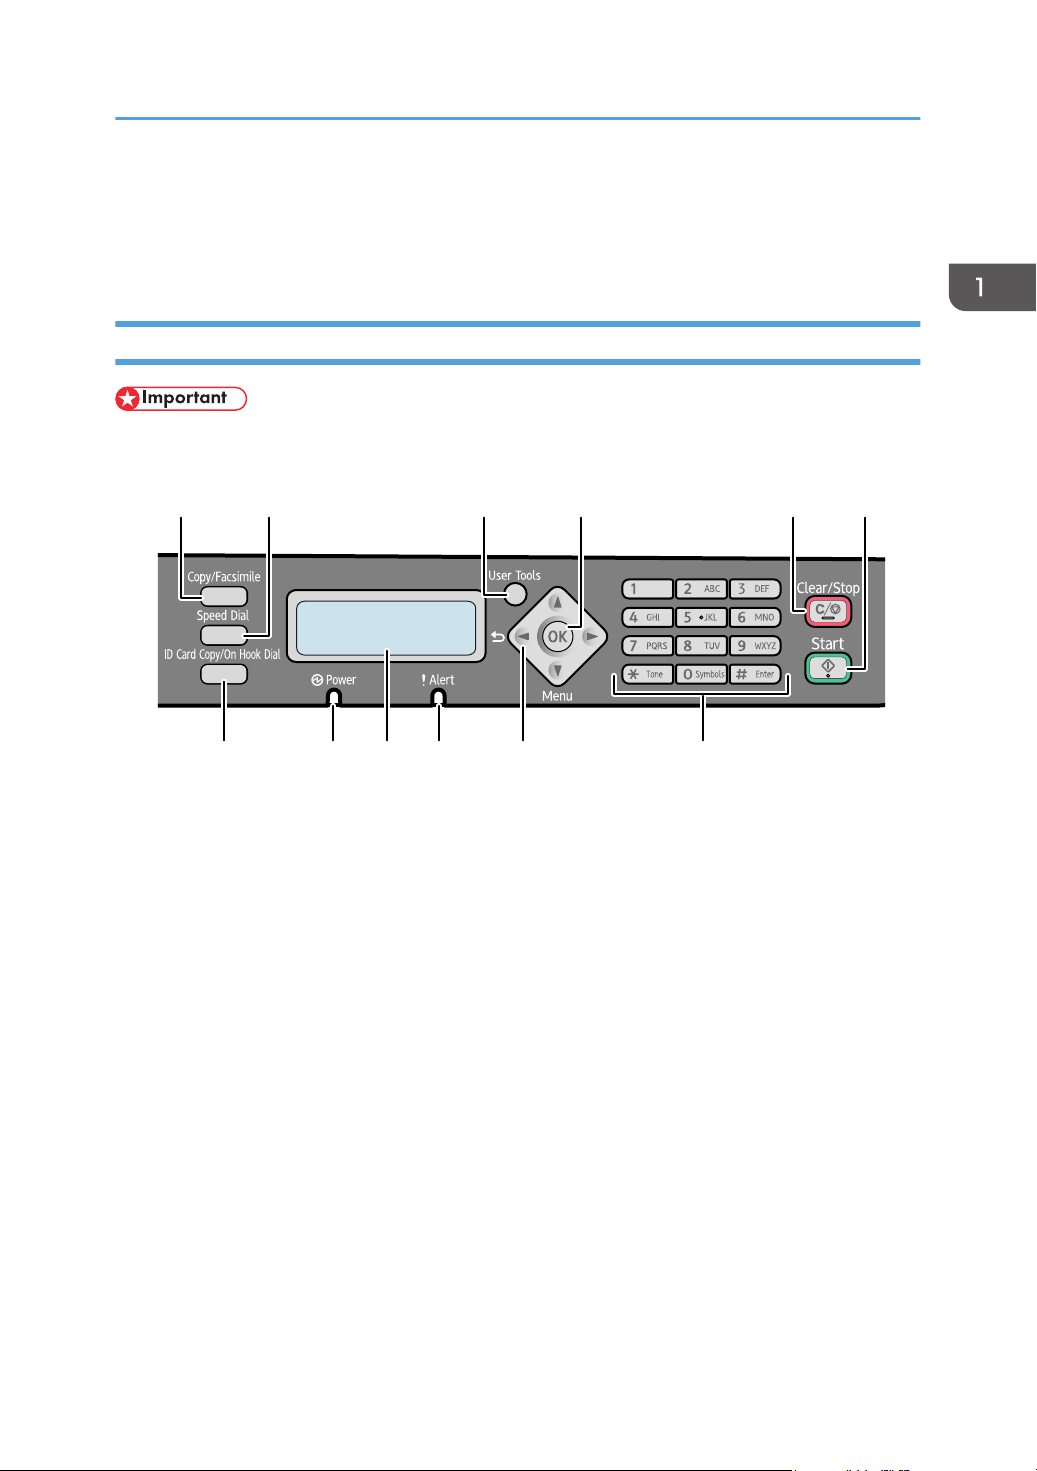
Control Panel
• The actual control panel may look different from the illustration below, depending on the country of
use.
1. [Copy/Facsimile] Key
Use this button to switch the machine to copier or fax mode.
2. [Speed Dial] Key
Use this button to send a fax using a registered speed dial number.
3. [User Tools] Key
Press to display the menu for configuring the machine's system settings.
4. [OK] Key
Use this key to confirm settings, and setting values, or move to the next menu level.
5. [Clear/Stop] Key
Use this button to cancel or stop a print job, document copying, fax transmission/reception, and other actions
in progress.
6. [Start] Key
Use this button to start fax transmit/receive or copy.
7. [ID Card Copy/On Hook Dial] Key
When the machine is in copier mode, use this button to perform an ID copy or modify ID copy settings.
When the machine is in fax mode, use this button to perform on-hook dialing or stop dialing a registered
destination.
9

1. Guide to the Machine
8. Power Indicator
This indicator lights up blue when the machine is turned on. It flashes when a print job is received and while
printing, scanning, or fax transmission/reception is in progress.
9. Screen
Displays current status and messages.
10. Alert Indicator
This indicator lights up red when the machine runs out of paper or consumables, when the paper settings do
not match the settings specified by the driver, or when other abnormalities occur. It flashes slowly when the
machine is running out of toner.
11. Scroll Keys
Press these keys to move the cursor in each direction.
12. Number Keys
Use to enter numerical values when specifying settings such as fax numbers and copy quantities, or enter
letters when specifying names.
10

Installing the Driver and Software
Installing the Driver and Software
You can install the necessary driver for this machine using the included CD-ROM.
The operating systems compatible with the drivers and software for this machine are: Windows XP/
Vista/7 and Windows Server 2003/2003 R2/2008/2008 R2.
The procedure in this section is an example based on Windows 7. The actual procedure may vary
depending on the operating system you are using.
• Be sure to disconnect the USB cable from the machine and turn the machine off before beginning
the installation.
Quick Install
Use Quick Install to install the printer driver, TWAIN driver, and WIA driver from the CD-ROM.
1. Close all applications except this manual.
2. Insert the CD-ROM into the CD-ROM drive.
3. From the CD-ROM menu, click [USB Quick Install].
4. Follow the instructions in the installation wizard.
Upgrading or Deleting the Printer Driver
Upgrading the printer driver
1. On the [Start] menu, click [Devices and Printers].
2. Right-click the icon of the printer model you want to modify, and then click [Printer
properties].
3. Click the [Advanced] tab.
4. Click [New Driver...], and then click [Next].
5. Click [Have Disk...].
6. Click [Browse...], and then select the printer driver location.
7. Click [OK], and then specify the printer model.
8. Click [Next].
9. Click [Finish].
10. Click [OK] to close the printer properties window.
11

1. Guide to the Machine
11. Restart the computer.
Deleting the printer driver
1. On the [Start] menu, click [Devices and Printers].
2. Right-click the icon of the printer you want to delete, and then click [Remove device].
3. Click [Yes].
4. Click any printer icon, and then click [Print server properties].
5. Click the [Drivers] tab.
6. Click the [Change Driver Settings] button if it is displayed.
7. Click [Remove...].
8. Select [Remove driver and driver package.], and then click [OK].
9. Click [Yes].
10. Click [Delete].
11. Click [OK].
12. Click [Close] to close the print server properties window.
Installing the Smart Organizing Monitor
Smart Organizing Monitor is a utility that allows you to modify the machine’s settings or view the
machine’s status from your computer. For details, see p.14 "What is Smart Organizing Monitor?".
1. Close all applications except this manual.
2. Insert the CD-ROM into the CD-ROM drive.
3. From the CD-ROM menu, click [Smart Organizing Monitor].
4. Select a language for Smart Organizing Monitor.
5. Follow the instructions in the installation wizard.
12

Initial Setup
Initial Setup
When you turn this machine on for the first time, you must set the following items. Select each setting
using the [ ], [ ], or number keys, and then press the [OK] key.
• [Language]
• [Country Code]
• [Year]
• [Month]
• [Day]
• [Hour]
• [Minute]
13

1. Guide to the Machine
What is Smart Organizing Monitor?
Install this utility on your computer from the included CD-ROM before using it.
Smart Organizing Monitor provides the following functions:
• Displays the status of the machine
Displays paper jam messages and other error messages.
• Paper size and type settings
Displays the settings for paper sizes or types available on this machine.
• Print test and configuration pages
Prints List/Report to check the list of settings for this machine and other information.
• Modify the system settings
Use to change custom paper size settings and other settings on this machine.
• Modify the Speed Dial
Register, change, or delete Speed Dial settings. Simplified Chinese can be used to specify the
destination.
For details about basic instructions on how to use Smart Organizing Monitor, see p.93 "Configuring
the Machine Using Smart Organizing Monitor".
14

2. Loading Paper
Supported Paper
Paper Size
• A4
• 8 1/2 " × 11 " (Letter)
• B5
• 5 1/2 " × 8 1/2 " (Half Letter)
• 7 1/4 " × 10 1/2 " (Executive)
• A5
• A6
• B6
• 16K (197 × 273 mm)
• 16K (195 × 270 mm)
• 16K (184 × 260 mm)
• Custom Paper Size
The following paper sizes are supported as custom paper sizes:
• Approximately 90-216 mm (3.6-8.5 inches) in width
• Approximately 148-297 mm (5.8-11.7 inches) in length
Paper Type
• Plain Paper (65-104 g/m2 (20-24 lb.))
• Recycled Paper (65-104 g/m2 (20-24 lb.))
• Thin Paper (60-64 g/m2 (16 lb.))
• Thick Paper (105 g/m2 (28 lb.))
Paper Capacity
50 sheets
(80 g/m2, 20 lb.)
15

2. Loading Paper
Non-Recommended Paper Types
Do not use the following types of paper:
• Ink-jet printer paper
• GelJet special paper
• Bent, folded, or creased paper
• Curled or twisted paper
• Wrinkled paper
• Damp paper
• Dirty or damaged paper
• Paper that is dry enough to emit static electricity
• Paper that has already been printed onto, except a preprinted letterhead paper.
Malfunctions are especially likely when using paper printed on by other than a laser printer
(e.g.monochrome and color copiers, ink-jet printers, etc.)
• Special paper, such as thermal paper and carbon paper
• Paper whose weight is heavier or lighter than the limitation
• Paper with windows, holes, perforations, cutouts, or embossing
• Adhesive label paper on which glue or base paper is exposed
• Paper with clips or staples
• When loading paper, take care not to touch the surface of the paper.
• Even if paper is adequate for the machine, poorly stored paper can cause paper misfeeds, print
quality degradation, or malfunctions.
16
Print Area
CHZ904
2
3
3
1
4
4
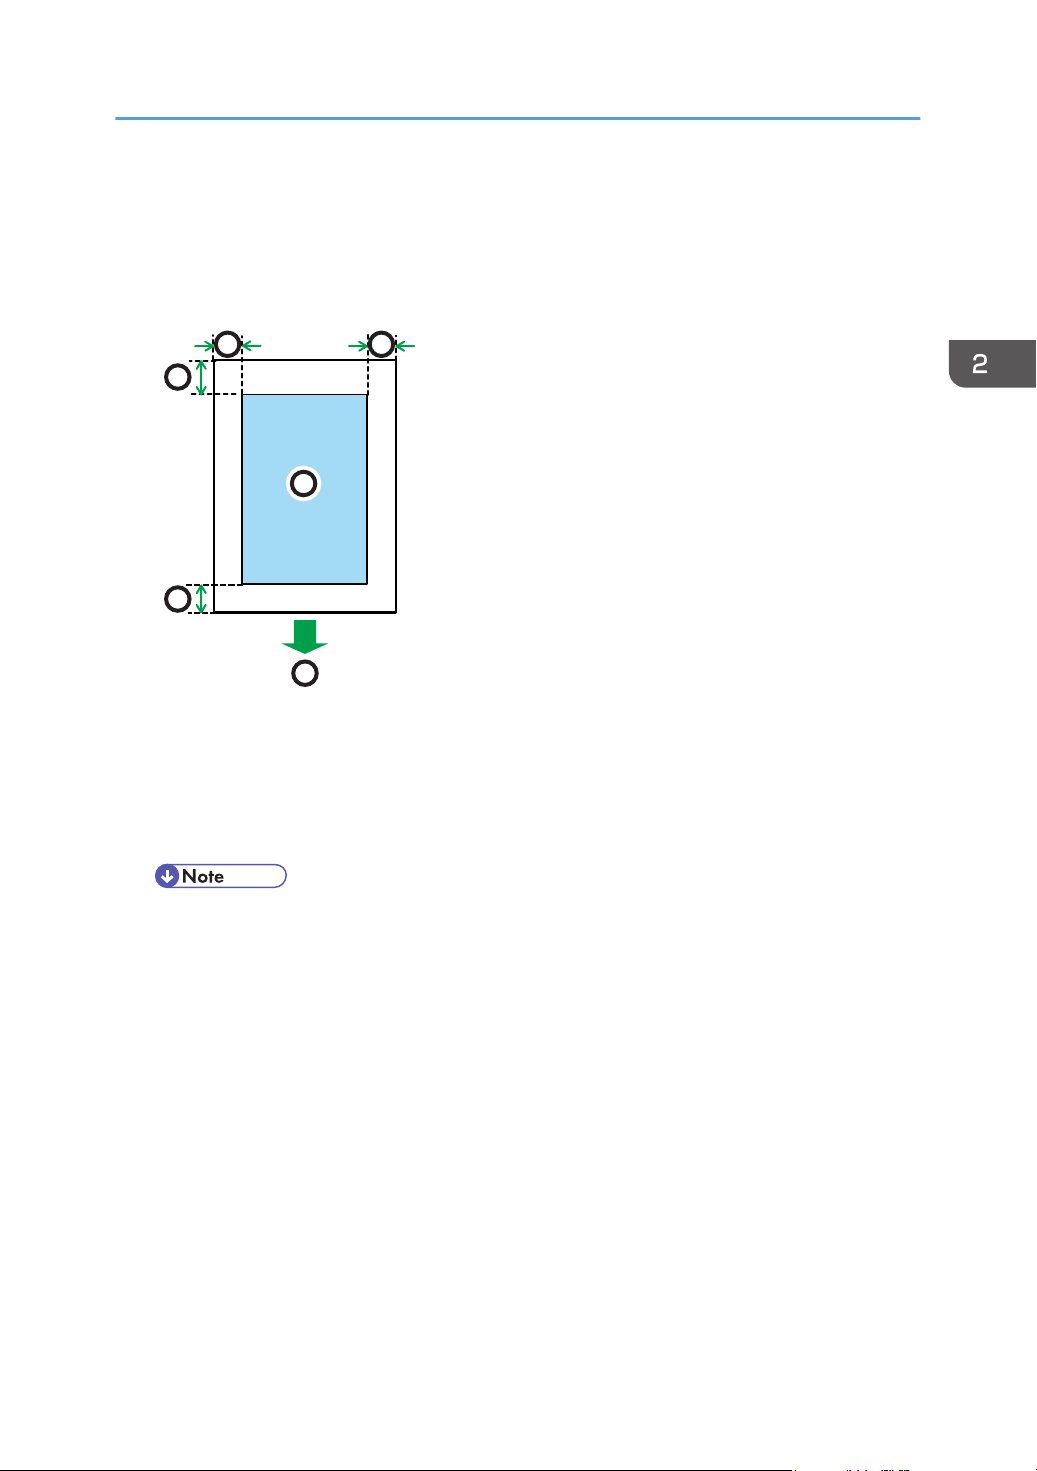
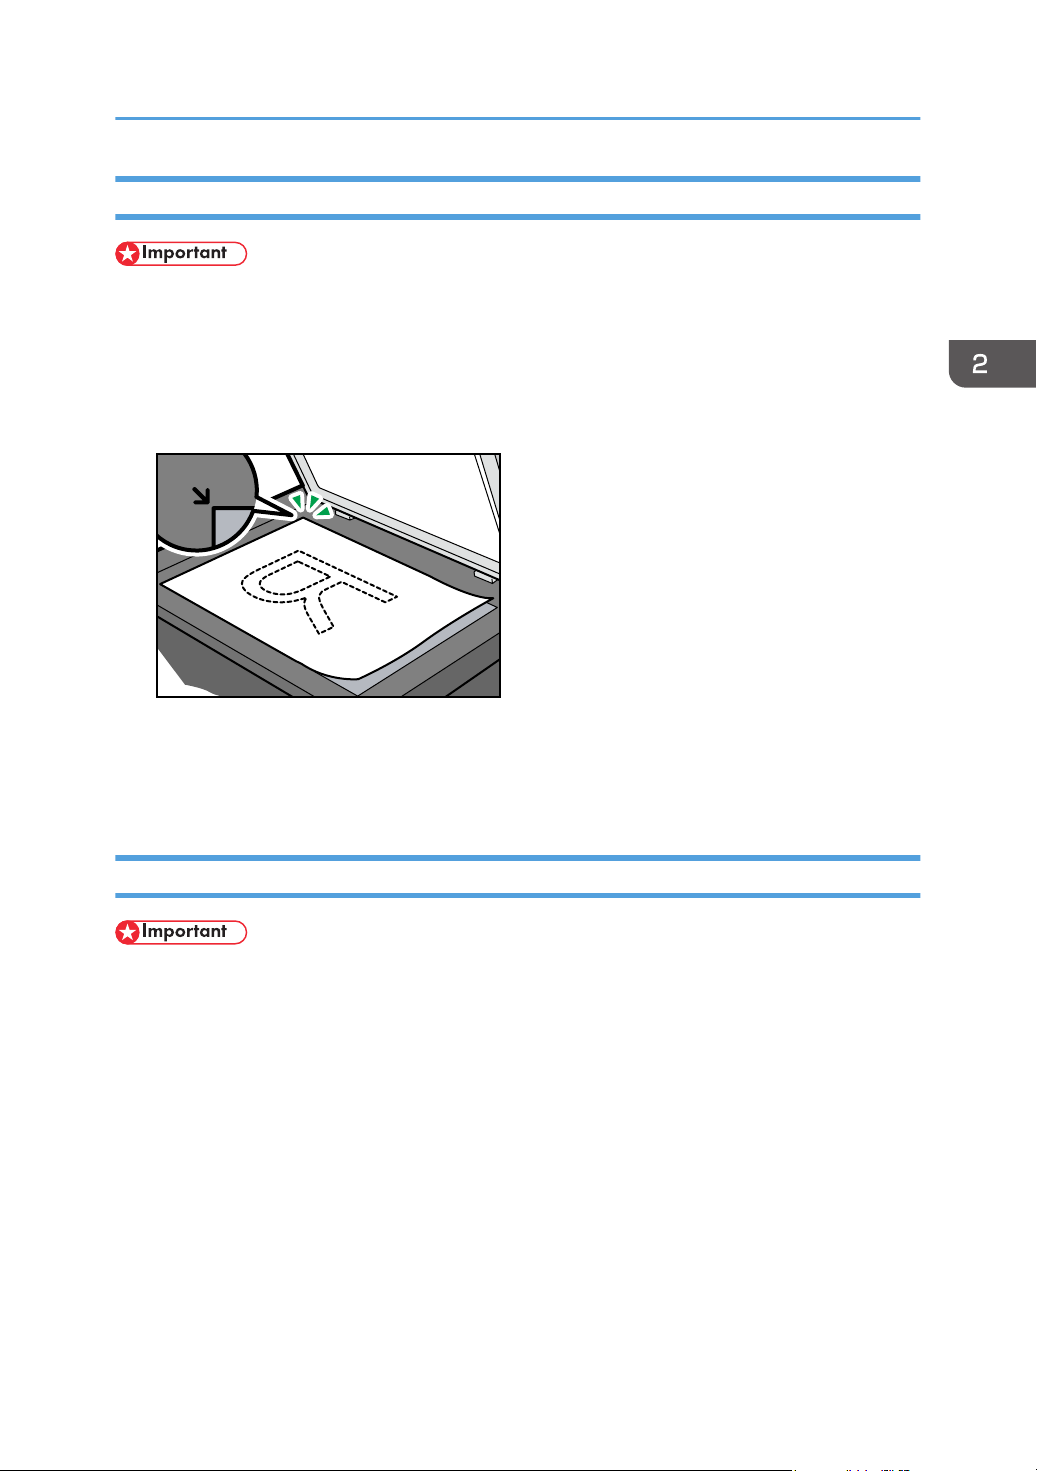
The diagram below shows the area of the paper that the machine can print on.
From the printer driver
Print Area
1. Print area
2. Feed direction
3. Approx. 4.2 mm (0.2 inches)
4. Approx. 4.2 mm (0.2 inches)
• The print area may vary depending on the paper size and printer driver settings.
17
CHZ904
2
3
3
1
4
4
CHZ904
2
3
3
1
4
4
2. Loading Paper
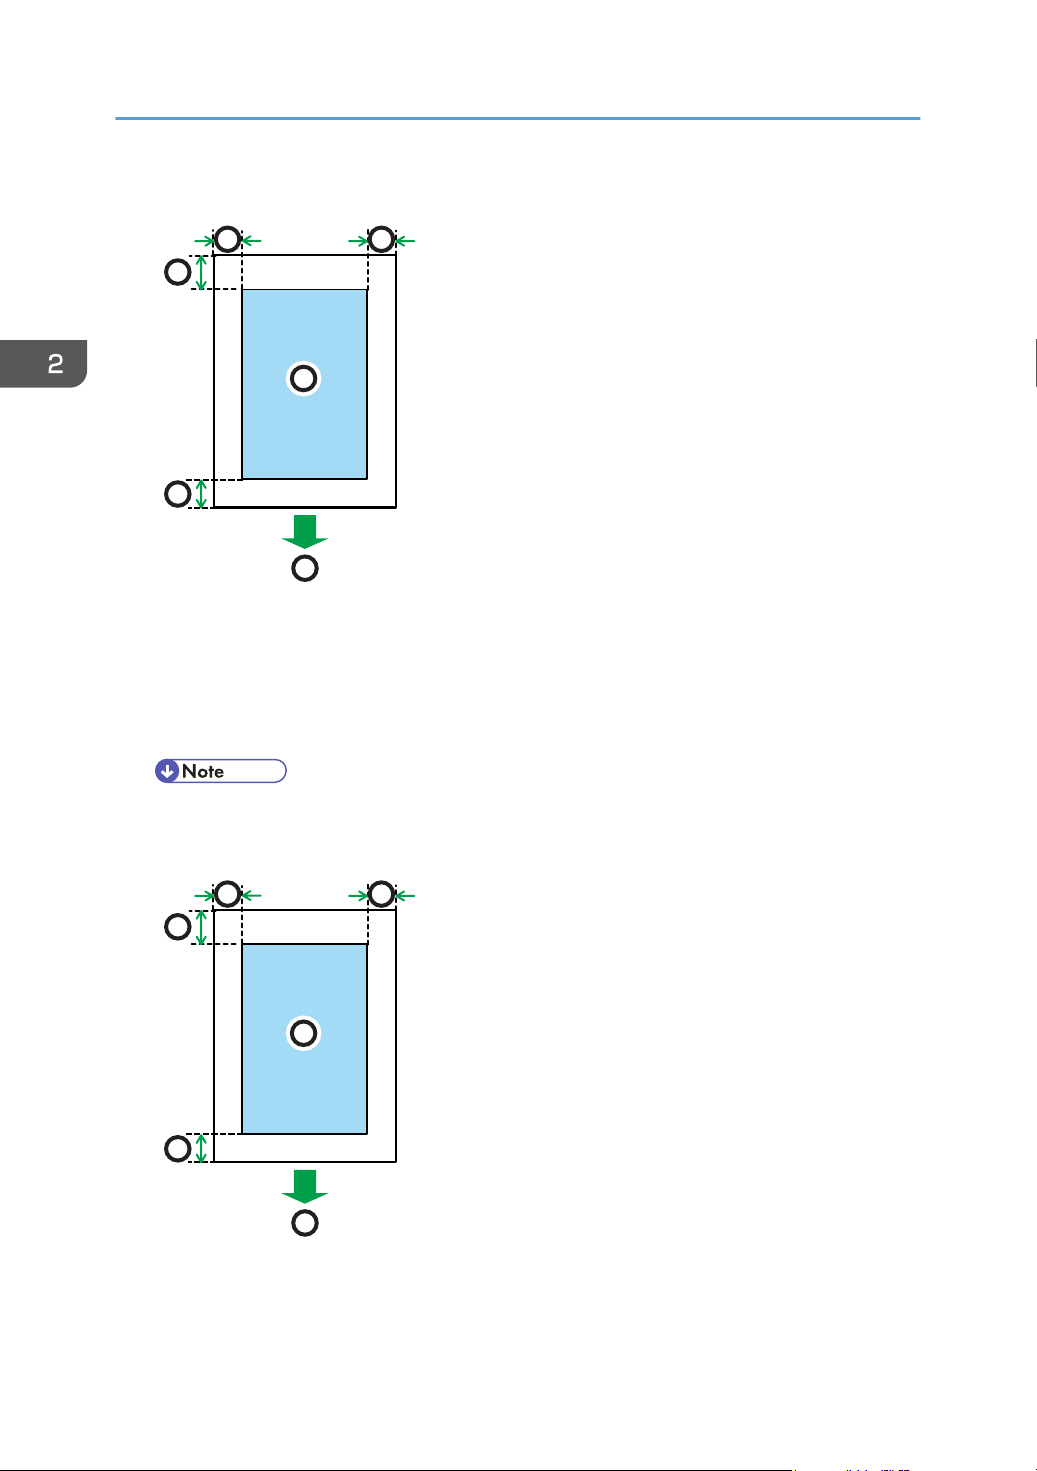
Copier function
1. Print area
2. Feed direction
3. Approx. 4 mm (0.2 inches)
4. Approx. 3 mm (0.1 inches)
• The print area may vary depending on the paper size.
Fax function
1. Print area
2. Feed direction
18

3. Approx. 4.2 mm (0.2 inches)
4. Approx. 4.2 mm (0.2 inches)
• The print area may vary depending on the paper size.
Print Area
19
1
2
CHZ005
1
2
CHZ006
2. Loading Paper
Loading Paper
Load a stack of paper for printing in the input tray on the back of the machine.
• When loading paper, be sure to configure the size and type of paper. When printing a document,
specify the paper size and type in the printer driver so that the settings configured when paper is
loaded can be used for printing.
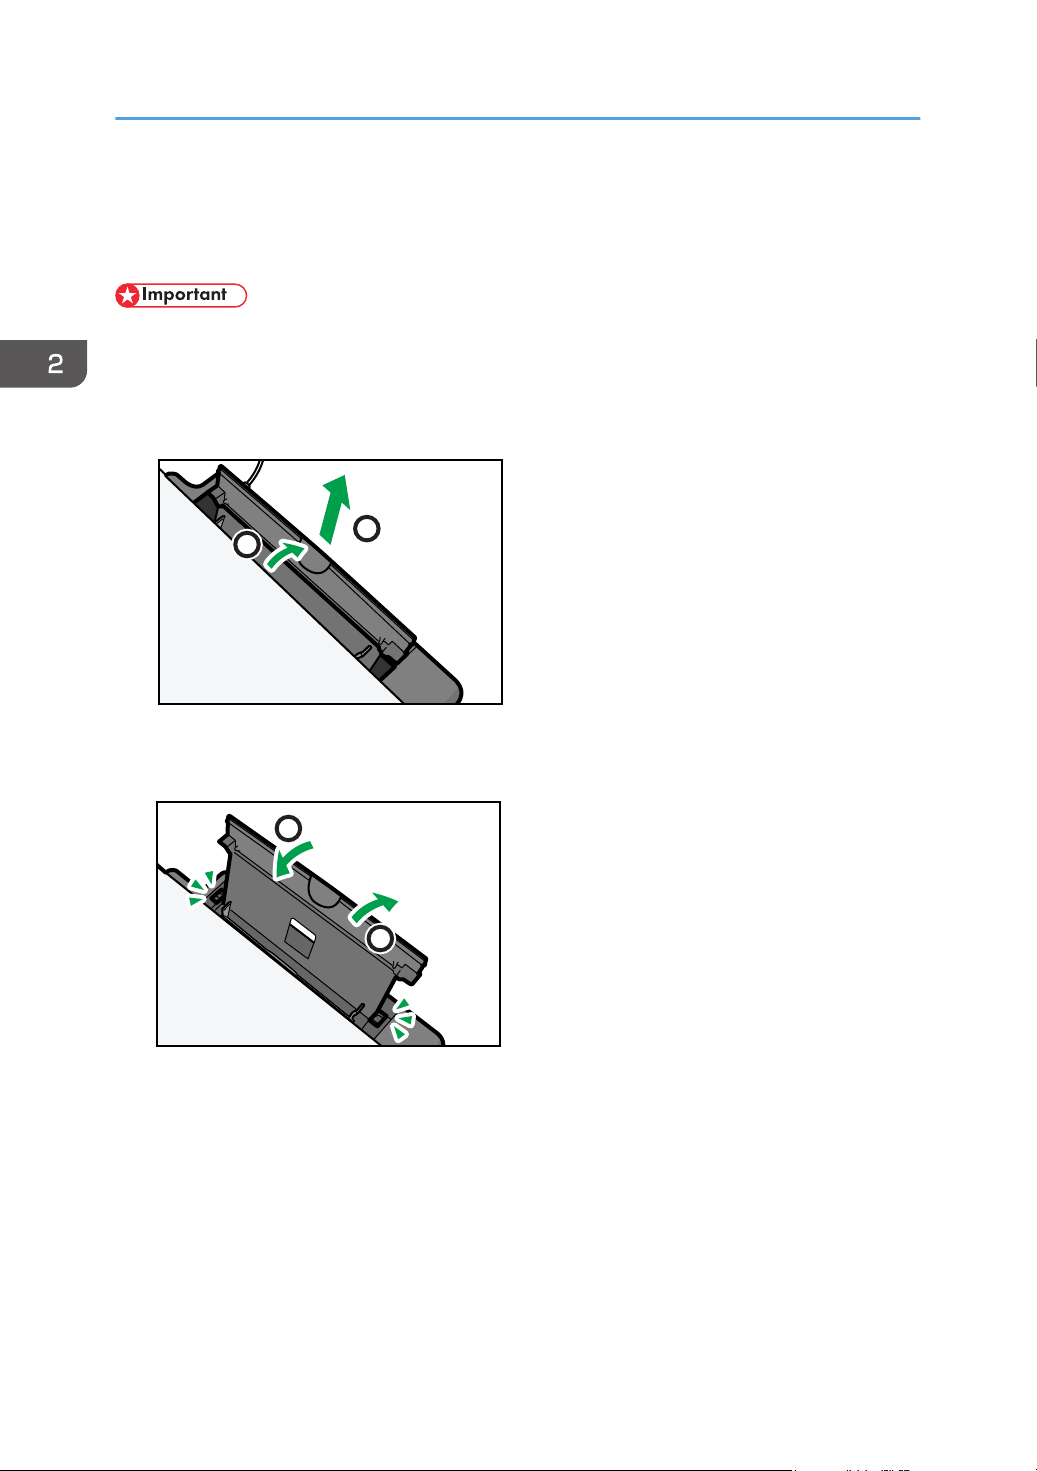
1. Open the input tray cover and pull out the tray.
2. After pulling out the tray, tilt it back and forth, and then attach the end of the input tray to
the machine.
20
CBK254
1
1
2
CHZ007
CHZ008
Loading Paper
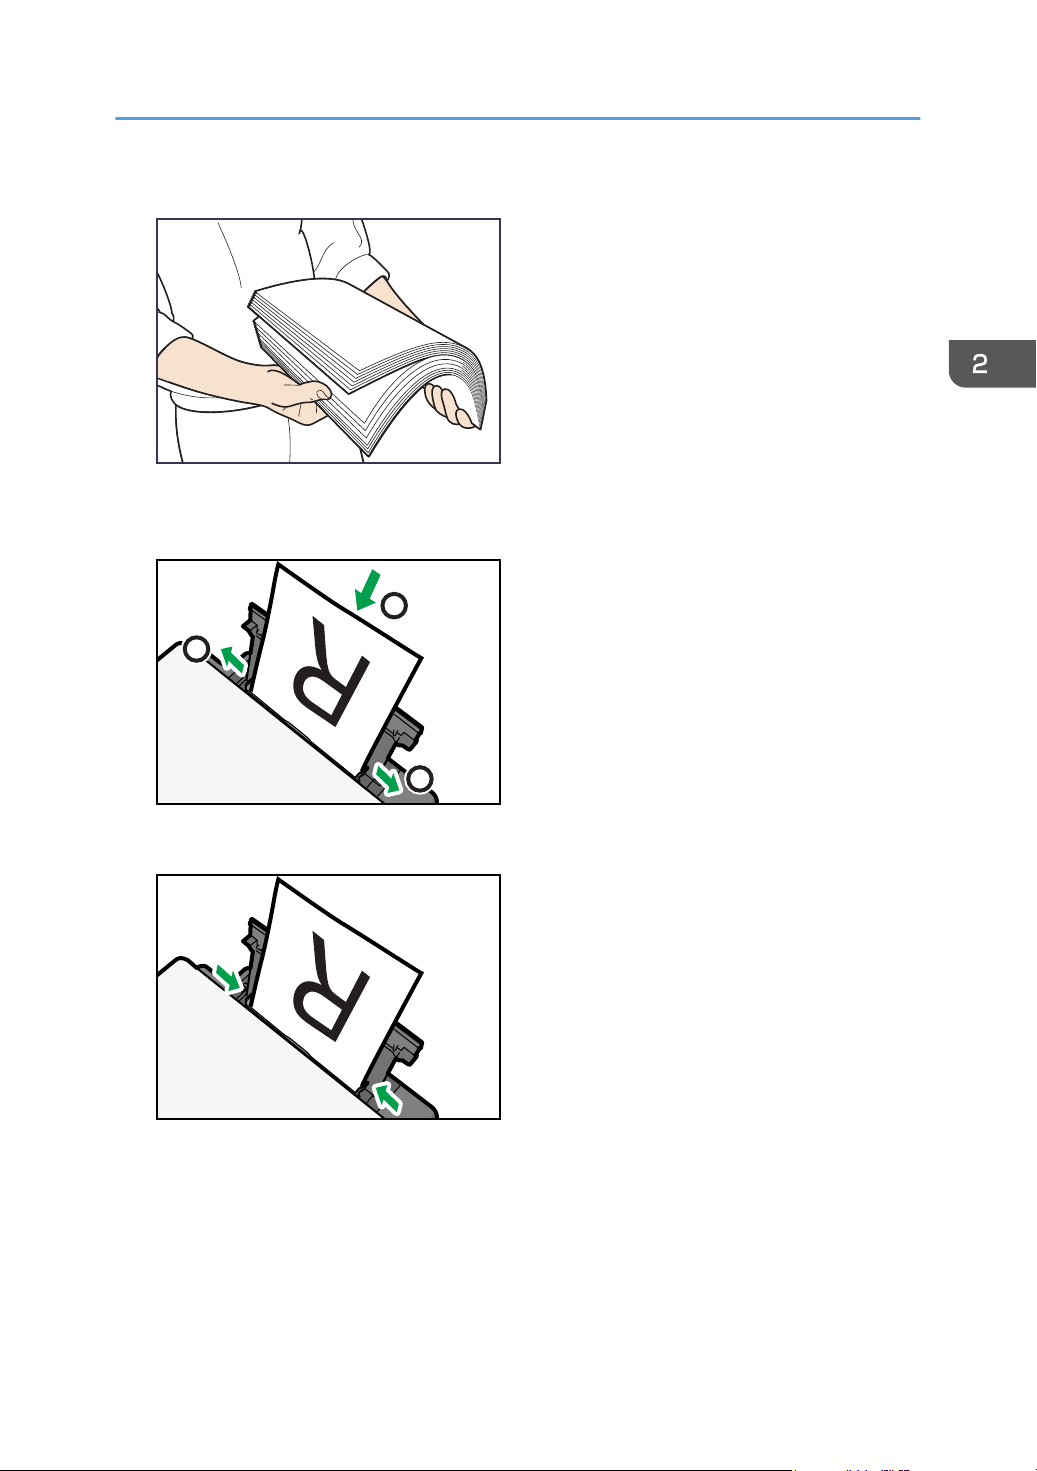
3. Fan the paper before loading it in the tray.
4. Slide the paper guide on both sides outward, and then load the paper print side up until it
stops.
5. Adjust the paper guide on both sides to fit the paper width.
21
CHZ027
CHZ960
2. Loading Paper
6. Open the front cover and tray extension.
Specifying Paper Type and Paper Size Using Control Panel
Specifying the paper type
1. Press the [User Tools] key.
22
2. Press the [ ] or [ ] key to select [System Settings], and then press the [OK] key.
3. Press the [ ] or [ ] key to select [Tray Paper Settings], and then press the [OK] key.
4. Press the [ ] or [ ] key to select [Paper Type], and then press the [OK] key.
5. Press the [ ] or [ ] key to select the paper type, and then press the [OK] key.
6. Press the [User Tools] key to return to the initial screen.
CHZ960
CHZ960
Loading Paper
Specifying the standard paper size
1. Press the [User Tools] key.
Press the [ ] or [ ] key to select [System Settings], and then press the [OK] key.
2.
3. Press the [ ] or [ ] key to select [Tray Paper Settings], and then press the [OK] key.
4. Press the [ ] or [ ] key to select [Paper Size], and then press the [OK] key.
5. Press the [ ] or [ ] key to select the paper size, and then press the [OK] key.
6. Press the [User Tools] key to return to the initial screen.
Specifying a custom paper size
1. Press the [User Tools] key.
2. Press the [ ] or [ ] key to select [System Settings], and then press the [OK] key.
3. Press the [ ] or [ ] key to select [Tray Paper Settings], and then press the [OK] key.
4. Press the [ ] or [ ] key to select [Paper Size], and then press the [OK] key.
5. Press the [ ] or [ ] key to select [Custom], and then press the [OK] key.
6. Press the [ ] or [ ] key to select [mm] or [inch], and then press the [OK] key.
7. Press the [ ] or [ ] key to select the width, and then press the [OK] key.
23

2. Loading Paper
8. Press the [OK] key.
9. Press the [ ] or [ ] key to select the length, and then press the [OK] key.
10. Press the [OK] key.
11. Press the [User Tools] key to return to the initial screen.
Specifying Paper Type and Paper Size Using Smart Organizing Monitor
The procedure in this section is an example based on Windows 7. The actual procedure may vary
depending on the operating system you are using.
Specifying the paper type and paper size
1. On the [Start] menu, click [All Programs].
2. Click [Smart Organizing Monitor for SP 100 Series].
3. Click [Smart Organizing Monitor for SP 100 Series Status].
4. On the [Status] tab, click [Change...].
5. Select the paper type and paper size, and then click [OK].
6. Click [Close].
Changing the custom paper size
1. On the [Start] menu, click [All Programs].
2. Click [Smart Organizing Monitor for SP 100 Series].
3. Click [Smart Organizing Monitor for SP 100 Series Status].
4. On the [User Tool] tab, click [Printer Configuration].
5. On the [System] tab, select [mm] or [inch] in the [Measurement Unit:] list.
6. In the [Horizontal: (90 to 216 mm)] box, enter the width.
7. In the [Vertical: (148 to 297 mm)] box, enter the length.
8. Click [OK].
9. Click [Close].
24

Placing Originals
This section describes the types of originals you can set and how to place them.
About Originals
Recommended size of originals
Exposure glass
• Up to 216 mm (8.5 ") in width, up to 297 mm (11.7 ") in length
ADF
• Paper size: 140 to 216 mm (5 1/2 " to 8 1/2 ") in width, 128 to 297 mm (5.0 " to 11.7 ") in
length
• Paper weight: 60 to 90 g/m2 (16 to 24 lb.)
Up to 15 sheets of an original can be placed in the ADF at once (when using paper weighing 80
g/m2, 20 lb.).
Placing Originals
Types of originals not supported by the Auto Document Feeder
If placed in the ADF, the following types of originals might be damaged, become jammed, or result in
gray or black lines appearing on prints:
• Originals larger or heavier than the recommended amount
• Stapled or clipped originals
• Perforated or torn originals
• Curled, folded, or creased originals
• Pasted originals
• Originals with any kind of coating, such as thermal fax paper, art paper, aluminum foil, carbon
paper, or conductive paper
• Originals with perforated lines
• Originals with indexes, tags, or other projecting parts
• Sticky originals such as translucent paper
• Thin, highly flexible originals
• Thick originals such as postcards
• Bound originals such as books
• Transparent originals such as OHP transparencies or translucent paper
25
CHZ916
CHZ919
2. Loading Paper
• Originals that are wet with toner or white out
Unscannable image area
Even if you correctly place originals, margins of a few millimeters on all four sides of the original may not
be scanned.
Margins when using exposure glass
1. Approx. 4.1 mm (0.2 inches)
2. Approx. 3 mm (0.1 inches)
3. Approx. 4 mm (0.2 inches)
Margins when using ADF
1. Approx. 4.1 mm (0.2 inches)
2. Approx. 3 mm (0.1 inches)
3. Approx. 4.3 mm (0.2 inches)
26
CHZ009
Placing Originals
Placing Originals on the Exposure Glass
• Do not place originals until all correction fluid or toner becomes completely dry. Doing so may
create marks on the exposure glass that will appear on copies.
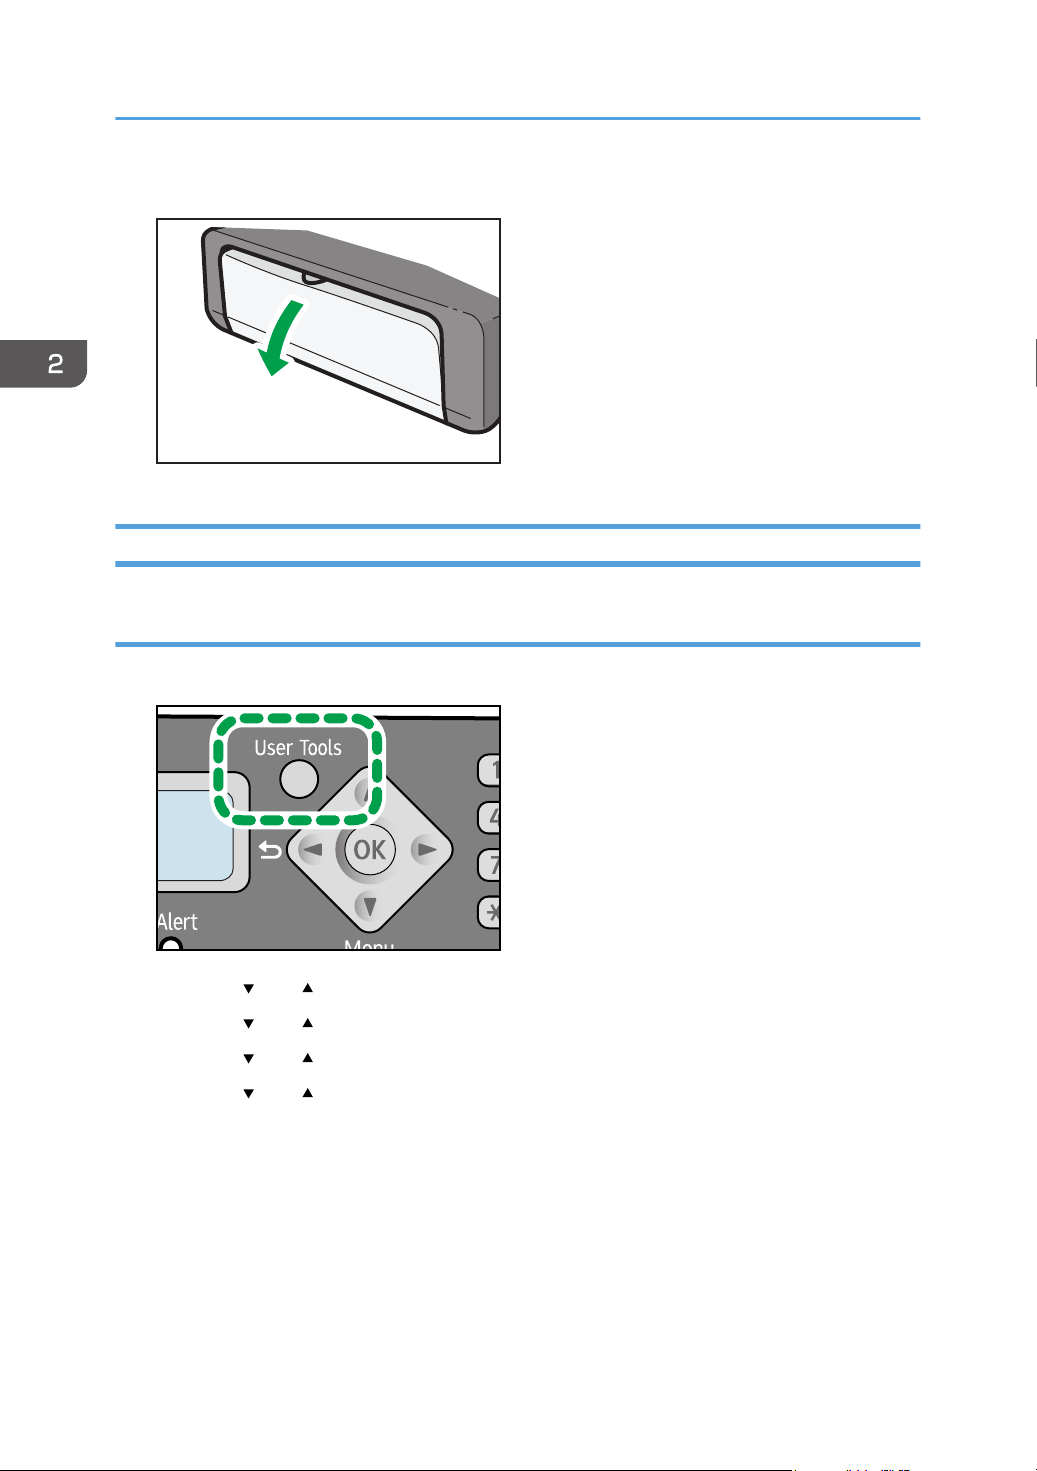
1. Lift the exposure glass cover.
2. Place the original face down on the exposure glass. The original should be aligned to the
rear left corner.
3. Lower the exposure glass cover.
Hold down the cover with your hands when using thick, folded, or bound originals and when the
cover cannot be lowered completely.
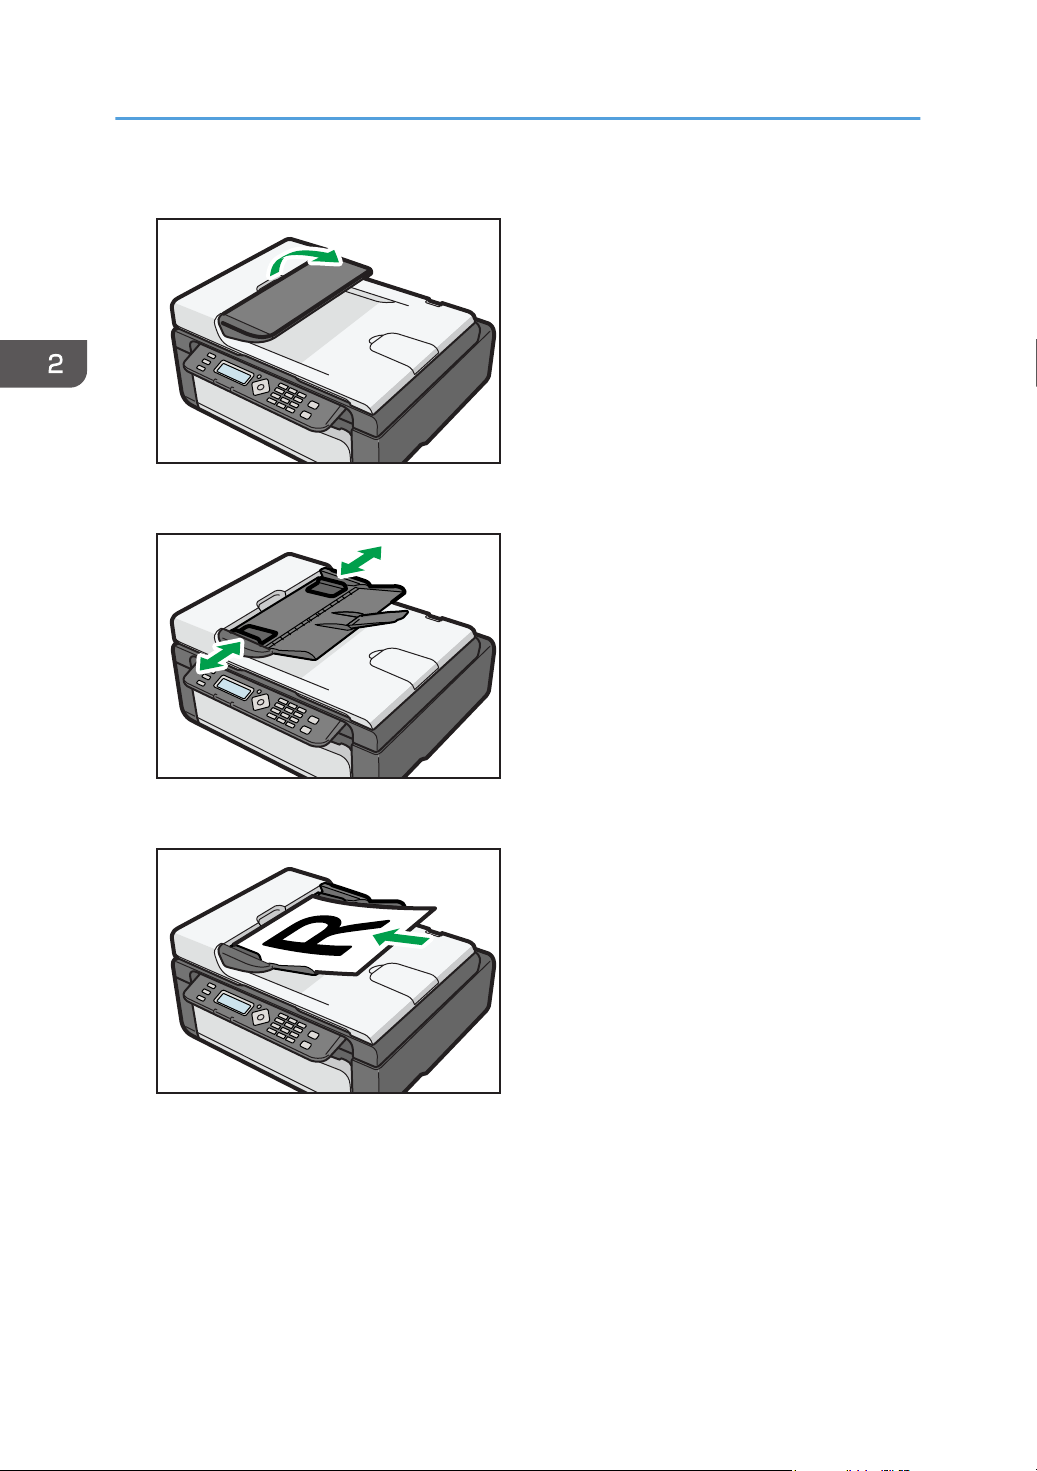
Placing Originals in the Auto Document Feeder
• Do not place originals mixed with different in the ADF all at once.
• To prevent multiple sheets from being fed at once, fan the pages of your original before placing
them in the ADF.
27
CHZ010
CHZ011
CHZ012
2. Loading Paper
1. Open the input tray for the ADF.
2. Adjust the guides according to the size of the originals.
28
3. Place the aligned originals face up in the ADF. The last page should be on the bottom.
Loading...