


User Manual
NeoPix Easy+
Mini projector
Register your product and get support at
www.philips.com/support
Table of contents
Introduction 3
Dear customer 3 About this user manual 3 What’s in the box 3 Product highlights 3
1 General safety information 4
Setting up the product 4 Repairs 4 Power supply 5
2 Overview 5
Top view 5 Front view 6 Side view 6 Rear view 6 Remote control 6 Access home menu 7
3 Initial operation 7
Placing projector 7 Changing screen size 8 Connecting power supply 8 Preparing the remote control 9 Power on and setup 9
4 Connect to playback devices 10
Connecting to devices through HDMI 10 Connecting to a computer through VGA 10
Connecting to external speakers or headphones
11
5 Wireless projection with Android devices 11
6 Wireless projection with iOS devices
12 7 Connect to wireless speaker 13 8 Media playback 13
Movie playback 13 Music playback 14 Photo playback 14
9 Change settings 15
Picture settings 15 WiFi settings 15 Bluetooth settings 15 Language settings 15 Restore default settings 15
10 Service 16
Cleaning 16 Update software 16 Troubleshooting 16
11 Appendix 19
Technical data 19
Introduction
Dear customer
Thank you for purchasing this projector.
We hope you enjoy this product and the many functions it offers!
About this user manual
The quick start guide supplied with this product allows you to start using this product quickly and easily. Detailed descriptions can be found in the following sections of this user manual.
Read the entire user manual carefully. Follow all safety instructions in order to ensure proper operation of this product (see General safety information, page 4). The manufacturer accepts no liability if these instructions are not followed.
Symbols used
Notice Troubleshooting
This symbol indicates tips that will help you in using this product more effectively and easily.
DANGER!
Danger of personal injury!
This symbol gives warning of danger of personal injury. Physical injury or damage can result from improper handling.
CAUTION!
Damage to the product or loss of data!
This symbol gives warning of damage to the product and possible loss of data. Damage can result from improper handling.
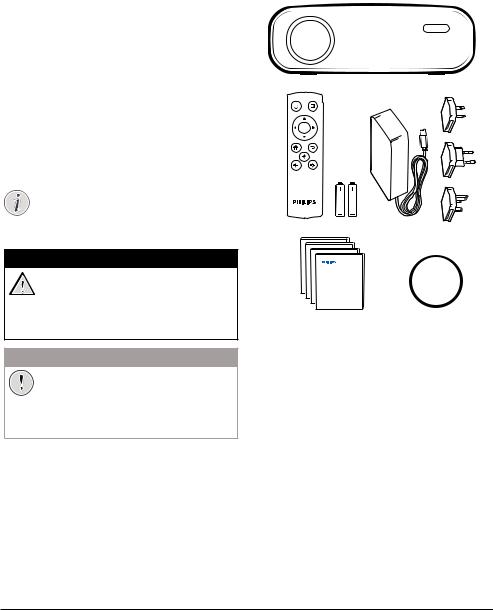
What’s in the box
ANeoPix Easy+ projector (NPX445)
BRemote control with 2 AAA batteries
CA/C power adapter
DPower plugs (EU, UK, US)
EQuick Start Guide
FLens cover
a
b |
d |
|
c |
||
|
OK
e f
Quick Start
Guide
Product highlights
Connecting to devices with HDMI output
With an HDMI cable, you can connect the projector to a playback device (see Connecting to devices through HDMI, page 10).
Wireless Screen Mirroring (Android and iOS)
With the Wireless Screen Mirroring function, you can share the screen of your smartphone without a cable. In order to allow screen mirroring, your smartphone must support the screen mirroring feature. This projector works with Miracast-compatible Android phones and iPhones with iOS 7/8/9/10 and 11.
Introduction |
3 |

1 General safety information
Take note of all warning and safety notes indicated. Do not make any changes or settings that are not described in this user manual. Incorrect operation, and improper handling can lead to physical injury, damage to the product or loss of data.
Setting up the product
This product is for indoor use only. Place the product securely on a stable, flat surface. To help avoid possible injuries to persons or
damage to the product itself, position all cables in such a way that no one will trip over them.
Do not operate the product in damp rooms. Never touch the mains cable or the mains connection with wet hands.
The product must have sufficient ventilation and must not be covered. Do not put the product in closed cabinets, boxes, or other enclosures when in use.
Protect the product from direct sunlight, heat, intense temperature fluctuations and moisture. Do not place the product in the vicinity of heaters or air conditioners. Observe the information on temperature listed in the technical data (see Technical data, page 19).
Prolonged operation of the product causes the surface to become hot. In case of overheating, the product automatically switches to standby mode.
Do not allow liquids to leak into the product. Turn off the product and disconnect it from the mains supply if liquids or foreign substances leaked into the product. Have the product inspected by an authorised service centre.
Always handle the product with care. Avoid touching the lens. Never place heavy or sharp objects on the product or on the power cable.
If the product gets too hot or emits smoke, shut it down immediately and unplug the power cable. Have your product checked by an authorised service centre. Keep the product away from open flames (e.g. candles).
DANGER!
Risk of explosion with incorrect type of batteries!
There is a risk of explosion if the wrong battery type is used.
Do not expose the batteries (battery pack or embedded batteries) to excessive heat such as sunshine, or open fire.
Under the following conditions, a layer of moisture can appear inside the product which can lead to malfunctions:
•if the product is moved from a cold to a warm area;
•after a cold room is heated;
•when the product is placed in a damp room.
Proceed as follows to avoid any moisture buildup:
1Seal the product in a plastic bag before moving it to another room, in order for it to adapt to room conditions.
2Wait one to two hours before you take the product out of the plastic bag.
The product should not be used in a very dusty environment. Dust particles and other foreign objects may damage the product.
Do not expose the product to extreme vibrations. This may damage the internal components.
Do not allow children to handle the product without supervision. The packing materials should be kept out of the hands of children.
For your own safety, do not use the product during thunderstorms with lightning.
Repairs
Do not repair the product yourself. Improper maintenance can result in injuries or damage to the product. The product must be repaired by an authorised service centre.
Please find the details of authorised service centres on the warranty card supplied with this product.
Do not remove the type label from this product, as this will void the warranty.
4 |
Philips · NeoPix Easy+ |
Power supply
Use only a power adapter which is certified for this product (see Technical data, page 19). Check whether the mains voltage of the power supply matches the mains voltage available at the setup location. This product complies with the voltage type specified on the product.
The power outlet shall be installed near the product and shall be easily accessible.
CAUTION!
Always use the  button to turn the projector off.
Turn off the product and unplug from the power outlet before cleaning the surface (see Cleaning, page 16). Use a soft, lint-
free cloth. Never use liquid, gaseous or easily flammable cleaners (sprays, abrasives, polishes, alcohol). Do not allow any moisture to reach the interior of the product.
DANGER!
Risk of eye irritation!
This product is equipped with a high power LED (Light Emitting Diode), which emits very bright light. Do not look directly into the projector lens during operation. This could cause eye irritation or damage.
2 Overview
Top view
a b
h g f e d c
AKeystone adjustment knob
Adjust distorted images to a rectangular or square shape.
BFocus adjustment knob
Adjust image sharpness.
C
•Switch the projector on or to standby.
•When the projector is switched on, the LED turns green. When the projector is in standby, the LED turns red.
D
Return to a previous menu screen.
E
Confirm a selection or entry.
FNavigation buttons
•Navigate menu options.
•Press  /
/ to change a selection.
G
Access the settings menu.
H
Access the home menu.
Overview |
5 |

Front view
a b
A Projection lens
B Front IR sensor
Side view
a b c |
d e f |
AUX MICRO SD |
HDMI USB DC |
A

3.5mm audio output; connect to external speakers or headphones.
B
3.5mm audio input; works only through VGA connection.
CMicro SD card slot
Connect to a Micro SD card for media play.
D 
Connect to the HDMI output on a playback device.
EUSB port
Connect to a USB storage device for media play.
F
Connect to the power supply.
Rear view
a b
AVGA port
Connect to the VGA port on a computer.
BRear IR sensor
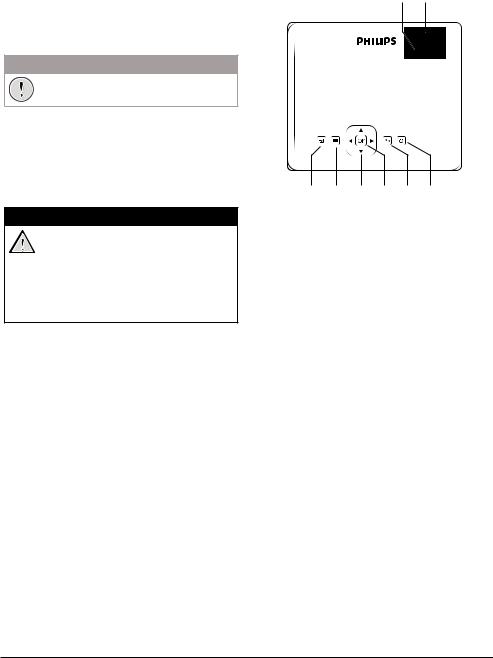
Remote control
h |
a |
|
b |
g |
OK |
f |
c |
e |
d |
|
A 
Access the home menu.
B 
Confirm a selection or entry.
C 
Return to a previous menu screen.
D  /
/
Increase or decrease volume.
E 
Mute or restore volume.
F 
Access the home menu.
GNavigation buttons
•Navigate menu options.
•Press  /
/ to change a selection.
H
•Switch the projector on or to standby.
•When the projector is switched on, the LED turns green. When the projector is in standby, the LED turns red.
6 |
Philips · NeoPix Easy+ |
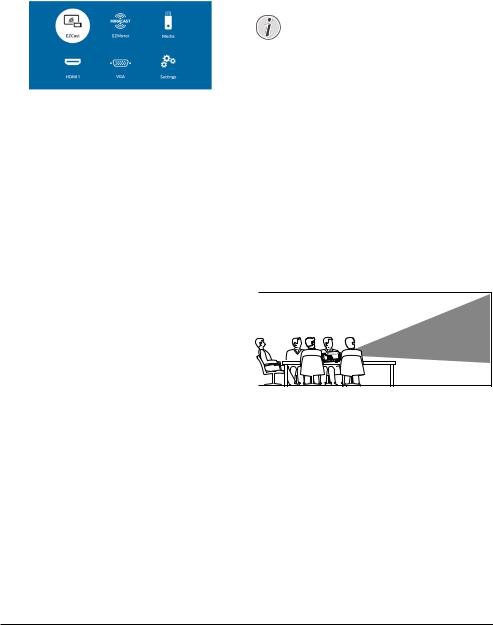
Access home menu
The home menu provides easy access to connected devices, setup and other useful features in the projector.
1Press  . The home menu is displayed.
2Press the Navigation buttons and OK to select the following.
•EZCast: Start wireless connection to an iPhone for Screen Mirroring.
•EZMirror: Start wireless connection to an Android device for Screen Mirroring.
•Media: Access media playback from USB or Micro SD card.
•HDMI: Select the digital device connected to HDMI on the projector.
•VGA: Select the digital device connected to VGA on the projector.
•Settings: Access menus to change picture, WiFi, Bluetooth and other settings.
3 Initial operation
Placing projector
You can install the projector in four different configuration. Follow the guidelines below for different projector placement.
Notice
For overhead mounting on ceiling, purchase a projector mount recommended by an installation professional and follow the instructions that come with the mount.
Before mounting on the ceiling, make sure the ceiling can support the weight of the projector and mounting kit.
For ceiling installation, this product must be securely attached to the ceiling in accordance with the installation instructions. An improper ceiling installation may result in accident, injury or damage.
Front table
1Place the projector on a table in front of the projection screen. This is the most common way to position the projector for quick setup and portability.
2To adjust projection to the correct position, press  , and select Settings - Picture Settings - Projection Location - Front).
Front ceiling
1Mount the projector on the ceiling with upside up in front of the projection screen. A projector mount is required to mount the projector on ceiling.
Initial operation |
7 |
 Loading...