


Register your product and get support at
NP1100/05
NP1100/12
EN User manual |
3 |
|
|
Contact information |
31 |
|
|

Contents
1 |
Important |
4 |
|
Safety |
4 |
|
Notice |
5 |
|
Disposal of product and packing |
|
|
material |
6 |
|
|
|
2 Your Streamium Network Music |
|
|
|
Player |
8 |
|
Overview |
8 |
|
Front view |
8 |
|
Top view |
8 |
|
Rear view |
8 |
|
Remote control |
8 |
|
|
|
3 |
Prepare |
10 |
|
Install remote control batteries |
10 |
|
Position your NP1100 |
10 |
|
|
|
4 |
Connect |
11 |
|
Connect audio device |
11 |
|
Connect AC power |
11 |
|
First-time setup |
11 |
|
Create wireless connection |
12 |
|
Create wired connection |
12 |
|
|
|
5 Turn on / switch to standby |
13 |
|
|
|
|
6 |
Play |
14 |
|
Adjust volume |
14 |
|
Mute |
14 |
|
Repeat play |
14 |
|
Shuffle play |
14 |
|
Stream music from a UPnP device |
14 |
|
Install Windows Media Player 11 |
14 |
|
Configure a PC to share music |
15 |
|
Search for audio files (music) |
15 |
|
Scroll at high speed |
15 |
|
Quick jump navigation |
15 |
|
Alphanumeric search |
15 |
|
Internet radio |
16 |
|
Listen to Internet radio |
16 |
Mark radio stations as Favorites |
16 |
|
|
|
|||
Listen to Favorite Stations |
16 |
lish |
|
Manually add Internet radio stations |
17 |
||
Listen to My Media |
17 |
Eng |
|
Browse through Internet Radio lists |
17 |
|
|
|
|
|
|
|
|
|
|
7 |
Settings |
19 |
Contents |
|
Adjust display |
19 |
|
|
|
||
|
Adjust DIM settings |
19 |
|
|
Adjust brightness |
19 |
|
|
Date and time settings |
19 |
|
|
Set the time |
19 |
|
|
Set the time format |
19 |
|
|
Set the date |
20 |
|
|
Set sleep timer |
20 |
|
|
Set button sound (Clicker) |
20 |
|
|
Network setup |
20 |
|
|
Create wireless connection |
20 |
|
|
Create wired connection |
20 |
|
|
Change language |
21 |
|
|
|
|
|
8 |
Maintenance |
22 |
|
|
Cleaning |
22 |
|
|
Update |
22 |
|
|
Update through wireless connection |
22 |
|
|
Update through PC connection |
22 |
|
|
Restore the default settings |
22 |
|
|
|
|
|
9 |
Technical data |
24 |
|
|
Supported audio file formats |
24 |
|
|
Supplied accessories |
24 |
|
|
PC connection requirements |
24 |
|
|
|
|
|
10 |
Troubleshooting |
26 |
|
|
|
|
|
11 |
Glossary |
27 |
|
EN

1 Important
Safety
Know these safety symbols
This ‘bolt of lightning’ indicates uninsulated material within your unit may cause an electrical shock. For the safety of everyone in your household, please do not remove product covering.
The ‘exclamation point’ calls attention to features for which you should read the enclosed literature closely to prevent operating and maintenance problems.
WARNING:To reduce the risk of fire or electric shock, this apparatus should not be exposed to rain or moisture and objects filled with liquids, such as vases, should not be placed on this apparatus.
CAUTION:To prevent electric shock, match wide blade of plug to wide slot, fully insert.
ARead these instructions.
BKeep these instructions.
CHeed all warnings.
DFollow all instructions.
EDo not use this apparatus near water.
FClean only with dry cloth.
GDo not block any ventilation openings. Install in accordance with the manufacturer’s instructions.
HDo not install near any heat sources such as radiators, heat registers, stoves, or other apparatus (including amplifiers) that produce heat.
IFor countries with a polarized mains, do not defeat the safety purpose of the polarized or grounding-type plug. A polarized plug has two blades with one wider than the other.A grounding type plug has two blades and a third grounding prong.The wide blade or the
third prong are provided for your safety.
If the provided plug does not fit into your outlet, consult an electrician for replacement of the obsolete outlet.
Caution:To prevent electric shock, match the wide blade of the plug to the wide slot, fully insert.
JProtect the power cord from being walked on or pinched, particularly at plugs, convenience receptacles, and the point where they exit from the apparatus.
KOnly use attachments/accessories specified by the manufacturer.
LUse only with the cart, stand, tripod, bracket,or table specified by the manufacturer or sold with the apparatus. When a cart is used, use caution when moving the cart/apparatus combination to avoid injury from tip-over.
EN

MUnplug this apparatus during lightning storms or when unused for long periods of time.
NRefer all servicing to qualified service personnel. Servicing is required when the apparatus has been damaged in any way, such as power-supply cord or plug is damaged, liquid has been spilled or objects have fallen into the apparatus, the apparatus has been exposed to rain or moisture, does not operate normally, or has been dropped.
OBattery usage CAUTION – To prevent battery leakage which may result in bodily injury, property damage, or damage to the unit:
•Install all batteries correctly, + and - as marked on the unit.
•Do not mix batteries (old and new or carbon and alkaline, etc.).
•Remove batteries when the unit is not used for a long time.
PApparatus shall not be exposed to dripping or splashing.
QDo not place any sources of danger on the apparatus (e.g.liquid filled objects, lighted candles).
RThis product may contain lead and mercury. Disposal of these materials may be regulated due to environmental considerations. For disposal or recycling information, please contact your local authorities or the Electronic Industries Alliance: www.eiae.org.


 Warning
• |
Never remove the casing of this NP1100. |
ish |
• Never lubricate any part of this NP1100. |
ngl |
|
• |
Place this NP1100 on a flat, hard and stable surface. |
E |
|
||
• Never place this NP1100 on other electrical |
|
|
|
equipment. |
|
• Only use this NP1100 indoors. Keep this NP1100 away |
Important |
|
|
from water, moisture and liquid-filled objects. |
|
• Keep this NP1100 away from direct sunlight, naked |
|
|
|
flames or heat. |
|
|
|
|
Important notes for users in the U.K.
How to connect a plug
The wires in the mains lead are coloured with the following code: blue = neutral (N), brown = live (L).
As these colours may not correspond with the colour markings identifying the terminals in your plug, proceed as follows:
•Connect the blue wire to the terminal marked N or coloured black.
•Connect the brown wire to the terminal marked L or coloured red.
•Do not connect either wire to the earth terminal in the plug, marked E (or e) or
coloured green (or green and yellow). Before replacing the plug cover, make certain that the cord grip is clamped over the sheath of the lead - not simply over the two wires.
Mains plug
This apparatus is fitted with an approved 13 Amp plug. To change a fuse in this type of plug proceed as follows:
ARemove fuse cover and fuse.
BFix new fuse which should be a BS13625 Amp, A.S.T.A. or BSI approved type.
CRefit the fuse cover.
If the fitted plug is not suitable for your socket outlets, it should be cut off and an appropriate plug fitted in its place.
If the mains plug contains a fuse, this should have a value of 5 Amp. If a plug without a fuse
EN

is used, the fuse at the distribution board should not be greater than 5 Amp.
The severed plug must be disposed off to avoid a possible shock hazard should it be inserted into a 13 Amp socket elsewhere.
Norge
Typeskilt finnes på apparatens bakside. Observer: Nettbryteren er sekundert innkoplet. Den innebygde netdelen er derfor ikke fraktoplet nettet så lenge apparatet er tilsluttet nettkontakten.
For å redusere faren for brann eller elektrisk støt, skal apparatet, ikke utsettes for regn eller fuktighet.
Notice
Notice of compliance
For USA:
This equipment has been tested and found to comply with the limits for a Class B digital device, pursuant to Part 15 of the FCC Rules.
These limits are designed to provide reasonable protection against harmful interference in a residential installation.This equipment generates, uses and can radiate radio frequency energy and, if not installed and used in accordance with the instructions, may cause harmful interference to radio communications. However, there is
no guarantee that interference will not occur in a particular installation. If this equipment does cause harmful interference to radio or television reception, which can be determined by turning the equipment off and on, the user is encouraged to try to correct the interference by one or more of the following measures:
•Reorient or relocate the receiving antenna.
•Increase the separation between the equipment and receiver.
•Connect the equipment into an outlet on a circuit different from that to which the receiver is connected.
•Consult the dealer or an experienced
radio/TV technician for help. For Canada:
This digital apparatus does not exceed the Class B limits for radio noise emissions from digital apparatus as set out in the Radio Interference Regulations of the Canadian Department of Communications.This Class B digital apparatus complies with Canadian ICES-003.
Class II equipment symbol
This symbol indicates that the unit has a double insulation system.
Hearing Safety
Listen at a moderate volume:
Using headphones at a high volume can impair your hearing.This product can produce sounds in decibel ranges that may cause hearing loss for a normal person, even for exposure less than
a minute.The higher decibel ranges are offered for those that may have already experienced some hearing loss.
Sound can be deceiving. Over time your hearing ‘comfort level’ adapts to higher volumes of sound. So after prolonged listening, what sounds ‘normal’ can actually be loud and harmful to your hearing.To guard against this, set your volume to a safe level before your hearing adapts and leave it there.
To establish a safe volume level:
Set your volume control at a low setting. Slowly increase the sound until you can hear it comfortably and clearly, without distortion.
Listen for reasonable periods of time:
Prolonged exposure to sound, even at normally ‘safe’ levels, can also cause hearing loss.
Be sure to use your equipment reasonably and take appropriate breaks.
Be sure to observe the following guidelines when using your headphones.
EN
Listen at reasonable volumes for reasonable periods of time.
Be careful not to adjust the volume as your hearing adapts.
Do not turn up the volume so high that you can’t hear what’s around you.
You should use caution or temporarily discontinue use in potentially hazardous situations.
Do not use headphones while operating a motorized vehicle, cycling, skateboarding, etc.; it may create a traffic hazard and is illegal in many areas.
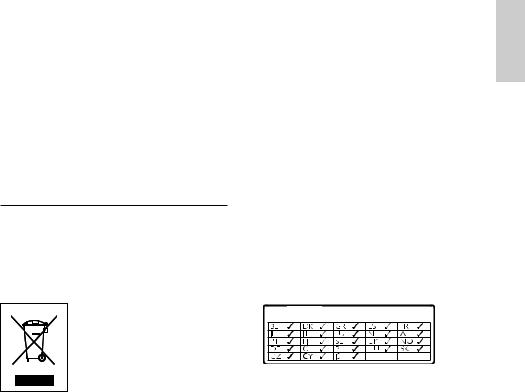
Disposal of product and packing material
Your product is designed and manufactured with high quality materials and components, which can be recycled and reused.
When this crossed-out wheeled bin symbol is attached to a product, it means the product is covered by the European Directive 2002/96/EC. Please be informed about the local separate collection system for electrical and electronic products.
Please act according to your local rules and do not dispose of your old product with your normal household waste.The correct disposal of your old product will help prevent potential
negative consequences to the environment and human health.
All redundant packing material has been omitted.We have done our utmost to make the packaging easily separable into mono materials. Please observe the local regulations regarding the disposal of packing materials.
Environmental information
All unnecessary packaging has been omitted. We have tried to make the packaging easy to separate into three materials: cardboard (box), polystyrene foam (buffer) and polyethylene (bags, protective foam sheet.)
Your system consists of materials which can be recycled and reused if disassembled by a specialized company. Please observe the local regulations regarding the disposal of
packaging materials, exhausted batteries and old equipment.
Battery disposal information
Batteries (including built-in rechargeable batteries) contain substances that may pollute the environment. Always hand the appliance in at an official collection point to remove any built-in batteries before you discard the appl iance. All batteries must be disposed of at an official collection point.

 0984
0984 


Important English
EN

2Your Streamium Network Music Player
Congratulations on your purchase and welcome to Philips!
To fully benefit from the support that Philips offers, register your product at www.philips. com/welcome.
Overview
Front view
A DISPLAY |
Top view
Rear view
ALINE OUT (red/white) jacks
BDIGITAL OUT (black) jack
C jack
jack
DETHERNET jack
EPOWER SUPPLY jack
Remote control
You can control the NP1100 with the remote control.
A STANDBY - ON
EN

O  RATE
RATE
P  (skip back)
Q HOME
R SHUFFLE (random play)
S REPEAT
T MUSIC
U INTERNET RADIO
A
BMUSIC SERVICES (optional feature
available in some regions)
CSETTINGS
DDIM (adjust display)
EFAVORITE
FSEARCH
G


 (navigate)
HOK /  (confirm / play/pause)
I (skip forward)
J (stop)
K+ VOL -
LMUTE
MCLEAR
Na/A (case shift)
Your Streamium Network Music Player English
EN

3 Prepare
Install remote control batteries


 Caution
•Risk of explosion! Keep batteries away from heat, sunshine or fire. Never discard batteries in fire.
•Risk of decreased battery life! Never mix different brands or types of batteries.
•Risk of product damage! When the remote control is not used for long periods, remove the batteries.
1
2
3
Open the battery compartment.
Insert two AAA batteries with correct polarity (+/-) as indicated.
Close the battery compartment.
Position your NP1100


 Caution
•Risk of product damage! Place the NP1100 on a surface that is level, flat, and strong enough to support the
NP1100.
•Risk of interference! Keep the NP1100 away from TVs, VCRs, and other radiation sources.
10 EN
4 Connect
Connect audio device
1 Use the supplied red and white audio cables to connect the AUX IN jacks of the sound system with the red and white (see ‘Rear view’ on page 8)LINE OUT jacks (see ‘Rear view’ on page 8) of the NP1100.
2 Set the source of the sound system to ‘AUX’.
3 Control the sound system as you normally would.
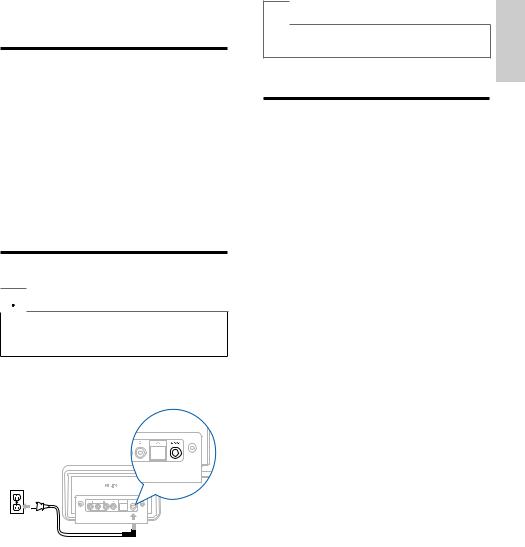
Connect AC power


 Warning
•Risk of product damage! Ensure that the power supply voltage corresponds to the voltage printed on the back or the underside of the NP1100.
1 Connect the NP1100 to the power supply
2 Continue with the steps in chapterFirsttime setup (see ‘First-time setup’ on page 11).
 Note
Note
•The type plate information is located at the back or the underside of the NP1100.
First-time setup
When you connect the NP1100 to the power supply for the first time, the player shows a short demo and then displays the language menu:
1 Press 

 .
.
ÈThe display shows the date format menu.
2 Press 
 to select the date format, then press
  .
.
ÈThe display shows the time format menu.
3 Press 
 to select the time format, then press
  .
.
È The display shows the date menu.
4 Press 
 to select the date, then press
  . È The display shows the time menu.
5 Press 
 to select the time, then press
  . È The display shows the network menu.
6 To complete the setup, continue with one of the following chapters:
•First-time setup:Wireless setup (see ‘Create wireless connection’ on page 12)
•First-time setup:Wired setup (see ‘Create wired connection’ on page 12)
Connect English
EN 11
 Tip
Tip
•After the first-time set-up, you can change the language, date and time in the Settings menu.
Create wireless connection
1 |
Hold ready your network name and |
|
2 |
network password or encryption key. |
|
Follow the steps in chapter Set up the |
||
|
player for the first time (see ‘First-time |
|
|
setup’ on page 11) until the display shows |
|
|
the network menu options [Search for |
|
3 |
networks] or [SSID]. |
|
Press |
to select [Search for networks], |
|
4 |
then press . |
|
Press |
to select [Wireless], then press |
|
5 |
. |
|
Press |
to select your home network |
|
|
with wireless broadband Internet access, |
|
|
then press . |
|
6 |
• Enter encryption key (if required). |
|
Select [Automatic] > (Enable Proxy?) [No |
||
(default)].
È The NP1100 displays a confirmation screen that the settings are saved.
Create wired connection
1 Use the an Ethernet cable (sold separately) to connect the NP1100 to the router that is connected to your home network with broadband Internet access.
2 Ensure that the router is turned on.
3 Follow the steps in chapter Set up the player for the first time (see ‘First-time setup’ on page 11) until the display shows the network menu options [Search for networks] or [SSID].
4 Press 
 to select [Search for networks], then press
  .
.
5 Press 
 to select [Wired], then press
  .
.
6 Select [Automatic] (DHCP).
7 Select (Enable Proxy?) [No (default)].
ÈThe NP1100 displays a confirmation screen that the settings are saved.
12 EN

5Turn on / switch to standby
You can select from the following status options:
•On
•Standby
•The  button on the remote control can turn on the NP1100.
•The NP1100 remembers the last audio source you selected.
 Note
Note
•In stop mode, if no buttons are pressed for 20 minutes, the NP1100 switches to standby.
1 |
To turn on the NP1100, press . |
2 |
To switch the NP1100 to standby, press . |
Turn on / switch to standby English
EN 13
 Loading...