


Quick Start
Compact Plain Paper FAX |
|
|
Model No. |
To get started, |
|
KX-FP250 |
||
please read the |
||
KX-FP245 |
Quick Start section |
|
(pages 4 to 11). |
OPERATING INSTRUCTIONS
Preparation Initial
Telephone
Fax/Copy
Please read these Operating Instructions before using the unit and save for future reference.
FOR OPERATION ASSISTANCE,
CALL 1-800-HELP-FAX (1-800-435-7329) OR SEND A FAX TO 1-215-741-6376.
●This unit is designed for use in the United States of America, and may not operate in other countries. (See page 97 for more details.)
●Este producto ha sido diseñado para su uso en los Estados Unidos de América, y puede no funcionar correctamente en otros países. (Consulte la página 97 para tener más detalles.)
Comienzo Rápido (p. 98)
Help
en rápido Comienzo Information General
98) .(p español

Thank you for purchasing a Panasonic facsimile.
Welcome to the world of Panasonic facsimiles.
This product combines the facsimile, telephone and copier features to provide you with more efficient office or home use. By utilizing these convenient features, you can maximize the effectiveness of this unit.
Things you should keep record of
Attach your sales receipt here
For your future reference |
|
|
Date of purchase |
|
Serial number |
|
|
(found on the bottom of the unit) |
Dealer’s name and address |
|
|
Dealer’s telephone number |
|
|
Caution:
●The Telephone Protection Act of 1991 requires the following information to be clearly stated either at the top or bottom margin of the first message page when transmitting messages via telephone facsimile;
—Date and time of transmission,
—Identification of the business, entity or person(s) sending the facsimile, and
—Telephone number of the business, entity or person(s).
To program this information into your unit, complete all the instructions on pages 25 through 28.
●Note that the images of copied or received documents will remain on the used film. When disposing of the used film, use discretion.
●Do not rub or use an eraser on the printed side, as the print may smear.
● If you have not applied to the |
|
R service, you will not be able to use the IQ-FAX function (see |
pages 44 to 46). |
|
|
Trademark


 is a registered trademark of FaxSav Incorporated.
Hammermill R is a registered trademark of INTERNATIONAL PAPER in the United States and/or other countries.
Copyright:
This manual is copyrighted by Kyushu Matsushita Electric Co., Ltd. (KME) and its licensee. Under the copyright laws, this manual may not be reproduced in any form, in whole or part, without the prior written consent of KME and its licensee.
© Kyushu Matsushita Electric Co., Ltd. 1998
2

Important safety instructions 
When using this unit, basic safety precautions should always be followed to reduce the risk of fire, electric shock, or personal injury.
1.Read and understand all instructions.
2.Follow all warnings and instructions marked on this unit.
3.Unplug this unit from AC outlets before cleaning. Do not use liquid or aerosol cleaners. Use a damp cloth for cleaning.
4.Do not use this unit near water, for example near a bath tub, wash bowl, kitchen sink, or the like.
5.Place the unit securely on a stable surface. Serious damage and/or injury may result if the unit falls.
6.Do not cover slots and openings on the unit. They are provided for ventilation and protection against overheating. Never place the unit near radiators, or in a place where proper ventilation is not provided.
7.Use only the power source marked on the unit. If you are not sure of the type of power supplied to your home, consult your dealer or local power company.
8.For safety purposes this unit is equipped with a three prong grounded plug. If you do not have this type of outlet, please have one installed. Do not use any type of adaptor plug to defeat this safety feature.
9.Do not place objects on the power cord. Install the unit where no one can step or trip on the cord.
10.Do not overload wall outlets and extension cords. This can result in the risk of fire or electric shock.
11.Never push any objects through slots in this unit. This may result in the risk of fire or electric shock. Never spill any liquid on the unit.
12.To reduce the risk of electric shock, do not disassemble this unit. Take the unit to an authorized servicenter when service is required. Opening or removing covers may expose you to dangerous voltages or other risks. Incorrect reassembly can cause electric shock when the unit is subsequently used.
13.Unplug this unit from the wall outlet and refer servicing to an authorized servicenter when the following conditions occur:
A.When the power supply cord or plug is damaged or frayed.
B.If liquid has been spilled into the unit.
C.If the unit has been exposed to rain or water.
D.If the unit does not work normally by following the operating instructions. Adjust only controls covered by the operating instructions. Improper adjustment may require extensive work by an authorized servicenter.
E.If the unit has been dropped or physically damaged.
F.If the unit exhibits a distinct change in performance.
14.During thunderstorms, avoid using telephones except cordless types. There may be a remote risk of an electric shock from lightning.
15.Do not use this unit to report a gas leak, when in the vicinity of the leak.
SAVE THESE
INSTRUCTIONS
INSTALLATION:
1.Never install telephone wiring during a lightning storm.
2.Never install telephone jacks in wet locations unless the jack is specifically designed for wet locations.
3.Never touch uninsulated telephone wires or terminals unless the telephone line has been disconnected at the network interface.
4.Use caution when installing or modifying telephone lines.
WARNING:
●To prevent the risk of fire or electrical shock, do not expose this product to rain or any type of moisture.
OTHER INFORMATION
●Keep the unit away from electrical noisegenerating devices, such as fluorescent lamps and motors.
●The unit should be kept free from dust, high temperature and vibration.
●The unit should not be exposed to direct sunlight.
●Do not place heavy objects on top of this unit.
●Do not touch the plug with wet hands.
For Assistance, Call 1-800-435-7329 |
3 |
|
|

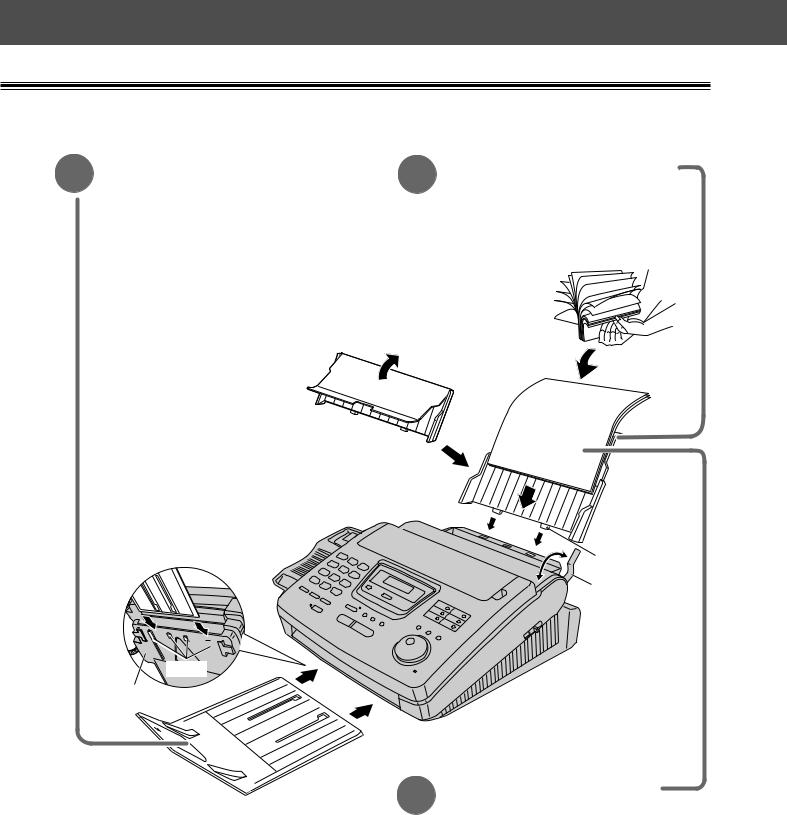
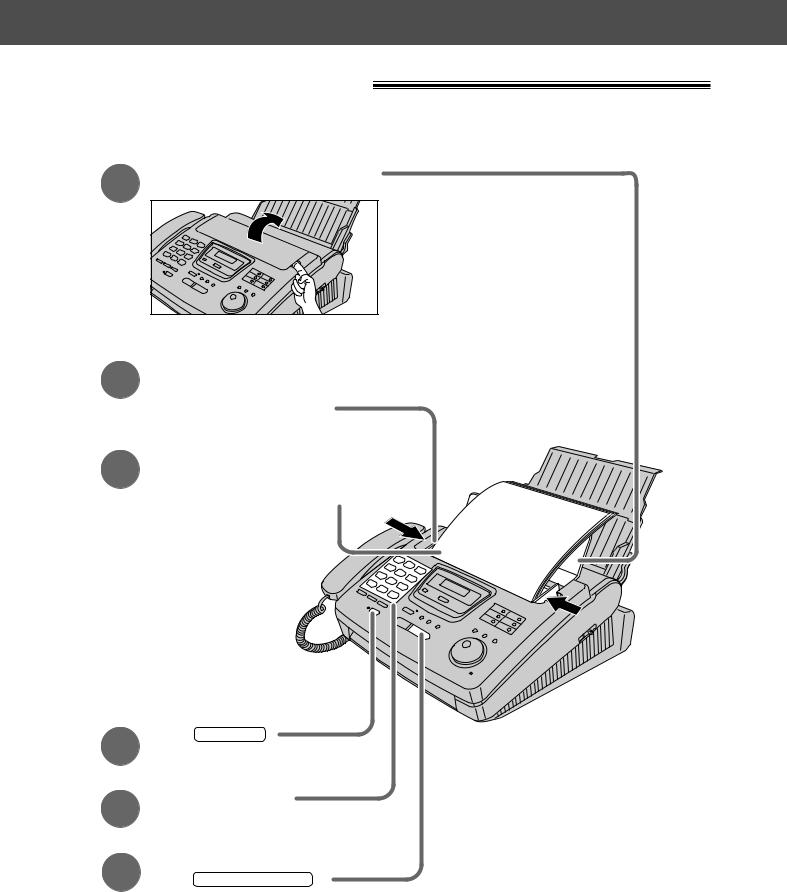
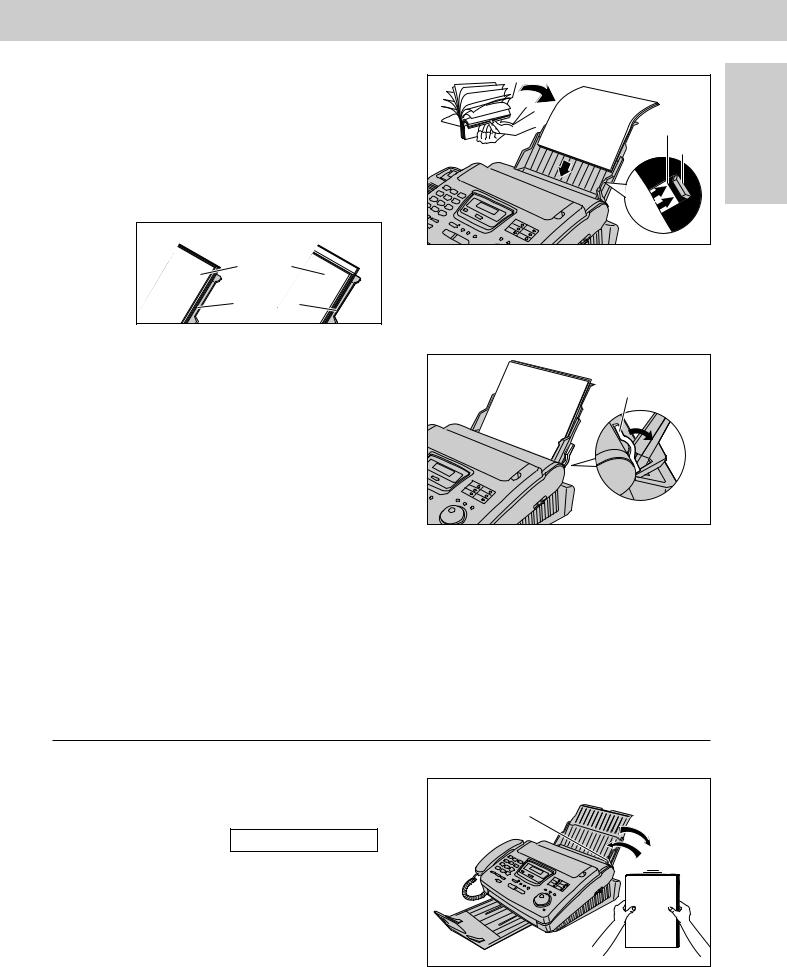
Quick Start
Installation
Remove the shipping tape from the unit and stacker, and install as follows.
Shipping tape
|
ape |
1 |
Cov |
Film cartridge (See page 19.) |
A. Slide the cover open lever forward.
B.The cover is under tension to improve print quality.
Pull up hard enough to open. 


C. Remove the leaflet from the unit.
D. If the film in the film cartridge is slack, tighten it by winding the bottom side gears.
Incorrect Correct
Tight
E.Install the film cartridge into the unit.
F.Make sure that the blue label on the cartridge matches the one on the unit.
G.Close the cover securely by pushing down on both corners.
Blue labels |
Blue gear |
|
Blue label
Bottom side gears
Cover open lever
Leaflet
4 |
For Assistance, Call 1-800-435-7329 |
|
|
Quick Start
2Stacker (See page 21.)
A.Lift the front of the unit, insert the stacker into the slots and slide it until it stops.
Slots
Bottom
3
4
Paper tray (See page 22.)
A.Open the paper tray.
B. Insert the two tabs on the paper tray into the slots on the back of the unit.
 Tab
Tab
Recording
paper set
lever
Recording paper
(See page 22.)
A.Pull the recording paper set lever forward.
B.Fan the stack of paper to prevent a paper jam and insert the paper into the paper tray.
C.Move the recording paper set lever back.
For Assistance, Call 1-800-435-7329 |
5 |
|
|
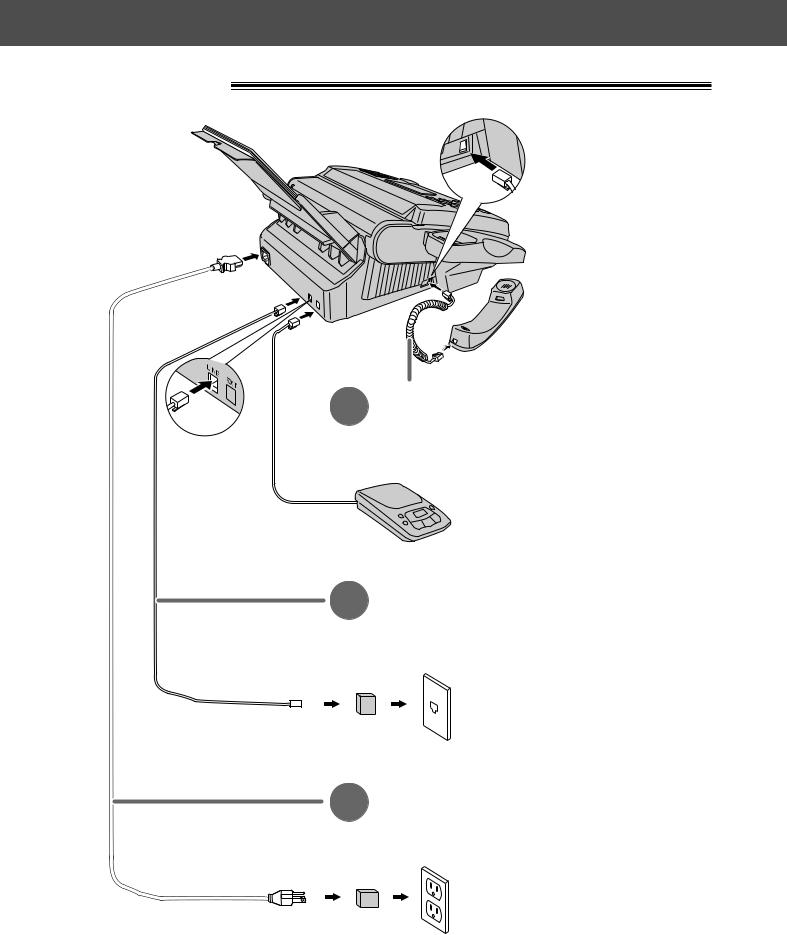
Quick Start
Connections
1 Handset cord
A. Connect to the unit.
B. Connect to the handset.
Answering machine (not included)
For further details, see page 61.
2Telephone line cord
A.Connect to “LINE” on the unit.
B.Connect to a single telephone line jack.
RJ11C
( Lineprotectorsurge )
3Power cord
A.Connect to the unit.
B.Connect to a power outlet.
120 V, 60 Hz
(Powerprotectorsurge)
● For further details, see page 24.
6 |
For Assistance, Call 1-800-435-7329 |
|
|
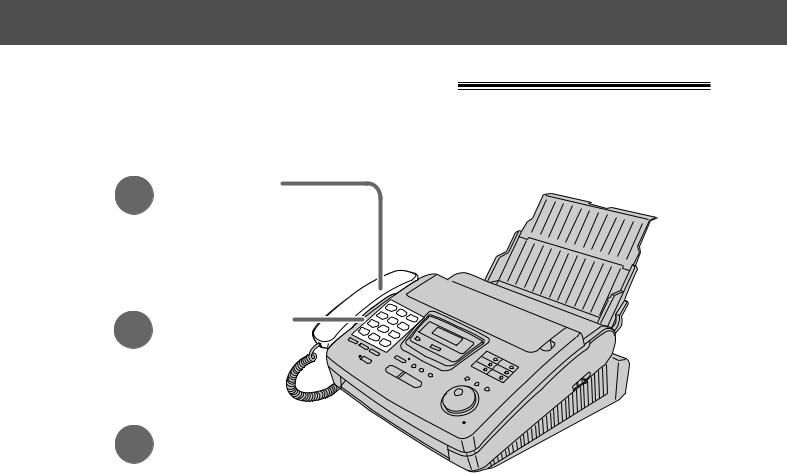
Quick Start
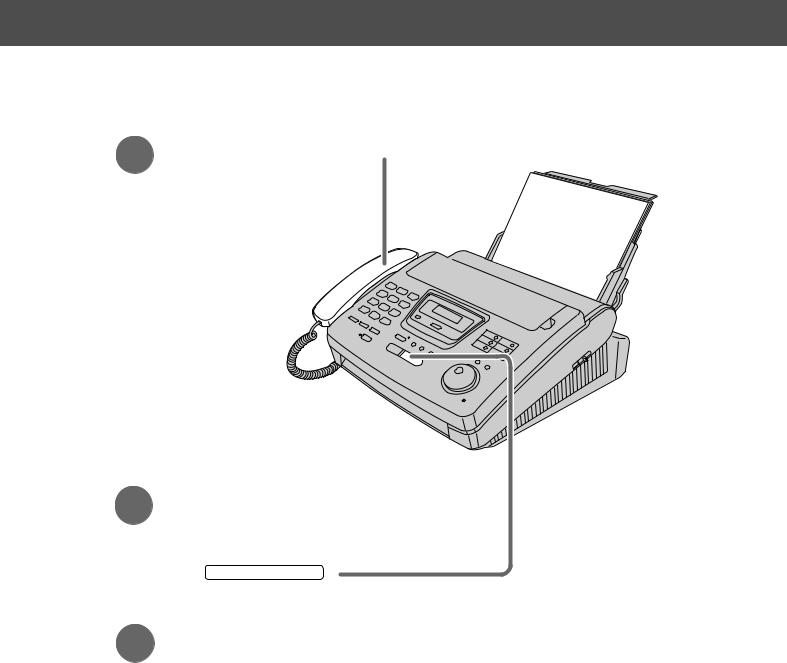
Voice call - making/answering
Voice call - making
1 Lift the handset.
2 Dial the number.
3 |
When finished, |
hang up the handset. |
●For further details, see page 30.
●If you have a trouble, see page 81.
For Assistance, Call 1-800-435-7329 |
7 |
|
|
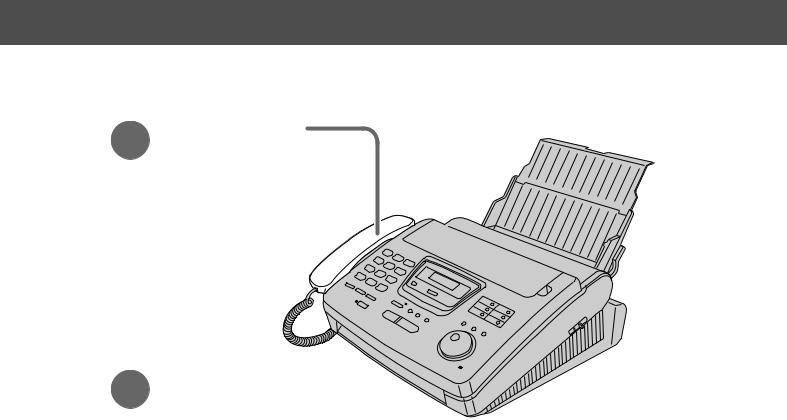
Quick Start
Voice call - answering
1 |
When the unit rings, |
lift the handset. |
2 |
When finished, |
hang up the handset. |
●For further details, see page 31.
●If you have a trouble, see page 81.
8 |
For Assistance, Call 1-800-435-7329 |
|
|
Quick Start
Fax - sending/receiving
Fax - sending
1 Open the document feeder tray.
Adjust the width of the 2 document guides to
the size of the document.
Insert the document until 3 a single beep is heard and
the unit grabs the document.
(up
FA |
|
|
CE |
|
|
|
D |
|
to1 |
O |
WN |
5p |
|
|
|
a |
|
|
ge |
|
|
|
s) |
4
5
6
Press SP-PHONE .
Dial the fax number.
When a fax tone is heard, press .
●For further details, see page 41.
●If you have a trouble, see pages 81 and 82.
For Assistance, Call 1-800-435-7329 |
9 |
|
|
Quick Start
Fax - receiving
1 When the unit rings, lift the handset.
When:
2 — document reception is required,
—a fax calling tone (slow beep) is heard, or
—no sound is heard,
press START/COPY/SET .
3 Hang up the handset.
●For further details, see page 58.
●You can select the desired option to receive calls according to your needs. See pages 56 and 57.
●If you have a trouble, see page 82.
10 |
For Assistance, Call 1-800-435-7329 |
|
|
Copy - making
1 Open the document feeder tray.
Adjust the width of the
2 document guides to
the size of the document.
Insert the document until 3 a single beep is heard and
the unit grabs the document.
●Make sure the handset is hung up.
Quick Start
|
FA |
|
|
|
|
|
( |
|
C |
E |
DO |
|
|
up |
o |
|
|
W |
|
|
|
t |
15pag |
|
N |
||
|
|
|
||||
|
|
|
|
e |
|
|
|
|
|
|
|
s) |
|
4
5
6
Press START/COPY/SET .
Enter the number of copies (up to 99).
Press START/COPY/SET .
●For further details, see page 76.
●If you have a trouble, see page 83.
For Assistance, Call 1-800-435-7329 |
11 |
|
|

Table of Contents
Initial
Preparation
Accessory |
Included accessories . . . . . . . . . . . . . . . . . . . . . . . . . . . . . |
14 |
|
Accessory order information . . . . . . . . . . . . . . . . . . . . . . . |
14 |
Help Button |
Help function . . . . . . . . . . . . . . . . . . . . . . . . . . . . . . . . . . . |
15 |
Finding the |
Location . . . . . . . . . . . . . . . . . . . . . . . . . . . . . . . . . . . . . . . |
16 |
Controls |
Overview . . . . . . . . . . . . . . . . . . . . . . . . . . . . . . . . . . . . . . |
18 |
Setup |
Film cartridge . . . . . . . . . . . . . . . . . . . . . . . . . . . . . . . . . . . |
19 |
|
Stacker . . . . . . . . . . . . . . . . . . . . . . . . . . . . . . . . . . . . . . . |
21 |
|
Paper tray . . . . . . . . . . . . . . . . . . . . . . . . . . . . . . . . . . . . . |
22 |
|
Recording paper . . . . . . . . . . . . . . . . . . . . . . . . . . . . . . . . |
22 |
|
Connections . . . . . . . . . . . . . . . . . . . . . . . . . . . . . . . . . . . |
24 |
|
Date and time, your name and facsimile telephone |
|
|
number . . . . . . . . . . . . . . . . . . . . . . . . . . . . . . . . . . . . . |
25 |
Volume |
Adjusting volumes . . . . . . . . . . . . . . . . . . . . . . . . . . . . . . . |
29 |
Making and |
Voice call - making . . . . . . . . . . . . . . . . . . . . . . . . . . . . . . |
30 |
Answering Calls |
Voice call - answering . . . . . . . . . . . . . . . . . . . . . . . . . . . . |
31 |
Telephone |
TONE, FLASH and PAUSE buttons . . . . . . . . . . . . . . . . . |
32 |
|
Dialing mode (touch tone or pulse) . . . . . . . . . . . . . . . . . . |
33 |
One-Touch |
Storing names and telephone numbers |
|
Dial |
in One-Touch Dial . . . . . . . . . . . . . . . . . . . . . . . . . . . . |
34 |
|
Making a voice call using One-Touch Dial . . . . . . . . . . . . |
36 |
JOG DIAL |
Storing names and telephone numbers |
|
|
in the JOG DIAL directory . . . . . . . . . . . . . . . . . . . . . . |
37 |
|
Making a voice call using the JOG DIAL directory . . . . . . |
39 |
Voice Contact
Talking to the caller after fax transmission or reception . . 40
Sending Faxes
Fax/Copy
Sending a fax manually . . . . . . . . . . . . . . . . . . . . . . . . . . . 41 Sending a fax using One-Touch Dial . . . . . . . . . . . . . . . . . 42 Sending a fax using the JOG DIAL directory . . . . . . . . . . . 43 IQ-FAX . . . . . . . . . . . . . . . . . . . . . . . . . . . . . . . . . . . . . . . 44 Documents you can send . . . . . . . . . . . . . . . . . . . . . . . . . 47 Confirmation report . . . . . . . . . . . . . . . . . . . . . . . . . . . . . . 48 Automatic journal report printing . . . . . . . . . . . . . . . . . . . . 49 Delayed transmission (sending a fax at a specific time) . . . 50 From memory . . . . . . . . . . . . . . . . . . . . . . . . . . . . . . . . . . 51 Multiple stations . . . . . . . . . . . . . . . . . . . . . . . . . . . . . . . . . 52 Overseas . . . . . . . . . . . . . . . . . . . . . . . . . . . . . . . . . . . . . . 54 Connecting tone . . . . . . . . . . . . . . . . . . . . . . . . . . . . . . . . 55
Receiving Faxes Setting the unit to receive calls . . . . . . . . . . . . . . . . . . . . . 56 TEL mode (answering all calls manually) . . . . . . . . . . . . . 58 FAX ONLY mode (all calls are received as faxes) . . . . . . 59 Using with an answering machine . . . . . . . . . . . . . . . . . . . 61 Distinctive Ring service (ring pattern detection feature) . . 64 TEL/FAX mode (receiving voice calls with rings and
fax calls without rings when you are near the unit) . . . 66 Extension telephone . . . . . . . . . . . . . . . . . . . . . . . . . . . . . 70 Fax activation code . . . . . . . . . . . . . . . . . . . . . . . . . . . . . . 70
(continued)
12 |
For Assistance, Call 1-800-435-7329 |
|
|

Error Messages |
Printed reports . . . . . . . . . . . . . . . . . . . . . . . . . . . . . . . . . . |
78 |
|
LCD display . . . . . . . . . . . . . . . . . . . . . . . . . . . . . . . . . . . . |
79 |
Operations |
When a function does not work, check here before |
|
|
requesting help . . . . . . . . . . . . . . . . . . . . . . . . . . . . . . . |
81 |
|
If a power failure occurs . . . . . . . . . . . . . . . . . . . . . . . . . . |
84 |
Jams |
Recording paper jam . . . . . . . . . . . . . . . . . . . . . . . . . . . . . |
85 |
|
Sending document jams . . . . . . . . . . . . . . . . . . . . . . . . . . |
87 |
|
Sending documents does not feed, or multi-feeds . . . . . . |
87 |
Ink Film |
How much film you have left . . . . . . . . . . . . . . . . . . . . . . . |
88 |
|
Replacing the film or film cartridge . . . . . . . . . . . . . . . . . . |
88 |
Cleaning |
Document feeder . . . . . . . . . . . . . . . . . . . . . . . . . . . . . . . . |
90 |
|
Thermal head and black bar . . . . . . . . . . . . . . . . . . . . . . . |
90 |
Receiving Faxes |
Other size documents . . . . . . . . . . . . . . . . . . . . . . . . . . . . |
71 |
|
Silent detection (receiving faxes from older model |
|
Fax/Copy |
fax machines) . . . . . . . . . . . . . . . . . . . . . . . . . . . . . . . . |
72 |
|
Memory reception alert . . . . . . . . . . . . . . . . . . . . . . . . . . . |
73 |
|
Friendly reception . . . . . . . . . . . . . . . . . . . . . . . . . . . . . . . |
73 |
|
Pager call - when your unit receives a fax . . . . . . . . . . . . . |
74 |
|
Film detection . . . . . . . . . . . . . . . . . . . . . . . . . . . . . . . . . . |
75 |
Copying |
Making a copy . . . . . . . . . . . . . . . . . . . . . . . . . . . . . . . . . . |
76 |
Help |
|
|
General
Information
Reports |
Printing the feature settings, telephone numbers, |
|
|
the journal and printer test list . . . . . . . . . . . . . . |
. . . . . 91 |
Display Contrast |
Changing the LCD display contrast . . . . . . . . . . . . . |
. . . . . 92 |
Reset |
Resetting the advanced features . . . . . . . . . . . . . . . |
. . . . . 92 |
FCC Information |
List of FCC requirements and information . . . . . . . . |
. . . . . 93 |
Warranty |
Limited Warranty . . . . . . . . . . . . . . . . . . . . . . . . . . . |
. . . . . 94 |
|
Servicenter Directory . . . . . . . . . . . . . . . . . . . . . . . . |
. . . . . 95 |
|
Notes for product service and shipping the product |
. . . . . 96 |
Specifications |
Technical data about this product . . . . . . . . . . . . . . |
. . . . . 97 |
Comienzo |
Comienzo rápido en español . . . . . . . . . . . . . . . . . . . . . . . . . . . . . . . . . . . |
. 98 |
rápido en |
|
|
español |
|
|
|
Index . . . . . . . . . . . . . . . . . . . . . . . . . . . . . . . . . . . . . . . . . . . . . . . . . . . . . . . . |
.108 |
|
Features Summary Summary of user programmable features . . . . . . . . . . . . . |
110 |
Preparation Initial
Telephone
Fax/Copy
Help
en pido rá Comienzo Information General
98) ol.(pespañol españ
For Assistance, Call 1-800-435-7329 |
13 |
|
|
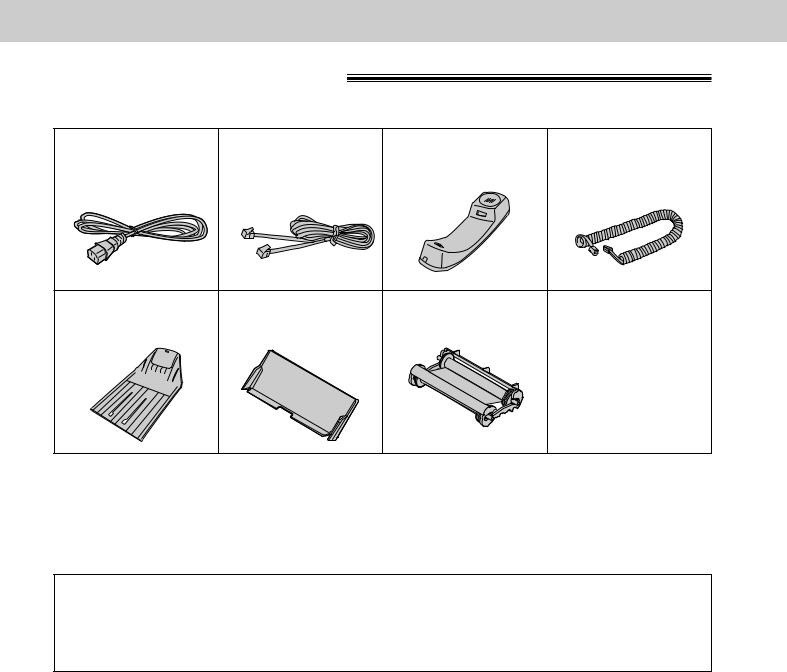
Accessory
Included accessories
To order, call toll free 1-800-435-7329 or see the fax order instructions below.
Power cord. . . . . . . . |
1 pc. Telephone line |
Handset . . . . . . . . . . |
1 pc. Handset cord. . . . . . |
1 pc. |
Part No. PQJA200Z |
cord . . . . . . . . . . . . . . |
1 pc. Part No. PFJXE0105Z |
Part No. PQJA212M |
|
|
Part No. PQJA59V |
|
|
|
Stacker . . . . . . . . . . |
1 pc. Paper tray . . . . . . . . |
1 pc. Film cartridge. . . . . . |
1 pc. |
Part No. PFZE1FP250M |
Part No. PFYEFP200M |
(with free starter film) |
|
●If any items are missing or damaged, check with the place of purchase.
●The part numbers listed above are subject to change without notice.
●Save the original carton and packing materials for future shipping and transportation of the unit.
Accessory order information 
The free starter film is only 20 meters (65') long. We recommend that you buy regular film [100 m (328')] for uninterrupted use of your unit.
For best results, use Panasonic replacement film, KX-FA135 or KX-FA136. To order, call toll free 1-800-435-7329 or see the fax order instructions below.
Fax order: Please send a fax to 1-800-237-9080. Include: Your name, shipping address, telephone number, credit card type, number, expiration and your signature, order part number and quantity, delivery method – overnight, 2nd day, or ground.
Model No. |
Description |
Specifications |
|
|
|
|
|
KX-FA135 |
Film cartridge |
1 cartridge and 1 film [216 mm x 100 m (81/2" x 328') roll] |
|
(The film has already been installed in the cartridge.) |
|||
|
|
||
|
|
|
|
KX-FA136 |
Replacement film |
2 films [216 mm x 100 m (81/2" x 328') rolls] |
|
(Film only. Use with your original cartridge.) |
|||
|
|
||
|
|
|
|
Note: |
|
|
●The film is not reusable. Do not rewind and use the film again.
●The films above can be used for your unit even though the model number of your unit
(KX-FP250/KX-FP245) is not listed on the film’s box.
14 |
For accessory order, call toll free 1-800-435-7329 |
|
|
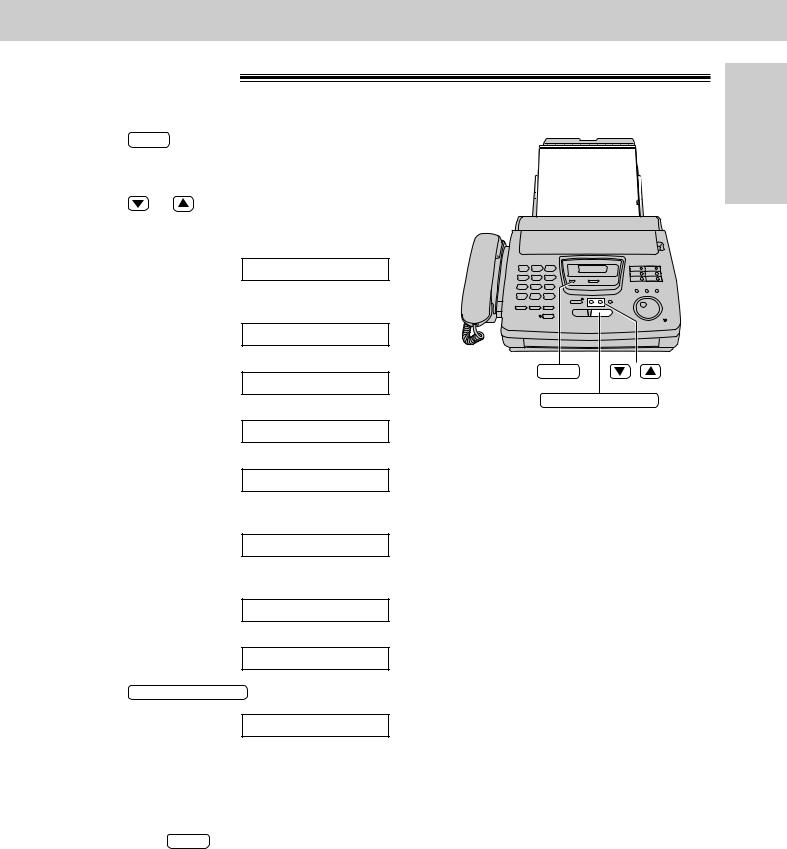
Help Button
Help function
You can print a quick reference for assistance as follows.
1 |
Press |
HELP . |
|
|
|
|
Display: |
PRESS[▼▲]&[SET] |
|
|
|
|
||
2 |
|
|
|
|
Press |
or |
until the desired item is |
||
displayed. The following items are available. |
||||
1. How to program your unit
1.HOW TO SET UP
2.How to store names in the JOG DIAL directory and how to dial them
2.JOG/AUTO DIAL
3. Help with problems sending faxes
3.FAX SENDING
4. Help with problems receiving faxes
4.FAX RECEIVING
5. How to use the copier function
5.COPIER
HELP |
/ |
START/COPY/SET
6.Frequently asked questions and the answers
6.Q and A
7.Explanation of some error messages shown on the display
7.ERRORS
8. List of available reports
8.REPORTS
3 Press START/COPY/SET .
PRINTING
Preparation Initial
Note:
●When you press HELP during programming, the unit will print out a quick reference for that feature.
For Assistance, Call 1-800-435-7329 |
15 |
|
|

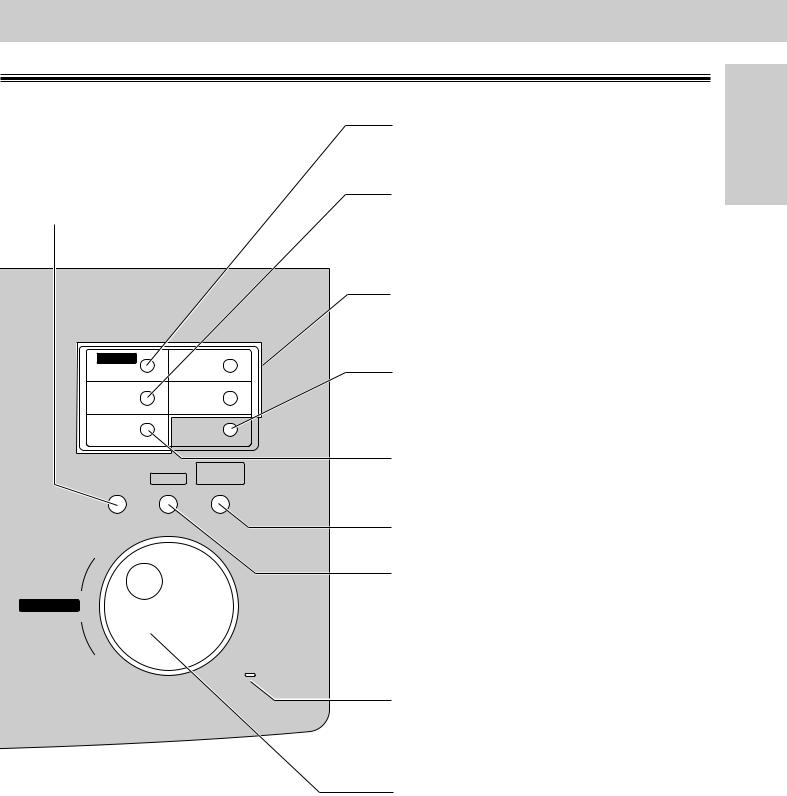
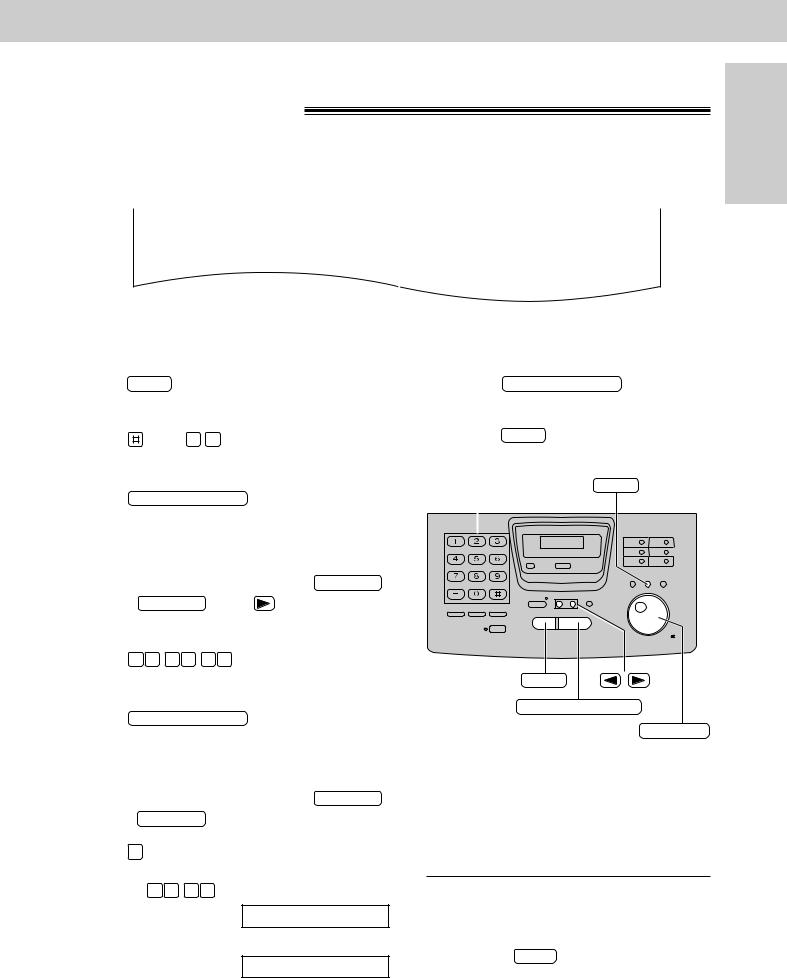
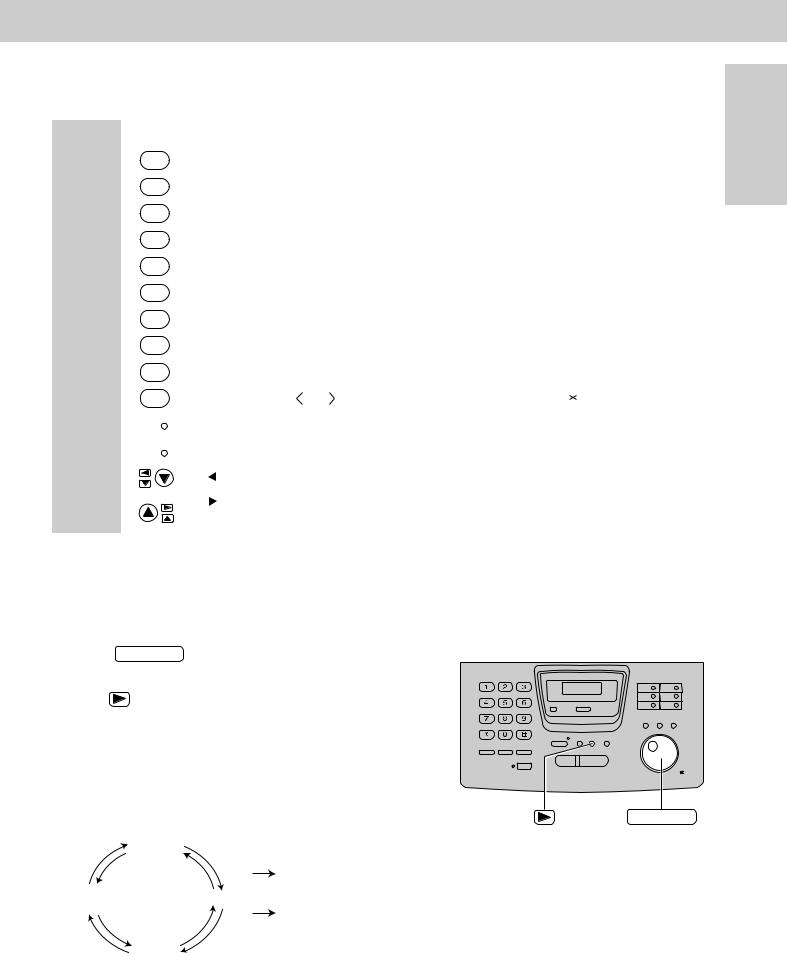
Finding the Controls
Location
●Used to check the amount of remaining film (p. 88).
●In the copy mode, used to choose between “Collated and Uncollated” (p. 76, 77).
● Used to change from pulse |
● Used to print a quick |
|
to tone during dialing (p. 32). |
reference (p. 15). |
|
Dial keypad |
● Used to turn on/off the auto |
|
|
|
answer mode (p. 56). |
|
|
|
|
ABC |
DEF |
GHI |
JKL |
MNO |
PQRS |
TUV |
WXYZ |
|
OPER |
|
●Used to send faxes using the IQ-FAX function (p. 46).
Display panel
|
MEMORY% |
HELP |
IQ-FAX |
AUTO ANSWER
FAX ON 

TONE
FLASH REDIAL/PAUSE MUTE
STOP
VOLUME |
FILM REMAINING |
RINGER/HANDSET/SPEAKER |
|
ZOOM |
COLLATE |
START/COPY/ SET
SP-PHONE 
● Used as a hookswitch |
● Used for voice muting |
● Used to stop an operation |
|
(p. 30). |
or cancel programming. |
||
(p. 32). |
|||
|
|
●Used for speakerphone operation.
●Used to adjust volumes (p. 29).
●Used to select feature settings during programming.
●In the copy mode, used to select an enlargement/reduction rate (p. 76, 77).
●Used to redial the last number dialed (p. 30, 41).
●Used to insert a pause during dialing (p. 32).
●Used to initiate fax transmission, reception or copying.
●Used to store a setting during programming.
16
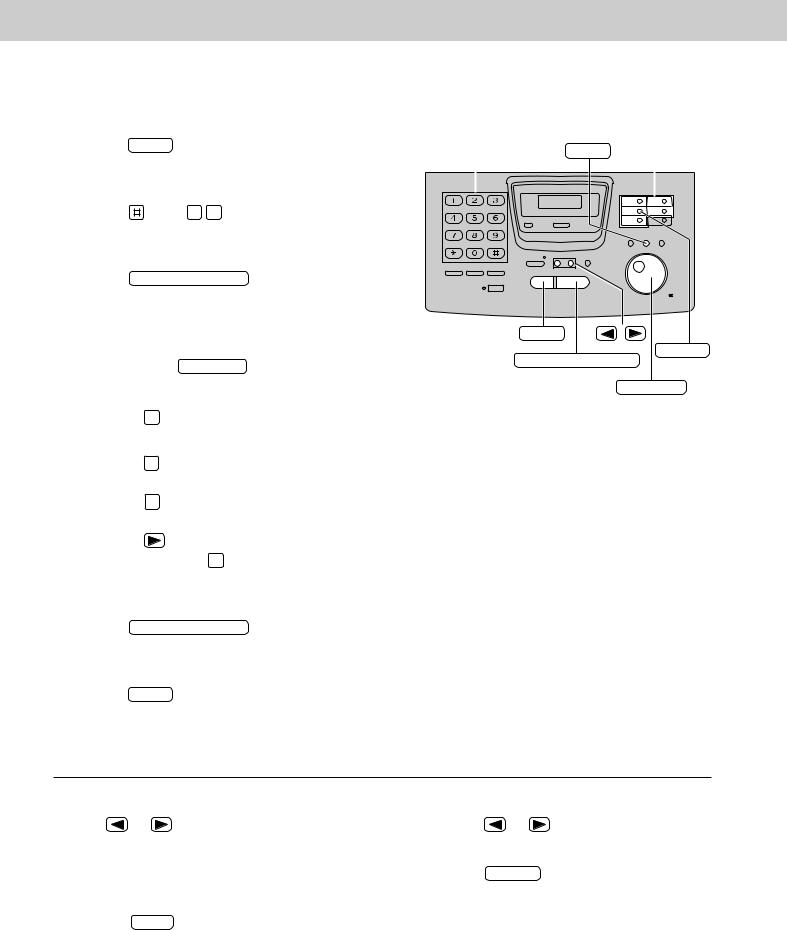
Finding the Controls
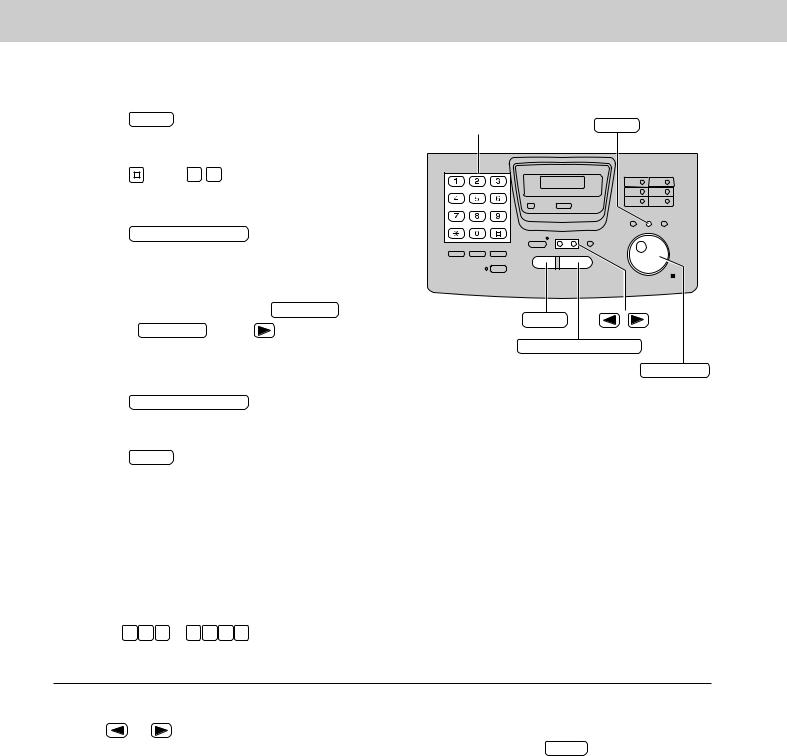
●Used to select a resolution (p. 41).
1 |
BROAD CAST |
4 |
6 |
HYPHEN |
9 |
2 |
|
5 |
7 |
INSERT |
10 |
3 |
|
NAME/TEL NO. |
8 |
SECRET |
LOWER |
RESOLUTION |
DIRECTORY |
|
MENU PROGRAM |
||
FWD 
JOG DIAL
BACK
MIC 
●Used for transmission to multiple stations (p. 52, 53).
●Used to insert a hyphen (p. 27, 34, 35).
●Used to insert one character or one space (p. 26, 27, 35).
●Used for One-Touch Dial (p. 34, 36, 42).
●Used as command keys (p. 27, 35).
●Used to confirm a stored telephone number (p. 39).
●Used to select stations 6-10 for One-Touch Dial (p. 34, 36, 42).
●Used to keep the telephone number secret (p. 34, 35, 37).
●Used to store or edit names and telephone numbers (p. 34, 37, 38, 52).
●Used to initiate or exit programming.
●Used to talk with the other party when using the speakerphone.
●Used to search for a stored name (p. 39, 43).
●Used to select characters during programming (p. 27, 35).
●Used to select the basic features during programming (p. 110).
Preparation Initial
17
Finding the Controls
Overview
Document feeder tray
Document guides
Document entrance
Speaker
Cover
Stacker
Document exit
Recording paper exit
Paper tray
ecording paper ntrance
 Recording paper set lever
er
18

Setup
Film cartridge
The free starter film prints about 65 letter size pages. A normal film roll prints about 330 letter size pages. Purchase one of the following full size replacement film kits as soon as possible for uninterrupted use of your Panasonic plain paper fax machine.
Full size replacement film kits:
● KX-FA135 Film cartridge Complete kit includes: Film roll, gears and cartridge. (prints about 330 letter size pages)
● KX-FA136 Replacement film Two replacement film rolls only. Use these film rolls to refill the cartridge. (prints a total of about 660 letter size pages)
Caution:
●The film can only be used once. When the unit displays “FILM EMPTY”, refill or replace the cartridge with one of the above kits (see page 14 for ordering instructions). If the film is rewound, the print quality will be greatly reduced, and the unit may jam.
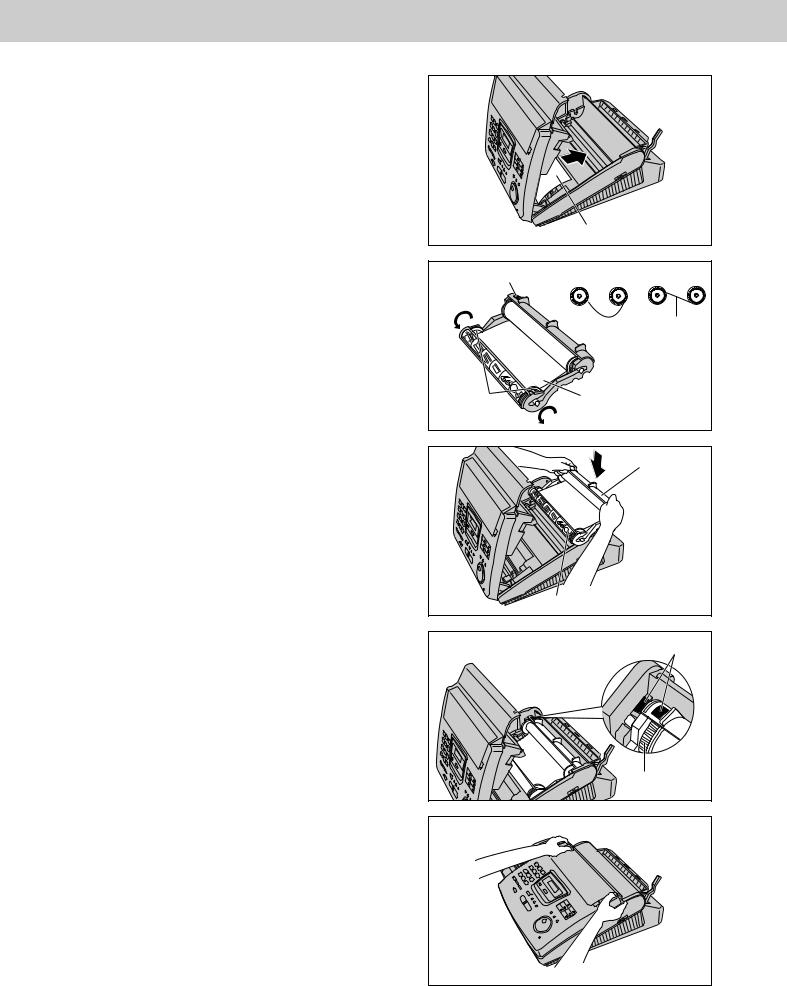
1 Remove the shipping tape from the unit.
2 Slide the cover open lever forward.
3 |
The cover is under tension to improve print |
quality. Pull up hard enough to open. |
pe |
Cover |
Cover open |
lever |
Preparation Initial
(continued)
19
Setup
4 Remove the leaflet from the unit.
5 |
If the film in the film cartridge is slack, tighten it |
by winding the bottom side gears. |
6 Install the film cartridge into the unit.
7 |
Make sure that the blue label on the cartridge |
matches the one on the unit. |
8 |
Close the cover securely by pushing down on |
both corners. |
Leaflet
Blue label |
Incorrect |
Correct |
Tight
Bot |
lm |
|
|
gears |
|
ilm cartridge
el |
Blue labels |
Blue gear |
20
Setup
Stacker
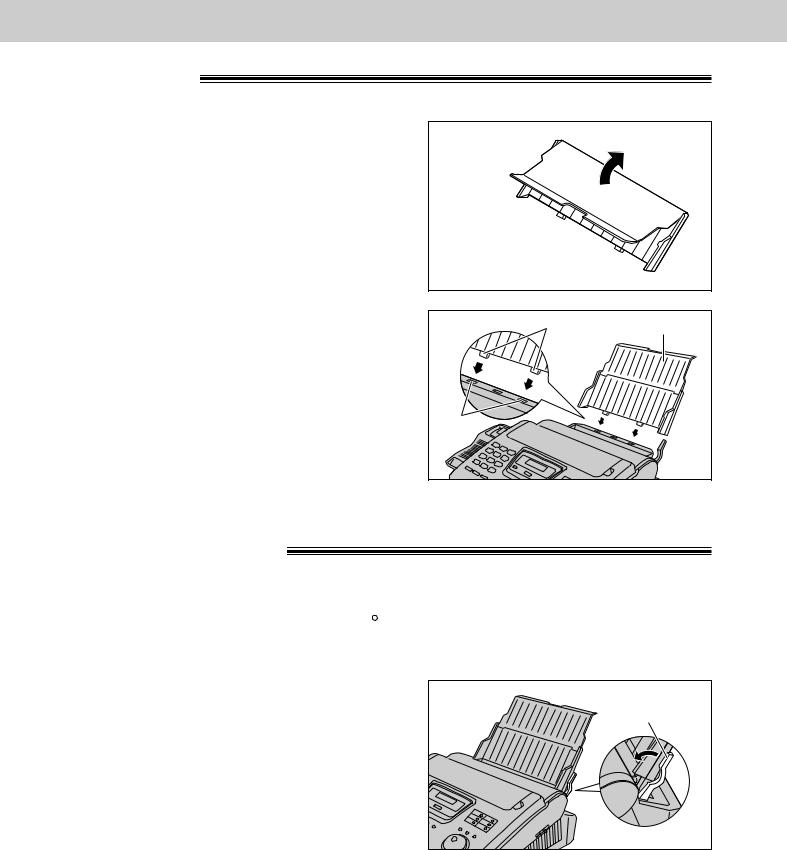
1 |
Remove the shipping tape from the stacker. |
2 |
Lift the front of the unit, insert the stacker into the |
slots. |
3 Confirmslots. the stacker is locked with the center
|
|
Preparation Initial |
Bottom |
|
|
Slots |
Shipping tape |
Stacker |
|
||
|
|
|
Stacker |
|
|
|
Center slots |
|
4 Slide the stacker until it stops.
Stacker
Using legal size paper
1 Press the dotted area on the stacker extender.
2 Open the stacker extender.
Dotted area |
POUSSERPOUROUVRIR |
PUSHTOOPEN |
Stacker extender |
Stacker |
extender |
21 |
Setup
Paper tray
1 Open the paper tray.
Paper tray 
2 |
Insert the two tabs on the paper tray into the slots |
on the back of the unit. |
● Do not place the unit in areas where the paper tray may be obstructed by walls, etc.
Tabs |
Paper tray |
Slots |
|
Recording paper
Letter or legal size recording paper can be loaded. The paper tray can hold up to 150 sheets of 75 g/m2 (20 lb.) paper. You may use 60 g/m2 to 90 g/m2 (16 lb. to 24 lb.) paper.
For best results, use inkjet paper like Hammermill R Jet Print only. If you use other types of paper, the print quality may be affected.
1 Pull the recording paper set lever forward. |
Recording paper |
|
set lever |
22
Setup
2 |
Fan the stack of paper to prevent a paper jam |
and insert the paper into the paper tray. |
●The height of the stack of the paper should not exceed the upper limit on the paper tray, otherwise a paper jam or multi-feed may occur.
●The paper should not be over the tab.
●If the paper is not inserted correctly, readjust the paper or a paper jam may occur.
Correct |
Incorrect |
|
Stack of |
|
paper |
|
Paper tray |
|
Initial |
Upper limit |
Preparation |
Tab |
|
|
3 Move the recording paper set lever back. |
Recording paper |
|
set lever |
Note: |
|
● Avoid paper with a cotton and/or |
20%, such as letterhead paper or those |
used for resumes. |
|
●Do not use different types or thicknesses of paper in the paper tray at the same time. This may cause a paper jam.
●Avoid extremely smooth or shiny paper that is highly textured. Also avoid paper that is coated, damaged or wrinkled.
●Avoid double-sided printing.
●Do not use paper printed from this unit for double-sided printing with other copiers or printers, or a paper jam may occur.
Adding paper to the paper tray
1. Pull the recording paper set lever forward.
●The unit will beep and the following message is displayed.
Display: CHECK LEVER
2.Remove the installed paper.
3.Add paper to the removed paper and straighten it.
4.Fan the stack of paper and insert it into the paper tray.
5.Move the recording paper set lever back.
Recording paper |
set lever |
23 |
Setup
Connections
1 |
Connect the handset cord. |
2 |
Connect the telephone line cord. |
3 |
Connect the power cord. |
● When the power is turned on for |
the first time, the unit will print some basic information.
Power cord |
||
120 V, 60 Hz |
|
|
(protectorPower surge) |
|
|
RJ11C |
|
|
Line surge |
) |
Telephone |
( protector |
line cord |
|
Note:
 Handset cord
Connect to “LINE”.
●The warranty does not cover damage due to power line surges or lightning.
For additional equipment protection, we recommend the use of a surge protector. The following types are available; TELESPIKE BLOK MODEL TSB (TRIPPE MFG. CO.), SPIKE BLOK MODEL SK6-0 (TRIPPE MFG. CO.), SUPER MAX (PANAMAX) or MP1 (ITW LINX).
●When you operate this product, the power outlet should be near the product and easily accessible.
●If you wish to connect an answering machine to the unit, see page 61.
●If the following message is displayed when the unit is plugged in, the recording paper set lever is released. Display: CHECK LEVER
Move the lever back (see step 3 on page 23).
Automatic dialing mode setting
●When the telephone line cord and the power cord are connected, the unit will automatically start to detect the dialing mode.
Display: CHECKING LINE
Wait until one of the following messages is displayed.
— If your line has touch tone service:
LINE IS TONE
— If your line has rotary pulse dial service:
LINE IS PULSE
●If the power cord is disconnected or a power failure occurs, the unit will detect the dialing mode again when power is restored.
●You can change the dialing mode setting manually. See page 33.
●If you connect the power cord before connecting the telephone line cord, the following messages will be shown alternately.
Display: |
INSERT TEL LINE |
|
|
|
NO TEL LINE |
|
|||||
|
|
|
|
|
|
Connect the telephone line cord.
24
Setup
Date and time, your name and facsimile telephone number
You should program the date and time, your logo and facsimile telephone number. This information will be printed on each page transmitted from your unit, fulfilling the requirements of the Telephone Protection Act of 1991.
|
|
Your logo |
Your facsimile telephone number |
Date and time |
|||||||
|
|
|
|
|
|
|
|
|
|
|
|
Example: |
|
|
|
|
|
|
|
|
|
|
|
|
|
|
|
|
|
|
|
|
|
||
|
FROM : Panasonic Fax |
FAX NO. : 1234567 |
|
Feb. 26 1998 04:02PM P1 |
|||||||
Fax Correspondence
Setting the date and time
1 |
Press |
MENU . |
|
|
|
|
|
|
|
Display: |
|
1.SYSTEM SET UP |
|||||
|
|
|
||||||
2 |
|
|
|
|
|
|
|
|
Press |
, then 0 1 . |
|
|
|
|
|
||
|
|
|
SET DATE & TIME |
|||||
|
|
|
|
|||||
3 |
|
|
|
|
|
|||
Press |
START/COPY/SET . |
|||||||
|
|
|
M:01/D:01/Y:98 |
|||||
|
|
|
|
|||||
|
|
|
|
|
|
|
|
|
4 |
|
|
|
|
|
|
|
Cursor |
|
|
|
|
|
|
|
||
Enter the correct month/day/year by selecting |
||||||||
each 2 digits using the dial keypad or JOG DIAL . |
||||||||
|
If using JOG DIAL , press |
|
|
|
to move the |
|||
|
cursor. |
|
|
|
|
|
|
|
Example (using the dial keypad): Aug. 10, 1998
|
Press |
0 |
8 |
1 |
0 |
9 |
8 . |
|
|
|
|
|
|
|
|
|
|
|
|
|
|
|
|
|
|
|
|
M:08/D:10/Y:98 |
|
5 |
|
|
|
|
|||||
Press |
START/COPY/SET . |
|
|||||||
|
|
|
|
|
|
|
TIME: |
12:00AM |
|
|
|
|
|
|
|
|
|
||
6 |
|
|
|||||||
Enter the correct hour/minute by selecting |
|||||||||
each 2 digits using the dial keypad or |
JOG DIAL . |
||||||||
If using JOG DIAL , press  to move the cursor.
Press  to select “AM” or “PM”.
Example (using the dial keypad): 3:15PM
1. Press 0 3 1 5 .
TIME: 03:15AM
2. Press  until “PM” is displayed.
TIME: 03:15PM
7 |
Press |
START/COPY/SET . |
||||||||
|
|
|
|
|
SETUP ITEM [ ] |
|||||
|
|
|
|
|
|
|
||||
8 |
Press |
MENU . |
|
|
|
|
|
|||
|
|
|
|
|
||||||
Dial keypad |
|
|
MENU |
|||||||
|
|
|
|
|
|
|
|
|
|
|
|
|
|
|
|
|
|
|
|
|
|
|
|
|
|
|
|
|
|
|
|
|
|
|
|
|
|
|
|
|
|
|
|
|
|
|
|
|
|
|
|
|
|
|
|
|
|
|
|
|
|
|
|
|
|
|
|
|
|
|
|
|
|
|
|
|
|
|
|
|
|
|
|
|
|
|
|
|
|
|
|
|
|
|
|
|
|
|
STOP |
/ |
START/COPY/SET
JOG DIAL
Note:
●The  key can be used to select “AM” or “PM” wherever the cursor is located.
●The accuracy of the clock is approximately ±60 seconds a month.
To correct a mistake
●Press  or
or  to move the cursor to the incorrect number, then make the correction.
●If you press STOP while programming, the display will return to the previous one.
Preparation Initial
25
Setup
Setting your logo
The logo can be your company, division or name.
1 |
Press |
MENU . |
|
|
|
|
|
|
|||
|
|
|
|
Display: |
|
1.SYSTEM SET UP |
|||||
|
|
|
|
|
|
||||||
2 |
Press |
|
, then 0 2 . |
|
|
|
|
|
|
||
|
|
|
|
|
|
|
|||||
|
|
|
|
|
|
YOUR LOGO |
|||||
|
|
|
|
|
|
|
|||||
3 |
|
|
|
|
|
||||||
Press |
START/COPY/SET . |
||||||||||
|
|
|
|
|
|
|
LOGO= |
||||
4 |
|
|
|
|
|||||||
Enter your logo, up to 30 characters, by using the |
|||||||||||
dial keypad or JOG DIAL (see the next page). |
|||||||||||
|
Example (using the dial keypad): Bill |
||||||||||
|
1. |
Press |
2 |
twice. |
|
|
|
|
|||
|
|
LOGO=B |
|||||||||
|
|
|
|
|
|
|
|
|
|
|
|
|
2. |
Press |
4 |
six times. |
|
|
|
|
|
Cursor |
|
|
|
|
|
|
|
||||||
|
|
|
|
|
|
|
|||||
|
|
LOGO=Bi |
|||||||||
|
3. |
Press |
5 |
six times. |
|
|
|
|
|
|
|
|
|
|
|
|
|
|
|||||
|
|
LOGO=Bil |
|||||||||
|
4. |
|
|
|
|
|
|
|
|
||
|
Press |
|
to move the cursor to the next |
||||||||
|
|
space and press 5 |
six times. |
||||||||
|
|
|
|
|
|
|
|
|
|
|
|
|
|
|
|
|
|
|
LOGO=Bill |
||||
5 |
|
|
|
|
|
|
|
||||
Press |
START/COPY/SET . |
||||||||||
|
|
|
|
|
|
SETUP ITEM [ ] |
|||||
|
|
|
|
|
|
|
|||||
6 |
Press |
MENU . |
|
|
|
|
|
|
|||
|
|
|
|
|
|
||||||
Dial keypad |
MENU |
One-Touch |
||||||||
Dial keys |
||||||||||
|
|
|
|
|
|
|||||
|
|
|
|
|
|
|
|
|
|
|
|
|
|
|
|
|
|
|
|
|
|
|
|
|
|
|
|
|
|
|
|
|
|
|
|
|
|
|
|
|
|
|
|
|
|
|
|
|
|
|
|
|
|
|
|
|
|
|
|
|
|
|
|
|
|
|
|
|
|
|
|
|
|
|
|
|
|
|
|
|
|
|
|
|
|
|
|
|
|
|
|
|
|
|
|
|
|
|
STOP |
/ |
INSERT
START/COPY/SET
JOG DIAL
To correct a mistake |
To insert a character |
|||||
● Press |
or |
to move the cursor to the |
1. |
Press |
or |
to move the cursor to the |
incorrect character, then make the correction. |
|
position to the right of where you want to |
||||
To delete a character |
|
insert the character. |
||||
2. |
Press |
INSERT (One-Touch Dial key 2) to |
||||
|
|
|
|
insert a space and enter the character. |
||
●Move the cursor to the character you want to delete and press STOP .
26
Setup
To select characters with the dial keypad
Pressing the dial keys will select a character as shown below.
Keys |
|
|
|
|
|
|
|
|
Characters |
|
|
|
|
|
|
|
||||
|
|
|
|
|
|
|
|
|
|
|
|
|
|
|
|
|
|
|
|
|
|
1 |
|
1 |
[ |
] |
{ |
} |
+ |
– |
/ |
= |
, |
. |
_ |
: |
; |
? |
| |
||
|
|
|
|
|
|
|
|
|
|
|
|
|
|
|
|
|
|
|
|
|
|
2 |
|
A |
B |
C |
a |
b |
c |
2 |
|
|
|
|
|
|
|
|
|
|
|
|
|
|
|
|
|
|
|
|
|
|
|
|
|
|
|
|
|
|
|
|
|
3 |
|
D |
E |
F |
d |
e |
f |
3 |
|
|
|
|
|
|
|
|
|
|
|
|
|
|
|
|
|
|
|
|
|
|
|
|
|
|
|
|
|
|
|
|
|
4 |
|
G |
H |
I |
g |
h |
i |
4 |
|
|
|
|
|
|
|
|
|
|
|
|
|
|
|
|
|
|
|
|
|
|
|
|
|
|
|
|
|
|
|
|
Dial |
5 |
|
J |
K |
L |
j |
k |
l |
5 |
|
|
|
|
|
|
|
|
|
|
|
keys |
|
|
|
|
|
|
|
|
|
|
|
|
|
|
|
|
|
|
|
|
6 |
|
M |
N |
O |
m |
n |
o |
6 |
|
|
|
|
|
|
|
|
|
|
||
|
|
|
|
|
|
|
|
|
|
|
|
|||||||||
|
|
|
|
|
|
|
|
|
|
|
|
|
|
|
|
|
|
|
|
|
|
7 |
|
P |
Q |
R |
S |
p |
q |
r |
s |
7 |
|
|
|
|
|
|
|
|
|
|
|
|
|
|
|
|
|
|
|
|
|
|
|
|
|
|
|
|
|
|
|
8 |
|
T |
U |
V |
t |
u |
v |
8 |
|
|
|
|
|
|
|
|
|
|
|
|
|
|
|
|
|
|
|
|
|
|
|
|
|
|
|
|
|
|
|
|
|
9 |
|
W |
X |
Y |
Z |
w |
x |
y |
z |
9 |
|
|
|
|
|
|
|
|
|
|
|
|
|
|
|
|
|
|
|
|
|
|
|
|
|
|
|
|
||
|
0 |
|
0 |
( |
) |
|
|
! |
" |
# |
$ |
% & |
¥ |
|
@ |
^ |
’ |
¤ |
||
|
|
|
|
|||||||||||||||||
|
|
|
|
|||||||||||||||||
|
|
|
|
|
|
|
|
|
|
|
|
|
|
|||||||
|
|
|
|
HYPHEN key (Used to insert a hyphen.) |
|
|
|
|
|
|
|
|
|
|||||||
One-Touch |
|
1 |
|
|
|
|
|
|
|
|
|
|||||||||
|
|
|
|
|
|
|
|
|
|
|
|
|
|
|
|
|
|
|
|
|
Dial keys |
|
|
|
|
|
|
|
|
|
|
|
|
|
|
|
|
|
|
|
|
|
|
|
INSERT key (Used to insert one character or one space.) |
|
|
|
|
|
||||||||||||
|
2 |
|
|
|
|
|
|
|||||||||||||
|
|
|
|
|
|
|
|
|
||||||||||||
|
|
|
|
|
|
|
|
|
|
|
|
|
|
|||||||
|
|
|
|
|
|
|
|
|
|
|
|
|
|
|||||||
Arrow |
|
|
|
|
key (Used to move the cursor to the left.) |
|
|
|
|
|
|
|
|
|||||||
|
|
|
|
|
|
|
|
|
|
|
|
|
|
|
|
|
|
|
|
|
|
|
|
|
key (Used to move the cursor to the right.) |
|
|
|
|
|
|
|
|
||||||||
keys |
|
|
|
|
|
|
|
|
|
|
|
|
||||||||
|
|
|
|
To enter another character using the same number key, move the cursor to the next space. |
||||||||||||||||
|
|
|
|
|
|
|
|
|
|
|
|
|
|
|
|
|
|
|
|
|
To select characters using the JOG DIAL
Instead of pressing the dial keys, you can select characters using the JOG DIAL.
1. Rotate |
JOG DIAL |
until the desired character |
is displayed. |
|
|
2. Press |
to move the cursor to the next space. |
|
● The character displayed in step 1 is inserted. |
||
3. Return to step 1 to enter the next character. |
||
Display order of characters |
||
|
|
JOG DIAL |
|
Capital |
|
|
alphabet |
|
|
|
: Rotating to |
Lower case |
the right |
|
alphabet |
|
Number |
|
: Rotating to |
|
|
|
|
|
|
the left |
|
Symbol |
|
Preparation Initial
27
Setup
Setting your facsimile telephone number
1 |
Press |
MENU . |
|
|
|
Display: |
|
1.SYSTEM SET UP |
|
|
|
|
||
2 |
|
|
|
|
Press |
, then 0 3 . |
|
||
|
|
|
YOUR FAX NO. |
|
|
|
|
|
|
3 |
|
|
|
|
Press |
START/COPY/SET . |
|||
|
|
|
NO.= |
|
|
|
|
|
|
4 |
|
|
||
Enter your facsimile telephone number up to 20 |
||||
digits using the dial keypad or JOG DIAL . |
||||
|
If using |
JOG DIAL , press |
to move the |
|
|
cursor. |
|
|
|
|
|
Example: |
|
NO.=1234567 |
5 |
|
|
|
|
Press |
START/COPY/SET . |
|||
|
|
|
SETUP ITEM [ ] |
|
|
|
|
|
|
6 |
|
|
|
|
Press |
MENU . |
|
||
Dial keypad |
MENU |
STOP |
/ |
START/COPY/SET
JOG DIAL
Note:
●The  button replaces with a space and the
  button replaces with a “+”.
Example (using the dial keypad): +234 5678 Press  2 3 4
2 3 4  5 6 7 8 .
To correct a mistake |
To delete a number |
||
● Press |
or |
to move the cursor to the |
● Move the cursor to the number you want to |
incorrect number, then make the correction. |
delete and press STOP . |
||
28
Volume
Adjusting volumes
Ringer volume
4 levels (high/middle/low/off) are available.
While the unit is idle, press  or
or  .
.
¡ To turn the ringer off:
1.Press  repeatedly until the following message is displayed.
Display: RINGER OFF= OK?
YES: PRESS SET
2. Press START/COPY/SET .
● To turn the ringer back on, press  .
.
¡While the ringer volume is set to off:
The display will show the following message.
RINGER OFF
 /
/ 
START/COPY/SET
When receiving a call, the unit will not ring and will display the following.
INCOMING CALL
Handset receiver volume
5 levels (high to low) are available.
While using the handset, press  or
or  .
.
Speaker volume
8 levels (high to low) are available.
While using the speakerphone, press  or
or  .
.
Preparation Initial
29
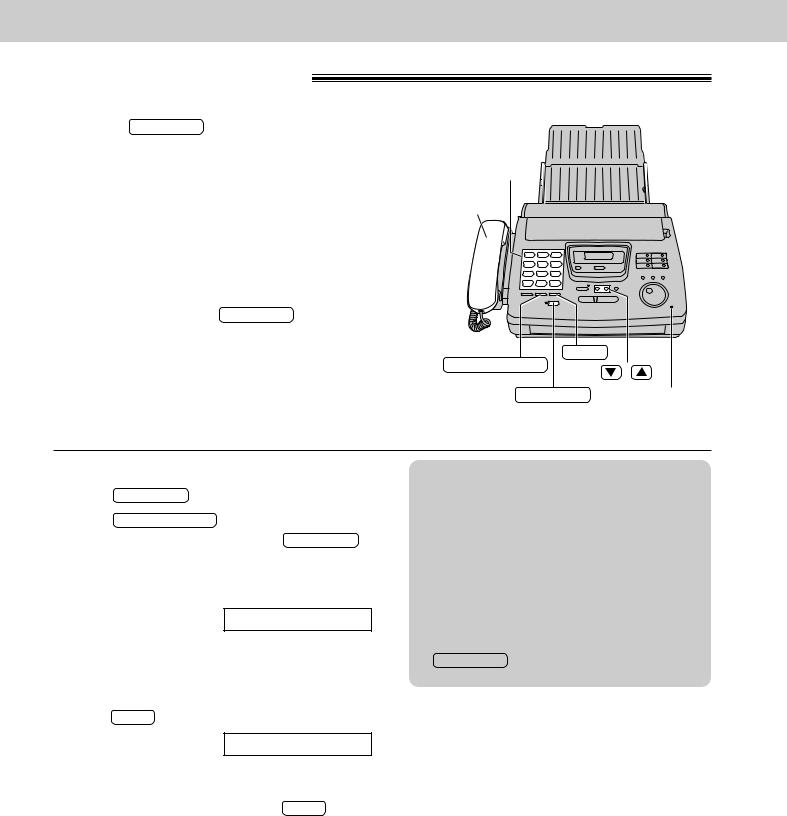
Making and Answering Calls
Voice call - making
1 |
Press |
SP-PHONE |
or lift the handset. |
||||
|
Display: |
|
|
|
|||
|
|
TEL= |
|||||
|
|
|
|||||
2 |
|
|
|
|
|
|
|
Dial the telephone number. |
|
|
|||||
|
Example: |
|
TEL=2345678 |
||||
|
|
|
|||||
|
|
|
|
|
|||
|
● If you misdial, hang up and dial again. |
||||||
3 |
When the other party answers, talk into the |
||||||
microphone or handset. |
|
|
|||||
4 |
|
|
|
|
|||
When finished, press |
SP-PHONE |
or hang up the |
|||||
handset. |
|
|
|||||
Dial keypad
Handset
REDIAL/PAUSE |
MUTE |
|
/ |
||
|
SP-PHONE Microphone
To redial the last number
1.Press SP-PHONE or lift the handset.
2.Press REDIAL/PAUSE .
●If the line is busy when using the SP-PHONE button, the unit will automatically redial the number up to 14 times.
●During redial, the following will be displayed.
Display: WAITING REDIAL
To mute your voice to the other party
1. Press MUTE during a telephone conversation.
Display: <MUTE>
●The other party cannot hear you, but you can hear them.
2.To resume the conversation, press MUTE .
Hints for speakerphone operation
●Use the speakerphone in a quiet room.
●If you have difficulty hearing the other party, adjust the volume using  or
or  .
.
●If you and the other party speak at the same time, parts of your conversation will be cut off.
●To switch to the handset, lift the handset. To switch back to the speakerphone, press
SP-PHONE .
30
 Loading...