


 Loading...
5.8 GHz Expandable Cordless Handset
Operating Instructions
PLEASE READ BEFORE USE AND SAVE.
Charge the battery for
6 hours before initial use.
Model No. KX-TGA523
Pulse-or-tone dialing capability
The KX-TGA523 will only work with the Panasonic cordless phone systems: KX-TG5200/KX-TG5202/ KX-TG5210/KX-TG5212/ KX-TG5230/KX-TG5240/ KX-FPG391
Contents by Section
1 Getting Started
2 Listening to the Radio
3 Using the Sleep Timer
4 Using the Alarms
5 Things You Should Know
6 Referencia rápida
Panasonic World Wide Web address: http://www.panasonic.com
for customers in the USA or Puerto Rico

1Getting Started
1-A |
Accessories |
|
(included) |
|
|
Battery |
..............................one |
Order No. HHR-P104
Handset Cover .................. |
one |
Order No. PQKK10142Z1 |
|
Belt Clip ............................ |
one |
Order No. PQKE10377Z1 |
|
Charger Unit .....................one
Charger Order No. KX-TGA523M
AC Adaptor Order No. PQLV1Z
Loop Antenna Order No.
N1DAEYY00002
•For extra orders, call 1-800-332-5368.
For hearing or speech impaired TTY users, call 1-866-605-1277.
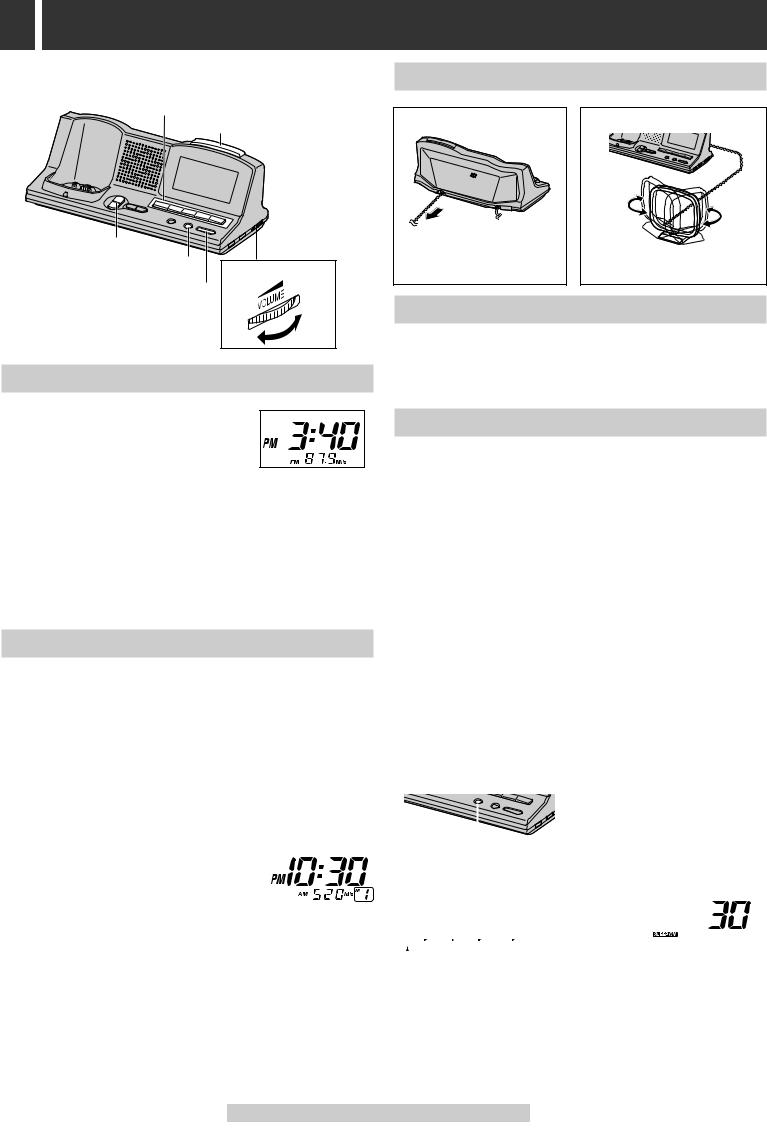
1-B Location of Controls
Handset |
Charger (with Clock Radio) |
Ringer/Message
Alert Indicator
Antenna
Display |
Soft Keys (1-G) |
||
|
|
||
Headset Jack |
[OFF] Button |
||
(5-A) |
|
||
[ |
] (TALK) |
[MENU] Button |
|
Button |
|||
Navigator Key |
|||
[ |
] (Speaker- |
||
|
|||
phone) Button |
[REDIAL] Button |
||
[Y] (TONE) |
[FLASH/ |
||
Button |
CALL WAIT] |
||
|
|
||
[HOLD/INTERCOM] |
Button |
||
|
|||
Button |
Charge Contacts |
||
|
|
(1-F) |
|
Note: The steps necessary to start up the handset are described in these Operating Instructions. Please read the KX-TG5200/ KX-TG5202/KX-TG5210/KX-TG5212/ KX-TG5230/KX-TG5240/KX-FPG391 operating instructions for further details about the handset operations.
[SNOOZE/MUTE] Button (2-D, 4-C)
[BUZZER, ALARM SET]
Button (4-B)
[RADIO, ALARM SET]
Button (4-A)
Charge Contacts
(1-F)
Display VOLUME
Control (2-A)
CHARGE |
|
Indicator (1-F) |
|
[+, -, TUNE/CLOCK] |
[TIME SET] |
Button (1-H, 2-A) |
Button (1-H) |
Memory Buttons ([M1], [M2], |
[ALARM ON/OFF] |
[M3], [M4] and [M5]) (2-B) |
Button (4-D) |
[SLEEP] Button (3-A) |
|
[OFF] Button (2-A, 4-C) |
|
[FM/AM, RADIO] Button (2-A)
1-C Connecting the AC Adaptor/Setting Up the Loop Antenna
2 |
3 |
1
Loop Antenna
Stand the antenna up by inserting the tab into the slot until it clicks into place.
•To disconnect the antenna, firmly pull the antenna cord, holding the cord near the plug.
Hook |
Make sure the |
|
|
AC adaptor plug |
Power Outlet |
|
is securely |
|
|
connected to the |
(AC 120 V, 60 Hz) |
|
unit. Feed the |
AC Adaptor |
|
cord through the |
|
|
|
|
|
hooks as shown. |
|
Hooks |
|
|
•USE ONLY WITH Panasonic AC ADAPTOR PQLV1 (Order No. PQLV1Z).
•The AC adaptor must remain connected at all times. (It is normal for the adaptor to feel warm during use.)
1-D Installing the Handset Battery |
1-E Belt Clip |
|
Insert the battery (#), and press it down until it snaps into the |
You can hang the handset on your belt or pocket using the included |
|
compartment ($). Close the cover. |
belt clip. |
|
2 |
To attach the belt clip |
To remove the belt clip |
1 |
|
While pressing the top of the clip |
(A), pull the right edge in the direction of the arrow (B).
 B
B
A
For assistance, please call: 1-800-211-PANA(7262)

Getting Started |
Section 1 |
|
|
1-F Battery Charge
Place the handset on the charger and charge for 6 hours before initial use.
•The unit beeps once, the CHARGE indicator lights and “Charging” is displayed.
•When the battery is fully charged, “Charge completed” is displayed if there are no new calls in the Caller List.
 CHARGE Indicator
•Recharge the battery when:
–“Recharge battery” is displayed on the handset,
–“ ” flashes, or
–the handset beeps intermittently while it is in use.
•If the battery has been discharged, the handset will display “Charge for 6 HRS” and “ ” when you place the handset on the charger. The handset will not work unless the battery is charged. Continue charging.
Battery information
After your Panasonic battery is fully charged, you can expect the following performance:
Operation |
Operating time |
While in use (TALK) |
Up to 5 hours |
|
|
While not in use (Standby) |
Up to 11 days |
|
|
While using Clarity Booster feature |
Up to 3 hours |
|
|
•Clean the charge contacts of the handset and the charger with a soft, dry cloth once a month. Clean more often if the unit is subject to grease, dust or high humidity. Otherwise the battery may not charge properly.
A nickel metal hydride battery that is recyclable powers the product you have purchased. Please call 1-800-8-BATTERY for information on how to recycle this battery.
1-G Handset Registration
This handset must be registered to a KX-TG5200/KX-TG5202/ KX-TG5210/KX-TG5212/KX-TG5230/KX-TG5240/KX-FPG391 base unit.
The handset will be assigned an extension number at registration. The KX-TGA523 will not work without one of the following Panasonic cordless phone systems: KX-TG5200/KX-TG5202/KX-TG5210/ KX-TG5212/KX-TG5230/KX-TG5240/KX-FPG391.

 [-] Press LOCATOR on base unit for 3 sec.
Then press OK
BACK |
OK |
CHARGE Indicator |
Soft Key ( OK ) |
*LOCATOR Button |
|
•Base unit model shown here is KX-TG5240.
*The location of LOCATOR button varies by base unit model. KX-TG5200/KX-TG5202: LOCATOR [  ], [
], [  ], [
], [  ], [
], [  ] or [
  ]
]
KX-TG5210/KX-TG5212: LOCATOR/INTERCOM [  ], [
], [  ], [
], [  ],
],
[  ] or [
  ]
]
KX-TG5230/KX-TG5240/KX-FPG391: [LOCATOR/INTERCOM/TRANSFER]
Only one handset can be registered at a time.
Make sure the base unit and the other handsets are not being used. Have both the handset and base unit nearby during registration.
The handset display shows the |
Press |
LOCATOR |
||||||
instructions as shown on the right. |
on |
base unit |
||||||
for |
3 |
sec. |
||||||
|
||||||||
1 Base unit: Press and hold the |
Then |
press OK |
|
|
||||
|
||||||||
|
|
|
|
|
|
|
||
|
|
|
O |
|||||
*LOCATOR button for 3 seconds. |
|
|
|
|
|
|
|
|
|
|
|
|
|
|
|
||
•The CHARGE indicator flashes. After the CHARGE indicator starts flashing, the rest of the procedure must be completed within 1 minute.
•On the KX-FPG391, “HS REGISTRATION” is displayed.
2 |
Handset: |
Ex. Extension number 2 |
|||||
#Press the soft key ( |
OK |
). |
|
|
|
|
|
|
SP |
PRIVACY |
|
2] |
|||
|
|
||||||
|
|
||||||
|
$Wait until a long beep sounds and the |
Handset |
[2] |
|
|
||
|
display shows the new extension number. |
Registered |
|
||||
|
•Registration is complete. |
|
|||||
•The registered number “[1]” to “[4]” is shown on the top right the display.
•You can stop registration by pressing [OFF] on the handset and pressing the *LOCATOR button on the base unit.
•To cancel the handset’s registration, please see the base unit Operating Instructions.
•If you try to register this handset to the KX-TG6500 base unit, “Wrong handset Refer to manual” is displayed. The base units for this handset are mentioned above.
1-H Setting Time
The charger unit has a 12-hour clock (monthly accuracy ±30 seconds). After the AC adaptor is connected, “

 ” flashes on the display. Follow the steps to set the clock.
[+, -, TUNE/CLOCK]
[OFF] |
[TIME SET] |
1 Press [TIME SET].
2 Adjust the time by pressing
[+, TUNE/CLOCK] or [–, TUNE/CLOCK].
•Pressing [+] or [–] increases or decreases the time in one-minute units.
• Pressing and holding [+] or [–] |
Ex. 3:30PM is set. |
|
increases or decreases the time faster. |
||
|
||
3 Press [TIME SET] to set the clock. |
|
|
• The time stops flashing. |
|
|
|
|
•You can exit time setting mode any time by pressing [OFF].
•If a power failure occurs, the display will show “
 ” for about 10 minutes, then it will become blank. After power returns, “


 ” will be displayed. The clock memory will be lost. Set the clock. The radio alarm and buzzer alarm memory will be retained for about 10 minutes during a power failure (4-A, 4-B).
For assistance, please call: 1-800-211-PANA(7262)
2Listening to the Radio
Section 2
Memory Buttons |
2-C Improving Reception |
||
|
|
||
([M1], [M2], [M3], [M4] and [M5]) |
|
|
|
[SNOOZE/MUTE] |
For FM |
For AM |
|
[+, -, TUNE/CLOCK] |
Extend the cord and place |
|
|
the antenna in a location |
Reorient the antenna horizontally |
||
[OFF] |
|||
where reception improves. |
until reception improves. |
||
VOLUME Control |
|||
[FM/AM, RADIO] |
|
|
|
Loud 2-D Muting the Radio
Press [SNOOZE/MUTE] while listening to the radio.
•“  ” flashes on the display.
•To release the mute, press [SNOOZE/MUTE] again.
2-E Changing the FM Tuning Sensitivity
You can change the sensitivity used for tuning in FM stations from 0.2 MHz (factory preset) increments to 0.1 MHz.
•Note that if you change the sensitivity, all FM station presets (2-B) and the station used for the radio alarm (4-A) will return to the factory preset. The buzzer will sound at the set radio alarm time.
1. Press [FM/AM, RADIO] to turn the radio on.
2. Press [FM/AM, RADIO] to switch to the FM band.
3. Press and hold [FM/AM, RADIO] for about 5 seconds.
•The display changes to show the lowest available FM frequency.
•To change the sensitivity back to 0.2 MHz increments, repeat the procedure above.
•If the AM band is selected and you press and hold [FM/AM, RADIO] for about 5 seconds, the band will change to FM but the FM tuning sensitivity will not change.
To preset stations |
3 |
|
|
|
Using the Sleep Timer |
|
Section 3 |
|
||||||||||||||
1 |
Press [FM/AM, RADIO] to turn the radio on. |
|
|
|
|
|
|
|
|
|
|
|
|
|
|
|
|
|
|
|||
|
3-A |
Setting the Sleep Timer |
|
|||||||||||||||||||
2 |
Press [FM/AM, RADIO] to switch between FM and AM. |
|
|
|||||||||||||||||||
|
|
|
|
|
|
|
|
|
|
|
|
|
|
|
|
|
|
|||||
3 |
Tune in to the desired station by pressing |
|
|
|
|
|
|
|
|
|
|
|
|
|
The sleep timer turns the radio off |
|
||||||
|
|
|
|
|
|
|
|
|
|
|||||||||||||
|
[+, TUNE/CLOCK] or [–, TUNE/CLOCK]. |
|
|
|
|
|
|
|
|
|
|
|
|
|
after a set time. |
|
||||||
|
• Press and hold [+] or [–] to search faster. |
|
|
|
|
|
|
|
|
|
|
|
|
|
|
|||||||
|
|
|
|
|
|
|
|
|
|
|
|
|
|
|
|
|
|
|
||||
4 |
Press and hold a memory button ([M1] to |
|
|
|
|
|
|
|
|
|
|
|
[SLEEP] |
|
|
|
|
|||||
|
|
|
|
|
|
|
|
|
|
|
|
|
||||||||||
|
|
|
|
|
|
|
|
|
|
|
|
|
|
|
|
|
|
|
|
|
||
|
[M5]) until the memory number is |
|
|
|
While the radio is on, press [SLEEP] |
Ex. Sleep Time: 30 min. |
|
|||||||||||||||
|
displayed. |
|
|
|
|
|||||||||||||||||
|
|
|
|
repeatedly to select the time (minutes). |
|
|
|
|
||||||||||||||
|
• To turn the radio off, press [OFF]. |
|
|
|
|
|
|
|
||||||||||||||
|
|
|
|
•Each time you press [SLEEP], the time will |
|
|
|
|
||||||||||||||
|
|
|
|
|
|
|
|
|||||||||||||||
|
Ex. Memory Number |
1 |
|
change as follows: |
|
|
|
|
||||||||||||||
|
|
|
|
|
|
|
|
|
|
|||||||||||||
•If you assign another station of the same band (FM or AM) to the |
30 |
|
60 |
|
90 |
|
120 |
|
OFF |
|
|
|
|
|||||||||
|
|
|
|
|
|
|
|
|||||||||||||||
memory button, the previously assigned station will be erased. |
|
|
|
|
|
|
|
|
|
|
|
|
|
|
|
|
|
|
||||
|
|
|
|
|
|
|
|
|
|
|
|
|
|
|
|
|
|
|||||
•If a power failure occurs, station presets will be retained for about 10 |
•The radio will automatically turn off after the selected sleep time. |
|
||||||||||||||||||||
minutes. |
|
|||||||||||||||||||||
•You cannot set the sleep timer while an alarm is sounding (4-A, 4-B). |
|
|||||||||||||||||||||
To listen to preset stations |
To view the time remaining: Press [SLEEP]. |
|
||||||||||||||||||||
1 |
Press [FM/AM, RADIO] to turn the radio on. |
|
||||||||||||||||||||
To change the setting |
|
|
|
|
||||||||||||||||||
2 |
Press [FM/AM, RADIO] to switch between FM and AM. |
|
|
|
|
|||||||||||||||||
1. Press [SLEEP]. (The time remaining is displayed.) |
|
|||||||||||||||||||||
3 |
Press the desired memory button ([M1] to [M5]). |
2. Immediately after the time remaining is displayed, press [SLEEP] |
|
|||||||||||||||||||
|
• To turn the radio off, press [OFF]. |
|
|
repeatedly to select the sleep time. |
|
|
|
|
||||||||||||||
For assistance, please call: 1-800-211-PANA(7262)
Loading...