


 Loading...
Operating Instructions
SIP Phone
Model No. KX-HDV330
Thank you for purchasing this Panasonic product.
Please read this manual carefully before using this product and save this manual for future use.
Note
R In this manual, the suffix of each model number is omitted unless necessary.
R The illustrations such as some keys may differ from the appearance of the actual product. R Certain products and features described in this document may not be available in your
country or area. Contact your phone system dealer/service provider.
R The contents and design of the software are subject to change without notice. Document Version: 2016-01

Introduction
Outline
This manual describes information about the installation and operation of KX-HDV330.
Related Documentation
R Quick Start Guide
Describes basic information about the installation and safety precautions to prevent personal injury and/or damage to property.
R Administrator Guide
Describes detailed information about the configuration and management of this unit.
Manuals and supporting information are provided on the Panasonic Web site at: http://www.panasonic.net/pcc/support/sipphone/
For Future Reference
Record the information in the space below for future reference.
Note
R The serial number and MAC address of this product may be found on the label affixed to the bottom of the unit. You should note the serial number and MAC address of this unit in the space provided and retain this manual as a permanent record of your purchase to aid in identification in the event of theft.
MODEL NO.
SERIAL NO.
MAC ADDRESS
DATE OF PURCHASE
NAME OF DEALER
DEALER’S ADDRESS
DEALER’S TEL. NO.
Other Information
Trademarks
R The Bluetooth® word mark and logos are owned by the Bluetooth SIG, Inc. and any use of such marks by Panasonic Corporation is under license.
R All other trademarks identified herein are the property of their respective owners.
2

Table of Contents
Important Information |
|
Important Information .......................................... |
4 |
For Users in European Countries ....................... |
5 |
For Users in the United Kingdom ........................ |
5 |
For Users in Australia ......................................... |
5 |
For Users in Australia and the United |
|
Kingdom .............................................................. |
6 |
For Users in New Zealand .................................. |
6 |
For Users in the United States ............................ |
6 |
For Users in Canada ........................................... |
8 |
For Best Performance ......................................... |
9 |
Before Operating the Telephones |
|
Accessory Information ...................................... |
10 |
Location of Controls .......................................... |
12 |
The Display and Icons ...................................... |
19 |
Adjusting the Volume ........................................ |
26 |
Incoming/Outgoing Call Log ............................. |
26 |
Setting the Password ........................................ |
27 |
Selecting the Display Language ....................... |
27 |
Entering Characters .......................................... |
27 |
Bluetooth Headset ............................................ |
28 |
Basic Operation ................................................ |
29 |
Making Calls |
|
Making Calls ..................................................... |
30 |
Basic Calling ..................................................... |
30 |
Easy Dialing ...................................................... |
30 |
Making a Multicast Voice Paging call ............... |
32 |
Receiving Calls |
|
Receiving Calls ................................................. |
33 |
Answering Calls ................................................ |
33 |
Hands-free Mode .............................................. |
34 |
Training Mode ................................................... |
34 |
During a Conversation |
|
During a Conversation ...................................... |
35 |
Before Leaving Your Desk |
|
Call Forwarding/Do Not Disturb ........................ |
38 |
Listening to Voice Mail Messages .................... |
38 |
Xsi Visual Voice Mail ........................................ |
38 |
Using the Phonebook |
|
Using the Phonebook ....................................... |
40 |
Using the Personal Phonebook ........................ |
41 |
Using the Shared Phonebook ........................... |
47 |
ECO Mode ........................................................ |
47 |
Checking the Line Status .................................. |
48 |
Customizing the Telephone |
|
Customizing the Telephone .............................. |
50 |
Installation and Setup |
|
Installation and Setup ....................................... |
57 |
Updating the software |
.......................................64 |
Appendix |
|
Appendix ........................................................... |
65 |
Revision History ................................................ |
82 |
3

Important Information
Important Information
Data Security
We cannot be responsible for damages resulting from the misuse of this product.
R Keep a copy of all important data (such as the phonebook list) in case the machine malfunctions and data cannot be recovered.
R This product can store your private/confidential information. To protect your privacy/confidentiality, we recommend that you erase the information such as the phonebook or call log from the memory before you dispose of, transfer or return the product, or have the product repaired.
R To avoid unauthorized access to this product:
–Keep the password secret.
–Change the default password.
–Set a password that is random and cannot be easily guessed.
–Change the password regularly.
R Security settings, such as passwords, cannot be undone at Panasonic service centers. Take measures to prevent passwords from being lost or forgotten.
R If a password is forgotten, initialize the unit and configure the settings again. For details, consult your administrator or dealer.
R It is recommended that you lock the phonebook to prevent stored information from being leaked.
Disposal of Old Equipment and Batteries
Only for European Union and countries with recycling systems
These symbols on the products, packaging, and/or accompanying documents mean that used electrical and electronic products and batteries must not be mixed with general household waste.
For proper treatment, recovery and recycling of old products and batteries, please take them to applicable collection points in accordance with your national legislation.
By disposing of them correctly, you will help to save valuable resources and prevent any potential negative effects on human health and the environment.
For more information about collection and recycling, please contact your local municipality.
Penalties may be applicable for incorrect disposal of this waste, in accordance with national legislation.
Note for the battery symbol (bottom symbol)
This symbol might be used in combination with a chemical symbol. In this case it complies with the requirement set by the Directive for the chemical involved.
4

Important Information
For Users in European Countries
The following declaration is applicable to KX-HDV330NE/KX-HDV330X only
Panasonic System Networks Co., Ltd. declares that this equipment is in compliance with the essential requirements and other relevant provisions of Radio & Telecommunications Terminal Equipment (R&TTE) Directive 1999/5/EC.
Declarations of Conformity for the relevant Panasonic products described in this manual are available for download by visiting:
http://www.ptc.panasonic.eu
Contact to Authorized Representative:
Panasonic Testing Center
Panasonic Marketing Europe GmbH
Winsbergring 15, 22525 Hamburg, Germany
Ecodesign information
Ecodesign information under EU Regulation (EC) No.1275/2008 amended by (EU) Regulation No. 801/2013.
=======================================
Please visit here: www.ptc.panasonic.eu click [Downloads]
® Energy related products information (Public)
=======================================
Power consumption in networked standby and guidance are mentioned in the web site above.
For Users in the United Kingdom
R This unit is designed to be installed under controlled conditions of ambient temperature and a relative humidity.
R Avoid installing the unit in damp or humid environments, such as bathrooms or swimming pools.
R 999 and 112 can be dialed on the product after accessing the outside line for the purpose of making outgoing calls to the BT emergency (999) and (112) services.
The method for accessing an outside line differs depending on the SIP server. For details, confirm the features of the SIP server.
For Users in Australia
WARNING
R Please ensure that a separate telephone, not dependent on local power, is available for emergency use.
R This equipment will be inoperable when mains power fails.
R No “000” or other calls can be made from this device during a mains power failure.
5

Important Information
For Users in Australia and the United Kingdom
R This unit is capable of being used in conjunction with hearing aids fitted with inductive coil pick-ups. The handset should be held as for normal conversation. For operation, the hearing aid should be set to its "T" position or as directed in the operating instructions for the hearing aid.
R This unit is designed to aid the visually handicapped to locate dial keys and buttons.
For Users in New Zealand
R This equipment shall not be set to make automatic calls to the Telecom ‘111’ Emergency Service.
PTC General Warning
R The grant of a Telepermit for any item of terminal equipment indicates only that Telecom has accepted that the item complies with minimum conditions for connection to its network. It indicates no endorsement of the product by Telecom, nor does it provide any sort of warranty. Above all, it provides no assurance that any item will work correctly in all respects with another item of Telepermitted equipment of a different make or model, nor does it imply that any product is compatible with all of Telecom’s network services.
The Use of IP Networks through the PSTN
R Internet Protocol (IP) by its nature introduces delay into speech signals as each data packet is formulated and addressed. Telecom Access Standards recommends that suppliers, designers and installers using this technology for calls to or from the PSTN refer to ITU E Model requirements in the design of their networks. The overall aim is to minimize delay, distortion and other transmission impairments, particularly for those calls involving cellular and international networks, which already suffer extensive delay.
Echo cancellation
R Echo cancelers are not normally required in the Telecom PSTN because geographic delays are acceptable where CPE return loss is maintained within Telepermit limits. However, those private networks making use of Voice over IP technology are required to provide echo cancellation for all voice calls. The combined effect of audio/VoIP conversion delay and IP routing delay can cause the echo cancellation time of ³ 64 ms to be required.
Important Notice
R Under power failure conditions this appliance may not operate. Please ensure that a separate telephone, not dependent on local power, is available for emergency use.
R No “111” or other calls can be made from this device during a mains power failure.
For Users in the United States
Note
R This equipment has been tested and found to comply with the limits for a Class B digital device, pursuant to Part 15 of the FCC Rules. These limits are designed to provide reasonable protection against harmful interference in a residential installation. This equipment generates, uses, and can radiate radio frequency energy and, if not installed and used in accordance with the instructions, may cause harmful interference to radio communications. However, there is no guarantee that interference will not occur in a particular installation. If this equipment does cause harmful interference to radio or
6

Important Information
television reception, which can be determined by turning the equipment off and on, the user is encouraged to try to correct the interference by one or more of the following measures:
–Reorient or relocate the receiving antenna.
–Increase the separation between the equipment and receiver.
–Connect the equipment to an outlet on a circuit different from that to which the receiver is connected.
–Consult the dealer or an experienced radio/TV technician for help.
This device complies with Part 15 of the FCC Rules. Operation is subject to the following two conditions:
(1) this device may not cause harmful interference, and (2) this device must accept any interference received, including interference that may cause undesired operation.
WHEN PROGRAMMING EMERGENCY NUMBERS AND/OR MAKING TEST CALLS TO EMERGENCY NUMBERS:
1.Remain on the line and briefly explain to the dispatcher the reason for the call before hanging up.
2.Perform such activities during off-peak hours, such as early morning or late evening.
CAUTION
Any changes or modifications not expressly approved by the party responsible for compliance could void the user’s authority to operate this product.
FCC RF Exposure Warning:
R This product complies with FCC radiation exposure limits set forth for an uncontrolled environment. R To comply with FCC RF exposure requirements, this product must be installed and operated 20 cm
(8 inches) or more between the product and all person’s body.
R This product may not be collocated or operated in conjunction with any other antenna or transmitter.
FCC ID can be found on the bottom of the units.
Privacy of communications may not be ensured when using this phone.
Hearing Aid Compatibility
This telephone provides magnetic coupling for hearing aids as defined by the FCC in 47 CFR Section 68.316. Use only handsets or other acoustic devices with this equipment that are compliant with the hearing aid compatibility requirements of FCC Part 68.
When you hold the phone to your ear, noise might be heard in your Hearing Aid. Some Hearing Aids are not adequately shielded from external RF (radio frequency) energy. If noise occurs, use an optional headset accessory or the speakerphone option (if applicable) when using this phone. Consult your audiologist or Hearing Aid manufacturer about the availability of Hearing Aids which provide adequate shielding to RF energy commonly emitted by digital devices.
Compliance with TIA-1083 standard:
Compatible with |
Hearing Aid T-Coil |
T |
TIA-1083 |
Telephone handsets identified with this logo have reduced noise and interference when used with T-Coil equipped hearing aids and cochlear implants.
7

Important Information
Responsible Party
Panasonic Corporation of North America
Two Riverfront Plaza, Newark, NJ 07102-5490
Technical Support
Panasonic Corporation of North America
Two Riverfront Plaza, Newark, NJ 07102-5490
Telephone: 1 (800) 528-6747 Option 1
For Users in Canada
Industry Canada Notices and Other Information
This product meets the applicable Industry Canada technical specifications.
Notice
R This device complies with Industry Canada licence-exempt RSS standard(s). Operation is subject to the following two conditions: (1) this device may not cause interference, and (2) this device must accept any interference, including interference that may cause undesired operation of the device.
R This Class B digital apparatus complies with Canadian ICES-003.
CAUTION
Any changes or modifications not expressly approved by the party responsible for compliance could void the user’s authority to operate this product.
Compliance with TIA-1083 standard:
Compatible with |
Hearing Aid T-Coil |
T |
TIA-1083 |
Telephone handsets identified with this logo have reduced noise and interference when used with T-Coil equipped hearing aids and cochlear implants.
RF Exposure Warning:
R This product complies with IC radiation exposure limits set forth for an uncontrolled environment. R To comply with IC RF exposure requirements, this product must be installed and operated 20 cm
(8 inches) or more between the product and all person’s body.
R This product may not be collocated or operated in conjunction with any other antenna or transmitter.
Privacy of communications may not be ensured when using this phone.
8

Important Information
For Best Performance
Environment
R Keep the product away from heating appliances and devices that generate electrical noise, such as fluorescent lamps, motors and televisions. These noise sources can interfere with the performance of the product.
R Do not place the product in rooms where the temperature is less than 0 °C (32 °F) or greater than 40 °C (104 °F).
R Allow 10 cm (3–15/16 in) clearance around the product for proper ventilation.
R Avoid environments with excessive smoke, dust, moisture, mechanical vibration, shock, or direct sunlight.
R The apparatus is designed to be installed and operated under controlled conditions of ambient temperature and a relative humidity.
Routine Care
R Unplug the AC adaptor from the AC outlet and disconnect the Ethernet cable before cleaning. R Wipe the product with a soft cloth.
R Do not clean the product with abrasive powder or with chemical agents such as benzine or thinner. R Do not use liquid cleaners or aerosol cleaners.
Touch Display
R Touch the display only with the end of your finger. Do not touch the display with sharp objects, such as a pen or your fingernails.
R Use only one finger. Touching the display with more than one finger can result in unexpected behavior.
Placement
R Do not place heavy objects on top of the product.
R Care should be taken so that objects do not fall onto, and liquids are not spilled into, the product.
Optional Equipment
R A KX-HDV20 (20 Key Expansion Module) can be used with the product.
R The KX-HDV20 can be used only when the product receives power from the optional AC adaptor; it cannot be used when the product receives power via Power-over-Ethernet (PoE).
R Up to 5 KX-HDV20 units can be connected to the product.
However, if you mount the product on a wall, mount in with only one KX-HDV20 unit attached to the KX-HDV330. To mount a second KX-HDV20 unit or more, mount each in turn, unattached to the main unit.
9

Before Operating the Telephones
Accessory Information
Included Accessories
Handset: 1 |
Handset Cord: 1 |
Stand: 1 |
Wall Mounting Adaptor: 1 |
Screws for wall mounting: 3*1 |
*1 The two large screws are for mounting the unit on the wall. The small screw is for attaching the wall mounting adaptor to the unit.
Optional Accessories
Item |
Model |
AC Adaptor Model No.*2 |
AC Adaptor*1 |
KX-HDV330NE/ |
KX-A422CE (PNLV228) |
|
KX-HDV330RU |
|
|
KX-HDV330X |
KX-A422AL (PNLV228)/ |
|
|
KX-A422BR (PNLV228)/ |
|
|
KX-A422CE (PNLV228)/ |
|
|
KX-A422UK (PNLV228)/ |
|
|
KX-A422X (PNLV228) |
|
KX-HDV330/ |
KX-A422 (PNLV228) |
|
KX-HDV330C |
|
*1 This unit complies with the IEEE 802.3af Power-over-Ethernet (PoE) standard. If PoE is available on your network, this unit can receive the necessary power from the network through the Ethernet cable. In this case, no AC adaptor is needed. However, if PoE is not available or if you will use a KX-HDV20 (20 Key Expansion Module), you will need to connect an AC adaptor to the unit.
*2 To order an optional AC adaptor, please order using the "KX-A422xx" model number. For details about which AC adaptor model number you should order, consult your dealer.
Item |
Model |
20 Key Expansion Module |
|
Model No. |
|||
|
|
||
20 Key Expansion Module |
KX-HDV330NE |
KX-HDV20NE |
|
|
KX-HDV330RU |
KX-HDV20RU |
|
|
|
|
|
|
KX-HDV330X |
KX-HDV20X |
|
|
KX-HDV330/ |
KX-HDV20 |
|
|
KX-HDV330C |
|
10
|
|
|
|
|
|
Before Operating the Telephones |
|
KX-HDV20 Included Accessories |
|
|
|
||||
|
|
|
|
||||
Stand: 1 |
Connection cable: 1 |
Wall mount adaptor for |
|||||
|
|
|
|
|
|
KX-HDV20: 1 |
|
|
|
|
|
|
|
|
|
Screws for wall mounting: 3*1 |
Screw for attaching the |
|
KX-HDV20 to the unit: 1 |
*1 The two large screws are for mounting the unit on the wall. The small screw is for attaching the wall mounting adaptor to the unit.
Note
For users in the United States only
To order accessories, call toll-free 1-800-332-5368.
11

Before Operating the Telephones
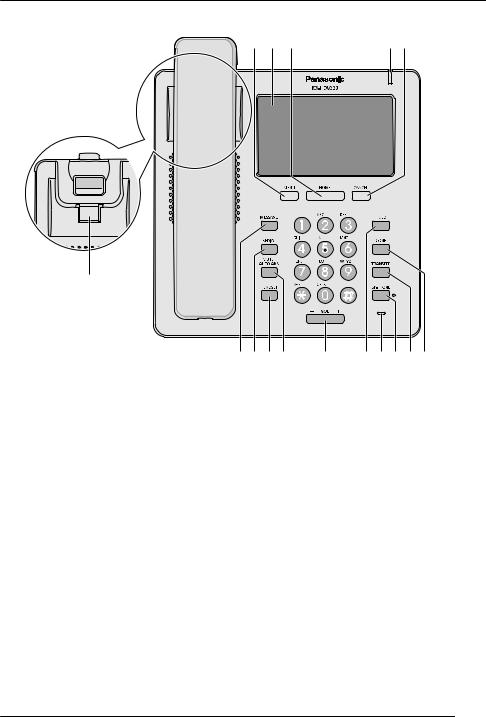
Location of Controls
KX-HDV330NE
A B C |
D E |
F
GHIJ K LMNOP
12

Before Operating the Telephones
KX-HDV330X/KX-HDV330SX
A B C |
D E |
F
GHIJ K LMNOP
13

Before Operating the Telephones
KX-HDV330RU
F
A B C |
D E |
GHIJ |
K LMNOP |
14
Before Operating the Telephones
KX-HDV330
F
A B C |
D E |
GHIJ K LMNOP
15

Before Operating the Telephones
KX-HDV330C
F
A B C |
D E |
GHIJ K LMNOP
16

Before Operating the Telephones
KX-HDV20NE/KX-HDV20X/KX-HDV20RU/KX-HDV20
Q
RS
 /MENU
/MENU
Display the menu. The contents of the menu differ depending on the settings and mode. The items that appear in each mode are as follows:
Mode |
Menu Items |
During a conversation |
R Call History |
|
R Phonebook |
|
R Flash/Recall |
|
R Park*1 |
|
R Call Center/Call Centre*1 |
With a call on hold in a Call Park zone |
R Park*1 |
When the phonebook is displayed |
R Lock Phonebook |
|
R Unlock Phonebook |
Touch display
For details about the display, see “Display”, Page 19.
 /HOME
/HOME
Return to the Home screen.
Depending on the mode, the screen you return to and other operations differ. Pressing this key in standby mode displays function keys 1 to 4.
Ringer/Message Waiting/Missed Call Indicator
The lamp flashes when you are receiving a call, or when you have an unread message or missed call notification.
17

Before Operating the Telephones
 /CANCEL
Used to cancel the selected item.
Handset Hook
Keeps the handset stable when the unit is mounted on a wall. For details, see “Hooking the Handset”, Page 64.
 /MESSAGE
Used to access your voice mailbox.
 /
/ /REDIAL
Used to redial the last dialed number.
 /HEADSET
Used for performing headset operations.

 /MUTE/AUTO ANS
Used to receive an incoming call in hands-free mode or mute the microphone/handset during a conversation.
 /VOL
/VOL
Used to adjust the ringer/receiver volume.
 /
/
 /HOLD
/HOLD
During talking, used to place a call on Hold. In standby mode, used to retrieve a call on hold if there is one.
Microphone
Used for hands-free conversation.
 /SP-PHONE
Used for performing hands-free operations.
 /
/
 /TRANSFER
Used to transfer a call to another party.
 /CONF
/CONF
Used to establish a multiple-party conversation.
Self-labeling LCD
For details about the self-labeling LCD, see “KX-HDV20 Self-labeling LCD”, Page 23.
DSS Keys [01–20]*2
Used to perform the assigned function. When a key is assigned as a Line key, it can be used to confirm the status of the line. The key name that you assigned is displayed on the KX-HDV20’s self-labeling LCD. For details about changing the DSS keys, see “Changing the Function Keys (Program Keys and DSS Keys)”, Page 51.
DSS Page Key*2
Used to switch the page of DSS keys displayed on the KX-HDV20 self-labeling LCD. There are two pages of 20 DSS keys.
*1 This item is displayed only when the feature is enabled. Contact your administrator for further information.
*2 These keys can be used when you connect a KX-HDV20 to the unit.
Note
R "DSS" stands for "Direct Station Selection".
18

Before Operating the Telephones
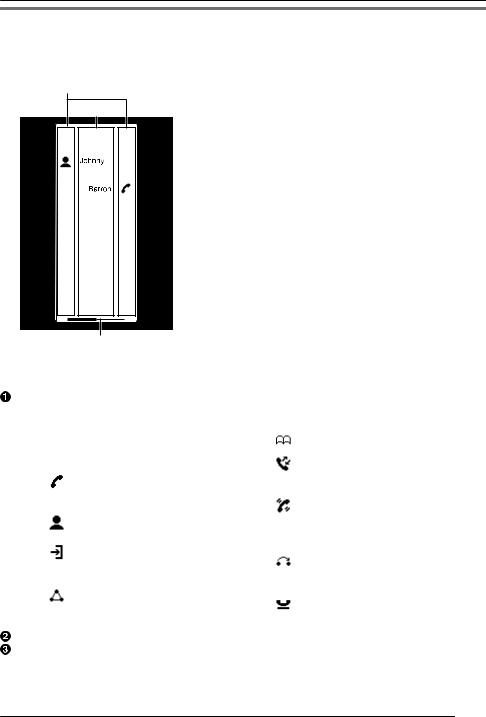
The Display and Icons
Display
[Example]
Status bar
There are 2 display patterns for the status bar, which alternate back and forth. Tapping this area has no effects.
Pattern A: Status icons (settings, hold, incoming call, etc.) and time
Pattern B: Number and name of the telephone line, communication method icons (handset, headset, speakerphone, etc.), mute icon, and time
While configuring settings, the screen title is displayed.
Operation area
Displays the screens for all functions. Tapping here operates the telephone. The touch display responds only to tap operations.
The icons for the top screen change depending on the phone’s status.
Icons displayed in the status bar
|
|
|
|
Suffix |
Meaning |
|
|||||||
(none)/C |
|
|
|
NE/RU/SX/X |
|
||||||||
|
|
|
|
|
|||||||||
|
|
|
|
|
|
|
|
|
|
|
|
Handset in use |
|
|
|
|
|
|
|
|
|
|
|
|
|
|
|
|
|
|
|
|
|
|
|
|
|
|
|
|
|
|
|
|
|
|
|
|
|
|
|
|
|
Headset in use |
|
|
|
|
|
|
|
|
|
|
|
|
|
|
|
|
|
|
|
|
|
|
|
|
|
|
|
|
|
|
|
|
|
|
|
|
|
|
|
|
|
Using speakerphone |
|
|
|
|
|
|
|
|
|
|
|
|
|
|
|
|
|
|
|
|
|
|
|
|
|
|
|
|
|
|
|
|
|
|
|
|
|
|
|
|
|
Off-hook monitor |
|
|
|
|
|
|
|
|
|
|
|
|
|
|
|
|
|
|
|
|
|
|
|
|
|
|
|
|
|
|
|
|
|
|
|
|
|
|
|
|
|
Training mode |
|
|
|
|
|
|
|
|
|
|
|
|
|
|
|
|
|
|
|
|
|
|
|
|
|
|
|
|
|
|
|
|
|
|
|
|
|
|
|
|
|
Fwd enabled |
|
|
|
|
|
|
|
|
|
|
|
|
|
|
|
|
|
|
|
|
|
|
|
|
|
|
|
DND enabled |
|
|
|
|
|
|
|
|
|
|
|
|
|
|
|
|
|
|
|
|
|
|
|
|
|
|
|
|
|
|
|
|
|
|
|
|
|
|
|
|
|
Auto answer enabled |
|
|
|
|
|
|
|
|
|
|
|
|
|
|
|
|
|
|
|
|
|
|
|
|
|
|
|
|
|
|
|
|
|
|
|
|
|
|
|
|
|
Mute |
|
|
|
|
|
|
|
|
|
|
|
|
|
|
|
|
|
|
|
|
|
|
|
|
|
|
|
|
|
|
|
|
|
|
|
|
|
|
|
|
|
|
|
19

Before Operating the Telephones
|
Suffix |
Meaning |
||||
(none)/C |
|
|
|
NE/RU/SX/X |
||
|
|
|
|
|||
|
|
|
|
|
|
Ringer off |
|
|
|
|
|
|
|
|
|
|
|
|
|
|
|
|
|
|
|
|
Call on hold |
|
|
|
|
|
|
|
|
|
|
|
|
|
|
|
|
|
|
|
|
Call on hold in a Call Park zone |
|
|
|
|
|
|
|
|
|
|
|
|
|
|
|
|
|
|
|
|
Conference hold |
|
|
|
|
|
|
|
|
|
|
|
|
|
|
|
|
|
|
|
|
ECO mode enabled |
|
|
|
|
|
|
|
|
|
|
|
|
|
|
|
|
|
|
|
|
Receiving an incoming call |
|
|
|
|
|
|
|
|
|
|
|
|
|
|
|
|
|
|
|
|
Network error |
|
|
|
|
|
|
|
|
|
|
|
|
|
|
|
|
|
|
|
|
Bluetooth® connection established |
|
|
|
|
|
|
|
|
|
|
|
|
|
|
|
|
|
|
|
|
Bluetooth connection not established |
|
|
|
|
|
|
|
|
|
|
|
|
|
|
|
|
|
|
|
|
New message |
|
|
|
|
|
|
|
|
|
|
|
|
|
|
|
|
|
|
|
|
|
|
|
|
|
|
|
Missed call |
|
|
|
|
|
|
|
|
|
|
|
|
|
|
|
|
|
|
|
|
Phonebook lock |
|
|
|
|
|
|
|
|
|
|
|
|
||
Operation icons displayed in the operation area |
||||||
|
|
|
|
|
||
|
Icon |
Meaning |
||||
|
|
|
|
|
|
Back |
|
|
|
|
|
|
|
|
|
|
|
|
|
|
|
|
|
|
|
|
Personal Phonebook |
|
|
|
|
|
|
|
|
|
|
|
|
|
|
|
|
|
|
|
|
Shared Phonebook |
|
|
|
|
|
|
|
|
|
|
|
|
|
|
|
|
|
|
|
|
Add contact |
|
|
|
|
|
|
|
|
|
|
|
|
|
|
|
|
|
|
|
|
Enter delete mode |
|
|
|
|
|
|
|
|
|
|
|
|
|
|
|
|
|
|
|
|
Execute delete |
|
|
|
|
|
|
|
|
|
|
|
|
|
|
|
|
|
|
|
|
Enter edit mode |
|
|
|
|
|
|
|
|
|
|
|
|
|
|
|
|
|
|
|
|
Select all items |
|
|
|
|
|
|
|
|
|
|
|
|
|
|
|
|
|
|
|
|
Save |
|
|
|
|
|
|
|
|
|
|
|
|
|
|
|
|
|
|
|
|
Cancel |
|
|
|
|
|
|
|
|
|
|
|
|
|
|
|
|
|
|
|
|
Scroll up |
|
|
|
|
|
|
|
|
|
|
|
|
|
|
|
|
|
|
|
|
Scroll down |
|
|
|
|
|
|
|
|
|
|
|
|
|
|
|
|
|
|
|
|
Scroll left |
|
|
|
|
|
|
|
|
|
|
|
|
|
|
20
|
|
|
|
|
|
|
Before Operating the Telephones |
|
|
|
|
|
|
|
|
|
|
|
Icon |
Meaning |
|
|||||
|
|
|
|
|
|
|
Scroll right |
|
|
|
|
|
|
|
|
||
|
|
|
|
|
|
|
|
|
|
|
|
|
|
|
|
Move the cursor left |
|
|
|
|
|
|
|
|
||
|
|
|
|
|
|
|
|
|
|
|
|
|
|
|
|
Move the cursor right |
|
|
|
|
|
|
|
|
||
|
|
|
|
|
|
|
|
|
|
|
|
|
|
|
|
Backspace |
|
|
|
|
|
|
|
|
||
|
|
|
|
|
|
|
|
|
|
|
|
|
|
|
|
Pause |
|
|
|
|
|
|
|
|
||
|
|
|
|
|
|
|
||
|
|
|
, |
|
|
|
Selected |
|
|
|
|
|
|
|
|||
|
|
|
|
|
|
|
||
|
|
|
, |
|
|
|
Unselected |
|
|
|
|
|
|
|
|||
|
|
|
|
|
|
|
|
|
|
|
|
|
|
|
|
Search |
|
|
|
|
|
|
|
|
||
|
|
|
|
|
|
|
|
|
|
|
|
|
|
|
|
Category |
|
|
|
|
|
|
|
|
||
|
|
|
|
|
|
|
|
|
|
|
|
|
|
|
|
Missed calls |
|
|
|
|
|
|
|
|
||
|
|
|
|
|
|
|
|
|
|
|
|
|
|
|
|
Incoming calls |
|
|
|
|
|
|
|
|
||
|
|
|
|
|
|
|
|
|
|
|
|
|
|
|
|
Outgoing calls |
|
|
|
|
|
|
|
|
||
|
|
|
|
|
|
|
|
|
|
|
|
|
|
|
|
New missed call |
|
|
|
|
|
|
|
|
||
|
|
|
|
|
|
|
|
|
|
|
|
|
|
|
|
Confirmed missed call |
|
|
|
|
|
|
|
|
||
|
|
|
|
|
|
|
|
|
|
|
|
|
|
|
|
Number of unread voice mails |
|
|
|
|
|
|
|
|
||
|
|
|
|
|
|
|
|
|
|
|
|
|
|
|
|
Unread voice mail |
|
|
|
|
|
|
|
|
||
|
|
|
|
|
|
|
|
|
|
|
|
|
|
|
|
Read voice mail |
|
|
|
|
|
|
|
|
||
|
|
|
|
|
|
|
|
|
|
|
|
|
|
|
|
Call Forwarding |
|
|
|
|
|
|
|
|
||
|
|
|
|
|
|
|
|
|
|
|
|
|
|
|
|
Do Not Disturb |
|
|
|
|
|
|
|
|
||
|
|
|
|
|
|
|
|
|
|
|
|
|
|
|
|
Anonymous call |
|
|
|
|
|
|
|
|
||
|
|
|
|
|
|
|
|
|
|
|
|
|
|
|
|
Anonymous call rejection |
|
|
|
|
|
|
|
|
||
|
|
|
|
|
|
|
|
|
|
|
|
|
|
|
|
Change a message between read and unread |
|
|
|
|
|
|
|
|
||
|
|
|
|
|
|
|
|
|
|
|
|
|
|
|
|
Go on-hook |
|
|
|
|
|
|
|
|
||
|
|
|
|
|
|
|
|
|
|
|
|
|
|
|
|
Mute |
|
|
|
|
|
|
|
|
||
|
|
|
|
|
|
|
|
|
|
|
|
|
|
|
|
Ringer off |
|
|
|
|
|
|
|
|
||
|
|
|
|
|
|
|
|
|
21

Before Operating the Telephones
Character input icons
|
Suffix |
Meaning |
|
(none)/C |
|
NE/RU/SX/X |
|
|
|
||
|
ABC |
Latin character entry mode |
|
|
|
|
|
|
0 - 9 |
Numeric character entry mode |
|
Special character (Extended 1) entry mode
Special character (Extended 2) entry mode
Greek character entry mode
Cyrillic character entry mode
Note
R Example images of the display in this manual are samples only, and the actual screen on your phone may vary in color and/or appearance.
R Descriptions of icons displayed with text are not included.
22
Before Operating the Telephones
KX-HDV20 Self-labeling LCD
[Example]
KX-HDV20 (Optional model)*1
A
B
020
 010
010
019
018
 008
008
 007
007
016

 006
006
015
 005
005
014
 004
004
013
 003
003
012
 002
002
011
 001
001
C
*1 Up to 40 keys (20 keys ´ 2 pages) can be registered.
Pictographs
Pictograph |
Meaning |
Pictograph |
Meaning |
(Number) |
No function is assigned. |
|
Phonebook |
|
|
|
|
|
One Touch Dial |
|
Call History |
|
|
|
|
|
Line |
|
Simultaneous Ring |
|
Line Status |
|
Wrap Up |
|
|
|
|
|
BLF |
|
Directed Call Pickup |
|
|
|
|
|
ACD (Login/Logout) |
|
Call Forward |
|
Hoteling/Hospitality |
|
Transfer |
|
|
|
|
|
Conference |
|
Blind Transfer |
|
|
|
Park |
|
|
|
Park Retrieve |
Function Label Name
Page Information
|
Indication |
Meaning |
|
|
|
|
Displaying page 1 |
|
|
|
|
|
|
|
|
23

Before Operating the Telephones
|
Indication |
Meaning |
|
|
|
|
Displaying page 2 |
|
|
|
|
|
|
|
|
Note
R Images of the display in this manual are samples only. The actual screen on your phone may vary in color and/or appearance.
24

Before Operating the Telephones
Main Menu
The following menu items are displayed in standby mode.
Function
Displays the function keys.
See “Changing the Function Keys (Program Keys and DSS Keys)”, Page 51.
Voice Message
Used to access your voice mailbox.
See “Listening to Voice Mail Messages”, Page 38.
FWD/DND*1
Sets the Call Forwarding or Do Not Disturb features.
See “Call Forwarding/Do Not Disturb”, Page 38.
Paging*1
Makes a Multicast Voice Paging call.
See “Making a Multicast Voice Paging call”, Page 32.
Call History
Used to display the call log.
See “Incoming/Outgoing Call Log”, Page 26.
Phonebook
Used to access the Personal or Shared Phonebook.
See “Using the Phonebook”, Page 40.
Line Status
Used to display the status of each line on the LCD.
See “Checking the Line Status”, Page 48.
Basic Settings
Used to access the basic settings menu.
See “Changing the Basic Settings”, Page 55.
System Settings
Used to access the system settings menu.
See “Changing the System Settings”, Page 55.
Advanced Settings
Used to access the advanced settings menu.
See “Changing the Advanced Settings”, Page 55.
Call Center/Call Centre*1
Used to access the Call Center feature.
Presence*1
Used to access the Presence feature.
Application*1
Used to access the Application feature.
*1 This item is displayed only when the feature is enabled. Contact your administrator for further information.
25

Before Operating the Telephones
Adjusting the Volume
Adjusting the Receiver/Speaker/Headset Volume
1. Press [k]/[j] volume key: Adjust the volume during a conversation.
Note
R Both receiver volume and headset volume are adjusted in training mode. See “Training Mode”, Page 34.
Adjusting the Ringer Volume or Turning the Ringer Off [In standby mode]
1.Press [k]/[j] volume key: Adjust the ringer volume.
2.Tap "OK".
Note
R For details about setting the ringer pattern, see “Incoming Option”, Page 67.
Adjusting the Ringer Volume or Turning the Ringer Off while Ringing
While receiving a call, do the following to adjust the ringer volume or turn the ringer off:
Note
R If you attach a headset while receiving an incoming call, ringing will be heard from the speaker.
To adjust the ringer volume
1. Press [k]/[j] volume key: Adjust the ringer volume.
Note
R The adjusted volume level will also be used for subsequent calls.
R The volume can also be adjusted in the pop-up window.
To turn the ringer off
1. Tap  .
.
Incoming/Outgoing Call Log
Displaying the Incoming/Outgoing Call Log [In standby mode]
1.Tap  /
/  a "Call History"
2.Missed Call Log: Tap  .
.
Incoming Call Log: Tap  . Outgoing Call Log: Tap
  .
.
Making a call using the Incoming/Outgoing Call Log
See “Using the Incoming/Outgoing Call Log”, Page 31.
Storing an item using the Incoming/Outgoing Call Log
See “Storing an Item Using the Incoming or Outgoing Call Log”, Page 42.
26

Before Operating the Telephones
Deleting Items in the Incoming/Outgoing Call Log [When the Incoming or Outgoing Call Log is displayed]
1. Tap  .
.
2. Tap  /
/  : Tap the check boxes of the items you want to delete.
3. Tap  . a "OK"
Note
R You can select all items in the list by tapping  .
.
Setting the Password
The telephone password is not set by default. You must register a password (4 digits) before use. You cannot use the following features without setting a password:
R Phonebook lock (See “Locking the Phonebook”, Page 46).
Note
R To avoid unauthorized access to this product:
–Set a password that is random and cannot be easily guessed.
–Change the password regularly.
R Make a note of the password so that you will not forget it.
To set
[In standby mode]
1.Tap  /
/  a "Basic Settings"
2.Tap  /
/  a "Other Option"
3.Tap "Change Password".
4.Enter a new password (4 digits [0–9]).*1 a "OK"
5.Verify the password by entering it again as in step 4.
*1 If a password is already set, you will need to enter the old password first.
Selecting the Display Language
You can select the language displayed on your LCD.
[In standby mode]
1.Tap  /
/  a "Basic Settings"
2.Tap  /
/  a "Display Option"
3.Tap  /
/  a "Language"
4.Tap  /
/  : Select a language. a "OK"
R For a list of the languages that can be selected, see “Display Option”, Page 69.
Entering Characters
You can enter characters and digits using the dialing keys.
You can select one of the character modes by tapping the desired character mode while entering a name.
27
Loading...