


ADVANCED AND EVER ADVANCINGMITSUBISHI ELECTRIC
DEHUMIDIFIER |
2005 |
No.MJW-05010
SERVICE MANUAL
Model MJ-E16VX-S1
Sold from 2005
CONTENTS
1. |
........................................................................................PRODUCT SPECIFICATIONS |
|
2 |
|
2. |
OUTER DIMENSIONS .................................................................................................... |
|
3 |
|
3. |
EXTERNAL VIEW, PARTS AND DISPLAY SECTION................................................... |
|
3 |
|
4. |
NAMES AND FUNCTIONS OF PARTS....................................................................... |
4 |
~ 10 |
|
5. |
TECHNICAL POINTS................................................................................................. |
11 |
~ 13 |
|
6. |
MAINTENANCE ......................................................................................................... |
14 |
~ 16 |
|
7. |
WIRING DIAGRAM AND BLOCK DIAGRAM |
|
|
|
|
7.1 |
Wiring Diagram....................................................................................................... |
|
17 |
|
7.2 |
Function List ....................................................................................................... |
18 |
~ 21 |
|
7.3 |
Timing Charts ..................................................................................................... |
22 |
~ 25 |
|
7.4 |
General Block Diagram ...................................................................................... |
26 |
~ 27 |
8. |
TROUBLESHOOTING PROCEDURE |
|
|
|
|
8.1 |
Troubleshooting flowchart ................................................................................. |
28 |
~ 29 |
|
8.2 |
Key Component Check Procedures ....................................................................... |
|
30 |
|
8.3 |
Error Indications and Corrective Actions ............................................................... |
|
31 |
|
8.4 |
Self-Test program and Execution Procedure .................................................... |
31 |
~ 32 |
9. |
DISASSEMBLY AND REASSEMBLY HINTS .......................................................... |
33 |
~ 36 |
|
|
9.1 |
Disassembly Procedures ....................................................................................... |
|
33 |
10. CONTINUOUS WATER DRAINAGE ............................................................................. |
|
37 |
||
PARTS CATALOG .......................................................................................................... |
38 |
~ 45 |
||
11. TROUBLESHOOTING ............................................................................................... |
46 |
~ 47 |
||
PRECAUTIONS ............................................................................................................... |
48 |
~ 50 |
||
|
|
|
|
|

1. Product specifications
Model
Item
MJ-E16VX-S1
Performance |
Operatingnoise |
Dehumidifying capacity |
|
levels(dB) |
|
||
|
(30°C room temperature, 80% relative humidity) (liters/day) |
||
|
|
|
Laundry |
|
|
|
Low |
Electrical characteristics |
|
Power supply (phases,V,Hz) |
|
|
|
|
|
Power consumption (W)
Operating current (A)
Starting current (A)
Color tone
Dimensions (H × W × D mm)
Weight (kg)
Coolant quantity (g)
|
Evaporator |
|
|
|
Condenser |
|
|
|
Compressor |
Compressor protection |
|
|
Model |
|
|
|
|
|
|
|
|
Output (W) |
|
|
|
Winding resistance (Ω)(20°C) |
|
performanceProduct |
Blower |
Blower protection |
Easy Dehumidifying |
|
|||
Type
Output (W)
Flow rate selection
Speed (rpm)
Flow rate (m3/min)
Operating room temperature (reference) (°C)
Defrosting method
Humidity control
Tank full protection
Tank capacity (liters)
Continuous drainage
Operation modes
Timer
Air cleaning performance
Plug socket rating
16.0
41
37
Single phase, 220-240V, 50Hz 275 1.3 5.5
Blue (A) 570 × 384 × 187
11.7
120 Slit fin Slit fin
Thermal overcurrent relay
XB460VTE
150
Primary: 26.1 , subsidiary: 70.7
With temperature fuse
Sirocco fan
16
4
or 2.7 |
Laundry |
[2.7] |
Low |
or 2.6 |
TempLow |
|
MildewGuard |
|
PurifierAir |
|
DryingInside |
680 |
|
700 |
|
680 |
|
700 |
|
700 |
|
680 |
|
or 720 |
|
[720] |
|
or 700 |
|
|
|
|
|
|
|
2.5 |
|
2.6 |
|
2.5 |
|
2.6 |
|
2.6 |
|
2.5 |
|
|
|
|
|
|
|
|
|
|
1 ~ 35 (°C) Hot gas type
Built-in humidity sensor
Lead switch (automatic)
Auto-stopper tripped with about 4.0 liters of water
Commercial hose (inside diameter 15 mm)
AUTO · EASY DEHUMIDIFYING · LAUNDRY · MILDEW GUARD · LOW ·
LOW TEMP · DRYING INSIDE · AIR PURIFIER On/Off timer (1-9h)
Yes 16A
680 or 720
2.5 or 2.7
 The operating noise levels indicated are typical values measured in our anechoic room.
* The brackets [ ] enclose values measured at a room temperature of about 15°C or lower.
2

2. Outer Dimensions
3. External View, Parts and Display Section
Drain the water tank before use
Refrain from opening doors/windows during operation
Drying laundry indoors
¡Direct the louvres at the laundry. ¡Space laundry to improve airflow.
Installing your dehumidifier
Make sure to leave some space around the unit. 
<For use in close proximity to |
At least 50 cm |
At least |
|
a wall> |
|
||
|
2 cm |
||
Stop the louvre in the |
At least |
||
|
|||
vertical position. Blowing air |
20 cm |
At least |
|
at the wall may cause |
|
20 cm |
|
staining. |
|
|
|
|
At least 20 cm |
|
dehumidifier in |
enclosed room. |
Use the |
a small, |
Maintain room temperature above 16°C with an air conditioner
¡Drying times will vary depending on the nature of the laundry and the room temperature. In low temperatures, drying takes about twice as long as normal. In low temperatures (10°C), drying takes about twice as long as when normal (20°C+).
¡The airflow is strongest to the top right of the unit.
Operating noise
Place the unit on top of a mat. This reduces vibration and noise. It also prevents leaving depressions on carpets.
3

4. Names and Functions of Parts
filter
filter) (See box below for discussion)
Pre-filter
Air filter performance testing facility
Japan Spinners Inspecting Foundation (tested under
JIS L 1902 standards)
Front panel
Front Air Intake
Do not block.
What is a washable photocatalytic filter?
The washable photocatalytic filter has a two-layer construction consisting of a white particle filter and a blue air-freshener filter.
<Particle filter>
The fine particle filter removes pollen* and dust particles. <Air-freshener Filter>
The special air-freshening agent contained in the fibres of the air-freshener filter absorbs odorants such as ammonia. The odor is broken down by photocatalysis renewing the air-freshening properties.
As the filter’s particle and air-freshening properties are renewed by simply soaking and leaving it to dry in the sun, the air purifier can be used continuously over a long time. Cigarette smoke and toxins found in smoke, such as carbon monoxide, cannot be removed with this filter.
* Diameter of pollen: approx. 10-100 m
 Louvre
Side air intakes (left/right)
Do not block
Sensor
Do not cover
Continuous drainage outlet |
Power plug |
The water tank may contain water residue at time of purchase. This is from final product testing at the factory and is not due to a defect.
4

Control Panel
|
|
¡Swing louvre button |
|
|
|
|
|
|
|
|
|
|
|
|
|
|
|
||
¡Lamps |
¡Mode button |
|
|
¡Power lamp |
|
||||
Sets swing louvre |
|
|
Lights when unit is ON. |
|
|||||
Current mode lights |
For switching from |
|
|
|
|||||
direction or locks it into |
|
|
¡Power button |
|
|||||
¡Selection button |
one operating |
|
|
|
|||||
position |
|
|
Use this to switch the |
|
|||||
Switches modes |
mode to another |
|
|
|
|||||
|
|
|
|
unit ON and OFF. |
|
||||
|
¡Humidity Selection |
|
|
|
|
|
|||
|
|
|
|
|
|
|
|
|
|
|
This is used to set |
|
|
|
|
|
|
|
|
|
the target humidity. |
¡ON/OFF Timer button |
|
|
|
|
|
|
|
|
|
|
|
|
|
|
|
||
|
|
Sets timer |
|
|
|
|
|
|
|
|
¡Child lock |
|
|
|
|
|
|
|
|
|
To set the child lock, |
|
|
|
|
|
|
|
|
|
press the mode |
¡Tank full light |
|
|
|
|
|
|
|
|
button for three |
This lights up to warn that |
|
|
|
|
|
|
|
|
|
|
|
|
|
|
|
||
|
seconds. |
the water tank is full. |
|
|
|
|
|
|
|
You can select from 7 operating modes |
|
|
|
|
|
|
|||
|
|
¡Air purifier lamp |
|||||||
¡EASY |
|
|
|
|
Lights during air purifier only operation |
||||
|
|
|
¡Air purifier button |
||||||
DEHUMIDIFYING |
|
|
|
||||||
|
|
|
|
Switches to air purifier only operation |
|||||
|
|
|
|
|
|||||
¡LAUNDRY |
All modes include |
|
|
|
|
|
|
|
|
¡LOW |
|
|
|
|
|
|
|
|
|
dehumidifier and air purifier |
|
|
|
|
|
|
|
|
|
¡MILDEW GUARD |
functions. |
|
|
¡Drying inside lamp |
|||||
|
|
|
|||||||
¡LOW TEMP |
|
|
|
|
Flashes when drying inside in progress. |
||||
|
|
|
¡Drying inside button |
||||||
¡AUTO |
|
|
|
||||||
Air purifier only operation. |
|
|
|
Activates/deactivates drying inside. |
|||||
¡AIR PURIFIER |
|
|
|
|
|
|
|
|
|
The dehumidifier function is |
|
|
|
|
|
|
|
|
|
|
disabled. |
|
|
|
|
|
|
|
|
LCD Panel
All indicators on the LCD panel shown below.
¡Mode Indicator
Indicates the current operating mode.
¡Humidity Indicator |
|
|
|
|
|
||
This indicates the |
|
|
|
|
|
||
approximate humidity |
|
|
|
|
|
||
|
|
|
|
|
|||
|
|
indicates the current |
|
|
|
|
|
|
|
humidity |
|
|
|
|
|
|
|
indicates the |
|
|
|
|
|
|
|
|
|
|
|
|
|
|
|
humidity setting in |
|
¡Swing monitor |
¡Timer display |
||
|
|
|
|||||
AUTO mode |
|
Indicates the direction |
Displays the time set |
||||
The current humidity is |
|
of the swing louvre. |
for the ON/OFF timer. |
||||
displayed in a range from 30 |
|
|
|
|
|
||
to 80%. |
|
|
|
|
|
||
|
¡Child lock indicator |
||||||
|
|
|
|
||||
|
|
|
|
Displayed while child lock |
|||
|
|
|
|
is active |
|
|
|
¡Information display
Indicates room and unit condition
Low Temperature Indicator
The  indicator comes on if the room temperature drops below 15°C.
Activating Low Temp mode is recommended. |
|
|
DEFROST Indicator |
High humidity |
|
warning |
||
|
Airflow (dehumidifying) will stop and the frost that has accumulated inside will be melted and dropped into the tank when the  indicator is on. Please wait a moment as operation will resume in around 5 minutes.
While in DEFROST mode, airflow (dehumidifying) and the louvre will stop. The sounds coming from the unit will also change.
DEFROST will start automatically when room temperature drops below 15°C (This may be as often as once every 40 minutes).
The  indicator flashes when the humidity in the room exceeds 75%.
Activating the dehumidifier is recommended when the  indicator is flashing.
If the High humidity warning is not used, remove the power plug from the power socket.
5
Modes
¡ EASY DEHUMIDIFYING |
¡ LAUNDRY |
The unit operates intermittently airflow to remove the damp feeling (There is no need to set the When the room temperature is operates to decrease the damp
The airflow or louvre operation according to the humidity level.
Humidity level (%) |
60 |
|
|
|
Room temperature (°C) |
50 |
|
|
|
||
0 |
20 |
27 |
30 |
||
|
|
|
|
Room temperature is below 27°C - the unit automatically sets the humidity level according to the temperature.
Room temperature is above 27°C - the unit lowers the humidity level to 50%, then activates the blower. The dehumidifier is reactivated when humidity rises to 60%.
The unit operates for 12 hours and automatically switches off.
|
∞ Drain the tank before use. |
|
|
The unit may stop before the washing dries |
|
|
because of a full tank. |
|
Information |
∞ Do not use in conjunction with the OFF |
|
timer. |
||
|
||
|
The timer may turn the unit off before the |
|
|
washing dries. |
|
|
∞ The following conditions prevent clothes |
|
|
from drying well: |
|
|
Room temperature below 15°C, large |
|
|
volume of laundry; laundry not spaced well; |
|
|
clothes of thick fabric and spacious room. |
humidity level. Airflow is weak.
automatically once a day, suppressing mildew growth. floor space for maximum benefits.
|
. |
ON |
|
|
|
|
|
|
||
|
|
|
24 hours |
|
|
24 hours |
|
|
||
|
|
|
|
|
||||||
|
does not |
|
|
|
Standby |
|
Standby |
Repeat |
||
|
• Humidity 40%→Approx. 2 hours |
|
|
|
|
|||||
|
|
|
|
|
|
|
|
|
|
|
|
Dehumidifies |
Dehumidifies |
||||||||
|
• Humidity 50%→Approx. 4 hours |
|||||||||
|
|
|
|
|
|
|
|
|
|
|
Information |
∞ Refrain from turning on ventilation fans or opening windows or doors as this lowers performance. |
|||||||||
|
|
|
|
|
|
|
|
|
|
|
∞ Mildew growth may still occur due to the fungus type and conditions of the room.
E.g. Rooms that contain excessive condensation, bathrooms, and places with bad airflow (insides of closets and behind furniture).
∞ This mode does not remove existing mildew.
∞ Do not use in conjunction with OFF Timer mode. Effects may not be achieved.
Mildew is unable to produce new spores (similar to plant seeds) if dried as mycelia. The Mildew Guard feature applies this principle (However, the
spores themselves are resilient to dry conditions.). “Identification of Aspergillus and Penicillium”
<Research paper by Dr. K. Abe of the Environmental Biology Research Center>
6
¡ AUTO
The unit maintains the humidity level by automatically controlling airflow and operating intermittently as necessary. All you have to do is set the humidity level.
¡The unit turns off when current humidity decreases past the set humidity level, and restarts when the level is exceeded.
¡The unit operates for 6 minutes continuously regardless of the humidity level immediately after turning the power on.
Information |
Frequent use of exits and room size/conditions |
|
|
|
may cause the humidity to not reach the set |
<To view set humidity level/ To set humidity level>
¡ Pressing the button once displays the set humidify level with the
indicator. After 3
seconds, the display Press returns to the current
humidity display.
|
¡ Pressing HUMIDITY |
|
||||||||||
|
SELECTION while |
|
|
|
|
|
is |
|||||
|
|
|
|
|
||||||||
|
displayed sets the |
|
|
|
|
|
|
|||||
|
humidity level. Each time the button |
|||||||||||
Press |
is pressed, the humidity setting |
|
||||||||||
again |
changes. |
|
||||||||||
|
|
|
|
|
|
|
|
|
|
|
|
|
|
|
|
|
|
|
|
|
|
|
|
|
|
¡ Swing louvre function (how to read the swing monitor)
The louvre can be made to swing. Select from the 4 possible settings to suit the purpose.
 Press
Press
¡ Starts swing operation.
¡ The swing monitor is displayed.
The swing operation stops when the power cord is unplugged.
This indicates the range of louvre swing. (The louvre and monitor do not move in synchronization.)
With each press of the button
Stop swing operation
WIDE
UPWARD
REAR
Note Information
∞The level of noise emitted from the unit varies according to the angle of the air-flow.
∞The louvre may stop up to a maximum of 8 seconds to correct its position, after which it will start moving again.
∞If the louvre is knocked out of the desired angle, readjust by following the above steps.
in the vertical position when using the unit against a wall. Blowing air at the wall may
7
¡ Drying inside
The inside of the unit can be dried to suppress mildew growth on the cooler. On days the dehumidifier is used, drying inside is recommended.
Automatic operation
To activate drying inside after every use.
Press while the unit is on
¡Drying inside standby
(Drying inside lamp lit)
Drying inside starts when operation ends
When the unit is turned off, LAUNDRY mode ends, or the OFF timer ends.
¡Drying inside starts
The Drying inside lamp flashes, the humidity indicator turns off, and the louvre stops in the vertical position.
Drying inside mode
¡Drying inside ends
The Drying inside lamp turns off and the louvres shut.
<To deactivate automatic operation>
Press the Drying inside button while the unit is on (the Drying inside lamp turns off)
Manual operation
To activate drying inside by pressing a button.
Press while the unit is off
¡Drying inside starts
The drying inside lamp flashes, the humidity indicator turns off, and the louvre stops in the vertical position.
Drying inside mode
¡Drying inside ends
The drying inside lamp turns off and the louvres shut.
To abort drying inside
Press the drying inside button while the unit is performing drying inside (the Drying inside lamp turns off)
Press the power button to abort drying inside, and resume normal operation.
|
|
∞ Connecting/disconnecting the power plug deactivates automatic operation. |
|
|
|
|
||||||
|
|
∞ This function does not remove existing mildew. Also, aborting drying inside may cause the benefits to |
||||||||||
Information |
diminish. |
|
|
|
|
|
|
|
|
|||
∞ Do not close the louvres while drying inside as this causes noise. |
|
|
|
|
|
|||||||
|
|
∞ The moisture expelled from inside the unit may cause the humidity level of the room to rise. |
||||||||||
|
|
∞ The air leaving the unit may appear white depending on the humidity or temperature of the room. |
||||||||||
|
|
∞ The moisture expelled from inside the unit may smell due to odorants* that were not caught by the |
||||||||||
|
|
filter dissolving in the water. |
|
|
|
|
|
|
|
|||
|
|
* The photocatalytic filter is mainly for absorbing ammonia. |
|
|
|
|
|
|||||
|
|
∞ The OFF timer cannot be set during drying inside. |
|
|
|
|
|
|||||
|
|
|
|
|
|
|
|
|||||
<Drying inside operation> |
This operation takes approximately one hour. However, when the |
|||||||||||
|
|
|
|
|
|
room temperature is below 1°C, drying time is shortened to protect |
||||||
|
|
OFF |
|
the compressor. |
|
|
|
|
|
|
||
|
Regular |
|
Drying inside operation (approx. one hour.) |
|
|
|
|
|||||
|
|
|
|
|
|
|||||||
|
|
|
|
Unit |
|
|||||||
|
operation |
|
|
|
|
|
|
stops |
|
|||
Airflow |
Airflow stops; compres- |
Operating |
Compressor |
Airflow |
|
|||||||
|
|
|
|
sor activates (operating |
|
|
auto- |
|
||||
|
Dehumidifier |
Approx. |
sound) |
|
sounds |
stops |
Approx. |
mati- |
|
|||
|
|
|
|
|||||||||
|
Air purifier |
30min. |
Compressor operates |
Approx. 20min. |
|
10min. |
cally |
|
||||
|
according to room temperature |
|
|
|||||||||
|
|
|
|
|
|
|
|
|
|
|
||
|
|
|
|
|
|
|
|
|
|
|
|
|
8

[Lamp Indicator]
Tank full light
The unit automatically shuts down and indicates with the light and sound that the water tank is full. Empty the water tank.
¡Tank full light  lights
(The unit beeps continuously.)
¡Air flows stops (louvre stops)
¡Swing monitor turns off
¡Compressor turns off
•After removing the water and replacing the tank, the Tank full light will go off, and the unit will automatically return to operation mode.
•When the Tank full light is lit, no operation but ON/OFF is possible.
9

[Timer Operation]
OFF timer operation
The OFF timer can be set for 1 to 9 hours. Set the timer when the power is switched on.
To set
1 Switch the power on.
2 Select operating mode.
Select desired operating mode.
3 Change the louvre swing direction.
Select the desired setting.
4 Set the operating time.
Press
¡When pressed once the figure [  ] and [OFF] appear.
¡Each subsequent press changes the display in order from 1 to 9 hours. (Hold the button to run automatically through the numbers.)
No Display (LOW mode)
The OFF timer is set.
The following is an example of a display indicating AUTO dehumidifying (set to 60%), swing set to WIDE and the OFF timer set for 2 hours.
¡The time remaining until the unit switches itself off is indicated in increments of one hour with a flashing numeral.
¡When the set time is reached, the unit switches itself off and the louvre closes automatically.
¡Drying inside will commence if it has been activated.
To cancel the OFF timer
<When you want to turn the unit off>
Press the POWER button. (Power off)
Press
¡ The OFF Timer is cancelled.
<When you want to disable the Timer OFF mode, and continue operation>
Keep pressed until the remaining time display disappears to return to continuous operation.
|
Press |
|
¡ The OFF Timer is cancelled. |
Information |
∞ Empty the water tank before operating. The unit |
LAUNDRY or MIDEW GUARD. |
|
|
stops and the Tank full lamp lights if the tank |
|
becomes full during operation. |
|
∞ The OFF timer and ON timer cannot be set at the |
|
same time. |
|
∞ Do not use timer OFF mode in conjunction with |
|
∞ The OFF timer cannot be set during internal drying. |
ON timer operation
The ON timer can be set for 1 to 9 hours.
Set the timer when the power is switched off.
To set
1 Switch the power off.
2 Set the time you wish the unit to turn on.
Press
¡Press once. The Power lamp, Mode indicator, and a [ ] on the digital display flash. The [ON] indicator lights.
¡Each subsequent press changes the display in order from 1 to 9 hours.
(Hold the button to run automatically through the
numbers.)
No Display (operation
is off)
3 Select operating mode.
Select desired operating mode. Set drying inside (auto) as desired.
4 Change the louvre swing direction.
Select the desired setting.
5 Confirm the operating start time.
Press
¡ Power lamp and Time display light.
The ON timer is set.
The unit informs you if you forget to press the Power button by making the Time display and Mode indicator blink and sounding an alarm for 1 minute.
The following is an example of a display indicating AUTO dehumidifying (set to 60%), swing set to WIDE and the ON timer set for 5 hours.
¡The time remaining until the unit switches itself on is indicated in increments of one hour.
¡When the set time is reached, the unit switches itself on.
To cancel the ON timer
Press the Power button. (Power off)
|
Press |
|
¡ The ON timer is cancelled. |
Information |
∞ Drying inside is deactivated when the ON timer is |
commercially-available timer plug outlet. |
|
|
set during internal drying operations. |
|
∞ The ON timer function is not operable using a |
10
5.Technical points
5.1 The technical points of the new products
1)Drying inside
During dehumidification, moisture accumulates on the heat exchanger. If left, this can lead to mildew growth, which is circulated around the room with the air discharge. Drying inside starts automatically after operation, and dries any moisture inside the unit.
2)Powerful 16-litre/day dehumidifying
The uncomfortable damp feeling caused by humidity is something that needs to be removed quickly. Mildew can grow and damage the home or clothing when closets, dressing rooms, shoe cabinets, and other spaces where humidity is prone to collect are not dehumidified. A single high-capacity unit is effective in dehumidifying and drying various locations throughout the home, quickly moving from one point to the next.
3)Room humidity and sensible temperature comfortably controlled
The EASY DEHUMIDIFYING mode controls humidity according to room temperature. If the room temperature rises during dehumidification, use CIRCULATION mode (*1) to lower the sensible temperature.
*1 The automatic dehumidification and blower modes operate alternately controlling the sensible temperature and humidity to a comfortable level (50%–60%).
4)Washable photocatalytic filter
The photocatalytic deodoring filter and particle filter are integrated.
This filter collects ammonia, the base for household smells, as well as dust, fungus spores, and pollen. It is easy to clean, meaning longer lasting performance.
11

5.2 Operation and Performance
Working temperature |
Defrosting |
Dehumidification is possible with a room temperature of 1 – 35°C. If the room temperature exceeds 35°C, however, the temperature inside the unit will increase; therefore, the protective device may activate and halt operation in some cases. For this reason, the louvres should be aimed upward.
•If the room temperature is lower than 1˚C, there is danger of the removed water freezing, making dehumidification impossible, so the fan will start operating.
The unit may display  during operation and stop air flow, followed by a change in the operating noise. The unit has stopped the airflow, and is melting internal frost into the water tank. The unit will resume automatically when the defrost operation completes.
This operation will be performed automatically when the room temperature is approximately 15°C or lower. (When humidity is high, this will occur approximately once every 40 minutes for 5 – 10 minutes.)
Wait for 3 minutes before dehumidifying |
Room temperature may rise 2-4°C during operation |
How does the dehumidifier work?
If you pour cold water into a cup, the air around it becomes cold, causing water droplets to form on the surface of the cup.
The dehumidifier takes advantage of this phenomenon to remove moisture from the air.
1The unit draws air from the room, cools it with its cooling coil, causing the moisture to transform into water droplets.
2 The water droplets fall into the water tank.
3The dehumidified air is reheated by the heating coil, and then discharged.
The humidity of the room is thus reduced by repeating steps 1, 2, and 3.
The dehumidifier does not have a cooler function. Due to heat produced during operation, the room temperature may rise 2-4°C As a result, the unit may blow warm air, but this is not due to a malfunction. During winter, the air may not feel warm as the temperature is below body temperature.
|
Dried (warm) air |
Cooling coil |
Re-heating coil |
Moist air |
|
Compressor |
Water tank |
The humidity reading on the unit may differ from a hygrometer in the same room
Even in the same room, temperature and humidity levels may differ from place to place. If the hygrometer and the unit are in different parts of the room, the humidity levels are prone to differ.
Moreover, humidity levels differ between places that have good and no airflow.
Use the reading on the unit as an estimate.
h |
y |
|
|
W |
|
CURRENT
rethey a
differ e
n
t ?
<Cause>
●Inconsistencies in temperature and humidity
●Difference in location
●Difference in hygrometer precision
12

5.3 Coolant Circuit
Coolant flow
Dehumidifying 
Defrosting |
φ5 |
Blow |
|
exchanger |
radiation) |
|
|
||
|
Fan |
Heat |
(heat |
|
|
|
φ6.35
5.4 Performance curve
φ6.35
Compressor |
|
|
|
φ5 |
|
|
|
|
|
|
φ6.35 |
|
φ6.35 |
|
Tube temperature |
|
|
sensing thermistor |
|
|
|
|
|
|
Solenoid |
|
|
|
valve |
exchangerHeat |
Intake |
|
(closed when |
||
|
(cooling) |
||
|
|
|
|
|
dehumidifying |
|
|
|
and open |
|
|
|
when |
|
|
|
defrosting) |
|
|
Capillary tube |
Humidity |
|
|
φ5.0 × φ4.0 sensor
Room temperature sensing thermistor
φ6.35
Capillary tube
φ2.0 × φ0.8 × 340
When the temperature and humidity are low, the amount of water collected is decreased.
In winter, because the temperature is lower than in summer, the effects of the dehumidifier decrease dramatically as shown in the graph below.
Although less water collects in the tank, this is not a malfunction.
*If the temperature is low, but the humidity is high due to snow or rain, operating the unit in LOW TEMP mode will yield better results than in LOW mode.
Values for LOW when humidity is 80%.
Dehumidification capacity (L/day)
16
14
12
10
8
6
4
2
0
5 |
10 |
15 |
20 |
25 |
30 |
Room temperature (°C)
Summer (humidity) |
Winter (dampness) |
¡The values shown on the graph were measured at constant temperature and humidity and do not reflect values obtained in actual usage conditions.
13
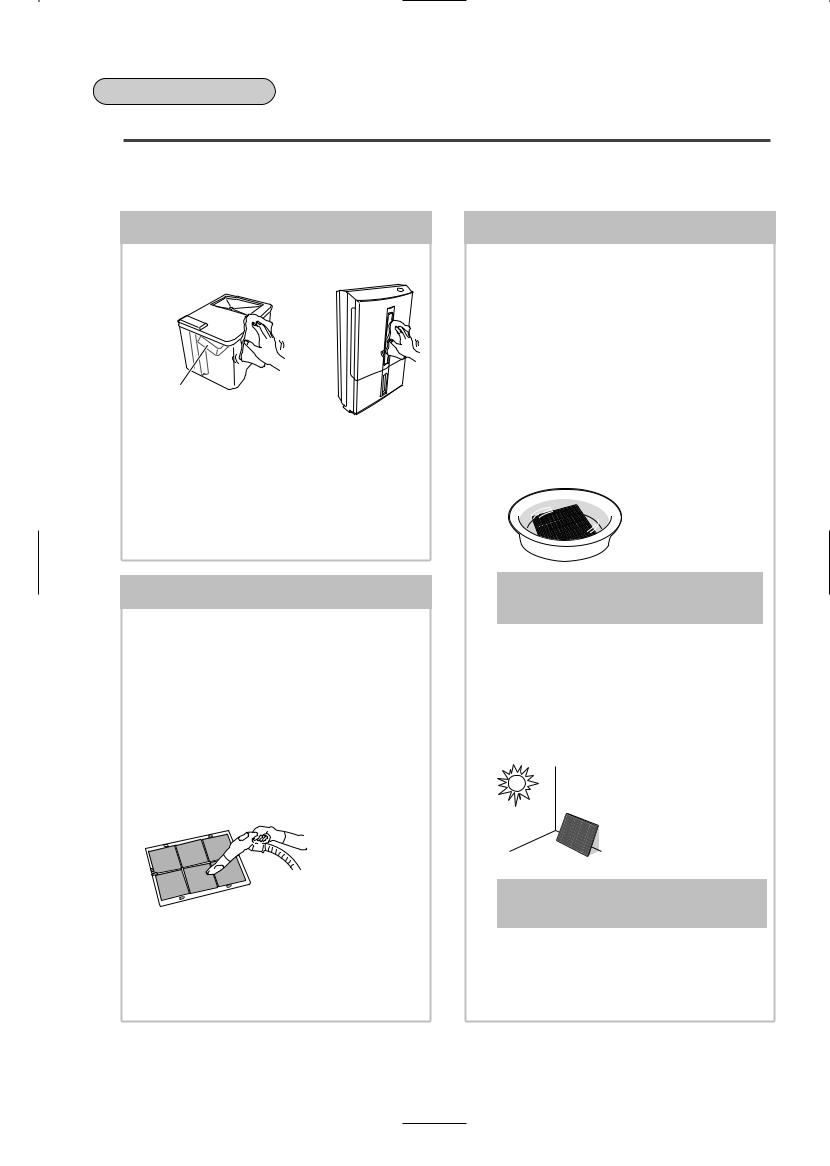
6. Maintenance
Maintenance
Do not use detergents, cleaning agents for heat exchange equipment, abrasive powders, chemically treated dusters, gasoline, benzene, thinners or other solvents, as they can damage the unit or the water tank, which may result in leakage.
Cleaning
Water tank · Main unit
Wipe with a soft cloth.
Floating element
Do not remove or dismantle.
¡The unit draws in dust present in the air, and this may cause the tank to gradually become dirty. If the dirt does not come off easily, wash with cold or warm water, then wipe with a soft, dry cloth.
¡Mildew may form in the tank unless kept clean.
Once every two weeks
Once every three months
Photocatalytic filter
Soaking the filter in water, and leaving it to dry in the sun renews the performance and prolongs service life. Perform this every three months.
1 Remove the front panel and pre-filter.
2 Remove the photocatalytic filter.
3 Soak the photocatalytic filter in water.
Soak in cool to lukewarm water for 30 minutes.
Do not use detergent or hot water. Also, do not brush or rub while soaking as this may damage the filter.
Pre-filter
Debris clogging the pre-filter reduces the effectiveness of the dehumidifier. Clean once every 2 weeks.
¡Stains may remain on the filter, but should not affect performance.
¡The filter can be soaked for a total of eight times. After that, replace with a new filter.
1 Remove the front panel and pre-filter.
2 Remove the photocatalytic filter.
3 Clean the pre-filter.
Remove grit with vacuum cleaner
 Hose with lukewarm water when excessively soiled. Dry well.
4 Dry the photocatalytic filter.
Dry well in the sun (The performance of the filter renews with soaking, and the photocatalytic effect of the sunlight removes remaining odorants)
Do not hang with pegs as this may damage the filter.
Do not use the filter while wet.
4 Fit the photocatalytic filter.
5 Attach the pre-filter and front panel.
5 Fit the photocatalytic filter.
6 Attach the pre-filter and front panel.
14

Removing Water from the Tank
The unit automatically shuts down and lights the Tank full lamp when the tank (approximately 4L) is full. Empty the tank.
1 Remove the water tank.
Open the front door. Grasp handle and slide out.
<Hold the tank this way>
2 Remove the tank lid, and empty.
Floating element
Tank lid Do not remove or dismantle the float.
3 Reattach the tank lid and replace the water tank.
Confirm that the lid is securely
attached to the  water tank, and
push the tank in. Close the front door.
¡If the lid is not properly closed, you may have problems removing the tank.
¡If the tank is not installed correctly, the tank full light will come on, and the unit will not operate.
Note |
Do not remove or dismantle the floating element |
in the tank. If it is removed, the unit cannot detect |
|
when the tank is full, and this could result in |
|
|
leakage. |
Pour the water out as shown.
15

Replacing the Air Purifying Filter
The air purifying filter is disposable.
Make sure to replace the filter when it becomes dirty.
Replacing the photocatalytic filter
Although the photocatalytic filter lasts roughly 2 years, replace it when:
¡You have soaked the filter 8 times.
¡The photocatalytic filter has turned brown due to cigarette smoke or black with dust.
Filter life differs on usage and environmental conditions.
Remove the front panel and pre-filter to replace the photocatalytic filter.
Parts sold separately
Photocatalytic filter for replacement
∞Type: MJPR-10TXFT
∞Type code: 5C5 815
For these items contact your nearest Mitsubishi Electric dealer.
Storage
After switching the unit off, leave for one day until any water inside has had time to run off, then carry out the following steps.
1 Perform drying inside
Performing drying inside to prevent mildew growth is recommended.
2 Bundle
power cord.
3 Remove the drainage water.
Empty the water tank and wipe away any remaining drops of water.
4 Clean the
pre-filter.
Remove grit with vacuum cleaner
5 Store the unit.
•When you are sure that all parts of the unit are dry, cover it with a cloth to keep it from dust.
•Store the unit in an upright position in a place not exposed to direct sunlight.
When disposing the unit
Dispose according to the garbage regulations in your district.
¡Photocatalytic filter Material: PET and PS
¡Unit
Do not disassemble. Dispose according to the garbage regulations in your district.
16
 Loading...