


Controller Kit Installation Manual
MIFH1, MRCH1, MCCH1, MOS1
Installation guide for:
• |
Wireless Receiver and Cable (MIFH1) |
• |
Portable Central Controller (MCCH1) |
• |
Remote Controller (MRCH1) |
• |
Outdoor Air Sensor (MOS1) |
DISCONNECT POWER BEFORE BEGINNING INSTALLATION. Can cause electrical shock or equipment damage.
Must be installed by a trained, experienced technician. Read these instructions carefully. Failure to follow these instructions can damage the product or cause a hazardous condition.
Installation at a glance
Wireless receiver
Remote controller |
Wireless |
outdoor |
air sensor |
Portable |
central |
controller |
This document covers linking and installation procedures for the Mitsubishi Split-Zoning Ductless and Ducted Systems' RedLINK™ control devices and accessories.
M32309
Before you begin, you must attach the cable to the CN105 connector on the indoor unit control board, then follow the steps in this document.
Remote controllers are linked to specific indoor units. Each indoor unit must have a dedicated remote controller and wireless receiver.
© 2010 Mitsubishi Electric & Electronics USA, Inc. |
|
Suwanee, GA 30024 All Rights Reserved. |
|
The three diamond logo is a registered trademark |
|
of Mitsubishi Electric Corporation |
|
www.mitsubishipro.com |
69-2426-01 |
|
Wireless System Installation Guide
1 Install batteries in wireless devices
Install batteries in all devices. Make sure batteries are inserted properly (see polarity marks on the devices).
Remote Controller
Install 2 fresh AA batteries
Install quick reference card
M28472A
M28474
Portable Central Controller (optional): Install 3 fresh AA batteries
Outdoor air sensor (optional): Install 2 fresh AA lithium batteries
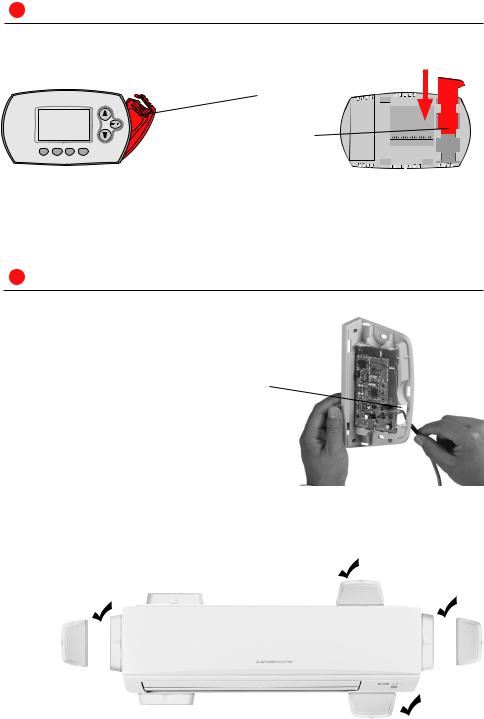
2Install cable and receiver
1Before mounting indoor unit, connect cable to the 5-pin CN105 connector on the control board in the indoor unit.
2Mount indoor unit. Route cable to preferred location of the wireless receiver.
3Route cable through hole in base of wireless receiver and attach to 5 pin connector on receiver board.
4Push the excess cable back through the indoor unit or behind the wireless receiver. Do not cut or modify the cable. Use zip tie connections on back of receiver if needed.
5Mount wireless receiver next to the indoor unit (see below) or in a remote location.
Mount in the orientations shown. Do not block vents.
X
OR |
OR |
X
MCR31400
69-2426—01 |
2 |
3 Link all devices to wireless network
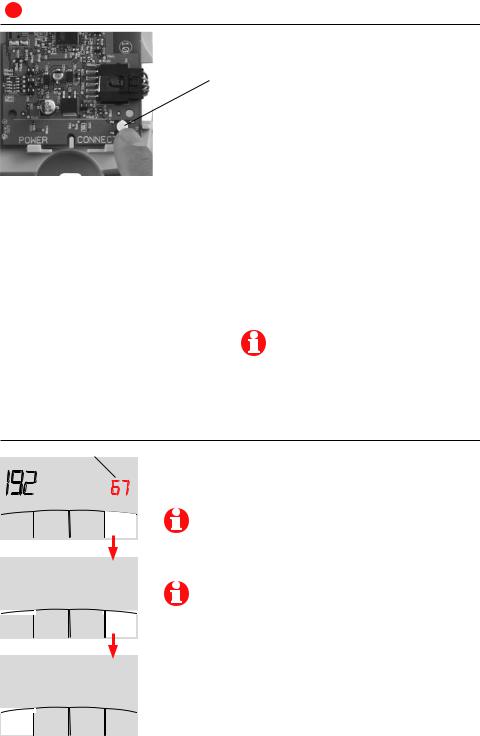
1Remove cover from wireless receiver.
2Verify POWER light is solid green.
3Press and release the CONNECT button.
4If CONNECT light does not flash, another receiver or RedLINK wireless adapter may be in wireless setup mode. Exit wireless setup at the other device.
POWER LED
Solid Green: Powered and communication is established.
Slow Flashing Green (1 flash/ second): Receiver is powered.
Wait approximately 30 seconds for communication to be established between the wireless receiver and the indoor unit. Check cable connection if flashing does not stop after 30 seconds.
Fast Flashing Green (5 flashes/second):
Error in communication between wireless receiver and the indoor unit. Check cable connection.
CONNECT LED
Flashing Green: In wireless setup mode.
Solid Green: RedLINK communication is established.
Yellow: Please wait.
Red: RedLINK device is not communicating.
Flashing status light times out after 15 minutes of inactivity. Press
CONNECT again if necessary.
Link remote controller to wireless network
Zone name
Wireless Setup
Next
Press σ or τ to change the name or location of this zone, then press NEXT.
Example: 67 = Meeting Room
See complete zone list on page 8.
M28925
Press CONNECT to establish a link to the wireless network.
If E0 or E1 appears, see error codes on page 10.
Wireless Setup
Connect
Back
M32308
Connected
Wireless Setup
Done
After a brief pause, the confirmation screen at left should be displayed to verify that the wireless connection has been established.
Press DONE to display the home screen.
M32307 |
3 |
69-2426—01 |
|

Wireless System Installation Guide
Link Portable Central Controller to RedLINK™ network (optional)
|
CONNECT |
WIRELESS SETUP |
|
|
M28481 |
Press to link |
Press to save |
another receiver |
and exit |
1Make sure the CONNECT light on the wireless receiver is flashing.
2Press CONNECT at the Portable Central
Controller. There will be a short delay as the
Portable Central Controller seeks a signal from the wireless network.
3When the screen displays "Connected," press DONE.
4Press NO at the next screen to save and exit. (Or press YES and repeat steps 1-4 to link another receiver.)
If E1 appears, see error codes on page 10.
YES NO
CONNECT MORE?
M28482
The linking procedure may time out if there is no keypress within 15 minutes. To begin again, press and hold the blank space (or arrow, if present) in the lower right corner of the screen until the display changes (about 3 seconds).
Link outdoor sensor to RedLINK™ network (optional)
Press and release |
1 Make sure the CONNECT light on the |
|
wireless receiver is flashing. |
2 Press and release the CONNECT button on the back of the sensor.
3Check remote controller to verify that the outdoor sensor is working. After about
15 seconds, the remote controller should display outdoor temperature and humidity.
M28483
69-2426—01 |
4 |
 Loading...