


Having TROUBLE with operation?
Please reset your unit
Refer to page of How to reset your unit
Vous avez des PROBLÈMES de fonctionnement?
Réinitialisez votre appareil
Référez-vous à la page intitulée Comment réinitialiser votre appareil
ENGLISH
FRANÇAIS
KD-R621
CD RECEIVER / RÉCEPTEUR CD
Dear Customer,
This apparatus is in conformance with the valid European directives and standards regarding electromagnetic compatibility and electrical safety.
European representative of Victor Company of Japan, Limited is:
JVC Technical Services Europe GmbH Postfach 10 05 04
61145 Friedberg Germany
Cher(e) client(e),
Cet appareil est conforme aux directives et normes européennes en vigueur concernant la compatibilité électromagnétique et à la sécurité électrique.
Représentant européen de la société Victor Company of Japan, Limited:
JVC Technical Services Europe GmbH Postfach 10 05 04
61145 Friedberg Allemagne
|
|
|
|
For canceling the display demonstration, see page 4. / Pour annuler la démonstration des |
||
|
|
|
|
|||
|
|
|
|
affichages, référez-vous à la page 4. |
||
|
|
|
|
|
|
|
|
|
|
|
|
For installation and connections, refer to the separate manual. |
|
|
|
|
|
|
Pour l’installation et les raccordements, se référer au manuel séparé. |
|
|
|
|
|
|
|
|
|
|
|
|
|
INSTRUCTIONS |
|
|
|
|
|
|
MANUEL D’INSTRUCTIONS |
|
|
EN, FR |
|
|
|
|
GET0708-003A |
|
|
|
||||
© 2010 Victor Company of Japan, Limited |
1110DTSMDTJEIN |
|
|
|
[E/EU] |
|
CoverRear_KD-R621_003A_f.indd 1-2 |
|
|
11/2/10 4:09:11 PM |
|
|
||
|
|
|
|

Thank you for purchasing a JVC product.
Please read all instructions carefully before operation, to ensure your complete understanding and to obtain the best possible performance from the unit.
IMPORTANT FOR LASER PRODUCTS
1.CLASS 1 LASER PRODUCT
2.CAUTION: Do not open the top cover. There are no user serviceable parts inside the unit; leave
all servicing to qualified service personnel.
3.CAUTION: Visible and/or invisible class 1M laser radiation when open. Do not view directly with optical instruments.
4.REPRODUCTION OF LABEL: CAUTION LABEL, PLACED OUTSIDE THE UNIT.
|
|
|
|
|
|
|
WARNING: |
|
|
|
|
|
|
|
|
Stop the car before operating the unit. |
|
|
|
|
|
|
|
|
||
|
|
|
|
Battery |
Caution: |
|||
|
|
|
|
|||||
Products |
Adjust the volume so that you can hear sounds |
|||||||
outside the car. Driving with the volume too |
||||||||
Information for Users on Disposal of |
||||||||
high may cause an accident. |
||||||||
Old Equipment and Batteries |
Caution on volume setting: |
|||||||
[European Union only] |
||||||||
These symbols indicate that the product and |
Digital devices (CD/USB) produce very little |
|||||||
the battery with this symbol should not be |
noise compared with other sources. Lower the |
|||||||
disposed as general household waste at its |
volume before playing these digital sources to |
|||||||
end-of-life. |
avoid damaging the speakers by the sudden |
|||||||
If you wish to dispose of this product and |
increase of the output level. |
|||||||
the battery, please do so in accordance with |
|
|||||||
applicable national legislation or other rules |
Caution for DualDisc playback: |
|||||||
in your country and municipality. |
The Non-DVD side of a “DualDisc” does not |
|||||||
By disposing of this product correctly, you |
||||||||
comply with the “Compact Disc Digital Audio” |
||||||||
will help to conserve natural resources and |
||||||||
standard. Therefore, the use of Non-DVD side |
||||||||
will help prevent potential negative effects |
||||||||
of a DualDisc on this product may not be |
||||||||
on the environment and human health. |
||||||||
recommended. |
||||||||
|
|
|
|
|
|
|
||
Notice: |
|
|||||||
The sign Pb below the symbol for batteries |
|
|||||||
indicates that this battery contains lead. |
|
|||||||
|
|
|
|
|
|
|
|
|
2ENGLISH
EN02-21_KD-R621[E]3.indd 2 |
|
|
10/21/10 1:39:01 PM |
|
|
||
|
|
|
|

How to attach/detach the control panel
How to reset your unit
Your preset adjustments will also be erased.
How to forcibly eject a disc
[Hold]
•Be careful not to drop the disc when it ejects.
•If this does not work, reset your unit.
Maintenance
Cleaning the unit
Wipe off the dirt on the panel with a dry silicon or soft cloth. Failure to observe this precaution may result in damage to the unit.
Cleaning the connector
Wipe off dirt on the connector of the unit and panel. Use a cotton swab or cloth.
JVC bears no responsibility for any loss of data in an iPod/iPhone and/or USB mass storage class device while using this System.
CONTENTS
3How to attach/detach the control panel
3How to reset your unit
3How to forcibly eject a disc
3Maintenance
4Canceling the display demonstration
4Setting the clock
5Preparing the remote controller
5About discs
6Basic operations
7 Listening to the radio
9Listening to a disc
10Connecting the other external components
10Listening to the other external components
11Listening to a USB device
12Listening to an iPod/iPhone
14Selecting a preset sound mode
15Menu operations
18Troubleshooting
20Using Bluetooth® devices
21Specifications
Condensation : When the car is airconditioned, moisture may collect on the laser lens. This may cause disc read errors. In this case, remove the disc and wait for the moisture to evaporate.
Temperature inside the car : If you have parked the car for a long time in hot or cold weather, wait until the temperature in the car becomes normal before operating the unit.
ENGLISH 3
EN02-21_KD-R621[E]3.indd 3 |
|
|
10/21/10 1:39:03 PM |
|
|
||
|
|
|
|
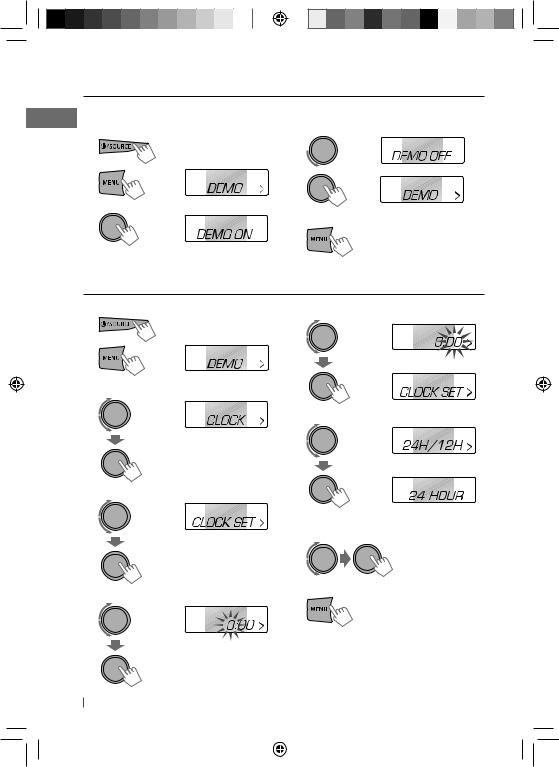
Canceling the display demonstration
Display demonstration will be activated automatically if no operation is done for about 20 seconds.
1 |
Turn on the power. |
4 |
Select <DEMO OFF>. |
|
[Hold] |
|
|
2 |
[Hold] |
5 |
|
|
(Initial setting) |
6 |
|
3 |
|
Finish the procedure. |
(Initial setting)
Setting the clock
1 |
Turn on the power. |
6 |
|
[Hold] |
|
2 |
[Hold] |
|
3 |
(Initial setting) |
|
Select <CLOCK>. |
|
7
Adjust the minute.
Select <24H/12H>.
4 Select <CLOCK SET>.
8 Select <24 HOUR> or <12 HOUR>.
5 Adjust the hour. |
9 Finish the procedure. |
(Initial setting)
4ENGLISH
EN02-21_KD-R621[E]3.indd 4 |
|
|
10/21/10 1:39:03 PM |
|
|
||
|
|
|
|

Preparing the remote controller
When you use the remote controller for the first time, pull out the insulation sheet.
Insulation sheet

If the effectiveness of the remote controller decreases, replace the battery.
Replacing the lithium coin battery
CR2025
This unit is equipped with the steering wheel remote control function.
•For details, refer also to the instructions supplied with the remote adapter.
Caution:
•Danger of explosion if battery is incorrectly replaced. Replace only with the same or equivalent type.
•Battery shall not be exposed to excessive heat such as sunshine, fire, or the like.
Warning (to prevent accidents and damage):
•Do not install any battery other than CR2025 or its equivalent.
•Do not leave the remote controller in a place (such as dashboards) exposed to direct sunlight for a long time.
•Store the battery in a place where children cannot reach.
•Do not recharge, short, disassemble, heat the battery, or dispose of it in a fire.
•Do not leave the battery with other metallic materials.
•Do not poke the battery with tweezers or similar tools.
•Wrap the battery with tape and insulate when throwing away or saving it.
About discs
This unit can only play the CDs with:
Discs that cannot be used:
•Discs that are not round.
•Discs with coloring on the recording surface or discs that are dirty.
•You cannot play a Recordable/ReWritable disc that has not been finalized. (For the finalization process refer to your disc writing software, and your disc recorder instruction manual.)
•8 cm CD cannot be used. Attempt to insert using an adapter can cause malfunction.
Handling discs:
•Do not touch the recording surface of the disc.
•Do not stick tape etc. on the disc, or use a disc with tape stuck on it.
•Do not use any accessories for the disc.
•Clean from the center of the disc and move outward.
•Clean the disc with a dry silicon or soft cloth. Do not use any solvents.
•When removing discs from this unit, pull them out horizontally.
•Remove the rims from the center hole and disc edge before inserting a disc.
ENGLISH 5
EN02-21_KD-R621[E]3.indd 5 |
|
|
10/21/10 1:39:04 PM |
|
|
||
|
|
|
|
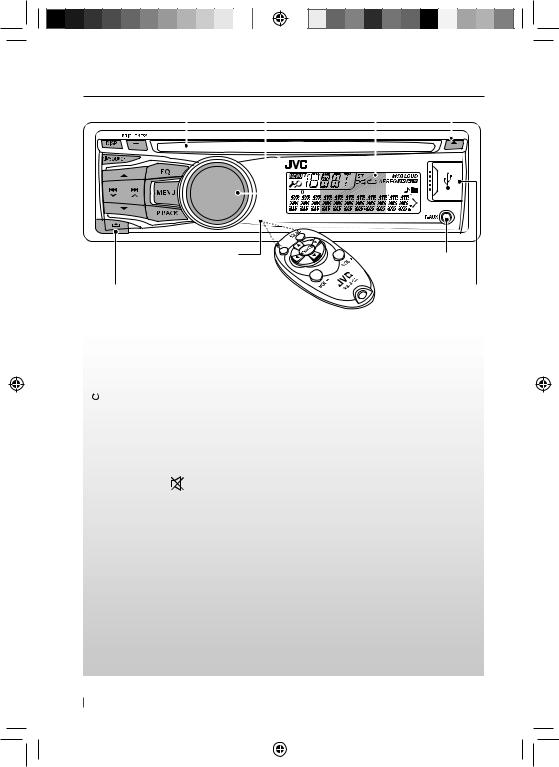
Basic operations
|
Loading slot |
Control dial |
Display window |
Ejects the disc |
|||||
|
|||||||||
|
|
|
|
|
|
|
|
|
|
|
|
|
|
|
|
|
|
|
|
|
|
|
|
|
|
|
|
|
|
|
|
|
|
|
|
|
|
|
|
|
|
|
|
|
|
|
|
|
|
Remote sensor
• DO NOT expose to
bright sunlight.
Detaches the panel
Front auxiliary input jack
USB (Universal Serial
Bus) input terminal
When you press or hold the following button(s)...
|
Main unit |
Remote |
General operation |
|
controller |
||
|
|
|
|
|
|
— |
Turns on/off [Hold]. |
|
|
|
Selects the sources (FM, CD, USB or USB-IPOD, F-AUX, BT AUDIO or |
|
/ SOURCE |
SOURCE |
R-AUX or BT PHONE, AM). |
|
|||
|
|||
|
|
• “CD” or “USB” is selectable only when a disc is loaded or a USB |
|
|
|
|
|
|
|
|
device is connected. |
Control dial |
VOL – / + |
Adjusts the volume level. |
|
|
(turn) |
— |
Selects items. |
|
|
|
Mutes the sound during playback. If the source is “CD” or “USB/ |
Control dial |
|
USB-IPOD” playback pauses. |
|
|
(press) |
|
• Press the button again to cancel muting or resume playback. |
|
|
— |
Confirms selection. |
|
|
|
Selects the sound mode. |
|
EQ |
SOUND |
• Hold the EQ button on the main unit to enter tone level |
|
|
|
adjustment directly. (page 14) |
BRIGHTNESS |
— |
Enters <BRIGHTNESS> menu directly. (page 16) |
|
|
|
|
• Activates/deactivates TA Standby Reception. |
|
|
|
• Enters PTY Searching mode [Hold]. |
|
T/P BACK |
— |
• Selects the controlling terminal of an iPod/iPhone [Hold]. (page 12) |
|
|
|
• Returns to the previous menu. |
|
|
|
• Exit from the menu [Hold]. |
|
DISP |
— |
• Changes the display information. |
|
• Scrolls the display information [Hold]. |
||
|
|
|
|
6ENGLISH
EN02-21_KD-R621[E]f.indd 6 |
|
|
11/15/10 4:20:06 PM |
|
|
||
|
|
|
|
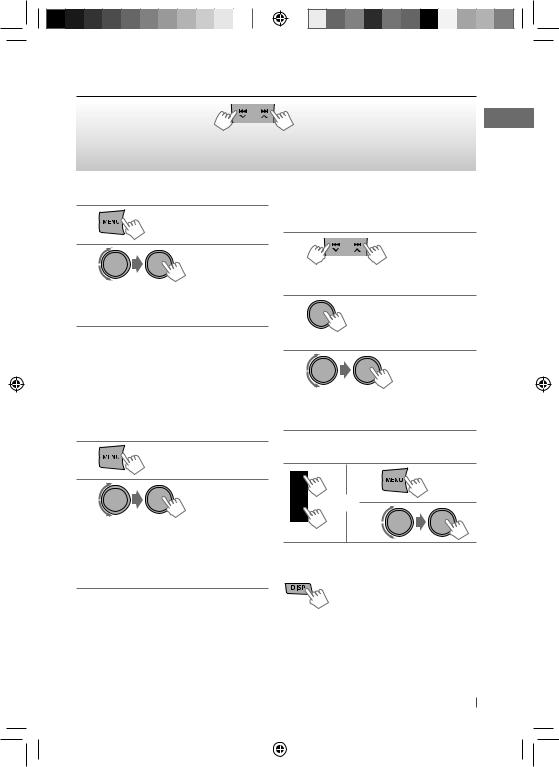
Listening to the radio
~ 
] “FM” or “AM”
Ÿ |
• [Press] Searches for stations automatically. |
|
• [Hold] Searches for stations manually. |
||
|
||
|
“M” flashes, then press the button |
|
|
repeatedly. |
“ST” lights up when receiving an FM stereo broadcast with sufficient signal strength.
Improving the FM reception
1
[Hold]
2
] <TUNER> ] <MONO> ] <MONO ON> Reception improves, but stereo effect will be lost.
To restore the stereo effect, repeat the same procedure to select <MONO OFF>.
Automatic presetting (FM)—
SSM (Strong-station Sequential Memory)
You can preset up to 18 stations for FM.
While listening to a station...
1
[Hold]
2
] <TUNER> ] <SSM> ] <SSM 01 – 06 / 07 – 12 / 13 – 18>
“SSM” flashes and local stations with the strongest signal are searched and stored automatically.
To preset another 6 stations, repeat the above procedure by selecting one of the other SSM setting ranges.
Manual presetting (FM/AM)
You can preset up to 18 stations for FM and 6 stations for AM.
1
] Tune in to a station you want to preset.
2
[Hold]
“PRESET MODE” flashes.
3
] Selects preset number.
Preset number flashes and “MEMORY” appears.
Selecting a preset station
1
or 2
Changing the display information (for non-Radio Data System station)
Frequency j Clock
Using the remote controller
5/∞ : Changes the preset stations.
2/3 : [Press] Searches for stations automatically.
[Hold] Searches for stations manually.
ENGLISH 7
EN02-21_KD-R621[E]3.indd 7 |
|
|
10/21/10 1:39:05 PM |
|
|
||
|
|
|
|
 Loading...