


ENGLISH
РУCCKИЙ
KD-R536/KD-R436/  KD-R435
CD RECEIVER / РЕСИВЕР С ПРОИГРЫВАТЕЛЕМ КОМПАКТ-ДИСКОВ / ϟΦυϙϧ ΩϟχΕλCD
For canceling the display demonstration, see page 4. /
Информацию об отмене демонстрации функций дисплея см. на стр. 4. /
ζϛιϗϧύλΖϔ4 ϟπϙϧ τΣϟχϖΣΣϔυόϔκϖηςϔπνυϒΣ μ
For installation and connections, refer to the separate manual.
Указания по установке и выполнению соединений приводятся в отдельной инструкции.
ΣυϚεϔζϛΦϛΕσϙ ιϗϧϠτΣηΕϔΩύϔΣϢλΣϔυηϖζηϓϨΩϠχϒΣϔυϟάϙϧ σηΕ
INSTRUCTIONS
ИНСТРУКЦИИ ПО ЭКСПЛУАТАЦИИ
ΦϕϠλϒλϕ
ʷʾʾʷƖʷʷʸ
ƾ ƿ

Thank you for purchasing a JVC product.
Please read all instructions carefully before operation, to ensure your complete understanding and to obtain the best possible performance from the unit.
 IMPORTANT FOR LASER PRODUCTS
1.CLASS 1 LASER PRODUCT
2.CAUTION: Do not open the top cover. There are no user serviceable parts inside the unit;
leave all servicing to qualified service personnel.
3. CAUTION: Visible and/or invisible class 1M laser radiation when open. Do not view directly with optical instruments.
4. REPRODUCTION OF LABEL: CAUTION LABEL, PLACED OUTSIDE THE UNIT.
[European Union only]
 Warning:
Stop the car before operating the unit.
 Caution:
Adjust the volume so that you can hear sounds outside the car. Driving with the volume too high may cause an accident.
Avoid using the USB device or iPod/iPhone if it might hinder driving safety.
 Caution on volume setting:
Digital devices (CD/USB) produce very little noise compared with other sources. Lower the volume before playing these digital sources to avoid damaging the speakers by the sudden increase of the output level.
 Temperature inside the car:
If you have parked the car for a long time in hot or cold weather, wait until the temperature in the car becomes normal before operating the unit.
 Condensation:
When the car is air-conditioned, moisture may collect on the laser lens. This may cause disc read errors. In this case, remove the disc and wait for the moisture to evaporate.
How to reset your unit
Your preset adjustments will also be erased.
Maintenance
 Cleaning the unit
Wipe off the dirt on the panel with a dry silicon or soft cloth. Failure to observe this precaution may result in damage to the unit.
 Cleaning the connector
Wipe off dirt on the connector of the unit and panel. Use a cotton swab or cloth.
 How to read this manual:
This manual mainly explains operations using the buttons on the control panel.
< > indicates the displays on the control panel.
[XX] indicates the initial setting of a menu item.
2 | ENGLISH
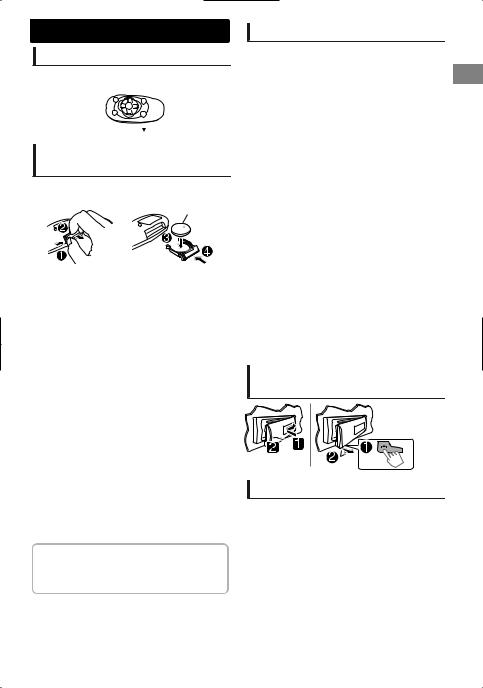
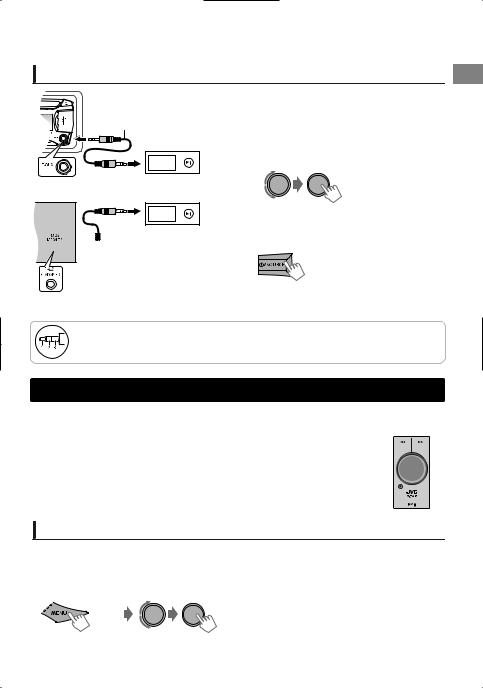
Remote controller
Preparing
When you use the remote controller for the first time, pull out the insulation sheet.
Insulation sheet 

Replacing the lithium coin battery
If the effectiveness of the remote controller decreases, replace the battery.
CR2025
 Caution:
Danger of explosion if battery is incorrectly replaced. Replace only with the same or equivalent type.
Battery shall not be exposed to excessive heat such as sunshine, fire, or the like.
 Warning:
Do not install any battery other than CR2025 or its equivalent.
Do not leave the remote controller in places (such as dashboards) exposed to direct sunlight for a long time.
Store the battery in places out of reach of children.
Do not recharge, short, disassemble, heat the battery, or dispose of it in a fire.
Do not place the battery with other metallic materials.
Do not poke the battery with tweezers or similar tools.
Insulate the battery by wrapping it with tape when disposing or storing it.
KD-R536 is equipped with the steering wheel remote control function. For details, refer also to the instructions supplied with the remote adapter.
Contents |
|
Remote controller .................................................. |
3 |
Preparation ............................................................ |
4 |
Canceling the display demonstration |
|
Setting the clock |
|
Basic operations ................................................... |
4 |
Radio ........................................................................ |
6 |
CD/USB .................................................................... |
7 |
iPod/iPhone (KD-R536 only) ................................ |
8 |
External components ......................................... |
9 |
Bluetooth .............................................................. |
9 |
Illumination color adjustments |
|
(KD-R536 only) ....................................................... |
10 |
Brightness adjustments .................................. |
11 |
Sound adjustments .......................................... |
11 |
Menu operations ............................................... |
12 |
Additional information ................................... |
14 |
Troubleshooting ................................................ |
16 |
Specifications ..................................................... |
17 |
How to attach/detach the |
|
control panel |
|
How to forcibly eject a disc
 (Hold)
Be careful not to drop the disc when it ejects.
If this does not work, reset your unit.
ENGLISH | 3
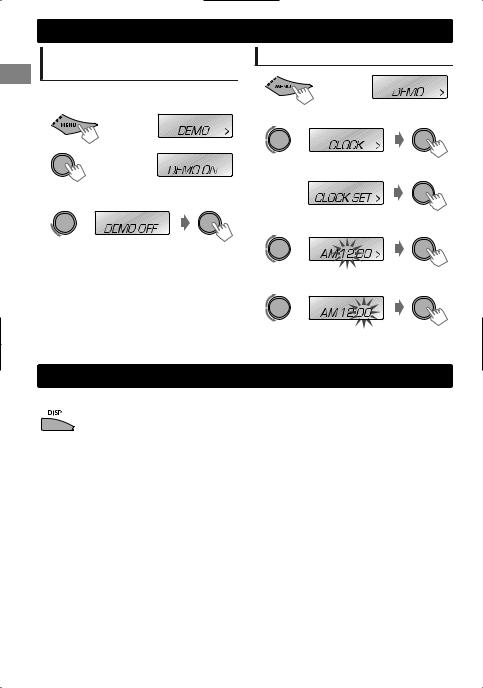
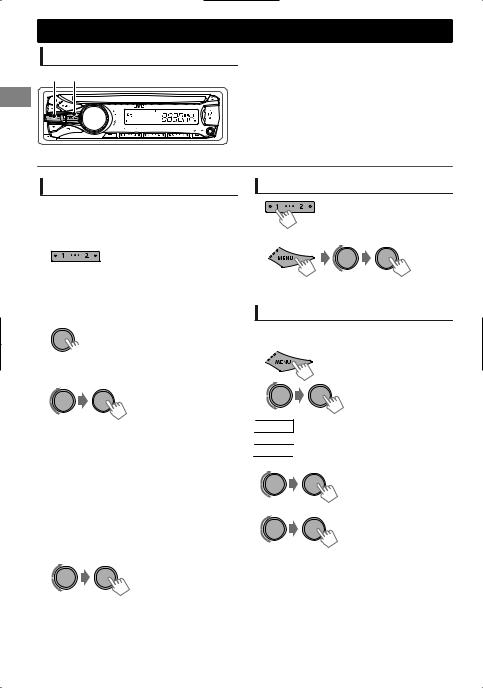
Preparation
Canceling the display |
|
Setting the clock |
|
demonstration |
1 |
|
|
The display demonstration is always turned on |
(Hold) |
||
|
|||
unless you cancel it. |
|
|
|
1 |
2 |
Select <CLOCK>. |
|
(Hold) |
|
|
|
2 |
|
|
|
(Initial setting) |
3 |
Select <CLOCK SET>. |
|
|
|
3 Select <DEMO OFF>.
4 Adjust the hour.
4 Press MENU to exit.
5 Adjust the minute.
6 Press MENU to exit.
Basic operations
 Display information
Changes the display information. (Press)
 Scrolls the current display information. (Hold)
|
Source |
Display |
|
Radio |
Frequency ) Clock |
|
CD/USB |
Album title/Artist* - Track title* - Track no./Playing time - Clock - |
|
iPod/iPhone (HEAD MODE/ |
(back to the beginning) |
|
IPOD MODE) *1 |
* “NO NAME” appears for conventional CDs or if not recorded. |
|
|
|
|
iPod/iPhone (EXT MODE) *1 |
EXT MODE ) Clock |
|
|
|
|
External Components (AUX) |
F-AUX or R-AUX ) Clock |
|
|
|
|
Bluetooth Audio |
BT AUDIO ) Clock |
|
|
|
|
*1 For KD-R536 only. |
|
4 | ENGLISH

|
|
|
|
|
|
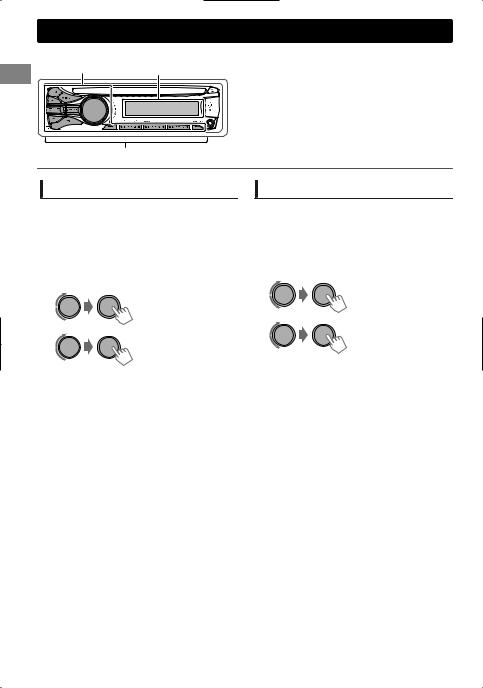
Basic operations |
|
|
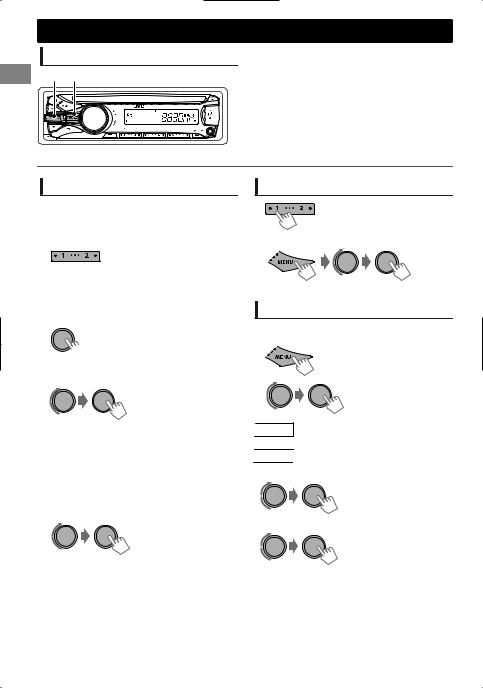
Control panel |
|
|
|
|
Remote controller |
|
|
|
Control dial |
|
Display window |
|
|
|
|
||
|
|
|
|
|
||||
|
|
Loading slot |
|
Ejects the disc |
|
|
||
|
|
|
|
|
||||
|
|
|
|
|
|
|
|
|
|
|
|
|
|
|
|
|
|
|
|
|
|
|
|
|
|
|
Detaches the panel |
Front AUX input jack |
Remote sensor |
USB input terminal |
DO NOT expose to bright sunlight. |
|
When you press or hold the following button(s)...
|
Control panel |
Remote |
|
General function |
|
|
|
controller |
|
||||
|
|
|
|
|
|
|
|
|
|
Turns on. |
|
|
|
|
|
— |
Turns off. (Hold) |
|
|
|
|
/SOURCE |
Press the /SOURCE button on the control panel and turn |
||||
|
|
|||||
|
|
|
|
the control dial within 2 seconds to select the source. |
|
|
|
|
SOURCE |
Press repeatedly to select the source. |
|||
|
Control dial |
VOL - / + |
Adjusts the volume level. |
|
|
|
|
(turn) |
— |
Selects items. |
|
|
|
|
|
|
Mutes the sound or pauses playback. |
|||
|
Control dial |
|
Press the button again to cancel muting or resume |
|||
|
(press) |
|
|
playback. |
|
|
|
|
— |
Confirms selection. |
|
|
|
|
|
— |
Enters <BRIGHTNESS> menu directly. (KD-R436/KD-R435 only) |
|
||
|
( page 11) |
|
|
|||
|
|
|
|
|
||
|
iPod |
— |
Switches to iPod source. (KD-R536 only) |
|||
|
Number |
|
Selects the preset stations. |
|
|
|
|
buttons |
— |
Stores the current station into the selected number button. |
|||
|
(1 - 6) |
|
|
(Hold) ( page 6) |
|
|
|
EQ |
SOUND |
Selects the preset sound mode. ( page 11) |
|
||
|
|
— |
Returns to the previous menu. |
|||
|
Exits from the menu. (Hold) |
|
|
|||
|
|
|
|
|
||
/ |
/ |
|
Selects a preset station. ( |
page 6) |
||
|
||||||
|
Selects MP3/WMA folder. ( |
page 7) |
|
|||
|
|
|
|
|||
|
|
|
|
|||
|
|
|
|
Searches for a station automatically. ( page 6) |
||
|
|
|
|
|||
/ |
/ |
Searches for a station manually. (Hold) |
||||
|
Selects track. ( page 7, 8) |
|
|
|||
|
|
|
|
|
|
|
|
|
|
|
|
|
|
|
|
|
Fast-forwards or reverses track. (Hold) |
|
||
ENGLISH | 5
Radio
Searching for a station
B A |
Select <FM> or <AM>. |
|
Auto search. (Press) |
|
Manual search. (Hold) |
|
“M” flashes, then press the button repeatedly. |
“ST” lights up when receiving an FM stereo broadcast with sufficient signal strength.
Storing stations in memory
 Manual presetting
You can preset up to 18 stations for FM and 6 stations for AM.
While listening to a station...
 (Hold)
The preset number flashes and “MEMORY” appears. The current station is stored to the selected number button (1 - 6).
- - - - - - - - or - - - - - - - -
1
 (Hold)
“PRESET MODE” flashes.
2 Select preset number.
The preset number flashes and “MEMORY” appears.
 Auto presetting (FM only)
SSM (Strong-station Sequential Memory)
You can preset up to 18 stations for FM.
1  (Hold)
2 |
-<TUNER> |
|
-<SSM> |
|
-<SSM 01 – 06> |
“SSM” flashes. When all the stations are stored, “SSM” stops flashing.
To preset <SSM 07 – 12>/<SSM 13 – 18>, repeat steps 1 and 2.
6 | ENGLISH
Selecting a preset station
- - - - - - - - or - - - - - - - -
You can also select a preset station using / .
Setting the Radio Timer
You can tune in to a preset station at a specific time regardless of the current source.
1 |
|
(Hold) |
|
|
|
2 |
|
-<TUNER> |
|
|
-<RADIO TIMER> |
|
|
-<OFF>/<ONCE>/ |
|
[OFF] |
<DAILY> |
|
Cancels Radio Timer. |
|
|
ONCE |
Activates once. |
|
DAILY |
Activates daily. |
3 |
Select the preset station. |
|
|
|
-<FM>/<AM> |
|
|
-<01> ... <18> for FM/ |
|
|
<01> ... <06> for AM |
4 Set the activation time.
5Press MENU to exit.
lights up after the Radio Timer has been set.
Only one timer can be set. Setting a new timer will override the previous setting.
The Radio Timer will not activate if the unit is turned off or if <AM> is set to <OFF> after selecting an AM station for the timer.

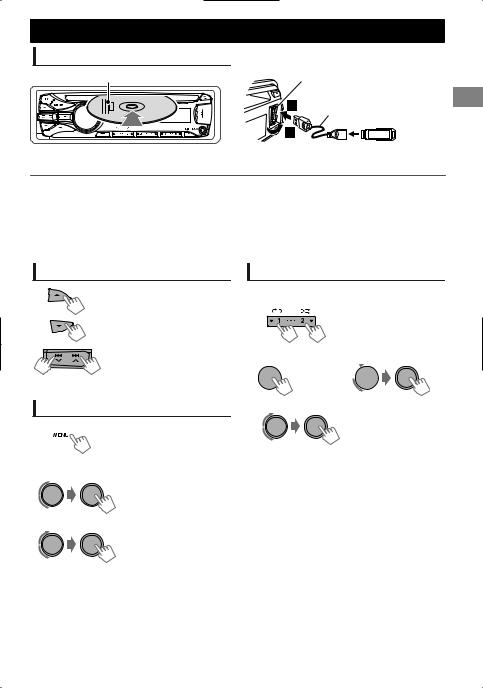
CD/USB |
CD/USB |
Playing a CD/USB device |
|
Label side |
USB input terminal |
|
USB 2.0 cable |
|
(not supplied) |
The source changes to “CD” and playback starts. |
The source changes to “USB” and playback starts. |
This unit can play MP3/WMA files stored in CD-R, CD-RW, and USB mass storage device (such as a USB memory and Digital Audio Player).
Make sure all important data has been backed up. We shall bear no responsibility for any loss of data in USB mass storage class device while using this system.
Ejected disc not removed within 15 seconds will reload automatically.
|
If the disc cannot be ejected, page 3. |
Selecting a folder/track
Selects folder. (For MP3/WMA)
Selects track. (Press)
Fast-forwards or reverses the track. (Hold)
Selecting a track/folder from the list
1 
2 Select a folder.
(For MP3/WMA)
3Select a track.
For MP3/WMA
If the disc contains many folders or tracks, you can fast search for desired folder or track by turning the control dial quickly.
Selecting the playback modes
You can select one of the following playback modes at a time.
1 |
Press 1 for REPEAT. |
|
Press 2 for RANDOM. |
|
Press again to exit. |
-- - - - - - - or - - - - - - - -
 (Hold)

|
|
|
<REPEAT>)<RANDOM> |
2 |
|
|
|
|
REPEAT |
|
|
|
RPT OFF |
|
Cancels repeat playback. |
|
|
|
|
|
TRACK RPT |
|
Repeats current track. |
|
|
|
|
|
FOLDER RPT * |
|
Repeats current folder. |
|
|
|
|
|
RANDOM |
|
|
|
RND OFF |
|
Cancels random playback. |
|
|
|
|
|
|
|
Randomly plays all tracks of |
|
FOLDER RND * |
|
current folder, then tracks of |
|
|
|
next folders. |
|
|
|
|
|
ALL RND |
|
Randomly plays all tracks. |
|
|
|
|
|
* For MP3/WMA |
|
|
ENGLISH | 7
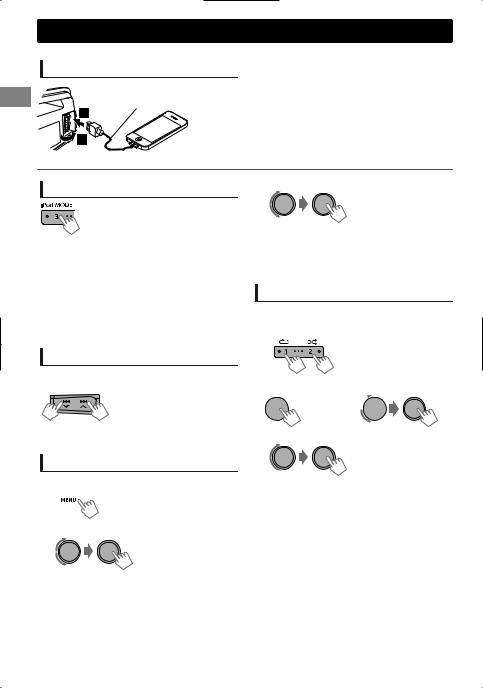
iPod/iPhone
KD-R536 only
Playing an iPod/iPhone
USB input terminal
USB 2.0 cable (accessory of the iPod/iPhone)
The source changes to “USB” - “USB-IPOD” and playback starts.
Selecting the control mode
|
|
#<HEAD MODE>/<IPOD MODE>/ |
|
|
<EXT MODE> |
|
|
|
|
HEAD |
Controls iPod playback through this |
|
MODE |
unit. |
|
IPOD |
Controls iPod playback from the |
|
MODE |
iPod/iPhone. |
|
EXT |
Allows any audio signals from iPod/ |
|
MODE |
iPhone. |
You can also change the setting using <IPOD SWITCH> in the menu.
Selecting a track
Applicable under <HEAD MODE/IPOD MODE> only.
Selects track/chapter. (Press)
Fast-forwards or reverses the track. (Hold)
Selecting a track from the list
Applicable under <HEAD MODE> only.
1 
2 Select the desired list.
PLAYLISTS)ARTISTS)ALBUMS)SONGS) PODCASTS)GENRES)COMPOSERS) (back to the beginning)
3 Select the desired track.
Repeat this step until the desired track is selected.
If the selected menu contains many tracks, you can fast search for the desired track by turning the control dial quickly.
Selecting the playback modes
Applicable under <HEAD MODE> only.
You can select one of the following playback modes at a time.
1 |
Press 1 for REPEAT. |
|
Press 2 for RANDOM. |
|
Press again to exit. |
-- - - - - - - or - - - - - - - -
 (Hold)

<REPEAT>)<RANDOM>
2
REPEAT
|
ONE RPT |
Functions the same as “Repeat |
|
One” of the iPod. |
|
|
|
|
|
ALL RPT |
Functions the same as “Repeat |
|
All” of the iPod. |
|
|
|
|
RANDOM |
|
|
|
RND OFF |
Cancels random playback. |
|
SONG RND |
Functions the same as “Shuffle |
|
Songs” of the iPod. |
|
|
|
|
|
ALBUM RND |
Functions the same as “Shuffle |
|
Albums” of the iPod. |
|
|
|
“ALBUM RND” is not applicable for some iPod/ iPhone.
8 | ENGLISH
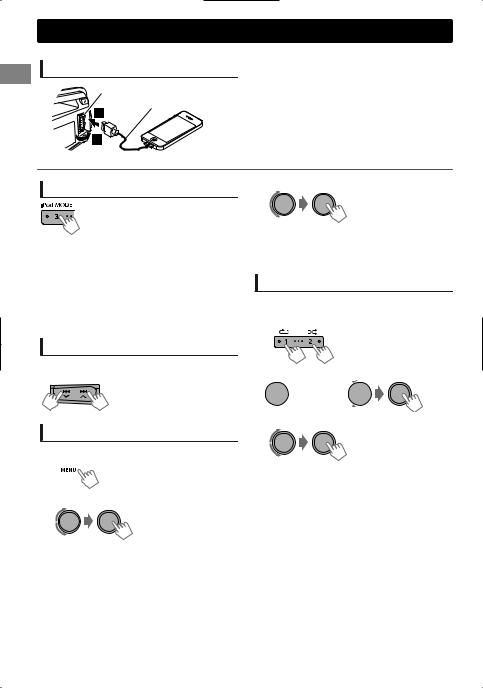
External components |
External components |
For details, refer also to the instructions supplied with the external components.
Playing an external component from Front/Rear AUX
3.5 mm stereo mini plug (not supplied)
Portable audio player, etc.


 3.5 mm stereo mini plug
(with “L” shaped connector) (not supplied)
1Connect to F-AUX on the control panel and/or R-AUX on the rear panel.
2 Set the source as necessary.
 (Hold)
-<SRC SELECT>
-<F-AUX>/<R-AUX>
-<F-AUX ON> or <R-AUX ON>
Press MENU to exit.
3 Select <F-AUX> or <R-AUX>.
4Turn on the connected component and start playing the source.
Recommended to use a 3-terminal plug head stereo mini plug for optimum audio output. Otherwise, sound may be interrupted or unclear while listening to an external component.
Bluetooth
For Bluetooth operations, it is required to connect the Bluetooth adapter, KS-BTA100 |
|
|
|
|
(separately purchased) to the auxiliary input jack (R-AUX/BT ADAPTER) on the rear of |
KS-BTA100 |
|||
the unit. ( Installation/Connection Manual) |
||||
|
|
|
||
KS-BTA100 is not available in some countries. Please contact your dealer where you |
|
|
|
|
purchased this unit. |
|
|
|
|
Operations may be different depending on the connected Bluetooth device. For |
|
|
|
|
|
|
|
||
details, refer also to the instruction supplied with the device. |
|
|
|
|
Preparation
For details on registering and using the Bluetooth device, refer to the instructions manual supplied with KS-BTA100.
1 Register (pair) a Bluetooth device with KS-BTA100.
2 Change the <SRC SELECT> settings of this unit.
(Hold)
-<SRC SELECT> -<R-AUX> -<BT ADAPTER>
3 Press MENU to exit.
ENGLISH | 9
Illumination color adjustments
KD-R536 only |
|
|
Button zone |
Display zone |
All zone: Includes both Button zone and |
|
|
Display zone. |
All zone
Selecting the preset color
You can select a preset color for <BUTTON ZONE>, <DISP ZONE>, and <ALL ZONE> separately.
1  (Hold)
2 Select <COLOR>.
3
|
BUTTON ZONE |
COLOR 01-29/USER/ |
|
|
COLOR FLOW 01-03* |
|
DISP ZONE |
|
|
* Color changes in |
|
|
|
different speeds. |
|
ALL ZONE |
|
|
|
|
|
|
|
Initial color: BUTTON ZONE [06], DISP ZONE [01], ALL ZONE [06].
If <ALL ZONE> is selected, the button and display illumination will change to the current/ selected <BUTTON ZONE> color.
4 Press MENU to exit.
Storing your own adjustments
You can store your own day and night colors for <BUTTON ZONE> and <DISP ZONE> separately.
1  (Hold)
2 Select <COLOR SETUP>.
3
|
|
BUTTON |
Select a primary |
|
|
color <RED/GREEN/ |
|
|
DAY |
ZONE |
BLUE>, and then |
|
|
adjust the level |
|
|
COLOR |
DISP |
<00-31>. Repeat this |
|
|
procedure until you |
|
|
|
ZONE |
have adjusted all the |
|
|
|
three primary colors. |
|
|
BUTTON |
Your adjustment is |
|
|
automatically stored |
|
|
NIGHT |
ZONE |
to “USER”. |
|
|
If “00” is selected for |
|
|
COLOR |
DISP |
all the primary colors |
|
|
for <DISP ZONE>, |
|
|
|
ZONE |
nothing appears on |
|
|
|
the display. |
|
|
ON |
Changes the display and |
|
MENU |
buttons illumination |
|
|
|
||
|
|
during menu, list search, |
|
|
COLOR |
|
|
|
OFF |
and playback mode |
|
|
|
||
|
|
operations. |
|
|
|
|
|
|
|
|
|
NIGHT COLOR/DAY COLOR is changed by turning on/off your car’s headlight.
4 Press MENU to exit.
10 | ENGLISH
Brightness adjustments |
Brightness adjustments |
You can select your preferred brightness for <BUTTON ZONE>, <DISP ZONE> separately.
1 |
2 |
|
|
||
|
|
|
Brightness button is only available for KD-R436/ KD-R435.
|
For KD-R536, page 12. |
|
BUTTON ZONE |
BUTTON 00 to 31 |
|
|
|
|
DISP ZONE |
DISP 00 to 31 |
|
|
|
3 Press MENU to exit.
Sound adjustments
Selecting the preset sound
You can select a preset sound mode, for each individual source, suitable for the music genre.
- - - - - - - - or - - - - - - - -
Press repeatedly.
 Pro Equalizer
1  (Hold)
2 |
-<PRO EQ> |
|
-<BASS>/<MIDDLE>/ |
|
<TREBLE> |
3
DYNAMIC-VOCAL BOOST-BASS BOOST- USER-FLAT-NATURAL (back to the beginning)
Storing your own adjustments
 Easy Equalizer
While listening, you can adjust the subwoofer level and tone level of the selected sound mode.
1  (Hold)
2 Adjust the level.
(Initial: [XX])
|
SUB.W* |
00 to 08 [08] |
|
|
BASS LVL |
-06 to +06 |
[+05] |
|
MID LVL |
-06 to +06 |
[00] |
|
TRE LVL |
-06 to +06 |
[+05] |
The adjustments are stored and <USER> is activated.
* Available only when <L/O MODE> is set to <SUB.W>. ( page 12)
Adjust the sound elements of the selected tone.
|
BASS |
(Initial: [XX]) |
|
|
Frequency |
60/80/[100]/200 Hz |
|
|
|
|
|
|
Level |
LVL -06 to +06 [+05] |
|
|
|
|
|
|
Q |
[Q1.0]/Q1.25/Q1.5/Q2.0 |
|
|
|
|
|
|
MIDDLE |
|
|
|
Frequency |
0.5/[1.0]/1.5/2.5 kHz |
|
|
|
|
|
|
Level |
LVL -06 to +06 [00] |
|
|
|
|
|
|
Q |
Q0.75/Q1.0/[Q1.25] |
|
|
|
|
|
|
TREBLE |
|
|
|
Frequency |
10.0/[12.5]/15.0/17.5 kHz |
|
|
|
|
|
|
Level |
LVL -06 to +06 [+05] |
|
|
Q |
[Q FIX] |
|
4 Repeat steps 2 and 3 to adjust other tones.
The adjustments are stored and <USER> is activated.
5 Press MENU to exit.
ENGLISH | 11
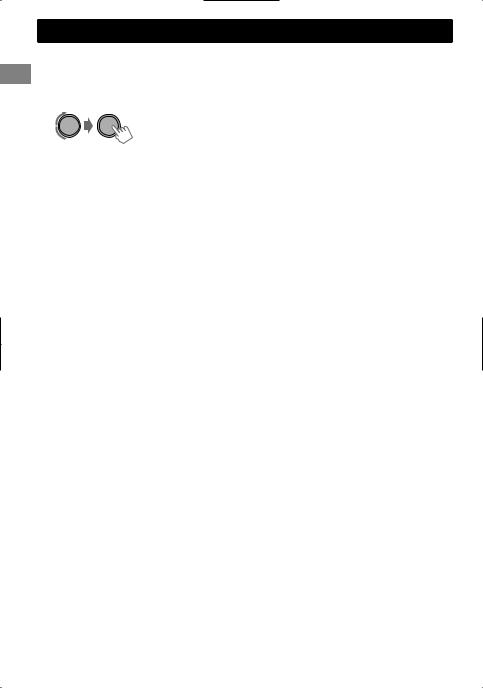
Menuoperations
1  (Hold)
If no operation is done for about 60 seconds, the operation will be canceled.
2
3Repeat step 2 if necessary.
To return to the previous menu, press .
To exit from the menu, press DISP or MENU.
|
|
Menu item |
|
Selectable setting (Initial: [XX]) |
|
DEMO |
For settings, |
page 4. |
|
|
CLOCK |
|
|
|
|
COLOR |
For settings, |
page 10. (KD-R536 only) |
|
|
COLOR SETUP |
|
|
|
|
|
DIMMER SET |
Selects the display and button illumination adjusted in the <BRIGHTNESS>/ |
|
|
|
|
<COLOR SETUP> setting. |
|
|
DIMMER |
|
[AUTO]: Changes between the Day and Night adjustments when you turn |
|
|
|
off/on the car headlights. *1 |
||
|
|
|
ON: Selects the Night adjustments. |
|
|
|
|
OFF: Selects the Day adjustments. |
|
|
|
BRIGHTNESS |
DAY [31]/NIGHT [15]: Brightness settings for the display and button |
|
|
|
|
illumination for day and night. |
|
|
|
|
BUTTON ZONE/DISP ZONE: Sets the brightness levels 00 — 31. |
|
|
DISPLAY |
SCROLL *2 |
[ONCE]: Scrolls the display information once. |
|
|
TAG DISPLAY |
[ON]: Shows the TAG information while playing MP3/WMA tracks. |
||
|
|
|
AUTO: Repeats scrolling (at 5-second intervals). |
|
|
|
|
OFF: Cancels. |
|
|
|
|
OFF: Cancels. |
|
|
PRO EQ |
For settings, |
page 11. |
|
|
|
FADER *3*4 |
R06 — F06 [00]: Adjusts the front and rear speaker output balance. |
|
|
|
BALANCE *4 |
L06 — R06 [00]: Adjusts the left and right speaker output balance. |
|
|
|
LOUD |
ON: Boosts low and high frequencies to produce a well-balanced sound at |
|
|
|
(Loudness) |
a low volume level. |
|
|
AUDIO |
|
[OFF]: Cancels. |
|
|
VOL ADJUST |
-05 — +05 [00]: Presets the volume adjustment level of each source, |
||
|
(Volume adjust) |
compared to the FM volume level. Before adjustment, select the source you |
||
|
|
|
want to adjust. (“VOL ADJ FIX” appears if “FM” is selected.) |
|
|
|
L/O MODE |
Select if the REAR/SW terminals are used for connecting the speakers or |
|
|
|
(Line output |
subwoofer (through an external amplifier). |
|
|
|
mode) |
SUB.W: Subwoofer |
|
|
|
|
[REAR]: Speakers |
|
*1 The illumination control lead connection is required. (See “Installation/Connection Manual”.) This setting may not work correctly on some vehicles (particularly on those having a control dial for dimming). In this case, change the setting to other than <DIMMER AUTO>.
*2 Some characters or symbols will not be shown correctly (or will be blanked) on the display. *3 If you are using a two-speaker system, set the fader level to “00”.
*4 This adjustment will not affect the subwoofer output.
12 | ENGLISH

|
|
|
|
Menu operations |
|
|
|
|
|
|
|
|
|
|
|
Menu item |
|
Selectable setting (Initial: [XX]) |
|
|
|
|
SUB. W *5 |
OFF: Cancels. |
|
|
|
|
|
(Subwoofer) |
[ON]: Turns on the subwoofer output. |
|
|
|
|
|
|
|
|
|
|
|
|
SUB.W LPF *6 |
LOW 55Hz/MID 85Hz/[HIGH 120Hz]: Audio signals with frequencies |
|
|
|
|
|
(Subwoofer low- |
lower than 55 Hz/85 Hz/120 Hz are sent to the subwoofer. |
|
|
|
|
|
pass filter) |
|
|
|
|
|
|
SUB.W LEVEL *6 |
00 — 08 [08]: Adjusts the subwoofer output level. |
|
|
|
|
|
(Subwoofer level) |
|
|
|
|
|
AUDIO |
HPF *6 |
LOW 100Hz/MID 120Hz/HIGH 150Hz: Activates the High Pass Filter. |
|
|
|
|
(High-pass filter) |
Audio signal with frequencies lower than 100 Hz/120 Hz/150 Hz are cut off |
|
|
||
|
|
from the front/rear speakers. |
|
|
||
|
|
[OFF]: Deactivates. (All signals are sent to the front/rear speakers.) |
|
|
||
|
|
BEEP |
[ON]/OFF: Activates or deactivates the keypress tone. |
|
|
|
|
|
(Keytouch tone) |
|
|
|
|
|
|
TEL MUTING *7 |
ON: Mutes the sounds while using the cellular phone (not connected |
|
|
|
|
|
(Telephone |
through KS-BTA100). |
|
|
|
|
|
muting) |
[OFF]: Cancels. |
|
|
|
|
|
AMP GAIN *8 |
LOW POWER: VOLUME 00 — VOLUME 30 (Select if the maximum power of |
|
|
|
|
|
(Amplifier gain) |
each speaker is less than 50 W to prevent damaging the speakers.) |
|
|
|
|
|
|
[HIGH POWER]: VOLUME 00 — VOLUME 50 |
|
|
|
|
|
SSM |
For settings, |
page 6. (Displayed only when the source is “FM”.) |
|
|
|
|
MONO |
Displayed only when the source is “FM”. |
|
|
|
|
|
(Monaural mode) |
[MONO OFF]: Enables stereo FM reception. |
|
|
|
|
TUNER |
|
MONO ON: Improves the FM reception but stereo effect will be lost. |
|
|
|
|
IF BAND |
[AUTO]: Increases the tuner selectivity to reduce interference noises |
|
|
||
|
|
|
|
|||
|
|
(Intermediate |
between adjacent stations. (Stereo effect may be lost.) |
|
|
|
|
|
frequency band) |
WIDE: Subject to interference noises from adjacent stations, but sound |
|
|
|
|
|
|
|
|||
|
|
|
quality will not be degraded and the stereo effect will remain. |
|
|
|
|
|
RADIO TIMER |
For settings, |
page 6. |
|
|
|
IPOD SWITCH |
[HEAD MODE]/IPOD MODE/EXT MODE: |
|
|
||
|
(iPod/iPhone control) |
For settings, |
page 8. (Displayed only when the source is “USB-IPOD”.) |
|
|
|
|
|
|
(KD-R536 only) |
|
|
|
|
|
AM *9 |
[ON]/OFF: Enables or disables “AM” in source selection. |
|
|
|
|
SELECT |
F-AUX *9 |
[ON]/OFF: Enables or disables “F-AUX” in source selection. |
|
|
|
|
(Front auxiliary |
|
|
|
|
|
|
|
input) |
|
|
|
|
|
SRC |
R-AUX *9 |
ON/OFF: Enables or disables “R-AUX” in source selection. |
|
|
|
|
(Rear auxiliary |
[BT ADAPTER]: Select if the rear auxiliary input jack is connected to the |
|
|
||
|
|
input) |
Bluetooth adapter, KS-BTA100 ( page 9). The source name will be |
|
|
|
|
|
|
changed to “BT AUDIO”. |
|
|
|
*5 Displayed only when <L/O MODE> is set to <SUB.W>. *6 Displayed only when <SUB.W> is set to <ON>.
*7 This setting does not work if <BT ADAPTER> is selected for <R-AUX> of <SRC SELECT>. *8 The volume level automatically changes to “VOLUME 30” if you change to <LOW POWER>
with the volume level set to higher than “VOLUME 30”.
*9 Displayed only when the unit is in any source other than the corresponding source “AM/ F-AUX/R-AUX/BT AUDIO”.
ENGLISH | 13

Additionalformatiinformation
About discs
This unit can only play the following CDs:
This unit can play back multi-session discs; however, unclosed sessions will be skipped during playback.
 Unplayable discs
Discs that are not round.
Discs with coloring on the recording surface or discs that are dirty.
Recordable/ReWritable disc that has not been finalized. (For details on disc finalization, refer to your disc writing software and your disc recorder instruction manual.)
8 cm (3 inch) CD. Attempting to insert using an adapter can cause malfunction. There may also be problems ejecting the disc if inserted.
 Handling discs
Do not touch the recording surface of the disc.
Do not stick tape etc. on the disc, or use a disc with tape stuck on it.
Do not use any accessories for the disc.
Clean from the center of the disc and move outwards.
Clean the disc with a dry silicon or soft cloth. Do not use any solvents.
When removing discs from this unit, pull them out horizontally.
Remove any burrs from the center hole and disc edge before inserting a disc.
 DualDisc playback
The Non-DVD side of a “DualDisc” does not comply with the “Compact Disc Digital Audio” standard. Therefore, the use of Non-DVD side of a DualDisc on this product may not be recommended.
About audio files
 Playable files
File extensions: MP3(.mp3), WMA(.wma)
Bit rate:
MP3: 8 kbps - 320 kbps WMA: 32 kbps - 192 kbps
Sampling frequency:
MP3: 48 kHz, 44.1 kHz, 32 kHz, 24 kHz, 22.05 kHz, 16 kHz, 12 kHz, 11.025 kHz, 8 kHz WMA: 48 kHz, 44.1 kHz, 32 kHz
Variable bit rate (VBR) files. (The elapsed time for VBR files will not be displayed correctly.)
 Unplayable files
MP3 files:
-encoded in MP3i and MP3 PRO format
-encoded in an inappropriate format
-encoded with Layer 1/2
WMA files:
-encoded in lossless, professional, and voice format
-not based upon Windows Media® Audio
-copy-protected with DRM
Files which include data such as AIFF, ATRAC3, etc.
 Maximum number of characters for file/folder name
Varies depending on the disc format used (includes 4 extension characters—<.mp3> or <.wma>).
ISO 9660 Level 1 and 2: 64 characters
Romeo: 64 characters
Joliet: 32 characters
Windows long file name: 64 characters
 Others
This unit can show WMA Tag and ID3 Tag Version 1.0/1.1/2.2/2.3/2.4 (for MP3).
The search function works but search speed is not constant.
14 | ENGLISH

About USB device
When connecting a USB cable, use the USB 2.0 cable.
You cannot connect a computer or portable HDD to the USB input terminal of the unit.
Connect only one USB device to the unit at a time. Do not use a USB hub.
USB devices equipped with special functions such as data security functions cannot be used with the unit.
Do not use a USB device with 2 or more partitions.
This unit cannot recognize a USB device whose rating is other than 5 V and exceeds 1 A.
This unit may not recognize a memory card inserted into the USB card reader.
This unit may not play back files in a USB device properly when using a USB extension cord.
Depending on the shape of the USB devices and connection ports, some USB devices may not be attached properly or the connection might be loose.
Operation and power supply may not work as intended for some USB devices.
The maximum number of characters for:
–Folder names: 63 characters
–File names: 63 characters
–MP3 Tag: 60 characters
–WMA Tag: 60 characters
This unit can recognize a total of 65 025 files, 255 folders (255 files per folder including folder without unsupported files), and of 8 hierarchies.
 Cautions
Do not pull out and attach the USB device repeatedly while “READING” is shown on the display.
Electrostatic shock at connecting a USB device may cause abnormal playback of the device. In this case, disconnect the USB device then reset this unit and the USB device.
Do not leave a USB device in the car, expose to direct sunlight, or high temperature. Failure to do so may result in deformation or cause damages to the device.
Additional information
About iPod/iPhone
iPod/iPhone that can be connected to this unit:
-iPod touch (4th generation)
-iPod touch (3rd generation)
-iPod touch (2nd generation)
-iPod touch (1st generation)
-iPod classic
-iPod with video (5th generation)*
-iPod nano (6th generation)
-iPod nano (5th generation)
-iPod nano (4th generation)
-iPod nano (3rd generation)
-iPod nano (2nd generation)
-iPod nano (1st generation)*
-iPhone 4S
-iPhone 4
-iPhone 3GS
-iPhone 3G
-iPhone
*<IPOD MODE>/<EXT MODE> are not applicable.
It is not possible to browse video files on the “Videos” menu in <HEAD MODE>.
The song order displayed on the selection menu of this unit may differ from that of the iPod.
When operating an iPod/iPhone, some operations may not be performed correctly or as intended. In this case, visit the following JVC website: <http://www3.jvckenwood.com/english/car/ index.html> (English website only).
Trademark and license notice
Microsoft and Windows Media are either registered trademarks or trademarks of Microsoft Corporation in the United States and/or other countries.
“Made for iPod” and “Made for iPhone” mean that an electronic accessory has been designed to connect specifically to iPod, or iPhone, respectively, and has been certified by the developer to meet Apple performance standards. Apple is not responsible for the operation of this device or its compliance with safety and regulatory standards. Please note that the use of this accessory with iPod, or iPhone may affect wireless performance.
iPhone, iPod, iPod classic, iPod nano, and iPod touch are trademarks of Apple Inc., registered in the U.S. and other countries.
ENGLISH | 15

Troubleshooting
|
|
|
Symptom |
|
Remedy/Cause |
|
|
|
|
General |
|
|
|
|
|
|
|
|
|
|
|
|
|
No sound, sound interrupted or |
Check the cords, antenna and cable connections. |
||
|
|
|
||||
|
|
|
static noise. |
Check the condition of the disc, connected device and |
||
|
|
|
|
recorded tracks. |
|
|
|
|
|
“MISWIRING CHK WIRING THEN |
Ensure the terminals of the speaker leads are properly insulated |
||
|
|
|
RESET UNIT”/“WARNING CHK |
with tape before resetting the unit. ( |
page 2) |
|
|
|
|
WIRING THEN RESET UNIT” |
If the message does not disappear, consult your JVC car audio |
||
|
|
|
appears on the display and no |
dealer or kits supplying company. |
|
|
|
|
|
operations can be done. |
|
|
|
|
|
|
|
|
|
|
|
|
|
The unit does not work at all. |
Reset the unit. ( |
page 2) |
|
|
|
|
|
|
|
|
|
|
|
Source cannot be selected. |
Check the <SRC SELECT> setting. ( |
page 13) |
|
|
|
|
|
|
||
|
|
|
The correct characters are not |
This unit can only display letters (upper case), numbers, and a |
||
|
|
|
displayed (e.g. album name). |
limited number of symbols. |
|
|
|
|
|
|
|
|
|
|
|
|
FM/AM |
|
|
|
|
|
|
|
|
|
|
|
|
|
SSM automatic presetting does |
Store stations manually. |
|
|
|
|
|
not work. |
|
|
|
|
|
|
|
|
|
|
|
|
|
CD/USB/iPod/iPhone |
|
|
|
|
|
|
|
|
||
|
|
|
“PLEASE” and “EJECT” appear |
Press [ ], then insert the disc correctly. |
||
|
|
|
alternately on the display. |
|
|
|
|
|
|
“IN DISC” appears on the display. |
The disc cannot be ejected properly. Make sure nothing is |
||
|
|
|
|
blocking the loading slot. |
|
|
|
|
|
“READING” keeps flashing on the |
A longer readout time is required. Do not use too many |
||
|
|
|
display. |
hierarchical levels and folders. |
|
|
|
|
|
|
Reload the disc or reattach the USB device. |
||
|
|
|
Tracks/folders are not played |
The playback order is determined by the file name (USB) or the |
||
|
|
|
back in the order you have |
order in which files were recorded (disc). |
||
|
|
|
intended. |
|
|
|
|
|
|
The elapsed playing time is not |
This sometimes occurs during playback. This is caused by how |
||
|
|
|
correct. |
the tracks are recorded on the disc. |
|
|
|
|
|
|
|
||
|
|
|
“NOT SUPPORT” appears on the |
Check whether the track is a playable file format. |
||
|
|
|
display and track skips. |
|
|
|
|
|
|
|
|
||
|
|
|
“CANNOT PLAY” flashes on |
Check whether the connected device is compatible with this |
||
|
|
|
the display. |
unit. (USB: |
page 17) (iPod/iPhone: page 15) |
|
|
|
|
The unit cannot detect the |
Ensure that the device contains files in the supported |
||
|
|
|
connected device. |
formats. ( page 14) |
|
|
|
|
|
|
Reattach the device. |
|
|
|
|
|
The iPod/iPhone does not turn |
Check the connection between this unit and iPod/iPhone. |
||
|
|
|
on or does not work. |
Detach and reset the iPod/iPhone using hard reset. For |
||
|
|
|
(For KD-R536 only.) |
details on resetting the iPod/iPhone, refer to the instruction |
||
|
|
|
|
manual supplied with the iPod/iPhone. |
||
Check whether <IPOD SWITCH> setting is appropriate. ( page 8)
.
Having TROUBLE with operation?
Please reset your unit. Refer to page of How to reset your unit.
16 | ENGLISH

|
Specifications |
Specifications |
|
|
|||
|
|
AUDIO AMPLIFIER SECTION |
|
|
|
|
|
|
|
|
|
|
|
||
|
|
|
|
|
|
||
|
|
|
|
|
|
|
|
|
Maximum Power Output |
50 W per channel |
|
|
|
||
|
Continuous Power Output (RMS) |
20 W per channel into 4Ω, 40 Hz to 20 000 Hz at |
|
|
|||
|
|
|
|||||
|
|
|
|
less than 1% total harmonic distortion. |
|
|
|
|
Load Impedance |
|
4Ω (4Ω to 8Ω allowance) |
|
|
|
|
|
Frequency Response |
40 Hz to 20 000 Hz |
|
|
|
||
|
Signal-to-Noise Ratio |
70 dB |
|
|
|
||
|
Line-Out, Subwoofer-Out Level/Impedance |
4.8 V/20 kΩ load (full scale) |
|
|
|
||
|
Output Impedance |
|
≤ 600Ω |
|
|
||
|
|
TUNER SECTION |
|
|
|
|
|
|
|
|
|
|
|
||
|
|
|
|
|
|
||
|
|
|
|
|
|
|
|
|
FM |
Frequency Range |
87.5 MHz to 108.0 MHz |
|
|
|
|
|
|
|
Usable Sensitivity |
9.3 dBf (0.8 μV/75Ω) |
|
|
|
|
|
|
50 dB Quieting Sensitivity |
16.3 dBf (1.8 μV/75Ω) |
|
|
|
|
|
|
Alternate Channel |
65 dB |
|
|
|
|
|
|
Selectivity (400 kHz) |
|
|
|
|
|
|
|
Frequency Response |
40 Hz to 15 000 Hz |
|
|
|
|
|
|
Stereo Separation |
40 dB |
|
|
|
|
AM |
Frequency Range |
531 kHz to 1 611 kHz |
|
|
|
|
|
|
|
Sensitivity/Selectivity |
20 μV/40 dB |
|
|
|
|
|
CD PLAYER SECTION |
|
|
|
|
|
|
|
|
|
|
|
||
|
|
|
|
|
|
||
|
|
|
|
|
|
|
|
|
Signal Detection System |
Non-contact optical pickup (semiconductor |
|
|
|||
|
|
|
|
laser) |
|
|
|
|
Number of Channels |
2 channels (stereo) |
|
|
|
||
|
Frequency Response |
5 Hz to 20 000 Hz |
|
|
|
||
|
Signal-to-Noise Ratio |
98 dB |
|
|
|
||
|
Wow and Flutter |
|
Less than measurable limit |
|
|
||
|
|
USB SECTION |
|
|
|
|
|
|
|
|
|
|
|
||
|
|
|
|
|
|
||
|
|
|
|
|
|
|
|
|
USB Standard |
|
USB 1.1, USB 2.0 |
|
|
|
|
|
Data Transfer Rate (Full Speed) |
Max. 12 Mbps |
|
|
|
||
|
Compatible Device |
|
Mass storage class |
|
|
|
|
|
Compatible File System |
FAT 32/16/12 |
|
|
|
||
|
Playable Audio Format |
MP3/WMA |
|
|
|
||
|
Maximum Supply Current |
DC 5 V " 1 A |
|
|
|||
|
|
GENERAL |
|
|
|
|
|
|
|
|
|
|
|
|
|
|
|
|
|
|
|
|
|
|
|
|
|
|
|
||
|
Power Requirement (Operating Voltage) |
DC 14.4 V (11 V to 16 V allowance) |
|
|
|
||
|
Grounding System |
|
Negative ground |
|
|
|
|
|
Allowable Operating Temperature |
0°C to +40°C |
|
|
|
||
|
Dimensions |
Installation Size |
approx. 182 mm × 52 mm × 158 mm |
|
|
|
|
|
(W × H × D) |
Panel Size |
approx. 188 mm × 59 mm × 14 mm |
|
|
||
|
Mass |
|
1.2 kJ (excluding accessories) |
|
|
|
|
Subject to changes without notice.
ENGLISH | 17
Благодарим Вас за приобретение изделия JVC.
Перед тем, как приступать к эксплуатации, пожалуйста, внимательно прочитайте все инструкции с тем, чтобы полностью изучить и обеспечить оптимальную работу этого устройства.
 ВАЖНО ДЛЯ ЛАЗЕРНОЙ АППАРАТУРЫ
1.ЛАЗЕРНАЯ АППАРАТУРА КЛАССА 1
2.ПРЕДУПРЕЖДЕНИЕ: Не открывайте верхнюю крышку. Внутри устройства нет частей, которые
пользователь может отремонтировать. Ремонт должен осуществляться квалифицированным обслуживающим персоналом.
3. ПРЕДУПРЕЖДЕНИЕ: В открытом состоянии происходит видимое и/или невидимое излучение лазера класса 1M. Не смотрите непосредственно в оптические инструменты.
4. ЭТИКЕТКА: ПРЕДУПРЕЖДАЮЩАЯ ЭТИКЕТКА, РАЗМЕЩЕННАЯ НА НАРУЖНОЙ СТОРОНЕ УСТРОЙСТВА.
[только Европейсий Союз]
 Предупреждение:
Остановите автомобиль перед началом работы с устройством.
 Предостережение:
Отрегулируйте громкость таким образом, чтобы слышать звуки за пределами автомобиля. Слишком высокая громкость во время вождения может стать причиной аварии.
Не используйте устройство USB или iPod/iPhone, если это может отрицательно повлиять на безопасность вождения.
 Предостережение, касающееся настройки громкости:
По сравнению с другими источниками воспроизведения цифровые устройства (CD/USB) создают незначительный шум. Уменьшите громкость перед воспроизведением, чтобы предотвратить повреждение динамиков из-за внезапного повышения уровня громкости на выходе.
 Температура внутри автомобиля:
Если Вы припарковали Ваш автомобиль на длительное время в жаркую или холодную погоду, перед тем, как включать это устройство, подождите до тех пор, пока температура в автомобиле не придет в норму.
 Конденсация:
Если автомобиль оборудован установкой для кондиционирования воздуха, возможна конденсация влаги на оптической линзе. Это может приводить к ошибкам при чтении диска. В этом случае извлеките
диск и дождитесь испарения влаги.
.
Как перенастроить Ваше устройство
Запрограммированные настройки будут также удалены.
Обслуживание
 Очистка устройства
В случае загрязнения протрите панель сухой силиконовой или иной мягкой тканью. Несоблюдение данной меры предосторожности может привести к повреждению устройства.
 Очистка разъемов
В случае загрязнения очищайте разъемы устройства и панели. С помощью хлопчатобумажной ткани или салфетки.
 Как читать это руководство:
Данное руководство описывает операции с использованием кнопок, расположенных на панели управления.
< > указывает на отображения на панели управления.
[XX] указывает на изначальную настройку элемента меню.
2 | РУCCKИЙ

Пульт дистанционного управления
Выполняется подготовка
При использовании пульта дистанционного управления в первый раз снимите изоляционный материал.
Изоляционный материал 

Замена литиевой батареитаблетки
При уменьшении эффективности пульта дистанционного управления замените батарею.
CR2025
 Предостережение:
При неправильной замене аккумуляторных батарей существует опасность взрыва. При замене следует использовать батареи того же типа или их эквиваленты.
Батарейки необходимо предохранять от чрезмерного нагревания, например, воздействия лрямого солнечного света, открытого огня и проч.
 Предупреждение:
Устанавливайте только аккумуляторную батарею CR2025 или эквивалентную ей.
Не оставляйте пульт дистанционного управления в местах, подверженных длительному воздействию прямых солнечных лучей (например на приборной панели).
Храните аккумуляторную батарею в недоступном для детей месте.
Не перезаряжайте, не укорачивайте, не разбирайте и не нагревайте батарею, а также не подвергайте ее воздействию огня.
Не оставляйте аккумуляторную батарею рядом с другими металлическими материалами.
Не разбирайте аккумуляторную батарею с помощью пинцета или аналогичного инструмента.
Изолируйте батарею при утилизации или хранении, обмотав ее изоляционной лентой.
KD-R536 поставляется с функцией рулевого пульта дистанционного управления. Дополнительную информацию см. также в инструкциях, прилагаемых к адаптеру пульта дистанционного управления.
Cодержание |
|
Пульт дистанционного управления |
.......... 3 |
Подготовка ........................................................... |
4 |
Отмена демонстрации функций дисплея |
|
Настройка часов |
|
Основные операции ........................................ |
4 |
Радио ....................................................................... |
6 |
CD/USB .................................................................... |
7 |
iPod/iPhone (только KD-R536) ........................... |
8 |
Внешние компоненты ..................................... |
9 |
Bluetooth ............................................................. |
9 |
Регулировка цвета подсветки |
|
(только KD-R536) .................................................. |
10 |
Регулировка яркости ..................................... |
11 |
Регулировка звука .......................................... |
11 |
Операции с меню ............................................ |
12 |
Дополнительная информация .................. |
14 |
Устранение проблем ..................................... |
16 |
Технические характеристики .................... |
17 |
Подключение и отключение панели управления
Принудительное извлечение диска
 (Удерживать)
Будьте осторожны, не уроните диск при извлечении.
Если это не поможет, попробуйте перенастроить приемник.
РУCCKИЙ | 3

Подготовка
Отмена демонстрации функций дисплея
Демонстрация отображения включена всегда, до тех пор, пока она не будет отменена.
1


 (Удерживать)
2
(Начальная настройка)
3 Выберите <DEMO OFF>.
4 Нажмите MENU, чтобы выйти.
Основные операции
 Сведения об отображении
Настройка часов
1


 (Удерживать)
2 Выберите <CLOCK>.
3 Выберите <CLOCK SET>.
4 Установите час.
5 Установите минуты.
6 Нажмите MENU, чтобы выйти.
Изменение отображаемой информации. (нажмите)  Прокрутка текущей информации отображения. (Удерживать)
|
Источник |
Отображение |
|
Радио |
Частота ) Часы |
|
CD/USB |
Название альбома/исполнитель* - Название дорожки* - № |
|
iPod/iPhone (HEAD MODE/ |
дорожки/время воспроизведения - Часы - (возврат в начало) |
|
IPOD MODE) *1 |
* Надпись “NO NAME” появляется для обычных компакт-дисков |
|
|
или компакт-дисков без записи. |
|
iPod/iPhone (EXT MODE) *1 |
EXT MODE ) Часы |
|
Внешние компоненты |
F-AUX или R-AUX ) Часы |
|
(AUX) |
|
|
Аудио Bluetooth |
BT AUDIO ) Часы |
*1 Только для модели KD-R536.
4 | РУCCKИЙ
|
|
Основные операции |
Панель управления |
|
Пульт дистанционного |
Диск управления |
Окно дисплея |
управления |
Загрузочный отсек |
Извлеките диск |
|
|
|
|
|
|
|
|
|
|
|
|
|
|
|
|
|
|
|
|
|
|
|
|
|
|
|
|
|
Отсоединение панели |
Передний входной разъем AUX |
|
||||
|
Телеметрический датчик |
Входной USB-разъем |
|
|||
 НЕ подвергайте его воздействию прямых солнечных лучей.
При нажатии и удерживании следующих кнопок...
|
Панель |
Пульт |
|
|
|
|
|
|
дистанционного |
|
|
Общая функция |
|||
|
управления |
|
|
||||
|
управления |
|
|
|
|
|
|
|
|
|
|
|
|
|
|
|
|
|
Включение. |
|
|
|
|
|
|
— |
Выключение питания. (Удерживать) |
||||
|
/SOURCE |
Нажмите кнопку /SOURCE на панели управления и |
|||||
|
|
|
поверните колесо управления в течение двух секунд, |
||||
|
|
|
|
||||
|
|
|
|
чтобы выбрать источник. |
|
|
|
|
|
SOURCE |
Нажмите несколько раз, чтобы выбрать источник. |
|
|||
|
Диск |
VOL - / + |
Настройка уровня звука. |
|
|
||
|
управления |
— |
Выбор элементов. |
|
|
|
|
|
(переверните) |
|
|
|
|||
|
|
|
|
|
|
|
|
|
|
|
Отключает звук или приостанавливает |
|
|||
|
Диск |
|
|
воспроизведение. |
|
|
|
|
управления |
|
Нажмите кнопку еще раз для включения звука или |
||||
|
(нажмите) |
|
|
возобновления воспроизведения. |
|||
|
|
— |
Подтверждение выбора. |
|
|
||
|
|
— |
Напрямую осуществляет вход в меню <BRIGHTNESS>. |
|
|||
|
(только KD-R436/KD-R435) ( |
стр. 11) |
|||||
|
|
|
|||||
|
iPod |
— |
Переключает на источник iPod. (Только KD-R536) |
|
|||
|
Кнопки с |
|
Выбирает запрограммированные станции. |
|
|||
|
цифрами |
— |
Сохраняет текущую станцию на выбранную цифровую |
||||
(1 - 6) |
|
|
кнопку. (Удерживать) ( |
стр. 6) |
|||
|
EQ |
SOUND |
Осуществляет выбор запрограммированного режима |
|
|||
|
звучания. ( стр. 11) |
|
|
|
|||
|
|
|
|
|
|
||
|
|
— |
Возврат к предыдущему меню. |
|
|||
|
Осуществляет выход из меню. (Удерживать) |
||||||
|
|
|
|||||
|
|
|
Осуществляет выбор запрограммированной |
|
|||
/ |
/ |
|
радиостанции. ( |
стр. 6) |
|
|
|
|
|
|
|
Осуществляет выбор папки MP3/WMA. ( стр. 7) |
|||
|
|
|
|
||||
|
|
|
Автоматически осуществляет поиск радиостанции. |
|
|||
|
|
|
|
( стр. 6) |
|
|
|
|
|
|
Осуществляет поиск радиостанции в ручном режиме. |
||||
/ |
/ |
|
(Удерживать) |
стр. 7, 8) |
|||
|
|
|
|
Выбор дорожки. ( |
|||
|
|
|
Быстрая перемотка дорожки вперед или назад. |
||||
|
|
|
|
(Удерживать) |
|
|
|
РУCCKИЙ | 5
Радио
Поиск радиостанции
B A
Bыберите <FM> или <AM>.
Автоматический поиск. (нажмите) Ручной поиск. (Удерживать)
После того как замигает надпись “M”, повторно нажимайте кнопку.
Индикатор “ST” загорается при приеме стереосигнала FM-трансляции достаточного уровня.
Сохранение радиостанций в памяти
 Программирование вручную
Можно сохранить 18 FM-радиостанций и 6 AMрадиостанций.
При прослушивании радиостанции...
 (Удерживать)
Запрограмированный номер мигает, и отображается надпись “MEMORY”. Текущая станция сохранена на выбранную цифровую кнопку (1 - 6).
- - - - - - - - или - - - - - - - -
1
 (Удерживать)
Мигает надпись “PRESET MODE”.
2 Выбор запрограммированного номера.
Запрограмированный номер мигает, и отображается надпись “MEMORY”.
 Автоматическое программирование (только FM)
SSM (Strong-station Sequential Memory
— последовательная память для радиостанций с устойчивым сигналом)
Можно запрограммировать до 18 радиостанций FM.
1  (Удерживать)
2 |
-<TUNER> |
|
-<SSM> |
|
-<SSM 01 – 06> |
Мигает надпись “SSM”. Когда все радиостанции будут сохранены, “SSM” перестанет мигать.
Чтобы запрограммировать <SSM 07 – 12>/ <SSM 13 – 18>, повторите действия 1 и 2.
Выбор запрограммированной радиостанции
- - - - - - - - или - - - - - - - -
Выбрать запрограммированную радиостанцию можно также с помощью / .
Установка таймера на радио
Вы можете включить запрограммированную радиостанцию в определенное время вне зависимости от текущего источника.
1 |
(Удерживать) |
|
|
2 |
-<TUNER> |
|
-<RADIO TIMER> |
|
-<OFF>/<ONCE>/ |
[OFF] |
<DAILY> |
Отменяет таймер радио. |
|
ONCE |
Активирует один раз. |
DAILY |
Активирует ежедневно. |
3 Выберите запрограммированную радиостанцию.
-<FM>/<AM> -<01> ... <18> для FM/
<01> ... <06> для AM
4 Установите время активации.
5Нажмите MENU, чтобы выйти.
загорается по завершении установки таймера радио.
Можно установить только один таймер. Установка нового таймера автоматически отменит предыдущую настройку.
Таймер радио не будет активирован, если изделие выключено, или если <AM> установлено на <OFF> после выбора радиостанции AM для таймера.
6 | РУCCKИЙ
CD/USB |
CD/USB |
Воспроизведение CD/USB-устройства |
|
Сторона с ярлыком |
Входной USB-разъем |
|
Кабель USB 2.0 (не входит |
|
в комплект поставки) |
Источник сменяется на “CD” и начинается воспроизведение.
Источник сменяется на “USB” и начинается воспроизведение.
Данное устройство может воспроизводить файлы формата MP3 и WMA, сохраненные на диски CD-R, CD-RW, а также на запоминающее устройство USB большой емкости (такое как USB-память и цифровой аудиопроигрыватель).
Убедитесь в том, что созданы резервные копии всех важных данных. Мы не несем ответственности за любую потерю данных на запоминающем устройстве USB большой емкости во время использования данной системы.
Извлеченный диск будет загружен заново, если его не вынуть в течение 15 секунд.
|
Если не удается извлечь диск, стр. 3. |
Выбор папки/дорожки
Выбирает папку. (Для MP3/WMA)
Выбор дорожки. (нажмите)
Быстрая перемотка дорожки вперед или назад. (Удерживать)
Выбор папки/дорожки в списке
1 
2 Выберите папку.
(Для MP3/WMA)
3Выберите дорожку.
Для MP3/WMA
Если на диске содержится много папок или дорожек, можно выполнить быстрый поиск нужной папки или дорожки, быстро вращая колесо управления.
Выбор режимов воспроизведения
В одно и то же время возможен выбор только одного из следующих режимов воспроизведения.
1 |
Нажмите 1 для REPEAT. |
|
Нажмите 2 для RANDOM. |
|
Нажмите еще раз, |
|
чтобы выйти. |
-- - - - - - - или - - - - - - - -
 (Удерживать)

<REPEAT>)<RANDOM>
2
REPEAT
|
RPT OFF |
Отменяет повторное |
|
воспроизведение. |
|
|
|
|
|
TRACK RPT |
Повтор текущей дорожки. |
|
FOLDER RPT * |
Повтор текущей папки. |
RANDOM |
|
|
|
RND OFF |
Отменяет произвольное |
|
воспроизведение. |
|
|
|
|
|
|
Произвольное |
|
FOLDER RND * |
воспроизведение всех |
|
дорожек текущей папки, а |
|
|
|
|
|
|
затем дорожек других папок. |
|
|
Произвольное |
|
ALL RND |
воспроизведение всех |
|
|
дорожек. |
* Для MP3/WMA
РУCCKИЙ | 7
iPod/iPhone
Только KD-R536
Воспроизведение iPod/iPhone
Входной USB-разъем
 Кабель USB 2.0 (дополнительная принадлежность для iPod или iPhone)
Источник сменяется на “USB” - “USB-IPOD” и начинается воспроизведение.
Выбор режима управления
|
|
#<HEAD MODE>/<IPOD MODE>/ |
|
|
<EXT MODE> |
|
|
|
|
HEAD |
Управление воспроизведением |
|
MODE |
iPod через устройство. |
|
IPOD |
Управление воспроизведением |
|
MODE |
iPod через проигрыватель iPod |
|
|
или iPhone. |
|
EXT |
Позволяет любые аудиосигналы с |
|
MODE |
iPod/iPhone. |
Вы также можете сменить настройку с помощью <IPOD SWITCH> в меню.
Выбор дорожки
Применимо только под <HEAD MODE/IPOD MODE>.
Выбор дорожки или раздела. (нажмите)
Быстрая перемотка дорожки вперед или назад. (Удерживать)
Выбор дорожки из списка
Применимо только под <HEAD MODE>.
1 
2 Выберите желаемый список.
PLAYLISTS)ARTISTS)ALBUMS)SONGS) PODCASTS)GENRES)COMPOSERS) (возврат в начало)
3 Выберите необходимую дорожку.
Повторяйте это действие до тех пор, пока не будет выбрана необходимая дорожка.
Если в выбранном меню содержится много дорожек, можно выполнить быстрый поиск нужной дорожки, быстро вращая колесо управления.
Выбор режимов воспроизведения
Применимо только под <HEAD MODE>.
В одно и то же время возможен выбор только одного из следующих режимов воспроизведения.
1 |
Нажмите 1 для REPEAT. |
|
Нажмите 2 для RANDOM. |
|
Нажмите еще раз, |
|
чтобы выйти. |
-- - - - - - - или - - - - - - - -
 (Удерживать)

<REPEAT>)<RANDOM>
2
REPEAT
|
ONE RPT |
Функции, аналогичные функции |
|
“Repeat One” проигрывателя iPod. |
|
|
|
|
|
ALL RPT |
Функции, аналогичные функции |
|
“Repeat All” проигрывателя iPod. |
|
|
|
|
RANDOM |
|
|
|
RND OFF |
Отменяет произвольное |
|
воспроизведение. |
|
|
|
|
|
SONG RND |
Функции, аналогичные функции |
|
“Shuffle Songs” проигрывателя iPod. |
|
|
|
|
|
ALBUM RND |
Функции, аналогичные функции |
|
“Shuffle Albums” проигрывателя iPod. |
|
|
|
|
“ALBUM RND” не применимо для некоторых iPod/iPhone.
8 | РУCCKИЙ

Внешние компоненты |
Внешние компоненты |
Дополнительную информацию см. также в инструкциях, прилагаемых к внешним устройствам.
Воспроизведение внешнего компонента с переднего/заднего разъема AUX
Мини-стереоразъем 3,5 мм (не входит в комплект поставки)
Портативный аудиопроигрыватель и т. д.


 Мини-стереоразъем
3,5 мм (с L-образным
соединителем) (не входит в комплект поставки)
1Подключите к F-AUX на панели управления и/или R-AUX на задней панели.
2 Установите необходимый источник.
 (Удерживать)
.
-<SRC SELECT> -<F-AUX>/<R-AUX>
-<F-AUX ON> или <R-AUX ON>
Нажмите MENU, чтобы выйти. 3 Bыберите <F-AUX> или <R-AUX>.
4Включите подключенное устройство и начните воспроизведение звука с его помощью.
Рекомендуется использовать мини-стереоразъем с 3 контактами для обеспечения оптимального качества выходного аудиосигнала. В противном случает звук может прерываться или быть нечетким при прослушивании внешнего компонента.
Bluetooth
Для операций с Bluetooth необходимо подключить адаптер Bluetooth, KS-BTA100 |
|
|
|
(продается отдельно) к дополнительному входному разъему (R-AUX/BT ADAPTER) |
KS-BTA100 |
||
на задней панели изделия. ( Pуководство по установке/подключению) |
|||
Модель KS-BTA100 доступна не во всех странах. Свяжитесь со своим торговым |
|
|
|
представителем, у которого вы купили это изделие. |
|
|
|
|
|
|
|
Набор доступных функциональных возможностей зависит от подключенного |
|
|
|
|
|
|
|
устройства Bluetooth. Дополнительную информацию см. также в инструкциях, |
|
|
|
прилагаемых к устройству. |
|
|
|
Подготовка
Дополнительную информацию о регистрации устройства Bluetooth см. в руководстве, прилагаемом к KS-BTA100.
1 Зарегистрируйте (соедините попарно) устройство Bluetooth с KS-BTA100.
2 Измените настройки <SRC SELECT> данного изделия.
(Удерживать) |
-<SRC SELECT> |
|
-<R-AUX> |
||
|
||
|
-<BT ADAPTER> |
3 Нажмите MENU, чтобы выйти.
РУCCKИЙ | 9
 Loading...