


ENGLISH
FRANÇAIS
KD-SD80BT/KD-R50
CD RECEIVER / RÉCEPTEUR CD
For canceling the display demonstration, see page 4. /
Pour annuler la démonstration des affichages, référez-vous à la page 4.
For installation and connections, refer to the separate manual.
Pour l’installation et les raccordements, se référer au manuel séparé.
INSTRUCTIONS
MANUEL D’INSTRUCTIONS
GET0799-003A
[E/EN]
Thank you for purchasing a JVC product.
Please read all instructions carefully before operation, to ensure your complete understanding and to obtain the best possible performance from the unit.
 IMPORTANT FOR LASER PRODUCTS
1.CLASS 1 LASER PRODUCT
2.CAUTION: Do not open the top cover. There are no user serviceable parts inside the unit;
leave all servicing to qualified service personnel.
3. CAUTION: Visible and/or invisible class 1M laser radiation when open. Do not view directly with optical instruments.
4. REPRODUCTION OF LABEL: CAUTION LABEL, PLACED OUTSIDE THE UNIT.
Battery
Products
Information for Users on Disposal of Old Equipment and Batteries
[European Union only]
These symbols indicate that the product and the battery with this symbol should not be disposed as general household waste at its end-of-life.
If you wish to dispose of this product and the battery, please do so in accordance with applicable national legislation or other rules in your country and municipality.
By disposing of this product correctly, you will help to conserve natural resources and will help prevent potential negative effects on the environment and human health.
Notice:
The sign Pb below the symbol for batteries
indicates that this battery contains lead.
.
.
Warning:
Stop the car before operating the unit.
 Caution:
Adjust the volume so that you can hear sounds outside the car. Driving with the volume too high may cause an accident.
Avoid using the USB or SD device or iPod/iPhone if it might hinder driving safety.
 Caution on volume setting:
Digital devices (CD/USB/SD) produce very little noise compared with other sources. Lower the volume before playing these digital sources to avoid damaging the speakers by the sudden increase of the output level.
 Temperature inside the car:
If you have parked the car for a long time in hot or cold weather, wait until the temperature in the car becomes normal before operating the unit.appears on the display and animation/text scroll will be stopped to prevent the display from being blurred when the temperature falls below 0°C. Once operating temperature is normalised, these functions will start working again.
 Condensation:
When the car is air-conditioned, moisture may collect on the laser lens. This may cause disc read errors. In this case, remove the disc and wait for the moisture to evaporate.
2 | ENGLISH
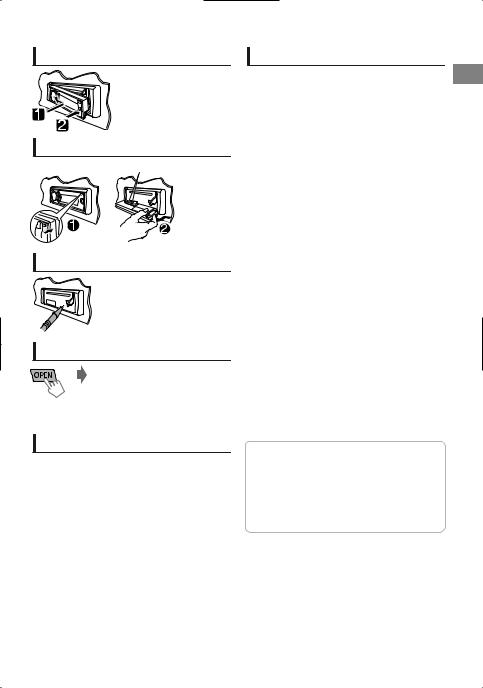
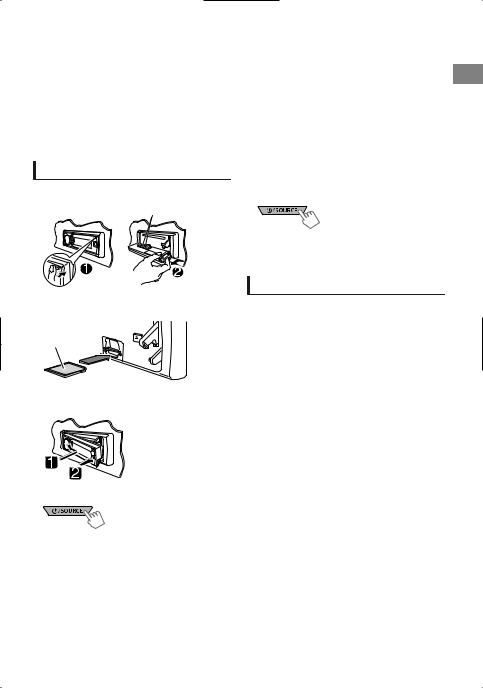
How to attach the control panel
How to detach the control panel
Avoid touching the connectors.
How to reset your unit
Your preset adjustments will also be erased.
How to forcibly eject a disc
 (Hold)
Be careful not to drop the disc when it ejects.
If this does not work, reset your unit.
Maintenance
 Cleaning the unit
Wipe off the dirt on the panel with a dry silicon or soft cloth. Failure to observe this precaution may result in damage to the unit.
 Cleaning the connector
Wipe off dirt on the connector of the unit and panel. Use a cotton swab or cloth.
Contents |
|
Preparation ............................................................ |
4 |
Canceling the display demonstration |
|
Setting the clock |
|
Basic operations ................................................... |
4 |
Radio ........................................................................ |
6 |
CD/USB .................................................................... |
8 |
SD (KD-SD80BT only) .............................................. |
9 |
iPod/iPhone .......................................................... |
10 |
Quick Search ....................................................... |
11 |
External components ...................................... |
11 |
Bluetooth connection ..................................... |
12 |
Bluetooth mobile phone ................................ |
14 |
Bluetooth audio player ................................... |
18 |
Illumination color adjustments .................... |
19 |
Brightness adjustments .................................. |
20 |
Sound adjustments .......................................... |
20 |
Menu operations ............................................... |
21 |
Remote controller ............................................... |
24 |
Additional information ................................... |
25 |
Troubleshooting ................................................ |
28 |
Specifications ..................................................... |
30 |
 How to read this manual:
This manual mainly explains operations using the buttons on the control panel.
< > indicates the displays on the control panel.
[XX] indicates the initial setting of a menu item.
ENGLISH | 3

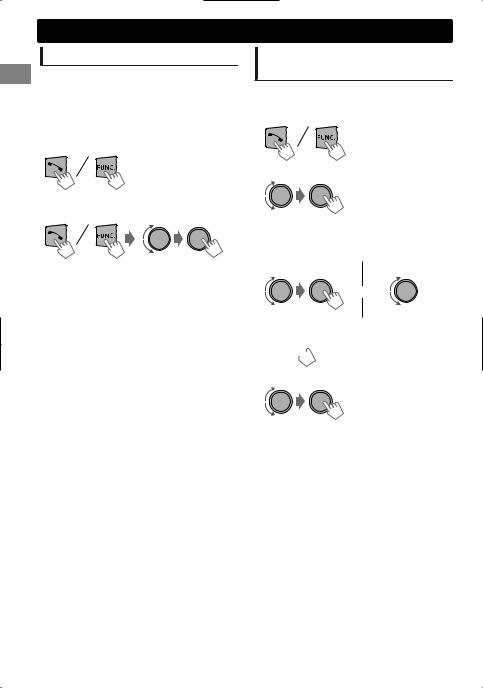
Preparation
Canceling the display demonstration
The display demonstration is always turned on unless you cancel it.
1 |
SET UP |
|
(Hold) |
|
DEMO |
|
PUSH Clock |
2 |
DEMO |
Off
On
PUSH
(Initial setting)
3 Select <Off>.
DEMO
Off
PUSH On
4 Press MENU to exit.
|
Setting the clock |
1 |
SET UP |
|
(Hold) |
|
DEMO |
|
PUSH Clock |
2 |
Select <Clock>. |
Clock
DEMO
Clock
PUSH Color
3 Select <Set Clock>.
Clock
Clock Display
Set Clock
PUSH 24/12H
4 Adjust the hour.
Set Clock
PUSH |
0 : 00 |
(Initial setting)
5 Adjust the minute.
Set Clock
PUSH |
0 : 00 |
6 Select <24H/12H>.
Clock
Set Clock
24/12H
PUSH Clock Adjust
7 Select <24Hours> or <12Hours>.
8 Press MENU to exit.
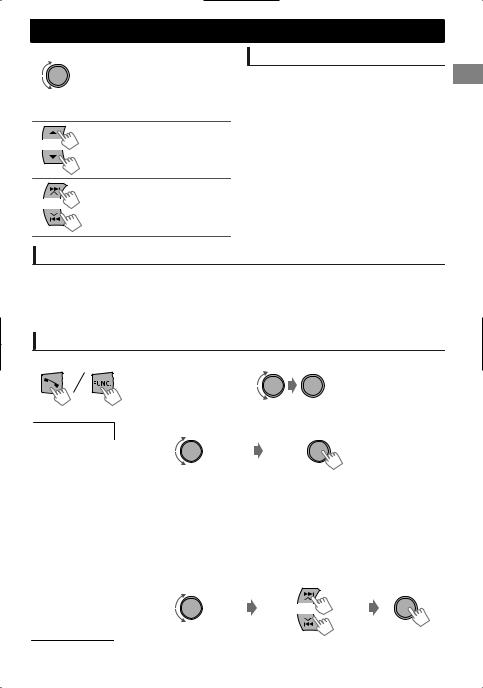
Basic operations
 Display information
Changes the display information. (Press)
 Scrolls the current display information. (Hold)
|
Source |
Display (Normal display pattern)*1 |
|
Radio |
Non-Radio Data System station: Frequency |
|
|
FM Radio Data System station: Programme type (PTY)/ |
|
|
Frequency/Station name (PS) |
|
CD/USB/SD*2/Bluetooth Audio |
Track title/Album title/Artist* |
|
|
* “No Name” appears for conventional CDs or if not |
|
iPod/iPhone (Headunit Mode/iPod |
|
|
recorded. |
|
|
Mode) |
|
|
|
|
|
iPod/iPhone (Application Mode) |
Application Mode |
|
External Components (AUX) |
Aux In |
*1 Display information varies for large font and large clock display patterns. *2 For KD-SD80BT only.
4 | ENGLISH
|
|
|
|
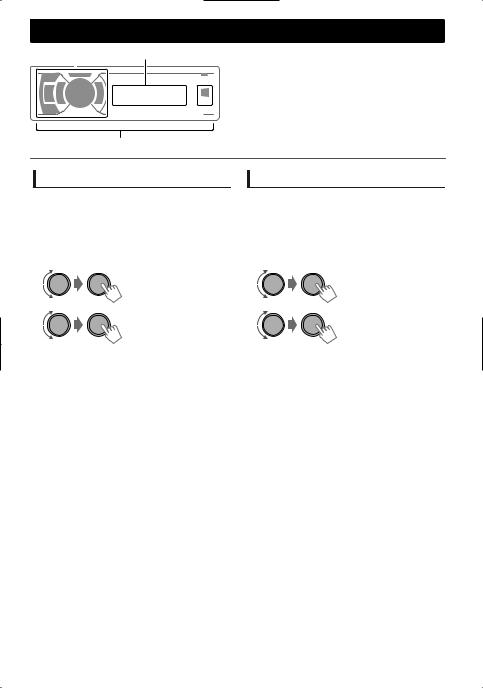
Basic operations |
|
|
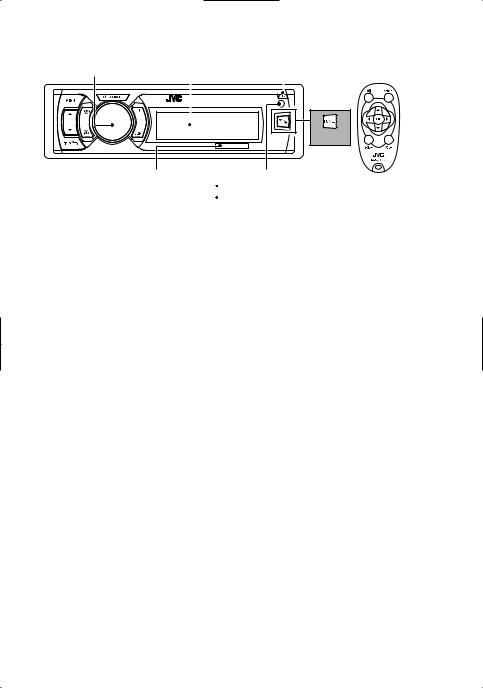
Control panel |
|
|
|
Remote controller |
|
|
Control dial |
Display window |
Flips down the panel |
|
|
||
|
|
|||||
|
|
|
|
|
|
|
|
|
|
|
|
|
|
|
|
|
|
|
|
|
|
|
|
|
|
|
|
|
KD-R50 |
KD-SD80BT |
Remote sensor |
SD card slot |
|
(KD-SD80BT only) |
Aim the remote controller directly at the sensor. |
|
DO NOT expose to bright sunlight. |
When you press or hold the following button(s)...
|
Control panel |
Remote |
|
General function |
|
|
|
controller |
|
||||
|
|
|
|
|
|
|
|
|
|
Turns on. |
|
|
|
|
|
— |
Turns off. (Hold) |
|
|
|
|
/SOURCE |
Press the /SOURCE button on the control panel and turn |
||||
|
|
|||||
|
|
|
|
the control dial within 2 seconds to select the source. |
||
|
|
SOURCE |
Press repeatedly to select the source. |
|
||
|
Control dial |
VOL - / + |
Adjusts the volume level. |
|
|
|
|
(turn) |
— |
Selects items. |
|
|
|
|
|
|
Mutes the sound or pauses playback. |
|
||
|
Control dial |
|
Press the button again to cancel muting or resume |
|||
|
(press) |
|
|
playback. |
|
|
|
|
— |
Confirms selection. |
|
|
|
|
EQ |
SOUND |
Selects the preset sound mode. ( |
page 20) |
|
|
|
|
|
|
Enters “Hands-Free” menu ( page 15), or answers |
||
|
|
— |
|
incoming call when the unit rings. |
||
|
|
Ends a call. (Hold) |
|
|
||
|
|
|
|
|
||
|
FUNC. |
— |
Enters <BRIGHTNESS> menu directly (if the USB Bluetooth |
|
||
|
Adapter* is not connected). (KD-R50 only) ( page 20) |
|||||
|
|
|
* Separately purchased. |
|
|
|
|
|
|
|
Activates/deactivates TA Standby Reception. ( page 7) |
||
|
— |
Enters PTY Search mode. (Hold) ( |
page 7) |
|||
|
|
|
Returns to the previous menu. |
|
|
|
/ |
/ |
|
Selects a preset station. ( page 6) |
|||
|
Selects MP3/WMA/WAV folder. ( |
page 8) |
||||
|
|
|
|
|||
|
|
|
|
|
|
|
|
|
|
|
Searches for a station automatically. ( page 6) |
||
/ |
/ |
Searches for a station manually. (Hold) |
||||
|
Selects track. ( page 8, 10, 18) |
|
|
|||
|
|
|
|
|
|
|
|
|
|
Fast-forwards or reverses track. (Hold) |
|
||
ENGLISH | 5

Radio
Searching for a station
B A
FM AF ST DYNAMIC 0:00
88.3 MHz
Select <FM> or <AM>.
Auto search. (Press) Manual search. (Hold)
“M” appears, then press the button repeatedly.
“ST” lights up when receiving an FM stereo broadcast with sufficient signal strength.
Storing stations in memory
 Manual presetting
You can preset up to 18 stations for FM and 6 stations for AM.
While listening to a station...
1
 (Hold)
“Preset Mode” screen appears.
2 Select preset number.
The preset number flashes.
 Auto presetting (FM only)
SSM (Strong-station Sequential Memory)
You can preset up to 18 stations for FM.
1 |
(Hold) |
|
|
2 |
-<Tuner> |
|
-<SSM> |
|
-<SSM 01 – 06> |
“SSM” appears. When all the stations are stored, “SSM” disappears.
To preset <SSM 07 – 12>/<SSM 13 – 18>, repeat steps 1 and 2.
Selecting a preset station
Setting the Radio Timer
You can tune in to a preset station at a specific time regardless of the current source.
1  (Hold)
2 |
-<Tuner> |
|
-<Radio Timer> |
|
-<Off>/<Once>/ |
|
<Daily> |
[Off] |
Cancels Radio Timer. |
Once |
Activates once. |
Daily |
Activates daily. |
3 Select the preset station. |
|
|
-<FM>/<AM> |
|
-<1> ... <18> for FM/ |
|
<1> ... <6> for AM |
4 Set the activation time.
5Press MENU to exit.
lights up after the Radio Timer has been set.
Only one timer can be set. Setting a new timer will override the previous setting.
The Radio Timer will not activate if the unit is turned off or if <AM> is set to <Hide> after selecting an AM station for the timer.
( page 23)
You can also select a preset station using / .
6 | ENGLISH

The following features are available only for FM Radio Data System stations.
Searching for your favorite Programmes—Programme Type (PTY) Search
1  (Hold)
2 Select a PTY code.
Radio
 NEWS Standby Reception
1  (Hold)
2 |
-<Tuner> |
-<News-Standby> -<On>/<Off>
The unit will temporarily switch to News Programme if available.
If the volume is adjusted during reception of Traffic Announcement or News, the adjusted volume is automatically memorized. It will be applied the next time the unit switches to Traffic Announcement or News.
PTY Search starts.
If there is a station broadcasting a programme of the same PTY code as you have selected, that station is tuned in.
|
PTY codes |
|
|
|
|
|
|
|
|||
|
News, Affairs, Info, Sport, Educate, Drama, Culture, Science, |
|
|
|
|
|
Varied, Pop M (music), Rock M (music), Easy M (music), Light |
|
|
|
|
|
M (music), Classics, Other M (music), Weather, Finance, |
|
|
|
|
|
Children, Social, Religion, Phone In, Travel, Leisure, Jazz, |
|
|
|
|
|
Country, Nation M (music), Oldies, Folk M (music), Document |
|
|
|
|
|
|
|
|
|
|
Activating TA/News Standby
Reception
Standby Reception allows the unit to switch temporarily to Traffic Announcement (TA) or NEWS programme from any source other than AM.
 TA Standby Reception
TP indicator |
TA Standby Reception |
The unit will temporarily switch Lights up to Traffic Announcement (TA) if
available.
Not yet activated. Tune in to Flashes another station providing the
Radio Data System signals.
To deactivate, press again.
Tracking the same programme —Network-Tracking Reception
When driving in an area where FM reception is not sufficient enough, this unit automatically tunes in to another FM Radio Data System station of the same network, possibly broadcasting the same programme with stronger signals.
1  (Hold)
2 |
-<Tuner> |
|
|
|
-<AF-Regional> * |
|
|
|
|
|
Switches to another station. |
|
[AF] |
The programme may differ |
|
from the one currently received |
|
|
|
|
|
|
(the AF indicator lights up). |
|
|
Switches to another station |
|
AF-REG |
broadcasting the same |
|
programme (the REG indicator |
|
|
|
|
|
|
lights up). |
|
|
|
|
Off |
Cancels. |
|
|
|
* AF-Regional: Alternative Frequencies-Regional
Automatic station selection— Programme Search
When the signal of a preset station you have selected is weak, this unit searches for another station possibly broadcasting the same programme as the original preset station is broadcasting.
<P-Search> ( page 22)
ENGLISH | 7
CD/USB
Playing a CD/USB device
Label side
USB cable from the rear of the unit
or
The source changes to “CD” and playback starts. |
The source changes to “USB” and playback starts. |
This unit can play MP3/WMA files stored in CD-R, CD-RW, and MP3/WMA/WAV files in USB mass storage device (such as a USB memory and Digital Audio Player).
Make sure all important data has been backed up. We shall bear no responsibility for any loss of data in USB mass storage class device while using this system.
Ejected disc not removed within 15 seconds will reload automatically.
|
If the disc cannot be ejected, page 3. |
Selecting a folder/track
Selects folder.
(For MP3/WMA/WAV)
Selects track. (Press)
Fast-forwards or reverses the track. (Hold)
Selecting a track/folder from the list
1
2 Select a folder. (For MP3/WMA/WAV)
3Select a track.
For MP3/WMA/WAV
If there are many folders or tracks, you can fast search for the desired folder or track by turning the control dial quickly, or use Quick Search
( page 11).
Selecting the playback modes
You can select one of the following playback modes at a time.
1
 (Hold)
|
|
<Repeat>)<Random> |
2 |
|
|
|
Repeat |
|
|
Off |
Cancels repeat playback. |
|
Track |
Repeats current track. |
|
Folder * |
Repeats current folder. |
|
|
|
|
Random |
|
|
Off |
Cancels random playback. |
|
|
Randomly plays all tracks of |
|
Folder * |
current folder, then tracks of |
|
|
next folders. |
|
All |
Randomly plays all tracks. |
|
|
|
* For MP3/WMA/WAV
8 | ENGLISH
SD |
SD (KD-SD80BT only) |
KD-SD80BT only
This unit can play MP3/WMA/WAV files stored in commercially available SD/SDHC cards.
SD/SDHC memory cards complying with the SD or SDHC standard can be used. SD card (≤2 GB), SDHC card (≤32 GB)
SDXC memory cards and MultiMedia Card (MMC) cannot be used.
A special adapter is required when using a miniSD card, miniSDHC card, microSD card or microSDHC card.
Make sure all important data has been backed up. We shall bear no responsibility for any loss of data in the SD/SDHC memory cards while using this system.
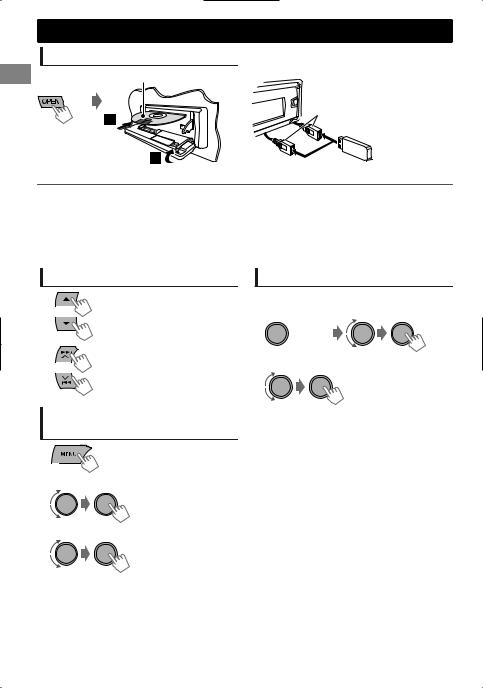
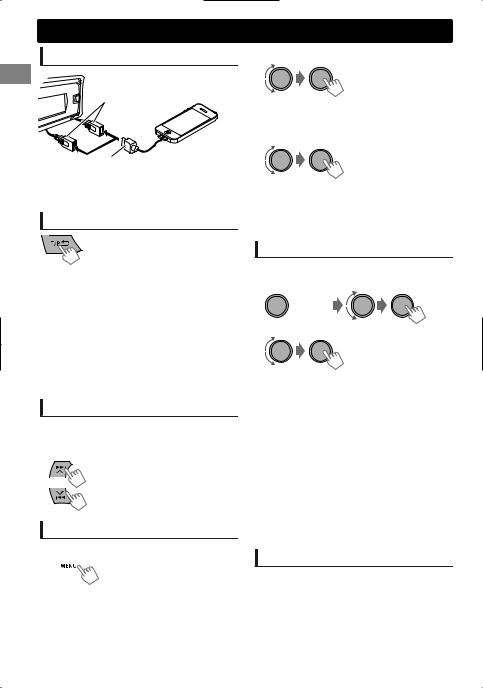
Playing the SD card
1 Detach the control panel. |
5 |
Select “SD” source. |
|
Avoid touching the connectors. |
|
Press repeatedly. |
|
|
The source changes to “SD” and playback starts. |
||
|
You can operate the SD card in the same way you |
||
|
operate the files on a CD/USB. ( page 8) |
||
2 Push the SD card into the slot until you |
|
Removing the SD card |
|
1 |
Detach the control panel. |
||
hear a “click” sound. |
|||
2 |
|
||
|
Push the SD card in until you hear a “click” |
||
Label side |
3 |
sound, then pull the card out. |
|
|
Reattach the control panel. |
||
3 Reattach the control panel.
4 Turn on the unit.
ENGLISH | 9
iPod/iPhone
Playing an iPod/iPhone
USB cable from the rear of the unit
or
USB 2.0 cable (not supplied)*
The source changes to “iPod-1/iPod-2” and playback starts.
* Recommend to use a cable suitable for car use.
Selecting the control mode
|
(Hold) |
-<Headunit Mode>/ |
|
|
<iPod Mode>/ |
||
|
|
|
<Application Mode> |
|
|
|
|
|
Headunit |
Controls iPod playback through |
|
|
Mode |
this unit. |
|
|
iPod Mode |
Controls iPod playback from the |
|
|
|
iPod/iPhone. |
|
|
Application |
The sound of any functions |
|
|
Mode |
(music, games, applications, etc.) |
|
|
|
running on the connected iPod/ |
|
|
|
iPhone is emitted through the |
|
|
|
speakers connected to this unit. |
|
You can also change the setting using <iPod Switch> in the menu. ( page 23)
Selecting a track
Applicable under <Headunit Mode>/<iPod Mode> only.
For <Application Mode>, applicable only for some audio applications.
Selects track/chapter. (Press)
Fast-forwards or reverses the track. (Hold)
Selecting a track from the list
Applicable under <Headunit Mode> only.
1 
2 Select the desired list.
Playlists)Artists)Albums)Songs) Podcasts)Genres)Composers) Audiobooks)(back to the beginning)
3 Select the desired track.
Repeat this step until the desired track is selected.
If the selected menu contains many tracks, you can fast search for the desired track by turning the control dial quickly, or use Quick Search
( page 11).
Selecting the playback modes
Applicable under <Headunit Mode> only. You can select one of the following playback modes at a time.
1
 (Hold)
2 |
<Repeat>)<Random> |
|
|
||
|
Repeat |
|
|
Off |
Cancels repeat playback. |
|
One |
Functions the same as “Repeat |
|
One” of the iPod. |
|
|
|
|
|
All |
Functions the same as “Repeat |
|
All” of the iPod. |
|
|
|
|
|
Random |
|
|
Off |
Cancels random playback. |
|
Song |
Functions the same as “Shuffle |
|
Songs” of the iPod. |
|
|
|
|
|
Album |
Functions the same as “Shuffle |
|
Albums” of the iPod. |
|
|
|
|
“Album” is not applicable for some iPod/ iPhone.
iPod/iPhone application
You can operate JVC original application with this unit in <Application Mode>. For more details, visit JVC website: <http://www3.jvckenwood.com/ english/car/index.html> (English website only).
10 | ENGLISH
Quick Search |
Quick Search |
If you have many folders/tracks/contacts, you can search through them quickly according to the first character (A to Z, 0 to 9 and OTHERS).
1 Enter list menu or “Hands-Free” menu.
CD (MP3/WMA)/ |
iPod/iPhone |
Bluetooth phonebook |
USB/SD* (MP3/WMA/WAV) |
|
|
Select the desired list.
Select <Phonebook>.
2Select the desired character (A to Z, 0 to 9 and OTHERS).
“OTHERS” appears if the first character is not A to Z or 0 to 9, such as #, -, !, etc.
* For KD-SD80BT only.
3 Select your desired folder/track/contact.
For CD/USB/SD and iPod/iPhone, repeat step 3 until the desired track is selected.
Searching may not work on some of the layers of the selected menu (for iPod/iPhone).
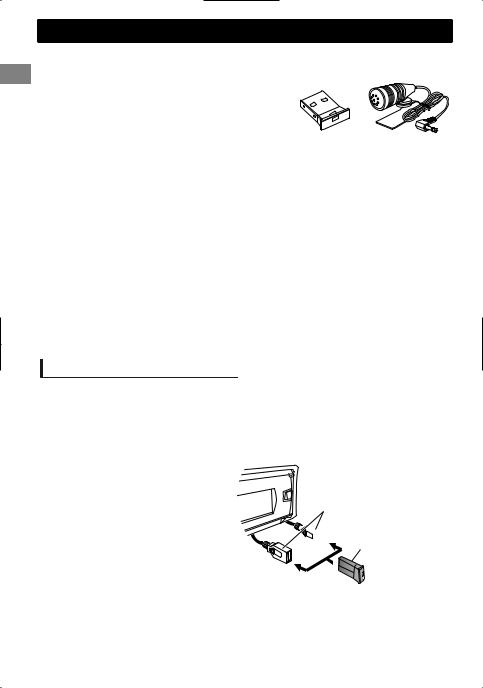
External components
You can connect an external component to the AUX (auxiliary) cable from the rear of the unit.
For details, refer also to the instructions supplied with the external components.
.
Playing an external component |
1 |
Connect to AUX cable from the rear of the |
from AUX |
|
unit. |
Portable audio |
2 |
Select <AUX IN>. |
|
|
|
player, etc. |
|
|
|
3 |
Turn on the connected component and |
AUX |
|
start playing the source. |
|
|
3.5 mm stereo mini plug (not supplied)
Use a 3-terminal plug head stereo mini plug for optimum audio output.
ENGLISH | 11
Bluetoothconnectionconnection
By connecting the supplied KS-UBT1 USB Bluetooth Adapter* and microphone* to this unit, you can operate a Bluetooth device using this unit. Refer to the “Installation/Connection Manual” for details on
connecting the microphone. |
|
|
Once the USB Bluetooth Adapter is attached, this unit is always |
|
|
available for pairing. |
|
|
Refer also to the instructions supplied with the Bluetooth |
|
|
device. |
|
|
Refer to the separate appendix to check the countries where |
KS-UBT1 |
Microphone |
you may use the Bluetooth function. |
|
|
If you turn off the unit, detach the control panel, or unplug the USB Bluetooth Adapter during a phone call conversation, the Bluetooth connection is disconnected. Continue the conversation using your mobile phone.
*KD-SD80BT only. KS-BTA50 Accessory Kit (USB Bluetooth Adapter and microphone) available separately for KD-R50.
This unit supports the following Bluetooth profiles
Hands-Free Profile (HFP 1.5)
Object Push Profile (OPP 1.1)
Phonebook Access Profile (PBAP 1.0)
Advanced Audio Distribution Profile (A2DP 1.2)
Audio/Video Remote Control Profile (AVRCP 1.3)
 Warning:
Stop the car in a safe place before operating complicated steps such as dialing numbers, using phonebook, etc.
Pairing a Bluetooth device
When connecting a Bluetooth device to the unit for the first time, perform pairing between the unit and the device.
Up to five Bluetooth devices can be registered in this unit.
A maximum of two Bluetooth phones and one Bluetooth audio device can be connected at any time.
This unit supports Secure Simple Pairing (SSP).
1Connect the USB Bluetooth adapter (KS-UBT1) to one of the USB input terminals.
USB cable from the rear of the unit
 KS-UBT1 or
2Search and select “JVC Unit” on the Bluetooth device.
For some Bluetooth devices, you may need to enter the Personal Identification Number (PIN) code immediately after searching.
12 | ENGLISH

Bluetooth connection
3Perform (A) or (B) depending on what appears on the display.
For some Bluetooth devices, pairing sequence may vary from the steps described below
(A) |
Pairing? |
|
Pairing? |
|
Device: [Device name] |
|
Yes: Press VOL |
|
Passkey: XXXXXX |
|
No: Press BACK |
“XXXXXX” is a 6-digit passkey randomly generated during each pairing.
Ensure that the passkey which appears on the unit and Bluetooth device is the same.
Select “Yes” to confirm the passkey.
Operate the Bluetooth device to confirm the passkey.
(B) |
Pairing? |
|
Pairing? |
|
|
Yes: Press VOL |
|
|
Device: [Device name] |
|
|
|
|
No: Press BACK |
|
|
|
|
|
|
|
|
|
(1) When the Bluetooth device prompts you to key in a PIN or passcode, enter the PIN code “0000” into the Bluetooth device. The above should then appear on the display.
You can change to a desired PIN code before pairing. ( page 23)
(2) If only “Pairing” appears, operate the Bluetooth device to confirm pairing.
Select “Yes” to confirm the pairing.
After pairing is successful, “Pairing COMPLETED” appears on the display.
The unit will establish a connection with the newly paired Bluetooth device and you can then control the Bluetooth device through the unit.
“ ” will light up when a phone is connected.
“ ” will light up when an audio device is connected.
Once the connection is established, the device is registered to the unit and there is no need to perform the pairing again unless you delete the registered device.
Some Bluetooth devices may not be able to connect to the unit after pairing. Connect the device to the unit manually. Refer to the instruction manual of the Bluetooth device for more information.
Connecting/Disconnecting a registered device manually
|
To connect |
|
To disconnect |
1 |
(Hold) |
1 |
(Hold) |
|
|
||
2 |
Select <Connect>. |
2 |
Select <Disconnect>. |
-<Bluetooth> -<Phone>/<Audio> -<Connect>
3 Select the desired device.
“Connecting...” appears on the display when the unit is connecting to the device. “Connected”#“[Device Name]” appears on the display when the device is connected.
4 Press MENU to exit.
-<Bluetooth> -<Phone>/<Audio> -<Disconnect>
3 Select the desired device.
“Disconnected”#“[Device Name]” appears on the display when the device is disconnected.
4 Press MENU to exit.
ENGLISH | 13

Bluetooth connection
Connecting to JVC original application
JVC original application is designed to view JVC car receiver status and perform simple control operations on Android smart phones.
For JVC original application operations, visit JVC website: <http://www3.jvckenwood.com/english/car/ index.html> (English website only).
1  (Hold)
2 Select <Connect>.
-<Bluetooth> -<Application> -<Connect>
3Select the desired smart phone.
“Connected”#“[Device Name]” appears on the display when the device is connected.
4 Press MENU to exit.
Deleting a registered device
1 |
(Hold) |
|
|
2 |
Select <Delete OK>. |
|
-<Bluetooth> |
|
-<Delete Pairing> |
|
-[Device Name] |
|
-<Delete OK?> |
“OK” appears when the device is deleted.
3 Press MENU to exit.
Bluetooth mobile phone
Receiving a call
 To receive a call
When there is an incoming call, the source automatically changes to “BT-1”/“BT-2”.
“Receiving...” appears on the display, followed by the phone number or name.
|
The display flashes in blue. ( page 17) |
or
You can also press / / / /SOURCE on the remote control to answer a call.
When <Auto Answer> is set to <On>, the unit answers incoming calls automatically.
( page 17)
 To end a call
or
(Hold) |
(Hold) |
You can also press and hold / / / /SOURCE on the remote control to end a call.
 To deactivate/activate hands-free mode
During a phone conversation...
Operations may vary according to the connected Bluetooth device.
14 | ENGLISH
 Adjustments during a call
Phone volume (00 — 50) [Volume 15]: Volume adjustments made during a call will not affect the other sources.
Microphone level
(01— 03) [02]: As the number increases, the microphone becomes more sensitive.
Noise Reduction and Echo
Cancellation mode:
Turns on/off.
Bluetooth mobile phone
Text message notification
When a text message is received, the unit rings and “[Device Name]”#“Received Message” appears.
<Message Notice> must be set to <On>. ( page 17)
You cannot read, edit, or send a message through the unit.
This feature is only available on certain phones.
Switching between two connected mobile phones
When two mobile phones are connected to the unit, you can access to both “Hands-Free” menus.
Press / FUNC. to enter 1st phone’s “Hands-Free” menu.
Press / FUNC. twice to enter 2nd phone’s “Hands-Free” menu.
Press to return to 1st phone’s “Hands-Free” menu.
Making a call from the hands-free menu
1 Enter the “Hands-Free” menu. |
2 Select a calling method. |
Refer to the table below
 for options.
3 Select and call the contact (name/phone number).
Dialed Calls |
Select the name/phone number |
Call |
|
|
|
|
|
Received Calls |
|
|
|
|
|
|
|
Missed Calls |
|
|
|
|
If the phonebook contains many numbers, you can fast search for the desired |
||
Phonebook |
|||
number by turning the control dial quickly, or use Quick Search ( page 11). |
|||
|
|||
“No History Found” appears if there is no recorded call history.
“No Data” appears if no entries are found in the Bluetooth device’s phonebook.
“Send Phonebook Manually” appears if <Phonebook Select> is set to
|
<In Unit> or the phone does not support PBAP. ( |
page 17) |
|
|
Dial Number |
Enter the phone number to dial. |
|
|
|
|
Select number/character |
Move the entry position |
Call |
|
|
|
|
||
ENGLISH | 15
Bluetooth mobile phone
Using voice recognition
You can use the voice recognition features of the connected phone through this unit.
“Not Support” appears if the connected phone does not support this feature.
1 Enter voice recognition mode.
If only one phone is connected,
Deleting a contact (name/ phone number)
Only when <Phonebook Select> is set to <In Unit>. ( page 17)
1 Enter the “Hands-Free” menu.
(Hold)
If two phones are connected,
Enter “phone list” |
Select the desired phone |
(Hold)
2When “Waiting Voice”#“[Device Name]” appears on the display, speak the name of the contact you want to call or the voice command to control the phone functions.
Supported voice recognition features vary for each phone. Please refer to the instruction manual of the connected phone for details.
2 Select a call method.
-<Dialed Calls>/ <Received Calls>/ <Missed Calls>/ <Phonebook>
3Select the contact (name/phone number) to be deleted.
Name |
Phone Number |
or
4Enter “Delete Entries” menu.
 (Hold)
5 Select <Delete> or <Delete All>.
|
Delete |
Selected name/phone number |
|
|
from step 3 is deleted. |
|
Delete |
All name/phone numbers from |
|
All |
selected menu in step 2 are |
|
|
deleted. |
16 | ENGLISH

Using the Settings menu
1 Enter the “Hands-Free” menu.
2 Select <Settings>.
Bluetooth mobile phone
3Repeat this step to perform the necessary settings.
To return to the previous menu, press .
To exit from the menu, press MENU.
The following settings are applicable to the paired device. If another device is paired, perform the settings again.
|
Menu item |
Selectable setting (Initial: [XX]) |
|
Phonebook |
[In Phone]: The unit browses the phonebook of the connected phone. |
|
Select * |
In Unit: The unit browses the phonebook registered in the unit. (You can copy |
|
|
the phonebook memory using <Phonebook Trans> ( page 23).) |
|
|
|
|
Auto Answer |
On: The unit answers incoming calls automatically. |
|
|
[Off]: The unit does not answer incoming calls automatically. |
|
|
|
|
Ringing Tone |
[In Unit]: The unit rings to alert you when a call/text message comes in. |
|
|
– Call Tone: Select your preferred ring tone (Tone 1 — 5) for incoming calls. |
|
|
– Message Tone: Select your preferred ring tone (Tone 1 — 5) for incoming |
|
|
text messages. |
|
|
Default ring tone is different according to the paired device. |
|
|
In Phone: The unit uses the connected phones’ ring tone to alert you when a |
|
|
call/text message comes in. (The connected phone will ring if it does not |
|
|
support this feature.) |
|
|
|
|
Ringing Color |
Color 01 — 29 [06]: Select your preferred color for incoming call/text message |
|
|
alerts. |
|
|
Off: Cancels. |
|
NR/EC Mode |
[On]: Turns on the Noise Reduction and Echo Cancellation of the connected |
|
|
microphone for clearer sound. |
|
|
Off: Cancels. |
|
MIC Setting |
Level (01— 03) [02]: The sensitivity of the microphone increases as the MIC |
|
|
level is increased. |
|
|
|
|
Message Notice |
[On]: The unit rings and “[Device Name]”#“Received Message” appears to alert |
|
|
you of an incoming text message. |
|
|
Off: The unit does not alert you of an incoming text message. |
* Selectable only when the connected phone supports PBAP.
ENGLISH | 17

Bluetoothaudioaudioplayer player
Playing a Bluetooth audio player
A
Select <BT-1> or <BT-2> depending on the location of the USB Bluetooth adapter KS-UBT1.
Operate the Bluetooth audio player to start playback.
Operations and display indications may differ according to their availability on the connected device.
Basic operations
Starts or resumes playback.
Mutes the sound.
Selects group/folder.
Reverse skips or forward skips. (Press)
Fast-forwards or reverses the track. (Hold)
Selecting the playback modes
For Bluetooth devices that support AVRCP 1.3.
1
 (Hold)
2 |
<Repeat>)<Random> |
|
|
||
|
Repeat |
|
|
Off |
Cancels repeat playback. |
|
Track |
Repeats current track. |
|
All |
Repeats all tracks. |
|
Group |
Repeats all tracks of the |
|
current group. |
|
|
|
|
|
Random |
|
|
Off |
Cancels random playback. |
|
All |
Randomly plays all tracks. |
|
Group |
Randomly plays all tracks of |
|
the current group. |
|
|
|
|
18 | ENGLISH
Illumination color adjustments
Button zone |
Display zone |
|
All zone: Includes both Button zone and |
|
|||
|
|
|
|
|
|
Display zone. |
|
|
|
|
|
|
|
||
|
|
|
|
|
|
|
|
|
|
|
|
|
|
|
|
|
|
|
|
|
|
|
|
|
|
|
|
|
|
|
|
All zone
Selecting the preset color
You can select a preset color for <Button Zone>, <Display Zone>, and <All Zone> separately.
1  (Hold)
2 Select <Color>.
3
|
Button Zone |
Color 01-29/User/ |
|
|
COLORFLOW 1-3* |
|
Display Zone |
|
|
* Color changes in |
|
|
|
|
|
All Zone |
different speeds. |
|
|
|
Initial color: Button Zone [Color 06], Display Zone [Color 01], All Zone [Color 06].
If <All Zone> is selected, the button and display illumination will change to the current/ selected <Button Zone> color.
4 Press MENU to exit.
Storing your own adjustments
You can store your own day and night colors for <Button Zone> and <Display Zone> separately.
1  (Hold)
2 Select <Color Setup>.
3
|
|
Button |
Press / to select a |
|
|
primary color <Red/ |
|
|
Day |
Zone |
Green/Blue>, then |
|
|
turn the control dial |
|
|
Color |
|
to adjust the level |
|
|
Display |
<00-31>. Repeat this |
|
|
Zone |
procedure until you |
|
|
|
have adjusted all the |
|
|
|
three primary colors. |
|
|
|
|
|
|
Button |
Your adjustment is |
|
|
Zone |
automatically stored |
|
Night |
|
to “User”. |
|
|
If “00” is selected for |
|
|
|
||
|
Color |
|
|
|
Display |
all the primary colors |
|
|
|
||
|
|
for <Display Zone>, |
|
|
|
Zone |
|
|
|
nothing appears on |
|
|
|
|
|
|
|
|
the display. |
|
|
On |
Changes the display and |
|
Menu |
buttons illumination |
|
|
|
||
|
|
during menu, list search, |
|
|
Color |
|
|
|
Off |
and playback mode |
|
|
|
||
|
|
operations. |
|
|
|
|
Night Color/Day Color is changed by turning on/off your car’s headlight.
4 Press MENU to exit.
ENGLISH | 19
 Loading...