


HP t423, t418, t413, t408, t403 Getting Started Guide [it]
...t450
Digital Camcorder
Caméscope numérique
Video Cámara Digital
Câmara Digital Video
Quick Start Guide
Guide de démarrage rapide
Guía rápida
Guia rápido de instruções
For the full version of the t450 product user manual go to: www.hp.com/support Pour la version complète du manuel d’utilisateur du modèle t450, allez sur: www.hp.com/support
Para descargarse la versión completa del manual de instrucciones del modelo t450, puede acceder al siguiente enlace: www.hp.com/support Para a versão completa do manual da t450, visite: www.hp.com/support
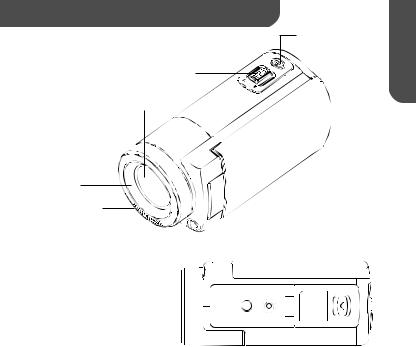
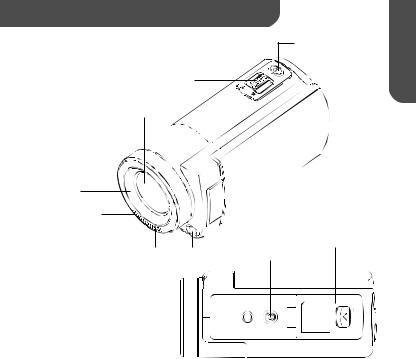
Tour of Your Camcorder
[Photo] Button
[Tele/Wide] Toggle
Optical Lens
External Lens
Mount
Microphone
|
|
|
|
|
Battery/SD Card Cover |
||
|
|
|
|
||||
|
|
|
|
||||
|
|
|
|
Tripod Socket |
|
||
Indicator |
Light |
||||||
|
|
|
|||||
|
|
|
|
|
|
|
|
|
|
|
|
|
|
|
|
Englis
1
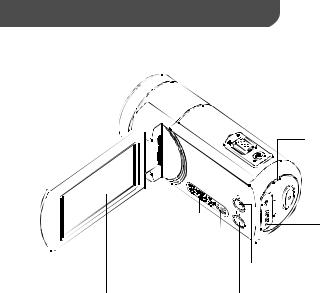
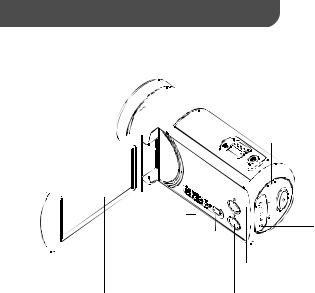
Tour of Your Camcorder
LED Indicator
 [Record] Button
 Mini USB Port
HDMI Port
[Wireless] On/Off Button
LCD Touch Panel |
[Pause] Button |
2
Getting Started
Adapter charging mode
PC USB charging mode
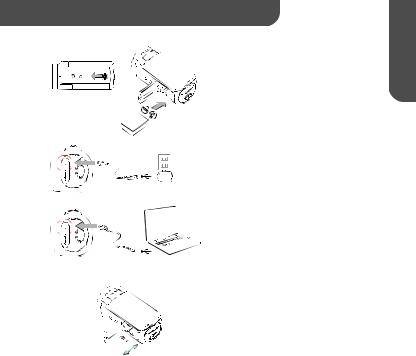
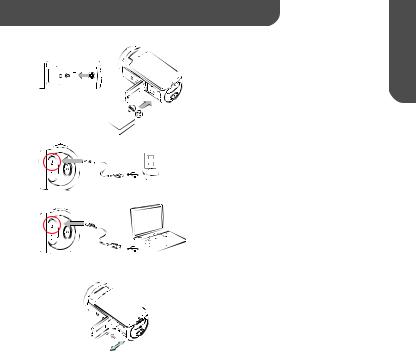
Step 1 :
Load the Battery
•Slide the latch and open the battery cover.
•Insert the battery correspondingly with the correct polarity marks (+ or -).
•Close the battery cover firmly so that it locks into place.
Step 2 :
Charge the Li-ion Battery
•Charge the battery fully before first use.
•Under charging, the indicator will flash.
•It could take up to 5 hours to charge fully with an adapter. Once complete, the indicator will turn off automatically.
Note:
• A longer time is required via a PC USB.
Step 3 :
Insert the Memory Card
•Slide the latch and open the battery cover.
•Insert the SD card into the slot until it locks properly.
•To remove the SD card, press inward to release it and gently pull it out.
Englis
3
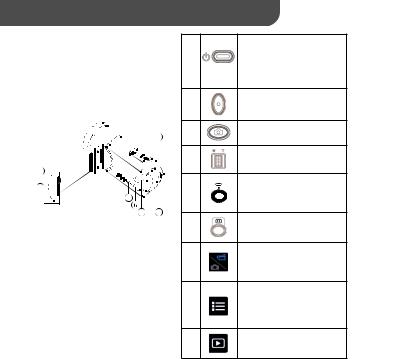
Record & Play
4 |
3 |
7


8
1
9
5 2
Tap on the screen to display the icons.
Power
•Flip out the LCD panel or press the
[ Power ]button.
•After idling for 3 minutes, the device
will turn off automatically.
|
Record |
|
• Press to take video. |
||
|
Press again to stop. |
|
|
Photo |
|
• Press to take photo. |
||
|
||
|
Tele/Wide |
|
• T: Zoom in . • W: Zoom out. |
||
|
Wireless |
|
|
• Touch to enable/disable wireless |
|
Use wireless to link with PC/ |
||
|
||
|
Mobile/Cloud. |
|
|
Pause |
• Press to pause recording. Press again to continue.
Video/Photo
• Touch to switch between Video and Photo.
•The default is in Video mode.
Menu
•Touch to turn the option menu on.
• Scroll left/right or touch to change among three menu pages (Video/Photo/Setting).
Playback
• Touch to go to the Playback Mode View or delete the recorded fi les.
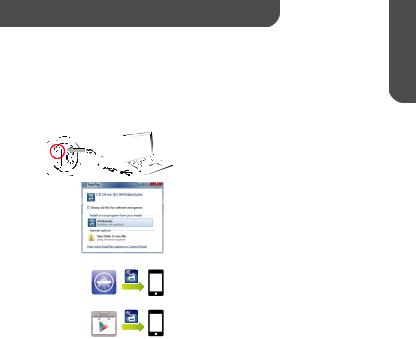
WiVideo Installation
To support wireless connection between camcorder and PC/Laptop (wireless enabled), WiVideo is a software that allows to view, manage video/ photo and live streaming taken from the camcorder wirelessly. Two versions are provided:
Note: Streaming will remain on even LCD panel is closed.
Version 1 : |
PC WiVideo Suite |
|
Englis
Version 2 :
App Store
Google Play
•Power on the camcorder before connecting to a PC/notebook.
•Use the camcorder (internal memory) to
install [ WiVideo Suite ] automatically onto the PC/ Laptop via USB cable when AutoRuns/AutoPlay is activated.
•If AutoRuns/AutoPlay is not activated:
Go to [ My computer ]→ search [ WiVideo Suite ] for installation.
Note:
•WiVideo is for Windows® only.
•When language on screen is not legible, refer to troubleshooting page.
Mobile WiVideo App
• For iPhone/iPad:
Download and install WiVideo App from App Store onto iPhone/iPad.
• For Android phone/tablet:
Download and install WiVideo App from Google Play onto Android phone/tablet.
5
Wireless Mode To PC
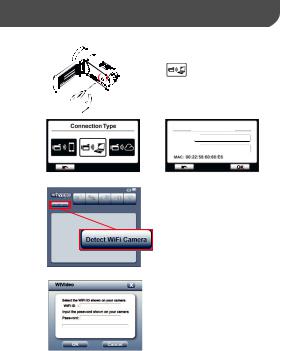
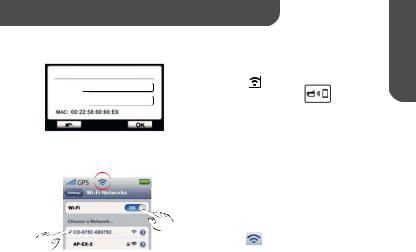
Step 1: (Camcorder side)
• Press [ Wireless  ] button → Seletct [ Wireless to PC
].
The screen will show the Wireless ID and Password.(The default password is 0000. Wireless ID and password can be edited on Setting menu.)
Wireless to PC
Wireless ID CD-675C-60675C
Password 0 0 0 0
CD-675C-60675C
0000
Step 2:(PC/Laptop side)
•Open the WiVideo software
•Click [ Detect Wireless Camera] button to search for camcorder.
•Check [ Wireless ID ] and enter [ Password ] shown on camera to the WiVideo window.
•Then, wireless to PC WiVideo Suite Mode is completed.
Note: Turn PC/Laptop wireless function on before use.
6
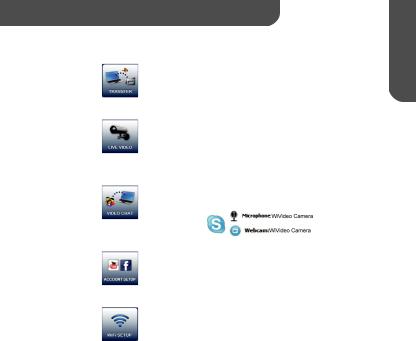
PC WiVideo Suite Function
Active Mode |
Function |
|
|
|
Manage Video and Photo Files |
|
• Transfer files from camera to PC. |
|
• Delete files in camera. |
Wireless/USB |
|
|
|
|
Watch Live Video (wireless only) |
|
• Watch live streaming on PC. |
|
• Remote control the camera. |
Wireless |
|
|
|
|
Wireless Webcam for Skype/MSN (wireless only) |
|
• Change video/audio setting of Skype/MSN. |
|
• Select WiVideo Camera |
Wireless |
(e.g. Skype) |
|
|
|
|
|
A ccount Setting (USB only) |
|
• Set up social network account and save info to |
|
camera via USB. |
USB |
|
|
|
|
Wireless Setup (USB only) |
|
• Configure and synchronize wireless profiles on camera |
|
via USB. |
USB |
• Name camera and create security password. |
|
|
|
|
|
7 |
Englis
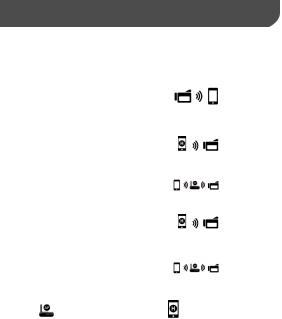
Wireless Modes to Mobile
System |
AP/3G |
Mode |
Schema |
Page |
|
Note |
|
|
|
|
|
|
|
|
|
|
|
|
|
|
|
1. |
Once Direct mode is on |
|
|
w/o |
|
|
|
|
original wireless will be turned off. |
|
|
Direct |
|
9 |
2. |
Remember to turn wireless |
|
|
|
3G |
|
||||
|
|
|
|
|
|
connection |
|
|
w/o |
|
|
|
|
|
back on once quit Direct mode. |
|
|
|
|
|
|
|
|
iPhone/ |
AP |
|
|
|
|
|
|
|
|
|
|
1. |
Hotspot is limited or charged |
||
|
|
|
|
|
|||
iPad |
|
w/3G |
Hotspot |
|
10 |
|
by wireless mobile service |
|
|
(Hotspot) |
|
(3G/4G) provider. |
|||
|
|
|
|
|
|
||
|
|
|
|
|
2. |
Mobile system will be slower. |
|
|
|
|
|
|
|
||
|
|
|
|
|
|
|
|
|
w/AP |
AP |
|
10 |
1. |
Distance will affect the signal |
|
|
|
|
strength. |
||||
|
|
|
|
|
|
|
|
|
|
|
|
|
|
1. |
Hotspot is limited or charged |
|
w/o AP |
Hotspot |
|
11 |
|
by wireless mobile service |
|
|
(Hotspot) |
|
(3G/4G) provider. |
||||
|
|
|
|
|
|
||
|
|
|
|
|
2. |
Mobile system will be slower. |
|
Android |
|
|
|
|
|
||
|
|
|
|
|
|
|
|
|
|
|
|
|
1. |
Distance will affect the signal |
|
|
|
|
|
|
|
||
|
w/AP |
AP |
|
11 |
|
strength. |
|
|
|
|
|
||||
|
|
|
|
|
|
|
|
AP : Wireless Access Point |
Hotspot : Mobile as Access Point |
||||||
8
Wireless to Mobile (iPhone/iPad)
Direct Mode
Wireless to Mobile
wireless ID CD-675C-60675C
Password 0 0 0 0
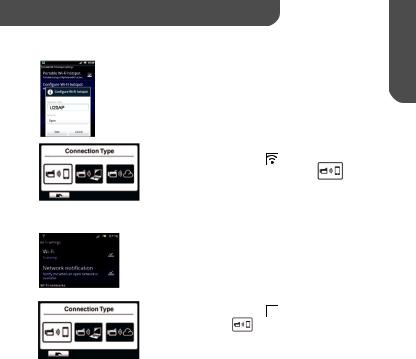
Step 1 : (Camcorder side)
• Press [ Wireless |
] button |
|
→ Select [ Wireless to Mobile |
] |
|
→Select [ Direct Mode ]
→The screen will show [ Wireless ID ] and [ Password ].
Englis
Step 2 : (Mobile side)
• Go to [ Settings ] → [ Wireless ]
→ Select the same [ Wireless ID ] in Step 1 to connect.
•Once the icon [ ] shows, the Dierct Mode connection is activated.
•Activate Mobile WiVideo App.
Note: It will take a while for [  ] to show up.
9
Wireless to Mobile (iPhone/iPad)
Mobile Hotspot Mode
Step 1 : (Mobile side)
•Go to [ Settings ] → [ Wireless ] → Enable [ Personal Hotspot ]
Step 2 : (Camcorder side)
[ Mobile Hotspot ] |
• Press [ Wireless |
] button |
] to scan |
|
→ Select [ Wireless to Mobile |
||
|
available AP |
|
|
→ Connect camcorder to mobile Hotspot.
AP Mode
[ AP ]
Step 1 : (Mobile side)
•Go to [ Settings ] → [ Wireless ]
→ Enable wireless and Select one available AP.
Step 2 : (Camcorder side)
• Press [ Wireless  ] → Select [ Wireless to
Mobile ] to scan available AP
→ Connect camcorder to the same selected AP.
10
Wireless to Mobile (Android)
Mobile Hotspot Mode
AP Mode
Step 1 : (Mobile side)
•Go to [ Settings ] → [ Wireless & network ] → Enable mobile Hotspot/AP
Note: Operation may vary, please refer to each individual model.
Step 2 : (Camcorder side)
• Press [ Wireless |
] button |
to scan |
→ Select [ Wireless to Mobile |
||
available AP |
|
|
→ Connect camera to mobile Hotspot/AP.
Step 1 : (Mobile side)
•Go to [ Settings ] → [ Wireless & network ] → [ Wireless settings ] → Enable wireless and Select one available AP.
Step 2 : (Camcorder side)
• Press [ Wireless  ] button → [ Wireless to Mobile ] to scan available AP
→ Connect camera to the same selected AP.
Englis
11

Mobile WiVideo Suite Function
Tele(T)
• Zoom in
Wide(W)
• Zoom out
Video
• Press to take/stop video
Photo
• Press to take photo
View
• Watch live view on camcorder
Album
• Playback/Delete files on camcorder
Setup
• Manage settings on camcorder
12
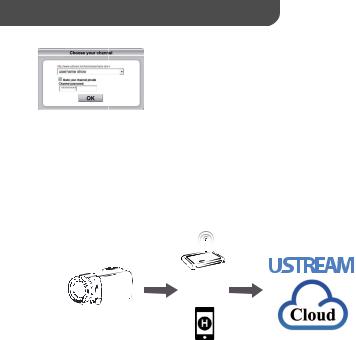
Wireless Mode to Cloud
Ustream enables to broadcast live events freely. People can watch live video broadcasting on PC and Mobile devices.
WiVideo Suite can guide you to setup Ustream automatically.
1.Set up Ustream account on PC
( PC internet connection is required)
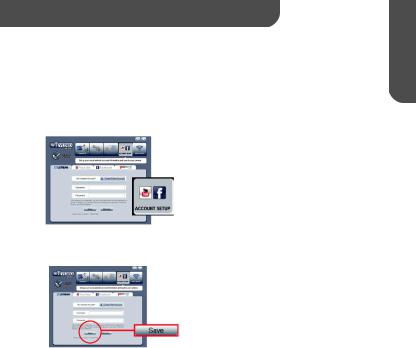
Step 1 : Create an account
•Plug the USB cable between PC/Laptop and camcorder
•Go to WiVideo Suite [ Account Setup ]
•Click [ Create A New Account ] and then fill up the information requested step by step.
•Then click [ Sign Up ].
Step 2 : Save account information to camera
•Enter Username/Password created in Step 1
•Then click [ Save ].
Englis
13
Wireless Mode to Cloud
Step 3 : Select one channel
WiVideo Suite creates one default channel.
You can create more channels on Ustream website.
•Select one channel for Ustream video broadcasting.
•For privacy, it is optional to enter password for the selected channel.
Warning:
•Mobile device Ustream App cannot access private channel.
•For private channel usage, refer to Ustream website for detail information.
2.Prepare AP/Mobile Hotspot for Ustream broadcasting
AP(Access Point)
or
Mobile
14

Wireless Mode to Cloud
3. Broadcast live video on Ustream (Camcorder side)
Step 1 :
Press [ Wireless  ] button
• Select [ Wireless to Cloud |
] |
Step 2 :
Log in your Ustream account
• Enter your username and password.
Step 3 :
Scan & Select Access Point
• The camcorder lists available Access Points.
• Select one for wireless connection.
The camcorder connects to Ustream server and starts video streaming.
4. Watch your Ustream broadcasting on PC/Mobile Device PC user:
www.ustream.tv
Ustream
•Go to Ustream website and enter the username/channel
Mobile user:
•Download Ustream App from App Store/ Google Play
Launch App and enter the username/channel
Englis
15

Troubleshooting
Problem/Situation |
Remediation/Solution |
|
|
|
|
Cannot power on the device/ |
Check battery direction and press the [ Power Button ] to turn on. |
|
The power turns off suddenly. |
||
|
||
|
|
|
|
Battery is weak or run out. Recharge the battery. |
|
|
|
|
The files on the memory card |
“!” means the SD card is low-speed or contains corrupted files |
|
do not display smoothly when |
Try to form at the card on the de vice not on PC. |
|
the LCD shows the “!” mark. |
|
|
|
The card has some problems and cannot be recognized. |
|
|
Use another card. |
|
|
|
|
Why do some of my indoor |
The device extends photo exposure time under low light/ indoor |
|
photos look blurry and dark? |
condition. Keep the device (and the target subject) steady for several |
|
|
seconds while taking photo. |
|
|
|
|
When the device is connected |
The disk [ DV ] indicates the internal memory of the camera. |
|
to the PC via USB cable. |
The disk [ Removable Disk ] indicates the SD card. |
|
|
The disk [ WiVideo Suite ] indicates the built-in application. |
|
|
|
|
Cannot connect to wireless |
The password configuration does not match the AP. |
|
|
||
|
|
|
|
The AP router or the computer wireless is not turned on. |
|
|
Turn the AP router or your computer wireless on. |
|
|
|
|
|
The device is not in the wireless network service area or the |
|
|
wireless network service is affected by distance. |
|
|
|
|
WiVideo Suite does not |
If the disk [ WiVideo Suite ] cannot be found, reboot |
|
install properly. |
your computer. |
|
|
|
|
WiVideo Suite language on |
Refer to FAQ of the instructions from each original computer |
|
screen is not legible. |
manufacturer. |
|
|
|
16
Aperçu de votre caméscope
Bouton [Tele/Wide (télé-objectif/grand angle)]
Objectif
Monture d’objectif externe
Microphone
Voyant indicateur Éclairage
Bouton [Photo]
Couvercle du logement de la batterie/carte SD
Filetage pour trépied
Français
1
Aperçu de votre caméscope
Voyant LED
 Touche [Record
 (enregistrement)]
 Mini port USB
Port HDMI
Bouton On/Off [Wireless]
Panneau LCD |
Touche [Pause] |
2
Guide de démarrage
Chargement via adaptateur secteur
Chargement via port USB de l’ordinateur
Étape 1 :
Chargez la batterie
•Faites glisser le verrou et ouvrez le logement de la batterie.
•Insérez la batterie en respectant les marques de polarité (+ ou -).
•Refermez fermement le logement de la batterie.
Étape 2 :
Chargez la batterie Li-ion
•Chargez complètement la batterie avant la première utilisation.
•Le voyant clignote pendant la charge.
•Le temps de charge complet avec l’adaptateur secteur est de 5 heures. Une
fois la charge terminée, le voyant s’éteint automatiquement.
NB:
•Le temps de charge est plus long via le port USB d’un ordinateur.
Étape 3 :
Insérez la carte de mémoire
•Faites glisser le verrou et ouvrez le logement de la batterie.
•Insérez la carte SD dans le logement jusqu’à ce qu’elle se verrouille en place.
•Pour retirer la carte SD, appuyez dessus pour la libérer et tirez délicatement dessus.
Français
3
 Loading...