


D-Link DSL-2640U
Wireless ADSL2/2+ 4-port Ethernet Router
User Manual
Building Networks for People
RECYCLABLE
2006/11/08 Ver. 1.00

Table of Contents
.
GENERAL INFORMATION ......................................................................... |
3 |
Package Contents ....................................................................... |
3 |
Important Safety Instructions ......................................................... |
3 |
Front Panel View ........................................................................ |
4 |
Back Panel View......................................................................... |
5 |
CONNECTING THE ROUTER TO YOUR COMPUTER ................................................. |
6 |
Connect the Telephone Cable ..................................................... |
6 |
Connect the Ethernet Cable ....................................................... |
6 |
Connect the Power Adapter........................................................ |
6 |
CONFIGURING THE ROUTER ..................................................................... |
7 |
HOME .......................................................................................... |
8 |
Wizard .................................................................................... |
8 |
ATM PVC Configuration.......................................................... |
8 |
Connection Type ................................................................ |
10 |
PPP Username and Password .................................................. |
11 |
Network Address Translation Settings........................................ |
11 |
Device Setup ..................................................................... |
12 |
Wireless .......................................................................... |
13 |
Setup - Summary ................................................................ |
14 |
Wireless ................................................................................. |
15 |
Wireless -- Basic................................................................. |
15 |
Wireless – Security .............................................................. |
16 |
WAN ...................................................................................... |
17 |
LAN ....................................................................................... |
24 |
DNS ....................................................................................... |
26 |
DNS Server Configuration ...................................................... |
26 |
Dynamic DNS............................................................................ |
27 |
Logout ................................................................................... |
28 |
ADVANCED SETUP ............................................................................. |
29 |
ADSL...................................................................................... |
29 |
ADSL Settings .................................................................... |
29 |
ADSL Tone Settings ............................................................. |
30 |
Virtual Server ........................................................................... |
31 |
NAT—Virtual Servers Setup .................................................... |
31 |
DMZ ...................................................................................... |
33 |
SNMP ..................................................................................... |
34 |
SNMP—Configuration............................................................ |
34 |
IP Filter .................................................................................. |
34 |
Incoming IP Filtering Setup .................................................... |
35 |
Outgoing IP Filtering Setup .................................................... |
37 |
Bridge Filters ........................................................................... |
39 |
MAC Filtering Setup ............................................................. |
39 |
Parental Control........................................................................ |
41 |
Time of Day Restrictions ....................................................... |
41 |
Routing .................................................................................. |
42 |
Routing--Static Route........................................................... |
43 |
Routing—Default Gateway ..................................................... |
44 |
Routing—RIP Configuration .................................................... |
46 |
Quality of Service ...................................................................... |
46 |
Port Mapping............................................................................ |
48 |
Certificate............................................................................... |
50 |
Local .............................................................................. |
50 |
Trusted CA ....................................................................... |
52 |
Wireless ................................................................................. |
53 |
Wireless—Advance Setting ..................................................... |
54 |
|
|
1 |
|

Wireless—MAC Filter ............................................................ |
57 |
Wireless—Bridge ................................................................. |
58 |
Wireless—QoS .................................................................... |
59 |
TOOLS ........................................................................................ |
60 |
Access Control .......................................................................... |
60 |
Access Control—Admin ......................................................... |
61 |
Access Control—Services ....................................................... |
62 |
Access Control—IP Address..................................................... |
62 |
Time ..................................................................................... |
64 |
Remote Log ............................................................................. |
65 |
TR-069 Client ........................................................................... |
66 |
System ................................................................................... |
68 |
Save and Reboot................................................................. |
68 |
Backup Settings.................................................................. |
68 |
Update Settings ................................................................. |
69 |
Restore Default Settings ....................................................... |
69 |
Firmware ................................................................................ |
71 |
Test ...................................................................................... |
72 |
STATUS ....................................................................................... |
74 |
Device Info .............................................................................. |
74 |
DHCP Clients ............................................................................ |
75 |
WAN Info ................................................................................ |
76 |
Route Info ............................................................................... |
76 |
Log ....................................................................................... |
77 |
LAN ....................................................................................... |
78 |
WAN ...................................................................................... |
79 |
ATM ...................................................................................... |
79 |
ADSL...................................................................................... |
81 |
ADSL BER Test ................................................................... |
82 |
Wireless Station Info................................................................... |
83 |
2

General Information
The D-Link DSL-2640U is an ADSL2+ router that provides a convenient wireless routing function. This user manual offers you with a simple and easy-to-understand format to install and configure your router.
Package Contents
Included in the package is one of each of the following—
•DSL-2640U Wireless ADSL2/2+ 4-port Ethernet Router
•Power adapter
•RJ-11 telephone cable
•RJ-45 Ethernet cable
•CD-ROM (containing User Manual & Quick Guide)
•Quick Guide (booklet)
Important Safety Instructions
•Place your router on a flat surface close to the cables in a location with sufficient ventilation. Do not mount this device on a wall.
•To prevent overheating, do not obstruct the ventilation openings of this equipment.
•Plug this equipment into a surge protector to reduce the risk of damage from power surges and lightning strikes.
•Operate this equipment only from an electrical outlet with the correct power source as indicated on the adapter.
•Do not open the cover of this equipment. Opening the cover will void any warranties on the equipment.
•Unplug equipment first before cleaning. A damp cloth can be used to clean the equipment. Do not use liquid / aerosol cleaners or magnetic / static cleaning devices.
3
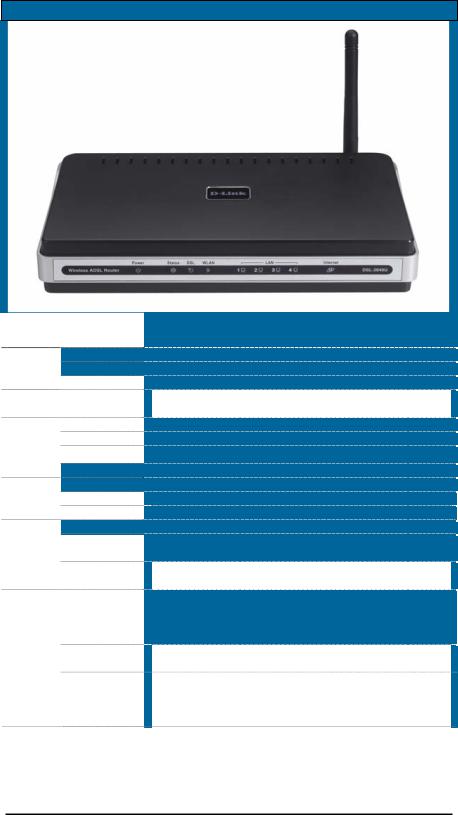
Front Panel View
|
LED |
|
|
Mode |
|
|
|
|
|
|
|
|
|
|
Power |
|
|
Solid Green |
||
|
|
|
No light |
|||
|
|
|
|
Red |
|
|
|
Status |
|
|
Flashing |
|
|
|
|
|
Green |
|||
|
|
|
|
|||
|
|
|
|
Solid Green |
|
|
|
DSL |
|
|
No Light |
|
|
|
|
|
Slow Flashing |
|
|
|
|
|
|
|
|
|
|
|
|
|
|
Fast Flashing |
|
|
|
WLAN |
|
|
Solid Green |
||
|
|
|
Flashing |
|
|
|
|
|
|
|
No Light |
|
|
|
|
|
|
Solid Green |
|
|
|
LAN 1-4 |
|
|
Flashing |
|
|
|
|
|
Green |
|
|
|
|
|
|
|
No Light |
|
|
|
|
|
|
|
|
|
|
|
|
|
Solid Green |
|
|
|
|
|
|
|
|
|
|
Internet |
|
|
No Light |
|
|
|
|
|
|
|
|
|
|
|
|
|
Red |
|
|
|
|
|
|
|
|
|
Indication
The router is powered on. (READY) The power is off.
Failure or device malfunction. (NOT READY) Traffic is passing through the device. (INTERNET
TRAFFIC)
DSL is synchronized. No carrier signal.
DSL attempting synch. Trying to detect carrier signal.
Carrier has been detected and router is trying to train. Wireless is up.
Wireless traffic is passing through. Wireless is down.
Powered device connected to associated port
LAN activity present (traffic in either direction).
No activity, router power off, no cable or no powered device is connected to the LAN port.
IP connected (device has a WAN IP address from IPCP or DHCP and DSL is up or a static IP address is configured, PPP negotiation has completed successfully (if used), and DSL is up. (WAN IP AVAILABLE)
Router power off, router in bridge mode or ADSL connection not present.
Device attempted to become IP connected and failed (no DHCP response, no PPPoE response, PPPoE authentication failed, no IP address from IPCP, etc.).
(WAN IP NOT AVAILABLE)
4
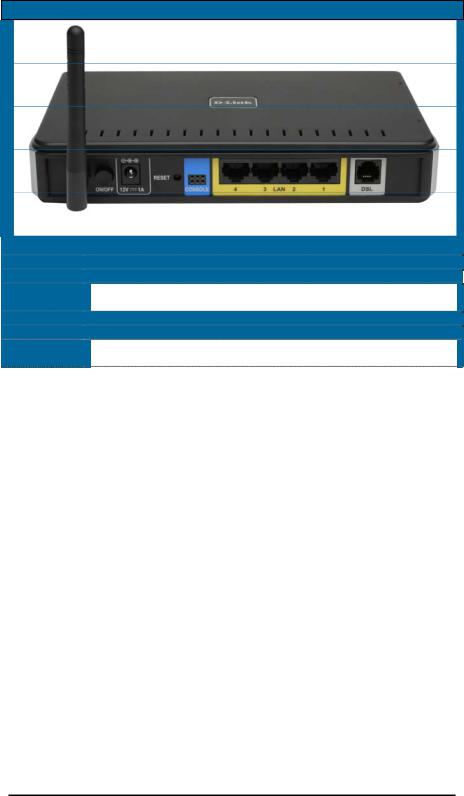
Back Panel View
Port
On/ Off
Power
Reset
Console
LAN 4-1
DSL
Description
Press to turn the router on and off. Connects to the power adapter.
Press for less than 3 seconds to reset the router.
Press for 3 seconds or more to revert to factory settings.
For use by D-Link service personnel for maintenance purposes only. RJ-45 connects the unit to Ethernet devices such as a PC or a switch. RJ-11 telephone port connects telephone cable to telephone or fax machine.
5
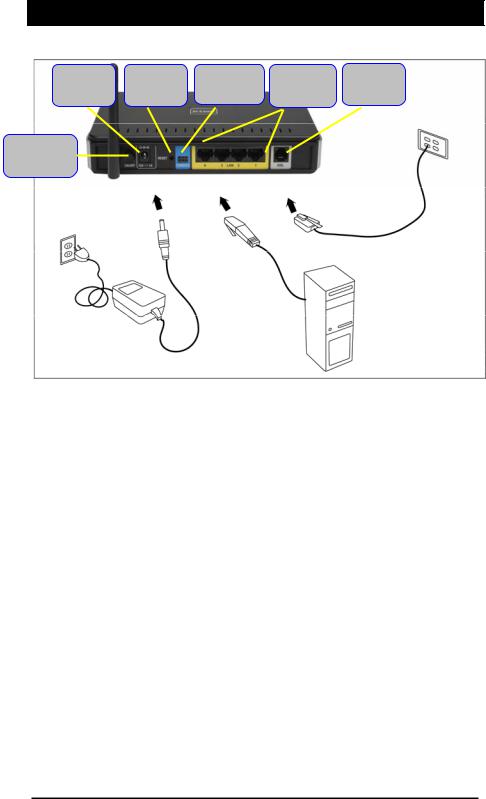
Connecting the Router to Your Computer
Power |
Reset |
Console * |
LAN |
DSL |
Input |
Button |
|
1-4 |
Port |
On / Off
Button
* Console—for use by D-Link repair service personnel only.
Connect the Telephone Cable
•Connect one end of the telephone cable to the DSL port on the router and the other end of the cable into the wall socket.
Connect the Ethernet Cable
•Connect one end of the Ethernet cable to one of the 4 LAN ports on the back of the router and attach the other end to an Ethernet Adapter or available Ethernet port on your computer. Or, you can attach it to a switch / hub first and connect your computer to the switch / hub.
Connect the Power Adapter
•Complete the process by connecting the power adapter to the Power input on the back of the router and then plug the other end of power adapter into a wall outlet or power strip. Then turn on the router and boot up your PC and any LAN devices, such as hubs or switches, and any computers connected to them.
6
Configuring the Router
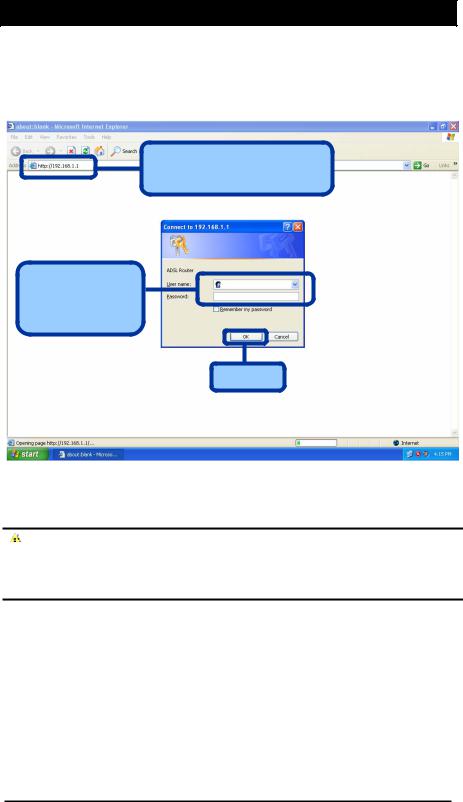
To use your web browser to access the web pages used to set up the router, your computer must be configured to “Obtain an IP address automatically”, that is, you must change the IP network settings of your computer so that it is a DHCP client. If you are using Windows XP and do not know how to change your network settings, skip ahead to Appendix A and read the instructions provided.
Open your web browser and enter the URL http://192.168.1.1 in the address bar and press Enter.
Enter “admin” in the User Name field and “admin” in the Password field.
Click OK
 NOTE: Actually, there are two default user name and password combinations. The user / user name and password combination provides limited access to certain configurations. The admin / admin combination can perform all functions. Passwords can be changed at any time.
7
Home
The home section provides configurations for general use, including a Quick Setup Wizard with steps to quickly set up your router for Internet connection. Also included in this section are LAN / WAN setup and DNS configuration. The below sections explains the setup for each.
Wizard
This section will explain how to quickly configure the router if your only intention is to access the Internet.
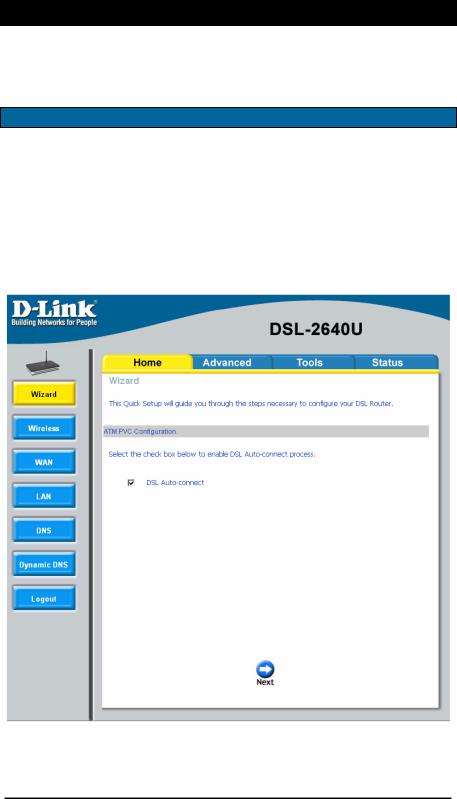
ATM PVC Configuration
To enable the auto-connect process, click on the box labeled DSL Auto-connect, a process that will automatically detect the first usable PVC and automatically detect PPPoE and PPPoA. To continue, click on the Next button.
Skip ahead to page 11 if you select DSL Auto-connect.
If you uncheck the DSL Auto-connect box, the resulting screen is seen below. Enter the VPI / VCI as indicated by your ISP. Also shown will be the Quality of Service.
8

9
Connection Type
Following is the Connection Type screen where you select the type of network protocol and encapsulation mode over the ATM PVC that your ISP has instructed you to use.
The following is a PPPoA example. Click on Next to continue.
10
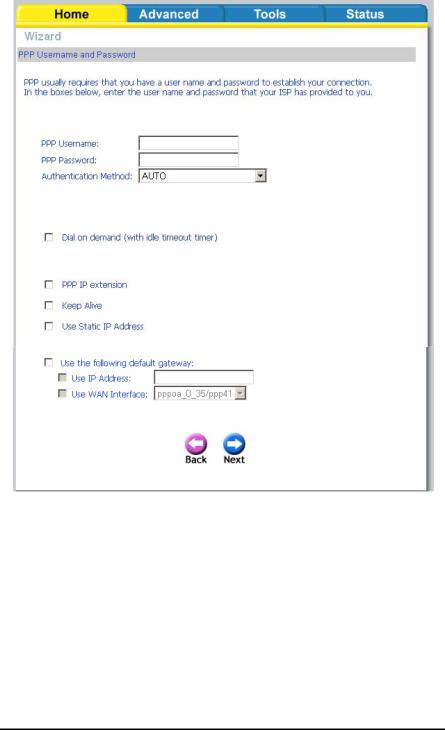
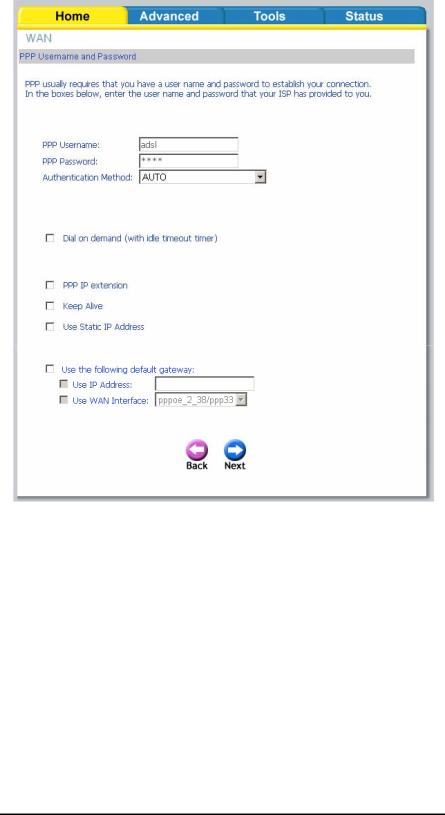
PPP Username and Password
Now, enter the PPP username and password as given by your ISP. Then decide if you will be using any features such as Dial on demand, PPP IP extension, Keep Alive and then click on Next.
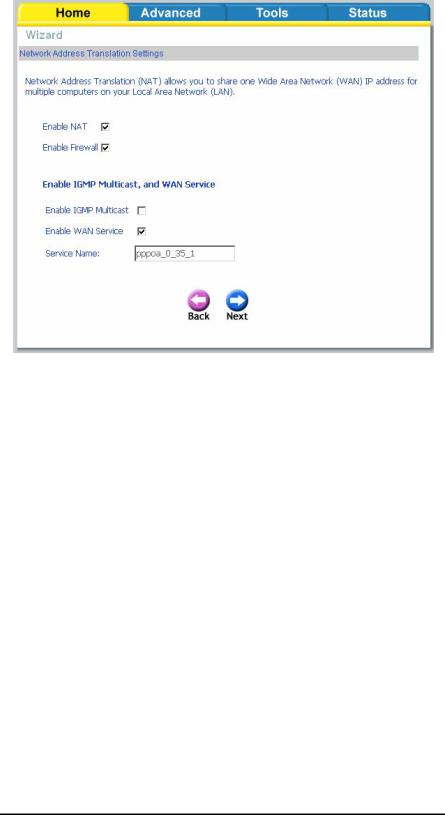
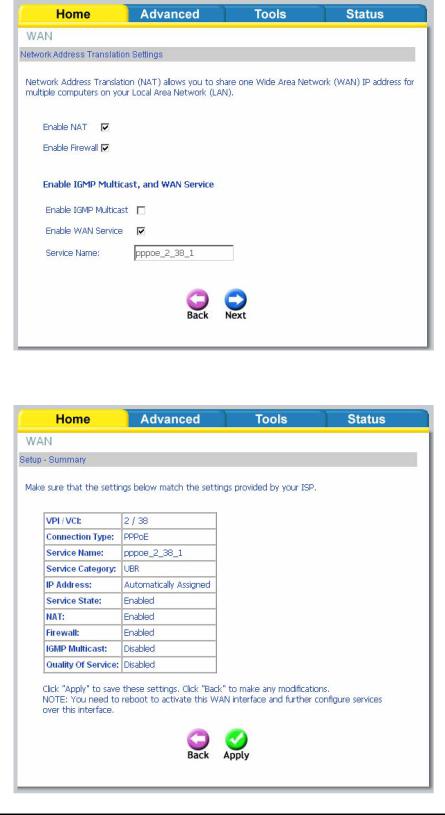
Network Address Translation Settings
The next step is to configure the Network Address Translation (NAT) settings. For the example, NAT will be enabled. The remaining fields are left as default and then click on Next to continue.
11
Device Setup
You can configure the DSL Router IP address and Subnet Mask for the LAN interface to correspond to your LAN’s IP Subnet. If you want the DHCP server to automatically assign IP addresses, then enable the DHCP server and enter the range of IP addresses that the DHCP server can assign to your computers. Disable the DHCP server if you would like to manually assign IP addresses. Click on Next to continue.
12
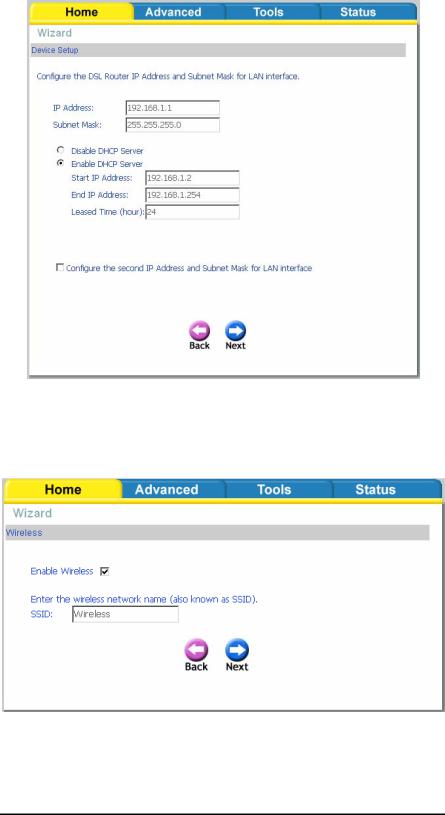
Wireless
The router’s wireless function can be enabled on the following screen. If the function is enabled, then continue by entering the SSID, the wireless network name. Click on Next to continue.
13
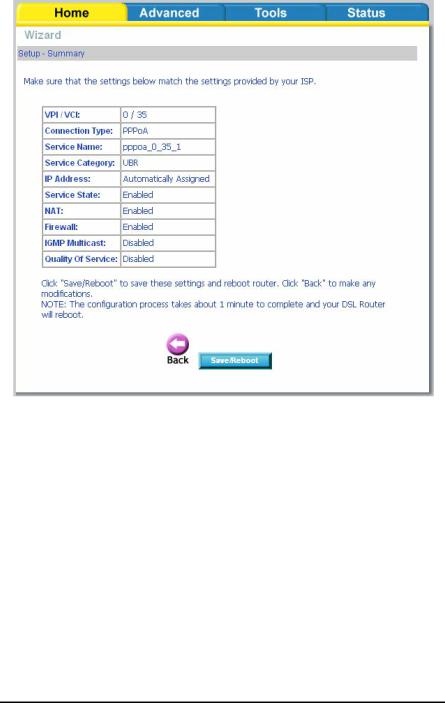
Setup - Summary
After all of the configurations are done, the WAN Setup Summary screen displays all WAN settings that you have made. Check that the settings are correct before clicking on the Save / Reboot button. Clicking on Save / Reboot will save your settings and restart your router.
14
Wireless
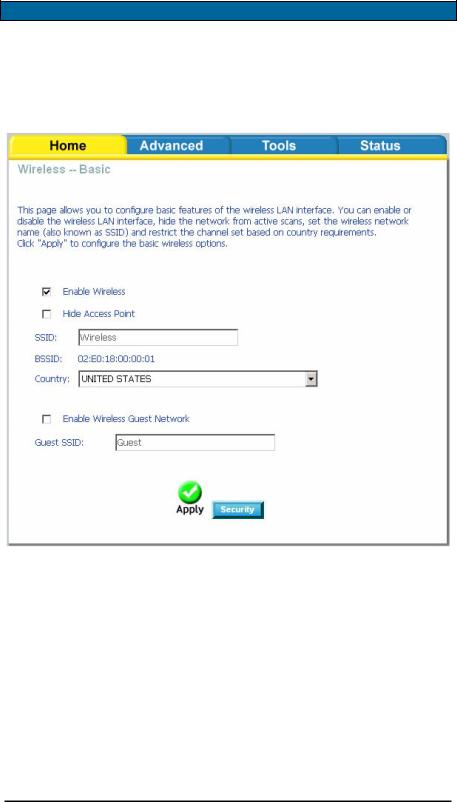
Wireless -- Basic
The below Wireless – Basic screen lets you enable or disable wireless. The default setting for wireless is enabled. You can also hide the access point so others cannot see your ID on the network. Click on Apply to save your configurations before clicking on Security to continue to the Security configurations.
15

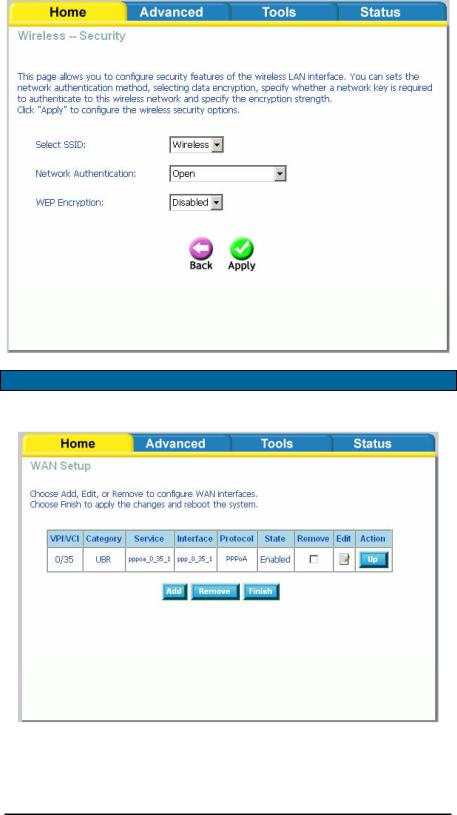
Wireless – Security
The next screen is the Wireless – Security screen which allows you to select the network authentication method and to enable or disable WEP encryption. Note that depending on the network authentication that is selected, the screen will change accordingly so additional fields can be configured for the specific authentication method.
Network authentication methods include the following—
•Open—anyone can access the network. The default is a disabled WEP encryption setting.
•Shared—WEP encryption is enabled and encryption key strength of 64-bit or 128-bit needs to be selected. Click on Set Encryption Keys to manually set the network encryption keys. Up to 4 different keys can be set and you can come back to select which one to use at anytime.
•802.1X—requires mutual authentication between a client station and the router by including a RADIUS-based authentication server. Information about the RADIUS server such as its IP address, port and key must be entered. WEP encryption is also enabled and the encryption strength must also be selected.
•WPA—(Wi-Fi Protected Access)— usually used for the larger Enterprise environment, it uses a RADIUS server and TKIP (Temporal Key Integrity Protocol) encryption (instead of WEP encryption which is disabled). TKIP uses128-bit dynamic session keys (per user, per session, and per packet keys).
•WPA-PSK (Wi-Fi Protected Access – Pre-Shared Key)—WPA for home and SOHO environments also using the same strong TKIP encryption, per-packet key construction, and key management that WPA provides in the enterprise environment. The main difference is that the password is entered manually. A group re-key interval time is also required.
•WPA2 (Wi-Fi Protected Access 2)—second generation of WPA which uses AES (Advanced Encryption Standard) instead of TKIP as its encryption method. Network re-auth interval is the time in which another key needs to be dynamically issued.
•WPA2-PSK (Wi-Fi Protected Access 2 – Pre-Shared Key)—suitable for home and SOHO environments, it also uses AES encryption and requires you to enter a password and an re-key interval time.
•Mixed WPA2 / WPA—during transitional times for upgrades in the enterprise environment, this mixed authentication method allows “upgraded” and users not yet “upgraded” to access the network via the router. RADIUS server information must be entered for WPA and a as well as a group re-key interval time. Both TKIP and AES are used.
•Mixed WPA2 / WPA-PSK—useful during transitional times for upgrades in the home or SOHO environment, a pre-shared key must be entered along with the group re-key interval time. Both TKIP and AES are also used.
16
WAN
Configure the WAN settings as provided by your ISP.
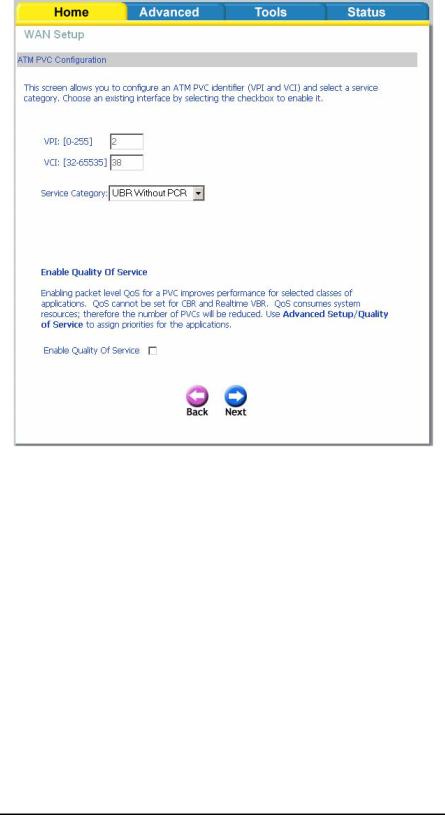
Click on the Add button if you want to add a new connection for the WAN interface and to proceed to the ATM PVC Configuration screen as seen below. The ATM PVC Configuration screen allows you to configure an ATM PVC identifier (VPI and VCI) and select a service category.
17

Find out the following values from your ISP before you change them.
•VPI: Virtual Path Identifier. The valid range is 0 to 255.
•VCI: Virtual Channel Identifier. The valid range is 32 to 65535.
•Service Category: Five classes of traffic are listed—
oUBR Without PCR (Unspecified Bit Rate without Peak Cell Rate)—
UBR service is suitable for applications that can tolerate variable delays and some cell losses. Applications suitable for UBR service include text/data/image transfer, messaging, distribution, and retrieval and also for remote terminal applications such as telecommuting.
o UBR With PCR (Unspecified Bit Rate with Peak Cell Rate)--
oCBR (Constant Bit Rate)—used by applications that require a fixed data rate that is continuously available during the connection time. It is commonly used for uncompressed audio and video information such as videoconferencing, interactive audio (telephony), audio / video distribution (e.g. television, distance learning, and pay-per- view), and audio / video retrieval (e.g. video-on-demand and audio library).
oNon Realtime VBR (Non-Real-time Variable Bit Rate)—can be used for data transfers that have critical response-time requirements such as airline reservations, banking transactions, and process monitoring.
oRealtime VBR (Real-time Variable Bit Rate)—used by time-sensitive applications such as real-time video. Rt-VBR service allows the network more flexibility than CBR.
•Quality of Service: Can be enabled only for UBR without PCR, UBR with PCR, and Non Realtime VPR.
18
The following screen shows the below types of network protocols and encapsulation modes—
•PPP over ATM (PPPoA)
•PPP over Ethernet (PPPoE)
•MAC Encapsulation Routing (MER)
•IP over ATM (IpoA)
•Bridging
If you will be using VLAN tagging, then click on the Enable 802.1q checkbox and then enter the VLAN ID number. Note that the 802.1q function is only available if you select PPPoE, MER, or Bridging. When finished with your selections, click on Next to continue.
19
The following screen allows you to enter PPP username and password as well as make any selections regarding your connection.
•Dial on demand: Allows you to manually connect to the Internet so you are not permanently connected. Idle timeout timer is included.
•PPP IP extension: Used by some ISP’s. Check with your ISP to see if it is required.
•Keep alive: Keeps you connected to your ISP even when no activity is present for a certain period of time.
•Use static IP address: Select if you want to use a non-DHCP issued IP address to connect to the Internet. If selected, you will be asked to enter the static IP address.
20
When finished, click on Next to proceed to the NAT Settings screen.
•Enable NAT: Select enable if you wish to share one WAN IP address for multiple computers on your LAN.
•Enable Firewall: Select if you wish to enable the router’s firewall for security.
•Enable IGMP Multicast: Select enable if you wish to be able to provide multicasts, mostly used in video streaming.
•Enable WAN Service: Select if you wish to use WAN service and then set the service name.
21
Click Next when finished with your configurations and the below screen will follow displaying the WAN settings that you made. When satisfied with the settings click on the Apply button.
22

After you apply the configurations, it will return to the WAN Setup screen showing the new configurations. Select the Finish button to save the changes and reboot the router.
Below is the DSL Router Reboot screen that will appear during the rebooting process.
When completed, the below pop-up window will appear confirmation that the modem has been rebooted.
23
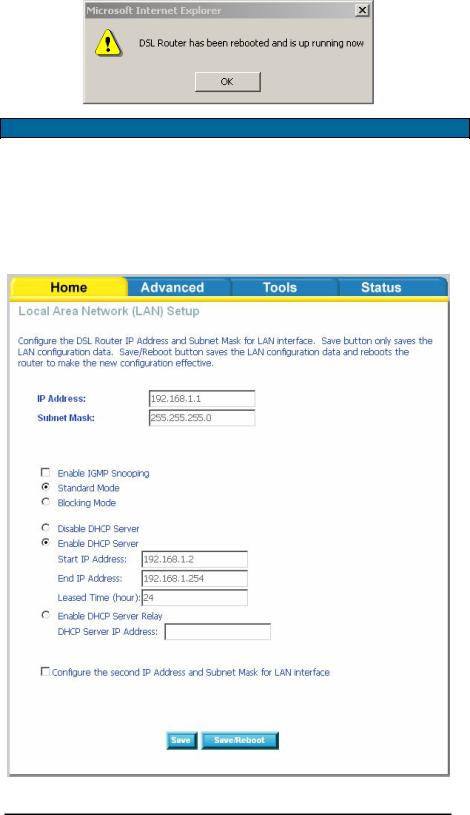
LAN
You can configure the DSL Router IP address and Subnet Mask for the LAN interface.
An available option if you will be multicasting is IGMP snooping, for which you can also select standard or blocking mode.
If you want the DHCP server to automatically assign IP addresses, enable DHCP server and enter the range of IP addresses that DHCP server can assign. Disable DHCP server if you would like to manually assign IP addresses.
24

The Save button only saves the LAN configuration data, but does not apply the configurations. Select the Save/Reboot button to save the LAN configuration data and reboot the router and apply the new configurations.
25
 Loading...