


 Loading...
Version 1.0 | 03/19/2013
User Manual
Wireless AC Dual Band USB Adapter
DWA-171

Table of Contents
Table of Contents
Product Overview.............................................................. |
3 |
Package Contents......................................................................... |
3 |
System Requirements.................................................................. |
3 |
Introduction.................................................................................... |
4 |
Features............................................................................................ |
5 |
Hardware Overview...................................................................... |
6 |
Installation.......................................................................... |
7 |
Getting Started.............................................................................. |
7 |
Remove Existing Installations........................................... |
7 |
Disable Other Wireless Adapters..................................... |
8 |
Wireless Installation Considerations.................................... |
10 |
Adapter Installation.................................................................... |
11 |
Configuration................................................................... |
17 |
D-Link Wireless Connection Manager................................. |
17 |
Wireless Networks............................................................... |
18 |
Wi-Fi® Protected Setup (WPS).......................................... |
19 |
My Wireless Networks........................................................ |
23 |
Add Profile....................................................................... |
24 |
Modify Profile.................................................................. |
25 |
Support................................................................................... |
26 |
About....................................................................................... |
27 |
Connect to a Wireless Network.............................................. |
28 |
Windows® 8................................................................................... |
28 |
Windows® 7................................................................................... |
30 |
Windows Vista®............................................................................ |
31 |
Windows® XP................................................................................ |
32 |
Wireless Security.............................................................. |
33 |
What is WPA™?............................................................................... |
33 |
Configure WPA/WPA2-Personal............................................. |
34 |
Using the D-Link Wireless Connection Manager..... |
34 |
Windows® 7........................................................................... |
36 |
Windows Vista®.................................................................... |
39 |
Windows® XP......................................................................... |
41 |
Configure WPA/WPA2-Enterprise.......................................... |
43 |
Troubleshooting............................................................... |
44 |
Windows® 7 Troubleshooting................................................. |
47 |
Wireless Basics.................................................................. |
49 |
Wireless Modes............................................................................ |
53 |
Networking Basics............................................................ |
54 |
Check your IP address................................................................ |
54 |
Windows® XP Users............................................................. |
54 |
Windows® 7/Vista Users.................................................... |
54 |
Statically Assign an IP Address............................................... |
55 |
Windows® XP Users............................................................. |
55 |
Windows® 7/Vista Users..................................................... |
56 |
Windows® 8 Users................................................................ |
57 |
Technical Specifications................................................... |
58 |
D-Link DWA-171 User Manual |
2 |

Section 1 - Product Overview
ProductPackageOverviewContents
D-Link DWA-171 Wireless AC Dual Band USB Adapter
CD with drivers and software
System Requirements
•A computer or laptop with an available USB 2.0 or USB 3.0 port
•Windows® 8, 7, Vista or XP (Service Pack 3)
•CD-ROM Drive
•A 802.11ac (draft), 802.11n, 802.11g or 802.11a access point or wireless router
D-Link DWA-171 User Manual |
3 |

Section 1 - Product Overview
Introduction
The Wireless AC Dual Band USB Adapter (DWA-171) delivers powerful wireless AC technology to your desktop or notebook computer. Simply plug the adapter into an available USB port and connect to a wireless network to access a secure, high-speed internet connection – 2.4GHz (150Mbps) or 5GHz (up to 433Mbps). And with integrated Dual Band technology, you’ll have reduced Wi-Fi interference to maximize throughput for faster streaming, gaming, and Skype calls.
Interference-Free Bandwidth
The Wireless AC Dual Band USB Adapter(DWA-171) delivers Dual Band technology to your home network for intelligent, versatile, interference-free bandwidth. Check your email and surf the Internet on the 2.4GHz band; or game, make Skype calls and stream HD movies to multiple devices using the cleaner, interference-free 5GHz band. Whatever you like to do online, Dual Band has you covered.
Easy WPS Push Button Setup
Quickly and easily establish a fast, secure home network that will have you browsing, streaming, and watching in minutes. It’s as easy as push and connect!
Compatible With All Your Wireless Products
While the Wireless AC Dual Band USB Adapter delivers cutting-edge 802.11ac speed to your home network, it’s also backward compatible with all of your current wireless products – no updates or adapters necessary.
What is wireless AC?
802.11ac is a new networking standard that produces high-throughput wireless speed on the 5GHz band. What does this mean for your home network? Flawless HD video streaming, faster gaming, and lag-free Skype and Facetime calls, all with less Wi-Fi interference for smooth, lightningfast performance. And while your home gains all the cutting-edge benefi ts of 11ac, D-Link’s Wireless AC Dual Band USB Adapter is also compatible with all of your current Wireless N products.
“Maximum wireless signal rate derived from draft IEEE 802.11ac specification and IEEE Standard 802.11n specification. D-Link makes no warranties as to forward compatibility with future standards or compatibility with draft 802.11ac devices from other manufacturers. Actual data throughput will vary. Network conditions and environmental factors, including volume of network traffic, building materials and construction, and network overhead, lower actual data throughput rate. Environmental factors may adversely affect wireless signal range. Up to 433Mbps wireless speeds achieved when connecting to other 802.11ac devices. Data throughput may also be limited by the product’s interface, less than 480 Mbps for a USB 2.0 interface. The inclusion of a specific product or manufacturer does not imply its endorsement of D-Link or the D-Link product. Computer must adhere to Microsoft’s recommended System Requirements.”
D-Link DWA-171 User Manual |
4 |

Section 1 - Product Overview
Features
•Draft IEEE 802.11ac, 802.11n, 802.11g and 802.11a Compliant
•Dual Band N Technology for use in 2.4GHz or 5GHz Networks
•Wireless AC Technology for Superior Wireless Performance
•Access Secure Networks using WPA™ or WPA2™
•Wi-Fi Protected Setup™ (WPS) Push Button for Easy Connection to a Wireless Network
D-Link DWA-171 User Manual |
5 |
Section 1 - Product Overview
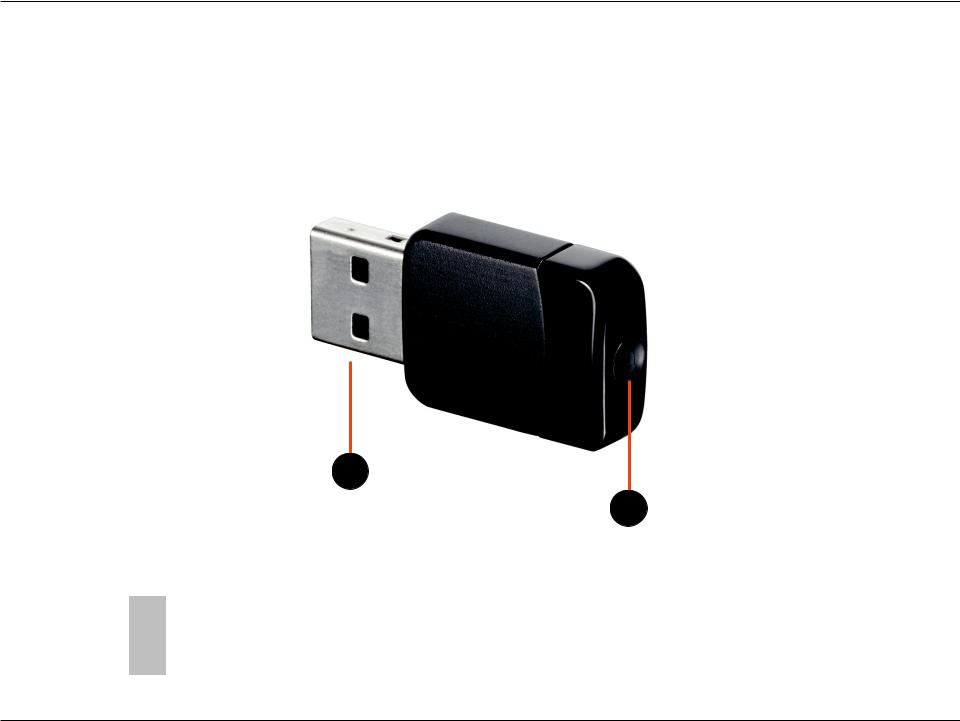
Hardware Overview
2
1
1 |
WPS Button |
Press the WPS button to automatically connect to a WPS-enabled wireless router |
|
or access point and establish connectivity. Refer to page 19. |
|||
|
|
||
|
|
|
|
2 |
USB Connector |
Used to connect the DWA-171 to your computer. |
|
|
|
|
D-Link DWA-171 User Manual |
6 |

Section 2 - Installation
Installation
This section will walk you through the installation process. If you have a built-in wireless adapter, please disable it in device manager before installing your D-Link adapter. Also, if you have previously installed another wireless adapter, please make sure any software is uninstalled.
Getting Started
Before installing your new D-Link wireless adapter, please verify the following:
•Remove any previous installations of wireless adapters
•Disable any built-in wireless adapters
•Verify the settings such as the SSID and security settings of the network(s) you want to connect to
Remove Existing Installations
If you’ve installed a different manufacture’s adapter or a different model D-Link adapter, make sure the software is uninstalled before installing the new software. Some utilities may cause a conflict with the new software. If you plan to use multiple adapters at different times, make sure the utilities are not set to load when your computer boots up. Windows® 7, Vista and XP users may use the built-in wireless utility for all adapters.
To remove any old software:
Windows® 7 users: Click Start > Control Panel > Uninstall Programs.
Windows Vista®/XP users: Click Start > Control Panel > Add or Remove Programs.
D-Link DWA-171 User Manual |
7 |
Section 2 - Installation
Disable Other Wireless Adapters
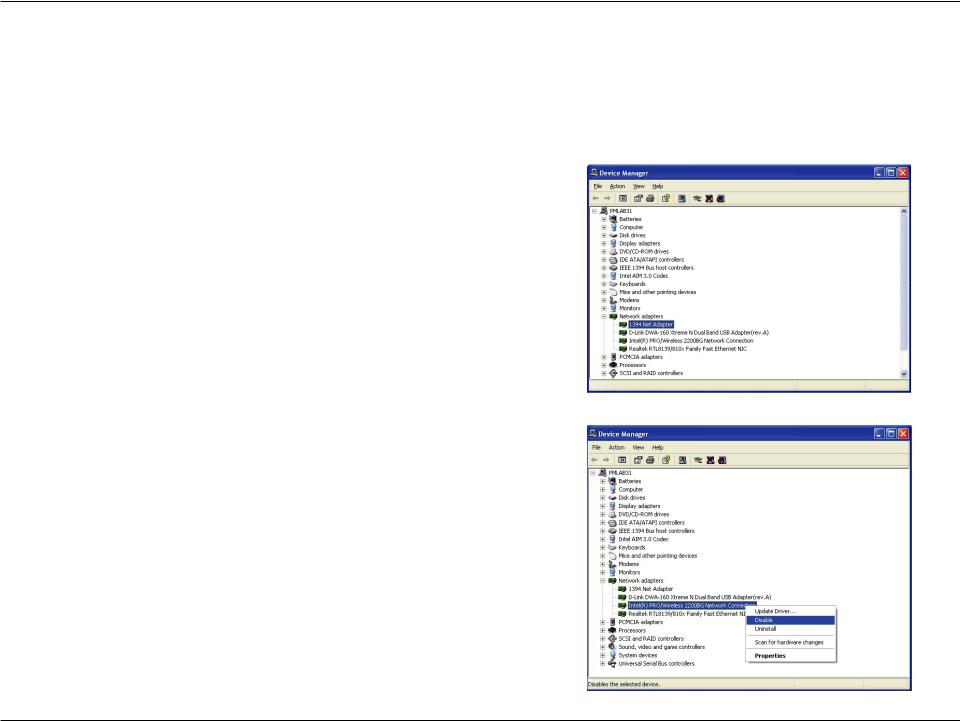
Most newer laptops may include a built-in wireless adapter. To prevent any conflicts with the D-Link wireless adapter, it is recommended to disable the wireless adapter (as well as any unused Ethernet adapters).
From the desktop, right-click on the My Computer icon and select Properties.
Click the Hardware tab and then click Device Manager. Scroll down the list and click the
+ sign to the left of Network Adapters.
Right-click the adapter you would like to disable and select Disable.
D-Link DWA-171 User Manual |
8 |
Section 2 - Installation
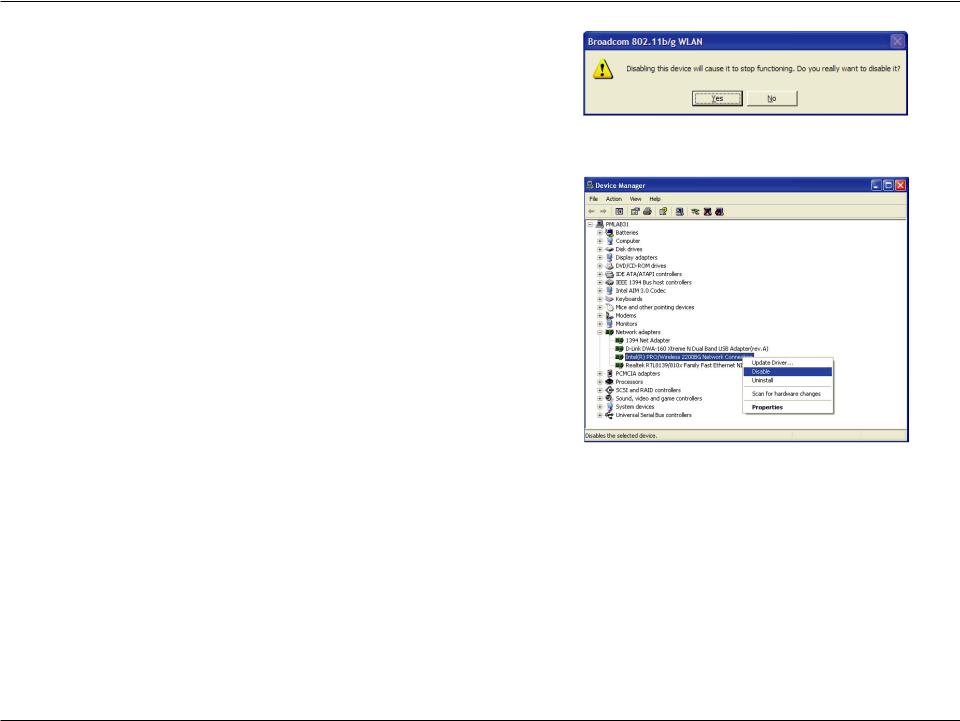
Click Yes to disable the adapter.
When the adapter is disabled, a down arrow or a grayed icon will be displayed.
Disabling the adapter will not remove the drivers. If you would like to use the adapter, simply right-click it and select Enable.
D-Link DWA-171 User Manual |
9 |

Section 2 - Installation
Wireless Installation Considerations
The D-Link wireless adapter lets you access your network using a wireless connection from virtually anywhere within the operating range of your wireless network. Keep in mind, however, that the number, thickness and location of walls, ceilings, or other objects that the wireless signals must pass through, may limit the range. Typical ranges vary depending on the types of materials and background RF (radio frequency) noise in your home or business. The key to maximizing wireless range is to follow these basic guidelines:
1.Keep the number of walls and ceilings between the D-Link adapter and other network devices to a minimum - each wall or ceiling can reduce your adapter’s range from 3-90 feet (1-30 meters.) Position your devices so that the number of walls or ceilings is minimized.
2.Be aware of the direct line between network devices. A wall that is 1.5 feet thick (.5 meters), at a 45-degree angle appears to be almost 3 feet (1 meter) thick. At a 2-degree angle it looks over 42 feet (14 meters) thick! Position devices so that the signal will travel straight through a wall or ceiling (instead of at an angle) for better reception.
3.Building materials make a difference. A solid metal door or aluminum studs may have a negative effect on range. Try to position access points, wireless routers, and computers so that the signal passes through drywall or open doorways. Materials and objects such as glass, steel, metal, walls with insulation, water (fish tanks), mirrors, file cabinets, brick, and concrete will degrade your wireless signal.
4.Keep your product away (at least 3-6 feet or 1-2 meters) from electrical devices or appliances that generate RF noise.
5.If you are using 2.4GHz cordless phones or X-10 (wireless products such as ceiling fans, lights, and home security systems), your wireless connection may degrade dramatically or drop completely. Make sure your 2.4GHz phone base is as far away from your wireless devices as possible. The base transmits a signal even if the phone in not in use.
D-Link DWA-171 User Manual |
10 |
Section 2 - Installation
Adapter Installation
Warning: Do NOT install the DWA-171 adapter into your computer before installing the driver software from the D-Link CD.
Turn on the computer and Insert the D-Link DWA-171 Driver CD in the CD-ROM drive.
If the CD Autorun function does not automatically start on your computer, go to Start > Run. In the run box type “D:\autorun.exe” (where D: represents the drive letter of your CD-ROM drive).
When the autorun screen appears, click Install Drivers.
D-Link DWA-171 User Manual |
11 |

Section 2 - Installation
The welcome window will appear. Click Next to continue.
By default setup will install to the default location: C:\Program Files\D-Link\DWA-171, where C: represents the drive letter of your hard drive. To install to a different location click Browse and specify the location, then click Next.
Select the Program Files folder location and click Next.
D-Link DWA-171 User Manual |
12 |
Section 2 - Installation
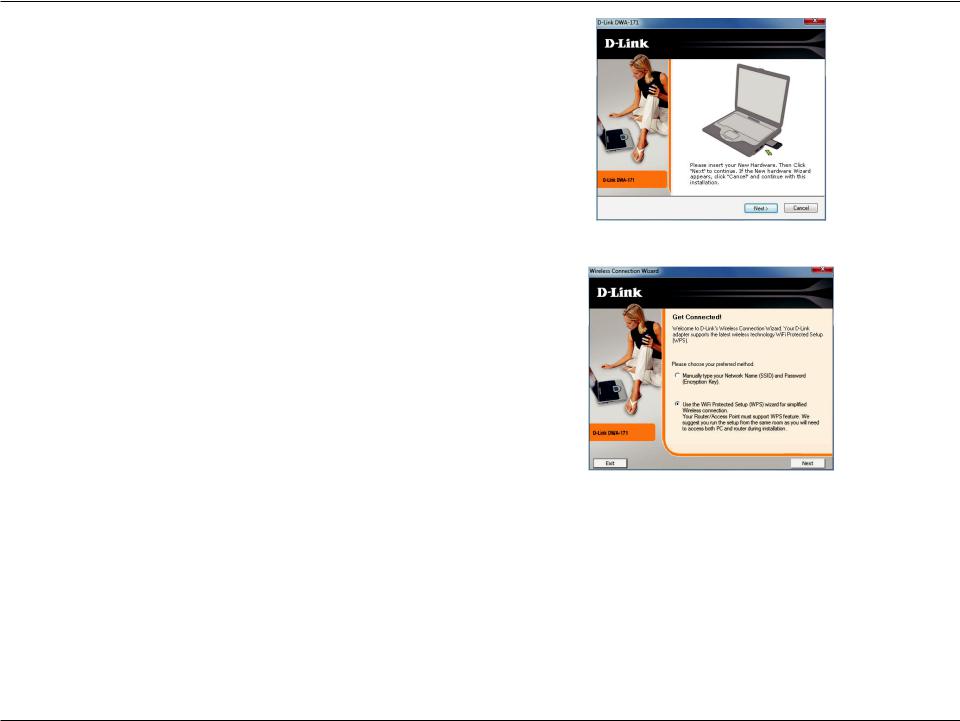
Insert the adapter into an available USB port on your computer. Click Next to continue.
If the Found New Hardware Wizard appears, click Cancel.
The drivers and software will now install. Please allow 1-2 minutes for this process to finish.
The Wireless Connection Wizard will now appear.
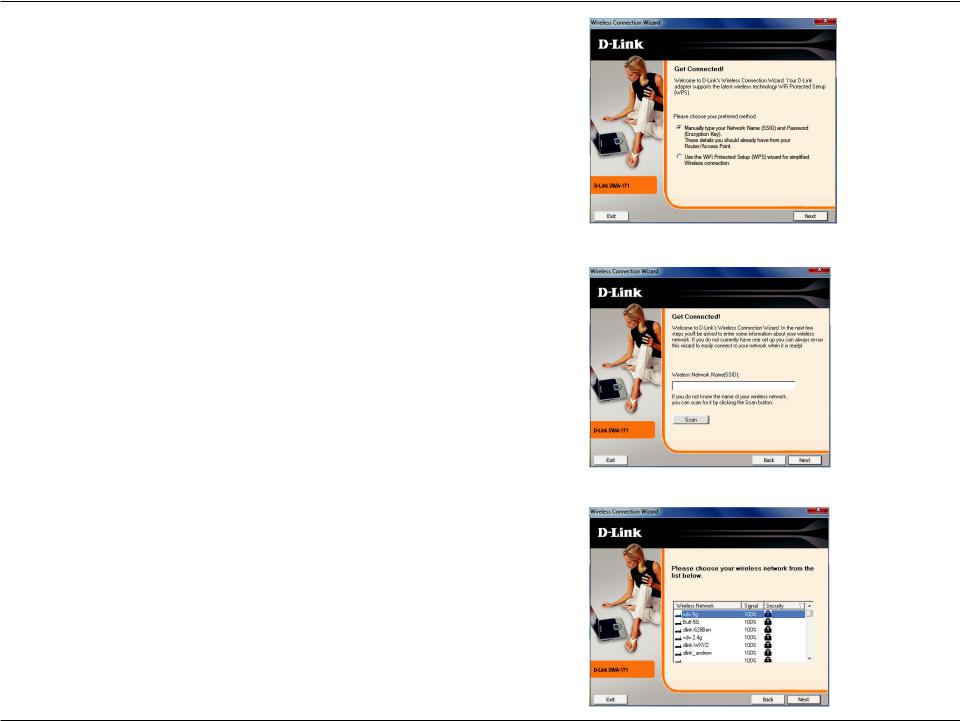
If you want to manually connect to a wireless network, refer to page 15. The following instructions will connect you to a wireless network using Wi-Fi® Protected Setup (WPS). Click Next to continue.
D-Link DWA-171 User Manual |
13 |
Section 2 - Installation
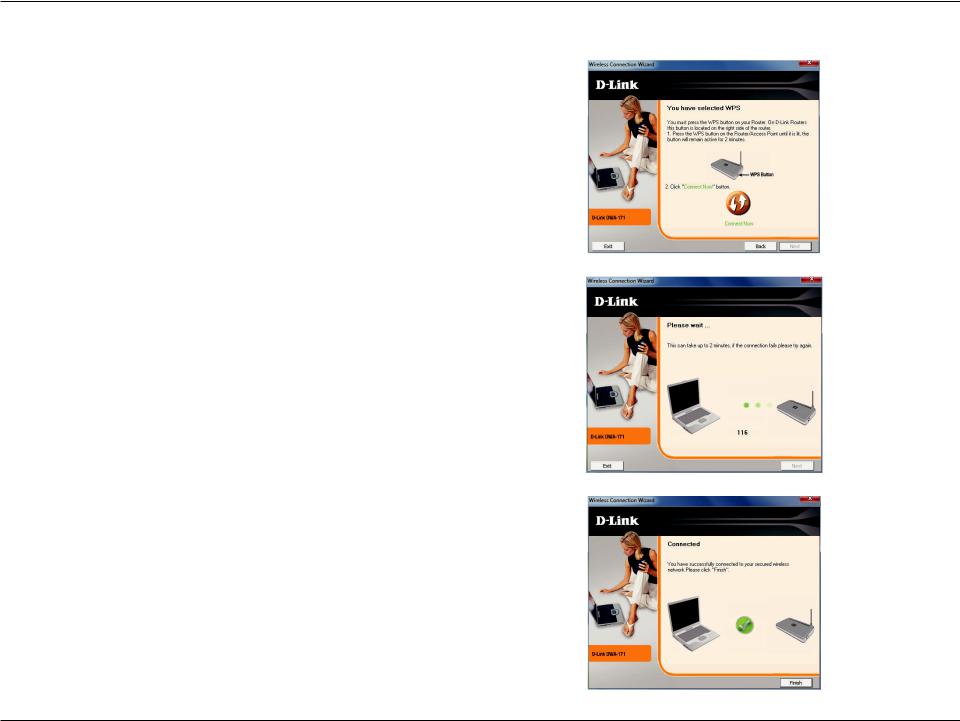
Push Button Configuration (PBC)
To connect to your network using the WPS push button configuration method, click the virtual button as shown in the screenshot.
Note: You may also connect to your network by pressing the WPS button on the adapter and holding for two seconds until the wizard screen comes up. Then, press the WPS button on the router/access point to continue.
Press the WPS button on your access point or wireless router within 2 minutes to establish connectivity.
Note: Some d evices may require you to launch WPS from software or a web interface. Please refer to your router or access point’s user manual for more information.
When this screen appears, you have successfully connected to your wireless network. Click Next to complete your setup.
D-Link DWA-171 User Manual |
14 |
Section 2 - Installation
To manually connect to your wireless network, select Manually type your Network Name (SSID) and then click Next.
Enter the network name (SSID) manually. If you enter the SSID incorrectly, you will automatically be brought to the site survey page. Click Scan to display the site survey page.
Click the Scan button to display a list of wireless networks (site survey). Click on the network name (SSID) and click Next.
D-Link DWA-171 User Manual |
15 |
Section 2 - Installation
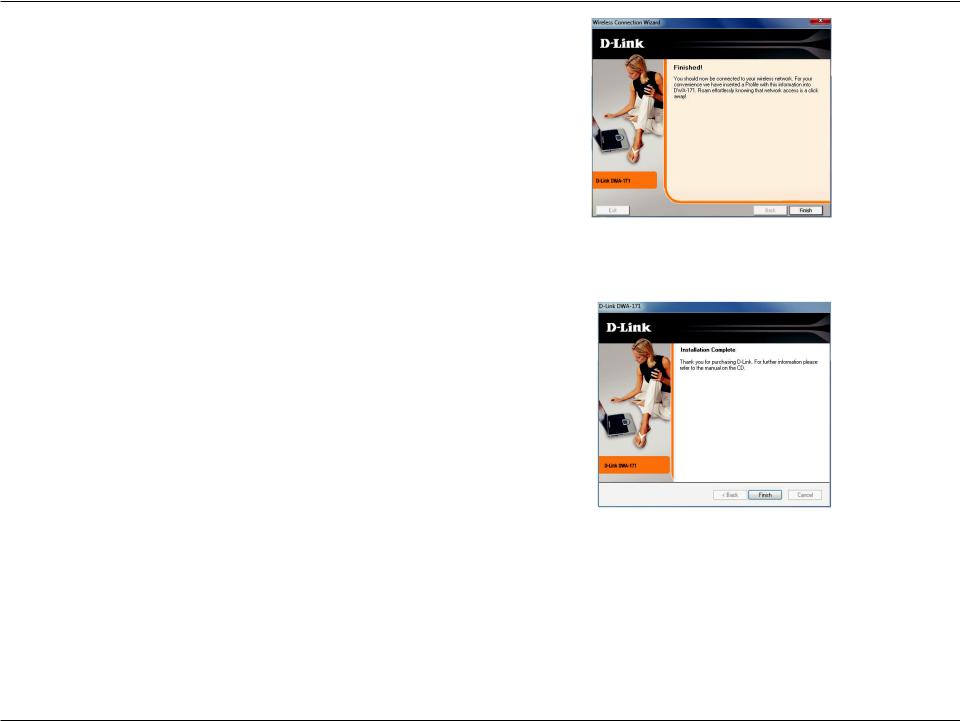
When this screen appears, you are successfully connected to your wireless network. Click Next to complete your setup.
Click Finish to continue. If you are prompted to reboot your computer, select
Yes, I want to restart my computer now.
D-Link DWA-171 User Manual |
16 |

Section 3 - Configuration
Configuration
This section will show you how to configure your new D-Link wireless adapter using the D-Link Utility as well as Windows® wireless utility.
D-Link Wireless Connection Manager
The D-Link DWA-171 uses the Wireless Connection Manager as the management software. The manager provides the user an easy interface to change any settings related to the wireless adapter. Clicking on the Wireless Connection Manager icon on the desktop will start the Configuration.
If you are using Windows® 8, 7, Vista or XP, please skip to pages 28 or 29 respectively.
Double-click the Wireless Connection Manager icon on your desktop.
D-Link DWA-171 User Manual |
17 |

Section 3 - Configuration
Wireless Networks
The Wireless Networks (Site Survey) page will display all wireless networks that are available in your area. To connect to a network, simply highlight the wireless network (SSID) and click Connect.
SSID:
MAC:
Signal:
Security:
Channel:
WPS Button:
Refresh Button:
Connect Button:
Activate Button:
The SSID (Service Set Identifier) is the name of the wireless network.
Displays the MAC address of the wireless device.
Displays the Link Quality of the wireless connection.
If there is a “lock” icon, this means the wireless network is secure. You must know the encryption key/security settings to connect.
Displays the channel of the wireless network.
Connect to a wireless network using Wi-Fi® Protected Setup. Refer to the next page.
Rescans for available wireless networks in your area.
Highlight a wireless network and click the Connect button. If the network is secure, a pop-up window will appear. Enter the security information to connect (refer to the Wireless Security section for more information).
Select a wireless network profile from the drop-down menu and click Activate to connect. Allow up to 30 seconds to connect.
D-Link DWA-171 User Manual |
18 |
Loading...