


 Loading...
2020 | Business Class Networking
NUCLIAS CONNECT
DNH-100 User Manual
V 1.00

Nuclias Connect Software User Manual |
|
|
Table of Contents |
Introduction.................................................................................................................................................................................. |
3 |
Product Overview........................................................................................................................................................................ |
3 |
Package Contents................................................................................................................................................................................................................ |
3 |
System Requirements......................................................................................................................................................................................................... |
3 |
Hardware Overview..................................................................................................................................................................... |
4 |
LED Indicators........................................................................................................................................................................................................................ |
4 |
Interface Connectors.......................................................................................................................................................................................................... |
4 |
Installation.................................................................................................................................................................................... |
5 |
Mounting................................................................................................................................................................................................................................ |
5 |
Connecting the Controller................................................................................................................................................................................................ |
6 |
Basic Configuration...................................................................................................................................................................... |
7 |
Launch Nuclias Connect.................................................................................................................................................................................................... |
7 |
Nuclias Connect Configuration................................................................................................................................................... |
9 |
Wizard....................................................................................................................................................................................................................................... |
9 |
Dashboard............................................................................................................................................................................................................................ |
12 |
Monitor.................................................................................................................................................................................................................................. |
13 |
Access Point.................................................................................................................................................................................................................... |
13 |
Wireless Client............................................................................................................................................................................................................... |
14 |
Configuration...................................................................................................................................................................................................................... |
16 |
Create Profile.................................................................................................................................................................................................................. |
16 |
Profile Settings.............................................................................................................................................................................................................. |
19 |
Firmware Upgrade....................................................................................................................................................................................................... |
36 |
SSL Certificate................................................................................................................................................................................................................ |
37 |
Payment Gateway........................................................................................................................................................................................................ |
38 |
Report..................................................................................................................................................................................................................................... |
39 |
Peak Network Activity................................................................................................................................................................................................. |
39 |
Most Active AP.............................................................................................................................................................................................................. |
40 |
Hourly Network Activity............................................................................................................................................................................................. |
41 |
Daily Network Activity................................................................................................................................................................................................ |
42 |
Log........................................................................................................................................................................................................................................... |
43 |
SNMP Traps..................................................................................................................................................................................................................... |
43 |
Syslogs.............................................................................................................................................................................................................................. |
44 |
System Event Log......................................................................................................................................................................................................... |
45 |
Device Log...................................................................................................................................................................................................................... |
46 |
System.................................................................................................................................................................................................................................... |
47 |
Device Management................................................................................................................................................................................................... |
47 |
User Management....................................................................................................................................................................................................... |
48 |
Settings............................................................................................................................................................................................................................ |
50 |
About................................................................................................................................................................................................................................ |
61 |
Appendix.................................................................................................................................................................................... |
62 |
Nuclias Connect App........................................................................................................................................................................................................ |
62 |
Page 2

Nuclias Connect Software User Manual |
Introduction |
Introduction
Nuclias Connect is D-Link’s centralized management solution for Small-to-Medium-Sized Business (SMB) networks. Nuclias Connect makes it easier to analyze, automate, configure, optimize, scale, and secure your network — delivering the convenience of an Enterprise-wide management solution, at an SMB price. Nuclias Connect gives you the financial and technical flexibility to expand from a small network to a larger one (up to 1,000 APs), while retaining a robust and centralized management system. And with its intuitive Graphical User Interface (GUI), a wealth of enhanced AP features, and a setup wizard that supports 11 languages, Nuclias Connect minimizes the hassle of deployment, configuration, and administration tasks.
The DNH-100 Nuclias Connect Hub is a hardware controller with pre-loaded Nuclias Connect software. It is designed to support small-to-medium business or enterprise environments by providing network administrators the capability to manage D-Link DAP series access points through one single platform. The Nuclias Connect Hub can currently manage up to one hundred APs per unit with the potential to extend to other Nuclias Connect products in future firmware updates.
Product Overview
Package Contents System Requirements
Package Contents
•DNH-100 Nuclias Connect Hub
•Power Cord
•Rack Mount Kit
•Quick Start Guide
•16 Gb MicroSD Card (Optional*)
System Requirements
•Computers with Windows®, Macintosh®, or Linux-based operating systems with an installed Ethernet Adapter
•Microsoft Edge, Safari 7, Firefox 28, or Google Chrome 33 and above (for configuration)
Page 3

Nuclias Connect Software User Manual |
Hardware Overview |
|
|
|
|
Hardware Overview |
|
LED Indicators |
Interface Connectors |
LED Indicators
|
|
1 |
2 |
3 |
|
|
|
|
|
||
# |
LED |
|
Description |
||
|
|
Solid Green - The device is powered on and ready for use, |
|||
|
|
and it is in standalone mode. |
|
||
1 |
Power |
Blinking Green - The device is booting up. |
|||
Solid Orange - The device is connected to Nuclias server |
|||||
|
|
||||
|
|
and single sign-on is available for use. |
|||
|
|
Solid Red - Device is unable to boot . |
|||
2Link Speed Solid Green - Port is operating at 10/100 Mbps
(10/100 Mbps) Light Off - No Link.
3Link Speed Solid Green - Port is operating at 1000 Mbps
(1000 Mbps) Light Off - No Link.
Interface Connectors
1 |
2 |
3 |
4 |
5 |
# |
Connector |
Description |
|
1 |
Reset |
Used for rebooting or resetting the device back to |
|
factory default settings. |
|||
|
|
||
2 |
Console |
RJ-45 port to connect the RJ-45 console cable for CLI |
|
Port |
management . |
||
|
|||
3 |
Ethernet |
Gigabit RJ-45 port for LAN connection. |
|
Port |
|||
|
|
||
4 |
MicroSD |
MicroSD slot for MicroSD card1,2,3 up to 32 Gb. |
|
Slot |
|||
|
|
||
5 |
USB Port |
USB 3.0 Type A port2 (provides 5V/1A power for |
|
optional HDD connection). |
|||
|
|
1 Due to EU regulations the 16 Gb MicroSD card is only included in the WW version. 2 Only FAT32 format is supported.
3 Do not remove the microSD card while the power is on as this may damage your card.
Page 4
Nuclias Connect Software User Manual |
|
Installation |
|
|
|
|
|
|
|
Installation |
|
Mounting |
|
Connecting the Controller |
Mounting
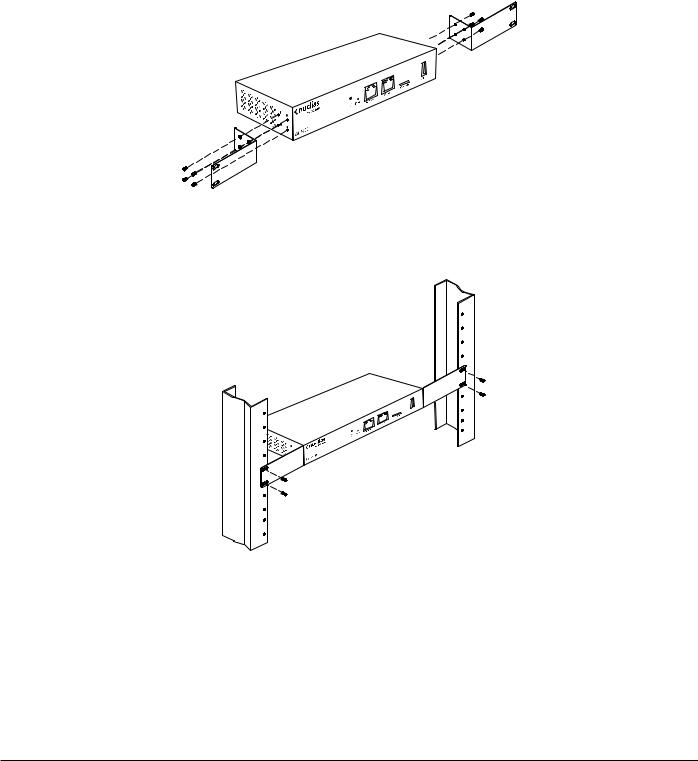
The DNH-100 can be mounted in an EIA standard size 19-inch rack, which can be placed in wiring closet with other equipment.
1.Attach the L-shaped mounting brackets to each side of the chassis as shown in Figure 3 and secure them with the screws provided.
2. Mount the device in the rack using a screwdriver and the supplied rack-mounting screws.
Page 5
Nuclias Connect Software User Manual |
Installation |
|
|
|
|
|
Connecting the Controller |
Mounting |
Connecting the Controller
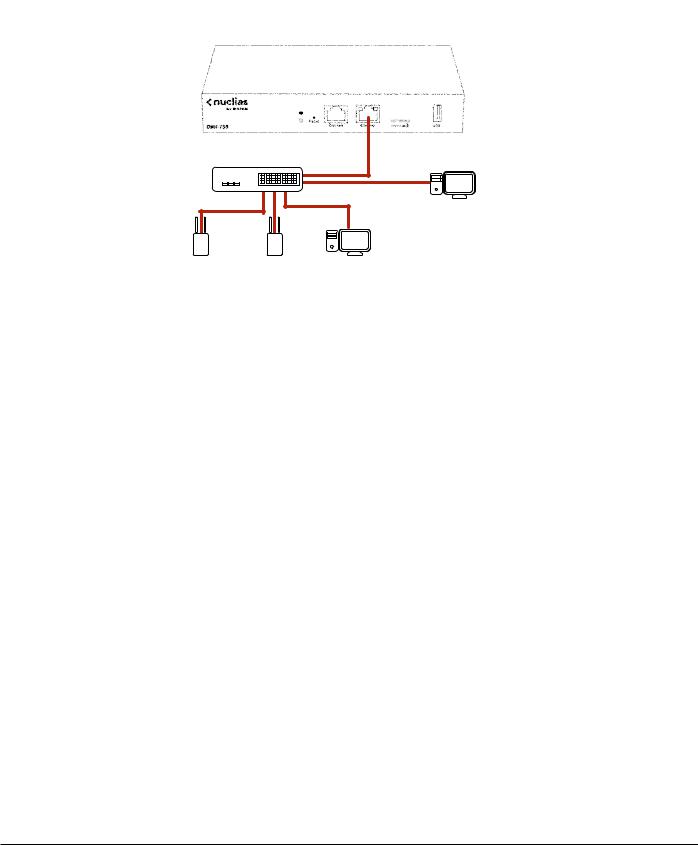
LAN
DHCP Server
Nuclias ConnectAPs |
Management |
|
Computer |
To connect the DNH-100, perform the following procedure:
1.Install the DNH-100 and access points according to the instructions in their documentation. Access points by default will receive an IP address from the DHCP server.
2.Connect one end of an Ethernet LAN cable to port labeled as Ethernet on the front of the wireless controller. Connect the other end of the cable to an available RJ-45 port on a switch in the LAN network segment.
3.Plug one end of the AC power cord into the AC power connector on the back panel of the device. Plug the other end into an AC power source.
Page 6
Nuclias Connect Software User Manual |
Basic Configuration |
Basic Configuration
Launch Nuclias Connect
Launch Nuclias Connect
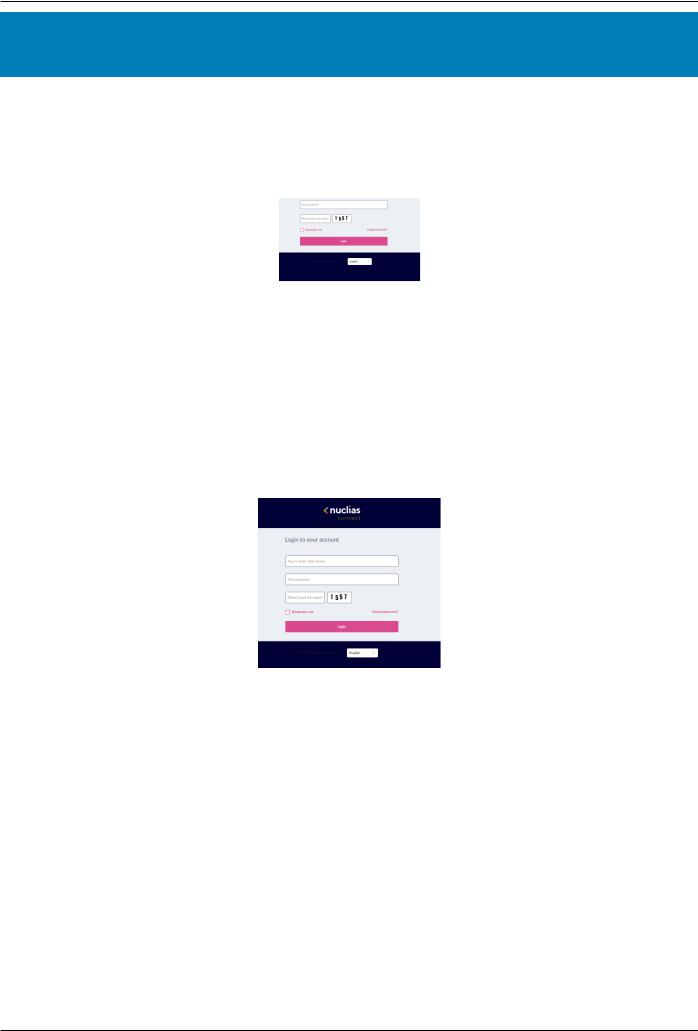
The DNH-100 comes preloaded with Nuclias Connect. Open a web browser from the management computer and enter the IP address or Domain Name of the DNH-100. The default IP address is https://192.168.0.200.
Note: For initial configuration, the management computer and DNH-100 must be in the same subnet.
The default user name and password of Nuclias Connect is ‘admin’.
Enter the Captcha code as shown on screen.
NOTE:
•The Remember me function can be selected to save the password entry for future use.
•The Forgot password? function provides an option to reset your password in the event that you’ve forgotten your current password. To use this function, the smtp server and email address must be configured first.
•The interface supports multilanguage options. By clicking the language drop-down menu, a different language can be selected.
Page 7

Nuclias Connect Software User Manual |
Basic Configuration |
|
|
After the web browser opens and connects successfully to the server, a change-password dialog will appear. A change in the default password is required after the first login.
When assigning a password, it is recommended to use a strong password. The new password is required to be 5 - 16 characters in length. By combining uppercase and lowercase characters, numbers and symbols a strong password can be created.
NOTE: Do not include common words or names.
Enter the previous password in the Old Password field.
In the New Password field enter the new password.
Enter the same password in the Confirm Password field to verify the entry.
Click Modify to complete the process.
Page 8

Nuclias Connect Software User Manual |
Nuclias Connect Configuration |
Nuclias Connect Configuration
Wizard
A wizard is available to guide you through first-time setup of the device. If at any time you wish to re-run the wizard you can click on the  icon to start the wizard.
In the Lan Settings section, the device connection parameters can be configured. These settings allow the management computer to connect to the device.
Parameter |
Description |
|
|
Get Address From |
Click the drop-down menu to choose whether the |
|
DNH-100 will get an IP address from a DHCP server |
|
or to manually set a static IP address. By default it |
|
is set to Static IP Address. Note: DHCP server is not |
|
recommended. |
|
|
IP Address |
If the above is set to Static IP address, specify an IP |
|
address for the DNH-100. |
Subnet Mask |
Specify a subnet mask for the device. |
|
|
Gateway |
Specify a gateway mask for the device. (Optional) |
|
|
Primary DNS |
Specify a primary DNS for the device. (Optional) |
|
|
Secondary DNS |
Specify a secondary DNS for the device. (Optional) |
|
|
Synchronize Device |
Check to enable the synchronization of the device |
Access Address |
access address. If the device access address is differant |
|
than the LAN IP address and you want to manage |
|
remote APs, this function needs to be disabled. |
|
|
In the Date and Time section, parameters about the device time and date can be configured. It is recommended that an NTP server is used; log and schedule settings are depanding on correct time and date configurations.
Parameter |
Description |
|
|
Time Zone |
Click the drop-down menu to select the time zone. |
|
|
NTP |
Check to enable use of NTP server(s) to manage |
|
device’s date and time. |
|
|
NTP Server 1 |
Specify the NTP Server’s address. |
|
|
NTP Server 2 |
Specify the secondary NTP Server’s address. |
|
|
Click Save and the device will automatically restart. Re-login to continue with the wizard.
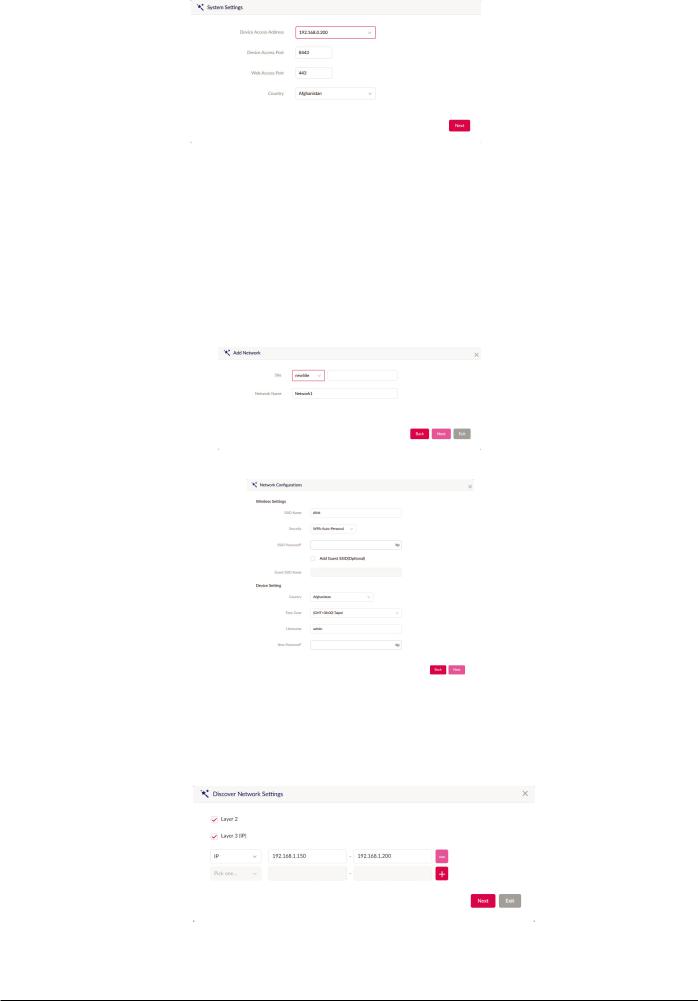
In the System Settings window, configure the following:
|
Parameter |
Description |
|
|
|
|
|
|
Device Access Address |
Enter the Nuclias Connect Server application’s IP address. |
|
|
|
To manage remote APs, the IP address must be a public |
|
|
|
IP address; IP mapping is required for instances behind a |
|
|
|
firewall or router. |
|
|
|
|
|
|
Device Access Port |
Enter the Nuclias Connect server application’s listen |
|
|
|
port number. The default value is 8443. For remote AP |
|
|
|
management behind a firewall or router, the inboud port |
|
|
|
must be opened. |
|
|
|
|
|
|
Web Access Port |
The web access ports as defined during the installation. |
|
|
|
The values are predefined. |
|
Click Next to continue |
|
|
|
|
|
|
|
|
|
Page 9 |
|
Nuclias Connect Software User Manual |
Nuclias Connect Configuration |
|
|
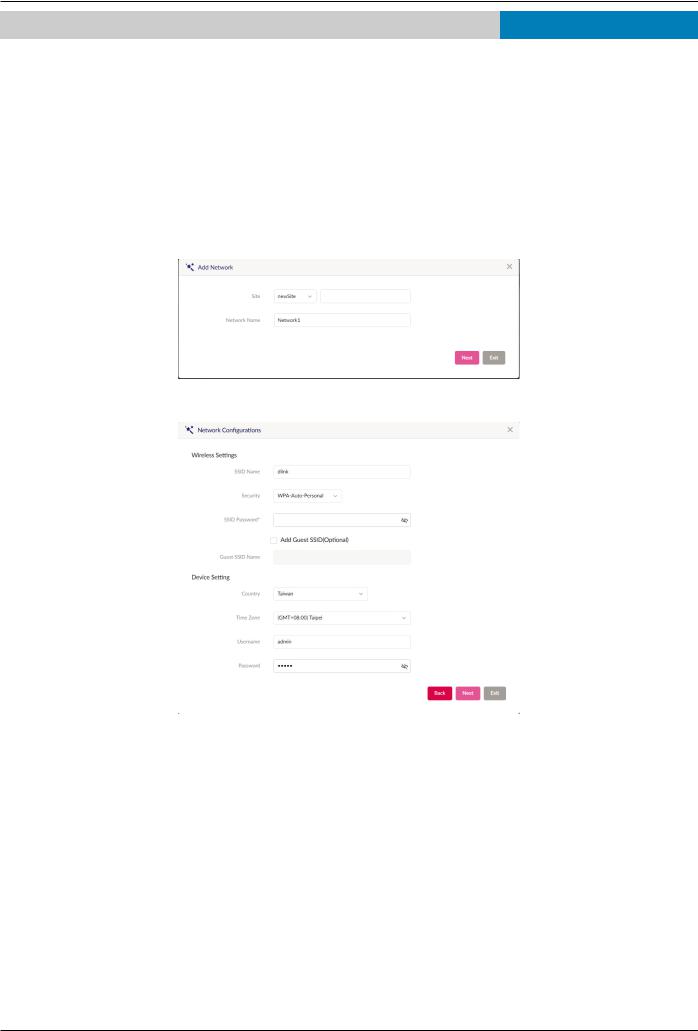
From the Site drop-down menu, selecting an existing site or select newSite and enter the name of the site in the empty field.
In the Network Name field, enter the name in which to identify the new network. Click Next to continue or Exit to return to the previous screen.
The Network Configurations page will appear. Enter the wireless and device settings to define the network configuration. Click Next to continue. To return to the previous page, click Back or click Exit to discontinue the configuration process.
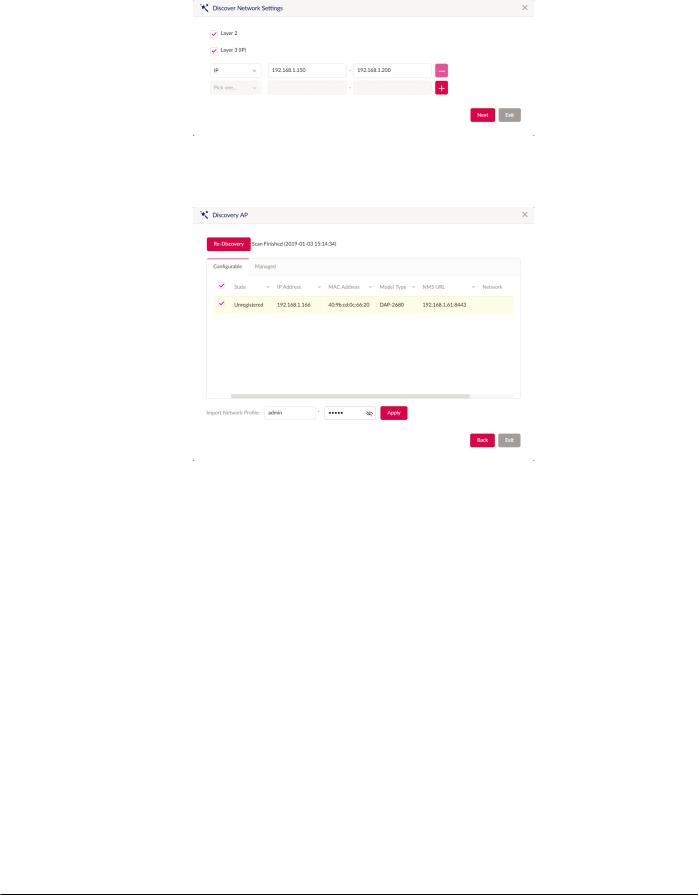
The Discover Network Settings page will appear. Select the data link layer (layer 2 or layer 3) to define the type of network in which to find manageable access points. If Layer 3 is selected, click the drop-down menu to define either an IP or a prefix
segmentation. Click  to add additional IP/prefix segments or Next to continue. Click Exit to discontinue the configuration process.
Page 10
Nuclias Connect Software User Manual |
Nuclias Connect Configuration |
|
|
The Start Discovery Page will appear. Click Start Discovery to list all available unmanaged devices. If a device is found, select it and click Apply to import the network profile. Click on the Managed tab to select already defined devices and add them to this network.
Page 11
Nuclias Connect Software User Manual |
Nuclias Connect Configuration |
|
|
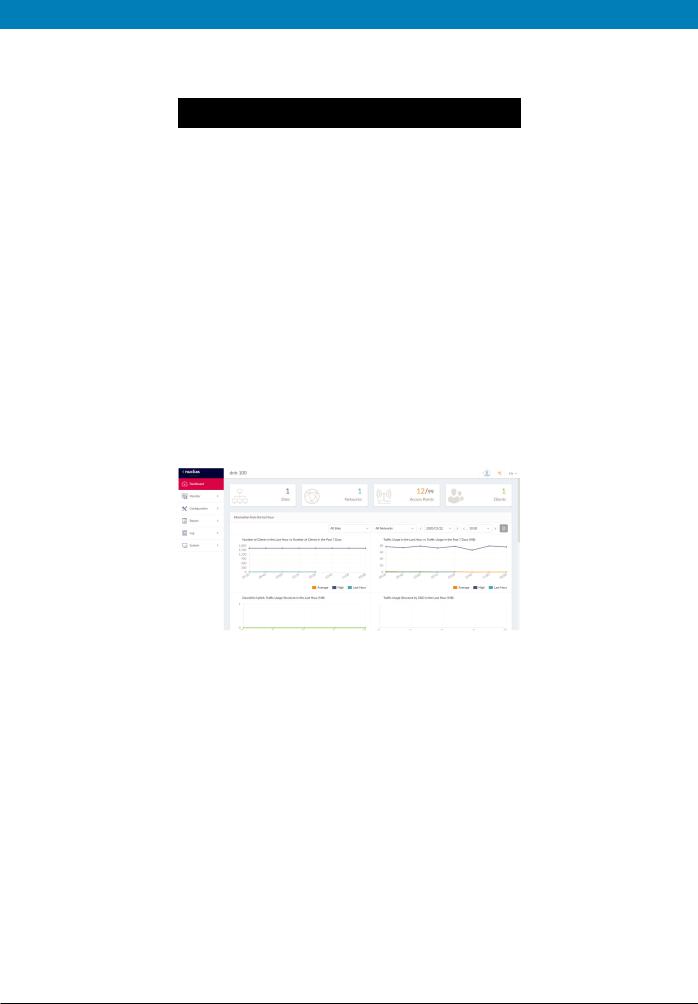
Dashboard
After successfully logging into the server, the Dashboard page will appear. A summary of information of all connected access points and wireless clients is available on this page.
Block |
Description |
|
|
Sites |
Displays the number of created profiles, |
|
also called sites. |
|
|
Networks |
Displays the total number of created |
|
networks. |
Access Points |
Displays the total number of available |
|
and online access points. |
|
|
Clients |
Displays the total number of wireless |
|
clients connected to the network. |
Information |
Displays log information for the number |
from the Last |
of clients, traffic usage, downlink/uplink |
Hour |
traffic usage, and traffic usage by SSID. |
|
|
Channel |
Displays the utilization rate for both 2.4 |
Utilization |
and 5 GHz bandwidth. |
|
|
Last Events |
Displays a shortened log version of the |
|
latest events across all or selected sites. |
|
|
Page 12
|
Nuclias Connect Software User Manual |
|
|
Nuclias Connect Configuration |
|
|
|
|
|
|
|
|
|
|
|
|
|
Nuclias |
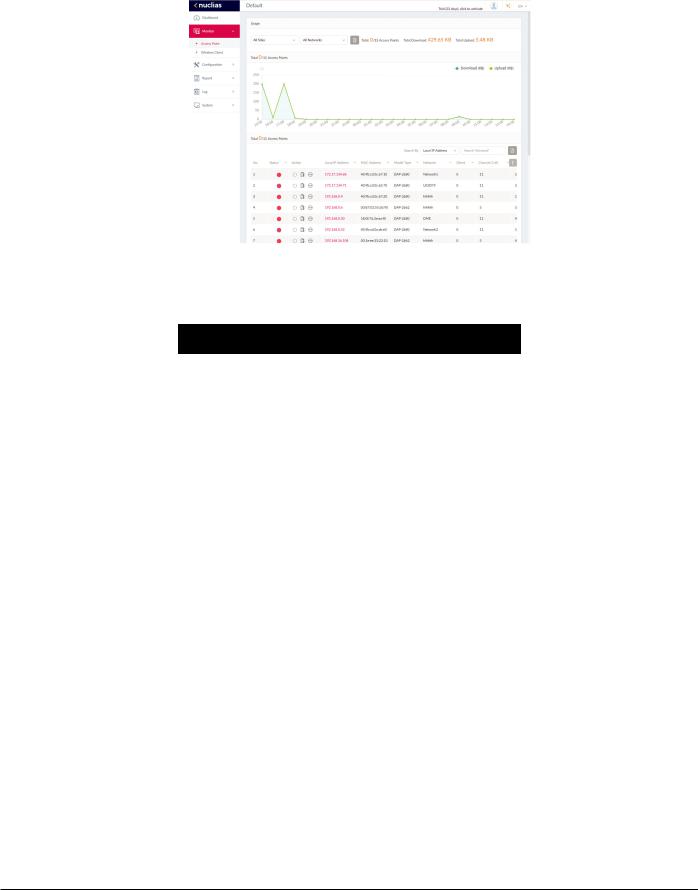
Monitor |
Access Point |
|||
After clicking on Monitor -- > Access Points in the menu, the Usage and Total Access Points frames will appear. On this frame, you can view a report of all or a selected number wireless clients and networks managed by the application.
Three reports can be generated using Site, Network, or Local IP address.
The following figure represents a typical report. This report can be refined by selecting the a specific Site from the first dropdown menu, and then selecting the network in the second drop-down menu.
Block |
Description |
Usage |
Displays a report listing the RX (kB) / |
|
TX (kB) usage for the specified site and |
|
network. |
|
|
Total X Access |
Displays a report listing all detected |
Points |
wireless clients. |
In the Search By drop-down field, select an attribute (Local IP Address, Local IPv6 Address, NAT IP Address, MAC Address,
Model Type, or FW Version) to specify the search function or enter a keyword related to the target device in the Search field. Click  to start the process. Any relevant devices meeting the search criteria will be listed in the frame.
Page 13

|
Nuclias Connect Software User Manual |
Nuclias Connect Configuration |
|||
|
|
|
|
|
|
|
|
|
|
|
|
Nuclias |
Monitor Wireless Client |
Connected Clients |
|||
After clicking on Wireless Clients in the menu the Connected Clients frame will show by default. In this frame, you can view a report of all connected clients managed by the application.
Three association reports can be generated by Site, Network, and Clients.
The following figure represents a typical report. This report can be refined by selecting a specific Site from the first drop-down menu, and then selecting a network and client.
This page shows a report that was generated by connected wireless clients. This report can be refined by selecting the date and time From and To, and then selecting the Type, either By MAC Address or By Alias, and also additionally entering Key Words in the text box provided.
In this report a list of wireless client connections, connected to the access points that are managed by this application, are displayed. Information such as Network, IP Address, IPv6 Address, MAC Address, Auth Type, OS (only available on captive portal clients), Upload, Download, Channel, RSSI (dBm), SNR (dB), Band, SSID, AP MAC Address, Traffic Usage, Traffic Usage(%), Last Seen, and Uptime is displayed for each wireless client.
In the Search field, enter a keyword related to the target device and click  to start the process. Any relevant devices meeting the search criteria will be listed in the frame.
Page 14
|
Nuclias Connect Software User Manual |
|
|
Nuclias Connect Configuration |
||
|
|
|
|
|
|
|
|
|
|
|
|
|
|
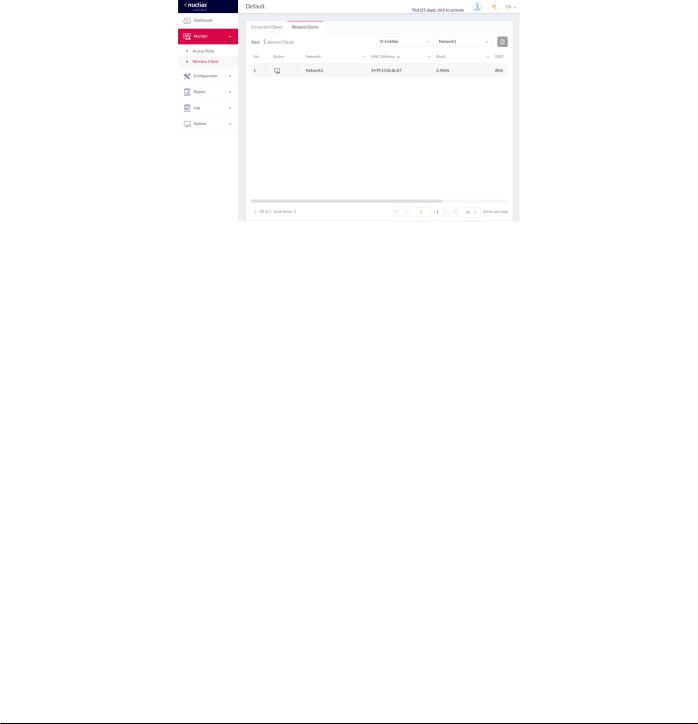
Nuclias |
Monitor |
Wireless Client |
Blocked Clients |
|||
Click on Blocked Clients. In this frame, you can view a report of all blocked clients detected. This report can be generated by specifying Site and Network criteria.
The following figure represents a typical report. This report can be refined by selecting a specific Site from the first drop-down menu, and also then selecting the network.
In this report a list of blocked wireless client connections are displayed.
In the Search field, click the drop-down menu and select a Site then select a Network. Click  to start the process. Any relevant devices meeting the search criteria will be listed in the frame.
The report lists the following information: No., Action, Network, MAC Address, Band, SSID, and Auth. Type.
Page 15
|
Nuclias Connect Software User Manual |
|
|
Nuclias Connect Configuration |
|
|
|
|
|
|
|
|
|
|
|
|
|
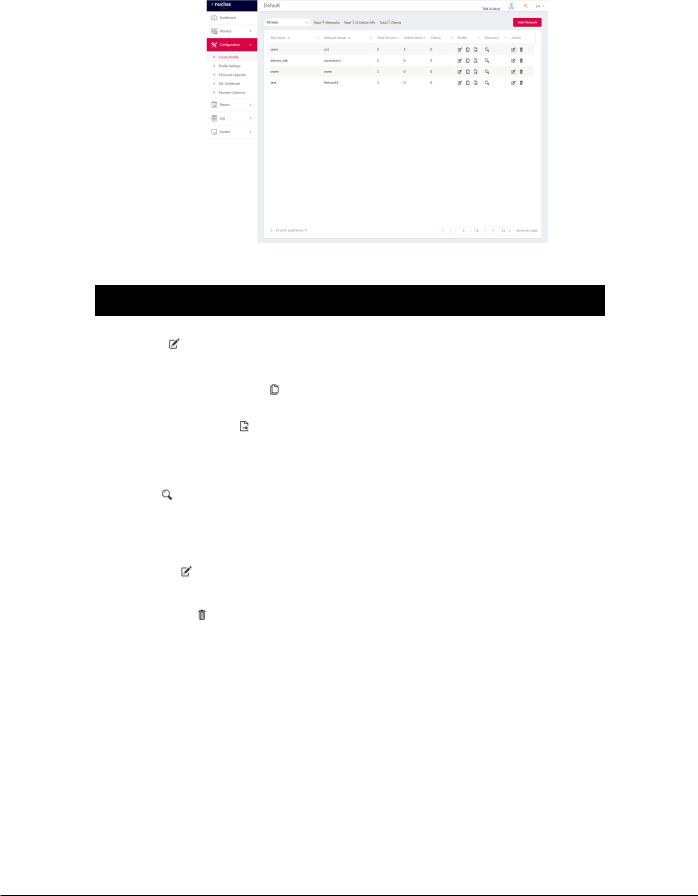
Nuclias |
Configuration |
Create Profile |
|||
The Create Profile function allows for the creation of new sites and networks.
After clicking on Configuration > Create Profile the Default frame displays listing all available sites and networks, see the following screen for further information.
Block |
Description |
|
|
Opens site details page, editing is available for selected |
|
Edit Profile |
site’s security, access control, and user authentication |
|
settings. |
||
|
||
|
|
|
Copy Profile to this Network |
Copies existing profile to a designated site and |
|
network. |
||
|
|
|
Export Network Profile |
Exports selected profile to a file (*.dat) on a local |
|
directory. |
||
|
Opens the Discovery Network Settings page. From |
|
|
this page, you can search for devices located on L2 |
|
Discovery |
protocol layer or specific IP addresses / Prefix subnet |
|
IPs. Once the criteria is defined, click Next. Click |
||
|
Start Discovery to find the results (Configurable and |
|
|
Managed devices) of the search. |
|
|
|
|
|
Opens the Edit Network page. From this page, you can |
|
Edit Network |
edit network settings or migrate to a new or existing |
|
site. |
||
|
||
Delete Network |
Deletes the selected network configuration. |
|
|
Page 16
Nuclias Connect Software User Manual Nuclias Connect Configuration
Nuclias Configuration Create Profile Add Network
Click Add Network to create a new site and/or network.
From the Site drop-down menu, selecting an existing site or select newSite and enter the name of the site in the empty field.
In the Network Name field, enter the name in which to identify the new network. Click Next to continue or Exit to return to the previous screen.
The Network Configurations page will appear. Enter the wireless and device settings to define the network configuration. Click Next to continue. To return to the previous page, click Back or click Exit to discontinue the configuration process.
Page 17
|
Nuclias Connect Software User Manual |
Nuclias Connect Configuration |
||
|
|
|
|
|
|
|
|
|
|
Nuclias |
Configuration Create Profile |
Add Network |
||
The Discover Network Settings page will appear. Select the data link layer (layer 2 or layer 3) to define the type of network in which to find manageable access points. If Layer 3 is selected, click the drop-down menu to define either an IP or a prefix
segmentation. Click  to add additional IP/prefix segments or Next to continue. Click Exit to discontinue the configuration process.
The Start Discovery Page will appear. Click Start Discovery to list all available unmanaged devices. If a device is found, select it and click Apply to import the network profile. Click on the Managed tab to select already defined devices and add them to this network.
Page 18
|
Nuclias Connect Software User Manual |
|
Nuclias Connect Configuration |
||
|
|
|
|
|
|
|
|
|
|
|
|
Nuclias |
Configuration |
Profile Settings |
|||
The Profile Settings function allows for the management of existing networks. Navigate to Configuration > Profile Settings to view existing sites. Select a site followed by an available network to view all settings that are available for editing: SSID,
VLAN, Bandwidth Optimization, RF Optimization, Schedule, Device Setting, Performance, WLAN Partition, and Wireless Resources.
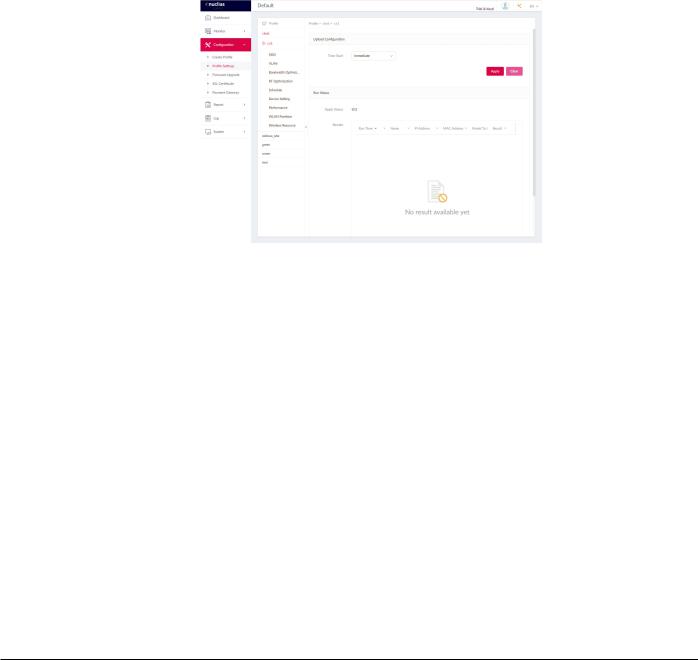
Once a network is selected the following screen will appear. The upload configuration function is available on the Profile Settings > [Site] > [Network] page.
For any updates to site or network configuration to take effect, the configuration must be uploaded to the access point. Under the Upload Configuration frame, click the Time Start drop-down menu and select the time (Immediate or Select Time) to update the configuration to the access point.
If Select Time is selected, set the day and time to upload the configuration. Once the Time Start is defined, click Apply to initiate the process.
Under the Run Status frame, the status of the upload configuration function will be reported. Once an update is complete, the results will be displayed in the Results frame.
Page 19

Nuclias Connect Software User Manual Nuclias Connect Configuration
Nuclias Configuration Profile Settings SSID
The SSID page displays the configurable parameters of a network’s wireless settings. Navigate to Configuration > Profile Settings > [Site] > [Network] > SSID to view existing settings.
In the Security section, the following parameters can be configured:
Block |
Description |
Band |
Click the drop-down menu to select wireless frequency band. |
|
|
Index |
Click the drop-down menu to select SSID index (Parameters: Primary, |
|
SSID 1 to SSID 7). To create a new SSID, select the index parameter |
|
first. |
|
|
SSID |
Enter the wireless network name. The SSID must be the same across |
|
all frequencies. In addition, make sure the network name (SSID) on |
|
the selected access point is the same as the defined network name |
|
(SSID) on the Nuclias Connect. For further information, see the access |
|
point Basic > Wireless settings and Advanced Settings > DHCP Server |
|
> Dynamic Pool Settings, to ensure the Domain Name field reflects |
|
the defined network name (SSID) on the Nuclias Connect. |
|
|
Character Set |
Click the drop-down menu to select the character set to be used in |
|
the SSID encoding: UTF-8 or GB2312. |
|
|
SSID Broadcast |
Click the drop-down menu to enable or disable the wireless SSID |
|
visibility. |
WMM (Wi-Fi |
Click the drop-down menu to enable or disable the Wi-Fi multimedia. |
Multimedia) |
|
|
|
Security |
Click the drop-down menu to select the wireless security protocol: |
|
Open System (no pre-shared key required), WPA-Personal, WPA |
|
Enterprise (Radius server required), WPA2-Personal, WPA2-Enterprise |
|
(Radius server required), WPA-Auto-Personal, WPA-Auto-Enterprise |
|
(Radius server required). |
|
|
Fast Roaming (802.11 |
Click the drop-down menu to enable or disable fast roaming. This |
k/v/r)4 |
function is only available for compatible models and specific |
|
software version. |
|
|
Encryption |
Click the drop-down menu to enable or disable WEP Open System |
|
encryption. The function is only available when Security is set as |
|
Open System. |
Key Size |
Click the drop-down menu to select the WEP key size. |
|
|
Key Type |
Click the drop-down menu to select the WEP key type. |
|
|
Key Index |
Click the drop-down menu to select the WEP key index. |
|
|
Key Value |
Enter the open system WEP encryption key. |
Encryption Type |
Click the drop-down menu to select the encryption type: Auto, AES, |
|
or TKIP. |
|
|
Group Key Update |
Enter the WPA group key update interval value. |
Interval |
|
Passphrase |
Enter the secret pass phrase used. The function is only available |
|
when Security is WPA-Personal, WPA2-Personal or WPA-Auto- |
|
Personal. |
RADIUS Server |
Enter the RADIUS server’s IP address. The function is only available |
|
when Security is WPA-Enterprise, WPA2-Enterprise or WPA-Auto- |
|
Enterprise. |
|
|
Once the settings are updated, the configuration must be uploaded to the access points. See “Profile Settings” on page 19 for further information.
4 Currently only DAP-2662 and DAP-3666 supports this function.
Page 20
|
Nuclias Connect Software User Manual |
Nuclias Connect Configuration |
||
|
|
|
|
|
|
|
|
|
|
Nuclias |
Configuration Profile Settings |
SSID |
||
Block |
Description |
Port |
Enter the RADIUS server’s port number. The function is only available |
|
when Security is WPA-Enterprise, WPA2-Enterprise or WPA-Auto- |
|
Enterprise. |
|
|
RADIUS Secret |
Enter the RADIUS server’s secret pass phrase. The function is only |
|
available when Security is WPA-Enterprise, WPA2-Enterprise or |
|
WPA-Auto-Enterprise. |
|
|
In the Access Control section, the following parameters can be configured:
|
|
Block |
Description |
|
|
|
Action |
Click the drop-down menu to select the action that will applied to |
|
|
|
|
the clients. |
|
|
|
|
|
|
|
|
MAC Address |
Enter the MAC address of the clients that will be allowed or denied |
|
|
|
|
access and click Add. |
|
|
|
Upload MAC Address |
Click Browser... to select the MAC address file, located on the local |
|
|
|
List |
computer, that will be uploaded. Click Upload to update the MAC |
|
|
|
|
address list. Click Download to download the current MAC address |
|
|
|
|
list. |
|
|
|
|
|
|
|
|
Action |
Click on the drop-down menu to enable or disable the IP filter |
|
|
|
|
function. |
|
|
|
|
|
|
|
|
IP Address |
Enter the IP address. |
|
|
|
Subnet Mask |
Enter the subnet mask. |
|
|
|
|
|
|
In the User Authentication section, the following parameters can be configured: |
|
|||
|
|
Block |
Description |
|
|
|
Authentication Type |
Click the drop-down menu to select the authentication type applied |
|
|
|
|
to the wireless client. Note: SLA Login (Click through) is currently |
|
|
|
|
only available for DAP-2662 and DAP-3666. |
|
|
|
Idle Timeout (2~1440) |
Enter the session timeout value. |
|
|
|
|
|
|
|
|
Enable White List |
Check the box to enable the white list function. This function is only |
|
|
|
|
available when Authentication Type is Username/Password. |
|
|
|
|
|
|
Page 21

Nuclias Connect Software User Manual |
Nuclias Connect Configuration |
|
|
Block |
Description |
MAC Address |
Enter the MAC address of the network device that will whitelisted and |
|
click Add to add the address to the white list table. This function is |
|
only available when Authentication Type is Username/Password. |
Upload Whitelist File |
Click Browser... to select the white list file, located on the local |
|
computer, that will be uploaded. Click Upload to update the white |
|
list. Click Download to download the current white list. The function |
|
is only available when AuthenticationType is Username/Password. |
|
|
IPIF Status |
Click the drop-down menu to enable or disable the use of the IP |
|
interface. |
|
|
VLAN Group |
Enter the VLAN group name. |
|
|
Get IP Address From |
Click the drop-down menu to select the IP address configuration |
|
setting. |
IP Address |
Enter the IP address of the IP interface. |
|
|
Subnet Mask |
Enter the subnet mask of the IP interface. |
Gateway |
Enter the gateway of the IP interface. |
|
|
DNS |
Enter the preferred DNS address of the IP interface. |
Username |
Enter the username. The function is only available when |
|
Authentication Type is set as Username/Password. |
|
|
Password |
Enter the password and click Add. Click Clear to clear the entered |
|
fields. This function is only available when Authentication Type is |
|
Username/Password. |
|
|
RADIUS Server |
Enter the RADIUS server’s IP address. This function is only available |
|
when Authentication Type is Remote RADIUS or MAC Address. |
|
|
RADIUS Port |
Enter the RADIUS server’s port number. This function is only available |
|
when Authentication Type is Remote RADIUS or MAC Address. |
|
|
RADIUS Secret |
Enter the RADIUS server’s secret. This function is only available when |
|
Authentication Type is Remote RADIUS or MAC Address. |
Remote RADIUS Type |
Enter the RADIUS server’s type. This function is only available when |
|
Authentication Type is Remote RADIUS or MAC Address. |
Server |
Enter the LDAP server’s IP address. This function is only available |
|
when Authentication Type is LDAP. |
Port |
Enter the LDAP server’s port number. This function is only available |
|
when Authentication Type is LDAP. |
Authentication Mode |
Click on the drop-down menu to select the authentication mode. |
|
This function is only available when Authentication Type is LDAP. |
Username |
Enter the administrator’s username that will be able to access and |
|
search the LDAP database. This function is only available when |
|
Authentication Type is LDAP. |
|
|
Password |
Enter the administrator’s password that will be able to access and |
|
search the LDAP database. This function is only available when |
|
Authentication Type is LDAP. |
|
|
Base DN |
Enter the base domain name of the LDAP database. This function is |
|
only available when Authentication Type is LDAP. |
|
|
Account Attribute |
Enter attribute for the account. This function is only available when |
|
Authentication Type is LDAP. |
Identity |
Enter the name of the administrator. This function is only available |
|
when Authentication Type is LDAP. |
Page 22
Loading...