


2-BAY NETWORK VIDEO Recorder
DNS-722-4
DNS-726-4
Quick Installation Guide+
Installations-Anleitung+
Guide d’installation+
Guía de instalación+
Guida di Installazione+


 Quick Install Guide
DNS-722-4/DNS-726-4
2-Bay Network Video Recorder

System Requirements
Hardware Requirements
One or two 3.5” SATA hard disk drives*
Network Requirements
•IP Camera(s) (See the D-Link website for a list of supported cameras.)
•Subscribed broadband internet connection (for remote access)
•Gigabit Ethernet Switch and Internet Router (or Internet Router with a with an available Gigabit Ethernet LAN port)
Remote PC Minimum Requirements
•Operating System: Windows® 2000/XP/2003/Vista™
•CPU: Pentium 4 – 2.4GHz or greater
•RAM: 512MB
•Web Browser: Internet Explorer v6.0 or later
Optional
UPS with USB interface
*Hard disk drives should be from the same manufacturer. To ensure maximum performance, identical drives are recommended for RAID 1 configurations.
Package Contents
•D-Link DNS-722-4/ DNS-726-4 Network Video Recorder (NVR)
•CAT5 Ethernet Cable
•Power Adapter
•Cable Holder
•Keys
•Manual and Software on CD
•Quick Install Guide
Note: Using a power supply with a different voltage than the one included with your product will cause damage and void the warranty for this product.
D-Link DNS-722-4/726-4 Quick Install Guide |
2 |
Hardware Overview
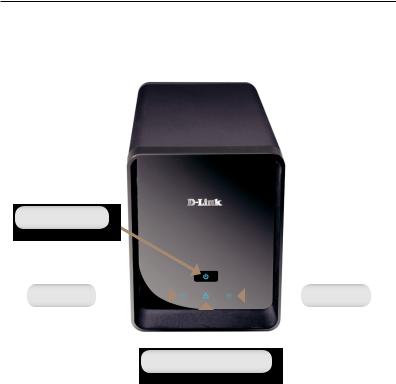
Front View
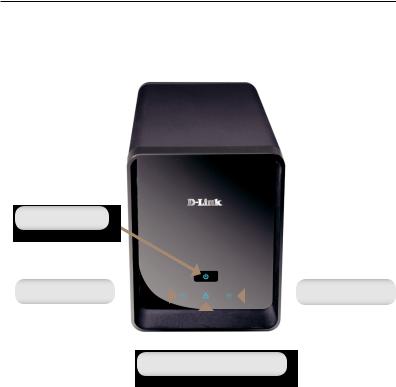
Power Button
Drive LED |
|
|
|
|
Drive LED |
|
|
||||
|
|
|
|
|
|
|
|
|
|
|
|
|
|
|
|
|
|
Network Activity LED
Power Button:
Press once to power on the NVR. Press and hold the button until the LED begins to blink to power down the NVR.
Drive LEDs:
These LEDs will be solid BLUE when the drives are connected but inactive. The LEDs will blink when the drives are being accessed, formatted or synchronized. They will illuminate AMBER if a drive has failed.
Activity LED:
The LED will be solid BLUE when there is an Ethernet connection. It will blink to indicate LAN traffic.
3 |
D-Link DNS-722-4/726-4 Quick Install Guide |
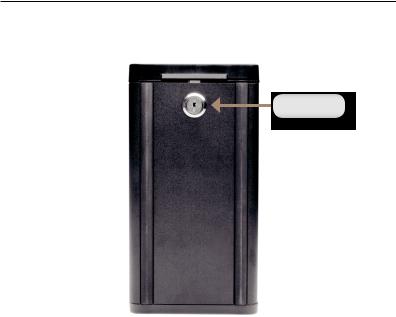
Bottom
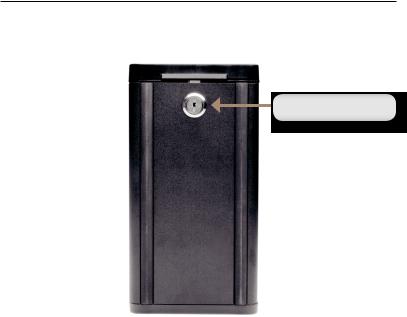
Key Lock
Key Lock:
Use this lock to secure the front panel of the NVR. The panel can be unlocked with the provided key for initial installation.
D-Link DNS-722-4/726-4 Quick Install Guide |
4 |
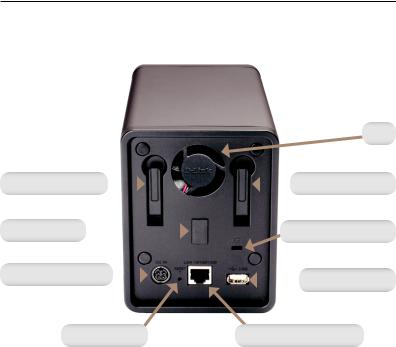
Rear Panel (Connections)
|
|
|
|
|
|
|
|
|
|
|
|
|
|
|
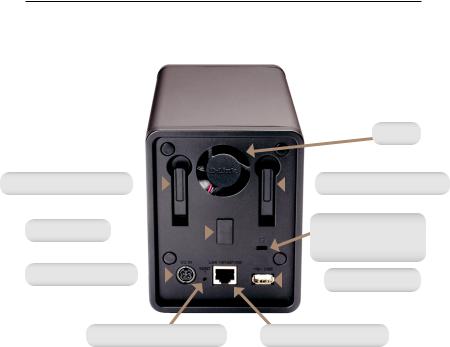
Fan |
|
|
|
|
|
|
|
|
|
|
|
|
|
|
|
|
|
|
|
|
|
|
|
|
|
|
|
|
|
|
|
|
|
|
|
Drive Eject Lever |
|
|
|
|
|
|
|
|
|
|
|
Drive Eject Lever |
||||
|
|
|
|
|
|
|
|
|
|
|||||||
|
|
|
|
|
|
|
|
|
|
|
|
|
|
|
||
|
|
|
|
|
|
|
|
|
|
|
|
|
||||
Cable Holder |
|
|
|
|
|
|
|
|
|
|
|
|||||
|
|
|
|
|
|
|
|
|
|
Security Cable Slot |
||||||
|
|
|
|
|
|
|
||||||||||
|
|
|
|
|
|
|
|
|
|
|
|
|
|
|
||
|
|
|
|
|
|
|
|
|
|
|
|
|
|
|
|
|
Power Receptacle |
|
|
|
|
|
|
|
|
|
|
|
|
|
|||
|
|
|
|
|
|
|
|
|
|
USB Connector |
||||||
|
|
|
|
|
|
|
||||||||||
|
|
|
|
|
|
|
|
|
|
|
|
|
|
|||
|
|
|
|
|
|
|
|
|
|
|||||||
|
|
|
|
|
|
|
|
|
||||||||
|
|
|
|
|
|
|
||||||||||
|
Reset Button |
|
|
Gigabit Ethernet Port |
|
|||||||||||
|
|
|
|
|
|
|
|
|
|
|
|
|
|
|
|
|
Power Receptacle:
The supplied power adapter connects here.
Gigabit Ethernet Port:
The Gigabit Ethernet port connects the NVR to a network.
Drive Eject Lever:
Use these levers to eject the hard drives. The front panel must be removed before ejecting the drives. Make sure to reset the ejector before installing the new hard drive.
5 |
D-Link DNS-722-4/726-4 Quick Install Guide |

Reset Button:
A pinhole button located beside the Ethernet socket is used to reset the system or restore the factory default settings. To reset, simply press and hold the button until the power LED flashes.
USB Connector:
A UPS can be used as an emergency power supply for the NVR. The UPS can use the USB interface to notify the NVR to perform a proper shutdown
before battery power runs out.
Security Cable Slot:
An external lock can be affixed to this slot to prevent theft.
Fan:
The NVR will adjust the system temperature automatically by turning the fan on/off.
Cable Holder:
Holds the power cable to ensure a safe operating environment.
Note: After resetting the unit, you will still be able to access the recorded data on your hard drives.
D-Link DNS-722-4/726-4 Quick Install Guide |
6 |
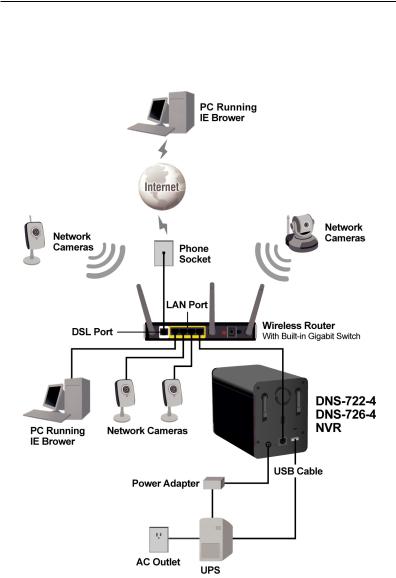
Connecting Your NVR to the Network
Your Network Setup
7 |
D-Link DNS-722-4/726-4 Quick Install Guide |
Hardware Installation
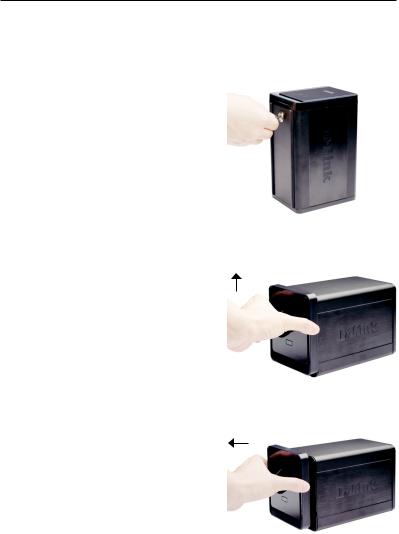
Install the Hard Drives:
1.Please install a SATA HDD before turning on the NVR. Use the key to unlock the faceplate from the bottom of the NVR.
2. Slide the faceplate up until it unlatches from the device.
3.Once the faceplate is unlatched, pull it off the device, exposing the drive bays.
D-Link DNS-722-4/726-4 Quick Install Guide |
8 |
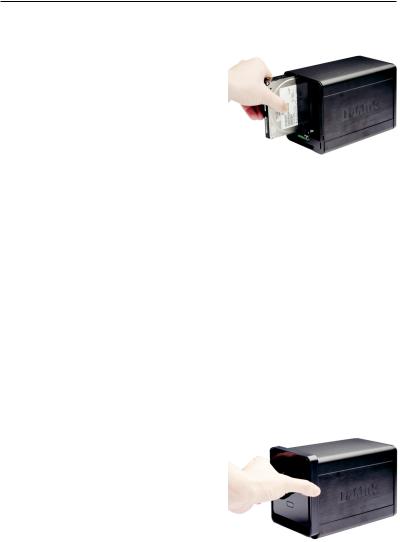
4.Insert a 3.5” SATA hard drive into an available drive bay. Make sure to align the drive connector to the SATA connector on the bottom edge inside the drive bay of the NVR. Gently push the drive in until it connects. When a drive is inserted properly, you will feel it “seat” into the connector. Some hard drives that are thin or oddly shaped may need to be guided carefully into position. If a drive is not properly seated, the LED will not illuminate after powering on the device.
Optional: When installing an optional second HDD, please repeat Step 4. To avoid data incompatibility in RAID 1 operation, useidentical SATA drives from the same manufacturer. Formatted drive capacity for RAID 1 operation is dependant on the HDD with the lowest capacity.
5.Attach the faceplate to the front of the device.
9 |
D-Link DNS-722-4/726-4 Quick Install Guide |
6.Lock the faceplate to secure the HDDs.
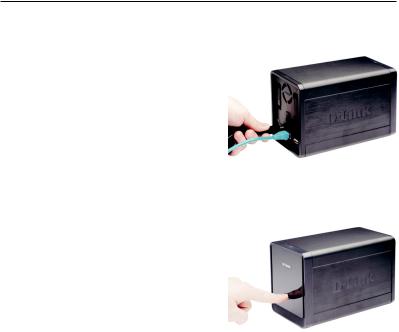
Connect the Ethernet Cable
Connect an Ethernet cable to the Ethernet port. Connect one end of the Ethernet cable to the NVR. Connect the opposite end of this cable to a Gigabit Ethernet LAN port of a router or a switch, or directly to a computer.
Connect the UPS (Optional)
If you have a Universal Power Supply (UPS) that you would like to use with the NVR, you may connect it before powering the unit on.
1.Connect the USB cable from the UPS to the port on the back of the NVR.
2.Connect the power cable to the UPS. (Ensure that the UPS is plugged in and receiving power.)
Note: To turn off the NVR, simply push the power button for 5 seconds. The power LED will blink and the NVR will turn off after a moment.
|
|
|
D-Link DNS-722-4/726-4 Quick Install Guide |
10 |
|
Attach the External Power Supply
Attach the external power supply to the DC power receptacle located on the NVR’s rear panel (labeled DC12V) and connect the other end to an AC power outlet.
Turn on the Power and Initialize the HDD
Push the power button at the front panel. The LED on the NVR will begin to blink. When you have a proper connection, wait about 60 seconds, the NVR power LED will stay steady and the HDD and network LEDs will begin to blink. The NVR will initialize the HDD to default settings. To change HDD settings, please visit the SETUP page in the web-based configuration utility.
Supported Cameras
DNS-722-4: Supports all D-Link network cameras.Includessupportforauto-discovery, and up to 1.3 megapixel resolution.
DNS-726-4: Supports known-brand network cameras including D-Link, Axis, Panasonic, and SONY. Specific feature support depends on software.
11 |
D-Link DNS-722-4/726-4 Quick Install Guide |

Getting Started
Step 1: Make sure the NVR is connected to a network via a router or a switch, or directly connected to PC.
Step 2: Turn on the computer and insert the D-Link DNS-722-4/DNS-726-4 Autorun CD into the CD-ROM drive. The following step-by-step instructions displayed are shown when using Windows Vista operating system. The steps and screens are similar for other Windows operating systems.
Click NVR Search Utility.
Highlight an available NVR and click Configuration to access the web-based utility.
For detailed configuration instructions, please refer to the User Manual on the CD-ROM.
Technical Support
United Kingdom (Mon-Fri)
Home Wireless/Broadband 0871 873 3000 (9.00am–06.00pm, Sat 10.00am-02.00pm) Managed, Smart, & Wireless Switches, or Firewalls 0871 873 0909 (09.00am – 05.30pm)
(BT 10ppm, other carriers may vary.)
Ireland (Mon-Fri)
All Products 1890 886 899 (09.00am-06.00pm, Sat 10.00am-02.00pm) €0.05ppm peak, €0.045ppm off peak Times
Internet http://www.dlink.co.uk ftp://ftp.dlink.co.uk
|
|
|
D-Link DNS-722-4/726-4 Quick Install Guide |
12 |
|

 Schnellinstallationsanleitung
DNS-722-4/DNS-726-4
2-Bay Network Video Recorder

Systemanforderungen
Hardwarevoraussetzungen
Ein oder zwei 3,5” SATA-Festplatten*
Netzwerkanforderungen
•IP-Kamera(s) (Eine Liste unterstützter Kameras finden Sie auf der D-Link Website.)
•Internetverbindung (für den Fernzugriff)
•Gigabit Ethernet Switch und Internet Router (oder Internet Router mit einem verfügbaren Gigabit Ethernet LAN-Port)
PC-Mindestanforderung für den Fernzugriff
•Betriebssystem: Windows® 2000/XP/2003/Vista™
•CPU: Pentium 4 – 2,4 GHz oder höher
•RAM: 512 MB
•Webbrowser: Internet Explorer V 6.0 oder höher
Optional
UVS (unterbrechnungsfreie Stromversorgung) mit USB-Schnittstelle
*Festplattenlaufwerke sollten vom gleichen Hersteller sein. Um die bestmögliche Leistung zu gewährleisten, werden für RAID 1 Konfigurationen identische Laufwerke empfohlen.
Packungsinhalt
•D-Link DNS-722-4/ DNS-726-4 Network Video Recorder (NVR)
•CAT5-Ethernetkabel
•Stromadapter
•Kabelhalter
•Schlüssel
•Handbuch und Software auf CD
•Schnellinstallationsanleitung
Hinweis: Die Verwendung eines Netzteils mit einer anderen Spannung als in dem zum Lieferumfang gehörenden Netzteil führt zu Schäden. In diesem Falle erlischt der Garantieanspruch für dieses Produkt.
|
|
|
D-Link DNS-722-4/726-4 Quick Install Guide |
14 |
|
Hardware-Überblick
Vorderansicht
Ein-/Aus-Taste
Laufwerks-LED |
|
|
|
|
Laufwerks-LED |
|
|
|
|
|
|
|
|
|
|
|
|
|
|
|
|
|
|
Netzwerkaktivität-LED
Ein-/Aus-Taste:
Diese LEDs leuchten durchgehend BLAU, wenn die Festplattenlaufwerke angeschlossen, aber inaktiv sind. Die LEDs blinken, wenn auf die Laufwerke zugegriffen wird oder wenn sie formatiert oder synchronisiert werden. Sie leuchten GELB, wenn ein Laufwerk ausgefallen ist.
Laufwerk-LEDs:
Diese LEDs leuchten durchgehend BLAU, wenn die Festplattenlaufwerke angeschlossen, aber inaktiv sind. Die LEDs blinken, wenn auf die Laufwerke zugegriffen wird oder wenn sie formatiert oder synchronisiert werden. Sie leuchten GELB, wenn ein Laufwerk ausgefallen ist.
Aktivitäts-LED:
Die LED leuchtet bei einer Ethernet-Verbindung durchgehend BLAU. Sie blinkt, um LAN-Verkehr anzuzeigen.
15 |
D-Link DNS-722-4/726-4 Quick Install Guide |
Unterseite
Schließvorrichtung
Schließvorrichtung:
Verwenden Sie diese Schließvorrichtung, um die Vorderplatte des NVR zu sichern. Sie kann mit dem im Lieferumfang enthaltenen Schlüssel zur Erstinstallation aufgeschlossen werden.
|
|
|
D-Link DNS-722-4/726-4 Quick Install Guide |
16 |
|
Rückseite (Anschlüsse)
|
|
|
|
|
|
|
|
|
|
|
|
|
|
|
|
Lüfter |
|
|
|
|
|
|
|
|
|
|
|
|
|
|
|
|
|
|
|
|
|
|
|
|
|
|
|
|
|
|
|
|
|
|
|
|
|
|
|
|
|
|
|
Laufwerkauswurfhebel |
|
|
|
|
|
|
|
|
|
|
|
Laufwerkauswurfhebel |
|||||||
|
|
|
|
|
|
|
|
|
|
||||||||||
|
|
|
|
|
|
|
|
|
|
|
|
|
|
|
|
|
|
|
|
|
|
|
|
|
|
|
|
|
|
|
|
|
|
|
|
|
|
||
|
|
|
|
|
|
|
|
|
|
|
|
|
|
Anschluss für ein |
|
||||
|
Kabelhalter |
|
|
|
|
|
|
|
|
|
|
|
|
||||||
|
|
|
|
|
|
|
|
|
|
Sicherheitsschloss |
|
||||||||
|
|
|
|
|
|
|
|
|
|
|
|
|
|
|
|||||
|
|
|
|
|
|
|
|
|
|
|
|
|
|
oder - kabel |
|
||||
|
|
|
|
|
|
|
|
|
|
|
|
|
|
||||||
|
Stromanschluss |
|
|
|
|
|
|
|
|
|
USB-Anschluss |
|
|
||||||
|
|
|
|
|
|
|
|
|
|
|
|||||||||
|
|
|
|
|
|
|
|
|
|
|
|
|
|
|
|
|
|||
|
|
|
|
|
|
|
|
|
|
|
|
||||||||
|
|
|
|
|
|
|
|
|
|
|
|||||||||
|
|
|
|
|
|
|
|
|
|||||||||||
|
|
Rücksetzknopf (Reset) |
|
Gigabit-Ethernet-Port |
|
|
|
||||||||||||
|
|
|
|
|
|
|
|
|
|
|
|
|
|
|
|
|
|
|
|
Stromanschluss:
Anschluss für den mitgelieferten Stromadapter.
Gigabit-Ethernet-Port:
Der Gigabit Ethernet-Port verbindet den NVR mit dem Netzwerk.
Laufwerkauswurfhebel:
Wird zum Auswerfen der Laufwerke verwendet. Vor dem Auswerfen der Laufwerke muss die Vorderplatte entfernt werden. Vergessen Sie nicht den Hebel zurückzusetzen, bevor Sie das neue Festplattenlaufwerk installieren.
17 |
D-Link DNS-722-4/726-4 Quick Install Guide |

Rücksetzknopf:
Ein vertiefter Knopf, der sich neben der Ethernetbuchse befindet und der zum Zurücksetzen oder zur Wiederherstellung des Systems auf die werkseitigen Standardeinstellungen verwendet wird. Drücken Sie zur Rücksetzung des Systems auf den Knopf und halten Sie ihn so lange gedrückt, bis die LED-Betriebsanzeige blinkt.
USB-Anschluss:
Für den NVR kann eine unterbrechungsfreie Stromversorgung (UVS) verwendet werden. Das UVS-Gerät kann die USB-Schnittstelle nutzen, um den NVR zu veranlassen, das System ordnungsgemäß herunterzufahren, bevor die Batterieleistung zu Ende geht.
Anschluss für ein Sicherheitsschloss oder -kabel:
Ein externes Schloss kann hier angebracht werden, um Diebstahl zu verhindern.
Lüfter:
Der NVR passt die Systemtemperatur automatisch durch entsprechendes Ein-/Ausschalten des Lüfters an.
Kabelhalter:
Halter für das Stromkabel zur Sicherung der Betriebsumgebung.
Hinweis: Sie haben auch nach einem Rücksetzen des Systems weiterhin
Zugriff auf die auf Ihren Festplattenlaufwerken befindlichen Daten.
|
|
|
D-Link DNS-722-4/726-4 Quick Install Guide |
18 |
|
 Loading...