


 Loading...
USER MANUAL
ShareCenter TM DNS-315
VERSION 1.1

Table of Contents
Table of Contents
Introduction............................................................... |
1 |
Product Overview......................................................... |
2 |
Package Contents.................................................... |
2 |
System Requirements.............................................. |
3 |
Features................................................................... |
4 |
Hardware Overview.................................................. |
6 |
Front Panel......................................................... |
6 |
Rear Panel (Connections).................................. |
7 |
Bottom Panel (Connections)............................... |
8 |
Note about Power Button & Reset Button.......... |
8 |
LED Notifications................................................ |
9 |
LED Notifications.............................................. |
10 |
LED Notifications.............................................. |
11 |
Handling Precautions........................................ |
12 |
Connecting the DNS-315 and Getting Started......... |
13 |
Connecting the DNS-315 and Getting Started......... |
14 |
Installing a Hard Drive in the DNS-315............. |
15 |
Note about Installing a new hard drive............. |
15 |
Installation.................................................................. |
19 |
Setup Wizard (stand-alone).................................... |
19 |
ShareCenter Setup Wizard - Welcome Screen.20 |
|
ShareCenter Setup Wizard - Detaching the |
|
Cover................................................................ |
21 |
ShareCenter Setup Wizard - Installing the Hard |
|
Drive................................................................. |
22 |
ShareCenter Setup Wizard - Screwing the Hard |
|
Drive into Place................................................. |
23 |
ShareCenter Setup Wizard - Sliding the Cover & |
|
Shutting the Device........................................... |
24 |
ShareCenter Setup Wizard - Attaching the Cover |
|
& Closing the Device........................................ |
25 |
ShareCenter Setup Wizard - Connect the DNS- |
|
315 to your Network.......................................... |
26 |
ShareCenter Setup Wizard - Power on your |
|
DNS-315........................................................... |
27 |
ShareCenter Setup Wizard - Connecting to the |
|
DNS-315........................................................... |
28 |
ShareCenter Setup Wizard - Connecting to the |
|
DNS-315........................................................... |
29 |
ShareCenter Setup Wizard - Format Warning..30 |
|
ShareCenter Setup Wizard - Format................ |
31 |
ShareCenter Setup Wizard - Format Complete32. |
|
ShareCenter Setup Wizard - Restart................ |
33 |
ShareCenter Setup Wizard - Device Errors...... |
34 |
ShareCenter Setup Wizard - Logging into your |
|
NAS.................................................................. |
35 |
ShareCenter Setup Wizard - Creating a New |
|
Password.......................................................... |
36 |
ShareCenter Setup Wizard - Configuring the IP |
|
Address............................................................. |
37 |
D-Link ShareCenter DNS-315 User Manual |
i |

Table of Contents
ShareCenter Setup Wizard - Configuring Device
Information........................................................ |
38 |
ShareCenter Setup Wizard - Introducing |
|
DDNS................................................................ |
39 |
ShareCenter Setup Wizard - DDNS |
|
Confirmation..................................................... |
40 |
ShareCenter Setup Wizard - DDNS Settings... |
41 |
ShareCenter Setup Wizard - Configuring Time |
|
Zone Settings.................................................... |
42 |
ShareCenter Setup Wizard - Configuring Email |
|
Integration......................................................... |
43 |
ShareCenter Setup Wizard - Configuring Email |
|
Integration......................................................... |
44 |
ShareCenter Setup Wizard - Mapping the DNS- |
|
315.................................................................... |
45 |
ShareCenter Setup Wizard - Configuration |
|
Summary.......................................................... |
46 |
ShareCenter Setup Wizard - Repair Wizard..... |
47 |
ShareCenter Setup Wizard - Repair Wizard..... |
48 |
ShareCenter Setup Wizard - Repair Wizard..... |
49 |
ShareCenter Setup Wizard - Repair Wizard..... |
50 |
ShareCenter on your Browser.......................... |
51 |
D-Link Storage Utility........................................ |
52 |
Configuration.............................................................. |
54 |
Web UI Login.......................................................... |
54 |
Web UI General Layout.......................................... |
55 |
Management........................................................... |
56 |
Welcome to ShareCenter Setup Wizard........... |
57 |
ShareCenter Setup Wizard - Start Page........... |
58 |
Disk Management - Hard Drive Configuration........ |
62 |
Hard Drive Configuration Wizard...................... |
63 |
Hard Drive Configuration Wizard - Physical Disk |
|
information........................................................ |
64 |
Hard Drive Configuration Wizard - Volume |
|
Configuration Summary.................................... |
65 |
Hard Drive Configuration Wizard - Warning |
|
Message........................................................... |
66 |
Hard Drive Configuration Wizard - Formatting..67 |
|
Hard Drive Configuration Wizard - Setup |
|
Complete.......................................................... |
68 |
Disk Management - S.M.A.R.T Test................. |
69 |
Disk Management - Quick Test........................ |
70 |
Disk Management - Quick Test Warning.......... |
71 |
Disk Management - S.M.A.R.T. Schedule........ |
72 |
Disk Management - S.M.A.R.T. Schedule........ |
73 |
Disk Management - Schedule List.................... |
74 |
Disk Management - Deleting the Schedule List75. |
|
Disk Management - Scan Disk......................... |
76 |
Disk Management - Scan Disk......................... |
77 |
Disk Management - Performing the Scan Disk.78 |
|
Disk Management - Performing the Scan Disk.79 |
|
Disk Management - Performing the Scan Disk.80 |
|
Account Management - Users and Groups...... |
81 |
Account Management - Users and Groups...... |
82 |
Account Management - Adding New Users |
|
Wizard............................................................... |
83 |
Account Management - Username and |
|
D-Link ShareCenter DNS-315 User Manual |
ii |

Table of Contents
Password.......................................................... |
84 |
Account Management - Username and |
|
Password.......................................................... |
85 |
Account Management - Setting up Groups....... |
86 |
Account Management - Setting up Network |
|
Access.............................................................. |
87 |
Account Management - Setting up Access |
|
Priviledges........................................................ |
88 |
Account Management - WebDAV..................... |
89 |
Account Management - Quota Settings............ |
90 |
Account Management - Account Summary...... |
91 |
Group Setup Wizard - Adding a New Group..... |
92 |
Account Management - Import Users............. |
100 |
Account Management - Import Users............. |
101 |
Account Management - Import Users............. |
102 |
Account Management - Import Users............. |
103 |
Account Management - Import Users............. |
104 |
Account Management - Import Users............. |
105 |
Account Management - Quotas...................... |
106 |
Account Management - User Quota Settings.107 |
|
Account Management - User Quota Settings.108 |
|
Account Management - Group Quota Settings109. |
|
Network Shares.............................................. |
110 |
Adding New Network Shares Wizard.............. |
111 |
Adding New ISO Mount Shares Wizard.......... |
122 |
Account Management - Admin Password....... |
127 |
Network Management - LAN Setup...................... |
128 |
Network Management - LAN Setup ..................... |
129 |
Network Management - Link Speed Settings.132 |
|
Network Management - LLTD Settings........... |
133 |
Network Management - Dynamic DNS |
|
Settings........................................................... |
134 |
Network Management - Dynamic DNS |
|
Providers......................................................... |
135 |
Network Management - UPnP Router |
|
Detection......................................................... |
136 |
Network Management - UPnP Router |
|
Detection......................................................... |
137 |
Network Management - Port Forwarding........ |
138 |
Network Management - Port Forwarding........ |
139 |
Application Management - FTP Server........... |
140 |
Application Management - FTP Server Settings |
|
Window........................................................... |
141 |
Application Management - Blocked IP |
|
addresses....................................................... |
142 |
Application Management - FTP Server Status |
|
Report............................................................. |
143 |
Application Management - UPnP AV Server..144 |
|
Application Management - AV Server............. |
145 |
Application Management - UPnP AV Server..146 |
|
Application Management - iTunes Server....... |
147 |
Application Management - AFP Service......... |
149 |
Application Management - NFS Service......... |
150 |
System Management - Language................... |
151 |
System Management - Time and Date........... |
152 |
System Management - Device........................ |
153 |
System Management - System Settings......... |
154 |
System Management - Power Management..156 |
|
D-Link ShareCenter DNS-315 User Manual |
iii |

Table of Contents
System Management - Notifications - Email... |
158 |
System Management - Notifications - SMS.... |
159 |
System Management - Adding an SMS Service |
|
Provider.......................................................... |
160 |
System Management - Notifications - Event |
|
Settings........................................................... |
161 |
System Management - Logs........................... |
162 |
System Management - Firmware Upgrades... |
163 |
System Management - USB Devices............. |
164 |
System Status - System Information.............. |
165 |
System Status - Hard Drive Information......... |
166 |
System Status - Resource Monitor................. |
167 |
Applications.......................................................... |
168 |
FTP/HTTP Downloads.................................... |
168 |
Applications - Remote Backups - Server........ |
170 |
Applications - Remote Backups - Remote |
|
Backups.......................................................... |
171 |
Applications - Local Backups - Local Backups176. |
|
Applications - Local Backups - Local Backups177. |
|
Applications - Local Backups - Local Backups178. |
|
Applications - Local Backups - Time Machine179. |
|
Applications - Local Backups - Time Machine180. |
|
Applications - Local Backups - Time Machine181. |
|
Applications - Local Backups - Time Machine182. |
|
Applications - Local Backups - USB Backups.183 |
|
Applications - P2P Downloads - Settings....... |
187 |
Applications - P2P Downloads - P2P Settings188. |
|
Applications - P2P Downloads - Downloads... |
189 |
Applications - P2P Downloads - Downloads... |
190 |
Applications - Web File Server....................... |
191 |
Applications - Amazon S3............................... |
193 |
Applications - Amazon S3 - Setup Wizard...... |
194 |
Applications - Amazon S3 - Setup Wizard...... |
195 |
Applications - Amazon S3 - Setup Wizard...... |
196 |
Applications - Amazon S3 - Setup Wizard...... |
197 |
Applications - Amazon S3 - Setup Wizard...... |
198 |
Applications - Amazon S3 - Setup Wizard...... |
199 |
Applications - Amazon S3 - Setup Wizard...... |
200 |
Applications - Amazon S3 - Backup............... |
201 |
Applications - Amazon S3 - Backup............... |
202 |
Applications - Amazon S3 - Backup............... |
203 |
Applications - Amazon S3 - Restore............... |
204 |
My Favorites......................................................... |
205 |
Re-arranging the My Favorites View.............. |
205 |
Add an Icon to My Favorites........................... |
206 |
Remove an Icon from My Favorites................ |
207 |
Mapping a Drive.............................................. |
208 |
USB Print Server.................................................. |
210 |
USB Copy Function.............................................. |
213 |
D-Link ShareCenter DNS-315 User Manual |
iv |

Introduction
The D-Link DNS-315 1-Bay Network Storage, when used with an internal SATA drive, enables you to share documents, files, and digital media such as music, photos, and video with everyone on the home or office network. Remotely accessing files through the Internet is also possible with the built-in FTP server, and Web File server protocols. Whether you are allowing access locally or over the Internet, keep data safe by only giving rights to specific users or groups. When configuring the DNS315, you can create users and groups and assign them to folders with either read or read/write permissions. This is ideal for an office environment with employee-specific sensitive data or for the home where you can ensure your children will only have access to age appropriate material. The DNS-315 will be available to any computer (PC, MAC, or Linux-based) on your network, without the need to install any software on the computer.
Back up your music, photo, and video collections to the DNS-315 for safekeeping. Then, enjoy the benefits of the built-in UPnP AV media server as you stream digital content to compatible media players2 (such as those found in D-Link’s MediaLounge product line). This feature is highly convenient as it allows you to turn off a computer that would normally be needed for the same function.
1Hard Drive not included.
2D-Link cannot guarentee full compatibility or proper playback with all codecs. Playback capability depends on the codec support of the UPnP-AV media player.
D-Link ShareCenter DNS-315 User Manual |
1 |

Product Overview
Package Contents
•D-Link ShareCenter™ DNS-315
•CD-ROM with Manual and Software
•Quick Installation Guide
•12V/ 2A Output Power Adapter
•Cat5 Ethernet Cable
•6 x Screws
Note: Using a power supply with a different voltage than the one included with the ShareCenter™ will cause damage and void the warranty for this product.
If any of the above items are missing, please contact your reseller.
D-Link ShareCenter DNS-315 User Manual |
2 |

System Requirements
For best results, the following minimum requirements are recommended on any system used to configure and use the ShareCenter™:
•Computer with: 1Ghz processor / 512 MB RAM / 200 MB available space / CD-ROM drive
•Internet Explorer version 7, Mozilla Firefox 3 or Apple Safari 4 and above
•Windows® XP (with Service Pack 2) or Vista™ or Windows 7™
•3.5” SATA Hard Drive(s)
Operating System Compatibility
The DNS-315 is compatible with the following operating system:
Windows® |
Mac® OS X® |
|
• Windows XP |
• Leopard® |
|
• Snow Leapard® |
||
• Windows Vista |
||
• Lion® |
||
• Windows 7 |
||
|
For the highest performance and reliability, always install the latest updates and service packs. For Windows© computers, go to the Start menu and select Windows Update. For Mac computers, go to the Apple menu and select Software Update.
Disk Drive Format
The DNS-315 drive is preformatted as a single EXT4 partition for compatibility with all Windows operating systems via SAMBA.
D-Link ShareCenter DNS-315 User Manual |
3 |

Features
The ShareCenter™ is designed for easy installation and allows remote access to important data via LAN orWAN.This ShareCenter™ supports up to 1 SATA hard drive and includes the product features listed below:
•Equipped one 10/100/1000 Mbps autoMDIX Gigabit Ethernet LAN port
•Embedded one hot-swappable SATA II 3.5” HDD interface, support 3TB HDD or larger volume
•Equipped Ultra Cooler with FAN speed control
•Support Real time clock (RTC),NTFS
•Network Protocols
-DHCP Client or Static IP -NTP Server
-DHCP Client or Static IP
-Windows 7, Vista x32/64 PnP-X/LLTD -Dynamic DNS
-Bonjour
-UPnP Port Forwarding
•Network File Services
-Supports Windows XP/ Vista/ 7, Mac OS X 10.5, Linux -CIFS/SMB for Windows and Mac OS X
-NFSv2/v3 for Linux and UNIX -HTTP and HTTP/S for web browsers -AFP3.1 for Mac OS X
•File System
-EXT4 for internal HDD
-FAT32, NTFS for USB external Storage
•File System Management
-Unicode Support for both Samba and FTP server -File sharing: Windows/ Mac/ Linux
•FTP server
-FTP over explicit SSL/ TLS mode (FTPES) -FTP bandwidth and connection control - FTP support FXP
•Download Management -HTTP/FTP schedule download -Peer to peer download support
•Disk Management -HDD S.M.A.R.T test -Scandisk
-Reformat HDD: EXT4
-Support Advanced Format HDD
•Power Management
-Power Saving (Disk idle spin-down) -Automatic power recovery -Schedule power on/off
-Smart FAN Control
•Folder Management
-Share Folder Level Permission -Public Folder
-Supports ISO Mount
D-Link ShareCenter DNS-315 User Manual |
4 |

•Remote File Sharing -Web File Sever -FTP Server -WebDAV
•User/Group Management
-User/group assignment for Network sharing and FTP server
-Quota for user and group
-Users can assign to multiple Groups -Batch User Creation/ Import Users
•Backup Management
-Schedule Backup from PC to NAS -Apple Time Machine support
-Remote network backup (Rsync, Remote Snapshot) -Cloud Backup (Amazon S3)
-USB Backups (External storage and digital camera) -USB Copy Button
•System Management -Support Storage Utility
-OS support: Windows XP, Vista, 7 and Mac OS X
-Two access modes supported: Open (Share) mode and Account (User) mode, no setup necessary in open mode -Support Configuration file save/load
-System status -Network Recycle bin
-System/FTP Log (Syslog Client) -Email/ SMS notifications
•USB port support: -External Storage device
-Printer server -MTP/PTP
•Media Streaming -UPnP AV server: -DLNA Certificated -Support PS3/Xbox 360
-Support UPnP AV file > 4GB
-D-Link new Media Player (including Boxee) compatible - iTunes Server
•Windows Applications
- Yahoo Widget support •Web Browsers Supported
-Internet Explorer 7+
-Mozilla Firefox 3+
-Apple Safari 4+ -Google Chrome3+ -Opera 10+
D-Link ShareCenter DNS-315 User Manual |
5 |
Hardware Overview
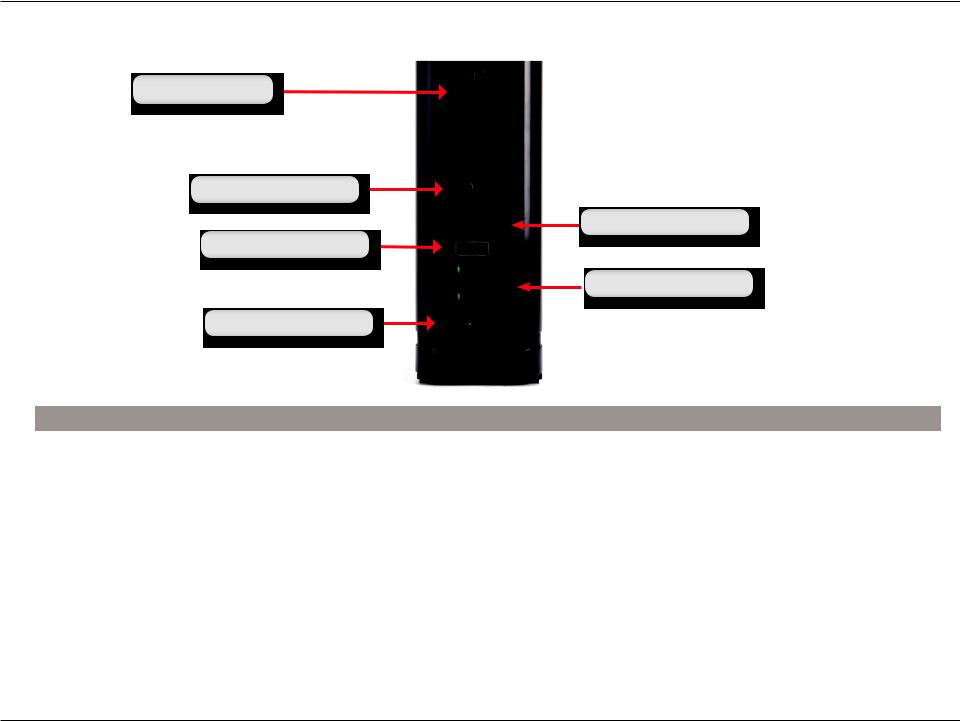
Front Panel
COMPONENT |
DESCRIPTION |
Power LED |
This WHITE light illuminates when |
|
the device is powered on. |
HDD LED |
This WHITE light will be solid when the drive |
|
is connected but inactive. The WHITE light will |
|
blink when the drive is being accessed. It will |
|
illuminate AMBER if free drive capacity is less than |
|
5%. It will illuminate RED if the drive fails. |
USB LED |
This WHITE light will illuminate when a USB Storage |
|
device is inserted into the USB port. When there’s |
|
traffic this light will blink. It will illuminate AMBER |
|
if it fails to mount the USB storage device. |
|
|
HDD LED
USB LED
Power LED
D-Link ShareCenter DNS-315 User Manual |
6 |
Rear Panel (Connections)
Cooling Fan
Power Button
USB Copy/Unmount
USB Port
Gigabit Ethernet Port
Power Receptacle
COMPONENT |
DESCRIPTION |
Cooling Fan |
The cooling fan is used to cool the hard drive. |
Power Button |
Press this button to power on the DNS-315 |
USB Button Copy/ |
Click this button to copy data from your USB storage device. Click |
Unmount |
it again for 5 seconds to unmount the USB storage device. |
USB Port |
Use this port to attach a USB device |
Gigabit Ethernet Port |
Use the Gigabit Ethernet Port to connect the ShareCenter to the local |
|
network. The port is equipped with both a LINK/Traffic (R) and Speed LED |
|
(L) to indicate connectivity and traffic respectively to the local LAN |
Power Receptacle |
Connect the supplied power cord to the back socket |
|
|
D-Link ShareCenter DNS-315 User Manual |
7 |

Bottom Panel (Connections)
Reset Button
COMPONENT |
DESCRIPTION |
Reset Button |
Press and hold the button for over 5 seconds to reset the DNS-315. |
|
|
Note about Power Button & Reset Button
Use the Power Button to safely power up and power down the DNS-315 to avoid data loss or data damage to the drive. Use the Reset Button and the Power button together to Repair the hard drive on the DNS-315.
D-Link ShareCenter DNS-315 User Manual |
8 |
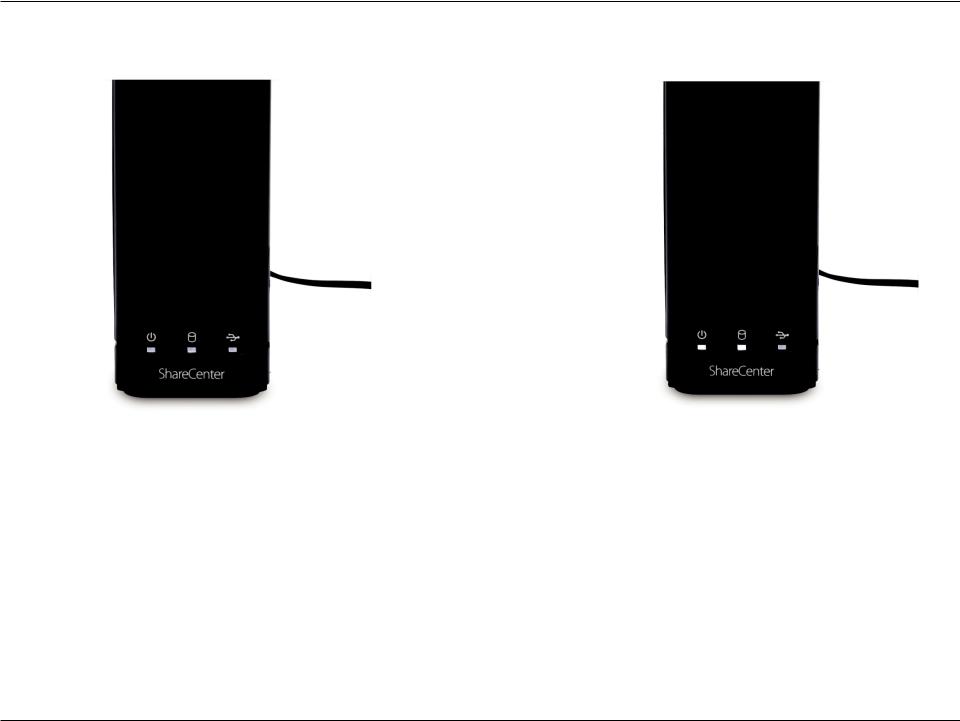
LED Notifications
When all lights are inactive the system is powered down.
When the Power LED is flickering white, the DNS-315 is powered on.
D-Link ShareCenter DNS-315 User Manual |
9 |

LED Notifications
When the HDD LED is amber, the free HDD capacity is less than 5% it is in use.
When the HDD LED is red then the HDD fails.
D-Link ShareCenter DNS-315 User Manual |
10 |
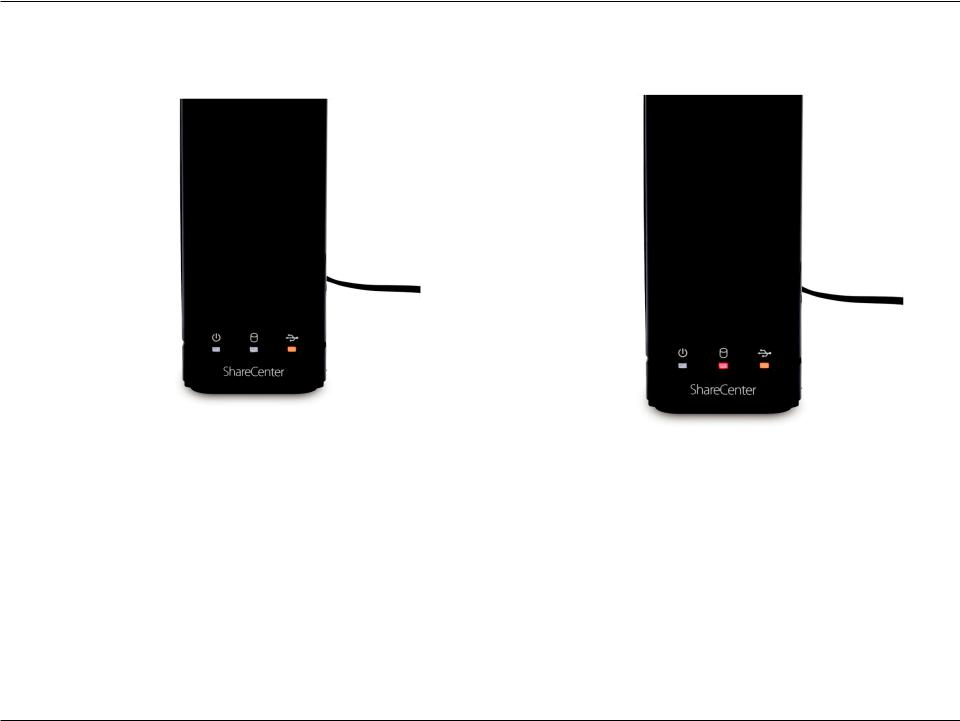
LED Notifications
When the USB LED is amber, that means the USB storage is installed but failed to mount the device
When the HDD LED is red but the USB LED is orange, it means that data is not being transferred to the HDD correctly. Check the USB Flash drive. Make sure the device is installed correctly.
D-Link ShareCenter DNS-315 User Manual |
11 |

Handling Precautions
The DNS-315 must be handled with care and precaution during unpacking and installation. Drives may be damaged by rough handling, shock, or vibration. Always observe the following precautions when unpacking and installing your DNS-315.
•Do not drop or jolt the DNS-315
•Do not move the drive during activity. Secure it tightly with the screws provided.
•Do not use this product as a portable drive.
•To allow proper ventilation, do not block any of the drive enclosure’s air slots.
D-Link ShareCenter DNS-315 User Manual |
12 |

Connecting the DNS-315 and Getting Started
This chapter provides instructions for connecting the drive to your network and installing the ShareCenter software. It includes the following topics:
•Connecting the DNS-315
•Getting Started with the ShareCenter Setup Wizard
Connecting the DNS-315
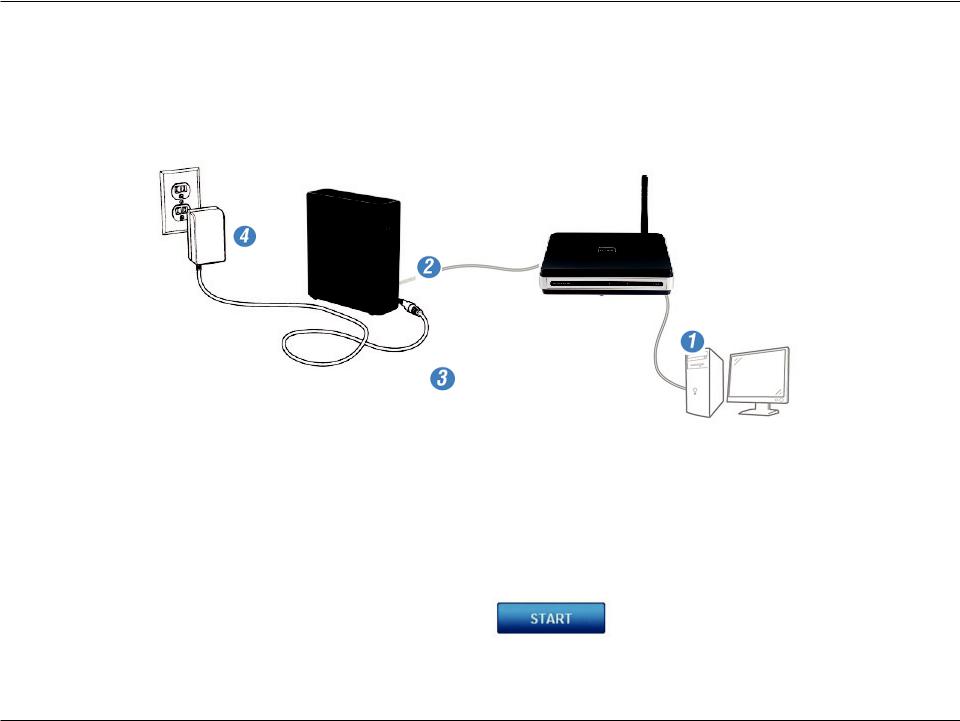
To connect the DNS-315:
• Depending on your region, if required, change the power adapters as follows:
D-Link ShareCenter DNS-315 User Manual |
13 |
Connecting the DNS-315 and Getting Started
• Connnect the devices accordingly
1.Connect your computer to the router (using an Ethernet Cat5 cable).
2.Connect the DNS-315 to the router (using an Ethernet Cat5 cable).
3.Connect the Power cord to the DNS-315.
4.Plug the socket into the wall unit.
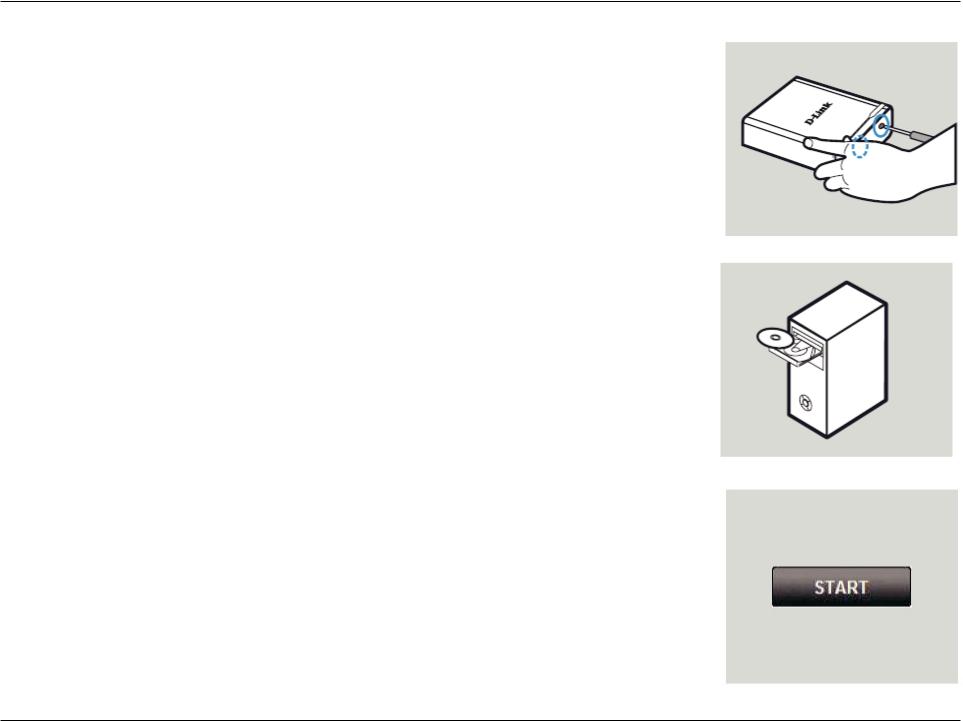
To run the Storage Utility or the ShareCenter Setup wizard insert the ShareCenter™ CD into your CD-ROM drive:
The auto-run feature starts the program. Click “Start” to begin.
The ShareCenter Setup wizard provides a Welcome screen. Follow the instructions carefully.
D-Link ShareCenter DNS-315 User Manual |
14 |

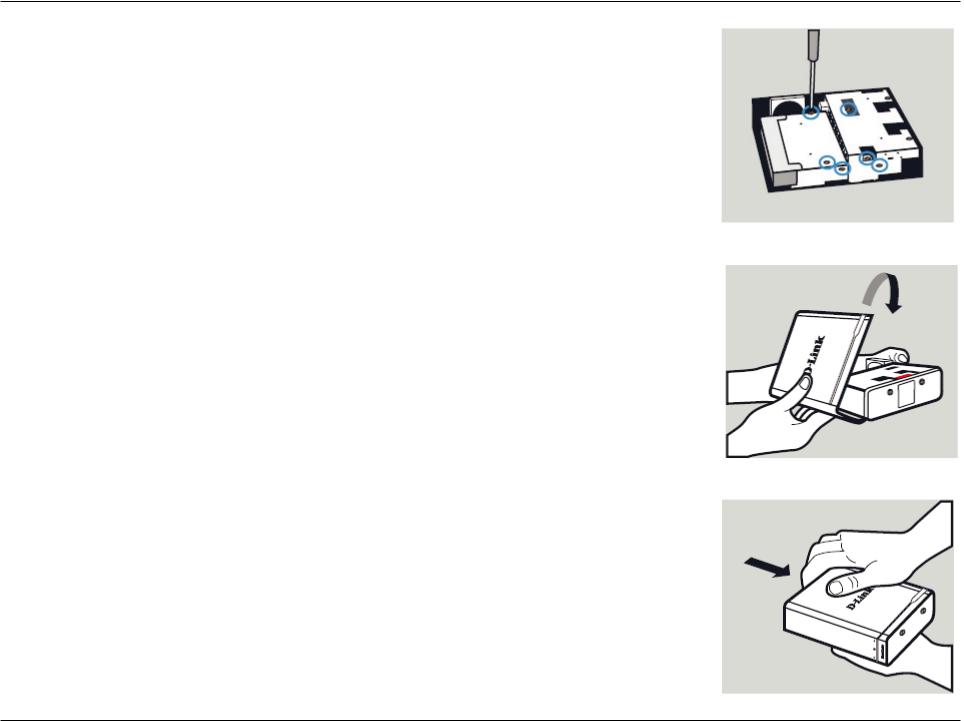
Installing a Hard Drive in the DNS-315
Step 1: Unscrew the two screws at the bottom of the DNS-315.
Step 2: Slide the cover away from you until it unhooks from the base.
Note about Installing a new hard drive
Please power off the DNS-315 before removing the cover
D-Link ShareCenter DNS-315 User Manual |
15 |
Step 3: Unhook and open the cover from its base.
Step 4: Keep the DNS-315 in the upright position and insert a 3.5” hard drive into the drive bay of the device. (Ensure the SATA connector is aligned with the SATA socket at the base of the unit otherwise the DNS-315 will not power on correctly.
D-Link ShareCenter DNS-315 User Manual |
16 |
Step 5: Screw all six screws supplied to secure the hard drive to the base unit.
Step 6: Flip the cover back to align with the red line on the bracket.
Step 7: Slide the cover downwards.
D-Link ShareCenter DNS-315 User Manual |
17 |
Step 8: Re-attach the device screws at the bottom of the DNS-315.
Step 9: Remove the ShareCenter from the package and insert it into your computer.
Important: Ensure that your internet connection is active. Do not connect any USB storage devices yet.
Step 10: Click the gray Start button on the welcome screen to begin the Setup Wizard. Follow the instructions on the screen.
Default IP: DHCP (use D-Link Storage Utility to search)
Default Username: admin
Default Password: (leave this blank)
D-Link ShareCenter DNS-315 User Manual |
18 |

Installation
Setup Wizard (stand-alone)
The Setup wizard will step you through the process of getting your ShareCenter ready for immediate use. The wizard will setup the following:
•Show you the proper Hard Drive installation procedure
•Show you how to connect the LAN cable.
•Show you how to connect Power and switch the device on.
•Show you how to check the Hard Drive LEDs
•Configure your Administrator Username and Password
•Setup the Network configuration for the Local LAN.
•Configure the ShareCenter Name. Description and Workgroup
•Configure the Dynamic DNS settings and/or if necessary, show you how to apply for a DDNS account.
•Setup the System Time and Date
•Configure the E-Mail Settings where the ShareCenter System Alerts are then sent.
•Setup and format the Hard Drive RAID configuration.
•Map the ShareCenter Volumes as Network Drives on your computer.
Note: The computer used to access the ShareCenter
web-based configuration manager must be on the same subnet as the ShareCenter. If your network is using a DHCP server and the computer receives IP settings from DHCP server, the ShareCenter™ will automatically be in the same subnet.
D-Link ShareCenter DNS-315 User Manual |
19 |
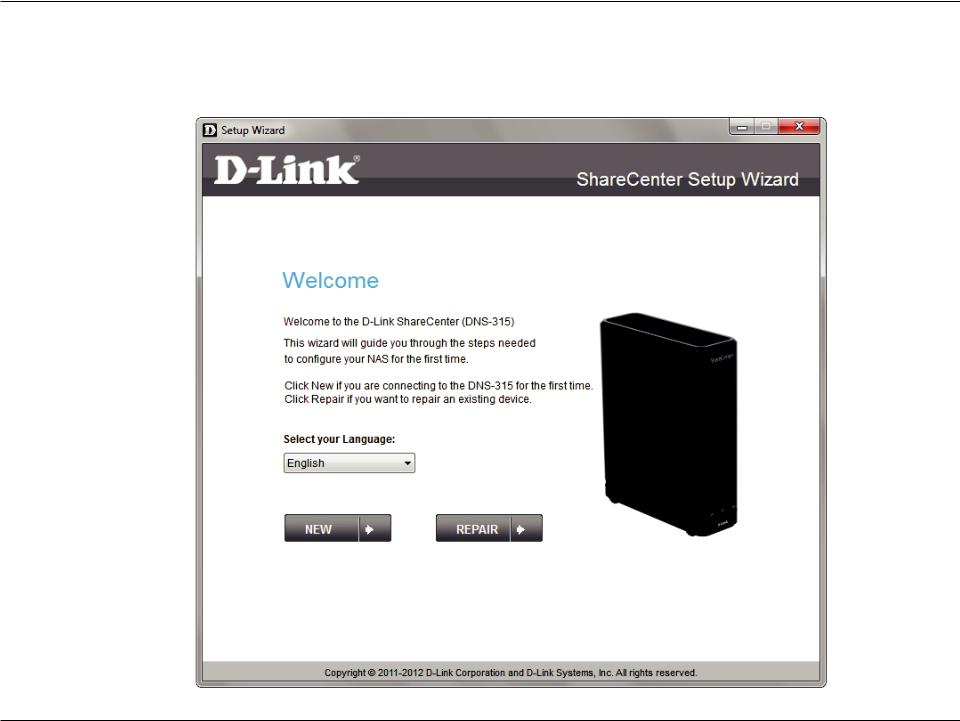
ShareCenter Setup Wizard - Welcome Screen
This step below is the startup screen. The ShareCenter Setup Wizard guides you through the entire installation process. Select your language from the drop-down list and click New.
D-Link ShareCenter DNS-315 User Manual |
20 |
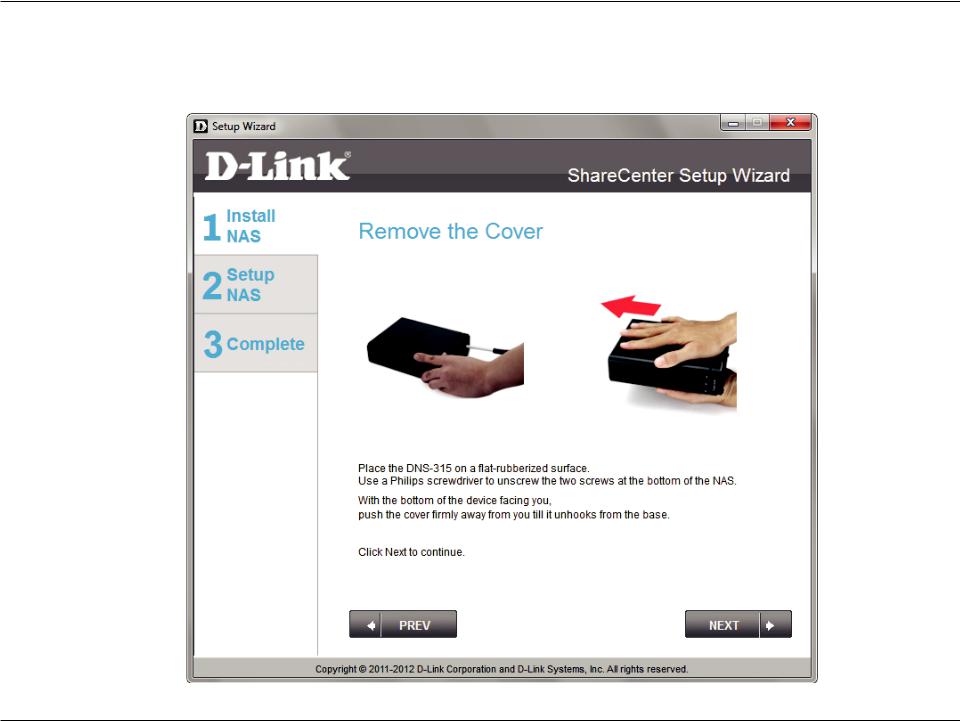
ShareCenter Setup Wizard - Detaching the Cover
This step below shows you how to unscrew and slide the ShareCenter to install the hard drive. Click Next to continue.
D-Link ShareCenter DNS-315 User Manual |
21 |

ShareCenter Setup Wizard - Installing the Hard Drive
This step above shows you how to open your ShareCenter so that you can install one hard drive. Click Next to continue.
D-Link ShareCenter DNS-315 User Manual |
22 |
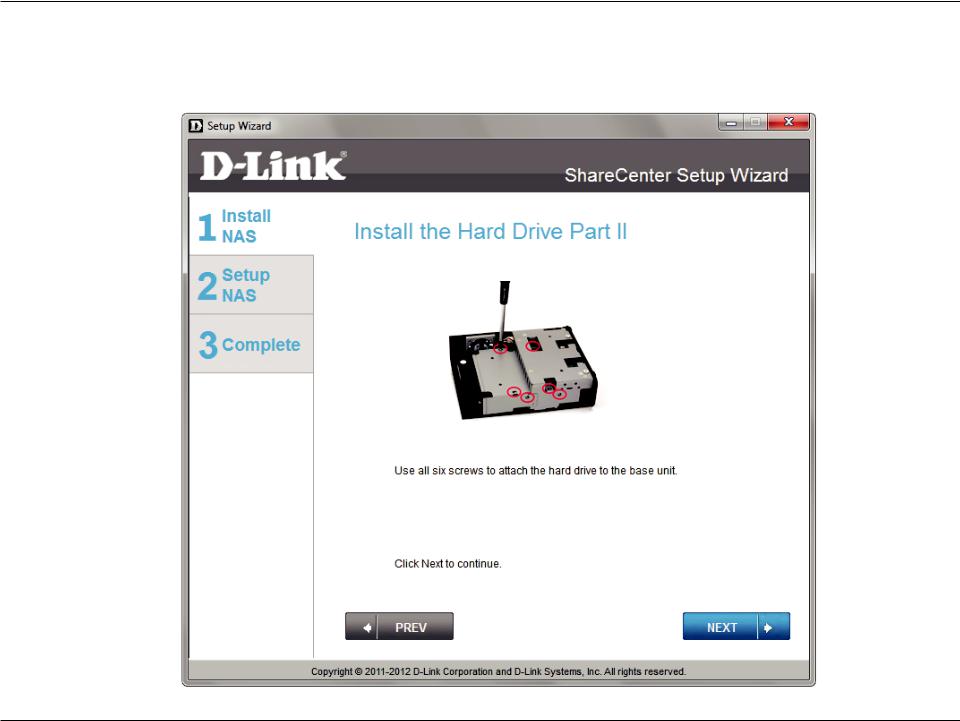
ShareCenter Setup Wizard - Screwing the Hard Drive into Place
Use all six screws to firmly attach the hard drive to the base of the DNS-315. Click Next to continue.
D-Link ShareCenter DNS-315 User Manual |
23 |
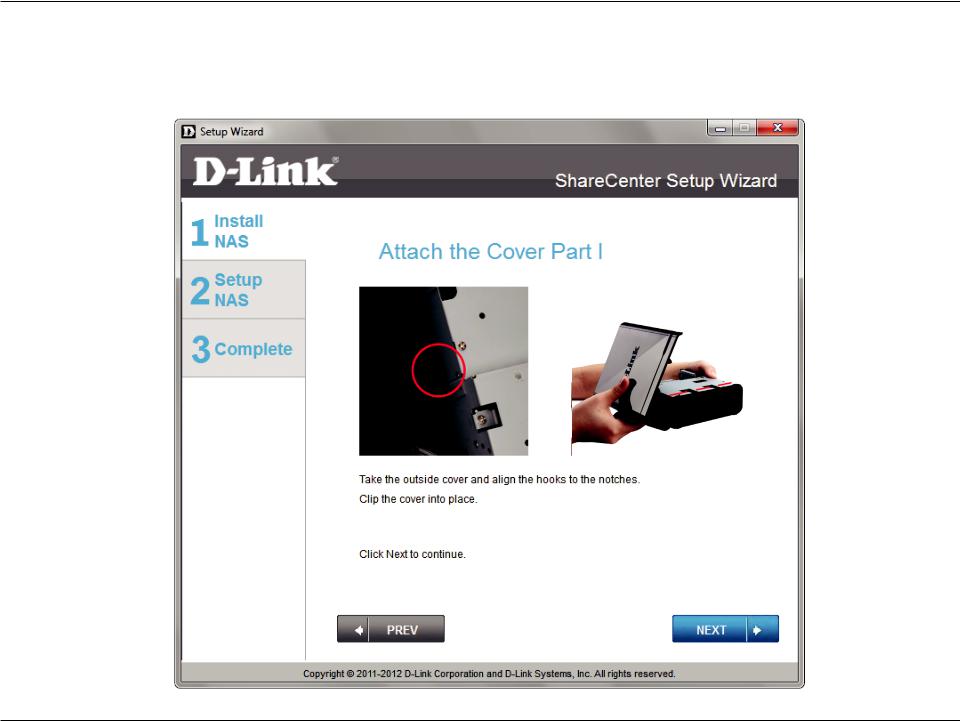
ShareCenter Setup Wizard - Sliding the Cover & Shutting the Device
Use the hooks on the cover to allign it with the red lines on the bracket. Slide it into place and shut the cover. Click Next to continue.
D-Link ShareCenter DNS-315 User Manual |
24 |
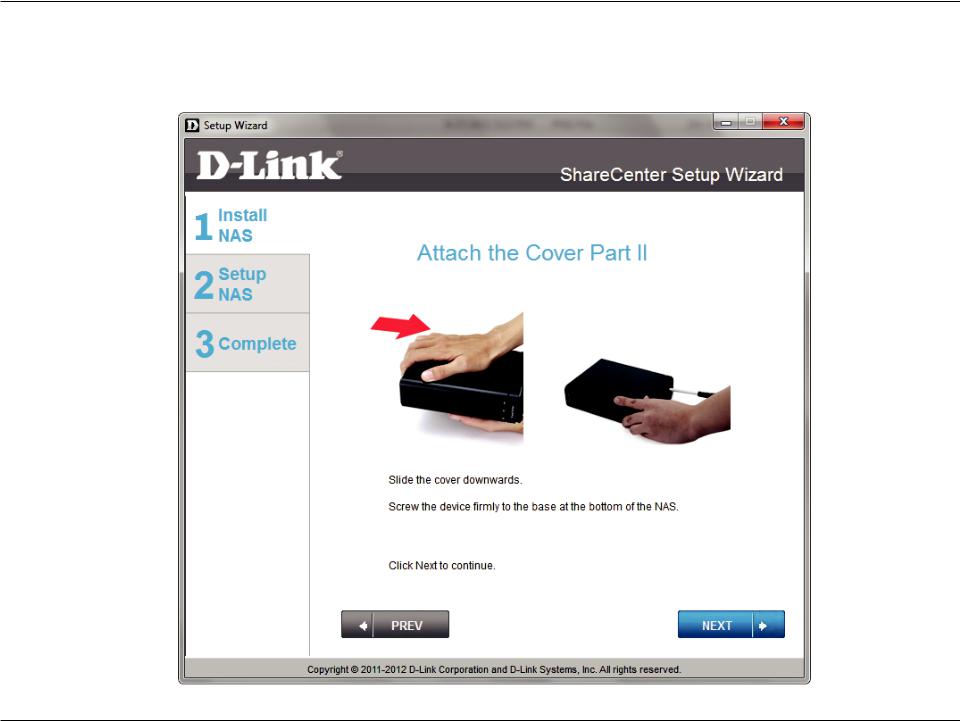
ShareCenter Setup Wizard - Attaching the Cover & Closing the Device
Slide the DNS-315 cover towards you and screw the device firmly into place using the remaining screws. Click Next to continue.
D-Link ShareCenter DNS-315 User Manual |
25 |
Loading...