D-Link DP-301P+ User Manual

D-Link DP-301P+
Pocket Size Print Server
Manual
Building Networks for People
Contents
Package Contents ................................................................................ |
3 |
Introduction............................................................................................ |
4 |
Setting up the DP-301P+ ...................................................................... |
8 |
Getting Started .................................................................................... |
10 |
Using the Web Configuration ............................................................... |
11 |
TCP/IP Printing for Windows XP ......................................................... |
18 |
TCP/IP Printing for Windows 2000 ...................................................... |
26 |
TCP/IP Printing for Windows 98SE/Me ............................................... |
34 |
Unix/Linux Printing ............................................................................... |
45 |
Setting up AppleTalk or LPR Printing in MAC OS X ............................. |
46 |
Setting up AppleTalk Printing in MAC OS 9 ......................................... |
51 |
Technical Specifications ...................................................................... |
57 |
Contacting Technical Support .............................................................. |
58 |
Warranty and Registration ................................................................... |
59 |
Appendix: DP-301P+ Printer Compatibility List .................................. |
62 |
2
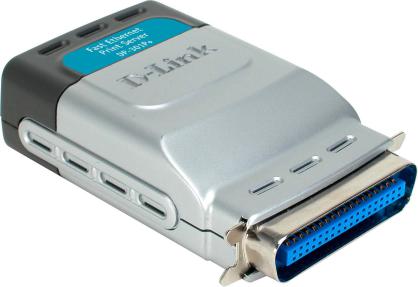
Package Contents
Contents of Package:
D-Link DP-301P+
Pocket Size Print Server
Manual and Warranty on CD
Printed Quick Installation Guide
If any of the above items are missing, please contact your reseller.
System Requirements:
A computer with an installed Ethernet adapter
Windows XP/2000/NT4/Me/98SE
Apple Mac OS with AppleTalk
Linux
NetWare 5.x or above (Native NDS)
Internet Explorer 6.0, or Netscape Navigator version 6.0 or above, with JavaScript enabled
Printer must support required Operating System
3
Introduction
The D-Link DP-301P+ Print Server is a pocket size print server that connects to your Ethernet/Fast Ethernet network anywhere you wish to locate printer services. The DP-301P+ manages the flow of print files from workstations or file servers to connected printers, delivering print jobs to printers much faster than a file server or a PC acting as a print server.
The DP-301P+ includes easy-to-use software to install on most Windows-based networks. Protocol support for TCP/IP, NetBEUI, and AppleTalk are provided to ensure seamless connection to major networking operating systems.
The DP-301P+ has a built in Web-based management feature that allows users to easily configure and manage multiple print queues through TCP/IP. The DP-301P+ also supports Telnet as an alternative method to configure the unit.
The DP-301P+ improves network printing services in the following ways:
The DP-301P+ manages print file traffic. This provides workload relief to your file servers, and allows the file servers’ full capacity to be used for file access or other direct services to network users. On Peer-to- Peer networks, workstations can print directly to the print server without increasing the load of another workstation or server.
Because the DP-301P+ is very portable and inexpensive compared to a PC-based print server, and the print server connects to your file servers through the network, printers can be deployed to locations of maximum convenience to users.
4

The DP-301P+ offers extraordinary flexibility, operating with all major network operating systems and protocols:
TCP/IP
UNIX lpr/lpd (HP-UX, Sun OS, Solaris, SCO, UnixWare, IBM AIX) Windows NT/2000, Windows 95/98SE/Me, Windows XP NetWare 5.x NDPS LPR Remote Printing
NetBEUI
Windows NT/2000/XP, Windows 95/98SE/Me, Windows for Workgroups, Microsoft LAN Manager, IBM LAN Server
AppleTalk
Mac OS EtherTalk
Windows-based setup and administration software, PS Admin, is supplied with the print server, making configuration and management quick and easy. The print server also supports configuration and management via the Telnet protocol for networks without Windows-compatible machines.
External Features
Port Connectors
The DP-301P+’s parallel port is located on its front panel. The port can be configured using the PS Admin program or the print server’s Telnet interface. (See the PS Admin User’s Guide, available on the CD that came with the DP-301P+, for information about configuring the print server’s ports.) The print server also supports web configuration permitting users to configure settings through the web browser. The default IP address is as follows:
Default IP address – 192.168.0.10
Subnet mask – 255.255.255.0
Note:
The PC’s IP address must be in the same subnet as the print server’s IP address for the two devices to communicate. (For example, if your print server’s IP address is 192.168.0.10, with a subnet mask of 255.255.255.0, then your computer’s IP address should be 192.168.0.x, where x is a value between 1-254, excluding 10.)
5
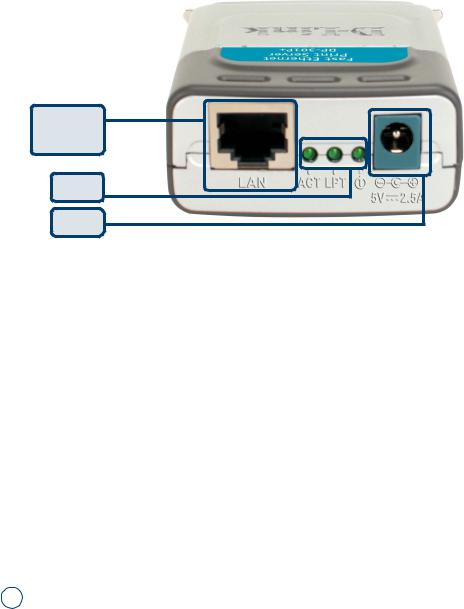
Rear Panel
Ethernet
Port
LEDs
Power
Ethernet Port - Network Cable Connector
The print server’s rear panel features an RJ-45 connector for connection to 10Base-T Ethernet cabling or 100Base-TX Fast Ethernet cabling (which should be CAT5 twisted-pair cable). The port supports the NWay protocol, allowing the print server to automatically detect or negotiate the transmission speed of the network. Use this port to connect to your network router.
Power - DC Power Connector
The DC power input connector is located on the print server’s rear panel .
LED Indicators
The back panel of the print server features three LED indicators:
ACT - Lights up to indicate activity on the network.
LPT - Lights up to indicate printing activity.
l - Lights up to indicate that the DP-301P+ is powered ON.
6
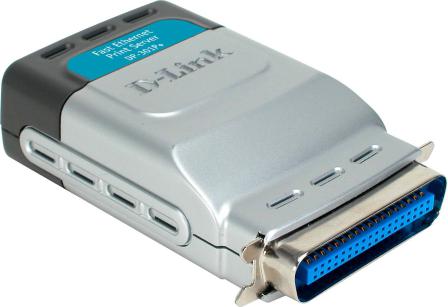
Front Panel
Parallel Port Connector
The front panel of the print server features the parallel port connector. Plug this connector directly into the parallel port on your network printer. There is no need for a parallel port cable between the print server and your network printer.
7

Setting up the DP-301P+
Installing the Print Server
WARNING: Configuration problems may result if the print server is powered up without first establishing its network connection. Follow this procedure to avoid complications at the configuration stage.
1.Confirm proper operation of the printers to be connected to the DP-301P+.
2.When you have confirmed proper operation of the printer, switch its power
3.Confirm that your network is operating normally.
4.Connect the DP-301P+ RJ-45 Connector to the network, using an Ethernet CAT5 cable.
5.While the printer is powered OFF, install the DP-301P+ parallel port connector into the parallel port on the network printer.
6.Switch on the connected printer.
7.Plug the AC power adapter’s DC output plug into the DC 5V power socket on the print server.
8.Plug the power adapter into a power outlet. This will supply power to the print server, as it has no external power switch. The green Power LED on the Print Server’s front panel should illuminate steadily, and the Print Server’s Self-Test will proceed.
Power ON Self-Test
Every DP-301P+ has been factory-tested to operate properly.
Whenever the DP-301P+ is powered up, two testing procedures follow automatically. The first procedure is a programmed series of flashes intended to confirm proper operation of the LED indicators. The second procedure comprises programmed tests of the DP-301P+’s internal circuitry. If any fault is found during the circuitry tests, testing stops and a continuous pattern of flashes signals the nature of the fault.
8

Indicator Test
Immediately upon power-up, the 1 (Power) and LPT indicators will illuminate steadily in green for several seconds. Then the LPT indicator will become dark 1 while the (Power) indicator remains steady. Irregularity of any indicator during this test indicates that there is a problem with the indicators themselves.
Circuit Tests
The circuit tests immediately follow the indicator test. A normal (no fault) result is signaled by three flashes of the LPT indicator and the start of normal print server operation. If any error condition is found during the circuit tests, testing will halt with the LPT indicator continuously signaling the particular error according to the following table:
LPT LED Flash Pattern |
Error Type |
|
|
|
|
Steady long flashes |
Firmware Reload Required |
|
|
|
|
Continuously on |
DRAM Error |
|
|
|
|
One long, two short flashes |
Timer INT error |
|
|
|
|
One long, three short flashes |
Flash Protected |
|
|
|
|
One long, five short flashes |
Flash Erase/Program error |
|
|
|
|
One long, six short flashes |
LAN Controller error |
|
|
|
|
One long, eight short flashes |
Parallel Controller Error |
|
|
|
|
One long, nine short flashes |
LPT Error |
|
|
|
|
One long, fourteen short flashes |
LAN PHY error |
|
|
|
|
In the event of a Firmware Reload Required error at startup, proceed according to instructions given in the PS Admin User’s Guide (“PS Admin Administration” section, under the heading “Upgrading the Print Server’s Internal Firmware”).
The PS Admin software includes a Print Test function for confirmation of print server connections and functions. This operational test can be performed after you have installed the PS Admin software and completed the PS Admin procedures for configuring the DP-301P+. See the instructions given in the PS Admin Users Guide (“Getting Started Setting up Your Print Server” section, under the heading “Testing your Print Server”).
9
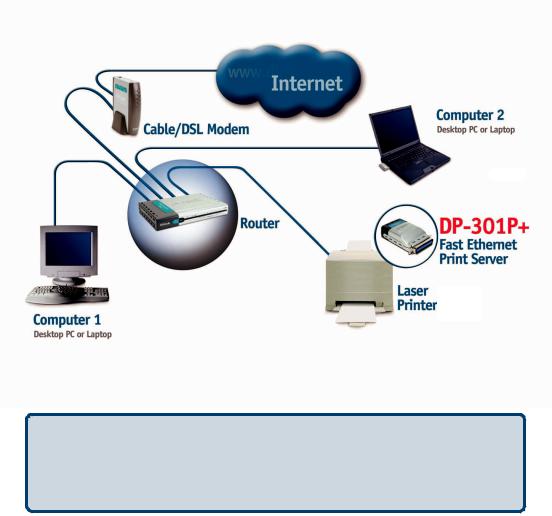
Getting Started
Below is a sample network using the DP-301P+. The DP-301P+ has a builtin Web-based management feature that allows users to easily configure and manage multiple print queues through TCP/IP.
For a list of printers that are compatible with the DP-301P+, please see the Appendix in this manual. The compatibility list is not comprehensive. Even if it is not included in the list, your printer may be compatible with the DP-301P+.
10
Using the Web Configuration
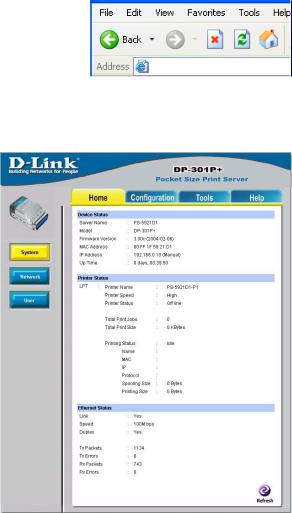
Open your web browser and type http:// 192.168.0.10 in the address box, and press Enter. This set of numbers is the default IP address of your print server. Please note that
the PC’s IP address must correspond with http://192.168.0.10 the print server’s IP address in the same
segment for the two devices to communicate.
Home > System
Device Status
This tab displays the system information, providing general information regarding the print server. Click on the Refresh button to acquire the most updated information. Once a printer is connected to the print server, the Printer Status will be displayed.
Server Name: The name assigned to the print server.
Model: The model of the print server.
Hardware Version: The version of the hardware on the print server.
Firmware Version: The version of the firmware and release date on the print server.
MAC Address: The MAC address of the Ethernet port.
IP Address: The IP address of the print server.
Up Time: The length of time the print server has been up.
This screen also displays information about the Printer Status and the Ethernet Status.
11
Using the Web Configuration (continued)
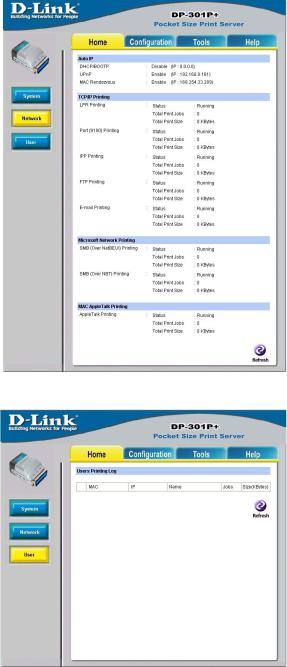
Home > Network
This screen contains information regarding Auto IP,
TCP/IP Printing, Microsoft Network Printing, and MAC AppleTalk Printing.
Home > User
This screen displays the
User’s Printing Log.
12
Using the Web Configuration (continued)
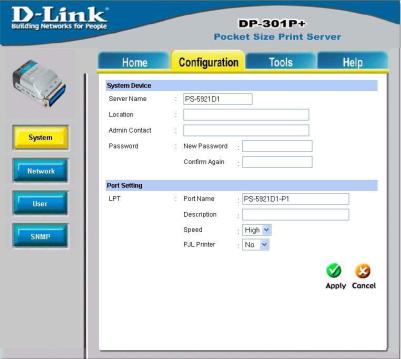
Configuration > System
The Configuration window will display the settings required to configure the DP301P+ Print Server. Consult your printer’s manual for the PJL (Printer Job Language) and print speed supported on your printer. Click Save on the bottom of the configuration page to ensure the settings are updated and saved.
Server Name: The name assigned to the print server.
Location: Input a comment indicating where the print server is located. (optional)
Admin Contact: The name of the print server’s administrator. (optional)
Password: By default the DP-301P+ does not have a password. For security, you may wish to enter a password.
Port Name: This is the assigned name for the parallel port.
Description: A brief description for the parallel port. (optional)
Speed: Select high or low printer port speed.
PJL Printer: This feature is used to support the Hewlett-Packard PJL (Printer Job Language) standard for bi-directional printing.
13
Using the Web Configuration (continued)
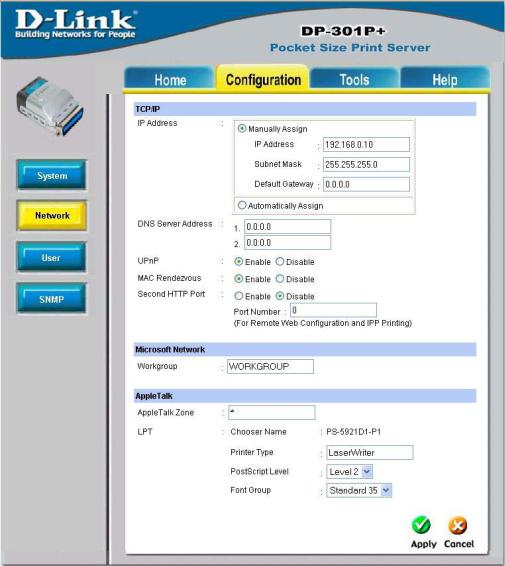
Configuration > Network
14

Using the Web Configuration (continued)
Configuration > Network (continued)
TCP/IP Protocol
IP Address
Manually Assign: To manually assign an IP address please provide the following information:
IP Address: The default IP address is 192.168.0.10 Subnet Mask: The default subnet mask is 255.255.255.0
Default Gateway: Enter the IP address of the default gateway (router).
Automatically Assign: Select this option to receive an IP address automatically.
DNS Server Address: A Domain Name Server (DNS) translates a domain name into an IP address. Enter the IP address of the DNS server here.
UPnP: Enable UPnP (Universal Plug and Play ) here. UPnP makes installation easier if all the communicating devices also have UPnP enabled.
MAC Rendevous: Select Enable for ease of use with Mac OS X computers.
Second HTTP Port: Select Enable and enter a Port Number for remote web configuration and IPP Printing. (IPP is a Web-based printer management)
Microsoft Network
Workgroup: Computers in the same network must have the same Workgroup name.
AppleTalk
AppleTalk Zone: Enter an asterisk.
Chooser Name: Enter the printer name.
LPT Printer Type: Enter the printer type.
PostScript Level: Enter the PostScript level.
Font Group: Enter the font group.
Save: Click Apply to save the changes. 15
Using the Web Configuration (continued)
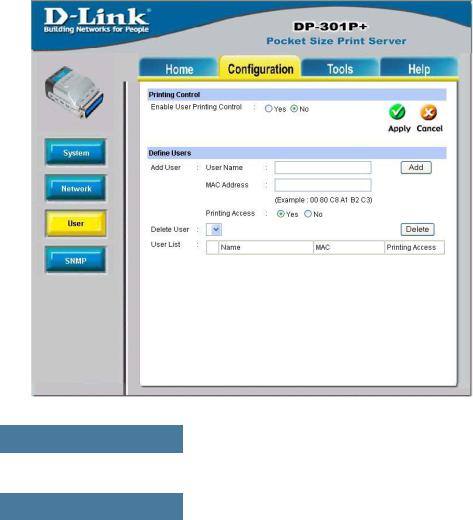
Configuration > User
Printing Control
Enable User Printing Control: To control access to the printer click Enable.
Define Users
Add User: Enter the User Name, the MAC Address, click Yes or No for Printing Access and then click Add.
User List: You can delete a user in the list by putting a check in the box to the left of the name and clicking Delete.
16
Using the Web Configuration (continued)
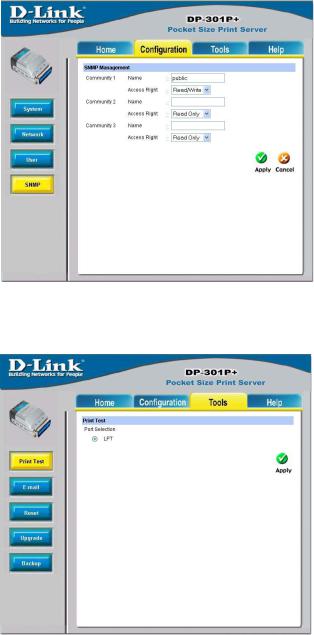
Configuration > SNMP
Configure your SNMP here.
Tools > Print Test
Click Apply to print a test page.
17
Using the Web Configuration (continued)
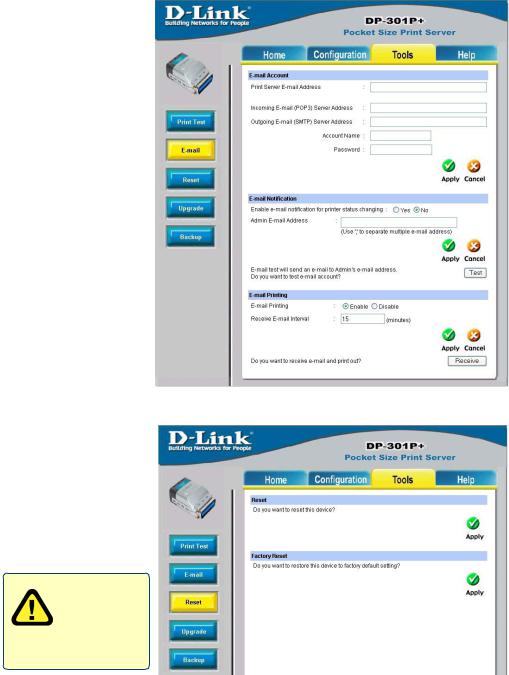
EmailAccount:
Configure the Print Server’s email account here.
Email Notification:
Click Yes to enable email notification for printer status change.
Test: Click Test to send an email to the Admin account.
Email printing: Click
Yes to enable email printing. (only the text)
Receive email interval: Enter the length of time between emails here.
Receive: Click Receive to get emails and printouts.
Reset: Click Apply to reset the DP-301P+.
Factory Reset: Click
Apply to reset the DP301P+ to the factory default settings.
You will lose your current
settings if you Reset the DP-301P+.
Tools > Email
Tools > Reset
18
Using the Web Configuration (continued)
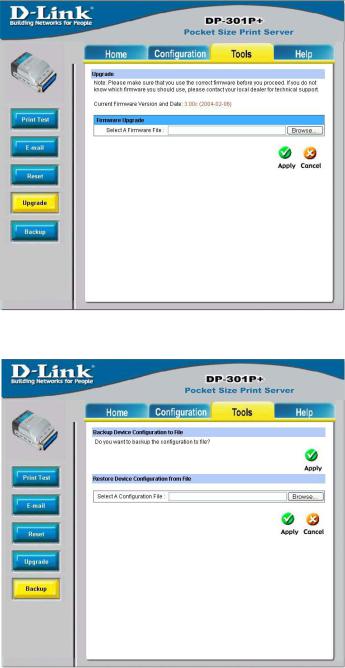
Tools > Upgrade
Firmware Upgrade:
Visit the D-Link support site at http:// support.dlink.com to find the latest firmware upgrade. Copy it to your hard drive.Then click Browse in this window to select the upgrade and click Apply. Your firmware upgrade is complete.
Tools > Backup
Backup Device Configuration to File:
Click Apply to make a backup copy of your current configuration.
Restore Device Configuration from File: Click Browse to browse your hard drive for backup configuration files. After you have selected a file click
Apply.
19
 Loading...