


Version 1.1 | 29/12/2011
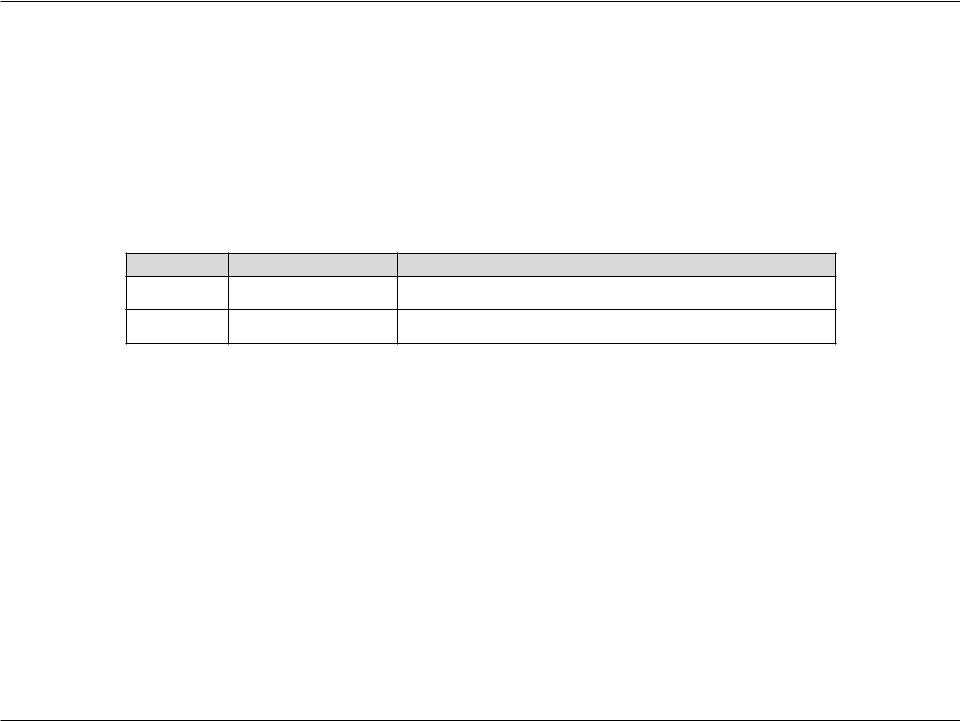
Table of Contents
Manual Overview
D-Link reserves the right to revise this publication and to make changes in the content hereof without obligation to notify any person or organization of such revisions or changes. Information in this document may become obsolete as our services and websites develop and change. Please refer to the www.mydlink.com website for the most current information.
Manual Revisions
Revision |
Date |
Description |
1.0August 02, 2011 DNR-322L Revision A1 with firmware version 1.00
1.1December 29, 2011 DNR-322L Revision A1 with firmware version 1.10
Trademarks
D-Link and the D-Link logo are trademarks or registered trademarks of D-Link Corporation or its subsidiaries in the United States or other countries. All other company or product names mentioned herein are trademarks or registered trademarks of their respective companies.
Copyright © 2012 by D-Link Corporation.
All rights reserved. This publication may not be reproduced, in whole or in part, without prior expressed written permission from D-Link Corporation.
D-Link DNR-322L User Manual |
i |

Table of Contents
Table of Contents
Features............................................................................................ |
4 |
Hardware Overview...................................................................... |
7 |
Front View................................................................................ |
7 |
Rear Panel (Connections)................................................... |
8 |
Getting Started........................................................................... |
9 |
NVR Software CD........................................................................... |
9 |
Installation................................................................................ |
10 |
Setup Wizard............................................................................ |
10 |
Install the Hard Drives....................................................... |
11 |
Power and Device Selection............................................ |
13 |
Admin password.................................................................. |
14 |
RAID Configuration and Drive Mapping..................... |
15 |
Search Camera...................................................................... |
16 |
Set up Internet connection.............................................. |
18 |
D-Link NVR Search Utility......................................................... |
25 |
Web UI Login......................................................................... |
27 |
Configure Hard Drive......................................................... |
28 |
Auto Search Camera........................................................... |
29 |
Web UI............................................................................................. |
31 |
Configuring the NVR.......................................................... |
32 |
Network Setup..................................................................... |
33 |
Camera Search...................................................................... |
34 |
Camera Setup....................................................................... |
35 |
Audio and Video.................................................................. |
36 |
Live and Playback Setup................................................... |
37 |
Recording Schedule........................................................... |
38 |
Event Setup........................................................................... |
41 |
Auto Backup.......................................................................... |
42 |
E-mail Setup.......................................................................... |
44 |
Time and Date Setup......................................................... |
45 |
Maintenance............................................................................ |
46 |
User Management.............................................................. |
46 |
System..................................................................................... |
48 |
RAID.......................................................................................... |
49 |
Dynamic DNS........................................................................ |
51 |
Firmware Update................................................................. |
52 |
Status......................................................................................... |
53 |
Camera Status....................................................................... |
53 |
System Info............................................................................ |
54 |
System Log............................................................................ |
55 |
NVR Log.................................................................................. |
56 |
Support................................................................................... |
57 |
Live Video................................................................................. |
58 |
General Setting........................................................................ |
61 |
Multiple view........................................................................... |
64 |
Playback.................................................................................... |
65 |
Open Record and Setting................................................. |
68 |
D-Link DNR-322L User Manual |
ii |

Table of Contents |
|
Search the Recorded Video to Playback |
......................70 |
Recorded Video Enhancement....................................... |
72 |
Save Video.............................................................................. |
73 |
Save Image............................................................................ |
74 |
Print Image............................................................................ |
75 |
Page Setting.......................................................................... |
75 |
Backup the Recorded Video............................................ |
76 |
Playback Manager Application............................................ |
77 |
Set Connections to the Units.......................................... |
78 |
Backup and File Manager Application................................ |
79 |
Verification Tool....................................................................... |
81 |
Verify Image / Video........................................................... |
82 |
Troubleshooting...................................................................... |
83 |
Choose a RAID Level............................................................... |
85 |
Replacing or Adding a New Hard Drive.............................. |
86 |
Technical Specifications......................................................... |
87 |
Firmware Specification........................................................... |
87 |
Hardware Specification.......................................................... |
88 |
D-Link DNR-322L User Manual |
iii |

Section 1 - Product Overview
Package Contents
•D-Link DNR-322L mydlink NetworkVideo Recorder (NVR)
•CAT5 Ethernet Cable
•Power Adapter
•Cable Holder
•Keys
•Manual and Software on CD
•Quick Install Guide
Note:Using a power supply with a different voltage than the one included with your product will cause damage and void the warranty for this product.
If any of the above items are missing, please contact your reseller.
D-Link DNR-322L User Manual |
1 |

Section 1 - Product Overview
System Requirements
Hardware Requirements |
• One or two 3.5”SATA hard disk drive(s)* |
|
|
|
|
Network Requirements |
• Broadband Internet connection (for remote access) |
|
• Network camera(s) (refer to the D-Link website for a list of supported cameras) |
||
|
• 10/100/1000Mbit Gigabit Ethernet switch or router |
|
|
|
|
|
Computer with the following: |
|
|
• MicrosoftWindows® 7,Vista®, or XP (32bits) |
|
|
• Pentium 4 - 2.4GHz or higher |
|
Web-based Configuration |
• 512MB or higher |
|
|
||
Utility Requirements/Remote |
Browser Requirements: |
|
PC Minimum Requirements |
||
• Internet Explorer 7.0 or higher |
||
|
||
|
Make sure you have the latest version of Java installed.Visit www.java.com to download |
|
|
the latest version. |
|
|
|
|
Optional |
UPS with USB interface |
|
|
|
*Hard disk drives should be from the same manufacturer. To ensure maximum performance, identical drives are recommended for RAID 1 configurations.
D-Link DNR-322L User Manual |
2 |

Section 1 - Product Overview
Introduction
Congratulations on your purchase of the DNR-322L 2-bay mydlink NVR.
DNR-322L is a standalone wired NetworkVideo Recorder (NVR) which supports multi-channel network cameras with M-JPEG, MPEG4orH.264recordingwith2high-speed3.5-inchSATAharddisksforlongtimerecording.Thankstothepowerfulembedded system, the NVR can record video from network cameras located in local or remote sites into a dedicated HDD storage without turn on PC.
Empowered by Mydlink technology, DNR-322L can be easily setup for internet access. It supports real-time monitoring and playback from everywhere via IE browser. The triplex function can keep recording while user live viewing or searching playback at the same time. With complete video management, display and playback ability makes it as a convenient and stable video recorder.
D-Link DNR-322L User Manual |
3 |

Section 1 - Product Overview
Features
Comprehensive IP Surveillance Solution
•Total Solution: The D-Link NVR is a standalone SATA RAID network video recorder capable of 24/7 recording without a PC. The NVR can manage multiple network cameras, providing direct access to view live video and play recorded data through the Internet from anywhere anytime. The device itself is compact in size and incorporates a physical security lock.
•Easy to Use: Auser-friendlyGUIsimplifiesnetworkandcamerasetup,allowinguserstoeasilyaccessmultiplecameras for viewing, recording, playback, and configuration.
•Centralized Interface for Configuration: NVR provides a flexible and economic alternative to manage and configure multiple Network cameras on a centralized web interface.
•Megapixel Resolution Support: The major advantage of digital over analog video is its higher resolution support. The NVR supports high resolution megapixel recording for vivid video with high clarity.
•Empowered by Mydlink technology: DNR-322L can be easily setup for internet access. It supports real-time monitoring and playback from everywhere via IE browser. The recording store in your own HDD with high privacy, not in the cloud.
Complete Network Functionality
•PPPoE Support:The D-Link NVR utilizes ADSL services. It can connect to the Internet via an ADSL modem over Ethernet.
•DDNS Support: Dynamic DNS is a solution for users without a fixed IP address. With DDNS service, users can connect to the NVR from the Internet using an easy-to-remember domain name.
•NTP Support: Maintaining an accurate record of time is essential if recorded data is to be used as evidence. To ensure that the time recording is always accurate, the NVR can update the system clock from an Internet server using the Network Time Protocol (NTP).
•DHCP Server: The NVR can act as a DHCP server for easy deployment when the network environment is very simple and there is no existing DHCP server.
D-Link DNR-322L User Manual |
4 |

Section 1 - Product Overview
Fully Functional Recording
1.Flexible Recording Schedule: Once cameras have been set up, a highly configurable scheduling system allows for continuous recording or recording during specifically allotted time frames. Each camera can be set to record independently at preset intervals. It also provides event recording based on specific triggers.
2.Recording Automatic Overwrite: The NVR can be configured to overwrite the oldest data automatically when Hard Disk space runs out, allowing for continuous and uninterrupted recording. Users can specify the number of days the recording should be kept (within the limits of the Hard Disk capacity). For example, if the NVR has the capacity to store 7 days of recording, using the overwrite option, the NVR will record the 8th day and delete the 1st day.
3.Recording Stop Alert: The NVR also provides the option to stop recording when the Hard Disk is full. When the disk reach capacity, a notification can be sent via E-mail or to an external device such as an audible alarm or LED display.
Comprehensive Data and Hardware Security
1.Secure Data: RAID 1 duplicates the recordings database onto two separate drives. In the event of an Hard Disk failure, data integrity is maintained on the secondary Hard Disk.
2.Auto Boot after Power Recovery: The NVR will boot up automatically once the power is recovered after a power outage.
3.Access List Control: User can specify safe and blocked IP addresses to filter the external connections; this feature increases data security.
4.Multiple User Privilege Control: Administrators may also choose access privileges for users by specifying the cameras they may have access to live view, playback, audio, and PTZ functions.
5.UPS Status Monitor: A UPS can be used as emergency power supply for the NVR. The UPS uses a USB interface to notify the NVR to perform a proper shutdown before battery power runs out.
6.Backup Recording Data: Recorded data is stored in a secure database.This recorded data can be backed up to additional storage locations periodically or whenever needed.
Powerful Event Management
1.Camera Status: The camera status page will show connection, recording, frame rate and bit rate information of each camera. Meanwhile, the estimated available recording time is also displayed for quick reference.
2.Flexible Event Management: Event setup is another key configuration of the NVR. The NVR can monitor all of the camera triggers from motion detection. One of the most powerful functions is notification application. The NVR centrally controls the E-mail and recording of all the connected cameras.
D-Link DNR-322L User Manual |
5 |

Section 1 - Product Overview
Instant Live View
1.Full Screen: Enlarge the display to full screen of live view and recorded video.
2.Drag and Drop GUI: With multiple channels enabled, users can change channel by drag and drop.
3.Camera Name and Status on OSD: Camera name and recording status are displayed via OSD to aid in identification.
4.PTZ/Audio Support: Users can control pan/tilt/zoom (PTZ) functions from within the interface using the provided interface buttons or by directly clicking on the video. A single camera may be viewed full-screen with optional twoway audio.
5.Preset Point: Presets from within the interface can be set to instantly restore a previously saved view.
6.Digital Zoom: Videos can be enlarged by digital zoom.
Intelligent Playback
1.AVI/ASF Outputs: During playback, if a user uncovers video that needs to be exported, two formats are available. The AVI format will export raw video. The ASF file format will transpose a timestamp on the exported video.
2.Playback Speed Control: Playback speed control allows for up to 16x speed fast forward or fast backward play. The step playback option displays one frame at a time.
3.Video Enhancement: Users can enhance the recorded video with controls such as brightness, contrast, and sharpness.
4.Print Picture: If a printer is connected to the user’s PC, the NVR can also print the selected still image.
D-Link DNR-322L User Manual |
6 |
Section 1 - Product Overview
Hardware Overview
Front View
|
|
USB Port |
|
|
|
|
|
|
Power Button |
|
||
|
|
|
|
|
|
|
|
|||||
|
|
|
|
|
|
|
|
|
|
|
||
|
|
|
|
|
|
|
|
|
|
|
|
|
|
|
|
|
|
|
|
|
|
|
|
||
|
|
|
|
|
|
|
|
|
|
|
|
|
|
|
|
|
Drive LED |
|
Power LED |
|
|
||||
|
|
|
|
|
|
|
|
|
|
|
|
|
|
|
|
|
|
|
|
|
|
|
|
||
COMPONENT |
|
|
|
|
|
|
DESCRIPTION |
|||||
Power Button |
Press once to power on the NVR. Press and hold the button until the LED begins to blink to power down the NVR. |
|||||||||||
Power LED |
Power LED will blink when boot, turn steady when working normal. |
|||||||||||
Drive LED |
These LEDs will be solid BLUE when the drives are connected but inactive. The LEDs will blink when the drives |
|||||||||||
are being accessed, formatted or synchronized. They will illuminate AMBER if a drive has failed. |
||||||||||||
|
||||||||||||
USB Port |
USB port for UPS status update. |
|
|
|
|
|
|
|||||
D-Link DNR-322L User Manual |
7 |
Section 1 - Product Overview
Rear Panel (Connections)
Cover Lock
Cooling Fan
Gigabit Ethernet Port
Cable Hook |
Security Lock |
|
Power Receptacle
Reset Button
COMPONENT |
DESCRIPTION |
|
Cover Lock |
This lock is used to remove the cover when unlocked. Locking it will restrict the removal of the top cover. |
|
|
|
|
Cooling Fan |
The cooling fan is used to cool the hard drives and features speed control. When the unit is first powered on the |
|
fans rotate at a low speed and rotate at a high speed when the temperature rises above 49 °C. |
||
|
||
Reset Button |
Press this button for more than 5 seconds to reset the unit to factory defaults. |
|
Power Receptacle |
Connect the supplied power cord to the receptacle. |
|
Gigabit Ethernet Port |
Use the Gigabit Ethernet Port to connect the device to the local network.The port is equipped with both a LAN |
|
LINK (R) andTraffic LED (L) to indicate connectivity and traffic respectively to the local LAN |
||
|
||
Security Lock |
This lock can be used to tie the DNR-322L to the desk to prevent theft. Cables are sold separately. |
|
|
|
|
D-Link DNR-322L User Manual |
8 |
Section 2 - Getting Started
Getting Started
NVR Software CD
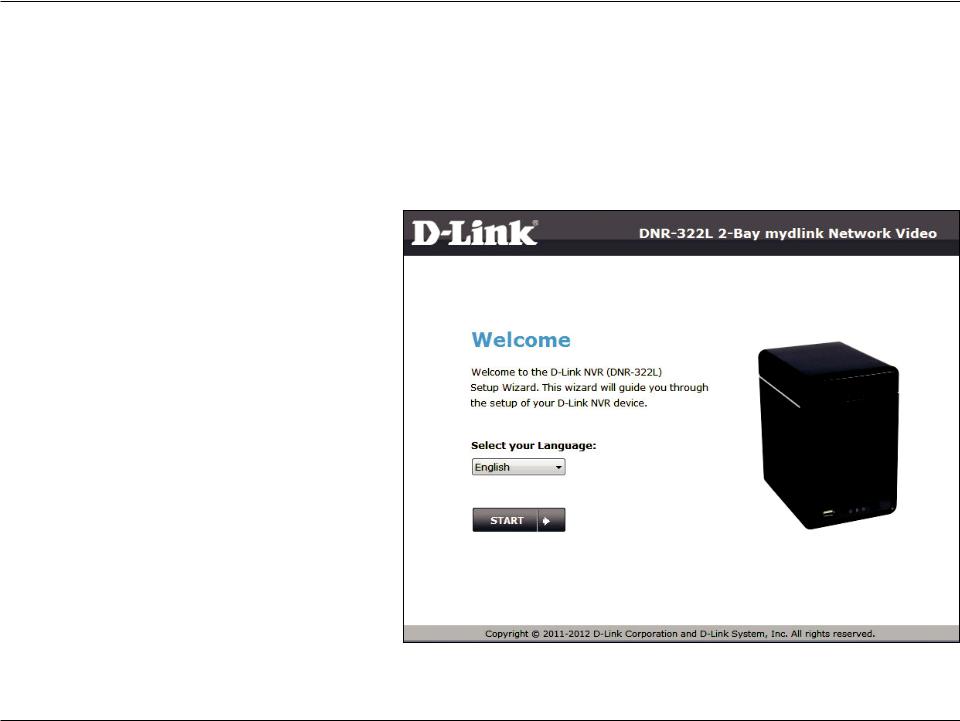
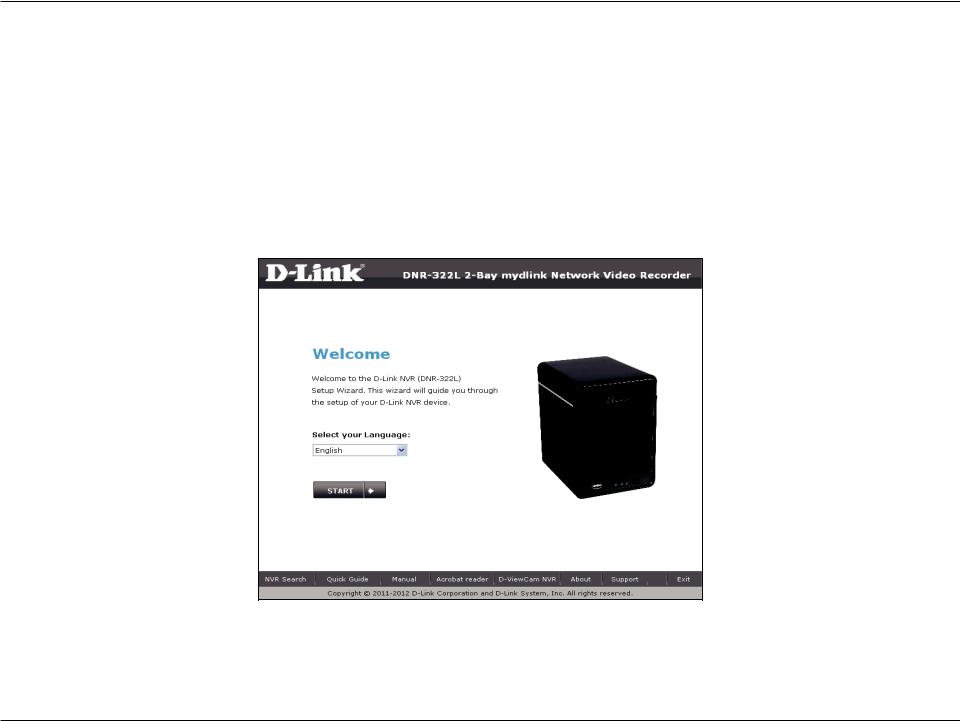
To get started with the NVR Setup Wizard, insert the supplied CD into your CD-ROM drive:
Click the Install button to start the NVR Setup
Wizard.
D-Link DNR-322L User Manual |
9 |
Section 3 - Installation
Installation
Setup Wizard
Insert the Installation CD-ROM into your computer’s optical drive to start the autorun program.
The CD-ROM will open the NVR Setup Wizard. Simply click Start to go through the Setup Wizard, which will guide you through the installation process from connecting your hardware to configuring your NVR.
Note: The computer used to access the NVR web-based configuration manager must be on the same subnet as the NVR. If your network is using a DHCP server, the NVR will automatically be in the same subnet.
D-Link DNR-322L User Manual |
10 |
Section 3 - Installation
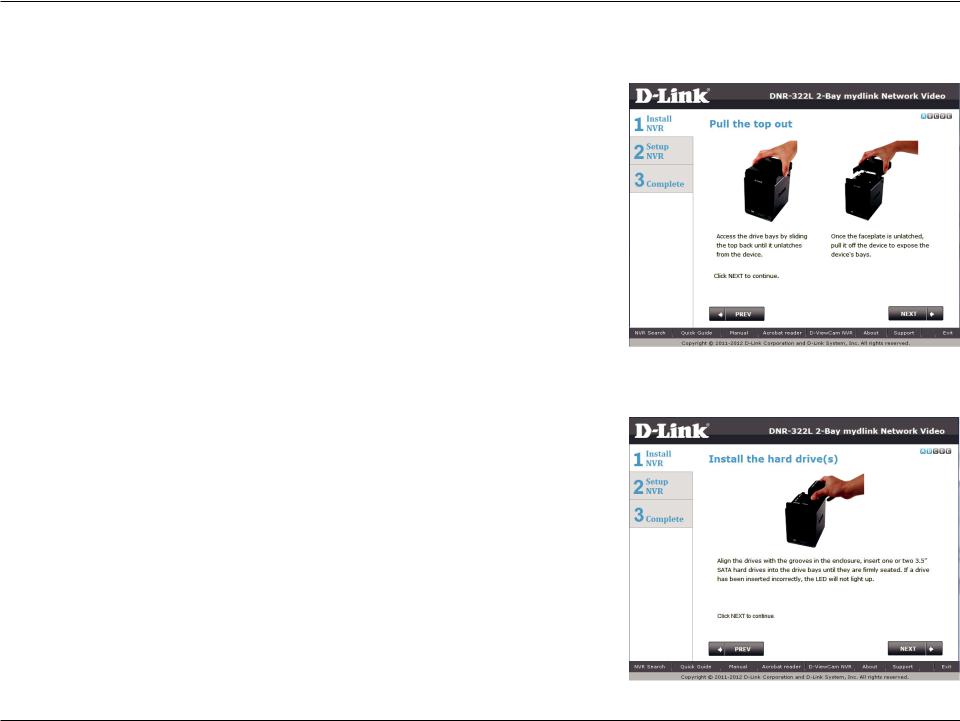
Install the Hard Drives
This step shows you how to open your NVR so that you can install one or two hard drives. Click Next to continue.
Slide either one or two hard drives into the open hard drive bays of your device. Click Next to continue.
D-Link DNR-322L User Manual |
11 |
Section 3 - Installation
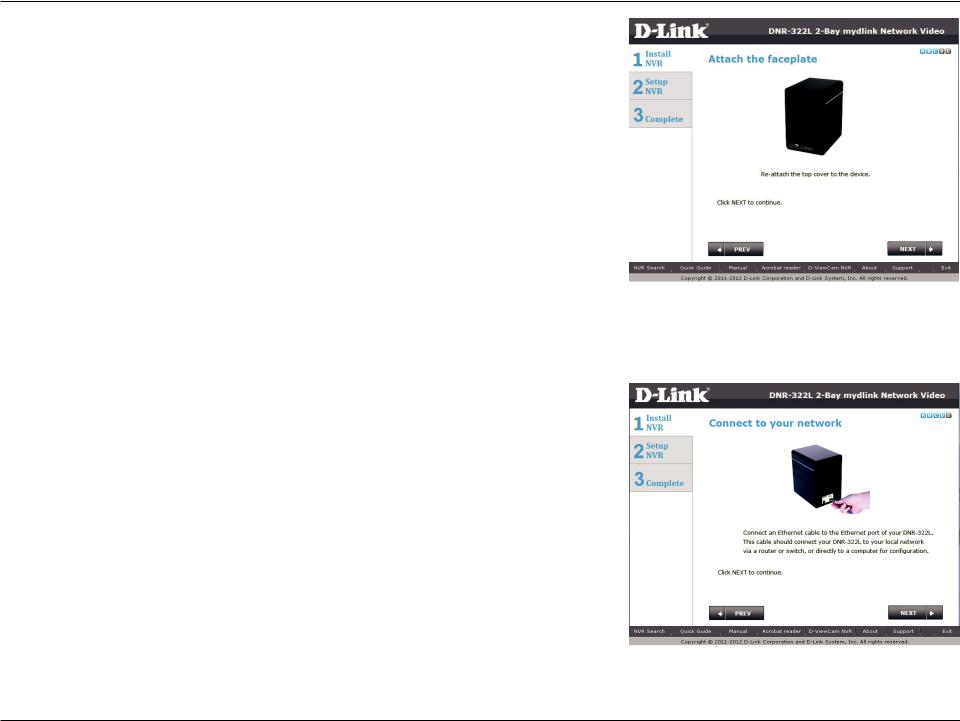
Once the hard drives are installed, you can attach the top cover. Click Next to continue.
A standard CAT5E Ethernet cable with a RJ-45 connector is needed to connect your NVR to your network. Click Next to continue.
D-Link DNR-322L User Manual |
12 |

Section 3 - Installation
Power and Device Selection
Connect the power adapter to the power receptor on the back of the device. Press the power button located under the faceplate LEDs to turn on the device. Click Next to continue.
With the power on check that the Power LED is solid. If it is solid, answer Yes to the confirmation window otherwise select No and wait for the power connection to the NVR. If the connection is good then check that the hard drives are installed correctly and have no other issues. Click Next to continue.
Note: When you select your device from the list, it will cause the LEDs to blink to confirm the device selection.
D-Link DNR-322L User Manual |
13 |
Section 3 - Installation
Admin password
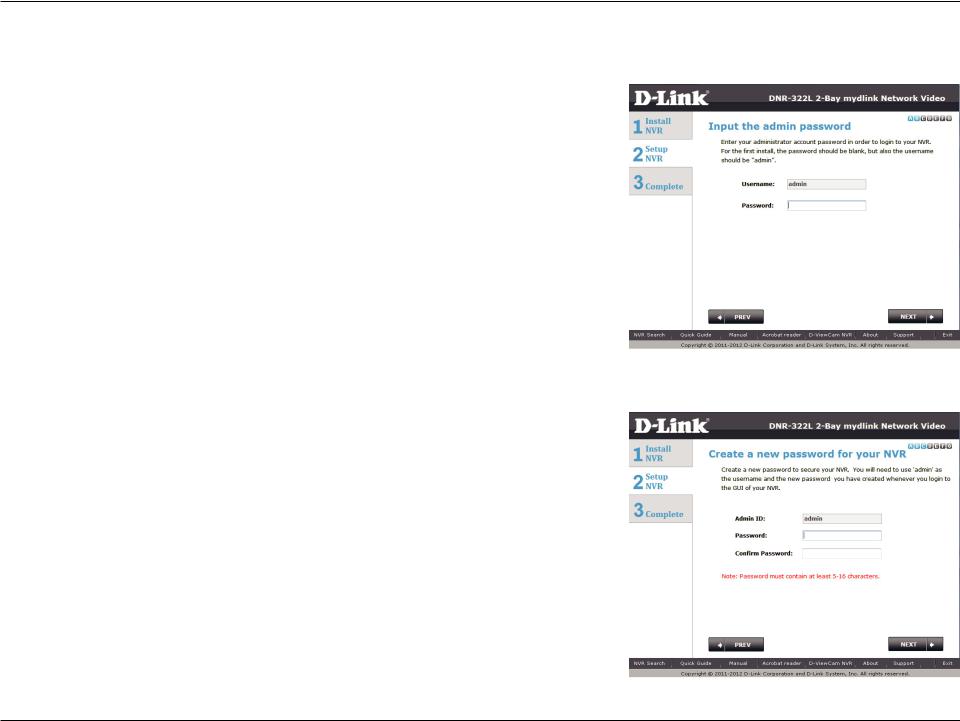
This window requests the Admin (administrator) password. If this is the first installation of this device then the password will be blank. Click Next to continue.
In this step you can create a new password for the Admin username. It is recommended you set a password however you may also leave the fields blank. Click Next to continue.
D-Link DNR-322L User Manual |
14 |
Section 3 - Installation
RAID Configuration and Drive Mapping
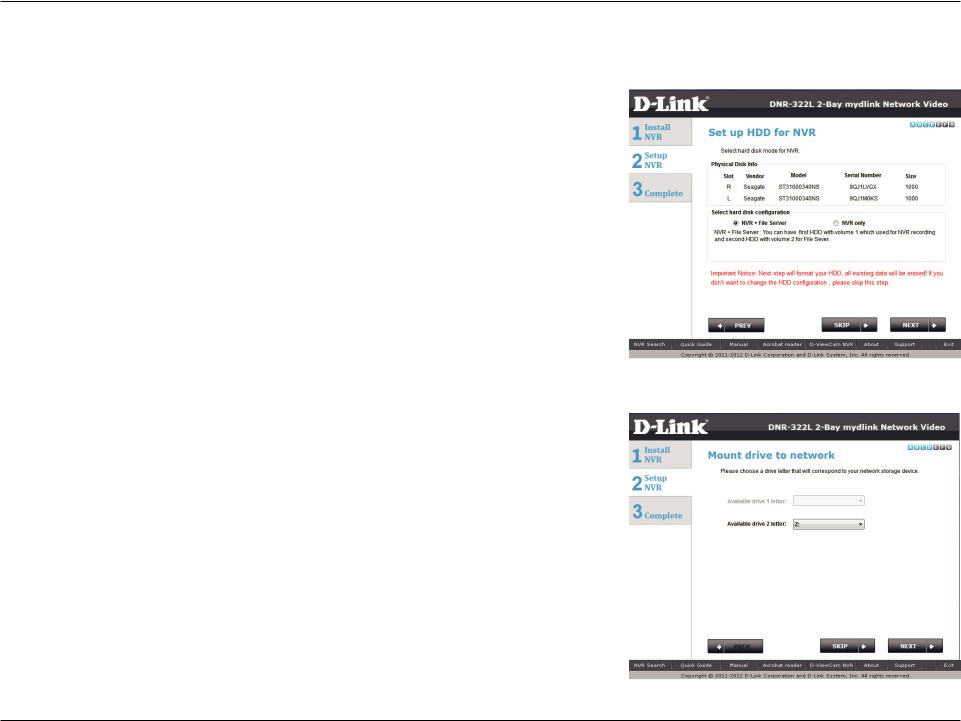
Select one of the Volume File Systems type. Clicking on each file system type radio button will give a description below.
Click Next to continue.
This step allows you to map the volume created as a network drive on your computer.
Click Next to continue.
Note:
1.Only Volume 2 is able to format as a File Server and mount to your Windows system as a Network Drive.
2.You can also use“NVR Search”utility to set up the Network Drive mapping.
D-Link DNR-322L User Manual |
15 |
Section 3 - Installation
Search Camera
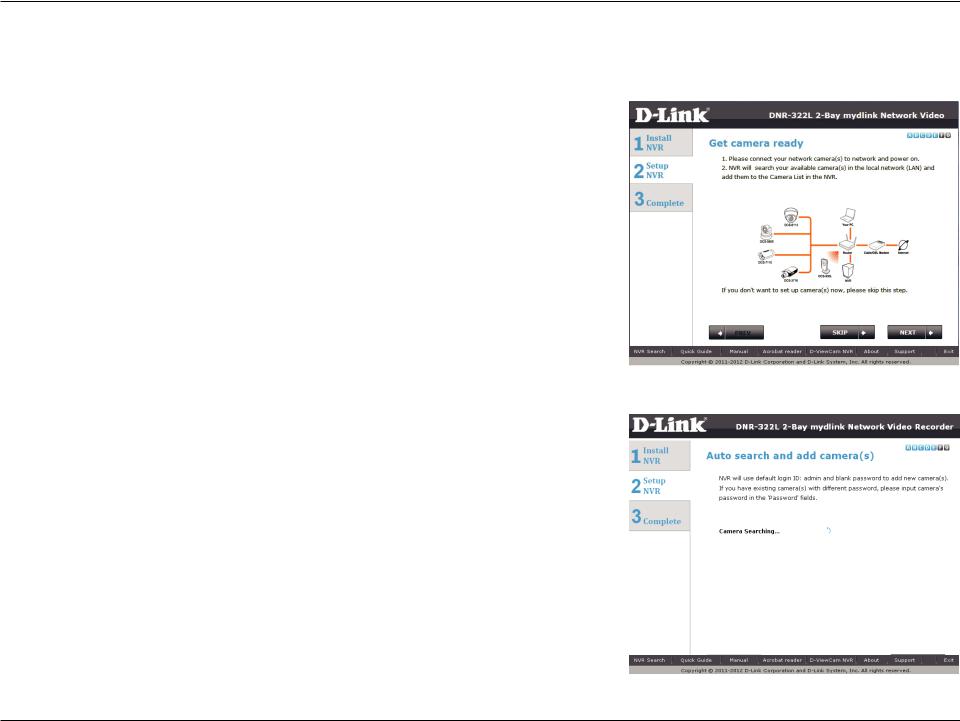
Please connect your network camera(s) to the network and power on.
The NVR will search for your available camera(s) in the local network (LAN) and add it to the camera list in the NVR.
NVR will use default login ID: admin and blank password to add new camera(s).
If you have an existing camera(s) with a different password, you can change the password in the Password field in the camera list.
D-Link DNR-322L User Manual |
16 |
Section 3 - Installation
Find the camera in the camera list and type the camera’s password in the Password field.
D-Link DNR-322L User Manual |
17 |
Section 3 - Installation
Set up Internet connection
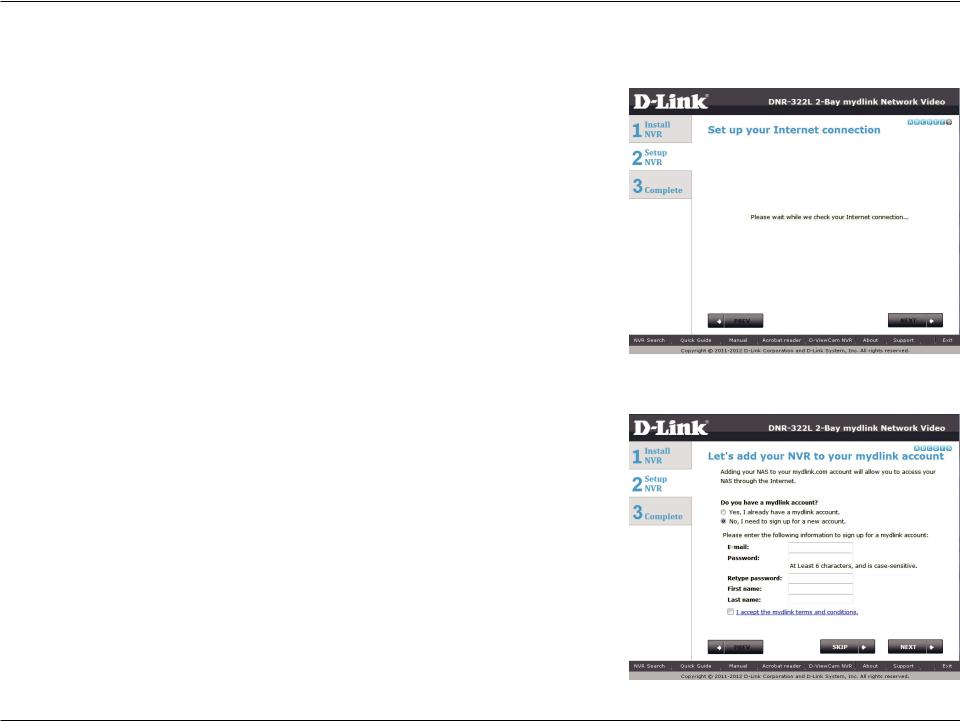
Setup Wizard will try to connect to the Internet.
Note:
If the NVR is not able to connect to the Internet, Setup Wizard will allow you to set up the“PPPoE”or“Static IP”for Internet connection. (Need to contact your ISP for the setup details). If you don’t don’t have the Internet connection information right now, or you don’t want to connect to the Internet, the Setup Wizard will guide you to go through the
“Local Access”process later.
If the NVR is able to connect to the Internet, you will need to login to mydlink or create a new mydlink account first.
D-Link DNR-322L User Manual |
18 |
Section 3 - Installation
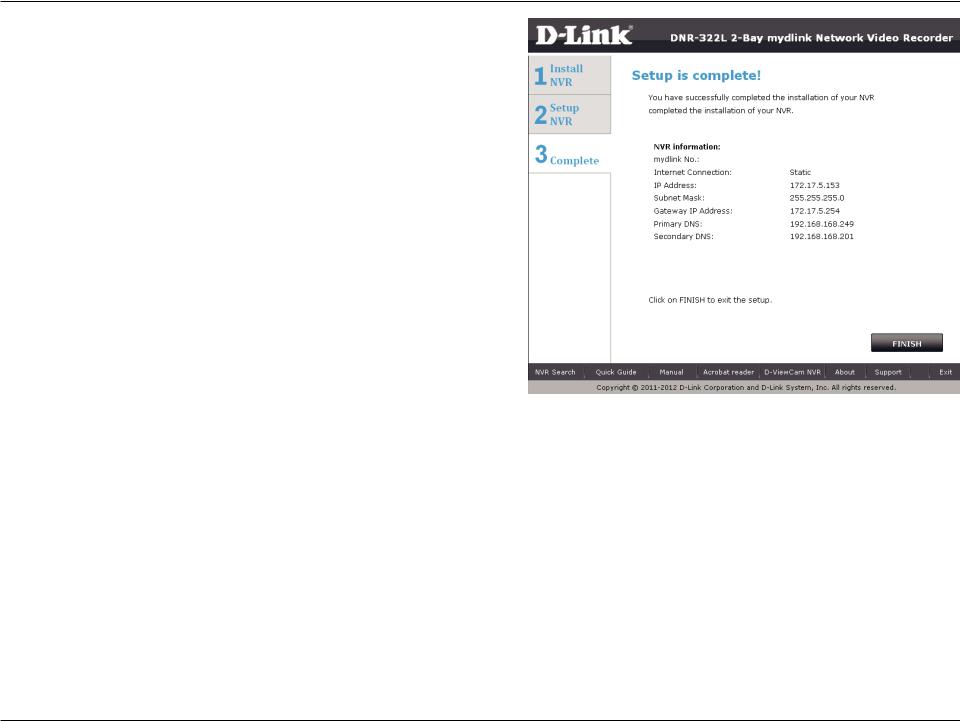
The final window of the installation wizard shows successful completion. Your device is now installed and ready for use.
Note:
Your drives are network mapped, so you will be able to access them under My Computer.
D-Link DNR-322L User Manual |
19 |

Section 3 - mydlink Portal
mydlink Portal
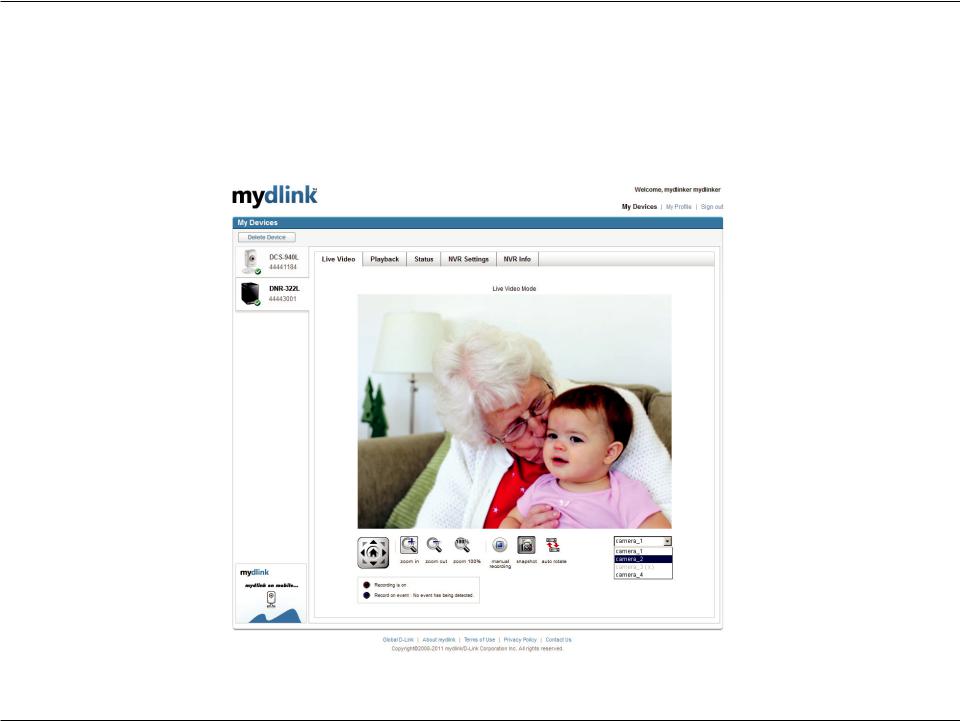
After registering your NVR with a mydlink account in the NVR Setup Wizard, you will be able to remotely access your NVR from the www.mydlink.com website. After you log in to your mydlink account, you will see a screen similar to the following:
D-Link DNR-322L User Manual |
20 |

Section 3 - mydlink Portal
NVR Status
Here, you can see the online status of each of your NVRs. Your online status may be one of the following:
A green checkmark indicates that your NVR is online and ready to use.
A yellow exclamation point indicates that your NVR is online, but the NVR password has changed. You will need to enter your new NVR password to access your NVR again.
A red x indicates that your NVR is offline and currently cannot be accessed remotely.
If your NVR is offline, try the following:
•Check to make sure that the Internet connection to your NVR is working properly.
•Try restarting your Internet router.
•Check your NVR’s cable connections and make sure they are secure.
•Check to make sure that the LED on your NVR is lit solid blue.
If you still cannot access your NVR, reset your NVR and run the NVR Setup Wizard again from the CD-ROM included in your package.
D-Link DNR-322L User Manual |
21 |
Section 3 - mydlink Portal
Live Video
In the main part of the screen, the Live Video tab will be selected by default. If the NVR is available, you will need to login NVR first,defaultloginIDis“admin”,passwordisblank.TheLiveVideofeedwillthenbedisplayed.Youcanchooseadifferentcamera from the drop down list. If the NVR is recording, you will see the red dot icon at the right top coner.
D-Link DNR-322L User Manual |
22 |
Section 3 - mydlink Portal
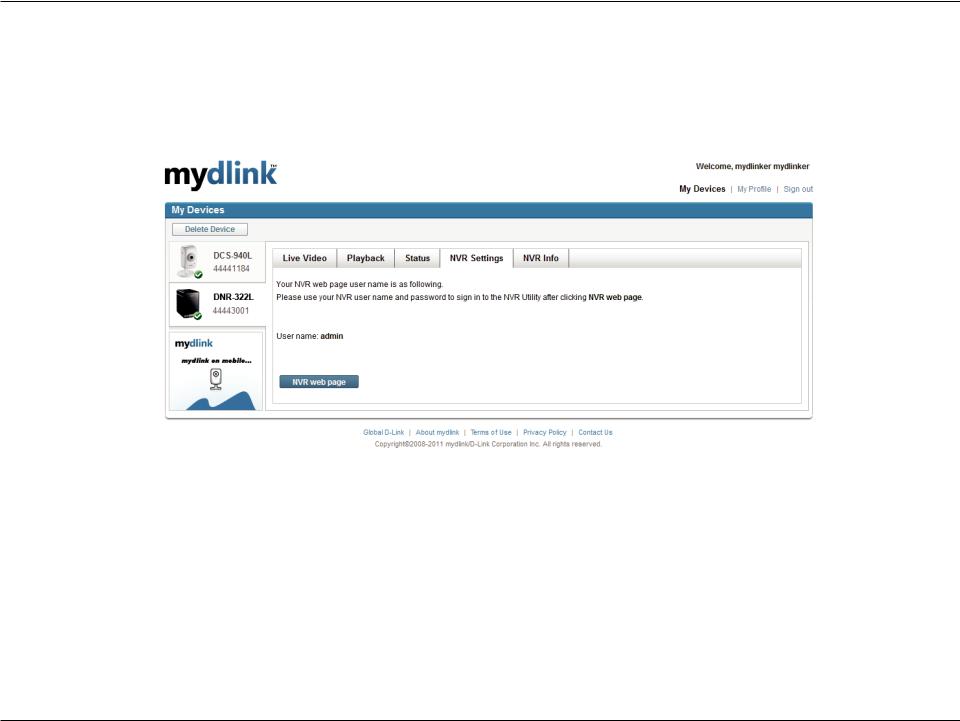
NVR Settings
The NVR Settings tab allows you to access your NVR’s configuration interface. To open your NVR’s configuration interface, click NVR web page and enter the password.
D-Link DNR-322L User Manual |
23 |
Section 3 - mydlink Portal
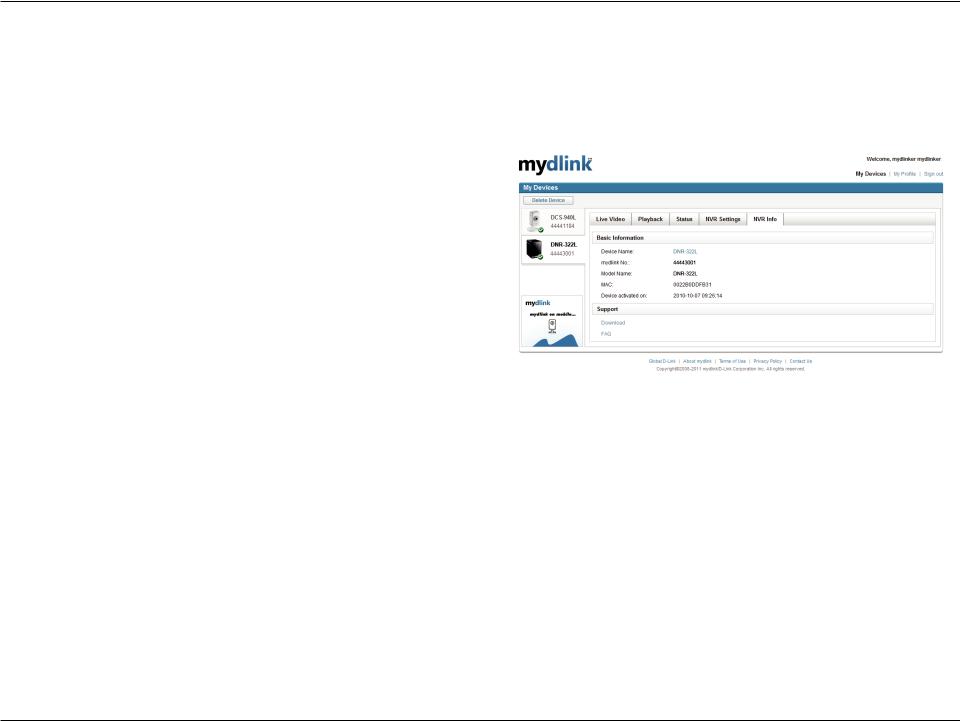
NVR Info
The NVR Info tab shows you various information about your NVR.
Device Name: The Device Name is a unique name that if can help you to identify it. Clicking on the Device Name will open a window for you to login to your NVR’s configuration interface.
mydlink No.: Displays the mydlink number of your device.
Model Name: Displays the model name of your device.
MAC Address: Displays the MAC address of your device.
Device activated On: Displays the time and date that your device was added to mydlink.
Support: This section provides you with links to various support websites and downloads related to your product.
D-Link DNR-322L User Manual |
24 |
 Loading...